Little kids love playing in the sand. To provide them with such an opportunity, caring adults set up sandboxes at home and in the country. Of course, there are ready-made ones for sale, but their price is not at all childish. The best way out is a do-it-yourself sandbox. When making it, you will certainly try to take into account all the features and preferences of your child.
What can you make a sandbox
The most popular material for building a children's sandbox is wood. It can be edged boards, logs of small diameter, timber, block house. Basically, they make it out of this. To make the work go faster, you can buy polished materials. They are more expensive, but have a smooth surface. If you need to save money, take ordinary materials, then manually or with the help of a grinder you will bring everything to perfect condition.
You can use plywood (moisture resistant) or OSB (OSB). Not everyone loves them, for the presence of glue and harmful fumes (formaldehyde). But in the air, these emissions are not terrible, and you can also use a material with an emission class of E0 or E1. It guarantees safety - children's furniture is made of such material. It is convenient to work with plywood and OSB: I cut out the necessary shape of the part, twisted them together, processed the ends and can be painted.
In the country, you can use improvised material. For example, plastic bottles. Just to keep them, they are attached to the board: lids are nailed with a certain step, bottles are screwed into them. Having received one “sidewall”, they take a piece of thick wire equal to the double length of the sidewall + 20 cm, pierce the bottle with wire, stepping back about 5-7 cm from the bottom, turn the wire up and pierce it in the opposite direction from above. The ends are twisted, trying to hide the "tails".

Something like this will need to "flash" the bottles with wire
Such a twist is obtained only on one side - on the other, just a bent wire. When you put the sidewalls, put them so that the “tails” are covered with a bottle. The finished sides of the sandbox from the bottles are installed in a shallow ditch, the board and the tapering bottom of the bottles are sprinkled with soil, and they are well tamped. You can throw a sheet of plywood at the bottom, and pour sand on top.
The second most popular "junk" material for summer cottages. They also make sandboxes. One side needs to be cut off. old tire. Get pretty high sides. Then there are two ways:

In any case, you will have to secure the cuts. In some tires, the cord (reinforcing fiber) is plastic, in some it is metal. Plastic can be sanded, but metal will have to be closed somehow.
To make a sandbox, you can use the trunks of fallen trees sawn into pieces. They make a very interesting and quite reliable fence. Before digging in, the wood needs to be processed - so that it lasts longer. There are modern impregnations with a simultaneous tinting effect. Comfortable. The processed stumps must be dried, and while they are drying, dig a moat around the perimeter of the future sandbox. Its depth is at least 20-25 cm. You should not do less - the kids will walk and jump on the stumps, so they should hold on well. Insert the logs into the ditch with the butt end, level, fill the gaps with soil and compact well.

From logs, you can also make a fence for a traditional type of sandbox. Put a base on the ground: a piece of linoleum, for example, in which to make several holes - to drain water after rain. Put logs on the base, making a rectangle / square out of them. You can fasten them with long nails, but it is more reliable with studs - steel rods with threads at both ends. Under them, it will be necessary to drill a hole obliquely at the junction of the logs. The diameter is slightly larger than the diameter of the stud. Drill the edges of the hole - so that you can drown the nuts with washers. Insert the rod into the hole, put washers on both ends, tighten everything with nuts.
You can make benches from above - one or two boards and benches for kids are ready. Of course, they rarely sit on them. More often they build their sand castles on them.

How to make a sandbox: step by step instructions
To begin with, let's analyze general principles production of sandboxes of any design. With some modifications, they are repeated every time.
Step one. Location selection . The place must be chosen so that part of the sandbox is in the shade, part in the sun. If this is not possible, we put it in a sunny place, and we make a canopy over it. Please note that there are no large trees or bushes nearby. They, of course, give a good shade, but leaves are pouring from them, and the sand will often have to be sifted.

Do not place the sandbox in strong sunshine, nor should it be in a corner where there is no air movement at all. But she also has no place in a draft. Another important point: if you plan to let the baby out to play in the yard on your own, the play area should be clearly visible from the window of the room where you spend most of your time.
Step two. markup . If the sandbox is rectangular, use pegs and threads stretched between them. The pegs were driven in, measuring the required dimensions (the standard size of a children's sandbox for children from 2 to 5 years old is 1.7 m * 1.7 m). Between them they pulled twine, rope, cord. We checked the diagonals, in order for the angles to be straight, they must be equal.

If the sandbox is with rounded corners or sidewalls, you can draw an arc with the help of sand poured into a bag. A small hole is cut in the corner of the bag and the required shape is “drawn” in this way.

Step 3 Digging a pit. We remove the sod, and take it aside, remove some soil, cleaning out the roots along the way, removing stones. The depth of the pit is 20-30 cm.

Getting down to earthworks - digging a pit
In the middle of the sandbox, make a small square of greater depth: with a side of about 60 cm and a depth of another 30-40 cm (the total depth of this hole will be 60-70 cm). Pour gravel into the hole. This will be a "water drainage system". If you form a slight slope from the edges to it, the sand will dry quickly after the rains.
Step 4 Laying the base.
We add a little sand (5-6 cm) to the bottom of the resulting pit, leveling it well. Now we need to lay the foundation. Most the best option- . It is a non-woven material, very tear-resistant. He will not allow grass to germinate, he will not allow sand to mix with the earth. If you bring it to the edges of the pit, it will also “hold” the earth, preventing it from flowing in when it rains.

If geotextiles are not found, you can lay a piece of plywood or linoleum. Only in them you need to cut a few holes (1.5-2 cm in diameter) for water drainage.
DIY sandbox: step by step photo reports
No matter how simple the design may seem, questions arise as it comes to implementation. To make them smaller, we publish several models of homemade sandboxes with step by step photos, depicting the main nodes.
Simple design
The easiest thing to do is knock down a rectangle or square from the boards. For a sandbox, the normal side of a square is 1.7 m. So you will need 4 or 8, 12 boards of this length. Sizes can be larger or smaller, the choice is yours. The number of rows of boards depends on their width and how high you want to make it.

If, as described earlier, they dug a pit of 25 cm, then poured 5 cm of sand, it turned out to be a depression of 20 cm. and above), the total height is 30 cm. If the board is 10 cm wide, 3 tiers will be required (boards, respectively 3 rows * 4 pcs = 12 pcs).
You will also need a bar with a section of 40 * 40 mm. It will need to be cut into pieces equal to the height of the sides of the sandbox. In our case, this is 30 cm. 4 pieces will be needed. The total length of the required timber is 1.2 m. All lumber is well polished, then impregnated with protective impregnations, otherwise the wood will quickly lose its appearance.
We take two boards, fold at an angle of 90 °. We put a bar at the junction, nail both boards or screw in self-tapping screws - two for each mount. We attach the next board to one of the ends, put the bar and repeat the operation. So we collect the first row. It will look like the photo on the left.

The second and third rows are assembled by analogy. For each connection we put two hardware (a nail or a self-tapping screw). Just make sure that the heads do not protrude and the tips do not stick out.

After the required height is collected, we can assume that the sandbox is made by hand. But, as always, now I want to add something to make it more convenient for the kids. They usually like to sculpt Easter cakes, and they need a platform. You can nail small plywood triangles in the corners or also assembled from chopped boards. Another option is to nail two longitudinal boards. They are perfectly installed on the bars in the corners. We also hammer nails into them.

Adding comfort
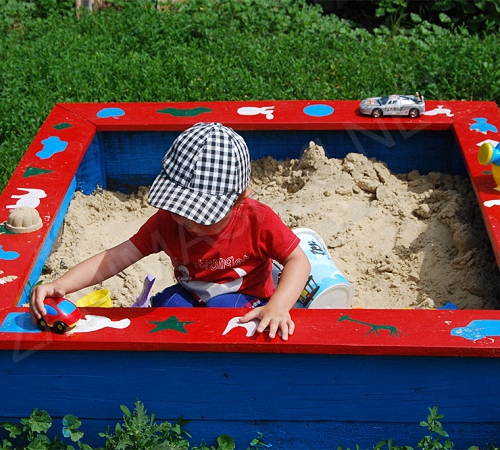
Continuing the theme of "improving" sandboxes. It’s not very pleasant to carry home toys that are soiled in the sand every time. The problem is solved simply: to fence off the part for toys. Comfortable for both you and your child. An additional wall is installed, which is also attached to the existing ones with the help of bars.

Fence off the compartment for toys - put an additional wall
And so that there is no temptation to pour sand there, you can come up with a lid. It will be possible to sit on it, or you can build Easter cakes.
A couple of boards, a little imagination and an ordinary box turns into a car. The boys will definitely like this one.

Sandbox-transformer with a folding lid
Construction begins in the same way as described earlier: a box of boards is assembled. The focus is on the lid design. You will also need boards for the lid and hinges - four ordinary door and four with one long shelf.
In our example, 6 boards went to each side of the lid. Attached them in pairs. First, two boards were nailed to the finished box on one side and on the other.

To them, they screwed a short shelf of a loop similar to a barn. Two boards were also attached to a long shelf. It is important that the second one is attached at least half the width, otherwise it can turn it out.

We fasten on ordinary door hinges next board. The shelves are on the other side. Then it turns out that the second part of the cover leans to the other side. The second board is attached to the fixed one with the help of an auxiliary bar. It is stuffed on both sides at a distance of about 15 cm from the edge.

To prevent the hinged lid from pressing on the hinges, an additional piece of the board is stuffed onto the first two boards. It serves as a support, when loaded, the board does not bend.

According to operating experience, we can say that children almost never play under the seats: it is inconvenient. To use this area more rationally, it can be fenced off under the toy compartment. Another plus of this solution is that less sand is required.

In this example, the docks are painted with an impregnation that simultaneously gives the wood its color. If you wish, you can use the usual opaque paint. Just take it for wood, for outdoor work. Otherwise, after a couple of rains, it will bubble or crack. Using paint, you can paint the sandbox in more “girlish” colors, although impregnations can also be different color but they just give a hint.

Sandbox boat
For boys, you can make a sandbox-boat or ship. The main "body" is built as usual, all other superstructures are attached to it.
In this version, it was decided to make the sandbox low. A triangle was attached to the downed hull - the nose of the future ship. It is much higher than the main part. To keep the boards strong, two boards on each side are driven into the ground 60 cm deep. Boards were nailed to them. In the corners, they are also fastened, but only between themselves - with nails (beaten obliquely).

Since the height difference turned out to be significant, a staircase was made from the “deck” to the bow. The top is sewn up with a board, the masts are strengthened.

Only finishing work and equipment remained. After some time, it was decided to make an extension at the stern - and a place to hide from the sun, and put a box for toys there. They put poles from a bar, sheathed with plywood cut to size. The final version of the ship looked like this.

Approximately according to the same technology, another boat was built.

Sheds
It is far from always possible to put a sandbox in partial shade. More often they put it in the sun, and then they make shading - some kind of canopy or umbrella. There are many interesting designs of such canopies that are quick and easy to make.

Perhaps the easiest to implement is this canopy: two racks are attached in the middle, between them is a cross member. A dense tan is thrown over the crossbar and attached to the driven loops.

This canopy is not much more difficult. Four racks are required. They are connected at the top with planks - they make the upper harness. An awning is sewn in size and stretched. You can fasten even with buttons, even with decorative nails. The main thing is to have the opportunity to shoot in the fall.

Such a roof is a little more difficult to make. Triangles are attached to the upper strapping of the racks - truss system. They are connected at the top with a longitudinal bar, which is correctly called a “skate” and they put props in the middle. Plywood or OSB is nailed under the soft tiles that are used in this case, and roofing material is already laid on top.
Pay attention to the decor of the sandbox itself: birch chocks are driven in / dug in around the perimeter, which are covered with boards from the inside: so that the peeling bark does not fall into the sand. Enough interesting solution.

Another simple sun visor for the sandbox. Two triangles are connected by thin planks. They are attached to the racks, only it is desirable to make the racks more solid. For small children, this section is enough, and for older children - from 4 years old - something more solid is required - at least 60 * 60 cm. To save money, you can sew two boards - knock them down with nails on both sides. It won't be hard to put up an awning.
How to make a sandbox with a "fungus" a small wooden canopy - see the video
Lids
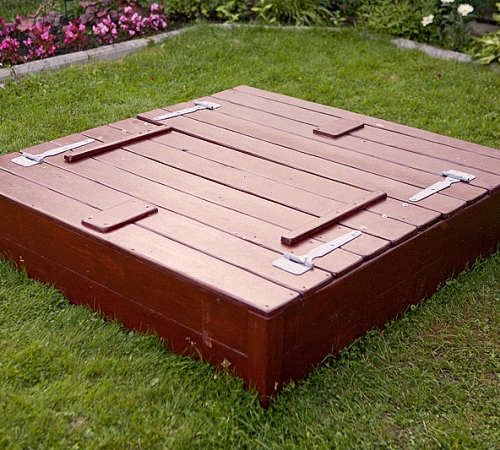
The second attribute required for sandboxes is lids. Not only do leaves fall into the sand and all sorts of garbage gets in, but also animals love to be there ... located. You can prevent encroachments on the purity of the sand with a cover. In the simplest version, this is a shield knocked down from boards or cut out of plywood, to which handles are attached.

Board cover
So that you do not have to remove and install the shields every time, you can attach hinges, and so that the doors do not hang, weld the handles on which they can rest. With the lid open, you get two small playgrounds. Children can sit on them or build their own sandcastles. Therefore, it is more convenient to make such covers from plywood: there are no cracks and it is less in weight.

There is an even more interesting design - exit. This type of lid is definitely made from plywood. Nail the top bar so that a gap remains. A sheet of plywood is inserted into it. And so that the opposite end does not hang out, legs are nailed - small pieces of a bar.

The same principle is implemented differently in the variant in the photo below. It is already for those who are good at carpentry.

Blueprints
In order for the sandbox to be built quickly and easily with your own hands, it remains to provide you with a few drawings. You can start from them, take as a basis. You can and should make adjustments.


Sandbox with a roof - photo and drawing


It seems that the baby was recently born, but time flies very quickly, and he has already begun to walk. This means that the baby needs to develop, play with other children. It's great if parents have a summer cottage. You can build a sandbox on it. Children's sandbox helps in the development of imagination and memory. And inadvertently, when the kid builds a sand castle, parents can see that the child has a talent for creativity. There are many positive qualities in such a design. And it's easy to build. You can ask your husband about it, he will do everything with his own hands.
First of all, you need to start the construction of such a structure with the choice of terrain. And it is worth taking it with all responsibility.

Location selection
- The sandbox for children should be in a viewable area. Children must be under the supervision of their parents. Therefore, it would be better to build it closer to home in order to look after the baby from the kitchen window.
- Sterility is the key to the health of the baby. Sand should not be clogged with foreign objects, such as foliage, bird droppings, branches, and so on. It is advisable not to build children's sandboxes near trees and bushes. And if a dry tree is nearby, construction is completely prohibited.
- The main thing is to hide the design from the lunch heat. In order not to harm the child with the sun's rays, you need to position it so that the sun hits in the morning and in the evening. At these moments it is the safest. But if the sun does not enter the sandbox at all, then in spring and autumn it will be very damp there. And this means that the baby can get sick at any time.

Size selection and preparation for construction
The shape and size can be chosen at your discretion. But there are some standards for building: for kids from 2 to 5 years old, a sandbox is built 1.7 by 1.7 meters. What do you need to prepare? Pegs, marking tape and lace. With the help of all this, you need to protect the area on which the building will be.
Further, 30 cm of earth is removed, and a hole is made in the center 65 cm deep and 45 cm in diameter. Then it needs to be covered with rubble and rammed. Make a small slope to the center of the sandbox so that during the rains, a puddle does not form. Before moving on to work, you need to clean up the leaves, debris, and everything that gets in the way. Then make markings.

Construction stages
To design a sandbox, you need to follow a few simple steps.

What to base?
At the bottom of the sandbox you can put polyethylene film, paving slabs and ordinary plywood sheets. You can not lay the foundation, but then the dirt will fall into the sand. The advantage of the base is that it blocks the way for rodents into the sandbox.

What is needed for the sides?
Bars - 4 pieces, 5 by 5 by 45 cm. Boards - 4 pieces, 150 × 30 × 2.5, and boards for the construction of horizontal sides are also 4 pieces. They need to be well sanded. Then the boards are treated with drying oil. The bars are dug in 18 cm, and boards are nailed to them. Next up are baby seats.

Is a cover needed?
The lid is not a mandatory design, but its presence is desirable. It will serve as protection from various debris and cats, which are very fond of sand. Of course, you can cover the sandbox with a tarpaulin every evening, but it is better to construct a wooden one. It is necessary to put together the boards among themselves, making a shield and nailing vertically, at the corners of 4 columns.

Decor
At this stage, there is a lot of room for imagination and creativity of parents. You can paint the building with bright colors, draw flowers or animals, a rainbow, geometric shapes, and so on. Everything that can make kids happy.

So you get a beautiful children's sandbox with a lid for giving.

Filler
It remains to buy a filler for the sandbox. Sand can be purchased at the store or use sand from a regular river. Sand from the river will definitely need to be sifted. And if purchased, it is desirable that it be with additives that will scare away various rodents. The sand must be clean, as it comes into direct contact with the child.
There are many different ways to build sandboxes. Let's look at a few of them next.
DIY classic sandbox
Everyone played in such sandboxes in childhood. Made, it is in the form of a wooden box with benches. Making such a sandbox with your own hands will not be difficult. But do not forget that it is built for children. This means that the building must be safe so as not to harm the baby. Boards must be perfectly sanded. By manual methods this will be hard to do. You will need a grinder with nozzles, she will quickly cope with the delivered slave. What's the next plan?


Stages
Materials need to be prepared. Cut boards to size. Carefully and carefully do the grinding. It must be remembered that for the construction of all sides, at least two wide boards will be needed. You can choose any height.

The next stage of work is to fasten the sides. You will need shorter boards. They are attached vertically to long boards. Nails or screws for fastening shields.
When the sides are done, they will need to be connected into a solid square. To do this, bars with one pointed end are screwed in the corners. Because the entire children's sandbox will be held on these bars. The bars are driven deep into the ground.

"Attraction" for kids is ready. You can also attach something like benches so that children can take a break from creating art. Boards-benches must be carefully sanded and varnished so that splinters do not drive.

Add-ons
But you can't stop there. You can apply some drawings, make the sandbox bright and interesting for children. In addition, you can make a roof. It will serve as a protective shield against wandering animals that love to "play" in the sand. And help keep it out of the rain.
Making a roof is not that difficult. You need to use the principle by which the side is built. Do not forget that it will turn out to be heavy, and the man himself will not be able to lift and install it. You have to ask someone for help. And if there is no one to ask, then the roof can be made of two parts. And on each half, make a handle and loops. You can also put a lock that will save you from uninvited visitors when the owners are away.
old ramps
It is the lightest and fast way make a sandbox for children in the country. A slope from a tractor or some other machine is laid in a certain place, covered with sand and ready. You can also paint. But this design is only suitable for small children. If the wheels from passenger car, they can also be used as a sand fence.

Logs and stumps
This is also an easy option. Logs and stumps, while standing, are dug into the ground, and a mini-attraction is obtained. The kids will be pleased not only to sculpt sand castles, but also to jump on these steps and run between them.

original form
This is an unusual classic, but the combination of children's desires with the capabilities of parents. You can make a truck with a body in which there will be sand. A boat with a sail, which will be instead of a roof. A gazebo with benches and a table that will play the role of a sandbox. The choice of design is limited only by your capabilities and imagination.
Landscaping a playground in your yard - not only useful way ennoble the site, but also the opportunity to free up a lot of time for babysitting. A well-groomed place for children to play is unthinkable without a sandbox and a funny decor made of plastic bottles, benches and swings. The original do-it-yourself children's sandbox is available to everyone home master, and the ideas and secrets of the structure are worth discussing in more detail.
How to decorate a playground with your own hands?
No matter how much parents wait for a kind uncle to come and arrange a place for children to play near high-rise building much faster to do it on your own. The warm season passes quickly, and you should not waste time on suburban area or in the garden country house. Moreover, it is not reasonable to leave children or grandchildren without such an exciting game as the construction of fortresses and "pasok" of sand. The choice of parents depends on the general concept of the playground:
- sandbox design;
- its size and shape;
- materials for manufacturing;
- type (closed or open sandbox).
For the improvement of the site and the children's sandbox with your own hands from improvised materials, much of what you are going to throw away will do. Some materials were gathering dust in the garage or on the balcony, something they wanted to give to someone for a long time, but then they postponed it. Some items waiting for recycling will be an excellent material for ennobling the yard. Suitable:
- plastic bottles;
- bald tires;
- awnings and nets;
- edged board;
- wooden bars and other lumber.
Labyrinths, crossbars, slides, horizontal bars, trampolines, tables for games and benches are mandatory attributes of a landscaped playground. Children grow and develop, and every day is filled with new achievements, which they willingly demonstrate to each other, parents, grandmothers or nannies. And for the sake of healthy mental development, you can’t compare children with each other, it’s better to praise them for today’s successes. Let this be the first neat "pass" of sand on the side of the children's sandbox with your own hands - there is a reason to praise the baby and a tasty treat for the efforts.
The sandbox can be a self-sufficient object on the site or organically fit into the overall landscape design. But more importantly, how comfortable it will be for children. In summer, the bright sun blinds, and a well-designed shadow is half the success, since the entertaining games of children and their heads must be protected from the scorching sun.
The cover for the sandbox can be made of dense polyethylene, tarpaulin or awning. You can also adapt a ready-made large cover, for example, from an inflatable pool. A shield from the remnants of the board is also suitable, but the best solution is do-it-yourself sliding seats at the children's sandbox, photo:
What is important to consider when creating a children's sandbox with your own hands?
The sandbox is perhaps the most important attribute for children's summer games. It is not so important which idea will become the basis of the design on adjoining territory, the main thing is that on the playground and in the sandbox it should not be dangerous for children and beautiful for everyone.
1. Sand quality.
Clean sifted sand is a guarantee of children's safety. Closed children's sandbox to give their own hands - the most suitable option, although the most labor intensive. Coarse river sand should be sifted, it should not contain fragments of freshwater shells or glass, so that children do not cut themselves.
Sand gradually mixes with street dust and spreads from the main place. It is advisable to replenish the sandbox at least once during the summer. It is better to completely replace it with a new and clean one, and sprinkle paths or a playground with dusty sand.
2. Alley to the sandbox.
The playground where the favorite place for children's games is located should be well compacted. But it is better when a path is brought to the sandbox so as not to make your way to it through the mud after rain or thickets. If this is a private household, then the sandbox should be part of landscape design, and when the child grows up, you can make a flower garden in this place. In an ordinary courtyard, it is better to equip a sandbox next to a path or paved area.
3. Benches and tables.
Children should not constantly sit on cold and wet sand, and they should be taught to take care of their health. Therefore, the side of the sandbox is made wide enough so that it is convenient for children to sit and lay out sand figures from molds nearby. But it is better to make a comfortable bench and a table. There are other do-it-yourself sandbox ideas for children, for example, with triangular rungs at all corners. In a polygonal sandbox, benches are made on 2-3 opposite walls.
Tip: It is advisable to equip a separate place nearby for scoops, molds and buckets so that the inventory does not “drown” in the sand without a trace.

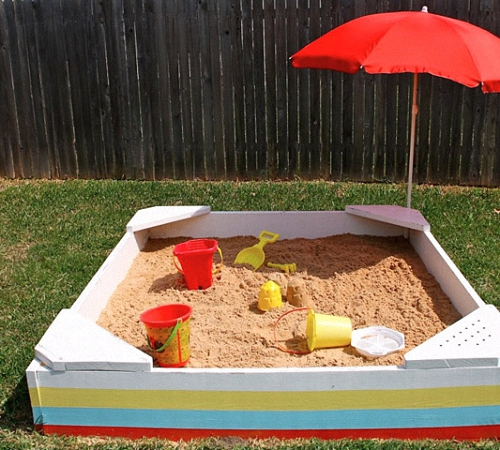
4. Canopy from the sun.
This is a mandatory attribute of the classic sandbox "fungus". But the square wooden roof on a high pillar in the center of the sandbox is only partially convenient. It should be made above head level so that children and adults entering the sand do not worry that you can hit your head. But the high roof during the day casts a shadow in different places of the sandbox. In the courtyard of a private house, it is not necessary to make a stationary wooden canopy. It is enough to install a folding beach umbrella on a tripod from the south side of the sandbox for the duration of the child's play or to pull up an awning.

5. Location of the sandbox
If there is not enough space in the courtyard of a private house, but the choice is small, and the sandbox has to be equipped right under the window or opposite the threshold. Children in plain sight are much better than a sandbox remote behind outbuildings, which is difficult to observe while doing housework. It is better to put a large box of sand near a high blank fence, which will additionally create a shadow. And the fence over the sandbox itself can be turned into a drawing board with colored crayons. The side walls are equipped with benches.
A tall sprawling tree creates a ready-made shadow over the sandbox, but dry branches, inflorescences and leaves, as well as caterpillars falling from it, will not add comfort when playing. Such a sandbox often has to be cleaned of plant debris. If the tree above the sandbox blooms profusely and is pollinated by bees, then this can be dangerous for babies. Inconvenience will be created by sweet fruits falling from a tree, near which wasps often swarm. If the tree blooms in early spring with “earrings” and does not “litter” until autumn, then this option is quite acceptable.
6. Ready-made or purchased sandbox?
Children's sections of hypermarkets offer everything, including swimming pools and ready-made plastic sandboxes. Such an acquisition will attract children with a fairly bright island. The finished colorful product with a children's design remains to be fixed on the site and filled with fresh sand. However, synthetic materials cannot be classified as environmentally friendly, and bright colors can evaporate chemicals when heated. And a broken sandbox is unlikely to be repaired. But if there is no man in the house who can build even an ordinary children's sandbox, then they prefer a purchased model, which is attractive and quite convenient.
Attention: when painting wooden sandbox the same problems may arise - the evaporation of volatile substances in the sun. It is advisable to complete all work and painting in early spring or in the absence of children.
7. Sandbox paint.
If you decide to make a children's sandbox with your own hands from wood, then carefully choose a varnish or paint. In building supermarkets there are harmless quick-drying dyes, and there is eco-paint - based on natural resins. See the instructions for the drying time, and before it is completely cured, do not allow children to play in the sand. Most paints stick to the hands after application, and children tend to lick their fingers. The same applies to the construction of a sandbox from large tires, which are painted in bright colors.
8. Dimensions of the sandbox.
If there are enough building materials to build a favorite place for children to play, then you should not make it too big. The sand gradually spreads, it has to be removed and new ones brought in. Dimensions and shape are arbitrary, there are no standards, and for young children there is enough space of 1.75x1.75 meters. And if there are several children, then “proprietary” disagreements often arise between them, and it makes sense to make a multi-section children's sandbox with your own hands, drawing up a drawing.
9. The bottom of the sandbox.
Parents often lose sight of the fact that in the sand, covered with open ground, get worms and other orgasms from the natural environment. This was done in Soviet times in kindergartens and courtyards. Today it is possible to purchase a dense film or agrofibre. Having stretched and fixed it at the bottom of the sandbox with a construction stapler, the easiest way is to isolate your rectangle.

But there is one minus - if there is no canopy, then a heavy downpour will quickly fill it. Such a system requires a slope and the ability to drain water, for example, through holes at the bottom of the walls of the sandbox or in the corners. The bottom of the protected sandbox is filled with rubble for drainage or laid out with hollow bricks.
10. The sides of a homemade square sandbox: the simplest option.
Usually they are made of wood - from a bar or edged board. With a minimum of building materials, 4 identical boards, 4 corners for fastening, 2 or 4 boards for a side in the form of a seat, plus reliable bars in the form of a peg, are enough to fix the structure. An important condition is that all boards must be carefully sanded so that children do not get splinters. Before painting, the cut boards or the finished structure are treated with an antiseptic against rotting and fungus and covered with drying oil a couple of times. It is better to paint in any cheerful color.
11. Design and decoration of the sandbox.
This is the most interesting part of building a sandbox, where you can use your creative talent and give free rein to your imagination. The finished sandbox and the fence near it can be repainted and drawings can be applied in a general way:
- prints of children's hands on a stencil;
- funny men in colored clothes;
- emoticons or faces of animals;
- geometric figures;
- letters and numbers.
With proper design of the sandbox, it can become not only a well-maintained place for children's games, but also a worthy decoration of landscape design.

Fantasy sandbox options
The sides of the sandbox do not have to be made of wooden board, processed bars driven into the ground with a picket fence - great idea. They can be made of different heights, like steps that children willingly step over or run. With this design, the size and shape of the sandbox may vary in size and configuration, as when embodied on the ideas of a children's sandbox with your own hands in the photo:
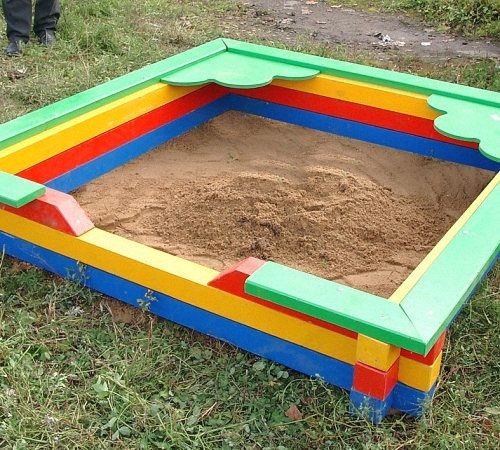
Polygonal sandbox is not so common, but in the yard 3-4 apartment buildings often make several sandboxes. As an option - make several different colored polygons with sand.
There are many others interesting ideas how to make a children's sandbox with your own hands. Caring parents understand that children do not just spend time in the sandbox, but their creative inclinations develop here, skills are formed. Sand - great material for creation, but aesthetics environment forms their taste and craving for beauty. The most difficult option is a round, rotating sandbox in the form of a transformer, consisting of several sections.
Wide pallets are used as a container for sand, wooden frames, heavy truck tires and other materials. The most popular solution is the original tire sandbox, which is laid out in a polygon and painted in different colors.
The most time-consuming, but interesting solution is to build a sandbox with a mobile lid in the form of a tower, which shifts to reveal sand. In this case, the rear legs should be on wheels, and the upper side will serve as a guide.

In the center or on the side of a large sandbox, you can put a table, and build benches on the sides. In this case, it will be easier for children to work with sand, picking it up under their feet and laying it out on the table. Convenient for a long game of children, a children's sandbox with a do-it-yourself lid in the form of a bench.
The most interesting design option is a multi-level sandbox. It is easy to make it from an old boat, designing it in the form of a ship and supplementing it with comfortable seats. Then the sand will be in the lower pan, and at the top in the boat. A sail-shaped awning will protect playing children from the sun.
Children are also interested in structures in the form of recognizable objects:
- rocket;
- teremok;
- car;
- locomotive;
- slide or labyrinth with a landing in the sandbox.
A more detailed master class on building a children's sandbox with your own hands - video:
I decided not to shelve the sandbox story that I mentioned and talk about the construction process. In addition, we still have warm Indian summer days ahead of us and, perhaps, someone will even have time to do something similar. :)
Almost all summer my wife and daughters spent at the dacha with grandparents. For children there expanse. You can walk on the street all day long, pluck raspberries and strawberries straight from the bushes, and generally enjoy your childhood and life. :)
But, no matter how good it is, and without the main component of childhood (unless, of course, it takes place in permafrost conditions), the mood of any child will not be the most positive. I'm talking, of course, about the sandbox. So my child at some point remembered that in the city, they say, there is this same sandbox, but in the country, much to the chagrin, no.
As a result, after agreeing with my grandmother (our main dacha field marshal), at an emergency family meeting, a decision was made - there will be a sandbox! :)
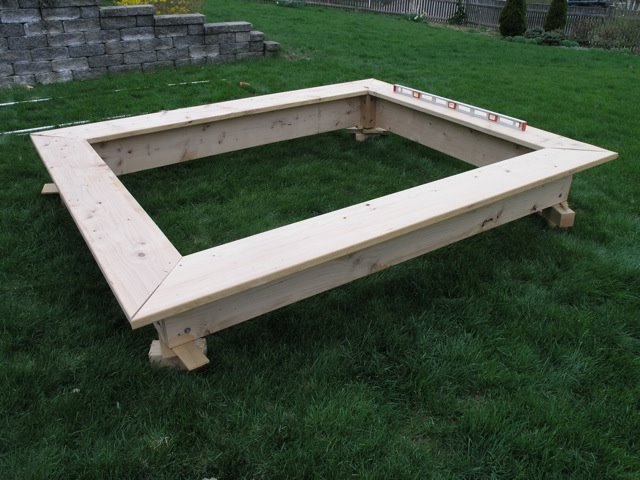
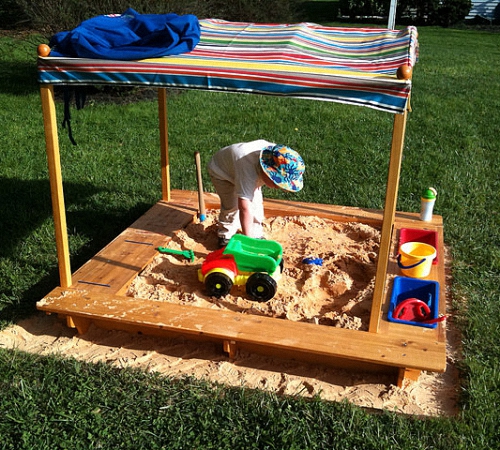
After wandering through the expanses of the Internet and reviewing a bunch of sandboxes of the most different forms and sizes, I decided to stop at a fairly simple, but functional and convenient option. But since I couldn’t find any diagrams and drawings, I had to do it “just like in the picture” :) The photo below was found by me on the Internet and was taken as the basis for construction.
Having estimated the approximate dimensions of the future sandbox, I went to the construction market. I bought boards, timber, wicket hinges and paint.

After I sawed the required number of parts, it remains only to grind everything and assemble it into a single structure. My faithful assistants helped me with these tasks :)

Grinding was carried out using a grinder and a grinding wheel, which is not entirely correct, since the process produces a lot of fine dust, which literally clogs everything. I want to buy next year grinder with a dust collector, otherwise cleaning takes almost as much time as the construction itself.

After all the details were processed, I proceeded to the assembly.

I extended the beam, to which the boards of the side walls of the sandbox were attached, since later I planned to dig it into the ground and these “tails” were supposed to serve as supports for the entire structure so that it would not fail.

Gathering everything together, pulled this colossus into the street. It turned out impressive (the sides of the square were about one meter and twenty centimeters).

For strength and reliability, I reinforced the corners with the help of the remnants of the timber.

Went through the first coat of paint. The “legs” of the sandbox were treated with used machine oil.

Well, more precisely, I didn’t paint the legs at all ... :)

I figured in place the pre-painted boards of the future sandbox cover.

With a grinder with a rough skin, he removed the edge from the boards, giving them a prettier look.

I firmly fixed the first two boards by screwing them with self-tapping screws. Then he began to assemble the first part of the movable sandbox cover, adding two more boards and attaching the gate hinges.

Something is starting to happen... :)

Then proceeded to the second part of the cover. The fact is that this lid is not simple, but with a curious mechanism that turns it into a shop! To do this, I added two more boards and fastened them with the help of bars.


Attached two boards, fixed with bars to the previous two boards, using the same wicket hinges. As a result, I got this design:

The bars are calculated so that when the lid is opened, they rest against the wall of the sandbox and serve as a support for the back of the bench.


Thus, our cover folds up and turns into a comfortable bench.

The fifth and sixth boards are fastened with the bars that I spoke about above. In the same way, I strengthened the third and fourth boards, reinforcing them with additional small bars. Now the boards are held not only on hinges and securely fastened to each other.

In addition, these short bars protect children's priests from being scratched on the hinges, and also serve as a back stop for the back of the bench so that it does not fold and fall on the children's arms and backs. Still, don’t say anything, but safety is above all! :)
So that the bench does not sag under the weight of those sitting, I screwed a small support plate in the center onto the first two boards.

After one side of the sandbox lid was finished, I proceeded to assemble the second side.

I decided to make the second half of the lid without a back, thus modifying and improving the original design. :) The fact is that if an adult suddenly decides to play with a child, it is convenient to do this without getting entirely into the sandbox, but sitting on its edge. In the original version of the sandbox, from which I took an example, both sides of the lid were with backs, which made it difficult for adults to board.

In my version, there are no such problems. :)

corners closed wooden corner so that the ends of the boards do not absorb moisture, and in general it looks much neater.

Having fully assembled and painted the entire structure, I went to look for a shovel ... :)

Having dug a pit along the perimeter, I lowered the supporting legs of the sandbox into it so that the side walls lay on the lawn.


