At present, there are a huge number various kinds fences: with decorative elements or simple fences. One of decorative species fence is a wattle fence (in Ukrainian it sounds like “tyn”). Making such a fence with your own hands is not difficult, although somewhat time-consuming.
Wicker fences with their own hands. A photo
The main advantage of a wicker fence is not in its size (it can be anything: high or low, as well as any other type of fence), but in its appearance. So There are two main types of weaving:
- vertical. The rods (vine) are intertwined from the bottom up, which allows you to make a really high and unusual fence of the desired size. In addition, there are craftsmen who not only weave standard patterns, but also make unique and original braids, patterns, drawings.
- Horizontal. The vine can also be woven to any height. But most often the horizontal type of weaving is used for low decorative fences. For example, for flower beds.
In these photos you will see what wattle fence (wicker fence) you can make with your own hands on the site of your house.


In addition to the standard vine (grape, willow, rose or reed), they often use wooden flexible slats. A fence made of this type of wood turns out to be solid, dense, with virtually no gaps, which makes it a good external fence for the perimeter of the site. The most important thing is that any wicker fence looks the same both from the outside and from inside.
Among modern materials there are also polyvinyl chloride (PVC) panels designed for weaving hedges. The advantage of artificial material is that it is the most durable, copes well with the aggressive effects of natural anomalies (be it bright sun, or prolonged rain, snow, wind), and is not susceptible to the appearance of pests.
In addition, it is several times easier to mount than a natural wood vine or rail.
How to make a wicker fence with your own hands
 How to weave wattle with your own hands? First of all, you need to decide what type of material will be used. So PVC vines can be mounted at any time of the year, without prior preparation. If the choice fell on natural material: willow, reeds, grapes, rod, then it must be carefully prepared.
What is needed:
- Stakes with a diameter of 5-7 cm. The budget option is pine. But in terms of its properties, this is not the most durable type of wood. Oak is a durable, but financially expensive material. Regardless of the type of stakes, they must be treated with a special compound for wood (from bark beetles, mold, and also refractory).
- rods for weaving with a small diameter (3-4 cm) even and smooth. It is better to harvest them from the fall, when the growth of plants has already stopped, but the tree sap is still preserved in them. Such rods will be flexible and durable, will not break during installation, and will provide easy weaving. They also need to be treated with a special compound.
Regardless of the type of weaving (horizontal or vertical), it is required to drive the stakes correctly. If artificial material is used, then the stakes are simply driven in or dug into the ground in increments of half a meter. If the stakes natural wood, then it is advisable to pre-drain the soil.
Drainage under the stakes of the wicker fence:
- Dig holes 40 cm deep for stakes.
- Pour in some unsifted dry sand.
 This will keep the wood from rotting quickly. Why is it better to use a step of half a meter between the stakes? it optimal distance, since this way the fence will not sag, they will tilt. In addition, it is easier to weave a vine, creating any ornament and pattern.
After the stakes are dug in, you can start weaving rods. To make them more flexible, their ends can be dipped in salted water for a few minutes. For horizontal weaving, it is enough to simply twist the rods between the stakes. For the vertical one, it is required to weave several rods horizontally at an equal distance, and then proceed to weaving vertically.
It is desirable that the ends of the rods did not touch the ground(Retreat at least 1-3 cm). So they will be less prone to decay.
If a tight fence is required, then the bars should be pressed as close as possible to each other. So they will not let in a lot of excess light, providing a strong fence. The uneven ends sticking out behind the stakes can later be cut evenly with a secateurs or a small hacksaw.
For braiding from rods, it is better to opt for reed vines, since it is the thinnest and most flexible. A willow vine of small diameter is also suitable for this purpose. A braid can be woven with one, two, three or more rods, depending on skill. It is recommended to first weave the braid, and then weave it between the stakes.
In this video you will see how to weave wattle with your own hands.
In the future, the finished fence can be dyed in any desired color. For example, wood varnish or facade paint. But most often the natural look is the most acceptable.
Lacquer will create additional protection from aggressive natural impact, and will also give additional shine to the design.
Wicker wooden fence - a good idea for country houses or. Such a structure gives authenticity to the house. Let's look at how to prepare the material for the hedge and how to assemble it.
Low, medium or high?
As a rule, wicker fences are divided into several types depending on the purpose. In like decorative element use fences small height (up to 1 meter): they enclose the tracks on and.

For zoning a site into small areas, a fence is well suited about a meter high. Thanks to such a fence in the garden there will be no feeling of a closed space, and at the same time it will emphasize the boundaries of the plots.
Large fences are used to protect the outer perimeter of the site, about two meters high. Depending on the material used, the fence can last a different number of years. So, for example, from cattail or reeds, your fence will last no more than a few years. To make it last longer, about 10 years, use willow, hazel or vine as a material for making.
Important! If you want the fence to serve you even longer, you should treat it with an antiseptic.

How to make a decorative fence
Base preparation
Harvesting is best done in spring or autumn. But if you urgently need to make a fence, then you can prepare branches in the summer: they you need to take even and smooth. To collect the vine, it is recommended to use a sharp knife and cut the vine diagonally. After the required amount of material has been collected, the branches are tied into a bundle and dried. When dry, the branches can be stored for a long time.
Before building a fence, the branches are steamed. This procedure gives them flexibility, making the fence easier to weave. You can not soar the branches, but dip their ends into a container of water. It is best to soak for two weeks. After that, it is easy to weave a fence.
If you planned to make a hedge from freshly cut branches, then the leaves can be left. The support of the hedge is usually made of branches. Pre the bark is removed from them, and the lower cut of the branch is treated with tar or any other type of antiseptic. This is done in order to slow down the process of decay of the support.
Choosing branches
To build wattle, you need natural materials that do not require trips to hardware stores. In addition, such fences are much cheaper in cost.

for weaving use a flexible vine, branches and other materials. Willow branches are especially often used, they have high strength and grow everywhere, besides, do not think about the type of willow, since all types of this tree are suitable for weaving.
When cutting willow in low-lying, often flooded places, choose smooth, elastic rods that are not affected. Harvesting is usually carried out in early spring or late autumn.
Did you know? The highest fence in the world was built in the Republic of South Africa in the 80s of the XX century: it was intended to protect oil storage facilities from terrorist attacks with rockets and reached 290 meters.
After cutting, tie the material into small bundles, which are then must be dried under a canopy on the shelves. An important point in the workpiece material is right choice vine length. You can use another branch as a yardstick.

Equally important in a wicker fence is the support system, which is usually made from thick branches (young trees) at least four centimeters in diameter. The height of such supports should be 50 centimeters more than the fence, since the ends of the supports are driven into. Thick pine branches are well suited for this, which are pointed at the bottom and driven deeper into the ground.
weaving process
The weaving process is not so complicated - the rods prepared in advance need weave between several supports. The lowest vine must be fixed by sticking the end into the ground by 15 centimeters, or by screwing it to the support with wire. Further, the remaining branches are simply tied to a support or frame with a wire.
The branch for the fence will have a thick and thin end, the one that was closer to the top. It is necessary to properly lay the branch from the thick end, while the thin end is braided around the support between the branches laid earlier.
Every 4 stacked vines, they must be tapped with a hammer to seal the weave. If you use reeds for weaving or weave bundles of 5-6 stems with wire, plant panicles should be cut in advance.
Important! Cuts and edges of the wicker fence must be left on its inside. If you want the wattle to last a long time - cover it with varnish.

Fence Installation
The ends that will be dug into the ground must be strengthened by treating the supports with impregnation, firing or resin. Best fit for supports. Due to the fact that it does not rot even in water, the whole of Venice is built on it.
If you plan to put a fence a meter high, bury the supports 30 centimeters into the ground, a higher fence will require more depth. If you use small hedges in landscape design, you need to deepen their supports by at least 20 centimeters.
Should choose the right distance between the supports, which will depend on the thickness of the rods. If the branches in the wattle fence are thick, the distance between the supports should be left from 50 centimeters.
It is advisable to maintain the same distance between the supports throughout the fence, only install the supports at a distance of 20 centimeters from each other along the edges of the fence. Sealing around the edges will secure the vine during further weaving.

Did you know? The wicker palisade in ancient times was erected as a temporary fortification around the fortresses and castles under construction until the stone walls were built.
A wicker fence is not so much a means of protection as a component of landscape design. It symbolizes the comfort and charm of village life and is one of the most ancient inventions. So, today we will find out how to make a wicker fence with our own hands, and also consider the advantages of this element, its role in.
Strengths and weaknesses of wicker fences
The main advantages of this design include the following.
- Excellent appearance . Thanks to weaving technology, an ordinary fence turns into a true work of art! Regardless of whether the fence is low or high, it will complement the design of your site in any case.
- Ease of creation. It is quite possible to make such a fence with your own hands, without resorting to the services of professionals.
- Cheapness. If you make a structure from wood from your yard, then the costs will generally be zero. Of course, if you purchase a ready-made design, then its cost will directly depend both on the material used in the manufacture, and on the dimensions of the product and the type of weaving (we will talk about this a little later).
- Environmental friendliness. Products of this type are absolutely safe in environmental terms. The fact is that in their manufacture no materials that can be hazardous to health are used.

Despite all the advantages described above, such fences also have disadvantages that you should also be aware of.
- Difficulty in carrying out repairs. If even one element breaks, you will need to disassemble the entire structure or, alternatively, one of the sections. By the way, without exception, wicker structures are extremely difficult to repair.
- Such buildings are not capital. And if you intend to decorate your own area with a wicker fence, you must understand that it (the fence) will perform an exclusively decorative function. Simply put, it will not protect against thieves.
- Operational period. The fence will not last long, as the wind and precipitation affect it not in the best way.
Note! Before you start creating a wicker fence, understand its strengths and weaknesses, do not forget about the service life and repair work.
Classification of wicker fences
There are a number of parameters by which the constructions described in the article are classified. So, according to their height, fences can be:
- low - 0.60.7 meters high, with which they decorate flower beds and plots in general;
- structures with a height of about 1 meter - are used for the purpose of zoning the yard (for example, to separate play area or recreation areas from the rest of the territory);
- high - at least 2 meters; this is already a reliable protection of your site, which is a capital structure (provided that the pillars are stone, and the wicker fence itself is located between them).

We will talk about how to make a wicker fence with our own hands a little later, now the classification of fences according to the weaving method. So, in this case, they can be:
- vertical - without experience it is quite difficult to make such ones, but with the appropriate skills it is quite possible to create a true work of art;
- horizontal - these are the most popular, as the simplest fences to make, which, by the way, last much longer than the previous ones.

Finally, according to the features of creating and using hedges, they can be as follows:
- decorative rounded designs - used for decoration and flower beds;
- simple weaving - they are placed in sections 2 meters long each; this option is much easier to repair than others, since, if necessary, one of the sections can always be replaced with a new one;
- wicker fences below 70 centimeters in height are installed on a ready-made base (specialists prefer metal in order to increase the operational life).
What material to use to make a wicker fence? We will talk about this in the next paragraph of the article.
Materials that are suitable for a wicker fence
There are several options, let's briefly review each of them.
Option number 1. Willow
If this material is prepared correctly, then it will turn out not only flexible, but also strong enough. The variety of this culture is quite wide, but almost every species can be used to create a wicker fence. By the way, a construction made of willow can be of two types:
- inanimate;
- alive.
The creation of a living fence means planting young shoots in the ground, which, growing up, will form the very wattle fence. As for the fencing of the inanimate, already cut shoots of culture are used here.

Option number 2. Hazel
In this case, the hedge is formed by young shoots, which differ primarily in flexibility. Raw materials should be harvested in early spring - even before the buds appear on the hazel.
Option number 3. cattail, reed
Let us immediately state that distinctive features these natural materials are fragility and fragility. For this reason, their use for the purpose of a full-fledged fence is at least impractical, because after a couple of years the fence will be unusable and will have to be changed. Moreover, with the help of reeds, only low structures can be created to divide the site into zones or to fence flower beds.
Option number 4. grape vine
Grape rods are easy enough to bend because they are flexible and long. Also, the vine is resistant to high humidity and temperature extremes.
As you can see, there are enough materials, but not every one of them suits us. By the way, looking ahead, we will inform you that there are other, no less effective materials. Now we proceed directly to the description of the technology, how to make a wicker fence with your own hands.
We will start with willow, because it is the most popular.
Making a wicker fence from willow
Willow branches are not only pliable and flexible, but also strong enough, so they are used for weaving not only fences, but also baskets. The weaving itself in this case can be both horizontal and vertical. The first option is more interesting: first, horizontal supports are created here, after which the branches are installed horizontally, with one end of each dug into the ground. Very soon the willow will turn green and it will seem that the fence was created by Mother Nature herself.

Stage one. Preparatory activities
So that the result of the work does not upset you and is really of high quality, you must not only acquire consumables, but also do it in a strictly certain time. Willow shoots should ideally be cut between September and March. Not vice versa.
But sometimes even rods that were cut "on time" have insufficient flexibility for weaving. Here fragility can be eliminated with hot water. For this purpose, the rods are placed in heated and clean water for about two to three hours. As a result, the shoots will be saturated with moisture and gain the desired flexibility.
Stage two. Consumables, equipment
When creating a willow fence, we need:
- vine, the diameter of which is approximately 20-30 millimeters;
- supporting pillars - logs or metal pipes;
- a hammer;
- wire, preferably thin;
- knife;
- screwdriver;
- secateurs;
- self-tapping screws.
Stage three. Manufacturing instructions
Consider step by step the process of making a fence.
Step one. First, install the support poles. We apply markings and drill holes for supports; the optimal installation step of the pillars is 1 meter. Having finished with this, we put the supports themselves. They should enter the ground by about 35-40 centimeters - so the design will turn out to be extremely durable and strong.
step two. We stick thicker rods into the ground only 15 centimeters. In the future, weaving will be achieved thanks to these dug-in rods.
Step Three. Next, about 10 centimeters from the surface, we install the lower rods. This is necessary in order to prevent the process of decay. In parallel with the vine from the bottom of the fence, we skip the pre-prepared wire, which will give the whole structure more rigidity.

Step Four. Now we begin the actual weaving procedure. Using a checkerboard arrangement of rods, we pass the vine through those that are dug in horizontally, and at the same time we pull the tips inward. Having made three rows, we tap on top with a hammer in order to tamp. We braid the metal wire into the structure every seven rows.
Step five. We cut off the protruding ends of the rods with a secateurs. Of course, the bars that protrude beyond the supporting pillars will not look beautiful.
Step Six. We also trim the posts from above, so that it is more aesthetically pleasing. If the pruner does not cope with this, we use a hacksaw.
step seven. Actually, the fence is already ready. After a few years, we treat it with a special impregnation so that it does not lose its original appearance.
Video - How to make a wicker fence with your own hands from willow
Making a wicker birch fence
Wicker fences made of birch branches deserve our attention, if only because they look really amazing! And if you add vertical weaving to this, you can get additional protection for the site. The manufacturing process itself is simple, but you still have to try. We start traditionally with the preparation of everything you need.

Stage one. Consumables and equipment
In our work we will use:
- a hammer;
- planks, preferably wider - so not so much will be required to fence them;
- screwdriver;
- wooden posts 10 centimeters thick;
- self-tapping screws;
- rope for marking.
When everything you need is ready, let's get to work.
Stage two. Manufacturing technology
Step one. We carry out preliminary preparation of branches, we select only the freshest of them - they are quite flexible. We clean them from small twigs and knots, adjust them so that they have the same size.

Step Three. After installing the pillars, we begin to mount the transverse strips. The length of each bar must exceed 3 meters (this figure depends on the step between the supports). We use self-tapping screws to fix the planks.
Step Four. Now we fix the branches themselves. We put the first one between the transverse slats from above, the second - in a similar way, but already, as it were, in a mirror image. Then we repeat everything: we push one branch in the usual way, the other - in a mirror way, etc.
Note! In order to minimize the gap between the branches, we use a regular hammer.
After some time, when the fence is already dry enough under the sun's rays, the process of its deformation will stop. This design will serve you for many years.
We make a wicker fence from boards
First, we note that such a fence looks more attractive than a traditional picket fence, which is why many owners of summer cottages prefer it. For manufacturing, you can use not only wood, but also veneer, plastic or even MDF. But the cheapest option is wood, so consider it.
Note! Fencing from boards will not only decorate the site, but also protect it. It is durable, reliable and durable, so it will effectively protect the yard from unauthorized entry.
Wicker fences on brick fences are especially popular - this is how they look most attractive. And if you decide to create such a structure on the site, then immediately get ready for difficulties and get at least one assistant, since it will be quite difficult for one to cope.

Stage one. Preparing everything you need
For the construction of wooden wicker fences we need:
- processed boards measuring 15x221 centimeters;
- wood paint;
- support bars with a diameter of 10 centimeters;
- screwdriver;
- self-tapping screws;
- file.
It is important that the thickness of the bars is at least 10 centimeters, since the weight of the future structure will be significant.
Video - A fence called "Wattle"
Stage two. Manufacturing procedure
Step one. First, we make a markup for the installation of support pillars. We pre-treat the pillars with an antiseptic, install them in increments of 2 meters.
step two. We cut the boards so that they all have the same size.
Step Three. We install vertical supports for weaving - they will serve as the basis for the future design.
Step Four. We start weaving itself in the same way as in the options described above, that is, from below. We take the first board, bend it and pass it through the supports, after which we fix it with self-tapping screws.
Step Five. We install the next board in the same way as the previous one, but already mirrored (that is, it is necessary to bend in the opposite direction).

Step Six. When assembling the second canvas, we exercise extreme caution. The boards of both canvases must match, and this is one of the main rules on how to make a wicker fence with your own hands.
Step Six. Upon completion of installation, we process all structural elements with a special protective paint.
How to care for wicker fencing?
There is nothing difficult to take care of. Immediately after installation, we finish the wooden boards in order to improve their aesthetic qualities. After processing the surfaces, we cover them with varnish. Choose a varnish of such a color that it fits the overall design of your own site.

Renew the paint every two years to bring it back to its original look. At the same time, it is quite possible to experiment with colors - for example, create a kind of chessboard, alternately painting the boards with black and white paint. What you get will definitely make you happy!
Production of a wicker PVC fence
In most cases, the concept of "wicker fence" is associated with wood or vines, but PVC, which has become increasingly popular in recent years, has significant advantages. Let's consider them.
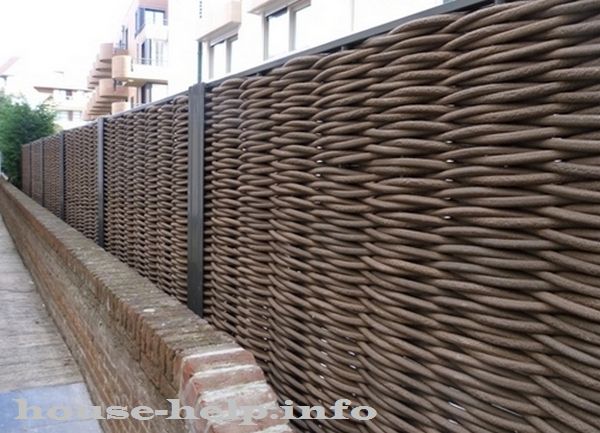

- Affordable cost. The manufacturing technology of the material itself is extremely simple, and therefore it is inexpensive.
- Durability, which is the main difference between PVC and vines or wood. The material has a special protective coating, it is primed and painted modern materials owing to which the service life reaches several tens of years. And, which is typical, during this period the appearance of the fence practically does not change.
- A wide range of. If desired, you can make a fence of any desired color, thereby ennobling your site. Also, the material has a cellular structure, which will make the design of the yard truly unusual.
- Quick installation. Anyone can handle this, besides the weight of the material is quite low.
- Ease of use. PVC fences, unlike the options described above, are immune to high humidity or temperature extremes, and they do not fade in the sun. And the maintenance of the material consists only in periodic wiping with a special solution. Elements made of metal should be coated with anticorrosive.
Video - How to make a wicker fence with your own hands
How much would such a fence cost?
Specific figures in this case depend on several factors, including:
- construction height;
- weaving method;
- material used in the work.
For example, a willow fence with a height of about 1 meter will cost at least 500-600 rubles per linear meter. Although, if desired, we can build a willow vine fence on the site absolutely free of charge, for which you just need to prepare branches and supports. But a fence made of PVC or wooden planks, will already cost from 750 rubles per linear meter.

As a conclusion
Wicker fences are true works of art. There are a lot of weaving technologies, design options and possible materials, so everyone can choose for themselves what is ideal for landscape design site. With sufficient strength, the fence can not only decorate, but also protect the estate from uninvited guests.
But it is worth noting that wicker structures are rarely used for protective purposes, although in the landscape it is an indispensable attribute! If you wish, you can make it on your own according to the instructions given in this article, or you can order it from experienced professionals.
We make the first impression of the house and the dacha even before we entered the territory, sometimes before we saw the house itself. The first thing that catches your eye is the fence. Everything else is after, and the first impression is from the fence. On some, albeit inexpensive, but attractive, you want to stop and look: original ideas always attract the eye. One of the most interesting is a wicker fence or wattle fence. Moreover, they are woven not only from vines or branches: there are wickerwork from boards, and there are from PVC rods. They all look different, but interesting and unusual.
What is a wicker fence made of?
Let's make a reservation right away that there are two types of wicker fence - "wattle" - from branches and "wicker" - from boards. The manufacturing technique is very similar, therefore both of them belong to wicker fences.
This is a wickerwork of twigs or branches

This is a wicker board fence.
What is braid made of?
Now about what you can make such fences from. A board fence - an Austrian braid - is most often made from a pine board 20-25 mm thick, about 100 mm wide. Material - most often - pine. It is more affordable, contains a large amount of resins, and therefore has a longer service life. But to extend its "life" it would be useful to paint with antifungal compounds.
The poles for such a fence are made from a bar of at least 80 * 80 mm, but are more durable from a profiled pipe. Size 60 * 80 mm or 40 * 80 mm, you can take square ones. Depends on how you mount the board. The span between the supports is 2.5-3 meters, and between them they put an intermediate one - from a bar of 40 * 40 mm or so. The exact span is determined locally and often depends on the flexibility of the board.
To prevent metal poles from spoiling the picture, they are covered with boards, which are fixed through with studs with washers. You can make a plinth and pillars of brick, and between them - a braid - vertical or horizontal - depends on your wishes.

Wickerwork on stone pillars
What to use for wattle
Captivity is made from young one-year-old shoots of several types of wood:
- willows (concrete);
- hazel (hazel);
- willow (red);
- aspens;
- birch;
- PVC rod.
The best are willow and hazel. Their core is dense, which is why the lines of operation are solid. Other breeds quickly lose their appearance and strength.

PVC wattle - durable and quite attractive
PVC wattle rod appeared only a few years ago. And although it is not natural, it is in good demand: wood, even processed, loses its attractiveness after a few years. Plastic, on the other hand, is not afraid of either the sun or frost, and does not change its appearance for a long time. Its minus is that you need to buy it, while the vine can be cut.
Rod preparation
"Cleaner" for the bark
Shoots are harvested in early spring or late autumn, their thickness is from 1 cm to 3 cm. On small fences - up to 1-1.2 m high - go tonic rods - 1-2 cm, on higher ones - those that are thicker.
It is better to clean the bark on the rods, and cover them with stain or wood oil. Brown color can be obtained by soaking the rods in potassium permanganate, gray - in blue vitriol.
You can also use unrooted shoots, but then the bark will begin to peel off, the view will be unattractive. It is more convenient to clean the bark with a split thick branch or “cleaner” (see photo). It is easy to make from a suitable size piece of branch.
If you plan to make a fence later, bundles of branches are placed in the basement. Before use, the rods are placed in a container with water for a week, periodically topping it up. The rods swell, elasticity returns to them, and it is easier to clean the bark. If the process is too hard, you can soak the branches for another week. Should go easier. To really make it easier, you can stand over the steam. Then the bark is removed like a banana peel, but the process of “soaring” itself causes difficulties.
pillars
The basis of any fence - pillars. They can be made from thick, even branches or trunks of young trees. Diameter - about 5 cm and more if you plan a high fence. They are buried or driven into a depth of at least 50 cm, the installation step is about 50 cm, it can be more or less, depending on the degree of flexibility of the prepared vine.
To make the poles last longer, they are treated with bactericidal impregnations, the ends are burned at the stake (the old-fashioned method), dipped in hot bitumen, and soaked for a couple of days in a solution of copper sulphate.
If you put a wicker fence for the external fencing of the site, it is better to use timber or metal pipes as poles. If the weave is horizontal, the section of the tube does not matter - in the sense that both round and square will do. Even with a round one it will be easier to work. And with vertical weaving it is more convenient to put poles from profile pipe. Crossbars are attached to them, and it is easier to do this to a flat edge.
Types of weaving

Start with this simple weave
Then, having made a couple of fences, you can move on to more complex drawings. There are several diagrams in the photo.

Schemes of weaving fences from vines and rods

Variations of weaving patterns
How to make a wicker fence yourself
We will consider the simplest option - the usual braided line. To begin with, you can practice on a small piece - master the technique, then you can start serious construction. For example, for training, you can make a fence for a garden or flower garden.
horizontal weaving
We drive six more or less thick pegs into the ground with a distance of 30-40 cm. We take the first vine, lay it with a “snake” intertwining between the posts. The vine alternately bends around the posts either in front or behind.

The first rod is laid
The second rod is laid in a mirror image to the bottom. If it starts at the back, then the next one is laid in front.

Weave the second rod in reverse
If there is a need to connect two vines, this is done on the nearest pillar. The next one is simply laid as a continuation of the previous one. And the protruding ends are cut off after everything is assembled.
The third, and all odd rows, fit like the first, the fourth and even - like the second. In general, we alternate the beginning in front of the pillar, then behind. Periodically, at the intersection of the vines and near the pillars, they knock with a mallet - a wooden mallet, compacting the rows.

We alternate each subsequent vine
This is the horizontal wedge. It can be continuous, or it can be shield. With continuous weaving, the pillars are installed around the entire perimeter, between them, one by one, vines are intertwined. It turns out an almost solid wall - the ends are brought out in one direction and there they are cut obliquely so that it is not visible.
If there is no thick vine, you can put a whole bunch of thin twigs at a time. It is unlikely that anyone will remove the bark from them, and a solid fence will not work either, but a small fence is easy. Such a fence made of rods looks decorative, it is perhaps even easier to make it yourself.

You can also use a lot of thin twigs
In panel manufacturing, sections of a certain length are made. Set the required number of stakes - 4-6 pieces, vines are woven between them. After reaching the required height, the ends sticking out on the sides are cut off.
If necessary, the edges of the rods are nailed to the stakes. It turns out such shields as in the photo. Sizes can be different - more or less depends on the desire and type of fence.

They make shields like this
When the required number of shields has been collected, they are put in place, hammering the pointed ends into the ground. Nearby poles can be connected - for greater stability. It turns out a shield wicker fence. See the video for an example of assembling wattle shields.
The installation of a shield wattle fence can also be done using metal poles. No special technology
- we drill holes below the freezing depth,
- throw a bucket of rubble, tamp,
- we put a pole, set it in height and align the vertical;
- we concrete;
- we attach ready-made shields to the pole.
One of the options for such an installation in the video.
Using the same technology, a braided fence is made from boards. They only braid the boards, and the span between the pillars is made larger.

Horizontal plank weaving
vertical weaving
The bars in a wicker fence can also be located vertically. In this case, three to five crossbars are nailed to the posts. The first crossbar is about 10 cm from the ground level, and then with the required step.
Weave like this: one end of the rod rests on the ground, for example, from the side closest to you. Then they bend, alternately stretching between the bars. The next escape is placed on the other side. It turns out it is in mirror image with the previous one. So they alternate - in front / behind.

Wicker fence with vertical weave
Since the vine has a noticeable difference in size at the top and near the root, they are turned in pairs either up with a thick edge, then down. Then it turns out the same density at the top and bottom. If this is not done, it will turn out thick at the bottom, rarely at the top. How to weave a vertical fence, watch the video - a master class from a person who has made more than one wicker fence with his own hands.
They make a vertical and wicker fence from boards. Just to make it look organic, and to extend the life of the boards, the tops are covered with a board stuffed from above. Ends are nailed to it. This also allows you to fix the boards, which is useful in this version - sometimes loose ones fall out.

How to make a vertical wicker board fence
You can also fasten the boards to the lower crossbar. Only either from above or below: so that the wood does not lead when the humidity changes. Another point: if you make it from a raw board, it is worth considering that having first assembled everything without gaps, after drying you will have 1 cm gaps between the boards. This applies to both horizontal and vertical models.

One of the options
The upper and lower crossbars can be made from a profile pipe. This is a more reliable material, which also guarantees greater stability.

Another option
Photo Ideas
It seems to many that a fence made of woven rods and branches is only a decorative fence that cannot fully protect the site. If you look at the next photo, this can be doubted. Wow such a fence, and almost opaque.

Full fencing, no worse than the rest
The main thing in this business is a thorough approach. Put the pillars, between which we braid everything very tightly. The service life may be short, but the costs are minimal. And both material and temporary.
If ordinary weaving is already easy, you can try and do something extraordinary. For example, a wicker fence made of branches arranged diagonally. And you can’t call it a frivolous structure either.

This is already a wicker fence more difficult to perform
There is another interesting way of weaving - a pigtail. Having practiced in small areas, it will be possible to do something larger.

More complex ways, but also more beautiful
If you need a decorative fence in the yard, in the garden, in the garden, a fence made of branches can be made rare. They even use rather thick branches, but you need to work with them immediately, until they have time to dry, or then bend them.

Do-it-yourself wattle fence can also be made from thick branches
By the way, if you use freshly cut willow twigs and stick them into the ground, after a while you can get hedge: willow takes root perfectly. You might get something like the following.

By weaving a willow fence, you can get a hedge
When planting hedges, use the same technique of weaving. Only form it from rooted shoots. After they become stiff, a very reliable fence will turn out. It's not easy to get through it.


From a board 100 mm

From a board 150 mm
Not only the fence can be made wicker. A lot of interesting things, it turns out: gazebos, huts, elements of garden decor.


The history of wattle is lost somewhere in the mists of time. Who and when wove the first fence from improvised material, perhaps even the most venerable historians and researchers will not be able to answer. But, despite such a solid experience, this type of fence is very popular today. Especially among those who like to create beauty with their own hands.
Of course, a wicker fence is much inferior to its plank, metal, and even more so stone counterparts, but in terms of its decorative qualities and naturalness, it far surpasses them.
Varieties of wattle: from fencing the site to decorating flower beds
There are many types of wicker fence. For example, they may differ in the way weave, which is horizontal and vertical. And if you wish and have time, you can even “embroider” all kinds of patterns on the fence.
Also, wattle fences differ from each other in the type of material used and the method of manufacture. The latter depends on where and for what purpose the fence is planned to be used.
So, for a capital fence around the house and the plot, wide frame rods up to 5 cm in size and vines up to 2.5 cm in diameter are used. Metal posts can also be used as the first rows, which makes the structure stronger and more durable.

In height, such a fence can reach 2 m and above, and install it on a pre-prepared base. Moreover, the thinner the twigs used for weaving, the denser the fence will be. By carefully aligning the rows and adjusting them to each other, you can achieve complete impenetrability of the fence.

Wattles lower and easier can be installed on the site itself for the purpose of zoning the territory. And with very low braids it is easy to decorate any flower bed and complement the landscape design of a garden or recreation area.
Tools and materials
Independent weaving of a fence does not require any special skills. However, like the big financial costs. To make a real masterpiece, you only need a hacksaw, a shovel, a tool for cutting rods (pruners or scissors), pliers or a hammer with nails for attaching branches to supports.
Building material for twisting can be purchased in special nurseries, or you can prepare it yourself.
At the same time, it is important to remember that it is best to cut the rods in the spring, before the plants sap, but they are also allowed to be collected in the late summer and autumn months. All of them should be as even and long as possible. When the branches for twisting dry out and to give them additional flexibility, they can be soaked in hot water or steam in the bath.
Willow twigs, as well as birch, dogwood branches, hazel branches, apple trees and vines are considered the best material for fencing. An interesting effect can be achieved by combining branches different breeds trees.
Weaving a fence: step by step instructions
- The first step in making a beautiful and original wicker fence is the installation of support stakes. In their capacity, both wooden poles pre-treated with antiseptic agents and metal pipes can be used. If you plan to build a high capital fence, then the supporting pillars are best poured with concrete.
- All rods are divided into thick, medium and thin. The thickest ones are dug into the ground between the pillars, at a distance of 40 cm from each other. They should be deepened by 0.2-0.3 m and rise above the planned height of the fence by about half a meter. If it is planned to build a fence with vertical weaving, then several horizontal poles will need to be fixed between the supporting stakes. The greater the height of the fence, the more such crossbars will need to be installed.
- So that over time, due to constant contact with the ground, the lower rods of the wattle fence do not begin to rot, you can make a sand cushion under the fence. Weaving starts from below, using the thickest vines (the higher, the thinner the rods). In this case, the first row begins to weave at a height of 10-15 cm from the ground. To strengthen the fence canvas and secure the first row, wire is woven into it along with rods.
- Having started weaving, they try to leave the tips of the branches on the inside of the fence. Every few rows, it is recommended to lightly tap the transverse rods from above. It is desirable to use both one vine, and several at once. The next vine is inserted into the weave not at the end of the previous one, but a little earlier, as if overlapping it. In this case, weaving begins from the side of the rod with the largest diameter.
- On the extreme pillars, the vines must be fixed so that they do not stick out in different sides. For fixing use wire or nails.
- In conclusion, the wattle fence can be decorated with flowers planted along it. Clay pots on stakes will also be an interesting decorative addition, which will give the hedge an additional rustic flavor.
How to make a willow hedge: video instruction


