A lot of wood materials used for cladding a room are very popular among consumers. To decorate the walls, hide the joints and protect them from mechanical influences, experts advise installing wooden corners. They are able to give the room an attractive and unusual look. Wooden corners are used not only for finishing door and window openings, but also used as skirting boards for floors and ceilings.
What are wooden moldings for?
Wooden corners are a material that is used to complete the finish and they are multifunctional, have a large number of positive characteristics. Due to these advantages, wooden corners are often used:
- For surfaces. At the final stage of finishing, wooden corners are used as the basis for cladding.
- To protect the walls. Wooden moldings protect surfaces from negative mechanical influences, and also exclude injury to household members.
- To complete the decorative and protective function, special corners with a cable channel are used to hide all the wires and protect them from mechanical influences.
In addition, the corners perfectly mask existing defects and gaps between the panels.
How to choose wooden moldings
In order for the wooden corners to fit into the overall style of the room and fully fulfill the assigned tasks, you need to be able to choose them correctly. First of all, pay attention to the shape and size of the corners. If you need to choose corners for finishing the facade, give preference to wide products, as they will better hide irregularities and protect the surface.
Please inspect the product carefully before purchasing. If there are cracks, irregularities and other visible defects on it, this indicates that low-quality material was used for the manufacture of wooden corners (including lining). Therefore, it is better not to buy products.
Varieties
Wooden are external and internal. By external indicators, it is rather difficult to distinguish them, since they are similar. For the manufacture of corners, a variety of wood species are used, such as:
- pine;
- alder;
- Linden;
If wooden corners are not suitable, you should pay attention to the folding profile of medium density fibreboard. The main advantage of the profile is its flexibility. The product bends well, which allows you to give it the desired shape.

Plastic models made under a tree are considered popular. For the production of corners, polyvinyl chloride is used. Perforated metal corners are also very popular. It will not work to decorate a room with such a corner, since perforated models are made only of a hidden type.
The use of wooden moldings
Traditional wooden corners 50 x 50 are becoming less popular every year, today combined models take the first place. For the production of corners, natural, environmentally friendly wood and chrome-plated metal are used. Wood is often combined with plastic and glass. Unusual edging made of chrome-plated metal on a wooden corner looks attractive, fills the interior with elegance and dilutes the style of the interior.
Sometimes they are decorated with a variety of dyes, turning them into a real work of art.

Methods and features of installation
Fastening a wooden corner is one of the important and special stages. Before installing the product, it must be treated with antiseptic preparations, dried well and impregnated with fire-fighting substances. To fix the corner, apply:
- self-tapping screws;
- adhesives;
- hidden fasteners.
The method of fastening depends on the material used in the manufacture of the corner, the characteristics of the room and on the joint of the lining.
If there are frequent and sudden changes in temperature or high humidity in the room, then it is better to use self-tapping screws as fasteners. During finishing inside the corners are attached with adhesives.
Installing a wooden corner is simple, following a certain sequence:
- It is necessary to measure the room, thereby determining the exact number of corners.
- Next, you need to process the products and fix them with screws.
- The final stage is the coating of the corner with varnish or paint.

With wooden moldings, any interior becomes more interesting and attractive, so this look finishing material does not lose its popularity over the years.
Using wooden corners, it is necessary to carry out finishing work carefully, without damaging the product. From right choice and quality installation depends on the situation and atmosphere in the house. Properly carried out work will positively affect the overall result.
In the conditions of modern construction the fastening corner represents one of the most demanded materials. It has such advantages as versatility and ease of use, which allows even non-professionals to use it at home. Most often, the mounting angle is used for joining wooden structures. If the work requires increased responsibility, then products marked “reinforced” are used, in which the strength characteristics are significantly higher than those of ordinary ones.
The mounting bracket is one of the important types of perforated fasteners used to fasten various elements to a plane at a right angle. The main sphere of use of such elements is the construction of wooden structures, including the installation of roofing, all kinds of ceilings, various decorative and other things. Also, these products are appropriate to use when installing heating or ventilation systems, and other things. Such a wide area of use makes this material one of the most popular types of perforated fasteners.

It is appropriate to use the mounting bracket for fastening a wide variety of elements that carry a different level of load - from decorative to capital parts of the building. In this regard, special requirements are imposed on this type of material.
Narrow ones are designed for fastening various light structures, including decorative ones. Anchor elements are appropriate to use to secure wooden supports and poles to the foundation. It is appropriate to use fastening beam corners for connecting timber elements, which can be load-bearing or auxiliary, as well as for creating frame-panel and frame houses. This assumes that these elements have certain properties and characteristics. Mounting angle equilateral has become quite common as an element roofing works, as it allows you to solve problems related to the fastening of the main and auxiliary elements. If the structure is expected to be affected by additional loads, then it is best to give preference to reinforced materials. Such mounting angles have a design that allows them to withstand significant loads, guaranteeing a sufficiently long service life. In construction, asymmetric mounting angles are actively used, for which there are a number of special tasks.
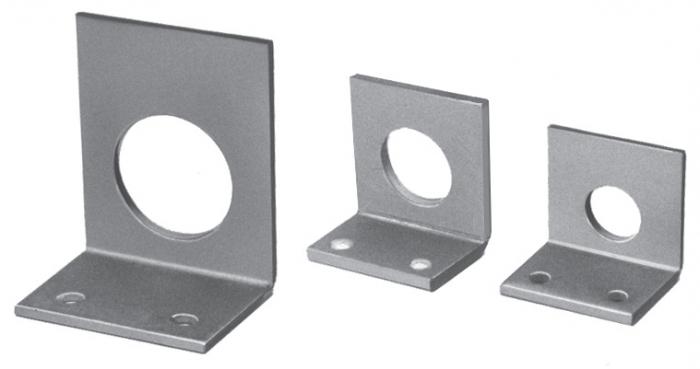
All elements of this category have one common property - there are perforated holes of different diameters on both planes, which ensures easy fastening with bolts, screws or screws different sizes. Strengthening of resistance to corrosion is provided due to the fact that production of fixing brackets is carried out from a galvanized steel sheet. This makes it possible to use them for connecting and fastening elements located in the open air, as well as operated in rather difficult conditions.
Fastening of various shelves to the wall is carried out with the help of corners and brackets. Let us consider in detail what are the fasteners for various shelves on the wall and how to make fasteners for the shelf to the walls different type.
Before attaching the shelves to the wall, it should be noted that the shelves in the end part drill a hole 5 mm below its surface.
Pay attention to the fact that the holes in the back and the holes in the wall intended for the dowels must match perfectly.
As a template in this plan, a rail of the desired length is used. It is applied to the end back of the shelf and a hole of the required diameter is drilled. Next, you need to attach it to the wall.

After that, start drilling. It must be done as accurately as possible.
This process is carried out in two stages:
- holes are made with a small diameter drill;
- after that, a hole is drilled with a drill of the desired diameter.
To mount any shelf on the wall, you will need materials and tools such as:
- threaded rod,
- mounting set,
- wood glue,
- electric drill,
- template rail,
- threaded coupling.
We fix the shelves (video)
In order to properly attach the shelf to the wall, you can use the following guidelines:
- both the bracket and the corners for the shelf must be securely fastened;
- each bracket for a removable system must be wide in order to firmly hold the shelf;
- all screws and other fasteners for various shelves to the wall must be correctly selected upon purchase;
- each bracket purchased must match the type of racks and shelves;
- fasteners for various shelves to the wall must correspond to the depth, width and height of the shelves themselves, as well as the weight of what will stand on them;
- Before ordering a mount for each shelf on the wall, you need to double check all measurements.
Fixed bracket and shelf fixing
The bracket is presented in a wide variety of its types. First of all, you need to understand how many of them you need. It then determines how each bracket will be positioned on the bottom surface of the shelf. Holes are drilled and any fixing devices are inserted into them. After that, you need to fasten the shelf with self-tapping screws.


Fixing a shelf to a concrete wall
Concrete and brick walls can withstand enormous loads due to their strength. Because of this, a small problem arises - it is very difficult to screw screws into it.
To attach a shelf to concrete wall You will need tools such as:
- pencil,
- perforator,
- screwdriver,
- hammer,
- wooden dowel.
Fastening the shelf to a concrete wall is carried out in this way:
- mark the place where the bracket will be fixed;
- mark with a building level where there will still be mounts for shelves on a concrete wall;
- holes are drilled;
- after that, you need to install the bracket;
- attach a shelf and hold against the holes;
- screw in the screws.


Shelf attachment to plasterboard wall
Today, very often in houses or apartments there are piers or plasterboard walls. With the help of this simple material housing can be transformed beyond recognition. Accordingly, it is possible to mount the shelf to the plasterboard wall.
Before attaching shelves to corners or brackets, attention should be paid to:
- Shelf weight. Heavy shelves are hung immediately on the frame, and light ones - on drywall.
- Availability of communications. Be sure to check if there are water pipes or electrical wires in the intended place. If there are communications, it is better to attach the shelf in another place.
- Attachment height. Based on the growth of all family members, you need to determine how, in this case, to properly fix any shelves to the wall.
- The location of the frame for drywall. It can be made from both a metal profile and wood, and the slats can be at different heights.
Shelf fastening to a plasterboard wall is carried out in the same way as to a concrete one.

Shelf mounts on wooden wall
TO wooden wall The shelf is pretty easy to put on. The most difficult thing is to correctly measure the holes where the corners will be attached. Next, the shelf must be brought with fasteners to the selected points and screwed to the tree with self-tapping screws.
Remember that the fastening of any shelf must be carried out in strict accordance with the horizontal level.
Shelf mounts for tiled wall
In the bathroom, it is sometimes very difficult to hang a shelf on the wall due to the fact that it is tiled. Such a tile, if you start drilling it, quickly begins to crumble. Therefore, many people are wondering: "How to fasten a shelf to a tiled wall?".
In order to attach a shelf to a tiled wall, you need a set necessary tools. The only thing that needs to be bought additionally is drills with hard facings. During drilling, all glaze is removed from the tile and the core of the tile is drilled at low speed.
In no case should you press too hard on the drill.
After that, a drill of a smaller diameter is taken and the wall breaks through to the desired size. Next, the bracket is installed. After that, you can mount the shelf on the tiled wall.
Hidden fastening of shelves to the wall (video)
When attaching shelves to the wall, both brackets and corners can be used as fasteners. The fastening of various shelves to the wall can be done both with your own hands and to order. Properly fixed shelves will look great in the interior of the room, and serve for a long time.
It takes ~3 minutes to read
The functional purpose of shelves in everyday life is the placement of various objects: large, heavy or decorative, fragile. The choice in their favor is made if the installation of furniture elements is undesirable for design reasons. The use of wall-mounted shelves in the interior allows you to create a feeling of lightness of space - to expand its visual perception. Although at the same time they perform a very specific carrier function.

Save
Therefore, it is important that each shelf is securely fastened, taking into account the strength of the wall (whether it is a brick, concrete, plasterboard partition or a wooden wall), its material and the planned load. Then the question arises of choosing the method of fastening, which is determined depending on several factors:
- Using the shelf as an element of the interior,
- production material,
- The strength of the surface of the wall or partition on which it will be attached.
Consider possible types fasteners and their choice depending on the style of interior design.
Mounting types
Hidden

Save
The choice of hidden fastening of shelves is usually determined by the style of the room. Since this method is quite laborious, it is preferred only in case of urgent need. This type of installation creates a feeling of lightness of construction, expansion of the space of the room. It is often used as an interior element in the style of minimalism, ethnic Asian (Japanese, Chinese, Thai), modern, high-tech.

Save
Hidden hinges
They can be used for wooden shelves, laminated chipboard, plywood. The hinges are attached to the back of the shelf with self-tapping screws according to the markings. If this product own production, then it is better to make recesses (cuts) in the places where the hinges are attached, according to the size and thickness of the mounting hardware, so that the hinges are flush with the edge of the product and adjoin the wall tightly. Now it can be hung on the wall, on the screws screwed into it in advance.

Save
Cantilever mount
In this section, we need to consider several types of mounting parts:
metal rods

Save
Now on the market there is a large selection of cantilever mounts, complete with them, you can pick up ready-made shelves of various sizes. The design includes a hidden bin holder for a wooden shelf, a bracket for attaching the bin holder to the wall.

Save
This method provides for the presence of holes in the shelf, into which metal rods of furniture fittings will be inserted, while the rod should be 2-5 cm shorter than the product itself.
At home, you can design a similar cantilever mount yourself, using pieces of reinforcement, threaded studs complete with drive-in anchors as metal rods. And in the shelf itself, it is necessary to drill holes in the size corresponding to the rods, observing the rule that they should be at least 2-5 cm shorter than the width of the product. At the same time, the thickness of the rods varies from 10 to 18 mm, depending on the weight of the future filling.
wooden blocks
This method of fastening includes mounting a frame of wooden bars on the wall, most often of a square or rectangular section, and then stringing a shelf on them, which is a hollow structure (box). For reliability, the parts are fixed with self-tapping screws; in addition, the elements can be put on glue.

Save
Brackets, fasteners, corners
When choosing mounting brackets, it must be borne in mind that the fasteners will always be in sight. AND this method may well become decorative element in the interior.

Save
After all, there is a wide variety of shapes, styles, materials for the manufacture of brackets. And that is why shelves on brackets are used in the interiors of classic, rustic, modern styles, modern styles, shabby chic, loft and others.

Save
The choice in favor of such fasteners can be made not only because of their decorative appeal, they can provide reliability with a significant load - up to 30-50 kg.

Save
Models and designs of brackets, materials of their manufacture and materials of shelves for fixing which they can be used are quite diverse. Therefore, it will not be possible to give generalized recommendations on how to attach them to them.

Save
Although the method of fixing glass shelves is a type of fastening with brackets, we will consider it as a separate issue. After all, the material for the manufacture of such products allows you to achieve interesting decorative effects.

Save
Glass products can be:
- Thin or thick (manufacturers release models on the market with a thickness of 4 to 12 mm).
- Shelves in triplex with misting between the layers of pattern elements (they have a significant dead weight).
- Transparent and matte.
- Colored or black glass.
- The shelves are stained glass.
- frosted glass with LED backlight(may be an independent decorative element in the interior).

Save
Brackets for glass shelves by design and dimensions are offered:
- Minimum dimensions for small and light shelves.
- Arms of large sizes, the so-called pelicans.
- Brackets with suction cups (bottom only), which makes the top surface of the shelf open.

Save
Since glass is a fragile material, this is taken into account in the design of the mounting brackets - they use silicone or rubber gaskets that protect the surface of the shelves both from above and below
Rules for fastening shelves and necessary tools
Tools
- Pencil or marker;
- Building level;
- Roulette or ruler;
- Drill or perforator (depending on the type of wall);
- Screwdriver or screwdriver;
- Mallet, better rubber.
Installation rules
The main and general condition for the reliability of a fixed shelf is the correct calculation of the reliability of fastening, depending on the planned load. The longer and the greater its mass with potential filling, the more support points should be (metal rods, wooden bars or loops).
For proper fixing of the prepared shelf on the wall in the provided place, the following rules must be observed:
- Mark the orientation using the building level, which will ensure a strictly horizontal location of the shelf. Mark a horizontal line on the wall with a pencil or marker;
- Using a tape measure, mark the places for fastening the screws. To do this, measure the distance between the centers of the holes of the hidden hinged hinges, the centers of the brackets, the corners. Mark this distance on the already drawn horizontal line.
- In these places, drill holes corresponding in diameter and length to the dowels and screws selected in the kit. To do this, you need to choose the right drill size. Then in drilled holes hammer in the dowels with a mallet and screw in the screws as an independent suspension (in case of using hidden loops) or fixing the fittings (metal rods or brackets).
- Now you can safely hang the shelf! If at the same time it is necessary to use additional fasteners with self-tapping screws or glue according to the technology, it is important not to forget.
Features of fastening shelvesdepending on wall type
Concrete wall
The nuance of working in a room with concrete walls is the choice of a drilling tool and a drill. This should be a perforator and a special concrete drill made of hard alloys. The size of the drill, its diameter and length, is selected depending on the specific mounting hardware.
plasterboard wall
If it is planned to hang a shelf on a plasterboard wall that performs a decorative role (for souvenirs, figurines or vases), then you can safely use the TNF / -W butterfly dowel to mount it.

Save
To fix it in drywall, you need to drill a hole of the appropriate size, drive a dowel into it. When a self-tapping screw is screwed into such a dowel, it opens itself, forming a reliable stop in the drywall sheet, and a special cuff on the dowel prevents it from turning. Fastening a light shelf made of glass, thin plywood or other light material in this way will be quite reliable.
For the installation of more weighty shelves, more laborious work will have to be done. At the design stage of plasterboard partitions, in the places of the planned fastening of the shelves, it is necessary to install additional transverse aluminum profiles or bars of the appropriate section. It is in them that holes will be drilled through drywall in the future, dowels will be installed and brackets will be attached.
If at the stage of designing plasterboard walls such additional structures were not provided, then a way out can be found. Already on the outside of the plasterboard partition, you can fix the transverse bar to the vertical profiles inside the plasterboard partition (in this case, their location must be known or determined, for example, by tapping or more technological methods). But in this case, the main task will be to make the bar invisible - for example, by hanging one long or several shelves in a row along the entire length of the bar. Or make it a decorative element.
Only a part of the widely used methods and the most common methods of fastening shelves in rooms has been described here. In addition to them, the imagination and experience of everyone can suggest other devices, designs and design solutions.
For shelves of various modifications, there are different fastenings Fastening of various shelves to the wall is carried out with the help of corners and brackets. Let us consider in detail what fasteners are for various shelves on the wall and how to make fasteners for a shelf to walls of various types.
Mounts for various shelves on the wall. Nuances
Before attaching the shelves to the wall, it should be noted that the shelves in the end part drill a hole 5 mm below its surface.
Pay attention to the fact that the holes in the back and the holes in the wall intended for the dowels must match perfectly.
As a template in this plan, a rail of the desired length is used. It is applied to the end back of the shelf and a hole of the required diameter is drilled. Next, you need to attach it to the wall.
Each type of shelf has its own nuances of fastening to the wall, carried out by a certain type of fastener.After that, start drilling. It must be done as accurately as possible.
This process is carried out in two stages:
- holes are made with a small diameter drill;
- after that, a hole is drilled with a drill of the desired diameter.
To mount any shelf on the wall, you will need materials and tools such as:
- threaded rod,
- mounting set,
- wood glue,
- electric drill,
- template rail,
- threaded coupling.
We fix the shelves (video)
In order to properly attach the shelf to the wall, you can use the following guidelines:
- both the bracket and the corners for the shelf must be securely fastened;
- each bracket for a removable system must be wide in order to firmly hold the shelf;
- all screws and other fasteners for various shelves to the wall must be correctly selected upon purchase;
- each bracket purchased must match the type of racks and shelves;
- fasteners for various shelves to the wall must correspond to the depth, width and height of the shelves themselves, as well as the weight of what will stand on them;
- Before ordering a mount for each shelf on the wall, you need to double check all measurements.
Fixed bracket and shelf fixing
The bracket is presented in a wide variety of its types. First of all, you need to understand how many of them you need. It then determines how each bracket will be positioned on the bottom surface of the shelf. Holes are drilled and any fixing devices are inserted into them. After that, you need to fasten the shelf with self-tapping screws.
Fixed bracket for fixing shelves to the wall has a wide range of varieties and different mounting technology When fastening a shelf with hidden fasteners, it is very important to observe the exact distances between the holes.Fixing a shelf to a concrete wall
Concrete and brick walls can withstand enormous loads due to their strength. Because of this, a small problem arises - it is very difficult to screw screws into it.
In order to attach a shelf to a concrete wall, you will need tools such as:
- pencil,
- perforator,
- screwdriver,
- hammer,
- wooden dowel.
Fastening the shelf to a concrete wall is carried out in this way:
- mark the place where the bracket will be fixed;
- mark with a building level where there will still be mounts for shelves on a concrete wall;
- holes are drilled;
- after that, you need to install the bracket;
- attach a shelf and hold against the holes;
- screw in the screws.
Shelf attachment to plasterboard wall
Today, very often in houses or apartments there are piers or plasterboard walls. With the help of this simple material, a home can be transformed beyond recognition. Accordingly, it is possible to mount the shelf to the plasterboard wall.
Before attaching shelves to corners or brackets, attention should be paid to:
- Shelf weight. Heavy shelves are hung immediately on the frame, and light ones - on drywall.
- Availability of communications. Be sure to check if there are water pipes or electrical wires in the intended place. If there are communications, it is better to attach the shelf in another place.
- Attachment height. Based on the growth of all family members, you need to determine how, in this case, to properly fix any shelves to the wall.
- The location of the frame for drywall. It can be made from both a metal profile and wood, and the slats can be at different heights.
The shelf must be fixed to the drywall wall using special butterfly dowelsShelf fastening to a plasterboard wall is carried out in the same way as to a concrete one.
Shelf mounts on wooden wall
The shelf is attached to a wooden wall quite simply. The most difficult thing is to correctly measure the holes where the corners will be attached. Next, the shelf must be brought with fasteners to the selected points and screwed to the tree with self-tapping screws.
Remember that the fastening of any shelf must be carried out in strict accordance with the horizontal level.
Shelf mounts for tiled wall
In the bathroom, it is sometimes very difficult to hang a shelf on the wall due to the fact that it is tiled and the core of the tile is drilled at low speeds.
In no case should you press too hard on the drill.
After that, a drill of a smaller diameter is taken and the wall breaks through to the desired size. Next, the bracket is installed. After that, you can mount the shelf on the tiled wall.
Hidden fastening of shelves to the wall (video)
When attaching shelves to the wall, both brackets and corners can be used as fasteners. The fastening of various shelves to the wall can be done both with your own hands and to order. Properly fixed shelves will look great in the interior of the room, and serve for a long time.


