The beautiful atmosphere of the garden in the country, painted with exquisite colors of nature, will ideally complement the artificial reservoir sparkling under the rays of the sun, which today is an integral element landscape design. A quiet water harbor, fish, waterfalls, ornamental plants, like nothing else, will emphasize the good taste of the owner and his aesthetic nature. How to build a pond in the country with your own hands, so that it brings a minimum of trouble during operation? In this article, we bring to your attention a variety of solutions for creating an artificial reservoir, near which you, your family and friends will relax and enjoy the beauty of nature.
Varieties of reservoirs
Today there are a large number of different ponds, qualifying according to the principles of construction and various features.
According to the shape and style, the following types of ponds are distinguished:
- formal or with regular geometry;
- landscape or with irregular geometry.
The first type of decorative reservoir is distinguished by a strict outline, its sides intersect at right angles, forming diamond-shaped, rectangular or other similar combinations. Brick or tile is most often used as facing materials, giving a certain severity to the structure. A formal pond is appropriate in the country, where there are already other buildings, rectangular paths.

Landscape ponds are often also called decorative. According to the device, such reservoirs are similar to formal ones, but their outline most often has a smooth shape in the form of a coastline. Of course, the appearance of such a reservoir can be the most diverse, it all depends on the imagination, the main thing is that the pond should have the most natural look.
According to the water level, decorative ponds are divided into:
- raised;
- buried.
Raised ponds mainly perform the decorative function of landscape design of a summer cottage, and they are created with geometry correct form. The depth of such a reservoir is quite small - within the borders. The advantages of such a decorative element in the country are minimal physical and financial costs.
However, the disadvantages are immediately visible - in winter time such a pond freezes through, and only annual plants can be bred in it, and there is no place for fish at all.
To create a buried pond, you will need to perform some earthen work using waterproofing materials. In such a pond, you can grow without problems perennials and start fish.
Choosing a place for a decorative pond in the country
The key to a well-groomed pond is its correct location. A decorative pond is best created near the house or a place to relax, for example, gazebos. So you can watch the playing water surface while drinking coffee or reading a book. However, the main criterion for the location of the pond are the surrounding landscapes.
It should be built in an open area, as large deciduous trees will not only create problems in the fall, but their rapidly growing roots can damage the pond system. It is also important that the reservoir is protected from strong winds, as they will negatively affect the development of coastal plants.

You also need to consider natural lighting. For a favorable reservoir of development in the rays of sunlight, it should be no more than 10 hours, otherwise small bacteria may begin to multiply in the pond, as a result of which it will become overgrown with mud and algae. With very little illumination, the development of already existing deep plants will be difficult.
Construction of artificial reservoirs based on the bowl
When building a reservoir, mistakes cannot be made, as it can turn into an ordinary swamp, the inhabitants of which will be frogs and midges.
Unlike pools, water in a reservoir should not only be ozonated and breathe, but also have a certain acid balance. And only by observing these conditions, the pond will be in a natural state, and growing plants and living fish in it will flourish and multiply.
Choosing a pond tank
Most in a simple way to make a mini-lake in the country is to build a pond based on a bowl.
Depending on the capacity and material of manufacture for the structure, you can choose the following bowls:
- polyethylene container with a capacity of 150-900 liters
This option is the most optimal for a small suburban area. Depending on your wishes, you can choose a variety of colors, shapes and configurations of the bowl, its service life is about 3 years.

- plastic vessel with a capacity of 1200-1600 liters
Such a base is more durable and strong, the service life is about 10 years.
- propylene or fiberglass form with a capacity of 5000-6000 liters.
With the help of such a bowl, it is possible to equip an artificial reservoir with an area of more than 10 m² and a depth of about 1.5 meters in the country house. Service life is approximately 30 years, in addition, if necessary, various types of different types repair.
Having determined your financial capabilities, and having opted for some kind of bowl, you can start building a pond in the country.

Stages of building a pond in a country house based on a bowl
Having chosen a suitable place for a mini-lake, we proceed to the arrangement of the pit:
- The first thing to do is markup. To do this, we lay the container upside down on the intended place of the reservoir and make notes along its contour.
- Then we drive in the pegs with an indent of 15 cm from the marking contours, while its outlines should be completely repeated.
- The next stage is digging a pit, and it should be borne in mind that the pit must fully comply with the parameters and shape of the bowl. The depth must be done with a margin of about 25 cm for a sand cushion.

- Thoroughly clean the bottom from various stones and roots.
- It is necessary to carefully level the bottom of the pit, for this you can try to fit a bowl into it and see if it needs to be earthworked, or if the pit already corresponds to the dimensions of the container.
- If the parameters of the pit correspond, then it is necessary to carefully compact its bottom.
- Then the ditch is completely covered with waterproofing material.
- A sand cushion should be laid at the bottom with a layer of 20-25 cm.
- Now you can start laying the bowl on the sand cushion. Its horizontal position is checked, after which the free space is covered with sand. Along with backfilling sand, you need to gradually fill the container with water.
- Then you can already show your imagination and start arranging a mini-lake in the country.
Do-it-yourself pond in the country house based on a flexible insulating polymer
Types of insulating film
If you plan to build a large pond, then a flexible insulating material is ideal for this purpose, thanks to which you will not limit yourself in choosing the shape and size of the pond.
We are talking about polyethylene, PVC film and butyl rubber.
Build a pond using polyethylene film only possible if it is planned to be temporary. The thing is that this material is quite fragile and easily damaged. The term of operation of a polyethylene film, as a rule, becomes no more than three years.
PVC (polyvinyl chloride) film is quite in demand in the construction of an artificial reservoir, it is very durable and reliable, its service life is 10-15 years.
Today, the best solution for equipping a pond in a country house with your own hands is butyl rubber rubber. This material is as strong as possible, reliable, not afraid of the sun and frost. It will serve you from 30 to 50 years.

For the price, of course, the most economical option, but not the most durable, is polyethylene film. The most expensive and reliable is butyl rubber. If it is too expensive for you, then stop at the insulating material made of polyvinyl chloride, it is almost half the price, but at the same time strong enough.
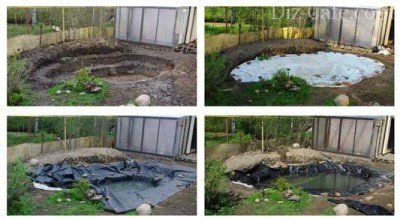
Construction stages
It is best to carry out work on the construction of a pond based on an insulating film in summer time when the air temperature is about 20 degrees. In order for the film to become more elastic, it must be kept in the sun for several hours.
- At the first stage, marking is made and a pit is dug.
This is done according to the same principle as when building a pond using a bowl, but here more attention should be paid to the depth and shape of the pit - a correct division into zones is necessary, which are performed in steps. The width of the steps must be at least 40 cm.
The optimal depth of an artificial reservoir:
From 20 to 40 cm in shallow water, or rather the first stepped zone;
From 50 to 100 cm in deep water, on the last step of the pond.
If you plan to grow fish in a pond, then for them it is necessary to provide for a “wintering hole”, which is made about 150 cm deep.
- The next step is a thorough leveling of the bottom
- After removing all large and small stones, roots, etc. the surface is backfilled with a layer of 5 cm with a clean layer of sand and covered with geotextile, due to which it is possible to extend the life of the film coating.
- Now you can proceed to the actual laying of the polymer
Settle the material freely, while securing it around the edges with bricks. It is not worth rushing to cut off the film, since initially you need to fill the resulting container with water in order for the material to take the desired shape.

The dimensions of the insulating film are calculated as follows: the length of the film is equal to the length of the reservoir, 2 depths plus a margin of about 40-50 cm. In the same way, the required width of the polymer can be calculated.
- Underwater design
Immediately after laying the insulating film, you can start pouring water, but it will look very impressive and beautiful if you decorate the underwater part in a special way, overlaying it, for example, with tiles, bricks or stone.

If the angle of inclination of the underwater shore is not more than 30°, then the stones can be laid without fastening them to each other, but with dressing of the seams. To do this, the space between them should be covered with clay. If the angle of inclination of the bank is steeper, then the stones must be fixed with cement mortar.

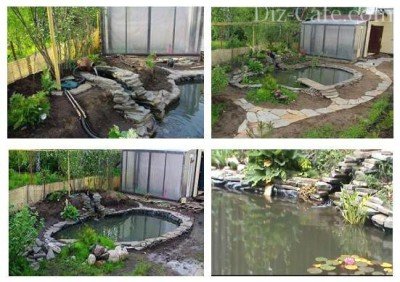
Decorative design of the reservoir in the country
When all the construction work is over, we proceed to the design of the reservoir - the last stage in the arrangement of an artificial pond in the country. The coastline can be laid out with pebbles, tiles, stone or a wide variety of other flooring.
The decoration of the banks with small stones is carried out by backfilling, while the blind area has the form of a gutter, the remaining insulating film is held by poured pebbles.
If you plan to decorate the shore with large stones, then you must first organize a concrete base, otherwise loose stones can slip and ruin the polymer.

Ponds look very impressive in combination with fountains, alpine slides, small streams. An excellent option for a small artificial reservoir would be a floating fountain, it is already sold with all the necessary equipment, you just need to turn it on to electricity.
If there is enough free space in the pond, then be sure to make an artificial waterfall with 2-3 cascades, through which water will flow into the bowl.
Its organization will require such main components as a powerful pump and a drain pipe, which will supply water from the pump to the top of the cascade. To create cascades, molded pallets or a thick waterproofing film can be used. The outlet pipe is best done underground, but if this is not possible, then just carefully disguise it. The following figure shows a diagram of the organization of a waterfall with 3 cascades.

Plants such as reeds, ferns, feces, iris, lake reeds, etc. will perfectly decorate the pond. Plastic or metal vessels are used for their planting. Coat the walls of the container with clay so that the water does not wash out nutrients earth.

Flowers and leaves of aquatic plants must be above the surface of the water. For example, for water lilies, the required depth is up to 100-130 cm, and for an arrowhead, 10-20 cm will be enough.
In the pond, be sure to plant aquatic plants - oxygen generators that produce oxygen and prevent the reproduction of various algae.
It is best to plant ground plants in containers dug near the pond in order to prevent the roots from growing under the pond. Put the fish in the water. You can decorate the ground part of the reservoir with a bridge or other decorative elements, give free rein to your imagination.
A pond in the country - a photo of beautifully decorated artificial mini-lakes:


Filters, weir and lighting
To ensure that the water in your pond is always clear and clean, you need to take care of its filtration. To organize this cleaning system you will need plastic pipes and reinforcing hoses. The pump and filter system should be selected based on the volume of your mini-lake and the desired degree of filtration.
When arranging a reservoir in the country, you need to think about such an element as a spillway. Thanks to it, it will be possible to regulate the water level, for example, in the spring during rains or when snow melts, our pond will never overflow its banks. A spillway is a small depression at the bottom of a pond filled with pebbles. Drainage pipes are connected to this depression, with the help of which excess water will be removed from the mini-lake.
Any artificial reservoir will look more spectacular if equipped with various types highlights.
If you choose the right spot lighting, then at night the artificial pond will come to life, fill with new highlights and take on unusual delightful forms.
Lighting can be placed permanently at the bottom of the pond, or it can be equipped with lamps that, using weights of various weights, will float at several levels of water. But the light bulbs located on the fountain nozzle will illuminate each jet of beating streams of water.
At the same time, it is worth remembering that all products that live by electricity must be appropriately labeled, which allows them to be used in water or outside.
A pond in the country - a photo of finished reservoirs with beautiful illumination:

- The ideal depth of the reservoir is about 5 m with an area of \u200b\u200babout 15 square meters. m, if you plan to increase the area of the pond, then accordingly you should increase its depth, for example, at 20 sq. it is desirable that the depth be more than 1 m.
- In order not to upset the balance of the ecosystem, it is better not to change the water in the artificial lake.
- Plant all plants closer to the shore.
- The ratio of water and vegetation should be 1:4, in which case the ecosystem will not be disturbed.
- It is desirable that the stones in the reservoir are not made of limestone, as it makes the water alkaline, which will negatively affect the fish living there.
- Do not be alarmed if after the first pouring of water into the reservoir it becomes cloudy. This is due to the fact that the stage of colonization by microorganisms is taking place, after some time, after the equilibrium of the ecosystem is reached, the water will be purified.
We maintain order in the pond
Like other structures, the pond needs some care. It will not be necessary to expend special physical strength here, with the right selection of aquatic plants in your mini-lake, a biological balance will gradually be established, and the system will control itself, but you just have to help it a little.
Caring for a pond is very simple and logical:
- In summer and spring, regularly remove filamentous algae from the reservoir with the help of sack, and around weeds. If your pond does not have a filtration system, you can buy special chemicals, which will saturate the water with oxygen without harming all its inhabitants. In the summer, when water evaporates quickly, top up as needed.
- In autumn, remove fallen leaves to the surface in time, as they will eventually sink to the bottom. Some plants that do not tolerate frost, transplant into separate containers for wintering. Thin out overgrown plants. To protect the reservoir from various debris for the winter, stretch a special mesh over its surface.
- In the spring, somewhere in April, it is already possible to start the pond - cut off the dried stems, clean the walls and bottom of the silt, if available, turn on the lighting of the fountain.
As you can see, care is quite insignificant considering how many emotions and joy this living wonderful corner brings you.
We will send the material to you by e-mail
O One of the best accents in landscape design can be an artificial reservoir. Such a structure will delight the owners of the site and will serve as a great place to relax. Many summer cottages are limited in size and are not suitable for large bodies of water, but with instructions and certain building skills, you can make a small pond in the country with your own hands step by step. Photos of all stages of installation will allow you to determine the technical side of the issue. Before installing the reservoir, you will need to prepare certain materials, select the appropriate project and read the recommendations from experts.
It is not necessary to spend a lot of money to build a beautiful pond in the country. From improvised options you can build a budget option
When deciding how to make a pond in the country with your own hands, you first need to decide on the size and shape of the structure. These parameters depend on the size of the site and the preferences of the owners. At the same time, the reservoir can be either of a strict geometric shape or have the natural contours of a natural pond.
The following requirements are imposed on the location of the future location of the water structure:
- the reservoir should not be illuminated by the sun's rays all day long, only 7-8 hours a day is enough. In intense light, water can bloom;
- the pond should not be located in a too shaded place;
- there should be no trees nearby, as foliage will pollute the water;
- the chosen place should not be strongly blown by the wind.
When choosing a good place, the terrain is important and good review structures from anywhere.

If you plan to install a fountain in the pond, then you should take care of convenient electrification. There are no special rules for choosing the configuration of a structure. The pond can have any shape - asymmetric, winding, oblong or square.

Useful information! The deeper the tank, the brighter the pond should be placed. If fish will live in the water, then it should be borne in mind that the amount of oxygen decreases in very hot water.
Do-it-yourself pond in the country house step by step: photo and installation guide
There are several ways to build a pond in the country with your own hands. Landscape photo ideas will help you choose. For quick installation work, it is worth purchasing a ready-made form. On sale there are special containers made of rubber rubber and reinforced plastic. Insulating film is considered a budget option.

Installation using a ready-made form
After choosing a suitable place, the finished form must be laid on the ground and a contour drawn. A trench is made according to the marks. After installing the tank, it must be filled by a third and sand should be poured into the voids formed. The bowl is then filled with water. After shrinkage, plants are planted around the resulting reservoir, and a stone is laid.

Useful information! Plastic containers are durable and easy to install, but such structures break down over time under the influence of ultraviolet rays. The best option is a fiberglass tank that is reinforced with a rubber backing.

Arrangement with film
With the right approach, you can equip a pond in the country with your own hands from a film. A step-by-step photo shows how to do such a job with high quality. For installation, you can choose the following colors of the film:
- black reflects clouds well, the bottom looks like a mirror;
- brown material imitates soil at the bottom;
- cream and blue film will give a resemblance to the pool and at the same time the fish are remarkably visible against such a background.

When choosing a material, you should pay attention to the composition of the material, thickness and resistance to mechanical damage. Bonding of the material is carried out with special glue. The use of a film may be accompanied by a preliminary arrangement of a sand cushion. The laid film should lie freely, without undue tension. After laying the material, the pit can be filled with stones. After the water has settled in the container for several days, the film can be cut.
Useful information! The more complex the device of the reservoir, the stronger the film should be.

Features of water filtration and planting
The installation of a filter system must necessarily accompany the design of the pond in the country with your own hands. At the same time, the photo necessary work can be viewed on the website. This is especially important when launching fish into the water.

Filtration kits are available from stores. They are accompanied by instructions with which the installation of equipment is carried out. Planting is an important step. For landing in the water, an arrowhead and a tail are suitable. You can pick up floating crops: hyacinths and lilies. Ferns, reeds and reeds will look good around the reservoir.
Useful information! An artificial reservoir must be cleaned periodically. In this case, the bottom should be cleaned of silt, leaves and other debris.

Related article:
Do-it-yourself pond in the country: landscape photo ideas and decoration
Do-it-yourself ponds in the country require special design. The photo displays the best design techniques. Figurines, stones and beautiful trees can be used as decor. Drops and uneven terrain allow you to build a reservoir with a cascade and a waterfall. original solution there will be a bridge or an artificial slide.

The finished building can be decorated with the following elements:
- underwater lighting looks bewitching, for this mini spotlights are mounted;


- For the installation of fountains, different types of pumps will be required.

Vegetation is considered an important decoration. It can be planted in baskets filled with earth and installed on the surface of the reservoir. High varieties of plants will look good nearby.
Useful information! Before purchasing fish, you need to clarify the conditions for their maintenance. Some types of fish are at enmity with each other, so you need to choose those that get along with each other.
Useful tips: how to equip a pond in the country with your own hands, video
- the pond is better to decorate with stones different sizes. A harmonious combination of boulders with small stones will create a magnificent view;

- when creating a reservoir, do not use sheer surfaces on which it is difficult to place plants;
- when landscaping, it is worth using containers that will prevent the strong growth of plants.

Useful information! A special soil is required for planting aquatic crops. In this case, plants should not occupy more than half the area of the reservoir.
How to prepare a pond for winter
The pond, made of a plastic bowl, tolerates the winter cold well. To prevent the bowl from deforming under the load of ice, several plastic bottles with sand.

In the case of a film construction, a similar method can also be used. In winter, equipment and plants should be covered. At the first appearance of leaf fall, the pond must be covered with a fine-mesh net. Before frosts, the reservoir is cleaned and water is pumped out. Plants and fish must be sent to winter in warm rooms. Pumps and filtering equipment should also be removed.

In the spring, the reservoir can be launched when night temperatures become above zero. Subject to all the installation rules and in the presence of high-quality material, you can build a beautiful pond in the shortest possible time. Using stylish decor elements will create a wonderful central composition on the site.
Such a luxurious garden decoration can be made with your own hands in various stylistic directions. Also, the pond can be decorated with decorative streams, paths, a neat coastline, etc.
Place for a pond
For the pond to have daylight, it is better to place it near the house, on the south or east side, away from areas densely planted with shrubs and fruit trees.
It is advisable to place the reservoir near the water source, so that after cleaning it is easier to fill.
How to make a fence from plastic bottles with your own hands, as well as which model to choose, read.
Shrub to create a hedge -.
Shape and size
When choosing the size of the reservoir, you need to focus on the area of \u200b\u200bthe garden plot. For example, on 6 acres it is better to build a 3x3 m structure with a depth of 80 cm or 2x2 m with a depth of 50 cm.
If it is planned to launch fish and other aquatic inhabitants into the pond, the water expanses will have to be expanded, otherwise the inhabitants in a cramped space will not survive.
Choosing a form, you need to be based on personal preferences and stylistic features of the site. Drop-shaped or bean-shaped designs look natural. For garden plots with height differences, designers advise considering options for small backwaters with streams.
Pond Base Selection
When the place and size of the pond are chosen, you need to decide on its basis. You can build a pond in the country from:

Step by step instructions for creating
To create an artificial pond with your own hands, you need to perform several stages of work with high quality. Before that, you need to prepare the necessary materials:
- PVC coating;
- fine gravel;
- rope;
- stone slabs;
- round stones;
- sand;
- bricks.
To create an artificial reservoir, you need to follow the step-by-step instructions:

You can also see how to make a film pond with your own hands in this video:
A small artificial pond can be made from an old bathtub. It is installed in the pit, after closing the drain hole. The inner sides are treated with glue for ceramic tiles with added paint. A chain-link mesh is laid along the perimeter of the container, a cement-sand mixture is applied to it, and various decorative elements– stones, tiles, gravel, etc.
decoration
When the main part of the work is completed, you can proceed to the decorative stage.
Stones and water
If there are cobblestones, they can lay out the perimeter and bottom.
It is important to remember that only stones without sharp corners can be laid on the bottom, especially if the base is made of film.
Water is poured from the hose in a weak stream. Within 2-3 weeks, the liquid may be cloudy - this biological process then the water will become clear and clean.
To maintain these qualities, you can have tadpoles that feed on algae and filter the water.
 Find out how to plant and care for a delphinium in the garden at.
 Additional decorations
The pond can be equipped with underwater lighting, which will look spectacular at night.
You can also install mini spotlights. To do this, use LED and halogen lamps. To make fountains, you will need special surface and underwater pumps.

The use of lighting in the pond - a modern design solution
Life in the pond

If you want to populate the pond with fish, create the necessary living conditions for them
A pond without vegetation and living creatures will soon lose its aesthetic appearance.
That is why landscape designers are advised to think in advance who will live in the pond. For example, tall species of plants, lotuses, water lilies, duckweeds can be planted at the bottom.
Before buying fish, you need to clarify the conditions of their habitat. It is important to remember that some species are at enmity with each other and will not be able to survive in the same territory.
Pond care in summer and winter
Summer is a period of active vegetative growth, so you need to monitor the plants planted in the pond and nearby.
It is necessary to remove overgrown algae, they can be used on suburban area as fertilizer and mulch. Plants blooming in a pond in the summer months are fertilized with long-acting agents. Weeds growing on the shore are regularly removed.
From June to August, you can plant exotic plants: calla, lotus, lazichiton, water lettuce, cinquefoil.
It is important not to forget about the constant monitoring of water quality.
A pond in which amphibians and fish do not live can be drained and covered with garden film before winter.
If there are inhabitants in it, then before the first frosts, a de-icer is turned on.
Reading time ≈ 10 minutes
To improve your site, you can build a beautiful pond in the country with your own hands using modern landscape ideas with examples of photos and design techniques. An artificial reservoir will bring harmony to the surrounding space and add originality to landscape design.
Natural green pond on the territory of your own summer house
Pond in the country
Sometimes an artificial pond in a suburban area is more of a necessity than a decoration. If a long stream flows through the territory or marshy soil is present, disadvantages can be turned into advantages. A do-it-yourself pond in the country will create an atmosphere of calm and relaxation.
What type of reservoir can be created in the country:

The first garden ponds appeared in the countries of the Ancient East, and only then this fashion reached Europe and Russia. Fountains and mini-waterfalls with massive stone edging began to be built near the palaces.
The pond can be:

The pond can be executed in different styles:

The improvement of a picturesque pond in the country, made by hand using landscape design ideas, is shown in the video below with photo examples and detailed instructions.
Competent planning
When arranging an artificial reservoir in the garden, it is necessary to draw up a detailed project plan and observe certain conditions.
Actions must be planned step by step:
- Location selection.
- Determination of sizes and shapes.
- Selection of the necessary materials.
- Stylistic decision.
- Plants and flowers.
- Decorative elements.
To begin with, you should walk around the territory of your dacha, carefully examining every corner and sketching on paper the shape of the future reservoir.

Place for a pond
This is an important planning stage in which several criteria should be taken into account:
- Soil features.
- Landscape relief.
- Climatic conditions.
- Illumination.
- Green vegetation.
- The presence of a natural reservoir in the territory.
In such a pond it is unlikely to be able to contain big fish or swim in hot weather, but there should be enough space for the location of the structure itself and the drainage of water. The home eco-system should resemble a mirror pond, not a swamp.

How to choose a seat:

Pond zoning:
- Coastal part. It takes about 12-30 cm, it is used for shallow water vegetation and for arranging the entrance area.
- Shallow part. Zone for plants and flowers - from 30 to 90 cm.
- Deep water part. The size can be from 1 meter, it must be below the freezing level of the soil. Fish for decoration or breeding can live here.
A great idea would be to complement the beautiful lighting with musical accompaniment. This design looks spectacular and impressive.

Material
Building materials must be strong, reliable and durable. Concrete is most often used, but today lighter materials and structures have appeared, for example, polyethylene or butyl rubber.
Most popular options:

To protect the film when laying the bottom, lay a small layer of geotextile under its surface. So gravel and sharp stones will not be able to damage the film structure.

Step-by-step instructions for arranging a "flexible" pond
It is easier to build a film-based pond than from concrete and more reliable than from a plastic mold. The recommended length of the film should be equal to the length and twice the depth of the reservoir itself + an additional 40-50 centimeters just in case. The desired width of the film is the width, double the depth of the pond and 40-50 centimeters for the remainder.
The main stages of arrangement:
- Soil preparation and marking.
- Earthworks to create a pit.
- Bowl installation or film flooring.
- Filling voids with river sand.

What may be required for work:
- Construction shovel.
- Irrigation hose.
- The pump for definition of pressure of the gulf of water.
- Compressor (for a fish pond to saturate the water with oxygen).
- Cleaning filter (for breeding fish).
- Cord, rope, pegs or light sand for marking the territory.
- Sterilizer for water purification.
- Construction wheelbarrow for the earth.
- Butyl rubber film.
- Adhesive for film ("Tangit", adhesive tape, etc.).
Pond making:
- Create a sketch. Drawing on paper the form, all details, decor and location of auxiliary equipment, taking into account the size and depth of the bottom.

- Transferring the mini-circuit to the soil with a garden hose or river sand. The contours must be marked with sand that differs in color from the ground. According to the applied outlines, a groove should be dug to a depth of up to 25 centimeters.

- Removing the fertile layer and digging a hole. This will require a shovel (a construction excavator for a pool or a large pond with a fountain) and a cart to remove the earth from the territory.
 The pit is dug according to the depth of the coastal, shallow and deep water zones calculated in advance. The deepest part should be in the center and be dug last. Each time, the depth line should be fixed using markings.
- Measuring the size of the pit. The walls of the pit are well compacted, and an additional 40-50 centimeters must be added to the edges to determine the future size of the covering material. The parameters are measured with a cord or rope, and then transferred to the film.

- Film waterproofing. The bottom of the pit is covered with a small layer of sand and geotextiles to provide reliable protection for the film surface. When the substrate is ready, the film is carefully laid, tightly fixed to the base with glue and well pressed against all surfaces.

- Filling with water. Water is poured gently and gradually with a hose, while a sharp pressure must be excluded.

- Consolidation. The edges of the waterproofing are fixed in a pre-dug trench along the contour with a depth of 25 cm and covered with earth and rubble, after which they are well compacted.
 The edge of the reservoir is fixed with rods, stones or large boulders. This stage is suitable for placing and planting plants and flowers. Be sure to leave a small crease at the bottom so that when filling with water, the film does not tear.
- Standing water. The finished reservoir should be left for 1-2 days so that the water settles well, after which the excess ends of the film are cut off. During this period, you can form beautiful bumpers, arrange the remaining decor and complete the landscaping work.

To strengthen the gently sloping shore, you can use a geogrid or geomat in combination with clay and black earth to make the pond look neat and well-groomed.

The size and shape of an artificial reservoir depends not only on the size of the site, but also on the imagination of the owners themselves. The aesthetic and decorative component undoubtedly play an important role here. If you follow all the recommendations and strictly follow the instructions, you can create the pond of your dreams in the country. How to make a pond in the garden with your own hands, using landscape ideas with photos and diagrams, is shown step by step in the video below.
Contemplation is the way to restore your inner strength and step back from the hustle and bustle. Admiring nature in any of its manifestations - be it a leaf, a blade of grass or even a small pebble, we fall into a kind of trance, delving into our "I" without being tied to current events. This is probably why there is a massive “escape” of citizens away from noisy habitats, closer to mother nature, where on their own, even a very tiny piece of land, you can relax and rest your soul. How to create a relaxing atmosphere in your garden? There is nothing easier! Instead of a couple of beds with potatoes and tomatoes, break a small pond at your dacha - now you will have more time to relax and contemplate the water surface - and this, as you know, is the best cure for stress and loss of strength. Do you think that such a complex hydraulic structure is beyond your power? With our recommendations, you will become “knee-deep sea”, not to mention a small pond, the laying of which you can quite master on your own.
So, you realized that your life is no longer conceivable without a nice little lake, designed to please your eyes and calm your nerves. How to create a pond in the country with your own hands, so that it harmoniously complements the landscape of the garden and lasts long enough, and does not become a problem area that requires tireless care?

An original feature of a small pond decorated with boulders can be an unusual path made of flat stones.
Let's start by choosing the style of the pond and choosing a place to lay it. Then, we will tell you how to technologically correctly make a pond and equip it. Selected in the right style and laid out with all the subtleties, an artificial pond will become a real gem of your garden and a great place to relax.
A small digression into history

A special charm to the landscape pond is given by its smooth outlines and decorative vegetation that adorns the water surface.
A landscape pond with natural outlines will always be appropriate in the depths of the garden next to the gazebo or not far from the terrace of the house - after all, you should be able to sit comfortably to watch the water surface.
The design of the reservoir can be more restrained according to the Japanese principle - boulders of various sizes, conifers, the absence of multi-colored herbs. Or in the Chinese style - more lush and bright, with an obligatory accent in the form of a tree with variegated foliage and a curved bridge. A landscape pond can also be created in the “nature garden” style, which involves planting only local plants characteristic of the region, and the absence of any plant exotics.

The most concise in form is a formal pond with rectangular outlines.
A formal pond with a geometric shape - square or rectangular - looks great next to the house, emphasizing its vertical and horizontal lines. Not bad such a pond is combined with a patio or patio, especially if rectilinear flower beds are laid out nearby or linear paths are laid.

An unusual flavor to the pond can be given by a path passing above its surface - either in the form of a bridge, or with individual stones or slabs.
An interesting technique that is widely used in modern landscape design is the laying of paths lined with terraced boards and thrown in the form of a bridge over a pond of a broken geometric shape. A similar path through the pond may also take the form of a concrete path or individual square slabs, as if hovering above the water. Cascades of small ponds of different sizes look original, where water flows from one bowl to another through small waterfalls.

The system of cascading ponds in the country house will not only make its landscape unusual, but also fill the garden with a pleasant murmur

Formal round ponds will decorate the patio or front group of your summer cottage
Round ponds, along with rectangular shapes, also belong to formal ponds and can decorate a lawn or open lawn, stylistically complement a garden area with a pergola, or be located near a picturesque group of trees. Round-shaped mini ponds in the garden can be made with your own hands much easier than any other configuration, using ready-made concrete rings, wooden tubs, plastic containers and even car tires.
Choose a location, size, material
The right place for the reservoir will be the key to its long-term functioning without seasonal “blooming” in spring and summer, when green algae are activated under the influence of ultraviolet radiation. For a certain period of daylight hours, the pond must be in the shade so that the algae do not multiply so intensively. On the other hand, the placement of a reservoir in a completely shady zone will lead to a delay in the development ornamental plants. It is important to observe the golden mean here.

By placing a recreation area with a barbecue in close proximity to the pond, you can always admire the beauty of the water surface.
It is important to know that the pond should be exposed to the sun for about 5 hours a day and be open from the southwest. It is undesirable to place a reservoir under shady trees - falling autumn leaves will pollute it.
As for the size of the pond, ideally the pond should occupy 3% of the area of the site. When the garden is small - with a standard area of 6 acres, not every summer resident is ready to allocate 18 m2 for a pond. Of course, the smaller the dimensions, the easier it is to make a pond with your own hands - and not so many materials will be required, and labor costs will be minimal. Therefore, when determining the width and length of an artificial reservoir, take into account your physical capabilities and the harmony of the perception of the pond as a compositional spot on your site - that is, how its dimensions are combined with other elements of the country landscape.

The ascetic solution in the design of the reservoir using only stones is a specific feature of the Celtic-style pond.

The design of a pond with a waterfall flowing down from a small beige sandstone wall will fit perfectly into the landscape style of the garden
According to the depth, it is recommended to divide the pond into three stages: a zone for coastal plants, a shallow zone for the queen of the pond Nymphaeum - winter-hardy water lilies and a deepening for wintering fish - if you intend to breed them.
Do not make the pond too deep, just dig a winter hole for fish about 150-180 cm deep (below the freezing mark) so that it takes about 1/5 of the pond area.

A cute rectangular-shaped pond can be arranged in a small summer cottage, and the edging of a terraced board will give an unusual look to the pond

The highlight of an avant-garde pond can be an extravagant wooden installation resembling an exotic animal or plant.

A continuous supply of water to the pond can be equipped with an old column or a group of brightly colored glass bottles.
When you have decided on the location and approximate dimensions of the reservoir, it's time to think about what materials to use in order to make the pond as easy and fast as possible. The most capital and expensive option for arranging a pond is a concrete base, which requires the construction of formwork and reinforcement. A less expensive way to lay a reservoir is to use a ready-made plastic container.

The pit under the pond is formed by characteristic ledges - curtains for planting plants

To ensure the circulation of water in the pond, a pump is installed at its bottom, from which water enters the cleaning filter and returns to the pond
And, finally, the most convenient and budgetary way to make an artificial pond with your own hands is to use a special moisture-resistant film that lays out the pond bowl. This method we took the bookmarks of the pond as a basis for a detailed description.
Step-by-step technology for creating a pond using film
1. Initially, it is necessary to sketch a plan of the future artificial pond on a scale indicating the depths and width of the curtains (shelves for planting plants), and it is also desirable to draw an approximate sketch of the decoration of the reservoir. This approach will help to avoid various alterations during the construction of the pond and at the planting stage. On the this stage think over what will serve as an accent in the composition of your lake - it can be an original stone, tree or sculpture.

Before starting the laying of a pond in your summer cottage, draw a plan of the reservoir indicating the depths and the placement of the main elements of the arrangement
2. Using a regular water hose or spreading sand along the perimeter of the reservoir in the form of a line, outline the intended contour of the pond. Be sure to check that the shores of your future lake are at the same level.

Having marked the outlines of the pond with a hose, dig a pit according to the drawn plan.
Periodically measure the level of the banks of the pond during the formation of the pit. If you do not have a water level of the required length, you can adapt an ordinary long board and set a small 50 cm level on it.
3. We start earthworks - we dig a pit to the depth of the coastal tier and mark the line from which the pond deepens to the next mark. Having received the second tier, we lay a line for digging the deepest part of the pond and take out the last portion of the earth.
The process of digging a pond is quite difficult, so it is better to resort to the services of earthmoving professionals, accompanied by a mini excavator. However, if you still decide to do this time-consuming part yourself, be prepared for the fact that water can accumulate at the bottom of the pit and you will have to mess around in dirty slurry. A pump specially adapted for pumping water with impurities and solids will help you remove water from the bottom of the pit. Nearby, you can dig an auxiliary hole and dump water into it.
4. After the pit is completely dug, we measure its dimensions with a cord, taking into account the depth, adding allowances of the order of 50 cm on the sides of the bowl - this is necessary to purchase a film of the desired size.
The problem that you will inevitably encounter in the process of earthworks is where to put the earth taken out of the pit under the pond? A good solution to this problem is to raise the level of the site, evenly distributing the soil over the garden. You can also use the earth of the pit as an embankment for a stream or as a base for an alpine slide.
5. The bowl of the pond is lined with a durable moisture-resistant film. As a rule, in order to protect the main film from damage by stones and plant roots, an additional layer of geotextile is laid under it. Also suitable for this purpose old linoleum or roofing material, or you can simply fill the hole with sand and tamp it down.
When the pit is formed, lay a layer of geotextile, and then a film, tucking the edges of the panels into a specially dug trench along the perimeter of the reservoir
To make the film for the pond more elastic, it is better to choose a sunny day for its installation - then it will heat up a little and it will stretch better, easily bending around all the ledges of the pit.
6. To equip the edge of the pond, an auxiliary trench breaks out along its perimeter - to tuck and fix the film. Laying the edges of the film in the trench, sprinkle it with rubble - so it will be securely fixed.
7. Reinforce the edge of the pond with stone blocks or plastic pipes, nailed to pegs - this way you prevent the earth from shedding from the coastal zone into the pond bowl. Line the edge with natural stone and decorate with a beautiful single block or group of boulders.
8. Place the prepared plants in special plastic containers and place them on curtains, line the bottom of the pond with stones and rubble.
9. Now you can pour water into the pond. To make it more convenient to choose pumping equipment and volumes of hydrochemistry for the care of the pond in the future, do not be too lazy to take readings from the water meter before and after filling the reservoir.
10. So that the water in the pond does not stagnate, it is better to equip the pond with a stream - it will ensure a constant circulation of water. To do this, the source of the stream rises above the level of the pond, and water will be supplied to it from the pond bowl using a submersible pump. Be sure to think about how to decorate the mouth of the stream - use stones, planting, clay or glass containers.
Fill the pond with water, equip the stream, install and connect a pump with a filter, plant aquatic plants
11. Install at the bottom of the pond submersible pump, stretch the pipes to the source of the stream and connect them to the water filter. It is better to take a cleaning filter with a pressure filter (with a reverse cleaning system) - it is more efficient than a flow filter.
Material about the device of an artificial stream in the country will also be useful:
Your pond is ready, now you just need to diligently take care of it - clean it of pollution, sometimes use preventive agents to revitalize the water and prevent the spread of algae, and take the plants to the basement for the winter.
The main mistakes in the arrangement of ponds
Creating something with your own hands is not easy to avoid some mistakes, especially compositional ones, so in order to make your pond right, consider some of the standard mistakes inherent in our gardeners:
- Making the banks of the pond with pellets of the same diameter, which makes the pond look somewhat boring. It is better to combine large stones with smaller ones, but do not fill up the entire coastal zone of the reservoir with them.
- Ponds are dug very deep, have sheer walls and resemble a kind of stone bag. A little investigation showed that it is profitable for earthmoving companies to dig deep ponds, as they are paid for the number of cubes of excavated earth. Pay attention to the depth of your pond - do not make it too deep, especially if you do not intend to breed fish.
- Craving for container gardening, which interferes with the normal development of plants, and fear of filling the pond with earth for planting. On the one hand, container planting allows you to quickly change the plant design of the pond by rearranging and rearranging plants. Probably, gardeners are also afraid of the prospect of a dirty pond after backfilling the earth, but there is nothing to be afraid of - the soil for aquatic plants is a heavy mixture with a high clay content, which is not washed out by water, and will eventually harden by the root system of plants.
Having thought about creating a pond with your own hands, do not forget that it is not easy - practice first by forming a miniature pond at home.

If the dimensions of your site do not allow you to equip a pond in the country, create a miniature pond in the most ordinary cup
If possible, feel free to proceed with a large-scale project to lay a full-fledged pond in a summer cottage. We are sure you can do it!
We advise you to read
 Psychological characteristics of children in adolescence
 Transferring a child to another school - the procedure and necessary documents Whether to transfer a child to another school
, diagnosis, treatment Treatment of urogenital chlamydia") Chlamydia urogenital - description, causes, symptoms (signs), diagnosis, treatment Treatment of urogenital chlamydia
Chlamydia urogenital - description, causes, symptoms (signs), diagnosis, treatment Treatment of urogenital chlamydia The benefits and significance of hydroamino acid threonine for the human body L threonine what

