In the process of creating a pond in your own country house, many questions arise, general recommendations not enough. Let's consider these questions.
How to make a natural pond?
First, let's define what is meant by this phrase:

How to choose a place and what to provide:
- distance from trees, tall shrubs. Water should not clog leaves, branches;
- good lighting, direct rays of the sun throughout the daylight hours are unacceptable;
- correctly positioned in the lowland so that rainwater does not spill over the territory, but flows into the pond;
- the site is chosen flat, with a slight slope.
What to consider so that the reservoir is “alive” and does not rot:

Making a pond
A properly made pond occupies at least a 10th part of the site. Deep - weakly warms up and simply dangerous, shallow - blooms. On the forums of gardeners recommend optimal size reservoir 2.5 - 3 m in diameter, 1.5 depth. The pit is dug by hand or with the help of machinery. Next is waterproofing.
Ecopond - involves natural waterproofing, called clay castle. Only this natural material contributes to the life of living ecological system. it good way make a pond without a film:

How to make a small pond?
There are a few simple ways arrangement of miniature reservoirs on the site. 

Since the shape is a wave-like configuration, transitions are taken into account during instillation. Special steps are made, one wider than the other. After installation, the voids are filled with earth.
The form is set slightly above ground level, a layer of sand of about 20-30 cm is poured under it, but first they make markings on the ground. Then you can start digging a pit. How to do this is clearly visible in the figures below.

How to make a big pond
- First mark the contours. For an irregular shape, a regular rope is suitable; for a rectangle, square - pegs are hammered, a twine is pulled between them.
- Digging a pit with an excavator. You can calculate its dimensions using the formula for calculating the volume of a truncated cone. This can easily be done on a site like fxyz.ru. It is only necessary to substitute the numbers in the desired line.
- Farther - align the walls of the dug bowl and make them flat. Provide terraces around the perimeter of the reservoir. They do not allow the earth to crumble, serve as convenient steps when laying waterproofing. In the future, they will be useful in the design of the pond.
Important! In the bowl of the pit, three zones are provided: deep, 1.8-2.0 meters, (below the freezing level of the earth). She is prepared so that she successfully winters. Medium - for plants. Small - in summer such places warm up well, fry, living creatures accumulate here, microflora multiplies.
If you are digging a swimming pond, you do not need to deepen the bottom, it is made even.
Next you need:
- remove stones, snags from the bottom;
- prepare waterproofing material.
The company "Landscape Constructions" recommends that you first fill the bottom with sand, lay it on top geotextile. 
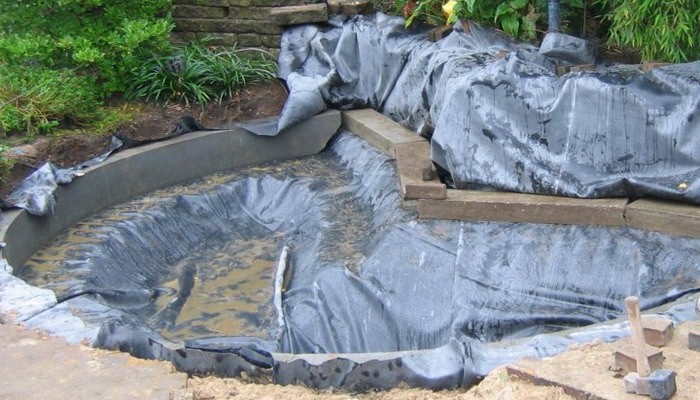
Among the existing options for waterproof coatings, usually choose butyl rubber film. The main argument is durability. She serves up to 20 years.
Laying out the film
How else can you waterproof a pond?

Note! In specialized stores, you can buy a ready-made plastic mold for a reservoir of 1000 liters or more.
How to build a dam?
A pit is not required for a pond, it is enough to make a dam using a stream or a catchment area where water flows. Running water fills the reservoir constantly. Block it in the narrowest place. First, a ditch is dug, the bottom is laid out with greasy clay, and it is rammed. Then they build a wall of clay, deepen into the bottom and edges of the ravine. The crest of the dam is raised a meter above the future water level, the rapids are made steep. 
Dams are built from natural materials: stone, gravel, logs, sometimes they are concreted. The base is supposed to be wide so that the structure can withstand water pressure.
When building such structures, remember about floods, consider water drainage in extreme situations.
The embankment is covered with a width of half a meter to 4, with a height of at least 0.5 m. The dam is filled only after the dam has settled.
Concrete dam. It is reinforced with rods, a corner, a steel mesh. For concreting, waterproof cement is used, liquid glass, PVA glue are added. 
If there is a ravine
The ravine next to the site, along the bottom of which a stream flows and overflows in high water, can be turned from a potential enemy into a friend and helper. The ravine is blocked from coast to coast by an embankment. In front of it, rain, spring, or river water gradually accumulates, a water surface is formed.
Here is a similar positive experience step by step:
- Dig a bypass, temporarily direct a stream into it so as not to interfere with work.
- Make shields from boards, cover them with a film, on top - with roofing material.
- Make gaps in the ravine, insert shields into them, lay out a dam from stones.
- The bottom of the proposed pond cover with clay, compact, lay a layer of sand on top, level. At the end of the pond lay out with a film, the walls - with a stone.
- In order to keep the water at a certain level, set overflow pipe. Excess water goes further along the diversion channel, into the ravine. To avoid silting, a sump is dug just above the course of a natural stream.
Such a water oasis practically does not require costs, it will avert the threat of flooding, decorate the place of rest. 
How to make sure that the pond does not freeze in winter?
In autumn, especially tender and valuable plants are removed from the pond, and ornamental fish are moved to the aquarium. Pond at low temperatures freezes, it is impossible to counteract nature, but it is possible to facilitate the wintering of fish in a reservoir, to ensure the flow of oxygen. 
- Reeds, cattail placed vertically. Oxygen through the hollow stems penetrates into the water.
- Styrofoam, bundles of straw on water will slow down freezing.
- Do products, pouring boiling water over ice.
- In severe frosts cover insulation (straw, burlap, roofing material). Such flooring cannot be kept for a long time, natural light is needed. A wooden or foam box is placed above the hole, an incandescent lamp is hung, the hole does not freeze.
Used here floating aerator, however, its action is effective only at low sub-zero temperatures. 

Pond from a quarry
Such reservoirs are called quarry ponds or gravel pits. Usually these are old neglected quarries in which peat or stone was mined. The water in them stagnates, fish is found, mainly, a trifle. Used for breeding fish when it is possible to provide a constant flow of water. Specialized farms on quarry ponds produce up to 2 centners of fish per hectare. Such reservoirs are of interest to entrepreneurs. 
If there is a well
The easiest way is to feed the reservoir from the well. Here is such a scheme, with the help of which a good idea was realized, the owner of such a pond shared at the dacha forum. Water performs a cycle, its consumption is small.
- Water from the pond flows to the filter. In this case, it performs the function of a skimmer.
- The water cleared of debris falls into the waterfall that oxygenates the water. The pump in the well turns on only when there is a need to raise the water level.
- The relay works, turns on the pump in the well, water enters the pond, fills it up to the required level. Next comes the filter's turn. All mechanisms enter in turn. Such a scheme automatically maintains the water level necessary for the operation of the filter and waterfall.
How to make a flowing pond

The bridge as a decoration of the reservoir
Straight, curved, hanging over the water surface - the bridge can be anything. Wood, concrete, stone, metal and their combinations are suitable for structures. Even the smallest bridge will enliven the site, become a continuation of the path, add an unusual line to the landscape. 
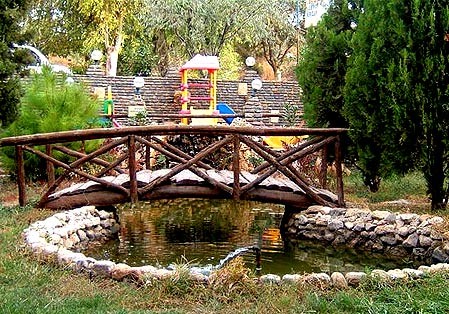
A simple bridge is easy to make:

pond filter
Alexander Pizanets tells how to make a filter for a pond in the video below.
For waterproofing artificial reservoirs, butyl rubber membrane (EPDM) is most often used. This is no coincidence: thanks to the ability to stretch, it takes the form of a bed without tension and voids. However, a pond with rubber banks looks ugly. What is the best way to shape its edge?
Water will hide everything
This can only be said about the deep-water zone of the reservoir. A few weeks after filling the pond with water, the membrane is covered with a coating, and at a depth its artificial appearance is no longer so noticeable. But the shallow water area and especially the visible part of the coast need to be decorated, otherwise the pond will have an unfinished look. To do this, it is important to correctly execute the upper edge of the bowl.
Usually it ends with a low roller, the crest of which is aligned strictly in a horizontal plane. It compensates for uneven earth's surface and makes the edge of the bowl parallel to the water level. A membrane is thrown over the roller and fastened behind it. A roller of sand or soil usually crumbles over time, releasing some of the water from the pond, so it must be removed from a more stable material. Most often, a "belt" made of concrete is used, sometimes made of plastic and even metal.
Strengthening the shore of the pond , you can start decorating the butyl rubber film. material for beautiful design the shores are pebbles, sand, stones, boardwalk. A wonderful element of decor can be lawn grass, shrubs, large-leaved perennials, or creeping plants, such as loosestrife (photo 1). If the reservoir is located in a lowland and there will be a lawn or other plantings at its edge, drainage is needed around the entire perimeter of the pond. For a beautiful lawn, the soil must be fertile.
With abundant watering or heavy rains, it nutrients will fall into the pond and become available not only to terrestrial plants, but also to unicellular algae, which is why the water in the pond will acquire a greenish tint. Drainage will prevent this. A drainage channel in the form of a pipe covered with rubble must be laid along the side of the reservoir and brought into the drainage drain. You can decorate it with a small layer of loose soil, pebbles or rubble (photo 2).
Large body of water in natural style
When decorating shallow water and the coast, it is best to use stones and pebbles. Moreover, the more different fractions, the more natural and interesting both the pond itself and the coastal zone look (photo 3).
On gentle banks, you can lay non-woven material over the film, lay stones on top and then fill the voids with pebbles. In addition to ease of installation, the advantage of such decoration is environmental friendliness.
Pebbles are a habitat for bacteria that cleanse the pond. The inconvenience of this method usually manifests itself after a few years when flushing the reservoir. It will take a lot of effort to clean it clean. You can also lay stones and pebbles on a concrete base - then they lie more stable. At the same time, decorativeness is not lost, and washing such a reservoir is much easier. There is only one drawback - cement is in contact with water and makes it more alkaline. It has been noticed that many filamentous algae, popularly called mud, prefer lime water.
Vegetable soil can also be used to decorate EPDM membranes in very large and deep water bodies. It has a lot of organic matter, which will quickly overgrow a small pond with aquatic plants or filamentous algae and make it look like a puddle. And in large reservoirs, the backfilled shore will eventually become overgrown with grass and will look like a natural one.
Pond with sheer walls
In this case, the decoration with stone and pebbles will require more skilled work. The stones are laid with the end part to the wall of the reservoir on the solution (cement, sand and tile adhesive external 2:4:1). This method is good for building deep reservoirs with a relatively small mirror area (photo 4).
Rounded stones or large pebbles can decorate the walls of swimming ponds.
In small reservoirs with vertical walls, laying natural stone "steals" the volume. Here you can use, for example, pvc film with small pebbles glued to it. True, it is not much more beautiful than the membrane: the glue is very clearly visible, and in those places where the pebbles have peeled off, it can no longer be attached back. In specialized shops for the construction of ponds, you can buy coconut canvas. Although it looks like a rare fabric, it copes well with decorative functions (photo 5).
It is better to fasten it immediately during construction or leave more mortgages in the side, since when wet, the canvas can sag and the edge of the film will be visible. Its color may seem too bright, but over time it will acquire a neutral hue.
Pond at the recreation site
It is quite easy to solve the edge problem if the reservoir is surrounded by a recreation area (photo 6).
Even if the site adjoins the pond on only one side, you can frame it with the same material. If the site is paved with natural stone, then its thickness should be 3 cm or more. The paving should be laid with an overlap of 5-7 cm above the water - then, when the reservoir is filled, the edge of the film will practically not be visible. During the construction of such a pond, it is necessary to provide for the overflow of excess rain or flood water into a drainage ditch. Otherwise, the area around the pond, laid on a concrete base, may be flooded when the reservoir overflows.
Another classic and very beautiful option for decorating the shore of a reservoir is a wooden flooring made of larch or pine impregnated with oil (photo 7).
If a wooden crafts do not come into contact with water, then this is a fairly durable design. You can use boards made of composite material, outwardly almost indistinguishable from wood, but even more durable.
Creating an artificial reservoir is absolutely not a difficult process, subject to certain rules. The most crucial stage is the choice of the principle of waterproofing. Given the current variety of options, choosing a particular method is sometimes quite difficult to make. Therefore, before giving preference to the option that suits you, carefully read the information below about the advantages, disadvantages and technology of the most popular modern solutions in order to ensure long-term operation of the reservoir and its stable attractiveness.
In some cases, it is perfectly acceptable to create a reservoir without creating a reliable waterproofing, but in this case, either its life will be short, or it will be necessary to use heavy equipment to compact the soil at the bottom. 
The use of one of the technologies for arranging such a layer still brings some advantages that are quite significant:

There are 3 main ways to design an artificial reservoir:
Important! Select the appropriate technology considering the following criteria:
What materials to use for pond waterproofing?
If you have chosen the first method and decide to make pond waterproofing one of the appropriate types of materials available, carefully consider the use of each. Most requested types:

Installation of the finished rigid form

Such products are presented on the market with a fairly wide range of the following materials:
- plastic;
- fiberglass.
We can safely note this method as the simplest and least labor-intensive than all other options. Plastic molds are especially popular today, and within the private landscape design, and in the design of commercial or public areas. 
Advantages
Flaws

Installation technology

All work on arranging the waterproofing of the pond in this way will not take much time, it is quite possible, with the appropriate equipment, to complete the project within 1 day.
Sequencing:

Video
View an example of how you can quickly create a pond in your own area using a ready-made form.
Arrangement of a pond with a film

Another modern solution that provides ample opportunities not only for the original design of the reservoir, but also for changing its shape during operation. There are several varieties of this material, the most popular of which are:

Laying technology
The principle of waterproofing a pond with a film also does not cause any difficulties in the performance of work, but it is still necessary to follow a certain sequence and follow the recommendations. 
Algorithm for laying a waterproofing film:
- Dig a pit in accordance with the parameters specified in the project.
- Dig a small trench along the coastline around the perimeter in order to conveniently and securely fix the film in the future.
- Clear the surface inside the pit of stones and ingrown plant roots.
- Thoroughly compact the soil in the pit.
- Form a sand cushion from the wet material.
- Lay geotextile over top to create additional protection waterproofing film.

- To lay the canvas on the bottom of the pond as quickly as possible, do the work in one of the suggested ways:

- At each tier, secure the film with stones to prevent it from shifting.

- Avoid strong tension on the canvas - it is better if there is a small sagging gap on each tier.

- Level the waterproofing film.
- Fix on the surface with stones, leaving a material gap of up to 50 cm.

- Pour water into the pond.

Important! Let the water run at a low pressure. If, as it fills, the film stretches in some places, loosen it to prevent tearing.
- Leave for a day or two so that the canvas is completely straightened and takes the desired shape.
- Finally fix the waterproofing film in the trench to the surface using small cross-section beams or plastic pipes, tucking the excess canvas under them.
Important! If you want to hide the waterproofing film, drain the water, fill the bottom with sand and pour water again with a small pressure.
- Decorate with selected plants and stones.

Video
Watch a video with an example of waterproofing an artificial lake with PVC film.
Pond waterproofing with clay

Despite the laboriousness and time costs associated with the design of the waterproofing of the pond with clay, this method still does not lose its relevance. It is preferred mainly by those owners of their own plots who strive to perform all construction work exclusively from natural materials, but at the same time ensure the strength and reliability of the designed structures. 
Waterproofing technology:

Waterproofing the reservoir with liquid rubber

This method is relatively new, but is becoming increasingly popular among consumers. 
The use of liquid rubber, which is based on bitumen and polymer particles, provides many advantages:

In order for you to appreciate the ease of doing work using this material, we give an example of a standard sequence for waterproofing with liquid rubber:

Video
Watch the video, which clearly shows the process of creating liquid rubber waterproofing, in order to independently evaluate all the advantages of such a solution.
Concrete waterproofing

This option of waterproofing is one of the most expensive, time-consuming and time-consuming. In addition, the competent implementation of the project without certain building skills is unlikely to succeed. 
Advantages

Flaws

Device technology
The scope of work with this approach varies depending on the size of the project, its complexity and the intended installation site. 
The standard sequence consists of the following steps:

Mechanical waterproofing of a reservoir
For the implementation of waterproofing of an artificial reservoir according to this principle, no Supplies, but the use of an excavator or other similar equipment is mandatory. 

Important! The effectiveness of this method lies in the fact that under pressure on the soil, small particles enter the lower layers of the soil, filling the voids. Large parts remain on the surface.
Pond without waterproofing
Creating a reservoir without a waterproofing coating is quite acceptable, for example, in the case of a high location of groundwater or clay terrain. 
The procedure for registration of such a reservoir is extremely simple and consists of the following steps:

Conclusion
Regardless of which method you prefer, be sure to use high-quality materials and follow all the rules of waterproofing technology. In this case, you do not have to regularly carry out restoration work and spend a lot of effort and time on caring for the water surface of the reservoir.
But, seeing how the neighbors squeezed out a bowl of high-strength cement several tons in a couple of winters, I was convinced that a rigid structure was not good. In general, everything was thought out and set to work.
I made the contour of the future reservoir oval - 8 m long, 3.5 m wide.
Together with my son they dug for a week, the walls were made inclined, about 120 °. The summer was dry, digging was easy: dry clay did not stick to the shovel. On occasion, I bought a black adhesive film for gas pipelines, the thing is very good, the only negative is that it is afraid of ultraviolet radiation, but it still served for almost 20 years.
The reservoir turned out to be 1.5 m deep, three steps were made to exit, at the lowest point they buried a 160-liter plastic barrel for the pump when replacing water. Then the entire reservoir was laid with two layers of polyethylene and glued with a black self-adhesive film - at that time it turned out super.
True, the reservoir was quickly chosen by mosquito larvae, we had to launch crucian fry, which took root perfectly.
In winter, I don’t drain the water, and the fish calmly hibernate in a barrel (the depth is 2.5 m).
However, time passes, the film has cracked over the years, the appearance has become untidy. I decided to overlay the reservoir with stone, since I brought a whole bunch of it from the city, mainly from garbage dumps.
Again, together with my son, they stripped off the entire old film, glued it with a new one, especially since now everything can be bought. The bottom of the reservoir (up to 80 cm) was overlaid with a square diabase with a solid bowl on concrete with reinforcement.
Above, I began to make blocks of 12 stones with thermal expansion joints so that they would not break in winter.
And on top, the parapet and the frame of the flowerpot were made entirely of concrete and wild stone, and there was enough stone for the hill-waterfall.
In general, while my structure stood for two winters, no cracks are visible. Carp are also doing well. Last year there were so many fry that they shared with neighbors, they just have a wild pond.
To be honest, a lot of work, everything about everything took 20 bags of cement and a decent amount of stone, but it turned out so beautiful! And water gurgles from a jug, and crucians play in the water! If anyone has questions, please call.
 40mm Pond Hydroponics Pump Stone Air Bubble Disc Aerator ...
90.02 rub.
Free shipping★★ ★★ ★★ ★★ ★★ (4.60) | Orders (9)
 100m Fluorocarbon Fishing Line Strong Nylon Multifilament Fishing Line Pond Stream ...
82.36 rub.
Free shippingIf we do not forget that the construction industry has existed as long as humanity, then the oldest of the sciences should be considered the discipline of how to protect the underground part of the structure from the effects of what in ancient times was called "mother earth". Indeed, at all times it was “cheese”, and the builders understood this, having reached perfection in the ways of eliminating the problem. Proof of this are ancient cities such as Venice. At the same time, no traces of the use of bitumen and tars were noted - waterproofing materials from oil in construction began to be introduced only from the 19th century.
What is the secret of building witchcraft? To say that the architects used clay would be an understatement. Italian pasta is also made from flour, but not all flour products are pasta, especially since not all pasta is pasta. The same is true with clay. The legend about the ancient technology of the “clay castle” has come down to us, which for all ages has closed the topic of the preservation of foundations in a flooded environment. True, today's information about the clay castle gives only a general idea of \u200b\u200bhow to provide waterproofing of the underground parts of the structure being built using clay. The art itself seems to have been lost, because modern theorists unanimously note the insufficiency of a clay castle for a capital solution to the problem of waterproofing. How then, let me ask you, should we relate to the cellars of St. Petersburg, which have been dry since the 18th century, although they were built in moist soils at a level below the occurrence of groundwater? By the way, the technology of a clay castle was used there, which, as you can see, still looks like an example of a successful solution to the problem ...
However, the secrets of the clay castle as a trouble-free method of waterproofing can be revealed at the level of amateur construction. The inquisitive mind of a person who builds a structure with his own hands is able to grasp the principle that guided the ancient builders. It turns out that clay radically changes its properties when it is crushed by mixing with water. The resulting dough can form a waterproof screen if it is filled with a trench around the perimeter of the basement of the building. Depth and width are determined by the level of soil watering and the depth of underground flows. This is the clay castle. It is characteristic that this technology in ancient times was used not only as a method of waterproofing, but also as a binding material. In rich mansions and temples, the clay castle was often superimposed on the brick pavement of the floors, and a decorative stone or stone was placed on top. ceramic tiles. This moment reveals possible cause legendary impenetrability of "ancient clay": it had adhesive properties! Not accidentally clay they thrashed with chains, pouring bull's blood, slurry and the devil knows what else ... They tried to make it stick?
Today, the markets offer an endless assortment of rolled and coating waterproofing products, but if you have not only intuition, but also hands, patience, and most importantly, a shortage Money, you will use only clay.
A complete list of objects, the construction of which should use the clay castle technology:
- artificial reservoir (pond, etc.)
- well;
- cellar;
- the foundation of any structure located in wet ground.

More about clay castles
For a clay castle, crumpled (moistened) greasy clay is used, in extreme cases - loam, with a sand content of less than 15%. Skinny clay does not provide adequate protection against water penetration.
Oily clay is plastic, it slowly gets wet and dries for a long time. Its color has absolutely no meaning, so you should not pay attention to it. Proper preparation of the material for use will help to make reliable waterproofing. To do this, the clay is soaked, covered and left to mature for an indefinite time, making sure that it does not dry out.
Experts recommend harvesting material in the fall and leaving it outdoors until spring. During this period, a cycle of gradual freezing and thawing of clay takes place, which will contribute to the uniform penetration of moisture through the interlayer spaces into all particles. The result is a homogeneous, plastic material suitable for use in a clay castle. To further improve the quality, lime is added to the composition of the waterproofing mixture, but not more than a fifth of the total volume.

Clay should not be either waterlogged or overdried. You can check the required humidity by simply folk way. It is necessary to collect a handful of "real" rock, and then try to squeeze it in a fist. If the formed lump does not crumble and does not slip through the fingers, then the material is considered ready for use.
Clay does not deteriorate over time and practically does not require material costs for the purchase, as it is found almost everywhere in the world. common use. A correctly made clay castle:
- does not need repair - cracks do not spontaneously appear in it;
- does not blur groundwater, but needs protection from storm drains;
- prevents the penetration of water, but allows moisture to pass to the walls of the foundation, and therefore it is recommended to additionally make surface waterproofing.
When constructing a clay castle, attention should be paid to the type of soils located in the construction zone of the building. If there is a sandy or sandy loam layer around the foundation, the expansion of clay during freezing will not play a big role. But for clay and loamy soil, an increase in the volume of the castle as a result of frost heaving can lead to unforeseen situations. In this case, it is important that the vertical surfaces of the foundation are even - without protrusions, recesses and extensions in the upper part of the structure. Otherwise, the buoyancy forces created by nature itself can lift the structure, squeezing the foundation up.
How to make a clay castle

The width of crushed clay waterproofing depends on the depth of the foundation, and for the upper and lower parts, the size may be different. With a standard deepening of the underground structure up to two meters, the width of the lock at the bottom mark should be at least 40 cm, and at the top - at least 25 cm. Clay should be laid in pre-installed formwork in uniform layers of 5-10 cm with mandatory tamping of each layer. If the sinuses of the pit correspond to the size of the waterproofing lock, then the formwork can be abandoned.
With a large amount of work, which takes more than one day, the laid and compacted clay should be covered with a film to prevent drying of the open surface, cracking in the body of the lock or rainwater.
The film will also be required upon completion of the laying of clay waterproofing to the required mark. In the covered state, the castle should be left for at least two weeks, after which it will be possible to proceed with the blind area around the house.


