* Since 1996, the design of the voltage regulator and the output location "61" have been changed.
Technical characteristics of the generator 37.3701 (G-222):
|
The maximum output current (at a voltage of 13V and rotor speed 5000 min -1), A |
|
|
Operating voltage, V |
|
|
Gear ratio engine-generator |
|
|
Direction of rotation (drive end) |
The stator and generator covers are tightened with four bolts. The rotor shaft rotates in two sealed ball bearings. Bearings are lubricated for the entire life of the generator. The inner ring of the rear bearing is pressed onto the rotor shaft, and the outer ring is pressed into the rear cover. The second rotor bearing is pressed into the front cover and clamped on both sides with plates with four bolts.
 rice. 3
 |
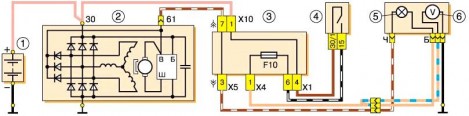
Alternator wiring diagram 37.3701:1 - battery; 2 - generator; 3 - mounting block; 4 - ignition switch; 5 - battery charge indicator lamp located in the instrument cluster; 6 - voltmeter.
Stator winding- three-phase, connected according to the "star" scheme. The battery charge indicator relay is connected to the neutral wire terminal (generator G-222). For generator 37.3701, the charge indicator lamp is connected to the output of the excitation winding supply diodes. If, after starting the engine, the indicator lamp is on, a malfunction has occurred in the generator circuit.
Rectifier- bridge circuit, consists of six power limiting diodes. They are pressed into two horseshoe-shaped aluminum radiator plates. On one of the plates there are three additional diodes through which the excitation winding of the generator is fed after the engine is started. The plates are combined into a rectifier unit mounted on the rear cover of the generator.
Excitation winding generator is located on the rotor. The winding leads are soldered to two copper slip rings on the rotor shaft. Power is supplied to them through two copper-graphite brushes. Since 1996, the brush holder has been structurally combined with an electronic integrated voltage regulator and fixed on the rear cover of the generator.
Voltage regulator- non-separable, it is not subject to repair.
To protect the on-board network from power surges during the operation of the ignition system and reduce radio interference, a 2.2 microfarad capacitor is connected between the “plus” terminal and the “ground” of the generator, mounted on the back cover.
The "minus" of the battery should always be connected to the car body, and the "plus" to the terminal "30" of the generator.
Do not disconnect the battery while the generator is running. This can lead to damage to the electronic components of the on-board network.
Generator maintenance consists in monitoring the tension of its drive belt.
Long-term operation of the car inevitably leads to wear and tear of various components. The VAZ-2107 generator is no exception. Periodic check and proper care prolong the life of the unit.
The generator is an important part of the electrical system. This is the main source of voltage. vehicle. Generator converts mechanical energy motor to electrical potential.
The voltage stability of the on-board network guarantees trouble-free operation of all consumers. The normal voltage level depends on the following elements:
- Generator.
- Battery.
- Relay-voltage regulator.
The electrical circuit is one. Wiring failure or short circuit may lead to failure of the entire system. The alternator does not work - the battery charging current disappears. The battery is dead - you won't start the car.
The test for serviceability can be carried out independently and at home. Usually, such a procedure does not involve the dismantling of devices on a Zhiguli-2105, 2107 car. You must have a tester that measures voltage, winding resistance, and diode health.
There are mechanical and electrical components of the unit. It doesn't matter if there is a carburetor or an injection system, the generator is checked in two directions. The following mechanical parts are subject to evaluation:
- body elements;
- V-belt;
- pulley;
- bearing units;
- brush block;
- fixing bolts.
External examination
External examination reveals obvious damage. If necessary, spare parts are cleaned of dirt, oils and moisture. Hard particles of sand contribute to the development of bearings and brushes. It is important to know that the ingress of water into the housing can damage the varnish coating of the windings. Insulation breakdown threatens with an interturn short circuit of the stator coils. Also, a layer of dirt can short lead 30 to ground. A short circuit will destroy the semiconductor rectifiers.
A car generator is a device that provides the on-board network with a constant electric current of up to 80 amperes. By their own design features, the unit has much in common with an electric motor. Inside the case there are two windings, as well as covers on the sides, equipped with bearings.
Technology does not stand still. Over the years, the generator circuit has been improved, its design has been optimized, and output characteristics have improved. Modern models are capable of delivering up to 80 amperes or more, which indicates an increase in the power of the device.
The generator device "seven"
The current source in the "seven", with an injection engine, is a three-phase mechanism that has electromagnetic excitation. Rated current generator reaches 80-90 Amperes and depends on the design features.
The generator consists of the following elements:
- Stator.
- Rectifier (built into the housing).
- Rotor.
- Two aluminum lids.
- Pair of bearings.
- Three-level voltage regulator.
The generator is mounted on the right side of the motor and is fixed with a pair of bolts to the engine bracket. The AC source is driven by a belt from the crankshaft pulley. The generator connection diagram may vary due to differences in the arrangement of parts.
The principle of operation of the device
Units G222, as well as 37.3701 have the same principle of operation. The task of the generator is to convert mechanical energy into electricity. The generated voltage is used to power electrical appliances vehicle and battery charging. At the output of the generator alternating current passes through the rectifier elements and is converted to D.C., 80 Amp. The rectifier block consists of six diodes.
The task of the regulator is to maintain the voltage at the required level. As soon as the person behind the wheel turns on the ignition, voltage is applied to the control lamp, and then to the 3-level regulator and to the excitation winding. The above process is clearly shown in the diagram.
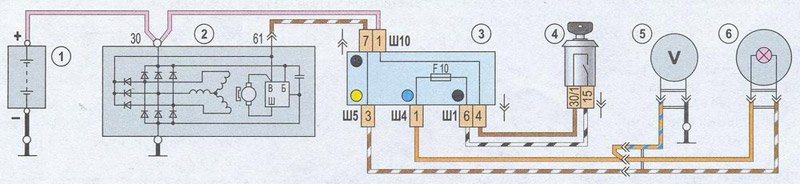
Each part of the generator is marked with its own numbers, which makes it easier to identify the various elements:
- Battery (battery).
- Generator set.
- Chain mounting block.
- Egnition lock.
- Circuit voltage meter (voltmeter).
- A light bulb that indicates the charge / discharge of the battery.
Power is supplied to the on-board network from three rectifiers, which are installed in the diode block. If the car owner turns on the ignition, and the control light continues to burn, then this is a sign of a weak battery charge. In such a situation, it is necessary to check the voltage in the network, and then make a decision. Based on specifications current source, at a voltage of 13 A, the current limit should be 55/80 A.
If the measurements showed the required voltage, there may be several reasons for the malfunction:
- Battery failure.
- Short circuit in the circuit.
- Breakdown of the 3-level voltage regulator.
- Malfunction of the VAZ-2107 generator with an injector.
In the considered cases, it is necessary to check:
- The tension level of the V-ribbed belt that connects the crankshaft and alternator pulleys.
- Battery charge and expiration date.
- Serviceability of bearings.
- Status of the 3-level regulator.
It is worth noting that the 37.3701 generator installed on the "seven" with a carburetor engine, as well as the G222 on the VAZ-2107 with an injector, do not differ in design and layout, so the principles for caring for them will be identical for all models. The main thing is to monitor the condition of the device, preventing dirt and moisture from getting into it.
How to connect the generator yourself
Replacing the generator on the "seven", equipped with a carburetor or injection engine, can be done for the following reasons:
- Winding burnout.
- Hull deformation.
- Interturn closure.
- Failure of the 3-level generator and other problems.
The replacement procedure consists of several stages - dismantling, installation and connection of the generator. Action algorithm:
- Disconnect the "negative" terminal from the battery.
- Disconnect the connector from the generator.
- Remove the protective cover. To do this, using the key to "ten", discard the terminal, after which the wire itself.
- Loosen the fasteners of the generator set, and then remove the V-ribbed pulley belt.
- Take the key to "seventeen", unscrew the nuts and remove the adjusting bar.
- Unscrew the nut from below and dismantle the bushing with the bolt.
- Remove the generator.
Replacing the generator with a new or repaired device is carried out according to the reverse algorithm. Before installation, carefully study the diagram and understand the nuances of connecting the generator on VAZ-2107 machines, with a carburetor or injector. Pay special attention to the wiring diagram and distinctive features two units (G222 and 37.3701).
Video: How to remove a VAZ generator (classic)
If the video is not showing, refresh the page or
Once installation is complete, adjust belt tension. To do this, do the following:
- Using a wrench, loosen the pair of mounting bolts holding the unit.
- Use a pry bar to tighten the strap.
- Fix it, in the desired position, with a special nut (located on the adjustment plate).
At the end of the work, make sure the tension is correct. To do this, press the belt at the midpoint, between the alternator and crankshaft pulleys. Ideally, the deflection should be 1.0-1.7 cm. Adjust the tension until it reaches the required parameter. After, tighten all nuts, with the necessary moment. This completes the alternator replacement.
Please note that modern cars have a large number of electrical appliances, so the power of the generator must be sufficient to provide all consumers with the necessary amount of energy. In addition, you should carefully monitor the condition of the device, repair or replace it, if necessary.
Proper operation of the generator 2106 2107 ensures the proper functioning of all vehicle devices. According to the attached operating instructions, the technical condition of the VAZ 2106 generator is checked at least once every 4 months. Inattention to this requirement leads to wear of the device. As a result, the question of which generator is better to put on the VAZ 2106 becomes relevant.
When the car is involved in an accident or major repairs, it is imperative to make sure that the device is in good working order. Otherwise, the voltage drop will cause serious damage to all consumers of electricity in the car. In most cases, you can troubleshoot the VAZ generator in the garage.
Possible causes of malfunctions
There are several common reasons that require the driver to look under the hood of the "iron horse":
- partial or complete combustion of the winding VAZ 2107;
- cases of interturn short circuit;
- physical wear of parts;
- external physical impact;
- mechanical damage.
Inexperienced drivers of the VAZ 2108 or earlier modifications need to remember one nuance. When choosing lighting fixtures, you need to consider their power. For example, deciding to install fog lights, the power of which is 40-50 W each, you should look into technical description VAZ 2106 or 07. Their installation is only allowed if the vehicle's generator produces more than 55 A of current.

Failure to comply with this rule leads to sad consequences. The increased load of the VAZ generator leads to its rapid wear. The power of the unit is gradually reduced, which is mistakenly perceived as a minor breakdown. That is why the total power of all voltage consumers should not exceed the maximum current level VAZ 2107, 08 or 06.
Another problem stems from the problem described above - incorrect charging. A car brand 2107 is designed in such a way that the generator is charged while driving. All consumers of electricity are selected taking into account the power of the device. In the case of replacing individual elements without taking into account their power, the VAZ generator receives less energy than necessary.
Forced "starvation" leads to accelerated wear and failure. Gadgets that significantly exceed the maximum level of current generated by the VAZ 2108 are of great danger. In this case, the "iron horse" runs the risk of stopping en route. On the spot and even within the walls of the service station, it will not be possible to revive the VAZ generator.
VAZ 2107/2105 cars have two types of generators: early models of cars are equipped with a G-222 generator, and later models are equipped with a 37.3701 generator. According to their characteristics, they are almost the same, therefore they have interchangeable parts.
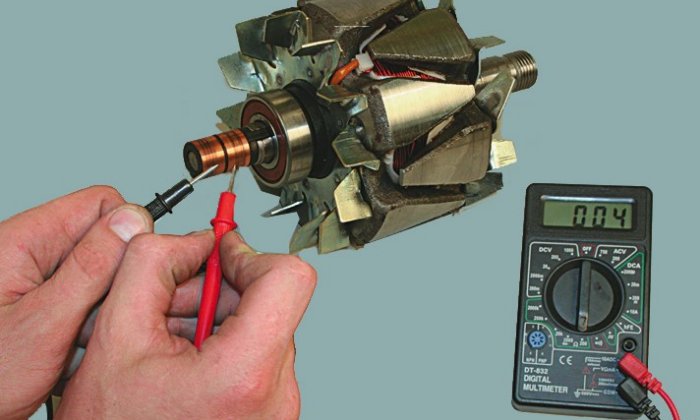
The mechanics of the generator is such that to generate electric current, the generator rotor rotates from a belt driven by an engine crankshaft pulley. The current of the rotor winding, flowing through the copper-graphite brushes, feeds the entire electrical system of the car. Since the brushes in the brush holder are constantly in contact with the rotor shaft, they wear out gradually and need to be replaced.
For trouble-free and safe operation of the car, it is recommended to replace the brushes every 50,000 km.
Signs of failure of brushes generator VAZ 2107 / VAZ 2105
In case of emergency, an indication of breakdowns is provided in the vehicle's electrical system. When the alternator is faulty, the battery light icon comes on. But you need to take into account that the cause of the breakdown can be a banal failure fuse in circuit, therefore, after checking the fuse, it is necessary to continue troubleshooting by checking the brushes, rectifier, voltage regulator.
To check the performance of both positive and negative diodes, it is necessary to measure the resistance with an ohmmeter in the area between “terminal 30” and “ground”. To do this, we connect the “positive” probe to “terminal 30”, and the “negative” probe to the body. If the device shows a short circuit, then one of the diodes is broken and needs to be replaced.
To test the voltage regulator, you must connect a voltmeter to the brushes. We connect the “plus” from the 12V battery to the output of the regulator, and connect the “minus” to the output “ground”. If there is no voltage, then the regulator is defective and needs to be replaced.
Sometimes a malfunction or an imminent failure of the brushes is indicated by power failure in the car: the light of lighting devices and headlights disappears or fades, the cigarette lighter or radio stops working, the stove stops heating, or the battery discharges too quickly.
An inspection hole is required to carry out quick and safe replacement of brushes.
If you are sure that it is mandatory to replace the brushes, then you can change them yourself and without removing the generator. To do this, turn off the battery power, unscrew the two screws of the brush assembly holder and change the assembly. In another case, when it is impossible to unscrew the bolts or an extended diagnosis of the health of the generator parts is needed, it is necessary to remove the generator.
It is forbidden to test the generator “for a spark”, even a second connection of the “30” clamp to the housing is unacceptable. In this case, through the valves goes high current, which contributes to their rapid failure. Verification must be carried out only with measuring instruments.
It is forbidden to start the car generator with a disconnected battery. This will lead to a short-term increase in voltage at terminal "30", as a result of which the parts of the rectifier and the vehicle's power supply device will become unusable.
After dismantling the brush assembly, it must be checked for sticking and sticking of the brushes, their protruding working part. It should also be noted that the working part should not be less than 12 mm.
To replace the brushes, you will need the following tools:
- ring wrenches for "8", "13";
- ratchet;
- a set of nozzles "for 13", "for 10", "for 17"; "at 19";
- screwdriver flat and Phillips;
- penetrating liquid WD 40;
- vise (if needed);
- new brushes for the VAZ 2107 generator.
The price of VAZ brushes is 34 rubles. Their analogue from UTM with the article HE0703A is 120 rubles.
The price is relevant for Moscow and the region for the summer of 2017.
We advise you to read
 Psychological characteristics of children in adolescence
 Transferring a child to another school - the procedure and necessary documents Whether to transfer a child to another school
, diagnosis, treatment Treatment of urogenital chlamydia") Chlamydia urogenital - description, causes, symptoms (signs), diagnosis, treatment Treatment of urogenital chlamydia
Chlamydia urogenital - description, causes, symptoms (signs), diagnosis, treatment Treatment of urogenital chlamydia The benefits and significance of hydroamino acid threonine for the human body L threonine what

