An electric jigsaw can cut through any material - stone, metal, wood. The electric saw makes straight, bevel and round cuts. How to learn to cut with a jigsaw smoothly?
Why does a jigsaw cut crooked
Initially, the jigsaw was intended for cutting patterns and circles. The straight saw function is not available on all models. The price of such a tool is much higher.
You can achieve a direct cut with a conventional jigsaw. To do this, use the ruler that should come with the kit. To control the process of sawing was easier, you need to lower the speed.
Novice craftsmen often face a problem: when cutting, the jigsaw leads to the side, and the cut is obtained at an angle. To cope with this, you need to study in detail the process of correct and even cutting.
There are several reasons for an uneven saw:
- the saw is blunt;
- too much pressure is used;
- in wood there is a slanting layer.
One of the causes of a crooked cut may be too thick material. As a rule, thin wood is easier and easier to saw. The jigsaw may have bad mechanics - in which case it needs to be changed. You can check the quality of the jigsaw by moving it from side to side. If it dangles, then it is a cheap tool for rough work. To get an acceptable result, you should saw with a margin, and make out the edges with a manual milling cutter.
Another effective method how to learn how to cut evenly with an electric jigsaw - draw on the workpiece not one line, but two parallel ones. So the cut will be smoother.
Direct cutting technique: the nuances you need to know
To achieve a smooth cut, use additional tools. Before starting the sawing, you need to fix the material well. The work surface must be stable. Experts do not recommend sawing wood along the grain. Achieving a straight cut will be difficult. Better to use a circular saw. If not, you can apply parallel stop. One edge is fixed on the product, the second leans against the tool. Thus, the cut is leveled.
If you want to make a circle, first drill a small hole in the middle. A jigsaw is attached to it, moving along the contours of the marked lines. When a rectangle is required, the saw is directed forward, rounding the corners and then shaping them.
It is forbidden to put pressure on the saw - it can overheat and break. Many novice users try to guide her movements so that she saws faster. it typical mistake masters. If you use the saw for too long, the tool will become blunt and start to catch on the wood.
To make the move easier, use engine oil. They lubricate the file. Stop occasionally to avoid overheating. After the saw, you need to clean the jigsaw and moisten it with oil.
Rules for an even saw with an electric jigsaw
- For a perfectly even saw, it is necessary to use a device with an increased frequency of movement of the blade. It is better to choose a large file. A board will serve as a guide. Pre-prepare 2 clamps with a workpiece and a guide. In order for the jigsaw to be freely located, it is placed on a dais. Measure the width of the material with a tape measure, draw notes, make one line out of them with a ruler.
- The guide is placed a few centimeters from the cut. It is attached with clamps. The jigsaw is attached with the cutting part to the cutting line. Connect it to the guide, attach it with a clamp. You have to make sure she doesn't move.
- The same manipulations are done on the other side. So that there are no defects left on the tree, you need to clamp it slightly.
- The next stage is the transition to the first clamp, checking its stability and clamping. After that, turn on the jigsaw, setting the highest speed. The number 2 is set on the pendulum. The file is set along the cut line. The guide is pressed against the side of the platform and sawing begins.
- By controlling the position of the platform, the tool is moved forward. When there is very little left to the end, the sawn off must be supported so that it does not break off. The cut pieces will be perfectly even.
- To make the saw glide smoothly and easily, some use an interchangeable blade. She comes from different materials. It is fixed on the base sole of the saw. The bar and adapter ensure a smooth cut.
- Some materials require additional cooling. When working with them, you need to keep a bowl of cool water near you. It can be installed on a support sole.
An electric jigsaw is a versatile tool that is indispensable in the household. Knowledgeable people say: dexterity in handling it comes with experience. The more you practice, the better the result will be.
As a quality building material, chipboard is more popular today than ever before.
How to saw off chipboard evenly and without chips at home?
It is used in various sectors of construction, because all the technologies for working with this material are very understandable and accessible. Everyone who has ever dealt with chipboard knows how to cut this material.
But the apparent simplicity of cutting this material requires knowledge of all the subtleties in order to avoid damage to the sheets. If the sawing technology is violated, irreparable difficulties may arise, so you need to know how to avoid them in the process.
The subtleties of sawing chipboard at home
The first problem that many people who deal with sawing face is the presence of a large amount of fine wood dust generated during work with chipboard. How can this be avoided?
In large industries, special technologies are used to solve this problem, but it is not always possible to apply them at home. For example, if you need to cut about 20-30 sheets of chipboard, then remove all the resulting construction garbage very difficult.
The best solution that many resort to today is sawing chipboard at the stage of acquiring sheets. But there are those who still prefer to cut with my own hands, i.e. independently.
But remember, in this case, you yourself will have to solve all the problems during the cut. To avoid them, listen to our advice!
For the implementation of high-quality and accurate cutting, we suggest using several recommendations from specialists.
For example, it is desirable to cut at home using the most common carpentry saw, with fine sharp teeth. When using such a tool, you can get an even, clear and high-quality cutting of a chipboard cut. To do this, the saw must work, leaning at an acute angle to the surface. chipboard sheet. During cutting, it should move smoothly, without sudden movements, with slight pressure on the plate itself, only in this case it is possible to obtain a high-quality cut and reduce the formation of creases to a minimum.
For implementation additional protection the following method must be used: apply adhesive tape to the cutting line, this method is ideal when cutting laminated chipboard.
During work, it is necessary to adhere to strict technology and be as accurate as possible with the material, as well as be consistent in your actions and not rush anywhere. If you do everything very quickly, then on the surface building material chipping may occur, which will worsen appearance finished sheet.
If everything is done correctly, then after the completion of the work a perfectly even edge is formed, there will be no need for additional processing of the sheets. If everything did not work out as accurately as possible, then in this case it is necessary to level the uneven edge with a planer, rasp or file.
Disadvantages of cutting chipboard at home
Also, one of the disadvantages of sawing is the exposure of the inner layer of chipboard, which can also be deformed in case of unprofessional work. To avoid this, use adhesive plastic tape. The adhesive coating, as well as the veneer, will protect the chipboard from deflections.
As you can see, the process of sawing chipboard is laborious, it requires certain skills and experience with this type of material. Therefore, if you are not sure that you can cut chipboard on your own, seek help from specialists who will do everything efficiently and quickly.
If you decide to do everything yourself, then we will be glad if the materials of the article help you with this, and you can cut the chipboard beautifully and accurately on your own.
Without any exaggeration, such a tool as a jigsaw is an indispensable tool in every home. With the help of such a tool, you can easily cut out a wide variety of shapes from a wide variety of materials.
How to saw chipboard without chips
It is the jigsaw that is one of the most convenient tools for cutting circles, ovals and other complex shapes.

Electric jigsaw device.
So how to cut with a jigsaw correctly and evenly? You must follow the instructions, and for this you will need:
- protective glasses;
- machine oil;
- gloves;
- jigsaw.
Work with a jigsaw
In order to cut smoothly with an electric jigsaw, you must proceed as follows:

Types of saws for electric jigsaw.
- Before starting work, you must maximum strength reinforce the material. It is strongly not recommended to cut along the fibers, since in this case it is very difficult to achieve evenness. In this regard, it is best to use a circular saw; in the absence of such a tool, you can use a parallel stop. Such a parallel stop should be attached to the jigsaw with one end, and the other end should rest against the edge of the workpiece. In this way, the most even cut is made.
- If it is necessary to make a cut inside the workpiece, then a hole is first made in the circle. Then, insert a jigsaw into the hole made and start moving in the direction of marking. After the desired hole has been cut, the corners of the workpiece are easily corrected on both sides.
- In order to cut with a jigsaw correctly, you should not use force when pressing the tool. Otherwise, the blade will heat up quickly, which may lead to breakage. Do not use one file for a long time, as it becomes dull rather quickly. And such a file makes scuffs at the edges of the material, which significantly impairs the quality of work. If we are talking about cutting materials of increased hardness, then the blade must be lubricated with a small amount of machine oil. Thus, it will be easier to work with a file, in addition, the life of the file will be significantly extended.
- When working with a jigsaw at low speeds, the jigsaw needs a break, since in such a process the engine often overheats. In this case, it is necessary to strictly observe safety precautions, the presence of goggles and gloves is simply necessary. After the work is completed, the tool must be cleaned and lubricated.
Process features

Scheme of a homemade electric jigsaw.
An electric jigsaw comes with a pendulum and a regular stroke. When the stroke is normal, the blade must be moved vertically, while the material is cut when moving up. The speed of work is quite high, the blade wears out much less.
As for working with a pendulum jigsaw, the principle of operation is the same, but keep in mind that it is best to work with soft wood and plastic, but it is better to refuse cutting steel sheets with such a tool.
If you need to cut a round hole, then an initial hole is drilled in the workpiece, then a file must be inserted there.
Then you should cut along the mark. If you want to make a hole in the form of a square or rectangle, then you need to cut in a straight line. Then the cut out area is removed and the remaining parts, which are in the shape of a triangle, are cut out.
If it is not possible to make an initial hole in the workpiece, it is advisable to make plunge sawing. Wherein electric jigsaw leans forward until the saw blade reaches the workpiece. Thus, the file makes a through-type hole in the workpiece. Using a jigsaw, you can cut bevels.

When working with a jigsaw, it is necessary that the table is stable, the material is securely fixed and the correct saw is selected.
Sawing with a jigsaw so that everything is smooth is not at all difficult. A guide is fixed on the tool, which is then wound up behind the edge of the workpiece.
If everything is done in this way, then the movements of the file are carried out smoothly and without much effort. In the event that the edge is curved, it is necessary to cut out according to the markup, which must be done before.
If you need to cut a sheet of wood that has a small thickness, chips may appear.
In order to prevent this phenomenon, the workpiece should be placed face down.
To carry out the work with such a tool with maximum efficiency, there is no need to use something else. Nevertheless, to increase the "working capacity" of the jigsaw, there are some additional devices.
When processing small workpieces, it is very important that the work is carried out with maximum precision. To do this, it is recommended to have a special table that is designed for sawing.
In order for the jigsaw to easily process any surface, it is permissible to use another additional device - a replaceable plate (the materials used in its manufacture are very different). This replacement plate is neatly attached to the support sole.
It should be borne in mind that there are materials that need to be pre-cooled and only then begin to process. Therefore, it is necessary to have a reservoir filled with cold water. To work with such a tool was easy and convenient, you must regularly use a lubricant. It is used for cooling and lubrication, as a result of which the life of such a tool will be significantly extended.
How to work with a manual jigsaw
In this lesson, we will show you the basics of working with a conventional manual jigsaw. Of course, a jigsaw can also be electric, but it costs a lot of money, and working on it is already a pursuit of speed, and not a calm, moderate creation of beauty.
For work, we need: a manual jigsaw, a file, a stand on the table, a clamp for attaching the stand to the table, an awl, a pencil, two paper clips, a sheet of tracing paper, a sheet of carbon paper, sandpaper and of course a piece of plywood of the right size. We will cut out a Christmas tree, in this work, in addition to the sawing technique, we will also master the technique of assembling plywood parts into a three-dimensional Christmas tree figure and the easiest way to finish the finished product using ordinary watercolor paint.

The size of the plywood should correspond to the pattern you have chosen, try to place the sawn parts more compactly, denser to each other, since everything that remains after sawing out, as a rule, can no longer be used in further work due to its fragility. And so we clean the selected piece of plywood with sandpaper, trying to drive it along the fibers, since transverse scratches will be very visible on the finished product and it is very difficult to remove them later, and the plywood treated with fibers looks velvety and soft.
The sandpaper should be medium grit to scratch the plywood less.

Fasten the tracing paper sheet and the drawing with the help of clips, then copy the drawing onto the tracing paper with a pencil. This operation is necessary in order not to damage the original drawing when transferring it to plywood.

It should be noted right away that with the current level of distribution and availability of a copier, with large-scale and complex patterns for cutting out, it is good to use a copier and the necessary pattern just needs to be copied onto Blank sheet paper and from it further transfer the drawing to plywood. The advantage of this method is also that it is quite easy to enlarge or reduce the drawing chosen for work. We impose a tracing paper with a pattern on plywood and a pencil, through a carbon paper we transfer it to its front side.

Having transferred the entire drawing to plywood, we carefully check whether all the lines of the drawing are clearly visible on plywood.

At the next stage, it is very important to check the future knots of the interconnection of the Christmas tree parts.
To do this, a piece of plywood of the same thickness that we are using needs to be attached to the drawn groove of the Christmas tree part and make sure that it fits exactly within the drawn borders. If the dimensions of the groove and the thickness of the plywood do not match, the width of the groove is corrected - it is drawn equal to the thickness of the plywood used. Otherwise, when assembling the finished parts, they will hang out or simply will not fit into each other. So all the grooves in all the drawings of the parts are checked.

We take the stand and insert its clamp into the central hole.

We fix the stand with a clamp on the edge of the table, window sill or workbench.

If your file is not inserted into the jigsaw, then we do it in the following sequence. We loosen the lamb of the lower clamp of the jigsaw (after turning the handle to the bottom - to the working position). We insert the file into the lower clamp.

The direction of the teeth of the file should be as in figure "b" - this is very important.

Then, loosening the lamb of the upper clamp, insert the upper end of the file into it and placing the jigsaw on the stand, press it with force and screw the lamb tightly. The file must be pulled tight. But too much tension can cause the saw blade to break when figured sawing, a weak file tension will also lead to this. So everything should be in moderation.

The position of the body when sawing out should be as in the figure.

When sawing with a jigsaw, you need to smoothly move your hand up and down, up and down, watching the position of the file so that it does not tilt from a vertical position.
How to cut chipboard at home?
When sawing along a curly line, turn the plywood, not the jigsaw, during the sawing process - this will reduce the likelihood of breaking the file.

When sawing sharp corners, make the movements of the saw in place, gradually turning the plywood.

You should have a free space - a hole in which the file will turn, now continue to cut in the right direction.

Make free space for turning the file on that part of the plywood that will be thrown out and you will easily get sharp corners.

After the entire contour of the drawing has been cut out, the sawn part will freely come out of their plywood.

Now, in order not to break the file, insert it into the cut from which the part was started and smoothly moving the jigsaw up and down, but only pull it out of the plywood with the back of the file.

Cut out the second part of the Christmas tree in the same way.

Treat the resulting parts with sandpaper.

Now we have two Christmas tree parts ready for assembly.

We collect them in one design.

Now paint the Christmas tree with watercolors or gouache.

All our Christmas tree is ready.

And at the end of the lesson, we will show you the sequence of cutting out internal holes in parts. Let's say we need to cut out part of the circle.

In the middle of the removed part of the part, we pierce a hole with an awl. Don't try to make the hole close to the drawn line, this can cause the plywood to chip, which will be pretty ugly.

Having loosened the upper clamp of the jigsaw, and having released the file, we introduce its upper end from below into the punctured hole.

We clamp the file into the upper clamp of the jigsaw and cut out the part of the picture to be removed.

Then again we release the file from the upper clamp. And we repeat this operation with each inner hole of the pattern.

The Christmas tree turned out to be stable and quite strong, for greater stability, the joined parts of the parts can be smeared with some kind of glue that does not leave marks on the tree - this is PVA glue, carpentry or casein glue.

How to cut laminated chipboard
For home craftsmen
How to cut chipboard with an electric jigsaw without chipping

In the process self-manufacturing furniture, the contractor may need to cut or trim the laminated chipboard for subsequent use. Of course, it is best to perform this operation on sawing, however, if necessary, and to reduce labor intensity, it is quite possible to cut chipboard at home (using a jigsaw). Moreover, it is very important to implement this procedure in such a way as to minimize the number of chips and thereby form an even cut.
Why do chips appear
Before cutting chipboard or laminate with a jigsaw, it is advisable to understand why chips form when cutting sheet material. And the answer here is simple: everything lies in the design of the jigsaw, or rather in the design of the nail file.
So, in the process of cutting, the nail file receives return movements (up and down). And if when the saw blade moves along the teeth (usually downwards), chips practically do not form, then when the tool moves in the opposite direction, the teeth, as it were, tear out the upper layer of the material, thereby forming an unpleasant chip. That is why you can observe an almost perfect cut from the bottom side of the chipboard and a cut with chips along its upper edge.
Ways to Minimize Chips
An additional reason for the formation of chips may be the divorce of the teeth of the nail file. Therefore, the first step is to take care of purchasing a tool with a straight cut (often these are Bosh files). However, it should be noted that during prolonged use, such files overheat and may even bend during the cut. In view of what it is necessary to take breaks in work to cool the cutting tool.
However, one replacement of the file is not enough, and in order to cut chipboard (laminate) with an electric jigsaw without chips, a small modification of the power tool is required. Namely, to make sure that when the file moves against the inclination of the tooth, the material does not break out. For what it is enough to make a stubborn platform. This conclusion can be reached by trying to cut through two sheets of chipboard at the same time. So there will be practically no chips on the lower element.
How to cut chipboard with a grinder?
In order to make a thrust pad for a jigsaw, it is enough to cut a rectangle out of any dense material (for example, laminate) in size identical to the dimensions of the sole of the power tool.
Then, along the larger axial line, a file should be made and the resulting equipment should be fixed to the sole of the jigsaw with electrical tape or double-sided tape. All refinement is ready and you can perform finishing work in compliance with certain recommendations.
First, as mentioned above, you should use a jigsaw file with a straight cut.
Secondly, in order to better control the cutting process, it is justified to apply a marking line on both sides of the chipboard and check the processing accuracy from above and below.
And thirdly, take constant breaks in work to cool the cutting equipment.

Sometimes the solution in this matter can be a simple cutting of the laminated layer of material with a mounting knife, and subsequent work with a jigsaw will no longer cause large defects in the form of chips. However, this work requires a certain experience and accuracy from the performer.
Drank, drank, thin. carving - all this is an integral process of creating an interior and decorating.
The method is used for both external and internal processing.
Since ancient times, this craft helped our ancestors in the construction, and the results of the work adorned houses, farmsteads, household items.
Today, the art of "cutting" is still relevant, and, as it seems to us, will always be relevant.
But here comes the unforgettable 21st century. Due to the relentless technological progress, giving birth to more and more new processing devices, sawing and sawing has become a little more convenient and easier.
However, the “most unique” instrument of all time is on the agenda! Old timer, you might say. Ladies and gentlemen, welcome His Majesty Lobzik! Applause!
But before we pick up this royalty, let's figure out how to choose the right jigsaw.
And so, we need the most ordinary tool. Simplest. It is inexpensive.

Most hemorrhoids - choose for a jigsaw necessary files. At the moment, the market is up to the neck with old samples of files, still Soviet ones, only a few millimeters thick.
If you are going to cut out just such a thing, in addition to files, you will have to stock up on immeasurable patience, because this is truly a hell of a job.
Perhaps the most annoying thing in this matter is that as soon as this two or three millimeter paper warms up well from friction, it has every chance to burst to hell when cutting some plywood, and you will immediately have to put in a new one.
Basically, such a file is enough for several hours of work, and then, if handled carefully.
If not carefully, for half an hour, maximum. In addition, it is worth adding that such files are only suitable for plywood. For such plywood, from which, for example, guitars are made.
For chipboard, metal and other materials, it is better to take a larger file.
In general, if you just need to cut plywood into pieces, squares or rectangles, take a file of five or ten millimeters.
No turns, just a flat road.
How sawing with a hand saw?
The question seems to be ordinary, but on the other hand, there are a couple of difficult moments.
The first thing to remember, if you still decide to go through torture and choose a file of a couple of millimeters, get ready for nine circles.

Moreover, if Dante had them all different, then your circles will be the closer to the ninth, the hotter. In order not to explode, like Vesuvius, and not cover Pompeii with lava, buy twenty of them. It will be needed.
We have plywood! We have a jigsaw! There is nothing easier than to take and saw.
All that remains to be done is sawing. As they said in one famous film "Saw, Shura, saw ...". And really, saw, my dear!
It doesn't take long to cut a board in half. However, in order to cut something, some kind of pattern, or, for example, grooves, you will have to spend much more time.
The most offensive thing in this case is that a file of a different size will not work. In order to cut it out, a different size is bad. With this, you should at least be able to do twists and turns normally.
In order to make, for example, a smooth angle, you need to slowly drive the jigsaw up and down, turning the full face of the saw blade in the direction you need.
In this case, you need to reduce all the pressure, and cut easily, in one place. Otherwise, you risk getting a file in the wrong place. As a result, spoil the work.
In the case - you should, again, stock up on a mountain of patience. It will take you more than one day to cut something with this nail file. It is better to take another one, or, in order not to change files one after another, buy two jigsaws. You will be much more comfortable that way.
How to cut chipboard with a jigsaw?
If you are going to figure out how to cut chipboard with a jigsaw, there is only one answer - tedious.
In addition, you will definitely have to choose a file of a different size. In general, it doesn’t matter what size the file is. What matters is the size of her teeth. The larger the teeth, the faster you will cut.
However, there is a significant risk of chips and chips that you can "cut" in the process, which, of course, will ruin the material. The smaller the teeth, the longer you will have to cut, but the work will be better and neater in the end.
In general, it all depends on the person. You can make a masterpiece with wide teeth, you can also make something that is flushed down the toilet with small teeth.
How to cut smoothly with a jigsaw, or why does a jigsaw saw crookedly?
Try to answer your own question. If you have already tried to saw, and this is probably exactly the case, you have seen how the canvas can abruptly go somewhere to the side, making an incision in the wrong place.
After that, sadness will pierce you through and through: everything will have to be done again, because what you did is a complete marriage. But don't despair. We will teach you how to cut evenly.

To begin with, as written in the instructions for the tool, you should firmly fix the working blade of the file between the lugs of the jigsaw.
The file, as a result, should be stretched between one and the second arcs. First, insert the file and secure it with one eye, so that the other end goes completely under the second eye (so that the edge is not too small).
Immediately have to change, but this is not comme il faut. In general, we compress the arcs to each other, then twist the desired eyelet and voila! The jigsaw is ready for use.
Before starting work, check how the file is worth, try to pull it with your finger. If everyone "iron" and tightly, then everything is done correctly.
Yes, yes, it is very similar, but one interesting activity, but still you need to concentrate at this moment. Your eyes should follow the slope of the blade. It is the slope that affects the cutting line. 
It is worth tilting a little, and behold, the line went to the side. Disorder. Right? Right.
In general, if you need to cut something evenly, you should draw a line with a pencil, as they did at school.
Follow this line and go. Nearby, just in case, so as not to deviate from the line, put a ruler. It is desirable that it be iron, otherwise you can ruin the right little thing.
How to cut tiles with a jigsaw?
Another milestone in urban development! … or not? Oh yes! We're talking about cutting. Revisited: "Another milestone in jigsaw sawing!" In general, to hell. Let's get to the point.
In this case, the sawing time increases many times ... If you chose a manual jigsaw for laying tiles, it's better to shoot yourself.
No, really, shoot yourself! Do you have any idea how long this is? If you need to cut one piece of tile, that's fine, but you probably won't do such garbage.
Therefore, in general, we change the trajectory. A manual jigsaw is good, but an electric one? This is a versatile tool that allows you to work with a wide range of materials.
This is plywood, and fiberboard, and chipboard. There are tiles, and ceramics, and metal, and a number of other materials, including even stones! But the essence remains the essence - you need to cut the tiles. If so, you will need electric jigsaw.
Working with any tool has its own secrets and nuances that will help both an intrigued beginner and an experienced specialist. 
As a result - an excellent result, there is no need additional work sanding and leveling the sawn-off surface. Charm!
So, how?
But simply. There is a lot of advice on the net from experienced people. All answers are different, all are similar in some way. The easiest and most obvious way is to entrust the work to professionals, of course.
However, the masters are the masters that they will do everything themselves, but you also want to know how to use this tool yourself.
It is vital to fix the material well on the workbench or saw table.
Do not forget that the material must be fixed with the face down, as the working stroke of the tool is directed upwards, which accordingly provides a more even and neat cut on the underside.
During the cut, it is necessary to make sure that the material does not fidget on the table. The cuts can turn out crooked and clumsy, you can ruin the material.
This technique is especially good for figured parts. But everything is simpler with us: tiles. We take it, put it on the surface and slowly bring it to the fixed tool. One, two and you're done! Nothing complicated.
Surely the first attempts will not do without hack-work, but everything comes with experience.
In general, drink to your health! Good luck and all the best.
And also you can watch a video of sawing wood carving with a jigsaw
And one more video how to cut with an electric jigsaw without chips
How to cut straight with a jigsaw? This question interests many, especially at the moment when a person is engaged in construction. This tool helps to cope with a difficult task. But what is it? According to external data and the main purpose, it is comparable to a saw that has an electric drive. In this case, you can cut various materials:
- Wood products.
- Metal constructions.
- Plastic.
- Tiles.
And to make the work of any purpose is not so difficult. According to the masters, the main thing is to create all the conditions to make it convenient to work. How to cut straight with a jigsaw? The first is to use only a flat and stable surface. The material to be cut must be firmly fixed, and a saw of the required sharpness and size must be selected.
Such a saw is considered unique because it can work on almost all materials. In addition, she does not only straight lines. It can be used to create curved cuts. But before you start the process, you should understand which jigsaws cut evenly and with high quality.
Work system
To fully understand the process, you need to prepare everything first. Here's what you need if the work will be done on wood:
- Any piece of wood.
- Jigsaw with electric drive.
- Personal protective equipment - goggles, gloves.
- Machine oil.
Requirements
The very first thing is to securely and firmly fix the material on which the work will be carried out. It also happens that an error occurs, and the jigsaw starts to cut unevenly. It is worth finding out the reason, otherwise it will not be possible to achieve the desired cut. This is the stability of the table, as well as the reliability of fixing the material. It is not so difficult to make even cuts with such a tool, but if you choose the direction along the fibers, nothing will work. Although people with experience can even cope with such a task.
How to cut straight with a jigsaw? If such a need is required for a person without experience, then the following steps must be performed - this is a parallel emphasis. To do this, on the one hand, fastening to the jigsaw is carried out, and the second side - an emphasis on the edge of the tree. This is how it will turn out to make the cut even and without residue of fibers.

Everyone can recognize the device of this unit in the instructions. When buying, many recommendations are given by managers. Each manufacturer invests instructions, this is no less useful information and is worth studying. Everything should happen in stages, if questions arise, then they need to be resolved, and not continue to work “at random”.
Making holes
How to cut a hole evenly with a jigsaw, for example? Often these steps are required. In order to install the jigsaw in the center of the future hole, a small hole is made, after which the cutting unit is inserted there. Then they simply pass along the marked line of the circle. A rectangular shape is also performed (namely, you need to move the saw along the side of the rectangle). But the corners smoothly bend around. Next you need to cut out the next side.
Another important point in work - do not press hard on the jigsaw. This condition is often violated by beginners, which leads to overheating and then to a breakdown. In addition, one saw should not be constantly used, otherwise it will become dull and will cling to the material being cut.

Durable materials are not easy to cut. To make the procedure quick, machine oil is used. They are lubricated in the process, and the work goes quickly. Low speed is another problem with such tools. The problem is that it overheats again. No one ruled out safety precautions, and even at home, do not forget about glasses and gloves.
When all procedures are completed, it is worth wiping the equipment and lubricating with machine oil. On sale there is an installation with a conventional and pendulum stroke. The first option is different in that the movement occurs upwards on any material. In the presence of a pendulum stroke and upward movement, an additional knife is thrown forward. This allows you to increase the process of work and at the same time do not wear out the saw much.
Features of the operation
How to cut straight with a jigsaw? Before starting work, you should find out the whole process, otherwise you will not be able to achieve the desired result. Often, when working with any materials, it is required to create a cut with maximum accuracy. It is a jigsaw with an electric drive that will do the job.
Here's what you need for this:
- Material for work.
- Jigsaw.
- Guiding tools.
- Clamps.
- Pencil.
- Construction roll.
Getting Started
The movement of the cutting blade must occur precisely so that the cut is the desired one. It is good when the frequency of movement is high. For this, a saw of the maximum width is taken (this is suitable for wood). The main thing in this process is the use of a guide. A flat board or rail becomes the main assistant.

Clamps are indispensable. They have a workpiece and a guide. The material to be cut should be placed on a slight elevation. This helps not to rest against the jigsaw. After that, the distance that should be cut off is fixed. For this, a roulette wheel is used. After applying the risks with a pencil. Then, using any ruler, these marks are connected, and a cut line is obtained.
What to do next?
Next, you need to fix the guide in a certain place. Clamps help with this. Fixation is performed from the cutting line. After that you need electrical appliance position the saw against the cutting line. Now they press the guide and also fix it, there should be no movement, but you should not press it too hard either.
Then they move to the second side and also fix it. The level of fastening is the maximum, but do not forget that some materials can be pressed through. When the whole process is completed, you need to move on to the first clamp. Do its installation correctly and clamp. Only then can you begin to perform an even cut. Otherwise, you will not be able to do quality work.

Now you can turn on the jigsaw and begin the process itself. The speed is high, the pendulum stroke should be at one. And the tool itself is placed so that the file is on the cut line. Only after this, the work will be done with high quality, and the line itself will turn out to be smooth and impeccable.
Do not forget a single moment - if a person has no experience, then any mistake becomes fatal. Especially when you need to cut parts, the number of which is limited. Experts recommend learning how to perform all actions on any unnecessary material and only after that proceed to the main work.
What else do you need to know?
Every device has accessories. They allow the whole process to be made more precise and to simplify something. It is believed that sawing plywood with a jigsaw is the easiest process, since the material does not have a large thickness. Sometimes you need to cut small parts. How to cut plywood with a jigsaw? This will be simplified by having a special table. It mostly comes with this electric tool, although many build it after purchasing it themselves.
The use of a clamp is always necessary. The same applies to the table - it is fixed using such an installation. But the process of cutting occurs in the opposite direction. But the movement is produced not by electrical equipment, but by a detail. Experts believe that this way the lines are accurate and correct.
Many beginners may encounter such a problem as clamping the saw. But how to deal with it? Often, many use a replaceable plate. This applies to additional tools. At the same time, the most diverse material is taken to create such a component. And its fixation occurs to the sole of the electrical installation. And already with the use of components such as a guide bar and an adapter, an accurate line is obtained.
Sometimes when sawing, the material starts to heat up, and the process will simply slow down. In such a situation, it will be necessary to cool the material. For this, a simple cold water. It is fixed on the support sole. Often people have a question about how to cut a laminate with a jigsaw evenly. Everyone knows that it is a tree, for this reason the same principle applies to it. In the process of laying a laminate board, it is such a tool that helps to make the process easier.
It is better to cut from the back side, and the smallest saw is taken for this. This helps to avoid deformation along the cut line. Since metal parts heating occurs. Here you need a cold liquid, and for a tool - machine oil. To create a cutting line of any shape, the thinnest saw is taken. Another addition is the circle cutter. Before installing it, a hole is made in the center.
Curved saw cut
When creating a curved cut, a problem arises - the material begins to move. Therefore, before starting work, the table is well fixed (and the part itself too).
How to cut chipboard with a jigsaw exactly?
This question interests everyone. It is important to carefully go around the corners, but you can make a circle in the part only after all other cuts are completed. For such work, the main saw is used. She is enough. Do not use force on the tool. The work of such a tool should take place in several stages:
- When working with hard materials - the use of engine oil and coolant.
- When working at high speeds, you need to take a rest, otherwise the equipment will overheat and fail.
- Compliance with safety regulations, the use of gloves and glasses.
- At the end of the work, the device is wiped and lubricated with oil.

There are also manual units. How to cut correctly and evenly with a manual jigsaw? It's easier because you can stop and make corrections, although many people think the opposite is true. In any case, a jigsaw is considered an indispensable equipment for the home. Because it works on any surface and creates smooth cuts. If possible, then you need to buy it. He will definitely not be superfluous in the economy.
A jigsaw is a very common tool among amateurs and professional carpenters, so it is important not only to choose it correctly, but also to know the rules of use. To answer the question of how to cut smoothly with a jigsaw, it is necessary to take into account a number of nuances related to the specifics of the jigsaw and the stages of cutting.
Choosing the Right Tool
A few tips from experienced professionals will help you choose the right tool for the job.
For sawing at home, a household or semi-professional D-shaped jigsaw is sufficient, which is operated with one hand. The more power, the heavier the jigsaw, and it will be more difficult for them to cut evenly.
A step speed controller, an electronic stabilizer and a pendulum stroke will greatly facilitate the sawing process. The presence of a plastic lining on the sole will allow you to securely fix the machine on the cutting blade. Useful features are built-in airflow and backlight.
It is worth paying attention to the fastening of the canvas. Some models have a restriction that does not allow the use of any file.
Each jigsaw model differs in shape, so before purchasing, you should hold the tool in your hand, and if possible, test it directly in the store.
Blade selection
Jigsaw blades vary in length and frequency of teeth. It is worth giving preference to proven brands, in this case there is a quality guarantee for the metal, and the cut will be even. Files are classified according to the configuration of the teeth:
- on the standard models teeth of the same size are located at an equal distance and in the same direction;
- the so-called file with a missing tooth is distinguished by the absence of teeth, due to which the cutting speed increases, the blade heats up less and jams, and the chips from the surface are removed to the side;
- in the case of twin teeth, the cutting speed is lower, but the cut quality is better. Chip removal from the cut is carried out;
- in reverse blades, part of the teeth is directed upwards. Using such a tool, you can cut chipboard and other wood with a jigsaw without chipping, since the upper teeth cut the material during the reverse movement.
The specific thickness of the canvas depends on the material to be worked with, but the basic ones for the manual model are No. 3, No. 5, No. 7.
Cutting line marking
In order to cut the material evenly with a jigsaw, it is necessary to correctly outline the cutting line and securely fix the workpiece on the surface. If you have to work with a long canvas, you should use a flat rail as a guide and two clamps to fasten it and the working material. It is necessary to act in a certain sequence.
First you need to make a markup on the chipboard using a ruler. To do this, the required distance is measured on both sides, the marks are connected, forming a cut line. To make a curly line, it is advisable to draw it on paper, and then transfer it to a tree using a carbon paper, after sanding the surface.
To cut a circle with a jigsaw, markup is applied with a construction pencil or black marker to the surface according to a pre-made stencil made of thick paper or cardboard. In this case, the sawing of the material begins with drilling a hole in the center. The blade should move from the center to the marking line, and then along the perimeter of the circle.
Important! The jigsaw is inherently designed for curved cuts, it is quite difficult to cut them exactly in a straight line. It is necessary to constantly monitor the line and direct the tool a little to the side.
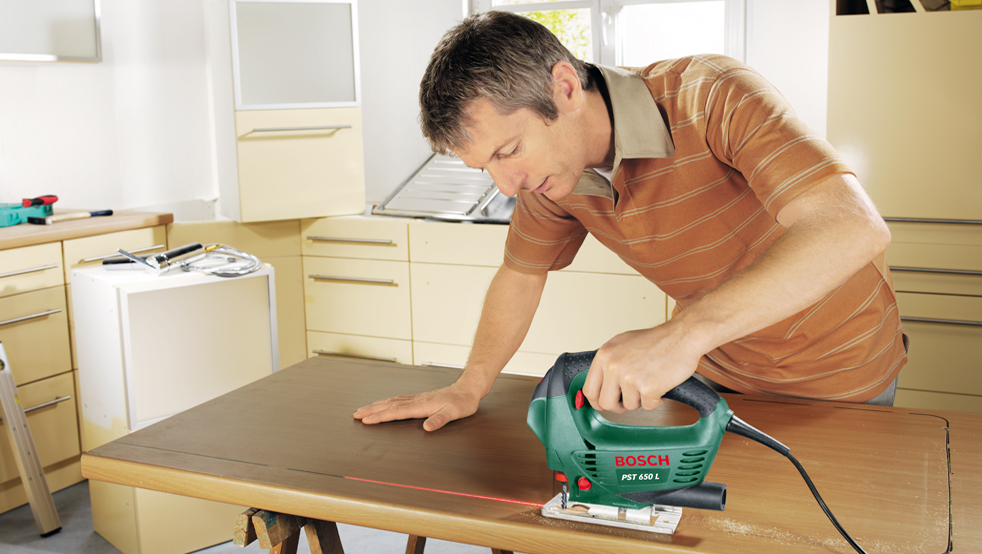
In order to avoid chips on the finished surface, the sawing process is carried out not at the mark, but near it. The laser guide on the jigsaw will help you cut straight.
Fastener material
In order for the cutting line to be even, the working surface must be as stable, rigid and durable as possible. When working at home, this can be an ordinary table with reliable legs and a flat top.
The board is fixed to the surface with clamps fixed on both sides with moderate force. The sheet to be processed must be positioned in such a way that the tool does not rest against the surface during operation. To prevent pressure from being applied to the saw blade during cutting, the protruding edge hanging from the surface can be weighted with an attached weight.
Saw execution technology
They begin to saw after fixing the workpiece and marking. To do this, turn on the jigsaw, set the maximum speed level and adjust the pendulum stroke by setting it to number 1.
It is necessary to bring the file to the marking line, press the side of the platform against the guide and get to work. Moving the jigsaw forward, you need to monitor the location of the platform. Do not allow deviation from the guide. When a few centimeters remain to the end of the canvas, it is necessary to carefully hold the free edge, avoiding a break. At this point, the process can be considered completed. So that the saw cut does not turn out to be a curve, it is worth remembering a number of nuances:
- in the process of work, you can not press hard on the electric jigsaw, otherwise the file will break;
- when cutting a steel sheet, it is necessary to choose a tool with maximum power and work at high speed - when heated, the steel softens and becomes more pliable;
- when processing plastic, laminate, organic glass or stainless steel, it is necessary to provide for additional cooling of the file and periodically take breaks so that the tool has time to cool;
- so that the plastic does not melt during processing, it is necessary to set the minimum speed with a frequency of 1000 revolutions / minute;
- the figured cut will turn out even when choosing a narrow file with small teeth;
- after finishing work, the electrical appliance should be cleaned of sawdust and put in a special case.
Professional builders are advised to follow some rules to help avoid mistakes that will not be easy to fix.
When choosing a file, it is necessary to build on the material with which to work: plastic, thin or thick metal, plywood, solid wood. You should prepare in advance all additional items that may be needed in the process of cutting, marking and fastening. Particular attention should be paid to fixing the material to the surface.
Note! To avoid marriage, the canvas should be placed face down.
It is best to try the sawing technique in advance, practice sawing with a jigsaw on unnecessary workpieces, because the curved line will be difficult to correct. Do not neglect safety precautions, you should use goggles sawing with gloves.
Mistakes when working with a jigsaw
If the technological subtleties are taken into account, and the cut line turns out to be a curve and with many chips, there may be several reasons.
The master has little experience with a jigsaw. You need to practice more and as a result you will be able to cut as it should.
The material is not fastened securely enough and moves when sawing, or it is fixed inconveniently for the person doing the work.
If the process is performed by a worker without experience, it is necessary to use guides, and in the manufacture of complex shapes, a special pattern. If this is not possible, the quality of the cut can be improved by reducing the speed.
The main reason why a curved cut is obtained is a tool or blade malfunction. In this case, there is a high probability of chipping, leaving the file to the side and blunting. An incorrectly selected canvas for a specific material will lead to the fact that it will break many times during work and the result will be of poor quality. It is worth carefully inspecting the jigsaw and repairing the damage.
Too much emphasis on the jigsaw leads to excess pressure, which also negatively affects the final cut.
To cut the material with a jigsaw, it is not necessary to have many years of carpentry experience, it is important to listen to the advice of professionals and follow the technology of working with the tool.
We advise you to read
 Psychological characteristics of children in adolescence
 Transferring a child to another school - the procedure and necessary documents Whether to transfer a child to another school
, diagnosis, treatment Treatment of urogenital chlamydia") Chlamydia urogenital - description, causes, symptoms (signs), diagnosis, treatment Treatment of urogenital chlamydia
Chlamydia urogenital - description, causes, symptoms (signs), diagnosis, treatment Treatment of urogenital chlamydia The benefits and significance of hydroamino acid threonine for the human body L threonine what

