A reliable, time-tested way to protect the foundation from the effects of surface water is to install a concrete blind area around the house. The undoubted advantage of a blind area made of concrete is its low cost and ease of manufacture.
100% protection against moisture, which is provided by a concrete blind area with an integral coating, is not able to guarantee any material (without arranging a multi-tiered "pie"). The condition of the foundation directly affects the position of the entire structure. Therefore, the foundation needs capital protection.
This is precisely the main task of the blind area - protecting the foundation and basement of the house. In addition to the barrier, it performs several other functions. For example, it allows you to organize a more convenient movement along the blind area and gives the building a finished appearance.
Consider step by step how to properly make a blind area around the house of concrete with your own hands. We propose to break down all the stages of arrangement into theoretical and applied.
- In the first part, we will analyze what you need to know and prepare before getting started.
- In the second - how to prepare the bed and properly pour the concrete blind area.
Requirements for the blind area and the rules for its construction
- concrete pavement width, according to SNiP 2.02.01-83 should be 200 mm. more than an overhang roofing material. If there is a drain, its parameters are also taken into account. The same SNiP regulates the width depending on the type of soil. The traditional (optimal) width of the blind area can be considered 1 meter. This width provides freedom of movement and plays the role of a path around the house;
- length. Since the foundation needs protection around the entire perimeter of the house, it is logical that the blind area should also completely encircle the structure. An exception may be only the installation site of the concrete porch;
- depth or level of deepening of the blind area should not exceed half of the estimated depth of soil freezing characteristic of a particular region. This parameter can be viewed in the table or requested information in the architecture department at the location of the object.
The ability of a concrete pavement to move along with the soil informs it of its function. Otherwise, its role will be reduced to water drainage, which is not enough to protect the foundation.
Note. The depth of freezing is affected by the presence of communications in the soil.
- concrete pavement thickness. Justified is the minimum thickness of the surface layer of 70-100 mm. If an increased operational load is planned, for example, the movement of a car, the thickness can reach up to 150 mm;
- blind area slope. SNiP III-10-75 recommends what the slope should be - from 10 to 100 mm per 1 meter of width (i.e. 1-10%). The angle of inclination is directed in the direction opposite to the foundation of the house. Slope requirements depend on local rainfall and soil type. In practice, the slope is taken equal to 20-30 mm per 1 m (2-3 degrees). If you do more, then in case of icing, it will be difficult to move along such a blind area;
- border. In the case of a blind area, the border is a decorative element and the decision to install it is made based on the preferences of the owner of the house and his financial capabilities. However, if bushes are planted in the immediate vicinity of the blind area - “root aggressors” (raspberries, blackberries) or trees that differ in a powerful surface root system (poplar, plane tree), then the installation of a limiter is mandatory;
- plinth height. The standards establish a minimum base height of 500 mm for a hard type blind area and a minimum of 300 mm for a soft one. Recall that the blind area around the house made of concrete is of a rigid type;
- deck height from ground level. It is desirable that the blind area is 50 mm above the ground. This recommendation is due to the fact that water should not accumulate on the edge of the blind area and turn into puddles. In winter, this is fraught with freezing and, accordingly, the destruction of the structure.
- concrete deck construction has a specific device diagram, which is shown in the drawing below.
Armed with the above data, you can proceed directly to the installation of a concrete blind area of \u200b\u200bthe foundation.
How to make a blind area of concrete around the house
Material preparation:
- blind area concrete. The brand is an indicator of the quality of concrete, its value ranges from 100 to 1000. It indicates the proportion of cement content in concrete. The concrete class is in the range from B3.5 to B8 and indicates the strength of concrete. So, class B 15, indicates that a cube of concrete pouring with a size of 15x15x15 cm is able to withstand a pressure of 15 MPa.
What brand of concrete is needed for the blind area? To prepare the solution, cement brand M 200 (class B15) is used.
The parameters (properties) of concrete, depending on the brand, are shown in the table.
- sand. What is needed? For the device of the lower layer of the pillow, river or quarry sand is suitable. The main thing is that it does not contain large impurities that can damage geotextiles;
- rubble (gravel). For the blind area, crushed stone of fraction 10-20 is suitable;
- clay or geotextile for a hydraulic lock. In practice, this layer is absent in the base cushion, because concrete drains water well;
- iron cement.
The composition of the concrete solution for the blind area
If it is not possible to use ready-made concrete, you can knead it yourself. For this you need to prepare:
- pavement cement. You should know that the brand of concrete is determined by the brand of cement and its specific gravity as a percentage of the components of the solution. For the blind area, cement M400 Portland cement is used. Cement must be fresh, with each month of storage it loses 5% of its properties. It is easy to check the freshness, just squeeze a little cement in your fist, if it shrinks into a lump - its expiration date is running out, if it crumbles freely - you can work with it;
Note. What kind of cement is best for the blind area? Naturally fresh and high brand. This will save on cement consumption and prepare a good concrete solution.
- sand. To prepare concrete, you need to take sifted and washed from impurities and soil;
- rubble. It is advisable to use crushed stone of a fraction of 5-10 mm. At the same time, crushed stone is better than, for example, small pebbles;
- water. Should be at room temperature;
- additives. Needed in order to give concrete frost-resistant properties. Liquid glass is often used as an additive.
From the tools you will need a concrete mixer or a container for mixing, a shovel, a bucket (it is better to take a plastic one, it is easier to wash), a measuring container (for water), a manual tamping log or a vibrating plate.
Preparation of concrete solution for the blind area
In practice, the blind area solution is prepared in portions, after all preparatory work. We will give a ready-made recipe for cement mortar and how to mix it correctly.
The composition of the concrete solution includes: cement, crushed stone, sand, water and various additives that increase its strength. The durability and strength of the blind area depends on the ratio (proportions) of these components.
Note. Components are measured by weight only.
The proportions of the solution for the blind area
Note. 1 cubic meter of sand is on average 1600 kg, 1 cubic meter of crushed stone is on average 1500 kg.
Depending on the brand of concrete, the proportions will differ. SNiP 82-02-95 regulates the composition of the mixture for obtaining concrete of a certain grade.
The concrete mixture is very demanding on the amount of water supplied. Its excess reduces the strength of concrete, because. brings cement flour to the top layer of the solution. This leads to the fact that the fortress is distributed unevenly. In practice, it is calculated that water should be approximately half the amount of cement. More accurate data is contained in the table (water-cement ratio (W / C) for concrete).
The order in which the components are added to the solution is also important. Cement is first poured into a mixing tank or concrete mixer and water is poured. By mixing, the so-called cement milk is obtained. Then the rest of the components are added to it. First, sand is poured, in small portions, and then crushed stone (gravel).
Note. Professionals advise maintaining an interval of 5 minutes. between the supply of components. Thus, the mixture is better mixed.
The technology of the blind area made of concrete with insulation
Step-by-step instruction:
Preparation of the base for the blind area. To do this, the top layer of soil is removed, all roots, stones, etc. are removed. The use of a continuous herbicide will eliminate the activity under the substrate. For example, drugs Agrokiller or Tornado.
Advice. Given that the blind area should exceed the edge of the roof slope by 200 mm, it is recommended to use a plumb line to accurately mark the boundary of the blind area.
markup. To do this, we pull the rope over the stakes clogged in the corners. To avoid sagging of the rope, you need to install intermediate stakes (at a distance of 5-6 m from each other).
Advice. How to determine the required angle of inclination of the blind area? Masters install additional beacons (stretch the rope) on the basement of the house. Fastening is made through 1-1.5 meters.
Hydraulic lock device. To do this, lay greasy clay with a layer of 100-150 mm or cover the bottom with geotextiles (roofing material, PVC film, advertising banner, etc.). Please note that the film does not tear, it is better to pour a layer of sand 50-100 mm into the bottom of the trench. A layer of sand of the same thickness is also poured over the film. The sand is leveled, moistened and rammed. In the case of a clay hydraulic lock, there is only one sand layer. When laying the film, its tension should be avoided. It must be able to move freely with the ground.
Note. Masters advise to make high-quality drainage near the hydraulic lock. To do this, you need to dig a trench 100 mm deep and 200 mm wide and fill it with rubble or lay a drainage pipe in it, wrap it with geotextile and fill it with rubble. This will increase the rate of water removal.
It is worth noting that many people ignore this stage of work. In practice, this attitude translates into the fact that the water passing through the expansion joint goes directly under the foundation, and when it freezes, it leads to an increase in pressure on it.
Backfilling of rubble. The layer thickness varies from 50 to 100 mm. The gravel is leveled and rammed. Since crushed stone is difficult to compact, some recommend using a special grate for laying it, which is used in landscape design for gravel paths. We note right away that this will increase the cost of the blind area without special need.
Sand filling.
Laying pipes of communications. To do this, a recess is made in the sand for pipes and storm water inlets.
Blind area insulation. Styrofoam or polystyrene foam is laid on the compacted sand, with which crushed stone and communications are covered. Only hard insulation is suitable for the blind area, but it is afraid of point loads, so it must be laid on a sand cushion.
Advice. Cold bridges can be eliminated by laying the insulation in two layers with an offset.
Reinforcement of concrete pavement. It is carried out by laying a reinforcing mesh with cells of 50x50 or 100x100 mm or knitting a reinforcing cage.
Advice. The chain-link mesh is not suitable for reinforcement - it is too flexible.
If insulation is not expected, the reinforcing mesh is laid directly on the rubble to a height of 20-30 mm. That will contribute to a better distribution of concrete.
Formwork device. Boards or plywood are installed strictly according to the level. In order to level the bursting force of concrete, the formwork is reinforced with stakes that are installed on its outer side. When installing, do not forget that the formwork is removable, which means that all seams will be visible after its dismantling. In this case, the blind area will have an ugly appearance. Therefore, when installing boards, you need to ensure that the internal seams are invisible.
Device expansion joints . To do this, we install wooden slats, boards (on edge), which are pre-treated with an antiseptic or tarred. The recommended distance between the expansion joints of the blind area is 2-2.5 meters. Expansion joints must be made diagonally at the place where the formwork turns (at the corners). The purpose of the expansion joint is to compensate for the thermal expansion of concrete during operation. They are set according to the level, taking into account the angle of inclination of the formwork, because. when pouring concrete, they are guided by them. As an alternative to wood, Guerlain butyl rubber tapes (10 rubles / m) or a hydro-swellable elastic cord, for example, Penebar Rapid SW45 A / B, can be used.
How to close the seams in the blind area?
According to reviews, those who ignored the formation of expansion joints after the first winter had cracks. Many people think that wood swells and lets moisture through. The resulting cracks can be sealed with special sealants, such as TEKTOR 103 mastic (225 rubles / piece), ISOSEAL P-40 (280 rubles / piece).
Pouring concrete pavement. When pouring concrete, care must be taken to ensure that no air pockets form, and that the cement mixture evenly fills the entire space. It is important that tubercles and depressions do not appear during pouring. Their presence will lead to stagnation of water in these places. If it is not possible to make the entire blind area at a time, part of it is poured, and then work is resumed.
Advice. When pouring the blind area, you can apply a technique for uniform distribution of concrete - bayonet. To do this, the concrete is “pierced” with a rod, and the mortar fills the entire space.
How to pour a concrete blind area around the house - video
Protection of the concrete blind area from destruction
Many are interested in how to cover the concrete pavement around the house. Indeed, without fail, after pouring the solution, the blind area must be protected from heaving, deformation, destruction, exposure to moisture, rain, snow. Consider how and what is the best way to do it.
Ways to protect the blind area of \u200b\u200bthe foundation:
Ironing of the concrete pavement around the house
How to iron the blind area with your own hands?
- Dry method of ironing - freshly poured concrete is sprinkled with a layer of cement (2 mm) followed by grouting. Dry cement sets with concrete mortar and increases its ability to withstand water.
- Wet method of ironing - 12-14 days after pouring (when the concrete dries), you need to walk along the surface of the blind area with a cement-sand mortar (1: 1) with the addition of lime dough (10% of the volume of the mixture).
Covering the blind area with a primer
Deep penetration primers, such as AURA Unigrund KRAFT (90 rubles), are suitable for this. Priming solutions are used when additional finishing is planned. For example, laying tiles or painting. If this is not in the plans, it is better to use a water repellent, for example, Eskaro Aquastop Waterproof W (1200 rubles) or GKZH-11 (195 rubles / 5 l). Concrete hardeners are gaining popularity, such as Monopol 1 (1,600 rubles / 5 kg), Monolit-20M (1,200 rubles / 10 l), Protexil (3,600 rubles / 20 l) or Ashford Formula ($ 120 / 10 l).
Protecting the blind area with liquid glass
A solution of liquid glass and cement is a more budgetary version of a protective composition (primer, water repellent), providing a similar result. A solution with liquid glass is prepared from a mixture of cement, water and liquid glass in a ratio (ratio) of 1:1:1.
Covering the blind area with a layer of enamel
Enamel must meet certain parameters for frost resistance, vapor permeability, moisture resistance, and environmental friendliness. The polyurethane enamel ELAKOR-PU (220 rubles/kg) has proven itself excellently.
Facing the blind area with tiles, stone
Lay tiles (ceramic, clinker, paving), pebbles or natural stone on top of the concrete pavement. In this case, concrete acts as a binder solution.
- near the blind area, it is desirable to install a storm drain, which will drain the flowing water and prevent silting of the site;
- to ensure uniform drying of the poured concrete, the blind area is covered with a film. So, evaporated moisture will linger on its surface. Since it is difficult to cover a wide blind area with a film, it can be moistened periodically. The time to complete solidification with a blind area thickness of 100 mm is 1.5-2 weeks;
- after the concrete has completely dried, the blind area is removed. Here you should be careful, because. removing the blind area can lead to damage to the edges of the blind area.
This procedure for performing work and taking into account all these nuances guarantees a long-term full-fledged functioning of the concrete blind area.
Do-it-yourself concrete pavement repair around the house
To the most common problems applies to:
The appearance of cracks in the blind area
How to fix cracks in the blind area?
Elimination depends on the depth of damage (crevices, crevices, concrete breaks):
- no more than 1 mm. "Self-healing" is used. Such a crack is not dangerous and is usually rubbed from friction during walking;
- no more than 3 mm. Assumes the use of "cement test". Shallow cracks can be repaired (filled) with a liquid cement solution (1 part cement to 1 part water);
- 3-30mm. Such cracks are considered large. To eliminate them, you can use a special sealant of the type mentioned above TEKTOR 103, ISOSEAL P-40. You can repair the crack with a freshly prepared concrete solution. However, before that, the crack needs to be widened. In cross section, it should resemble a cone. Apply a primer over the entire area of the crack. Any will do, for example, Ceresit ST-17 (450-500 rubles / 10 l). Next, the solution is poured. You can use the so-called hydroseal, a special cement-based mortar that hardens in 15 minutes. As an example, putty Lugato 5-Minuten Mortel (410 rubles 5kg)
- crack depth exceeding half the thickness of the blind area, this is already a split in concrete and refers to significant damage. It is eliminated only by expansion with the subsequent pouring of new concrete.
Stratification of the surface of the blind area over the entire area
In the language of the masters, this process is called concrete dusting or delamination (stratification). Several factors may be responsible for this phenomenon. For example, uneven hardening of concrete happens if you pour a concrete solution on a cold surface (observed when working in early spring) or make a large blind area. Increased air content in the concrete mix. Exceeding parts of crushed stone in the composition of concrete.
What to do if the concrete pavement crumbles?
If the process is just beginning, then the surface should be covered with a “cement paste” or a composition that contains liquid glass (proportions: cement, water and liquid glass - 1:1:1).
If the damage has reached a significant scale, then you need to take drastic measures:
- determine the boundaries of damage to prevent its spread;
- cut down part of the concrete;
- cover the edges of the blind area with a primer;
- apply a new layer of mortar;
- cover with foil until completely dry.
If you start, you will have to completely dismantle the blind area and fill in a new one. The measures described above will help extend the life of the blind area and save on alteration and reconstruction.
The cost of work on the device of a concrete blind area without material
And the last thing that interests everyone who wants to order the construction of a blind area is the prices for a concrete blind area. If you entrust the work to the masters, then the estimate should contain the costs of the work, which are presented in the table (approximate data at the end of 2015)
| Service - work on the blind area of a private house | Doing the work yourself | The cost of the master's work per sq.m. |
| Material price | We do not take into account, because cost will be the same | |
| Removal of the old blind area (dismantling) | 0 | 65 |
| Marking and excavation (depth 600 mm.) | 0 | 300 |
| Clay water lock device | 0 | 100 |
| Laying foil or geotextile | 0 | 40 |
| Backfilling of the sand layer + rammer (5 mm.) | 0 | 80 |
| Formation of crushed stone layer (100 mm) | 0 | 80 |
| Installation of a storm water inlet | 0 | 250 |
| Pipe laying (per meter) | 0 | 50 |
| Concrete blind area device (ready-made concrete) | 0 | 300 |
| Concrete pavement device (concrete mixing) | 0 | 650 |
| Total | Saving | About 1200-1400 rubles |
At the same time, keep in mind that it is unlikely that you will be able to negotiate a significant discount here. After all, this price does not take into account the cost of materials. For a complete picture, we recommend that you familiarize yourself with the cost of materials for the manufacture of a concrete blind area for 1 m.
Conclusion
Agree, a good incentive to make a blind area of concrete with your own hands. Moreover, from the above instructions it is clear that this work does not require a special tool, any special materials, only the desire to protect the foundation of the house with a reliable barrier.
Reliable protection of the foundation from the destruction of surface water is facilitated by the presence of a concrete blind area surrounding the building. The undoubted advantage of the design is the ease of manufacture. The only alternative option for creating a barrier would be a multi-tiered "pie". The integrity of the building directly depends on the quality of the foundation, so it needs full protection. In parallel with the main function, the blind area provides comfortable movement along the building and gives it appearance completeness. How to make a blind area around the house with your own hands, we will consider in detail.
Blind area parameters
The dimensions of any construction of a structure and the rules for its arrangement are regulated by regulatory documents, in our case it is SNiP 2.02.01-83. The correct blind area made of concrete corresponds to the following indicators:

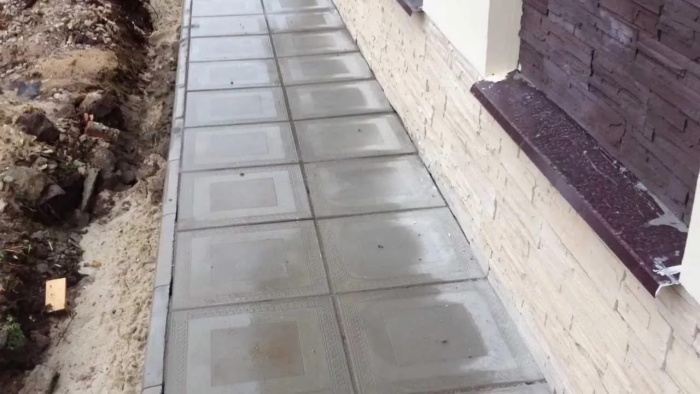
The device of the blind area around the house is carried out in a certain sequence, the option with paving slab cladding is shown in the diagram below:
Construction types
The scope of work on the design of the blind area around the house with your own hands varies depending on the type of design chosen, which are hard, semi-rigid and soft. Consider the main advantages and pitfalls of each option.
Rigid
This group includes monolithic concrete products. Concrete pouring or asphalt acts as a finishing coating.
Comment! If the protective structure is planned to be insulated, a rigid type of system is the only acceptable device option. It is not advisable to organize the insulation of semi-rigid and soft blind areas.
The operation of monolithic products continues throughout the life of the building. But the construction of concrete protection around the house is accompanied by negative aspects:
- The process is labor intensive and takes a lot of time.
- High material costs.
- Asphalt pavement requires tar. It is practical to use this binder only in the case of large-scale asphalting works.
- In the absence of additional cladding, it does not have a sufficient decorative effect.

semi-rigid
The protective underground layer of the semi-rigid system is represented by a multilayer cushion. Decorative coating can be made from paving or ceramic tiles, paving stones. Sometimes reinforced concrete slabs, cobblestones or porcelain stoneware are used for this purpose.
To make a fill around the house, labor and materials will be required much less than on a monolithic blind area. The device technology is simpler, but unacceptable for heaving soil, which can cause system deformation. Comparative analysis cost, quality and external characteristics makes the semi-rigid blind area a leader in comparison with other types of protection around the house.
Advice! Compliance of the blind area of paving slabs and other paved paths contributes to the formation of an aesthetic appearance of the backyard.
Advantages of semi-rigid construction around the house:
- Subject to the technology of the device, the period of operation is from two to three decades.
- There are no climate restrictions, with the exception of permafrost.
- It can be done with a small financial investment.
- Easy to preventive maintenance.

Soft
To make soft-type foundation protection around the house, you will need a multi-layer pillow covered on top with a layer of rubble. Such a design is characterized by minimal cost and time. But it will bring benefits for a maximum of seven years. It can be done in any region, however, they resort to a similar solution for arranging temporary protection around the house with a lack of finances.
A blind area made of concrete, made in compliance with all the rules, is presented in the following video:
Technology for the manufacture of concrete pavement
The construction of a concrete protective structure around the house begins with the purchase of materials. For these purposes, you will need:
- Cement. It is optimal to stop at the M500 brand.
- River or quarry sand without impurities that can spoil geotextiles.
- Crushed stone fraction from 5 to 10 mm.
- Natural clay or geotextiles will help to make a hydraulic lock around the house.
Site preparation
Excavation work on the design of the blind area around the house begins with the removal of the top layer of soil. The use of herbicides will help to exclude the activity of vegetation under the concrete structure. To make an accurate designation of the boundaries of the blind area relative to the edge of the roof slope, use a plumb line. For marking around the house, the rope is pulled over stakes. In addition to the corners, to avoid sagging, they are installed at intervals of 5-6 m. The installation of beacons on the basement around the house with a frequency of 1.0-1.5 m will help to make the correct angle of inclination of the blind area.

hydraulic lock
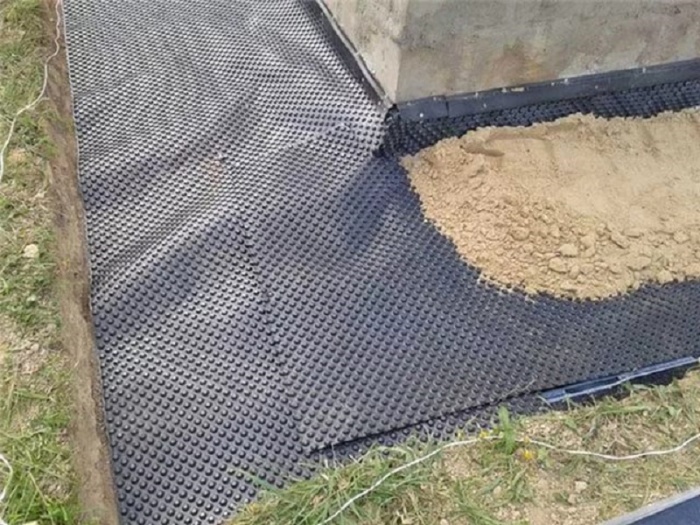
A hydraulic lock can be made using a layer of greasy clay, the thickness of which is 10-15 cm. A full replacement is a waterproofing material - roofing material, geotextile, PVC film. The film will remain intact if the protection is made with a sandy layer 5-10 cm thick, located under the material and on top of it.
Attention! The sand under the future blind area must be leveled, moistened and compacted.
The installation of the material should be done correctly without tension so that it can move around the house along with the ground. When arranging a hydraulic lock with clay, only one sandy layer is formed.
Pillow Shaping
Further, according to the technology of the device around the structure of the blind area, it is required to make a pillow. Initially, an embankment is formed from crushed stone 5-10 cm thick. The use of material of different fractions provides better compaction. Gravel or brick fight can be a replacement for rubble. When located close to the blind area ground water, between sand and gravel, it is necessary to make an additional waterproofing layer of geotextile. The edges of the material must be exposed to the formwork.
The optimal thickness of the sand layer is 10-15 cm, taking into account high-quality ramming. You can do the work manually, the vibrating plate is capable of facilitating the laborious process. Periodic wetting with water increases the density of the sand cushion for the blind area around the building.
Important! The formation of a pillow around the house takes place with strict observance of the angle of inclination of the concrete blind area.
A well-equipped blind area around the house with their own hands contains high-quality drainage. The following design is able to cope with the problem of drainage:
- Around the house, it is required to make a trench about 20 cm wide to a depth of 10 cm.
- The recess is filled with rubble or made out with a drainage pipe.
- Pipe laying is carried out with a slope to make a full drainage system.
At the same stage, stormwater inlets are being installed around the house.
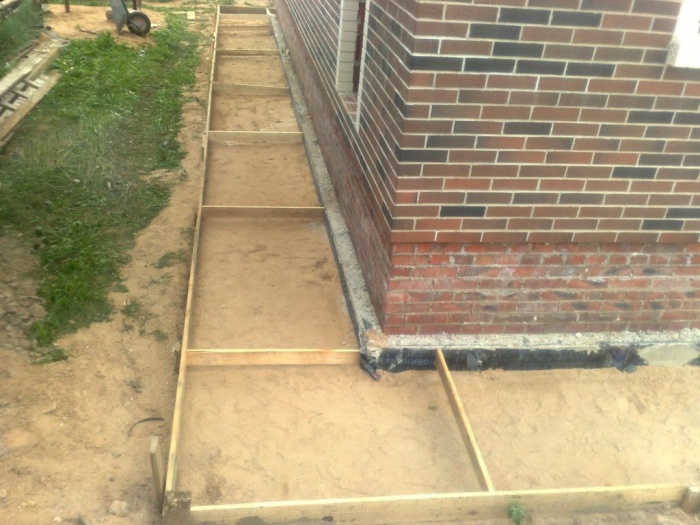
Formwork installation
It is better to make formwork around the house from boards 30-40 mm thick. The height depends on the size of the blind area made of concrete. If the dismantling of the structure is not planned, the boards are treated with an antiseptic solution, it is also desirable to waterproof them with a roofing material.
Correctly make formwork around the building for a concrete blind area using a level. Stakes clogged from the outside are capable of leveling the impact of the bursting solution. To fix the formwork structure at the corners, corners on bolts with a diameter of 10 mm will help. In order for the blind area to have an attractive appearance upon completion of the work, it is required to make the internal seams of the formwork boards invisible.
Important! To make a blind area around the building correctly, you will need to design an expansion joint.
The seam is located at the junction of the walls of the structure and the blind area, as well as across the system. The absence of this element will provoke the appearance of cracks in the protective structure made of concrete. It is required to make transverse seams with an interval of 2 m. Boards with a thickness of 20 mm will help to arrange the gaps of the desired size. If pouring concrete for the blind area around the building is not planned, the stage of arranging the formwork is excluded.
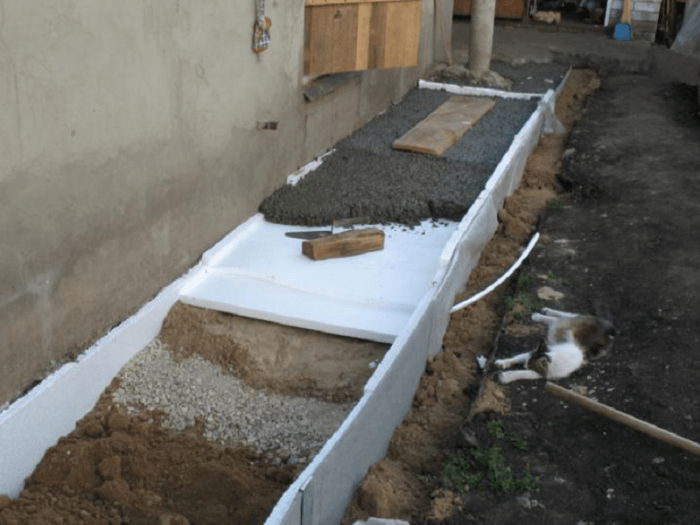
Insulation installation
The following algorithm of actions will help to qualitatively make the insulation of the blind area:
- Styrofoam sheets are tightly laid around the building, bricks are used as temporary fixation.
- The space between the plates is filled with mounting foam.
- After it dries, the protruding parts are removed with a sharp knife.
- On top of the foam, it is required to make a second layer of thermal insulation of the concrete blind area in the form of expanded polystyrene plates.

Reinforcement and pouring concrete
To ensure the strength of the concrete pavement around the building, reinforcement is required. The mesh size is 25 cm. Apply mesh netting not recommended due to excessive flexibility of the material. If there is no insulation layer, the reinforcing cage is placed above the blind area pillow at a height of 2-3 cm. This design contributes to the high-quality distribution of the concrete mortar.

The key point in pouring concrete is to monitor the uniform distribution of the solution and the absence of air bubbles. "Bayoneting" will help eliminate voids, which is best done with a metal rod. In the process of drying the cement composition, it is periodically moistened with water to avoid the appearance of cracks. Also, the blind area cast from concrete can be covered with a film to slow down the evaporation of moisture and uniform hardening of the protective structure around the house.

Conclusion
As a protection of the blind area from concrete, it is possible to make it iron. There is a dry and wet processing method. Alternatively, apply a surface coating with a primer, liquid glass or enamel.
To give the protective structure of concrete around the building a decorative effect, it is preferable to make a cladding. As a material, tiles (clinker or paving), natural stone, pebbles are suitable. In such a situation, concrete acts as a binder solution.
Another option on how to make a reliable blind area around the building is presented in the following video:
The blind area is called the design, the main purpose of which is to protect the foundation of the house from the effects of adverse factors. environment. With its presence, water cannot seep to the base of the building and destroy it. In addition, the blind area often performs a purely decorative function. A variety of materials can be used for mounting such a design.Depending on this, the
What to consider when drafting a project
The requirements for structures of this type are mainly as follows:
The blind area must be waterproof. Otherwise, it will not fulfill its main function - to protect the underground part of the foundation of the house from destruction.
The blind area should be equipped with materials that are resistant to cracking during strong temperature changes. The climate in most of the territory of Russia, as you know, is sharply continental. And the temperature range on the street, even within the same season, can vary quite a lot.
Next, we will consider different technologies for the blind area device. SNiP - rules that, however, must be followed exactly when erecting a protective tape of any kind. The design of the blind area should be drawn up taking into account the fact that:
ribbonmust have a slope of at least 2 degrees in the direction from the wall of the house;
Should be in the range from 70 cm to 2 m;
between the blind area and the foundation, a small temperature gap of 1-2 cm should be left.
The slope of the blind area in the process of its arrangement can be performed both at the stage of backfilling and tamping of the substrate, and when laying the base material. The width of the tape itself is chosen taking into account, among other things, the fact that it should protrude 20-30 cm beyond the roof overhang. Otherwise, the water flowing from the roof will seep under the blind area and spoil the foundation.

What materials can be used
The procedure is relatively simple -blind area at home. DIYsuch a design can be done without much difficulty.Most often, blind areas around buildings are poured, of course, fromcement-sandmixtures. The latter, according to technology, is supposed to be cooked in a ratio of 1x3. The substrate is made using crushed stone and sand. Also, paving stones can be used to equip the blind area. Sometimes it just falls off with rubble. In this case, tightness is ensured by arranging a clay substrate.
The choice of a particular material depends primarily, of course, on the financial capabilities of the owner of the house. The cheapest option for the blind area is crushed stone. Pouring concrete tape is a little more expensive. When using, you can collect not only a reliable, but also a very beautiful blind area. However, this option will cost the owners of the house, of course, quite expensive.
In addition to the cost, when choosing a material for the blind area, the owners of the house should also take into account design features the building itself. So, for example, for wooden house perhaps a clay blind area is more suitable. The top layer of rubble in this case at the final stage can be covered with earth. As a result, the space around the house will look as natural as possible. For a concrete building with plastered walls, most likely, a cement blind area is best suited. Around a large brick cottage, of course, it is worth equipping a protective strip from this. This will give the exterior of the building a finished look.

When choosing a material for the blind area, it is worth considering another rather important factor. It is believed that with a basement height of 50 cm around the house, it is more expedient to equip a concrete structure or a tiled one. If the above-ground part of the foundation protrudes above the surface to a height of 30 cm, you can also use crushed stone dump tape for protection.
The main technologies of the blind area
So, the blind area around the house can be built by pouring a cement mixture or laying tiles or clay. But there are other, more original ways of mounting such structures. For example, when arranging a blind area, geotextiles, multi-colored pebbles and even glass bottles can be used. In any case, when building a blind area, the chosen technology should be followed exactly. Otherwise, after some time, this structural element of the building will have to be repaired or even completely re-equipped.
Insulated option
Most often, homeowners in Russia equip ordinary blind areas around them, consisting of two layers: the substrate and the main upper part. But sometimes insulated versions of a similar design are also constructed around the perimeter of the building. Such blind areas, of course, are more expensive than usual ones. However, in some cases, their arrangement is a matter of necessity. Without fail, for example, insulated blind areas are erected around buildings built on heaving soils. It is also customary to equip such structures to protect columnarand shallow strip foundations. Further in the article, we will consider, among other things,and technology of the device of the warmed blind area.
The main stages of installation
Actually the technology of erecting a blind area when using different materials applied almost identically. This element is usually arranged in several steps:
markup is performed;
a “trough” is dug under the blind area;
formwork is installed;
a substrate is laid at the bottom of the "trough";
the laying or pouring of the main material is carried out.
Below we will considerpaving slab technologyand crushed stone, as well as pouring it from concrete.
How to markup correctly
When performing this procedure, be sure to use a plumb line. With its help, at the first stage, the projection point of the roof is found. To do this, they climb the ladder to the level of the roof, apply a plumb line to its edge and make a mark on the ground. Then they retreat in the direction from the building by 30 cm and drive a peg into this place. Having thus determined the required width of the blind area, establish landmarks around the entire perimeter of the building in increments of 1 m, making the necessary indent from the wall. After all the pegs are driven into the ground, they are connected with a cord.

Foundation preparation
This procedure, like marking, is performed almost the same for all types of blind areas. Preparation is made as follows:
Soil is removed inside the markup. This procedure should be performed using a bayonet sharp shovel. With this tool, you first need to cut the ground along the cord. Then the middle part of the "trough" is selected.
The bottom of the "trough" is compacted. The most convenient way to do this operation is with a shovel.
The total depth of the "trough" under the blind area should be at least 25 cm.
Substrate for cement structures
Concrete pavement deviceinvolves the use of formwork. It is easiest to make this design from boards 1.5-2 cm thick. Such lumber simply needs to be installed on the edge along the perimeter of the “trough” and fixed in this position with support posts.
After the formwork is assembled, you can proceed to the actual arrangement of the blind area itself. This procedure is performed as follows:
Roofing material is laid at the bottom of the trench in two layers.
The sandy "cushion" falls off. This element of the "pie" blind area is considered mandatory. Without a "cushion" in the future, the concrete part of the blind area will certainly begin to crack. The thickness of the sand layer in the substrate should be 5-10 cm.
The sand is carefully compacted by moistening with water from a hose with a shower head.
A layer of rubble is poured over the sand. Its thickness should be 5 cm.
Crushed stone is leveled and compacted with a shovel.

expansion joints
Blind area device technology around the houseinvolves the use of these additional elements in its design.One of the properties of concrete is the ability to expand with increasing temperature. Because of this, cracking of the cement blind area may occur. To avoid this,in the formwork around the entire perimeter of the house, not too thick bars should be installed across, in increments of about two meters (per edge). It is impossible to pour a concrete blind area with a continuous tape.
You should also make an expansion joint along the wall of the house. For its arrangement, you can use foamed polyethylene. This material simply needs to be applied to the wall in the area where the blind area adjoins. But it’s easier to make a compensation layer with the help of a roofing material laid on the bottom of the “trough”. This material must be raised to the wall to the height of the future blind area.
Reinforcement
Blind area technologyinvolves, among other things, strengthening through reinforcement. Using this procedure, the risk of cracking the tape in the future can be minimized.Reinforcement significantly extends the life of the blind area. To strengthen the tape, a metal mesh with a cell of 5 cm is usually used. This material is cut according to the widthfuture blind areaand laid on top of rubble around the perimeter.

Concrete pavement technology
Cement mortar forI'm pouring into the formwork lIt is best to cook in a concrete mixer. In this case, it will turn out to be of better quality. It is worth pouring the blind area in one step. In this case, it will turn out to be more durable. When pouring, the slope should be constantly monitored. At the end of the procedure, the tape should be allowed to dry for about two hours. Then the blind area must be covered plastic wrap for about 2 weeks.
Tile Tape
Blind area device technologyin this case will be slightly different from the method presented above.. To the bottom of the trenchfor tiled constructioncrushed stone is poured in a layer of 5-7 cm. Clay is laid on top of it. There will be a lot of seams between the tiles on such a blind area, for obvious reasons. That is, paving stones will not be able to provide at least relative tightness of the tape like concrete. The role of a waterproofing agent in this case will be performed by clay. The thickness of its layer in the substrate should be at least 5-10 cm. The clay must be compacted with a rammer. On top of it is to put also pvc film. This will provide additional insulation.
A layer of sand is poured over the film in the substrate. A cement-sand mixture prepared in a ratio of 4x1 is poured onto it. The thickness of the concrete layer in this case should be equal to 3 cm. The flooded area is leveled with a mop. Paving stones on the blind area should be laid in the direction away from you with dressing of the seams. Leave a gap of 1 cm between individual tiles.
Crushed stone tape
The technology of the blind area from paving slabs, thus relatively uncomplicated. But it is even easier to make a protective tape around the house from clay and rubble. Such a blind area can turn out to be very reliable. But of course, only subject to certain rules of dumping.
Under the rubble structurealso pre-dig a "trough". Further, the bottom of the latter is carefully rammed and leveled with a slope. At the next stage, clay is poured into the “trough” with a layer of 15 cm. This material should also be laid with a slight slope in the direction from the wall of the house. In this case, a roofing material or a thick PVC film is spread over the clay (with a slight overlap on the foundation). You can fix the material on the surface of the base, for example, with slats. The joints of roofing material are easiest to glue with bitumen.
A layer of sand 10-15 cm is poured over the waterproofing. The resulting “pillow” should be tamped with water and leveled with a slope. A layer of geotextile can be laid on top of the sand. This will prevent the germination of weeds on the blind area. Further, the crushed stone itself (with a rammer) is placed in the "trough".
How to make an insulated structure
In this case, the usual tlaying technologyblind areas.Howeveratherarrangementin addition, thermal insulation material is used. As the latter, it is allowed to use both expanded polystyrene and expanded clay.
The first layer of clay is laid on the bottom of the "trough". Next, crushed stone and sand are poured (with a rammer). Then the selected insulation is laid. Expanded clay should be poured in a sufficiently thick layer. stack as closely as possible to each other. Roofing material is laid on top of the insulation. Next, a layer of sand is poured. At the final stage, the concrete mixture is poured or the tiles are laid.

Instead of a conclusion
The technologies for installing a blind area made of paving stones, concrete or clay are thus simple. However, it is imperative to comply with the SNiP standards when erecting such structures. If there is a sand cushion and a waterproofing pad in the “pie”, it will turn out to be as durable as possible. Compliance with the slope during the installation process will ensure the best efficiency of this element of the building structure.
Let's say right away that there are no regulatory documents in our country that would regulate the correctness of creating a blind area. Separate standards tell about its purpose, required dimensions, angle of inclination and other information. The sequence of actions is not scheduled. However, there is a lot of world experience in this matter, which it would be foolish not to take into account.
These documents say that the blind area is arranged near the building in order to protect the soil from getting wet along the perimeter of the building. That is, it is part of the water protection measures. Why protect the soil, you ask? Yes, because when it is saturated with water, moisture begins to penetrate the foundation if it is poorly waterproofed. During the period of frost, this causes increased heaving of the soil and the destruction of concrete.

Also, the abundance of water in the soil can affect its bearing properties. This is inherent in clay and loamy soils. As a result, they cannot cope with the load from the structure, and it begins to sag, causing serious deformations, which can lead to cracks in the walls and foundation. Therefore, it is so important from the very beginning to take care that the soil around the house does not get wet. In addition, it reduces the load from the waterproofing of the foundation.
The blind area is also part of the architectural appearance of the whole house - without it, the building will not look attractive, even if expensive and beautiful materials are used to decorate the facade. Everything must be harmonious. And again, the blind area can be used as a path - it can be disguised and made one with the decoration of the local area.

What are the requirements for the blind area
Not a single regulatory document requires linking the size of the roof overhang with the required width of the blind area, although the connection, at first glance, can be traced naturally. Very often you can stumble upon information that you need to retreat 20-30 cm from the projection of the edge of the roof overhang. In fact, this is not required, since all water from the roof must be drained through the system. If you have not provided for it, then, indeed, these parameters can be correlated, but not necessarily. The blind area can have two minimum sizes, depending on the type of soil - 70 cm for sandy and 100 cm for clay.

An unorganized drain from the roofs of two-story houses (no more) must have an overhang of at least 60 cm in width. At the same time, the difference with the width of the blind area will be only 10 cm. It follows that the recommendation about the ledge by 20-30 cm is purely advisory in nature - many do this, but there is not much point in this, because even if the overhang is wider than the blind area right size and water will fall into the ground, it simply will not go this distance underground. The main thing is to protect the necessary centimeters.
There are also looser soils, which are called subsidence. There are two types of them, and the requirements for the width of the blind area will differ significantly here. Type 1 - 1.5 m or more, type 2 - 2 m or more.
Interesting to know! If a foundation pit was dug for the house, then the width of the blind area on any soil should go beyond its borders by at least 40 cm.
As for the angle of inclination of the blind area, it should fall in the range from 1 to 10%. For subsiding soils of both types, the minimum is 3%.

Types of blind area
There are three options for the blind area device, so first decide which one suits you best.
Hard blind area
This option is a solid tape around the perimeter of the entire structure. It is made of ordinary concrete or asphalt concrete.

Interesting to know! Asphalt concrete is a fairly plastic material, so it tolerates bending loads well. For this reason, it does not need to be reinforced with a reinforcing layer of rebar or steel mesh. Cement concrete does not have such properties, so reinforcement is strictly necessary.
Such a blind area is arranged according to exactly the same principle as sidewalk paths. The only thing you need to strictly observe the slope for good water drainage.
Both types of material are able to resist the penetration of water, of course, not 100%, but this indicator is quite high, due to which the soil around the building is effectively protected. From here, a certain rule can immediately be deduced - there should be no cracks and gaps in such a blind area, since they will serve as direct routes for the penetration of water into the soil.

Another rule for such a blind area is the need for a small deformation gap between it and the structure in case of thermal expansion of the material. So that there are no open slots, they are then filled with elastic materials, after which they are finished.
The next type is called semi-rigid. It is made of clinker bricks and paving slabs. The laying of the material is carried out in exactly the same way as on the tracks, but it is necessary to lay a layer of waterproofing at the base. Membrane and film materials are used for this. Such a coating can be arranged on dry sand or on a concrete base.

The simplest and most inexpensive option to perform is a soft-type blind area. It involves organizing a tape of water-repellent clay around the house - the material is rammed, after which it can be decorated on top with rubble or marble chips. Such a blind area was made in the old days, although even now it can be used for small buildings and country houses. To increase its effectiveness between the layers of clay and gravel, you can additionally lay a waterproof film.

Now the blind area based on a profiled membrane has become very popular - it belongs to the category of soft ones. She does it this way. First, a trench is dug around the entire house with a depth of 25-30 cm, the bottom of which is rammed so that a slope is obtained. Then a membrane is laid - it can be laid with an overlap on the foundation. Next, drainage is made of sand and gravel, and then a layer of soil. On such a blind area, you can safely plant a flower garden and not be afraid that the house will remain unprotected.
The problem with oversaturation of the soil with moisture often depends on the region. If you encounter this problem, you can solve it by installing drainage. In we will consider in detail, using examples, all aspects of this issue.

The second name of this blind area is hidden. This is an elegant and beautiful solution that will definitely decorate your home, but it will not be possible to walk on it, which will already be a significant disadvantage.
Why the blind area can become unusable
The desire of our people to constantly save is not some kind of greed, but a necessary measure. Well, we do not have such income to afford everything that technology prescribes. However, there are things on which saving is simply a crime, because as a result, everything results in even greater expenses. The list of such phenomena, of course, includes the blind area.
People tend to underestimate the power of natural phenomena, due to ignorance or careless attitude to business. And by the way, simple freezing of wet soil can squeeze out and split an entire concrete slab if it is not strong enough - we remind you that concrete does not belong to the category of elastic materials. The integrity of the blind area is also influenced by other factors that should be considered:

Advice! If there is a water outlet from the basement of the building, a separate gutter must be provided under the tap to drain the water. The same must be done at the ends of the drains.
How thick should the blind area be
How thick should the concrete blind area be to cope with the amount of water that falls on it from above? We are not talking about other options, since everything is determined by the thickness of the material used, while monolithic concrete must be accurately calculated. The essence of such calculations is not to determine the minimum thickness - it must be taken at least 7 cm, but, on the contrary, to calculate the maximum thickness at home.

It's easy to do. You know the angle of inclination that you will give for the blind area. Next, check as much as you want so that the blind area protrudes above the rest of the area, for example, 7 cm. We take into account the width of the tape, draw the resulting right triangle and find the height of the back side. To do this, you can use the Pythagorean theorem or the rules for finding lengths by the magnitude of the angle. If the calculations are difficult for you, then find the right one online calculator and get results in a few seconds.
How to make a blind area with your own hands
Now that we are aware of the basic requirements, let's see in what sequence the work needs to be done. For this we need the following materials and tools.
Table 1. Required materials.
| Materials, photos | Description |
|---|---|
| We will use Portland cement grade 400 or 500. We do not recommend taking less, since now there is a high probability of running into low-quality material. |
| The sand must be clean, so we take either river or washed sand. We also advise you to pre-screen it to avoid getting various debris and organic inclusions into the concrete. |
| A large aggregate for concrete will be crushed stone or gravel. The fraction of the material should be no more than 40 mm - check this parameter before buying. |
| Ideally, the base of the blind area needs to be insulated, which will create additional protection from soil freezing. For these purposes, rigid extruded polystyrene, for example, penoplex, is used. |
| For the blind area, you need to form an even formwork. We use for this edged board 25 mm thick and not less than the thickness of the blind area. |
| The reinforcing layer will be made of steel mesh. You can also use reinforcement, but this is a clear excess and extra spending. |


From the tools - everything is as usual for working with concrete:
- A concrete mixer if you don't want to do everything by hand.
- Vibrating plate for high-quality tamping of the base - can be replaced with a manual tamper.
- Shovels - bayonet and shovel.
- A bucket into which ready-made concrete will merge from the concrete mixer.
- Buckets or stretchers - in the second case, the tool will replace the tub.
- Building level to check the slope of the bottom of the trench.
- Rule and trowel for leveling the concrete mass.
- A simple carpentry set to put together formwork - a hammer, a hacksaw and nails.
Prices for popular models of concrete mixers
concrete mixers
Other devices may also be required, which we will mention later if necessary.
So, let's get started.
Step 1 - marking and excavation.
First of all, we need to accurately mark the boundaries of our blind area. We use twine and wedges for this. We have already written about these parameters above. Next, the soil is excavated - for a high-quality blind area, 20-25 cm will be enough. The waste soil should be immediately taken out of the site, as it will interfere with work.

At the same time, it is worth removing the remains of roots, any sharp objects and large stones from the trench. The bottom of the trench is leveled as far as possible and rammed. It will not be necessary to ram much, since the integrity of the soil below was not violated by us. The exception is cases when the excavation was previously filled back - here you need to especially try. The bottom of the trench should slope away from the house.
Step 2 - sand filling.
The next step is sand filling. We pour the material evenly, after which we level it well with a piece of board or rule. Please note that in the photo the formwork has already been installed by the master. He made it even before digging the pit. You can do the same, or organize it after the construction of all layers of the base - the essence of the person will not change.

Step 3 - Wet the sand.
To make it easier to compact the sand, it is recommended to moisten it. Moreover, using a watering can, like the master in the photo, will not be enough here. It is much more effective if you apply water through a hose and a sprayer so that the sand does not wash out. You need to wet the entire layer of the sand cushion, so do not spare water. During the passage of water through the sand, it will already begin to be compacted. If you spill well enough, then drawdowns may immediately become noticeable. If you do not have a vibrating plate at hand, we advise you to do this several times throughout the day.

Step 4 - compacting the sand.
Next, the sand is rammed. We go through each section of the tape without missing anything. After tamping, be sure to check whether the slope that you gave to the bottom of the pit is preserved, if not, then the sand must be added and the procedure repeated until you achieve the desired result.

Prices for a rammer
Vibroleg rammer
Step 5 - the installation of a waterproofing layer.
In principle, it is not necessary to lay a film under a concrete slab, since the concrete itself will not let water into the ground. However, such a measure would not be superfluous. She will play her part if it happens that the blind area gives a crack. As a result, due to the slope that we gave earlier, water will be diverted from the house. The waterproofing material is overlapped, while it is desirable to coat the joints with bituminous mastic.

Step 6 - insulation of the base.
The use of insulation is also an optional step, however, if you want to do everything as efficiently as possible, lay this layer, and your house will be guaranteed to be protected.

Step 7 - foaming the seams.
Since we decided to warm up, we do it right. Between the polystyrene plates there are gaps that will serve as cold bridges, so it is recommended to fill them with mounting foam.

We remind you that it is desirable to make an expansion joint around the perimeter of the building. How is it implemented? Some put boards, but then it is difficult to pull them out, and there is little sense from such work. For this reason, we advise you to organize a fixed formwork from the same foam, but of a smaller thickness - 2 cm is enough. Its upper edge is set so that it immediately forms the desired angle of inclination with the external formwork. You can also use foam insulation, but you can’t stretch the rule along it.

Step 8 - laying the reinforcing mesh.
We install the formwork, if this has not been done before. It is knocked down with nails and strengthened with wedges driven into the ground. From the inside, it is desirable to coat it with bitumen so that the tree does not draw moisture into itself. You can also wrap the material with plastic wrap.

Now we lay the mesh that will reinforce our concrete. Be sure to overlap, otherwise the tape will not be equally reinforced over the entire area, and cracks may also appear. Ideally, the reinforcement should be raised above the base by a couple of centimeters using special stands, but few do this, because of the inconvenience of subsequent movement - the mesh is simply laid on top of the insulation, and then, after pouring, it is slightly pulled up.
Step 9 - installation of partitions for expansion joints.
We break our tape into sections with wooden partitions. At the same time, they should not reach the base, so that concrete flows freely under them. You can also organize the seams by cutting through the concrete in the right places, immediately after it is poured. Here everyone chooses for himself.

Step 10 - pouring concrete.
It is prepared from the following ratio: 1 part of cement, 3 parts of sand and 4 parts of crushed stone. In this case, water must be added so much that the solution does not turn out to be very fluid.

We fill our formwork, distributing the mixture with a trowel and leveling it with a rule. In this case, the surface is smoothed as much as possible. It will not be superfluous to use a deep vibrator to make our tape more dense and durable.
Step 11 - ironing concrete.
Bay concrete, to increase strength, its surface must be ironed. To do this, dry cement is poured on top pure form and smoothed evenly with a trowel.

Ready concrete requires maintenance for at least one week. So that when it dries it does not crack, it must be regularly spilled with water. When it's hot outside, you should cover it with an additional dark film. If you follow all the prescribed points, you will get an incredibly strong formwork that will last for decades.
Video - Blind area around the house
Video - Do-it-yourself blind area around the house
The device of the blind area around the building is done immediately, as soon as the work was completed to complete the finishing of the outer walls, but before the finishing of the basement was started. This is due to the fact that it is necessary to overlap the expansion joint between the track covering and the wall of the building so that water cannot get there due to the protruding surface of the base.
As for the screw, deep columnar or pile types of foundation, in this case there is not even a need to make a blind area, but it is done for the most part so that it serves as a footpath or as a decor for arranging the yard.
Design features of the protective coating
Such a coating must be created around the entire perimeter of the building, since it is necessary to protect the foundation from all its sides. As for the norms and requirements that apply to it, they are all described in SNiP 2.02.01-83, which says that regardless of whether the blind area around the house is done by hand or with the involvement of specialists, its width on normal soil is not should be less than 60 cm, and on soils that tend to sink - from 100 cm.
In any case, the width of the coating should not protrude from the cut of the roof by at least 20 cm. The maximum width is not established by the regulations.
The hard coating must be laid only on a dense base, which has a thickness of at least 150 mm. It is very important to pay attention to the fact that the slope of the blind area from the building should not be less than 0.03%, taking into account the excess of the lower edge above the planning mark of no more than 50 mm. As for storm water, they must be discharged into special trays or stormwater drains (storm sewers).
A good insulated blind area, which should fully fulfill all its functions, consists of 3 layers:
- Waterproof (top).
- Underlying (sand with crushed stone or gravel).
- Warming (polystyrene foam).
Sometimes experts use another layer, which is used as geotextiles, the main task of which is to provide reliable waterproofing from groundwater. Groundwater can bring problems every spring, so the use of such a layer is quite relevant. Among other things, it will protect against the germination of weeds.
Materials for the top layer
Before you make a blind area around the house, you need to decide on the materials that will be best suited for these purposes. There are a large number of materials that differ in their capabilities.
- Among the most commonly used, economical and simple materials, clay is widespread. It is able to create a sufficient hydrobarrier. Most often it is used in rural areas, but with regard to modern buildings, the use of clay has long been abandoned, as more efficient technologies have replaced it.
- A more modern and common option is a blind area made of concrete pavement. Without investing a lot of money, such a blind area can be done very quickly, with your own hands. Concrete has a high service life and strength. Among other things, to improve its appearance, you can cover it with paving slabs or other coating.
- The blind area can be finished with paving slabs, which are laid on a mortar or cement-sand mixture. Often it is used as a creation of a single decorative style yard. The tile is quite durable and will not cause any problems when laying.
- You can also use paving stones, which are also suitable for these purposes, if you lay it on a sand cushion, after tamping it. It has a pleasing appearance to the eye, but it stands several times higher than paving slabs and has some difficulties during installation. When using this material, it is imperative to seal the seams in order to completely seal the top layer.
- In order to enjoy the blind area for many years and not think about repairs, it is recommended to use natural stone. But it is worth noting that such material can only be available to fairly wealthy people.
- As for asphalt, it is very rarely used due to the fact that it emits an unpleasant smell in the summer heat and does not have a high level of strength if it is made by hand. And buying from the factory will cost much more than a concrete blind area around the house.
Along the entire perimeter of the blind area, it is necessary to lay trays for draining water. Such trays are made of asbestos cement or ceramics. Last but not least is a well-made gutter. For some works, it is recommended to invite specialists if there is not enough theoretical or practical knowledge.
How to DIY
To start work on the creation of a concrete version of the protective coating, it is initially necessary to prepare a certain list of materials and tools, which includes:
geotextiles, which in principle can be replaced with clay;
- Portland cement 500 or Portland cement 400;
- reinforcing mesh with a cell diameter of 10 by 10 cm;
- washed or river sand;
- processed board or bitumen to process it;
- crushed stone fraction no more than 4 cm or gravel;
- polystyrene boards.
Once all the material is prepared, you need to take care of essential tool for work:
- hammer;
- concrete mixer;
- hacksaw;
- rammer or, if possible, a vibrating plate;
- mason's trowel;
- shovels: shovel and bayonet;
- rule for plaster;
- capacity for concrete;
- level.
To properly make a blind area with your own hands, step-by-step instruction help avoid mistakes and extra costs. The whole process begins with the fact that you need to carefully markup. Marking should be done around the entire perimeter of the building. As soon as this stage is over, you can remove 30 cm of soil and tamp the bottom.
The next step is to spread geotextiles on the rammed bottom or, if clay is used, then it must be tightly tamped to about 6 cm thick. On top of this, a mound of sand 5 cm thick should be made, and this layer must also be tightly tamped. Sand plays the role of a protective layer so that crushed stone does not damage the waterproofing layer.
Now is the time to put together formwork from the boards along the edge of the trench. Some use sheet material for these purposes in the absence of boards. When preparing the formwork, it is imperative to make its height 5 cm higher than the expected level. Now is the time to start backfilling a layer of crushed stone with gravel, which must be compacted to a thickness of 8 cm and sprinkled with sand on top. A lot of sand is not required, it is necessary so that during the pouring of the concrete mixture it does not penetrate into the voids between the rubble.
Before making a blind area, it is necessary to provide for expansion joints 1-2 cm wide. This is necessary because in hot weather the concrete layer can expand, and at very low temperatures it can break. This seam will prevent such a situation. Such a seam is made using a waterproofing material 1-2 cm thick or roofing material.
Among other things, approximately every 100-200 cm at all corners of the house across the blind area, it is necessary to make pieces of boards up to 3 cm thick and install them. This is necessary to compensate for possible expansions.
Naturally, before installing such cross rails, they must be carefully treated with a bitumen composition so that they do not rot. It is necessary to install such rails so that their upper edge is flush with the concrete poured in the future.
concrete layer
To maximize the strength of concrete, it must be additionally reinforced with a metal mesh. by the most optimal size cells will be 100×100 mm. Some craftsmen use wire with a diameter of up to 8 mm for these purposes. In fact, it can also be used, but only in this case it is necessary to bind all the individual elements together.
Once all the preparatory work has been completed, you can begin to prepare the concrete mixture and proceed with its pouring. You can purchase ready-made concrete of the M200-250 grade, but you should understand that this will significantly increase the overall estimate.
Before pouring the blind area around the house with your own hands, you can prepare concrete in the ratio:
- gravel - 4 parts;
- sand - 2.5 parts;
- cement - 1 part.
Water is best added to the concrete mixer as a last resort in small portions and kneaded until a homogeneous mass of medium density.
Filling the blind area is as follows. The process must be approached as responsibly as possible. The mixture is laid on top of the reinforcing mesh so that the slope of the blind area to the building is at least 3%, and the mesh should be slightly above ground level. Thus, we obtain a formula in which an increase in the level of 3 cm should be for every meter of width.
To remove air bubbles from the concrete solution, it is necessary to use the so-called bayonet. In order to level the surface as much as possible, it is necessary, using a trowel and a plastering rule, to carefully compare the surface with a constant control of the slope angle, using a level.
To make the surface even more durable, you can use a special ironing technology. To do this, it is necessary to sprinkle an even layer of dry cement through a sieve onto the surface of the wet mortar, which has not yet had time to set. If you do this without a sieve, then you have to use a spatula and rub it gently.
If the blind area is done in dry and hot weather, then the following steps must be performed. So that the concrete does not dry out, namely, it seizes, it is necessary to cover it with a wet cloth and water it with water after certain periods. The first 3-4 days you can not stand on it. Only after this time will his top grab, and it will be possible to step on the blind area without fear of damage.
paving slabs
Before you properly make a blind area around the house from paving slabs, you must first make another base for it. This is due to the fact that tiles do not have the same level of strength as concrete.
The base must be very dense. The first layer of clay must be increased, after which a mixture of sand and cement will be laid, on top of which the tiles are laid.
It should be noted right away that in the case of paving slabs, the trench should have a depth of 45 cm. Only in this case it will be possible to obtain high level sustainability. As a bottom layer, clay must be compacted so that its thickness reaches 30 cm. This will provide normal protection in the spring in case of a rise in the groundwater level. On top of this layer, a border is installed along the edge of the trench, which should not be higher than the level of laying tiles along the edge of the blind area.
Gravel or crushed stone is used as the second layer, which also needs to be well compacted to a level of 10-15 cm thick. This layer should be level with the ground. It is necessary to lay geotextile on top of it so that not a single plant can grow through it. Now you can start pouring a mixture of sand and cement, and then start laying the tile itself.
It is very important to follow the technology exactly.
paving stones
What is pavement pavement? This is one of the best materials for these purposes. It looks great and is thicker than the previous material and better resistant to external influences. It is noteworthy that due to its properties, paving stones can be laid directly on the sand. The trench can have a depth of 15 cm. It is enough just to lay the geotextile, then put a curb and compact the sand so that it does not reach the end of the trench a little. Now it is enough just to lay the material.
Attention! Despite the ease of installation and good appearance, it is necessary to remember the high cost of paving stones.
After laying, it is necessary to seal the masonry with cement mortar, which must be laid in the seams between the stones. In this case, it is necessary to ensure that the curb is not located above the upper level of the coating.
soft option
To learn how to properly make a soft blind area around the house, you first need to understand the term itself. This means crushed stone, pebbles, cobblestones, gravel and other materials, under which there is a layer of sand (sometimes clay is used), which are covered with plastic wrap.
Among all existing modern options this is the most economical type of coating, but it should also take into account the low operational period, which does not exceed 5 years. As soon as this period has passed, it will be necessary to repeat the procedure for laying a soft or any other blind area again.
It is worth paying attention to the slope of clay and polyethylene. This moment is important due to the fact that water is not drained by the top coating, but directly by the waterproofing layer.
Warming scheme
It is very important to learn how to properly make a blind area around the house, to think about its insulation. This is especially true for regions with traditionally low temperatures and for almost the entire territory of Russia in winter. Thanks to the insulation, it will be possible not only to keep the foundation intact, but also to keep the heat in the house.
For insulation, it is necessary to take high-quality material that does not rot, has a sufficient level of density, hydrophobic and durable. Under these parameters, polystyrene foam or polystyrene is best suited.
Insulation work must be carried out in 3 steps, which must be done in the course of creating a blind area:
- On clay or a thin sand cushion, it is necessary to lay a waterproofing or roofing material in such a way that part of the roll extends to the side walls.
- The second step is to insulate the basement wall. To do this, it is necessary to fix thermal insulation on it. When fixing the sheets, it is necessary to connect them as tightly as possible with grooves, and when this is not possible, then it is necessary to seal them using mounting foam.
- As for the horizontal layer, it must be laid directly on the lowest layer. To save money in this case without losing quality, you can use a layer of foam, and fix polystyrene foam on top of it. When laying, it is necessary to control that the seams between the layers do not coincide vertically.
On the Internet, you can find tips that with this type of insulation, you can use expanded clay instead of crushed stone, but this can even do more harm. The problem is that empty cavities remain in bulk expanded clay, where moisture will begin to appear over time, which will negatively affect the thermal insulation properties.
Operation and repair of the blind area
Now you know why you need a blind area around the house, why it is very important to properly care for and, if necessary, repair it. Over time, chips or cracks may appear on the surface of the concrete. Often this situation occurs due to subsidence of the soil, with the wrong selection of expansion joints or the use of poor quality materials.
To repair such cracks, it is necessary to use sand, asbestos and bituminous primer, which are mixed into a homogeneous mixture, but before that it is necessary to slightly enlarge the crack and clean it of dust using water pressure. After it dries, it is necessary to pour the mixture inside.
If the damage is too large, then it is necessary to increase them even more to the extent that they can be filled with a new portion of concrete. If necessary, damage can even be additionally reinforced with a rod or wire. After the place dries, it must be treated with a primer.