An electric jigsaw is a tool without which it is simply impossible to perform many woodworking and material processing works in which it is used. Possessing compactness and low weight, a manual portable jigsaw is able to cut out products of very complex geometry from a workpiece.
In work, the jigsaw is very convenient and besides, it provides very precise and thin cut. If you do not want to spend money on a purchased jigsaw, you can make it yourself at home.
The lightest product
The jigsaw table itself can be made with your own hands in a short period of an hour. The advantage of the fabricated design is its simplicity. It can be easily mounted on a countertop or workbench and, if necessary, can also be easily disassembled. The disadvantage of a home-made design can be considered its small area.
The simplest product consists of the following parts:
- Plywood.
- Mounting screws.
- Clamps.
The working basis of the machine can be laminated plywood, in which it is necessary to drill holes for installing fasteners and for the saw itself. Plywood must be at least 10 mm thick. In this case, in the sole of your power tool, you may also have to make holes for the mounting screws.
Homemade design can be attached to workbench with clamps. Please note that the heads of the screws for fastening must be recessed into the surface of the sheet so that they do not interfere with you during operation. Such a machine can easily handle the processing of small workpieces up to 30 millimeters thick. A drawing of this type of machine can be easily found on the Internet, and then with your own hands you can assemble it at home.
Another variant
This option consists of the following parts:
- Bed made of chipboard.
- Tube for vacuum cleaner.
- Laminated plywood for machine cover.
- Confirmants.
There is a second option for a stationary fixture for working with wood material, which is assembled from a larger number of spare parts, but it will not be difficult to make it. The bed is made of chipboard and consists of a rear wall and two sidewalls. To make it easy to get to the power button, the front wall of the machine is missing.
AT back wall do-it-yourself necessary drill holes for vacuum cleaner tube and cord. The cover for the machine can be made of laminated plywood with a thickness of 10 millimeters. The whole structure can be pulled together by confirmants. The jigsaw can be fixed in the same way as described above in the first case.
On a machine made according to this option, more massive workpieces can be processed, however, when working with a thick workpiece, the jigsaw saw can go in both directions and lean back. In this case, the accuracy of the cut deteriorates. This disadvantage can be easily eliminated with your own hands by installing a bracket on a home-made machine that will serve as an emphasis.
The jigsaw saw will move between two 11mm bearings, which must be screwed to the L-shaped strip made of steel. The back of the saw will rest against the wall of the bracket itself. This design will prevent your jigsaw blade from deviating from a given path.
The bracket must be attached to the frame, made of bars 50 by 50 millimeters. It can be lowered or raised depending on the length and thickness of the wood being processed. To do this, the frame itself, together with the stop, must not be fixed tightly to the sidewall of the machine, but pressed against it with a hardboard, steel or textolite plate. We install a vertical rack of the frame between the hardboard and the frame.
The machine can be more convenient if you mount an additional limiting bar on it, with which you can cut the material into workpieces of the same length and thickness.
The limiter is attached to the machine with clamps. His made from wood beam, aluminum or steel corner. You can also, for convenience, install a bar on a sled, which must be fixed to the sides or bottom of the tabletop.
Table for jigsaw machine made of chipboard
 To make this jigsaw table, you must have a certain carpentry skill, since when connecting its tsarg with legs, it must be made into a tenon groove. The tenon groove itself can be changed to a connection using dowels, wood glue and self-tapping screws.
The cover of the machine must be made lifting, to facilitate access to the tool when replacing it. In order for the machine to be multifunctional, it is necessary to provide a place for mounting a milling manual machine.
The table is assembled from the following materials:
- bar 80 by 80 millimeters;
- bar 40 by 80 millimeters;
- laminated plywood or laminated chipboard measuring 900 by 900 millimeters.
Measure the distance between the legs, it should be from 60 to 70 centimeters. The bars for the prolegs and the tsarg will be obtained if the bars 80 by 80 millimeters are cut lengthwise. You can choose the height of the legs yourself at your discretion, it all depends on how convenient it will be for you to work on the machine.
At each end of the prolegs and the tsarg, it is necessary to drill two holes for the dowels. The same holes must be made on the sidewalls of the legs. Coat the dowels with glue for half their length and insert into the ends. After that, assemble the frame completely. It will turn out to be indestructible. After checking and possible corrections, it tightens tightly.
All surfaces at the contact points must be smear with glue. Use self-tapping screws for additional structural strength, which must be screwed through the holes prepared in advance for them.
The lid must be attached to one of the drawers with the help of hinges; for this, a slot must be made in it to facilitate the removal and installation of the jigsaw. In the countertop on the back side, it is necessary to screw two strips with a pre-selected quarter, into which the sole of the power tool should enter.
Holes must be made in the slats, into which bolts or clamping screws must then be installed. A jigsaw fixed under the tabletop will be able to cut thicker material if a recess is made for its sole in the lid. The easiest way to make this recess using a milling machine.
As a result, the table will turn out to be very simple and spacious, so the necessary strength of its cover can be provided by a large thickness of chipboard or plywood. Use sheets of 20 mm or thicker.
Jigsaw machine using thin saws
 Since, when cutting difficult patterns in plywood, I saw an electric jigsaw, it is not well suited for this, you need to take a thin nail file. It can be attached to a hand-held power tool using the original fixture.
We also attach the jigsaw to the tabletop, but a thin file must be pulled, as it will not be enough just set on a pendulum. To facilitate the process of stretching the file, it is necessary to make a rocker from a bar.
In this case, the tension of your web is provided by means of a spring. Put its lower loop on the transverse hairpin. The upper loop must be inserted into the adjusting screw, which changes the tension of the damper. All wooden blanks for a homemade machine are made of hardwood.
Since there is no possibility of fastening a thin-section blade in a jigsaw machine, you can remake a piece of an old saw by first drilling a hole in it and completing it with a screw with nut and clamping plate.
A vertical slot must be made in the rocker arm, into which a second steel plate must be inserted. It is attached to the rocker with screws. The upper part of the file must be attached to it in the same way as the lower part. To make it easier for you, you can take an old jigsaw to make a trimming plate.
Making a smooth, straight cut with a budget jigsaw is not at all easy. The reasons are simple - backlash in the jigsaw, removal of the file, little experience of the master. All these reasons can be easily eliminated with a homemade bed with guides for the base of the jigsaw.
The presented design allows you to cut wood, sheet metal, plastic and even paper at an angle of 30, 45 or 90 degrees. Solely for the sake of experiment, I cut an old magazine and, as you can see in the photo, the cut turns out almost like from a printing house.


Required materials and tools:
- Sheet of fiberboard or plywood 400 x 700 mm;
- Reiki 30 x 50 and 20 x 30 mm;
- self-tapping screws;
- Studs M6;
- Wing nuts M6;
- Furniture fittings (screw nuts) M6;
- From tools: jigsaw, screwdriver / drill, square.
Step-by-step instructions for making guides for a jigsaw
1. As a basis for the village, I took a WPV door from an old closet. You can use a sheet of plywood. On the basis we mark the centers of future supporting elements from wooden slats- the distance from the edge should be equal to half the thickness, in my case 15 mm with a rail thickness of 30 mm.
2. Along the perimeter, we make holes for self-tapping screws with a diameter of 3 mm with chamfers so that the heads of the self-tapping screws do not protrude above the plane of the bed base. 2-3 holes on each side.


3. The next step is to fasten the base supports from 30x50 mm rails with wood screws. Supports are necessary so that there is free space for a jigsaw file.

Finished back side.

And from the working side.

4. Next, we make guides from two 20x30 mm rails and a 10 mm plywood base, as well as jigsaw travel stops from a rail of the same section.

The length of the guides must correspond to the length of the frame, and the width is selected individually for each jigsaw. Looking ahead, I will present a photo from which the principle of selecting the width of the plywood base is clearly visible.

5. First you need to dismantle the base of the jigsaw. Next, applying a 20x30 mm rail, we make markings for fastening with self-tapping screws.

6. We place the rail under the plywood sheet, while the markings should remain on top!

We make three holes for self-tapping screws with chamfers to “hide” the fastener caps.

Fasten the rail to the base of the guide.
7. We fix the second side rail only after trying on the base - it should walk between the rails freely, but without backlash. After “trying on” the rail, we fasten it temporarily from above with two screws, and then, by analogy with the sixth step, we fix the second rail, and unscrew the temporary screws.

8. We fix the travel stops with two self-tapping screws.

9. According to the markup, in the first step we make marks with a pencil along the edges of the guide.

According to the marks, we mark and make holes with a diameter of 6 mm.

10. Using the holes made in the previous step as a conductor, we make holes in the base.

11. Using a 10 mm drill, we make blind holes 10 mm deep.

12. We screw furniture fittings into the holes obtained with a hexagon. They can be purchased at hardware stores for.


We screw the M6 studs into the futorki.

13. We do similar operations on the guide.

Then we drill the internal thread of the futorka with a 6 mm drill.
14. We mount the guide on the studs.


The move should be free, without jamming.
15. According to the marking, we make a through hole for the jigsaw saw blade (do not forget to take into account the protruding pin).

16. We perform a longitudinal cut with a jigsaw, it is important not to rush at this step, cutting at a low speed with the pendulum mode turned off (mark "0") in order to get the most even cut without removing the file.

17. Using a square, perpendicular to the guide, we fix the stop from the rail 20x30 mm.
I didn’t want to put my expensive Makitovsky jigsaw on the table all the time, so I decided to buy another one to create a table. I very successfully turned up a jigsaw in the store "Our House" Caliber LEM-610E for only 862r. Included: wood file, side stop, vacuum cleaner adapter, spare brushes for the motor.
There was an outlet next to the display case and I looked at it in operation. Quite decently made, convenient, there is an adjustment of speed with a wheel, the inclusion is fixed with a button. The saw holder moves clearly without backlash.
It’s very fortunate that I was able to twist it in my hands before buying it, I wouldn’t risk ordering it from the Vseinstrumenty.ru website without knowing what it is. (Although the reviews about it are good) By the way, it costs more there and also pays for delivery ... so I successfully bought it in Our House. :)
Despite the advantages, he has a number of shortcomings that he saw on closer examination:
1) The file does not fit into the file holder. Apparently this is a copy of the marriage, but I did not waste my time on the exchange. Each saw has to be sharpened. (Although on the second jigsaw I won’t be able to use them after turning - it doesn’t matter, they are relatively inexpensive)
2) And this drawback can be seen even in the picture. The canvas is tilted strongly forward. (This also managed to be fixed by putting under back soles of tin strips, achieving 90 o .
3) The speed control wheel turns hard, not very clearly and with jamming. At the minimum speed value, the tool cannot start at all (However, the same garbage with the start-up of my other "caliber" drills. This is unpleasant, but does not spoil life much)
As always, everything is in the spirit of minimalism. I did not make a separate switch. It is quite conveniently turned on with a standard button and fixed.
To do this, I bought a bracket in KrepMarket (this is a fastener from some kind of iron structure system)
By the way, I love CrepeMarket. Any screws, nuts, screws, fasteners. Every time I design something, I wander there in thought and collect the necessary details for myself.
The excess was cut and trimmed.
Back view. Now the distance between the bearings has a fixed file clearance of 1.2mm. I have a plan for the future: make a gap adjustment.
For thin materials can be omitted below.
As an experiment, I drew an asterisk and tried to cut it out evenly
For a 130mm file, the maximum possible thickness is 5cm. It turns out that there are very long files, I recently saw a 300mm file on the market
Sawed off a 1.5mm slice from a 40x40mm bar
Which is what I did. Now it can cut long workpieces with a width of 11.5 cm. The old L-shaped design also remained, and if more strength of the holder is needed, it can be installed again, although the new design has remained quite strong and reliable.
I also came up with the idea of making a knife out of an old blunt file, grinding off its teeth and sharpening it.
 |
They can figuratively cut material like a sealant. The cut is even. Much better than a utility knife. Pictured is a mouse pad.
Well, perhaps that's all. The table turned out to be reliable and comfortable. Now I have a tool on which I can do finer work than on a circular.
Recently, I have been very interested in cutting out with a jigsaw, I don’t even know why it would be. It all started with the fact that I needed to cut a few gears out of plywood...
And off we go. At first I sawed the gears by hand, then I thought, pumping a muscle with a manual jigsaw is certainly good, but if you automate the process, it will be much faster!
So, for starters, get acquainted, this is a manual jigsaw for artistic sawing.
(all photos in this article were found on the Internet)
To cut, you need files, they are thin like wire, with sharp teeth. Previously, such files were sold in a pack of 50 pieces. Recently I went to the store, so these "bimesmen" began to sell them individually. During the evening, you can break a couple of pieces of such files.
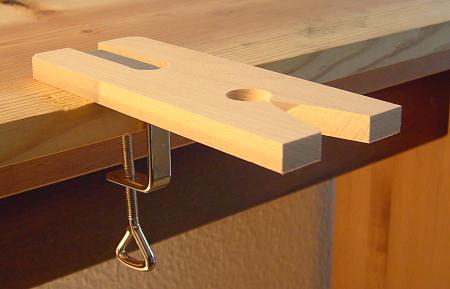
For sawing, we also need a special table, it can be a board with a conical slot, screwed to the table with screws or a clamp.
For the convenience of attaching files to the machine, it is better to use a special device that will compress the contour of the jigsaw, so you can easily change the file without effort. With the help of a wooden eccentric, compression occurs.

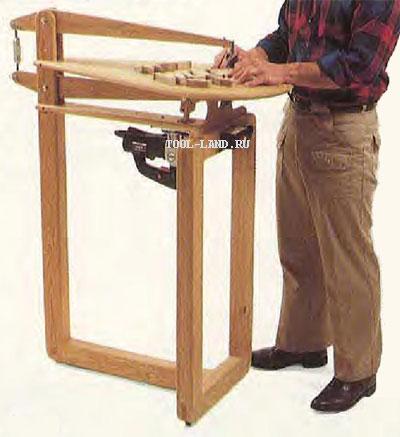
And now about automation. In the next photo you see a factory-type desktop jigsaw; on the Internet you can find a sea of various modifications. This thing is not very expensive, but even if I really want it in my city, I can’t find it, and in principle, there’s nothing to it. 
Industrial machines are certainly good, but I will probably use them for a couple of months and abandon this occupation, and in general, such a machine, as I found out, can be easily assembled by myself from plywood and wooden bars.


The next photo uses an industrial manual jigsaw and a spring to return the file.

So, we can easily assemble a desktop jigsaw with our own hands at home. I personally did this, but I have a special design, there are no photos of me in this article, but I will definitely post it, as well as a video in work.

This article will focus on the design of a home-made machine from a household electric jigsaw. The following will be step-by-step instruction, photos, videos, as well as drawings and diagrams.
Introduction
There are a lot of design options - from the simplest, where the file just sticks out of the table top, to rather complex designs with guides, the possibility of sawing at an angle, when it is possible to set the file not only 90 degrees to the base, but change the angle (well, within reason, certainly). There are devices (machines) for sawing, that is, making a straight and even cut.
Such devices are increasingly being used because of their versatility and functionality. In fact, they are similar in parameters and purpose to stationary machines and have a strictly defined practical use in every workshop.
Purpose
Homemade jigsaw machine is a versatile tool and is very popular, so it can be used both at home and in manufacturing enterprises– furniture workshops or carpentry workshops.
At the same time, of course, you need to understand that the quality of work largely depends on the jigsaw and saw itself, and the design only helps and expands the capabilities of the hand tool.
What are they used for? It is very convenient to make various parts from sheet material on it, well, as a rule, these are all kinds of wooden materials:
- an array of wood;
- plywood;
- various boards (fibreboard, chipboard, MDF, etc.);
- plastics
- thin (soft) sheet metal
A distinctive feature is the use in the design of a standard (household) electric jigsaw, which almost every craftsman has, as a saw propeller. Through simple manipulations, it is fixed with a file up, so the master does not lead the saw with the tool, but moves the workpiece.
Advantages
The main advantage of such designs in comparison with a hand tool is the convenience in processing materials. In the process of processing, the master does not hold the tool itself (it is quite weighty), but the workpiece. This allows you to work with maximum precision. In addition, the presence of stops makes a smooth saw possible, and this is expensive.
Basic construct
As mentioned above, there are a lot of options for execution, however, it is necessary to highlight the most basic basic structural elements, namely:
- desktop (bed);
- drive - jigsaw;
- rocker for attaching the file and keeping it taut.
The machines differ in such parameters as power (determined by the power of a hand-held power tool), the working stroke of the file, and the method of its attachment.
An important role, of course, is played by the overall dimensions of the product, including the area of the working surface of the table, which allows better processing of certain workpieces.
All other parameters (operating modes, laser illumination, etc.) are determined by the characteristics of the hand tool itself.
Step-by-step instructions for making a machine
In this section, we will analyze in detail each step of creating our future friend and indispensable assistant. The main stages of our work:
- Preparatory stage;
- Creation of blanks;
- Assembly.
It should also be noted what tools and materials we need.
Materials and structural elements:
- plywood 10, 12 or 14 mm. Below is a table with plywood parameters.
- spring;
- a pair of bearings;
Tool:
as well as other tools.
For reference, the table on plywood parameters:
Plywood thickness, mm Layers of plywood, not less than Sanded plywood Rough plywood Maximum deviation, mm Different-thickness Deviation, mm Different-thickness 3 mm 3 +0.3/-0.4 0.6 +0.4/-0.3 0.6 4 mm 3 +0.3/-0.5 +0.8/-0.4 1, 0 6 mm 5 +0.4/-0.5 +0.9/-0.4 9 mm 7 +0.4/-0.6 +1.0/-0.5 12 mm 9 +0.5 /-0.7 +1.1/-0.6 15 mm 11 +0.6/-0.8 +1.2/-0.7 1.5 18 mm 13 +0.7/-0.9 +1.3/-0.8 21 mm 15 +0.8/-1.0 +1.4/-0.9 24 mm 17 +0.9/-1.1 +1.5/-1, Ø 27 mm 19 +1.0/-1.2 1.0 +1.6/-1.1 2.0 30 mm 21 +1.1/-1.3 +1.7/-1.2
Preparatory stage
- draw up sketches and make a drawing of the future product,
- make paper patterns of future elements and details
- stick templates on the blanks of future parts.
There are two ways to make templates - take a tracing paper and draw on it the kennels of the future workpiece. This has been done since ancient times, since nothing is needed for this, except for a ruler and a pencil.
However, if you have a computer and a printer, it would be nice, of course, in A3 format, but A4 is also suitable (you just have to print several sheets and then glue them together), then the process of drawing with a pencil and a ruler can be replaced by drawing the outlines of blanks on a computer.
Then cut out with a clerical blade or just a sharp knife.
After the template is ready, it must be glued to the workpiece.
Create blanks
At this stage, you need to do:
The blanks are cut on a circular saw or on a homemade sawing machine from an electric jigsaw.
We process workpieces on a grinder or grinder sawing defects:
- burrs,
- bumps,
- chipped
We drill technological holes.
We grind the grooves with a file.
Drilling seats for bearings pen drill or a Forstner drill.
We make the necessary technological grooves for the quick-release cover and for the seat of the jigsaw with a milling cutter.
Assembly
At this stage, you need to do:
We assemble the parts for glue, we fix the parts with clamps.
Further fixation is carried out using screws and a screwdriver:
After assembling the parts, you need to grind to correct irregularities and remove burrs so as not to damage your hands during the operation of the future machine.
We assemble the main structure with screws.
We fix the base.
We fix the lid (tabletop).
Press in the bearings. Pressing can be done either with a clamp or a vice, or you can simply hammer it in.
We install the bracket. It should be noted that the mounting of the bracket must be done without excessive tightening of the nut - there must be free play. To do this, use a self-locking nut and only slightly tighten it.
Installing the spring shouldn't be difficult. You need to do as shown in the photo below.
For the future fastening of the file, you need to make a simple clip in the form of a plate with two holes. It must also be installed on the bracket using a self-locking nut. Moreover, the backlash of the plate in the seat is very important because the bracket moves, and the clamped plate will hamper its movement.
Below is a sketch of the design of the upper attachment of the file.
Then it is necessary to make technological holes for the controls of the jigsaw, so that it is convenient to change the engine speed, you can access the start button and its lock.
There is another solution that allows you to make it more convenient to turn on the tool - this is to place an outlet and a switch in an easily accessible place on the machine body, which would turn the power on and off in the outlet.
We plug the cord of the jigsaw into the outlet, and it turns out that we will turn it on and off using a switch installed in a place convenient for us. However, this is a matter of taste.
So, below is the manufacture of technological holes on the body.
Here are the controls that are now available.
Now you need to make clips for the file itself. The principle is simple - we take a bolt and make a cut at the base of the cap, but not completely. In the future, the file itself will be inserted into this cut. The principle is shown in the photo below.
This is how the upper assembly of the saw blade is mounted and assembled.
The lower node is almost the same as the upper one, except that it is not a plate that is used, but a standard file is taken (it can be “BU”), almost the entire cutting part is sawn off with a grinder (angle grinder) and the shank is left. In the remaining cutting part, a hole is made with a similar bolt with a slot at the base of the cap, which will also include a file. The principle is shown below.
After the file is fixed, we install the jigsaw itself. We fasten it with the help of bolts with countersunk hats so that they do not stick out on the tabletop of the machine.
We fix the file in the upper and lower clamps.
Now you need to adjust the perpendicularity of the file, relative to the table of our machine. To do this, you can use a square, or, as in our case, just a bar that is exactly trimmed. We make the adjustment as follows. To adjust the file to the left / right, the adjustment of the upper plate is used - its displacement on the axis - respectively in the desired direction.
And to adjust the file position forward / backward, the displacement of the file attachment itself forward or backward is used.
The machine is almost ready, it remains to make and install a plate that surrounds the jigsaw file. It can be made from textolite or any piece of sheet plastic.
This completes the manufacture of the jigsaw machine.
We hope that the presented material was useful to you.
Conclusion
dimensions
Here is a table with overall dimensions:
Parameter Value, mm Length 600 Height 500 Width 300
General assembly scheme
Let's apply complete scheme assembly, which in a sense can be a 3B drawing for making a do-it-yourself jigsaw machine.
Video
The video on which this material was made.
Do-it-yourself jigsaw machine - we remake a hand tool + Video

A desktop jigsaw is useful for every craftsman who cuts out thin details. However, it is far from always possible and meaningful to acquire a full-fledged machine. In this case, get down to business and do it yourself!
The device of the jigsaw machine - what lies inside?
Jigsaws are more special tools than devices that are needed by both an experienced craftsman and an amateur who runs a garage. Their purpose is reduced to a special task, namely cutting out complex curvilinear contours from sheet materials.
A special “chip” of such machines can also be attributed to the execution of the cut without violating the integrity of the external contour.
Most often, sawing occurs on wood and derived materials (plywood, chipboard, fiberboard), although modern machines equipped with appropriate nail files are able to work with other materials, such as plastic or drywall.
Such equipment has found application in the music industry (manufacturing of musical instruments) and, of course, in the furniture industry. They buy such units and lovers of tinkering in their own workshop.
The device of a traditional jigsaw machine, designed in accordance with all the rules, is as follows: the working surface on which the saw is placed hides the drive (electric motor) and the crank structure underneath.
The tension mechanism can be located both below and above the machine.
To process a part, it must be placed on the desktop. Many models have the ability to rotate it at different angles to make bevel cuts. The stops and guides on the surface, as well as the swivel mechanism, can be marked, which greatly simplifies and speeds up the work.
It is the length of the cut that depends on the length of the desktop - most models are limited to 30-40 cm. The power of the electric motor is an important, but still far from the most fundamental factor, since the machine has a huge margin of unclaimed power.
For example, for a home workshop or even a small production, a “engine” of only 150 watts is enough.
Standard jigsaw machines are considered devices with a range of motion in the region of 3-5 cm at an oscillation frequency of up to 1000 per minute. In many models, a change in speed mode is provided for different materials.
The jigsaw itself is usually made up to 35 cm long and is able to cut material up to 10 cm thick.
The width of the files can vary in a fairly wide range - from very thin two-millimeter to coarser ten-millimeter, with a thickness of 0.6 mm to 1.25 mm.
Even the thickest and widest nail file will easily break if you do not provide sufficient tension along the entire length of the nail file. For this, spring and helical springs are used.
Quite often, such machines are equipped with an air pump, which cleans the cut from sawdust by blowing, as well as a drilling unit.
The latter device is especially useful, because in this case the master does not need to be distracted by connecting an electric drill and drilling a hole - everything happens on the working plane of the machine. Of course, you have to pay for convenience!
How to make a jigsaw machine with your own hands from a manual jigsaw?
On the network you will find many different designs of home-made machines, but most of them come down to reprofiling a manual jigsaw into this machine.
Using your ingenuity and watching the video, you can easily make a homemade jigsaw machine from this tool. You only need to modify the jigsaw a little.
In fact, it plays the role of a machine tool drive and a crank mechanism, the rest needs to be thought out and implemented.
Of course, manufacturers are trying to please consumers in this area as well, offering their own platform options for quick and convenient conversions, but in reality, only you can make a device that meets your needs.
So, the first step is to make a support table, for which sheet metal is most often used.
In it you need to make a slanted oblong hole for the saw blade and holes for fasteners (countersunk screws are recommended), and attach the jigsaw to the bottom of the support table.
This design can only be strengthened on a wooden table. You can go beyond this and install guide rails.
The convenience of such an apparatus lies in the fact that in addition to performing functions that are not entirely inherent in it, you can always disconnect the drive and with a flick of the wrist turn it back into a manual electric jigsaw! If you constantly need this tool for work, it makes sense to choose a jigsaw specifically for the machine - it will be cheaper than spending money on a real machine.
Advantages and disadvantages - we continue to modify!
But such an assembly inherits not only the advantages of the tool, but also its disadvantages, in particular, a nail file that is too wide for filigree work, which significantly limits the curvature of the lines. If there is a need for this, there is a way out.
So far, our machine differs from the classic jigsaw unit by the absence of springs that would provide sufficient tension for the nail file.
But to build a simple rocker, which on the one hand will be under the tension of the springs, and on the other hand fixed on a nail file, is quite easy.
There is another option - to clamp the nail file between two guide rollers, but the first option is still more reliable. Do not forget to turn off the pendulum stroke on the jigsaw before you start using a homemade machine.
There is another design - if your tool is powerful enough, then it can only serve as a drive in a design of two rocker arms, between which a nail file is stretched.
The movement is transmitted by means of a nail file fixed on the lower rocker arm.
Machine from a sewing machine - we give a second life to old tools!
If you inherited a foot or hand sewing machine from your grandmother or mother, consider yourself the owner of an excellent jigsaw! Of course, for this you need to “conjure” a little over the machine.
First, remove the thread weaving device, which is usually located at the bottom of the machine. There is nothing complicated in this, it is enough to unscrew the two bolts.
Then we knock out the cotter pin and remove the drive shaft leading to the thread weaving mechanism.
Having unscrewed the top panel that protects the mechanisms, it is necessary to expand the slot in which the needle went. Focus on the needs and width of the nail file that you will use in your work.
Jigsaw blades of this kind also need to be slightly modified, namely cut to the maximum length of the needle that could be used on this machine.
After grinding off the upper teeth and sharpening the lower part on the point, you just have to insert the nail file into the needle holder and test your machine in action!
Desktop jigsaw do-it-yourself drawings

Home » Machine » Desktop jigsaw do-it-yourself drawings
The idea of \u200b\u200bcreating a homemade electric jigsaw is most often due to the shortcomings that the factory has hand tool. You can make your own small desktop machine, which will include a pusher, a reciprocating motor, a file tension system. In this case, you do not need complex drawings - having understood the essence, it is easy to achieve a result.
How to make your own setup
The desire to create a homemade jigsaw may arise for several reasons:
Designing a jigsaw is not difficult. A typical structure looks like this:
The unit can be easily adapted to any torque source. A pair of pulleys (one is located on the motor shaft, the other drives the crank mechanism) allow you to vary the gear ratio, reducing the load on the power unit and allowing you to get the desired speed (they are also responsible for the number of saw strokes per minute) on the actuator.
The machine, built according to the above scheme, can have a very different configuration, the material of manufacture is also selected individually. An example of a finished installation looks like this:
Disadvantages of a manual jigsaw
A manual electric jigsaw is designed to form even cuts. At the same time, as the rollers, rod, and pusher wear out, the saw may be beating and deviate from a straight line, and the angle of attack may change. Regardless of the quality of the tool assemblies, the following features are always present:
It is even more difficult to work with thin saws designed for curly cuts. If there is no practice, it is very difficult to achieve a good result, especially on a thick slab or wood materials. Consider how you can make the work of a carpenter easier, and the result better.
Standard Solutions
A manual jigsaw machine is made on the basis of a simple table. This device is common, mass-produced, samples can be seen in the photographs below.
The mechanics of work is simple:
- The jigsaw clearly fixes the tool, ensuring that there is no influence of the human factor (the hand can lead the jigsaw unevenly).
- The presence of a support allows you to move the device without deviations along the trajectory.
With the help of a table, jigsaws begin to cut in a straight line, but the possibilities of such a device are limited.
If you remove the side stop and try to guide the workpiece, forming a curved cut, the same problems of saw deflection arise. The problem can be solved by using a simple saw, rigidly fixed with a pair of rollers.
Making curly cuts is now convenient and fast. How homemade and industrial products of this type look like is shown in the following photos.
Tensioners for curved cuts
To perform very thin and precise curly cuts, you can make a machine from an electric jigsaw with a saw blade tension system. The idea of \u200b\u200bdoing it yourself is as follows:
As a tension block, a manual jigsaw clamp is used, to which an adapter is made, which, in turn, is inserted into the clamping device of the power tool rod. To ensure the adjustment of one freedom of movement, a pair of angles and a bolt are used. The result of the implementation of the idea is presented in the following photo.
The saw provides a clear vertical movement, you can create a good tension, but there is a mandatory runout in the horizontal direction. The canvas goes with pickup, it does not move in a straight line.
The development of this idea is in the next photo. Here the part fixing the trajectory moves, and the metal clamp provides structural rigidity and mechanical resistance.
The system is stabilized in two degrees of freedom, the cut made with its help is accurate and accurate. Using a diamond-coated cord for a hand jigsaw, you can cut glass without the formation of sloppy chips on the edges.
Devices for extremely fine work
If you need to work extremely delicately and slowly, you will need to reduce the force on the cutting blade and at the same time provide a strong tension and precise movement of the file. To do this, a home-made jigsaw is equipped with spacers with long arms.
In this case, the power tool does not operate in the cut zone, but at some distance. This allows, depending on the wishes of the carpenter, to adjust the force, speed and amplitude of the saw movement. One of the options for implementing the idea is presented in the following photo.
Depending on the needs of the master, the structure can be made of steel, have additional fixing zones, the power tool can not be installed rigidly, but with the possibility of movement within its support beam.
In practice, such solutions are rarely used. For delicate work that is done constantly, it is much more profitable to purchase a specialized band saw that will ensure quality and productivity.
As can be seen from the presented designs, a jigsaw can be made even from sewing machine having a moving rod.
DIY desktop jigsaw | Construction portal
A desktop jigsaw is an indispensable thing for any owner who is used to doing housework on his own.
Especially electric jigsaws are good for residents of the private sector, lovers of manual labor and summer holidays. From its prototype, an ordinary manual jigsaw, the desktop electric model has gone far enough.
A desktop jigsaw makes it easier and faster to cut, not to mention improving quality.
Do-it-yourself jigsaw machine - drawings and video details

Since childhood, we have been familiar with the technology of sawing with a jigsaw. The principle is simple - a fixed part is placed on a stand with a technological cutout, the cut is made by moving the file. The quality of work depends on the firmness of the hands and the skill of the worker.
In this article we will tell you how to make a jigsaw machine yourself. For those who do not want to bother and are ready to buy a factory tool, an article review by Viktor Tagaev - 11 popular jigsaws will be useful
In this way, you can literally cut lace from thin wooden or plastic blanks. However, the process is laborious and slow. Therefore, many masters thought about small-scale mechanization.
A simple design from the last century
Even in the magazine "Young Technician" drawings were offered on how to make a jigsaw machine with your own hands. Moreover, the design does not imply an electric drive, the drive works from muscular strength, like knife grinders.
The machine consists of the main parts:
- bed (A)
- desktop (B) with a slot for the canvas
- lever system (B) for holding the saw blade
- flywheel (D), which is the primary drive pulley
- crank mechanism (D), combined with the secondary drive pulley, and driving the levers (B)
- pedal assembly (E) with a crank mechanism that drives the flywheel (D)
- saw blade tensioner (W)
With the foot of the foot, the master sets the flywheel (D) in motion. With the help of a belt drive, the crank mechanism (D), connected to the lower lever (B), rotates. A file is stretched between the levers, the degree of tension is regulated by a lanyard (G).
With a well-balanced flywheel, a sufficient smoothness of the saw blade is ensured, and such a home-made jigsaw machine allows you to massively cut out the same type of workpiece, saving time and effort. In those days, jigsaw saw blades were produced in the form of a flat tape with unidirectional action.
Therefore, to obtain patterns of complex shape, it was necessary to rotate the workpiece around the canvas. The dimensions of the workpiece are limited by the length of the levers (B).
From mechanical jigsaw to electric one step
The foot drive cannot give real freedom of action and uniformity of the sawing stroke. It is more reasonable to adapt an electric motor for a crank mechanism. However, if you use a desktop jigsaw from time to time, it makes no sense to make a stationary structure with its own motor.
Popular: Do-it-yourself laser from a DVD drive - save on purchase
You can use household power tools. For example - a screwdriver with a speed controller.
Materials are used, literally from wooden scraps and old trash. The only critical part is the frame. It is better to make it from durable plywood with a thickness of at least 18 mm.
We make all connections on wood screws, the joints can be smeared with PVA glue. We assemble a support pedestal for the lever rod from the same material. The design of the support should not have backlashes; the subsequent accuracy of the operation of the entire machine depends on its strength.
The lever structure is assembled from wooden blanks. Of course, ordinary pine bars will not work here. You should use oak or beech. Don't let the cost of such material scare you - the legs from an old chair are perfectly used for levers. We cut out the straightest sections - and a strong lever mechanism is ready.
At the ends of the levers, we make longitudinal cuts, into which we install the attachment of the saw blade for jigsaws. The mount itself is a metal plate 2-3 mm thick with holes. The upper hole is for fixing in the lever, the lower one is used for clamping the saw blade. For convenience, we use wing nuts.
In the lower arm, a similar design in a mirror design.
We install the lever system in the bed. We connect the rear parts of the levers with a screw tie (lanyard). With its help, the tension of the saw blade is adjusted.
For convenience, you can install a supporting spring. In addition to the main function, it will serve as a buffer that softens jerks during the reciprocating movement of the mechanism.
The crank mechanism is made of plywood 10-12 mm thick. To fix the axis of rotation, we use embedded bearings that fit into the prepared holes in the racks.
Popular: Chemical anchor for concrete and more
Racks are interconnected, forming a solid support for the flywheel. An ordinary bolt or stud is used as an axis. Strength class not less than 8.
We connect the flywheel to the lower arm using a connecting rod. It is made from the same plywood. To increase the length of the seat under the axle, we glue the two halves. The rods for connecting to the lever are metal.
We check the course of the trapezoid - the levers should move freely, the tension of the canvas does not change. The axis of rotation can be lubricated with grease. After combining all the axial connections, we produce the final fixing of the structure.
The next stage is the manufacture of a desktop with a rotary mechanism. A swivel arc with a slot is cut out of plywood.
We install the table on the bed, to tighten the rotary mechanism we use a wing nut or we make a convenient flywheel from wood. Turning the tabletop will allow you to cut the floor at different angles.
An electric screwdriver is used as a drive. The cartridge is connected to the flywheel axis, and we get a removable electric motor. You use an electrical appliance as usual, and when you need to start a homemade jigsaw, you connect a screwdriver to the flywheel axis.
We use a clamp with a variable force as a speed controller.
This simple fixture is made from screw tightening (from table lamp or clamps) and a strong strap.
Drawings for manufacturing are not required, all structural elements are made "in place". It is convenient to work with the machine, despite the simplicity of the design.
You can make a machine according to this drawing, it does not change the essence. Everything has been tested and will work.
A very instructive video of the English craftsman. A detailed story showing drawings and a demonstration of making a jigsaw machine from plywood, and a screwdriver was used as an engine, you can also adapt a drill.
Stationary design for intensive use
The design is assembled from regular elements of the gearbox. If necessary, the fastening of the connecting rod can be reinforced with an additional metal insert. All racks and fasteners are made of metal. So there are less vibrations, and there will be no wear.
It can be made with your own hands, again from improvised materials.
The lever supporting the guide is made movable so that the device can be used only when necessary.
Bottom line: you can make a jigsaw yourself without large financial costs. The main thing is to decide on the tasks, and choose the optimal design.
Alexander turned out a very interesting home-made jigsaw machine. For a step-by-step description with an explanation of the dimensions of the parts, see this video.
Homemade jigsaw from an electric jigsaw: do-it-yourself drawings

If you are into carving and making figures or parts out of wood, plastic or similar material, you cannot do without a tool whose name is reminiscent of the distant Soviet past: this is a jigsaw.
Jigsaw jigsaw strife, now on sale are both "pioneer" elementary manual models, and electric modern instruments, only remotely resembling the usual files.
Homemade machine
You can also make a jigsaw yourself: in the technical literature and the network, many diagrams and drawings of electric jigsaws are offered.
An example of the manufacture of a jigsaw machine.
A homemade jigsaw will help you professionally make even parts of the most bizarre shapes. First you need to decide on the most suitable design for you.
Technical description and components
The schematic diagram of any jigsaw machine is the same for different models.
It must include the following parts:
- file;
- drive with a power of about 150 W;
- rocker for tensioning the file;
- working surface with graduation;
- drilling block, etc.
Consumables are fixed on the working surface. In advanced models, there are special devices for rotary movements of the part, in which the working surface can change the angle of inclination.
The dimensions of the surface will depend on your production and creative plans: the larger the parts you are going to cut, the larger your production table should be. Traditional sizes are usually around 30 - 40 cm.
The types of saw blades are varied. They depend primarily on consumable. The dimensions of the parts for cutting are also important. Conventional saw blades for working with wood have a length of about 35 - 40 cm. They are able to saw parts made of wood or plastic with a thickness of no more than 100 mm.
Another one the most important detail machine: crank assembly. Its function can hardly be overestimated: it is he who transmits the movement from the drive to the file, turning rotary motion into progressive.
Assembly drawing of a jigsaw machine.
Due to this, the file begins to oscillate with high frequency, the speed of such oscillations is on average about 800 - 1000 rpm. It is important to remember about the amplitude of vertical vibrations, it should not exceed 50 mm.
In advanced modern jigsaw models, the speed varies depending on the type of consumable. Most desktop models operate in two speed modes. Most often it is 600 and 1000 rpm.
Model range of jigsaw machines
Most often, machines differ in their electric drive power, the range of values is huge: from 90 to 500 watts.
Also, these devices are divided into varieties based on their fundamental design:
- universal;
- on suspension;
- with graduation;
- with a caliper in the lower position;
- with double support.
Jigsaws with bottom support
Scheme of machine design elements.
The most used and popular models are machines with a lower support. Their feature is the division of the working frame into the upper and lower parts.
While the upper section contains only one sawing and cleaning device, the lower section contains many working elements: an electric motor, a switch, a transmission unit and a control unit. This design makes it possible to cut sheets of materials of almost any size.
Machines with double support
A home-made jigsaw with a double caliper differs from the lower caliper by the presence in the upper section of a special additional bar and desktop with the ability to change the angle of inclination and overall height.
These models are designed to work with oversized parts. Such a machine is easier to make than the previous model. There are limitations in the materials with which you can work on it: their thickness should not exceed 80 mm.
Hanging machines
The name speaks for itself: the model is mobile, it works without a frame. The fundamental point in this design is the movement of the cutting file, and not the consumable. The module itself is attached to the ceiling, the saw is set in motion manually.
All this gives serious advantages: in this way you can create the most complex patterns, the surface dimensions are not limited by anything.
Graduated devices
Universal machines
Such devices are usually called electric jigsaw. Their feature is the ability to perform several operations such as grinding, polishing, sawing, etc.
How to make a jigsaw machine with your own hands?
We will not stop at the manufacture of the simplest machines: you can easily find such manuals with video support on the net. Let's talk about homemade machines from an electric jigsaw.
Assembling the machine with your own hands.
Here is the sequence of work for their manufacture:
- We make a frame from a plywood sheet or plastic. The main thing is that the thickness is at least 12 mm. The function of the bed is a foundation, a working surface and a place for fixing mechanisms and an electric motor.
- We place a special rocking chair with an eccentric on the opposite side. We connect them using a metal bar with bearings. All fasteners in the design are screw.
- We make the installation of the intermediate shaft. To do this, you need to prepare two bearings, put the pulley on the shaft as tightly as possible, then carefully fasten it with screws. Similar actions are performed with an eccentric.
- At the rocking chair, the amplitude of movements should change. To do this, you need to change the place of attachment of the screw, for which we drill exactly four threaded holes on the eccentric flange. The holes should be located at different distances from the axis. With a change in the place of attachment of the screw, the swing of the amplitude of the rocking chair will change.
- We make a rocking chair: this is nothing more than wooden rocker arms, into whose rear ends the screws that you built in the previous paragraph are inserted, these are tension screws. The rocker arms themselves are attached to the rack with hinges. We fix the file on the front ends of the rocker arms. Previous and given stages must be done with great care and diligence. The fact is that fastening the file is a fundamentally important thing. Rocker arms with plates are subjected to constant loads during movement due to their rigid screed with screws.
- You need a stand for a rocking chair. It will be better if it is made from a whole piece of material. We make a groove for the first rocker arm on the top of the rack. From the lower end we have a special rectangular opening for the second rocker arm.
Your machine is ready. We wish you cool ideas and their high-quality implementation.
Manufacturing options for a desktop jigsaw

The desktop jigsaw is designed for cutting various parts with a complex configuration from sheet materials. This tool is able to work with MDF, chipboard, fiberboard and many others.
Also, jigsaws can cut out the internal contours of parts, if you first make a small hole.
This tool has a wide range of applications, since it is able to provide high productivity, which cannot be achieved with a conventional hacksaw.
The device diagrams of all jigsaw machines are usually the same. Having carefully examined the drawings, which depict this tool, you can see its following structural units:
- bed, which is also often called the body. It is designed to accommodate all structural elements of the unit;
- drive mechanism;
- crank mechanism. It is necessary to convert the rotational energy of the motor shaft into the movement of the file used during operation;
- double rocker. Equipped with fasteners for sawing and tensioning device;
- Desktop. In some modern models, it has a turning mechanism that moves to a given angle.
Homemade plywood jigsaw.
How to make a machine from a jigsaw?
To make a jigsaw from a manual jigsaw, follow these instructions:
Everyone can make such a jigsaw machine with their own hands. Its advantage lies in the fact that at any time this unit can be quickly disassembled and only hand tools can be used.
Homemade jigsaw table-machine from a manual jigsaw
How to make a more professional tool?
A homemade jigsaw can have all the qualities that are present in professional equipment. To make it, you need to follow these instructions:
Types of metal pulleys
How to make a machine from a sewing machine?
From a sewing machine, an excellent jigsaw is obtained, which is equipped with a saw blade movement regulator. It is not difficult to make it if you follow these instructions:
All the presented options for the manufacture of jigsaw machines are very successful. The resulting units are highly productive, and it is not difficult to make them. Depending on their skills, each master will be able to choose best model homemade equipment.
Video: Sewing machine jigsaw
Do-it-yourself jigsaw machine: drawings, description and video

The desktop jigsaw is a specialized equipment that is widely used in the carpentry industry. It is used for cutting lumber and sawing figured parts from various materials.
A distinctive feature of such units is the possibility of cutting while maintaining the integrity of the outer contour of the workpiece.
Depending on which file is installed on the structure, the machine allows you to process natural wood and its derivatives, as well as plastic bases and even metal.
Such a universal device is indispensable when performing construction and repair activities, as well as in the production of furniture and souvenirs. With its help, artistic sawing of components for decor items and interior gizmos is carried out.
Often, such equipment is purchased not only by specialists, but also by home craftsmen for domestic purposes. Often, users wonder how to make a jigsaw with their own hands, because sometimes buying a factory unit is irrational, besides, it is absolutely easy to assemble a home-made jigsaw, the main thing is to know the features of its design.
Below is a diagram of the tool that will help you better understand its structure.
Device and principle of operation
The stationary factory sample includes a desktop for a jigsaw, on which a unit with a cutting element is fixed, as well as an electric drive and a crank mechanism installed under the table top. The tension unit can be installed both at the top and at the bottom of the machine.
Many models of units allow you to cut material at different angles, which is necessary when making an oblique cut. Very often, for greater ease of use, markings are applied to the swivel mechanism, stops and guides.
The length of the cut directly depends on the dimensions of the jigsaw table, and in most models this parameter is limited to 30 - 40 cm.
If you start creating a jigsaw machine with your own hands, please note that high power is one of the most important parameters of any working tool, but in the case of an electric jigsaw, this is not entirely true, and for domestic purposes or a mini carpentry shop, a 150 watt unit is enough. A more important element here is the crank mechanism, which is responsible for the quality of the transfer of engine torque to the forward-return movement performed by the cutting element in a vertical position.
A standard jigsaw tool that can be used for domestic purposes is characterized by an oscillation frequency of up to 1000 movements per minute with an amplitude of 3-5 cm. Many samples provide for speed adjustment for processing various materials.
In most cases, a saw is installed on such a tool, the length of which is up to 35 cm, which allows cutting parts with a thickness of up to 10 cm.
The width of the nail files can be completely different, from ultra-thin (2 mm) to coarser (10 mm), while their width varies between 0.6 - 1.25 mm.
In order for the cutting element, regardless of its thickness, to serve for a long time without breakages and cracks, it is necessary to provide it with optimal tension along the entire length, for which they resort to the help of helical and spring springs, and this feature must be taken into account when assembling a desktop jigsaw with your own hands.
As an additional option on the factory machines, an air pump is provided to remove sawdust from the cutting line.
A block with a drilling rig will also be useful, but you have to pay extra for each additional node, so it’s better to immediately decide on the need for individual elements of the device.
In principle, we have mentioned all the main points of the configuration and type of unit for sawing blanks, therefore, in the next section of the article, we propose to learn how to make a home-made jigsaw, especially since more than one home master is interested in this issue.
Assembly instructions
Many craftsmen make a jigsaw from a refrigerator compressor or an ordinary drill, converting their hand tools into electric ones.
You can also set the cutting blade in motion with the help of an engine from washing machine, we propose to consider the creation of jigsaws from manual electric jigsaws and old sewing machines.
Those who wish to create a jigsaw machine with their own hands can use the following drawing of its design:
We remake a manual jigsaw
Getting started, first of all, they make a table for a jigsaw, for which they use a sheet of thick plywood or metal, in which it will be necessary to cut through holes for the cutting blade and fasteners, and through them the manual unit placed from below is fixed to the supporting structure.
It is convenient that, at the first request, the machine made in a short time is quickly disassembled, and you again use a manual electric jigsaw.
Earlier we mentioned that the standard unit is equipped with springs that provide the nail file with the necessary level of tension, so you can’t do without a rocker arm, one edge of which is under spring tension, and the other provides attachment to the cutting element of a jigsaw machine, converted from an electric jigsaw.
You can use another option, in which you need to clamp the web between two guide rollers, but this option is less reliable. Thanks to such simple actions, the manufacture of a machine from an electric jigsaw can be carried out without difficulty in a short time.
We remind you that before starting work on a home-made jigsaw, the pendulum stroke on it must be turned off.
A jigsaw from a sewing machine is also assembled quickly and easily, besides, in this case you will get a full-fledged home-made jigsaw with a saw blade stroke control, which is provided by a speed switch on the sewing equipment.
So, initially they remove the mechanism for weaving threads, which is placed by most manufacturers in the lower part of the apparatus.
To do this, you just need to unscrew a couple of bolts, after which the cotter pin is knocked out and the drive shaft leading to the thread weaving unit is removed.
By the way, jigsaw saws are slightly modified, or rather, cut according to the size of the longest needle that could be installed on this machine. In order not to make an adapter for fixing the cutting element to the seat, it is enough to grind off the upper incisors and sharpen the lower part of the blade.
Now everything is ready to install the cutter in the needle holder, and you can start the process of sawing blanks, as shown in the video.


