And dried it, you can proceed with the installation. Laying a decorative stone made of gypsum is quite an exciting activity for everyone, because it does not require any special tools and experience. You can do all the work yourself and save a lot of money, because. for one square meter installers ask from 1000 to 1500 rubles.
From this article you will learn:
- How to prepare tiles for laying;
- How to glue tiles on walls;
- How to cut stone without dust;
- Is it possible to glue on wallpaper;
- How to grout seams on a brick;
- How to cover the stone
Preparing for installation
The wall on which the stone will be glued must be dry and even. Ideal option: primed plastered wall or drywall. Tiles need to be laid out on the floor and compared; Individual tiles may vary in size. It is often found that the length of the stones is different, if for slates this does not play any role, since it fits closely, then for bricks this is a disaster. Even if the length of some tiles is 1-2 mm longer, then “on the volume” your seams will shift and it will not be beautiful. There are 2 workarounds for this problem:
- File each tile;
- Do the installation "by eye". Usually, when laying bricks, a glazing bead of the same thickness is used to form a seam and laid on horizontal and vertical joints. If the brick is different in length, then this glazing bead is not placed on the vertical seams, but is made “by eye”, slightly narrowing or expanding the seam. If you do this and move a few meters away from the wall, then you won’t even notice anything, it will seem that everything is even.
Mounting
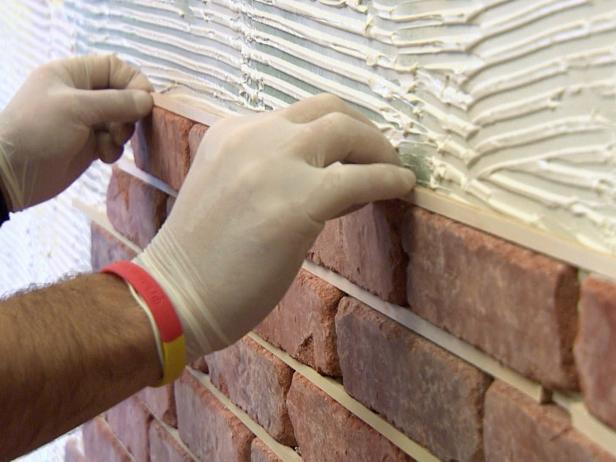
Let's analyze the installation using the example of decorative bricks, because. it is harder to lay than slate. It is better to start the stone sticker from the outer corner and from the second row. How the corner will look like is up to you, some installers file each tile at 45 degrees and join, others overlap. The second option is simpler, because no need to cut tiles, but it is only suitable for stones with simple relief. Laying from the corner means gluing solid tiles without cutting their length, if you do the opposite, it may turn out that you have a 2-3 cm cut to the corner and it will be honest to say “no ice”.
Before starting work, we make marks on opposite sides of the wall, equal to the height of the tile with a seam. If the height of the brick is 5 cm, and the seam is 1 cm, then we make marks 6 cm from the floor. Then we draw a line with a paint thread and fasten something even over the entire length of the wall: a bar, a rail, a drywall profile, etc. Next, we make a similar markup with a pencil up the wall after 5 and 1 cm. We draw only horizontal lines, they serve as a guide. If you have a laser level, then this markup is not needed and you can use it.
We start laying. For gluing, you need to press on the tile slightly shaking on the sides.

Do not forget to lay the glazing beads until the glue has dried.
I had only 1 glazing bead 1.5 meters long when I did the installation at the customer's apartment. I laid the first row, then started the second, and as soon as the tile went beyond the length of the glazing bead, I carefully removed it and shifted it further. And so with each subsequent row until you reach the ceiling. Most likely the ceiling will need trimming to length.

There is also another installation method: the glue is applied to the tile itself with an ordinary spatula, then glued to the wall. Thus, there will be no glue between the tiles. Many do not even fill this space, but leave it as it is.
How and with what to cut gypsum tiles?
You can cut tiles with a grinder with a stone disc for dry cutting or with a regular hacksaw. But it seems to me the easiest way is to take a saw for metal and a miter box, put a stone there and saw it. The stone is perfectly cut and there will be no dust like from a grinder. Now you know how to cut an artificial decorative stone at home without dust.
About wallpaper and stone
Frequently asked question: “Is it possible to glue a decorative stone on the wallpaper?” Answer: “no!”. The fact is that the wallpaper can get wet from the glue on which you are laying and it is possible to peel them off the wall. Usually in such cases, the wallpaper is cut with 1-2 cm under the tile, as in the photo.

Grouting decorative bricks
Grout, or as it is also called “joint”, involves filling the seam between the tiles and gives a natural look. brickwork. You can rub the seams in different ways and mixtures. You can use special grouts and a narrow spatula, as in the photo.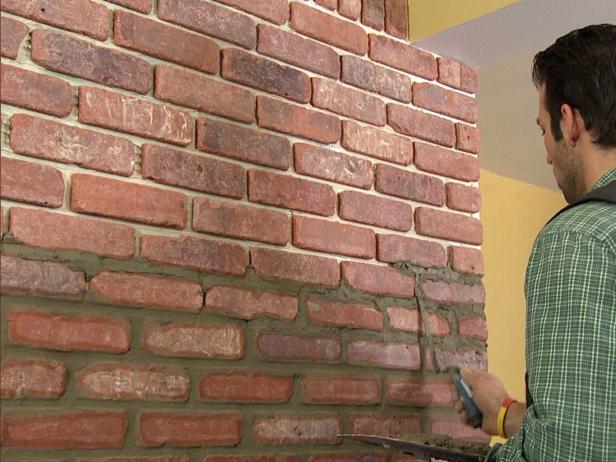 And you can take the usual finishing putty (it usually white color), dilute it with water and place it in a milk bag. On the other side of the bag, cut off a corner and squeeze all this mixture into the seams. You can see how this is done in the video.
How to cover the stone after installation?
Finished masonry can be painted water-based paint if there is a need for it. Another frequently asked question: “what kind of varnish to cover a plaster decorative stone?”. There is a special varnish for stone on sale, you can look for one. But you can cover with ordinary water-based acrylic varnish. You can buy this polish at any store. Lacquering is necessary so that the wall can be washed. Of course, it is better to make two layers, but if the budget is limited, then one. Read also:Stage 1: preparation of the working surface of the wall and the stone itself
1. Very often, artificial stone is simply and tastelessly pasted on the entire wall “from floor to ceiling” and the job is considered done. This is wrong and not always beautiful! The design of stone or brickwork can be decorated with hundreds different ways, and you need to choose the one that will emphasize all the advantages of a wild stone and effectively fit into the interior. Therefore, do not be lazy to make preliminary sketches. You can draw on the wall or lay out the tiles on the floor, simulating the future design. Try to achieve harmony in form, color and place.
2. As a rule, the walls inside the premises are concrete, brick or already plastered. In this case, preparation is minimal. If there are leftovers old paint or wallpaper, they should be removed if possible. To do this, use a metal spatula or a hard metal brush. The brush will allow you to clean hard-to-remove areas or scratch them to a sufficient depth, which will ensure reliable contact of the adhesive mastic with the wall surface. After that, treat the working surface of the wall with an ordinary water-based acrylic primer using a roller or brush. If the wall is wooden or lined with drywall, and the installation of tiles will be based on cement adhesive compositions, then there will be a little more work. You will first need to stick a paint grid on the wall (for example, fiberglass, with a mesh size of 5x5 mm.) And apply a layer of plaster on it.
3. And finally, you need to prepare the stone itself for installation. Since the tiles are made on the basis of a gypsum binder, the most effective way to ensure the durability of the coating will be the treatment of the back surface of the tile with the same acrylic primer that is used to pre-treat the wall. In addition, this simple procedure will greatly simplify the procedure for sticking wild stone on the wall.
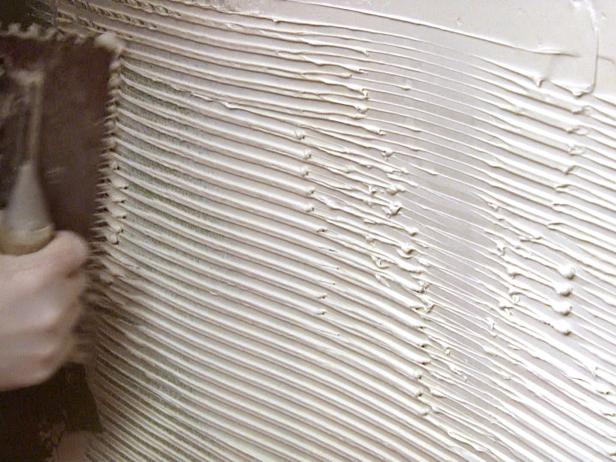
Stage 2: application of the adhesive layer
I must say, there is nothing easier than laying  interior facing tiles made of gypsum-containing materials. By and large, it can be glued with anything: any water-acrylic and mounting adhesives, acrylic adhesive sealant and much more. Considering that gypsum stone is also much lighter than sand concrete, the quality of fixing the tile to the wall will remain at its best. The main thing is not to forget to treat the wall with an acrylic primer. You can even refuse to apply mesh and plaster in relation to wooden and plasterboard walls, but only if the stone is laid without seams (for example, all types of decorative slates). In other cases, a reinforced surface will be required as a basis for seam filling. If your choice falls on the traditional method of installation - on a cement adhesive mortar, then laying is best done as shown in the figure. The adhesive mastic is evenly applied to the wall with a notched trowel; the layer thickness is a few millimeters, and the area covered at a time is not more than 0.5-1m2 (in order to have time to stick the stone before the cement glue begins to set).
- Glue "Liquid nails" (universal or for stone and ceramics) Ceresit CM 11 (grey) (5 kg / 25 kg) Ceresit CM 17 (grey) (5 kg / 25 kg) Litokol K80 (grey) (5 kg / 25 kg) Bergauf ( grey) (ceramic/granite 5kg /25kg) Creps super (grey) (5kg /25kg) Eunice granite (grey) (5kg /25kg) Ceresit SM 115 (white) (5kg /25kg) Bergauf mosaic (white) (5kg /25kg ) Glue Super ELTitans (ElTitans) (universal ceramic plaster, etc.)
Stage 3: laying decorative stone on the wall
When laying gypsum stone, you should follow a few simple rules:
1. Before laying the stone on drywall or similar perfectly flat surfaces, especially with the use of Liquid Nails or EL Titans adhesives, which are not completely applied to the entire back surface of the stone, it is necessary to check the fit of the back surface of the stone tiles to the wall. To do this, you need to alternately attach the tiles with the back side to the wall surface and check for irregularities. With a perfect fit, the tiles on the wall should not wobble. In the case of minor irregularities on the back of the tile, the latter are removed using an abrasive mesh. After that, the fit of the tile to the wall is re-checked.
2. Adhesive mastic should be thick and plastic, not crumbly. The stone must be pressed closer to the wall (especially if the installation is carried out on cement mortar), but not very great effort so that excess glue is squeezed out around the entire perimeter of the tile. This guarantees good sealing of the seam joint, uniform filling of the space between the tile and the wall with the adhesive solution, and the excess adhesive itself will then be chipped off. Just make sure that there is not too much extruded material, and it does not get on the front surface of the stone: it will not be easy to remove it.
 3. Gypsum stone is easy to cut and process with ordinary tools (such as a hacksaw). So, feel free to let them in to shape the edge of the masonry. Try to place tiles with cut edges outside eye level or cover the cut areas with mastic.
4. If the facing stone or brick is of the joint type, try to maintain approximately the same width of the joints and the parallelism of the rows. But, unlike tiles, not to fanaticism. Some deliberate negligence will only benefit the design.
5. Laying should start from the corners. After laying the corner to the height of three or four rows, continue laying the stone horizontally, completing each row before starting the next. Laying can be carried out from top to bottom or from bottom to top. This is not important, since the gypsum stone is easily fixed on the wall. However, working from top to bottom, you can avoid getting freshly applied mastic on the already laid tile.
Stage 4: rustication
The stones of most collections are laid with jointing, that is, at a certain distance from each other. The resulting joint is filled with a joint mixture, which usually consists of the same cement adhesive mastic. Sometimes it is tinted in the desired color to enhance the expressiveness of the masonry.
The width of the seam between the tiles of the facing stone depends on its type and ranges from zero (all types of shale) to several centimeters (rubble stone or boulder). Brick has a standard jointing - 12mm. If the stone is for seamless laying, it is necessary to tightly dock the tiles to each other.
If the tile has been laid correctly, then  squeezed out excess cement adhesive mastic will be enough to decorate the seam. Wait until the mortar hardens slightly (but does not crumble yet) and level it with a pre-prepared wooden spatula of the desired width and shape. Neat seams will give the masonry a finished look.
If the squeezed out mastic is not enough to decorate the rust or the stone was laid on a different type of glue, then filling the seam will be required. To do this, use a special bag with a grout inside, from which it is convenient to squeeze the mixture directly into the seam space.
After finishing work (not earlier than the mastic dries up and becomes crumbly), it will be necessary to clean the surface of the stone from the solution that accidentally got on it. This can be done with a dry brush. Do not use a wet or metal brush.
- MAPEI Ultracolor Plus Ceresit CE 40
Stage 5: applying a protective coating
The use of a protective coating in interior decoration is optional. However, such a coating definitely increases the durability of the cladding. In addition, there are situations when it is not just useful, but extremely relevant:
1. with increased chronic humidity of the room or regular “floods”;
2. when someone comes into frequent contact with the wall surface (for example, children or pets);
3. if the surface method of coloring the stone was used;
4. to increase the strength of the surface layer when using low-quality gypsum.
 Among a wide range of protective coatings, it is better to choose those that, firstly, have increased adhesion specifically to gypsum-containing compounds, and secondly, do not leave traces of their presence on the surface of the tile after drying.
Water-based formulations are more convenient to use (they are more pleasant to use than solvent-based liquids). But solvent-based coatings are often much more effective than water-based ones. This is especially true of armor coatings, which form a high-strength protective film on the surface of gypsum stone.
Apply a protective coating to a completely finished dry cladding using a household spray gun or brush (roller).
- PARAD Water repellent (aquaprotector)
- PENTA-811 Water repellent
- CERESIT CT13 Universal water repellent
- TIKKURILA Paneeli Assa Acrylic varnish for concrete and brick surfaces
- TsAPON varnish (creates the effect of a wet stone)
Hello, I will conduct this interview on my own behalf, since I have been laying gypsum decorative stone for 2 years already, I work conscientiously, and it is unlikely that someone better than me will be able to tell you about all the intricacies of laying. I will put everything on the shelves so that you can put it with your own hands with high quality. As they say, we try once, and we will admire for many years.
Straight to the point:
Buy decorative gypsum stone in Minsk You can follow the link decorative stone "Stone Line". I have been working with this stone for more than a year, I consider it the best in Belarus, and therefore I advise you so that there are no problems in the future!
Let's start with the necessary tools for laying:
1. Ordinary wood saw
 The gypsum polymer stone is easily cut with a regular hacksaw, so there is no need for a grinder and excess dust.
2. Miter box with high sides
It is used for sawing decorative plaster stone at 90 and 45 degrees.
3. Spatulas
 Spatulas are used to apply glue. I use three spatulas, small (7-9 cm), medium (15-17 cm) and medium notched (15-17 cm)
 It is used after laying decorative gypsum stone for filling joints between joints and at corners.
5. Paints from the manufacturer of gypsum stone in the required colors
Manufacturers should give out paint bottles with the stone in all the colors that your gypsum stones are painted with. It is used for painting over white seams after puttying and accidental chips.
6. Water-based varnish
After the paint has dried, all places on the decorative gypsum stone, where the seams were sealed and there were chips, must be varnished.
7. Kitchen sponges
It is very convenient to use when puttying seams with putty.
8. Two brushes of small diameter
The first brush is for applying paint on a decorative stone made of gypsum, the second is for water-based varnish.
9. Milk bag
 This, such an ordinary thing, will help you greatly facilitate the work of sealing joints and corners with putty. Cut the milk bag from the side where you already had a hole, from edge to edge. On the opposite side, we make a new small hole in the corner with a diameter of no more than 4-5 mm. We put putties inside the bag and now, through a small hole, gently squeeze it right into the joints of decorative stones.
10. File, sandpaper, chisel
It is far from always that a decorative gypsum stone is poured in perfectly even forms, this makes laying difficult. These tools will help you quickly fit stones one to one. It is most convenient for me to use a chisel, it can quickly and accurately remove both a large layer and a small one, and then clean it with sandpaper.
11. Tile adhesive (bag of 3-7 meters, see consumption on the package),
maybe liquid nails
 Gypsum decorative stone has a small mass, any glue will hold it without any problems and you should not buy super-duper strong glue for the same price. I usually use luxury tile adhesive in my work, or the one that customers buy. I rarely lay on liquid nails, but I can tell you with confidence that they will hold the stone without any problems. There was a case, they tried to lay it on silicone, it still holds.
! It is very convenient to lay decorative bricks on liquid nails. It dries quickly and does not stain the edges. Once I was asked to lay a white stone of the “Old Brick” texture on a white already painted wall. We didn’t want to remove the paint, the repair in the apartment had already been completed, everything was clean. We decided to lay on liquid nails directly on the paint + we did an imitation of jointing, retreating from each brick by 1 cm. It turned out very beautiful: on a white wall, white brick, and most importantly very neat. It seems to be a gamble, but it turned out quite reliably.
12. Level
Always make sure that your masonry does not move relative to the level.
13. Simple pencil
Mark cut lines.
14. Construction mixer or drill with a nozzle
For mixing glue and putty.
Gypsum decorative stone

See if the color depends on the viewing side
Let's start laying decorative stone with our own hands. Many secrets I have already revealed, describing necessary tools. So now let's talk about the laying process itself. To begin with, we consider the facing gypsum stone, it often happens that the color of the stone depends on the viewing side. It is important! Initially, ask the manufacturer which side to lay, otherwise it may turn out to be porridge. If the color of the stone does not depend on the viewing side, we begin laying.
We lay on the level, make sure that the joints do not match.
Dilute the glue with water, beat with a mixer, make the consistency of a thick paste. Next, we check the level of the floor, the first tiles must be laid according to the level. Decorative tiles often have different sizes (lengths), try to avoid repetition. For example: large, medium, small, medium ... and so on. When laying the second row, and all subsequent ones, make sure that the new joint does not coincide with the previous one, if it matches or is close to it, replace the tile with a different size.
We make complex elements with the help of a chisel or other improvised tools.
If you need to beautifully bypass the switch, you have reached the arch or, pick up a pencil, saw, chisel and carefully cut off the excess, after which the edges must be smoothed with sandpaper.
Cutting corners with a miter box
To ensure that the corners fit well together, cut them with a miter box, when laying two cut tiles, try to keep them snug against each other. Use a miter box for cutting right angles. If there is no miter box, use a corner or object with a perfect right angle.
Carry out curly cutting of edges along the contour of the texture


The texture of the decorative stone itself suggests how beautifully the stone can be cut. Saw with a hacksaw along the texture line, firstly, it is thinner there (easier to cut), and secondly, it turns out more beautiful and natural. Do not forget to sand with sandpaper after sawing.
We close up the joints, corners and places of figured cutting with putty.
We fill the milk bag with putty and gently squeeze it through a small hole exactly into the seam, corner, cut edges or around the switch. After that, we take an ordinary sponge for dishes and remove the excess, do not forget to periodically wash the sponge. Wipe the stone thoroughly so that no putty remains on it.

We paint over the places of putty and cuts with paint from the manufacturer.
Only after the putty has dried do we start painting all the white places: corner joints, cut edges of the stone, switches, etc. If the stone has several colors, be careful to match the color.
Go through water-based varnish
Walk through all the painted places with water-based varnish, this is a protective layer, so that in the future the stone is resistant to wet cleaning.
Everything! It remains only to admire the work done with your own hands. I wish you good luck in your endeavors. Once you start, the rest is not so difficult.
PS: If you have any questions or just want to thank for a useful article, write in the comments below.
Elena says: 07/01/2015 at 13:08
Good afternoon. I want to put a decorative gypsum stone (or is it better concrete?) in fragments in the hallway on the wall painted with washing paint. If you prime the stone itself and put it on liquid air, will it pass? Thank you!
Ranil says: 07/12/2015 at 21:30
Hello. We wanted to decorate the wall in the kitchen with stone in places. The wall is painted with water-based emulsion. Which stone is better to take (in the sense that it was easier)? Is it possible to glue a stone on a painted wall after pre-priming it? If so, what kind of primer? Thanks in advance.
Konstantin says: 08/02/2015 at 11:45
Good afternoon. Need your advice. There is a bar on which I want to put a decorative stone, the counter is sheathed with chipboard, but after reading here that it is not advisable to glue the stone on the chipboard, I became thoughtful! What if I screw drywall on the chipboard with self-tapping screws and then glue the stone on it. So can it be done or not? thanks in advance for your reply!!!
irvine says: 08/08/2015 at 13:55
Good day! Do you think it is necessary to plaster the wall before laying decorative "bricks" on a gypsum basis (dimensions 240x63x8 mm), if the vertical and horizontal difference is not more than 12 mm
Tatiana says: 08/17/2015 at 15:35
Good afternoon! Please tell me what to do if the water-based varnish does not dry out, after applying it has already been 3 weeks or a month, it may have been applied too abundantly or from hot weather, until now it sticks ... .. Thank you)))
Galina says: 08/25/2015 at 18:16
Can anyone help, they put a gypsum stone under the brick. The width of the seam is not the same everywhere, since the stone does not have a completely even edge. Without grout, I don't like something. How to rub the seams? we can't find any.
Tanya says: 09/02/2015 at 14:35
Hello! Please tell me, is it possible to use gypsum stone in the bathroom, provided that I cover it with a double layer of varnish (on the front side and ribs) and use grout?
Thanks in advance
Catherine says: 09/10/2015 at 18:02
Hello! Can you please tell me what temperature the decorative concrete stone can withstand? At what minimum distance from a cast-iron fireplace stove can it be laid? Thank you!
Anatoly says: 09/14/2015 at 03:01
Hello. Please tell me if it is possible to decorate the wall above the coal stove. gypsum stone or will it collapse from temperature?
Svetlana says: 09/23/2015 at 13:55
Hello, tell me, please, we want to lay out the wall with a gypsum brick Monte Alba, the wall is already putty, what can be done with it? how to remove the putty?
Igor says: 09/28/2015 at 03:04
Hello! Tell me, please, is it possible to lay a stone on liquid wallpaper and on a painted wall with water-dispersion paint? Thank you.
Andrew says: 11/13/2015 at 17:07
I combined the loggia with the kitchen and I want to lay out the parapet with gypsum tiles inside the room. The parapet is insulated with extruded polystyrene foam 100mm thick.
Oksana says: 11/16/2015 at 18:30
Hello! We bought a decorative brick. They didn’t check it immediately after delivery (it wasn’t possible). After a while, the boxes were opened, but it is very fragile and the back side is uneven. It’s too late to return, it’s been a long time. if you apply 3 points of nails on the surface of a brick and press it against the wall, then the brick breaks due to uneven surface and fragility. What should I do? Putting knauf on perflix, applying this mixture to the wall and brick, spreading it over the entire surface? Like butter on bread?) The brick is milky, but it will get dirty from the mortar. ?And then apply wax or varnish? Ideally, the wall should be white, matte. THANK YOU!
Andrew says: 11/17/2015 at 03:47 pm
I ordered a "line of stone" - slate.
But it hurts headache- the walls are puttied to "zero" on drywall.
I'm thinking of going with Ceresit 17 and then 16 for better grip.
I would like to use liquid nails, but 35m2 of gypsum tiles is a weight. Or will it keep?
If not liquid, then options:
Knauf Perfix is a drywall adhesive (it is believed that it is better, because putty draws water from cement adhesives).
Ceresit 16 or Lux Plus.
Liquid is easier, but something people periodically sting that it doesn’t hold well. Andrew says: 11/18/2015 at 10:19 am
Tried. Doesn't seem to be holding up well. It’s definitely not worth regretting when you press it - it flattens into a narrow strip. It's easy to apply but you have to wait for it to dry. True, I tried it on a concrete stone, but it is heavy.
Vladislav says: 23.11.2015 at 20:09
Good afternoon, great forum, thanks for the articles and advice. I concluded that it is better to prime the stone from the back, not to mention the walls, you can’t glue it on the wallpaper, and it’s better to use a special glue for gypsum stone or tile. That's all good) but here's how to decide on the plinth, the situation is such that a niche in the corner of the room will be sealed with a stone, and it turns out that the plinth and fillet will not be around the entire perimeter of the room, how will it look? Judging by the photo, it looks better and more authentic without a plinth, with a fillet, while the situation is not at all clear, make it up to the stone, that is, dock with it, or make a fillet completely around the perimeter and bring the stone up to it at the top (then there will be a gap between the stone and the ceiling )
The master persuaded me to make window slopes in the loggia to match the wall, laying it out with decorative stone (gypsum bricks). Didn't like the result. Looks rough. How to remove decorative stone?
Olga says: 03/25/2017 at 17:20
Hello! please answer - is it possible to make gypsum putty for sealing tile joints? if not, then advise how to seal the joints and seams in the tile from artificial stone? Please reply to email. mail. Thank you in advance!
Among the mass of types of finishing materials, gypsum tiles stand out for their decorative properties. Manufacturers have long paid attention to gypsum as a raw material for the manufacture decorative finishes internal walls premises. The lining is given a different shape.
Its outer surface may look like a cut different types stone, as well as imitate saw cuts of valuable wood species. In addition, gypsum is dyed in such a way that tile masonry forms spectacular patterns and ornaments.
How to glue gypsum tiles on the walls in order to get a durable and high-quality finish of enclosing structures, we will consider in this article.
What is gypsum tiles
 The basis of the material is gypsum. A mineral from the sulfate class has a chemical formula - CaSO 4 2H 2 O.
Sedimentary rock has a fibrous structure.
The gypsum fracture has a splintery shape. Gypsum splits into thin plates.
Gypsum tiles manufacturing technology
The raw mixture is made up in the following proportions:
| Proportions of gypsum mix for making tiles | ||
|---|---|---|
| № | Names of raw materials | Number of parts |
| 1 | Gypsum | 6 parts |
| 2 | Slaked lime | 1 part |
| 3 | Pure water | According to the degree of viscosity |
| 4 | Color | According to the color of the solution |
 Gypsum mortar is prepared independently as follows:
 - Dry ingredients are thoroughly mixed with a spatula or spatula. The mixture should take on the appearance of a homogeneous substance.
- Water is gradually poured into the finished powder, while the solution is stirred all the time. Constant stirring squeezes air out of the mixture and prevents lumps from forming.
- Water is stopped pouring when the solution takes the form of a paste-like mass.
- After that, silicone molds are filled with a gypsum mixture and the tiles are expected to completely harden.
So that the tile does not stick to the silicone mold or to the surface of another mold, the contact planes are coated with a fatty composition.
 Industrial panels are fired in special molds
 The industrial production of gypsum tiles includes various additional manufacturing operations:
- firing of gypsum placed in special molding containers;
- adding various plasticizers to the raw mixture;
- the use of formwork structures with complex surface configurations; this allows you to create tiles that completely imitate chips and cuts;
- the use of colors that create the outer surface of the tile different color; the use of halftones gives the lined wall volume and naturalness of natural materials.
Advantages and disadvantages of gypsum wall covering
Like any construction material, has its advantages and disadvantages:
 Gypsum elements are easily replaceable
 Advantages
Gypsum tile masonry has many advantages:
- easy to process (cut); this quality greatly simplifies the work when facing walls of complex configuration;
- the low weight of the material allows you to lay tiles on drywall;
- tiles are absolutely safe; environmental friendliness of the cladding allows its use even in children's bedrooms;
- in the event of a tile being torn off, the fallen object will not harm anyone; masonry elements have a low specific gravity;
- the laid coating significantly affects the increase in sound and thermal insulation;
- an accent wall made of such material creates a soft, comfortable flavor of the interior of the room;
- in the event of a need for minor repairs, the masonry can be easily corrected with gypsum putty.
Flaws
 Gypsum is known for its brittleness, so treat the cladding with care.
 Gypsum wall covering does not have any particular disadvantages:
- The cladding does not withstand shock loads and is instantly destroyed.
- The high hygroscopicity of the material does not allow the use of tiles for facing the facades of buildings and walls in rooms with high humidity (bathrooms, swimming pools and saunas).
- can not be covered with wallpaper. The paper base is soaked, and the cladding simply will not hold. Vinyl wallpapers under the weight of the cladding, they may not withstand and “leave” the walls along with the cladding.
 All foundation defects must be repaired.
 The most important thing for a wall is strict verticality and evenness of the surface. Wall deflections of more than 1 cm along its entire length and height are not allowed. Deflections, dents, cracks and other wall defects are plastered and puttied.
If the irregularities cannot be eliminated by the above method, plasterboard fences are mounted. The leveled surface is primed.
Types of glue
To fix the gypsum coating, mainly two types of adhesives are used, each of which has its own individual characteristics.
Alabaster mixes
Mostly dry alabaster mixtures are used. Prepare the glue, strictly following the instructions, the contents of which are indicated on the packaging with the adhesive mixture. 
It is important to prepare the adhesive in volumes that can be worked out in a short time. Otherwise, you will have to throw away the remnants of the frozen glue all the time, and these are extra costs.
Liquid Nails
 Polymer adhesive is very effective remedy for fixing gypsum cladding on the walls of the premises.
The only drawback is that with large areas of coverage, the cost of this type of glue will cost a pretty penny. talking plain language, it will be very expensive pleasure.
Gypsum laying
A thin layer of glue is applied to a small section of the wall. This will serve as a kind of additional primer for the base of the wall, which will significantly improve surface adhesion. This must be done when laying the cladding on drywall.
 Installation steps
 On the back side of the tile with a notched trowel, the adhesive is leveled with a thickness of about 0.5 mm. The tile is pressed against the wall and held for 5 - 7 seconds.
Seam formation
The seams between the sections, if required by the cladding structure, are formed with special spatulas. For seams I make special dry mixes. The color of the seams is obtained by adding colors when preparing the solution. See this video for coverage details:
Gypsum cladding decorates the walls of residential and non-residential premises. The introduction of gypsum lining into the interior of the rooms, imitating natural materials, creates a pleasant comfortable atmosphere in the home.
Gypsum tiles for stone interior decoration used for decorating apartments, private houses, as well as restaurants, shops, offices, hotels and other premises. What is this material, what types is it and how to use it?
Compound
Decorative gypsum tiles for interior decoration are composed of gypsum, water, sand, modifier and surfactants. Modifiers improve the quality of the finishing material, making it stronger and more durable.
The tile is available in the form of imitation brick, wild stone or cobblestone, as well as smooth.

Pros and cons
Gypsum tiles, especially those imitating brick or stone, are widely used. Its advantages are:
- ease of installation,
- low weight, which allows you to stick it even on drywall,
- relatively low price
- environmental cleanliness,
- small thickness,
- the material is warm to the touch, has heat and sound insulating properties,
- safety - it weighs little, does not conduct current,
- fire safety,
- the ability to apply decorative coatings on top.
It is also important that such an artificial stone can be restored and made independently.

Of course, it also has disadvantages:
- strongly absorbs water, therefore it is used only in dry rooms,
- does not have great frost resistance,
- low strength, impact and abrasion resistance,
- there is a risk of buying low-quality material that will quickly collapse,
- difficult to keep clean due to the complex relief, therefore it is recommended to cover the surface with a special varnish after installation.
The hygroscopicity of the tile can also be a positive quality - it allows you to regulate the humidity in the room.

Application
Artificial stone or gypsum bricks can be used to decorate the entire room, as well as one wall or a small section of it. Often with the help of this material they create accents in the interior: they trim niches, fireplaces, columns.

Brick-like tiles are popular for decorating loft-style interiors, as in the photo, because it is not always possible to build a real one in an apartment. brick wall. Its rough texture is well suited for this direction. Stone effect tiles are used in various architectural styles.
Advice! Before laying the tile, lay a sample out of it and see how it will look.
For stone tiles, the direction from which the light falls is very important. Side lighting will be beneficial to emphasize the relief, and front lighting is best avoided.

As in the case of other finishing materials, light cladding visually expands the room, while dark cladding makes it smaller. In small rooms, such as small rooms, balconies, loggias, it is better to tile not the entire wall, but individual fragments. Large areas are best covered in large rooms: living rooms, halls. Most often, individual elements are decorated with stone-like tiles: niches, fireplaces, stoves (in this case, its refractory properties are very useful), ventilation ducts, stairs. You can see an example of finishing in the photo.

Mounting technology
Gypsum tiles are best glued on concrete, gypsum, brick, drywall, and plastered substrates. Facing is carried out at a temperature above +10 degrees.

If gypsum tiles are glued to some non-standard surface, for example, to an old tile, it makes sense to make a layer of a material that connects well with both the cladding and the base. For a tile base, this can be a high-quality strong tile adhesive.
To decorate a wall with gypsum stone, from the tools you will need:
- level - water or laser;
- drill with mixer attachment,
- hacksaw or grinder for sawing,
- miter box,
- foam sponges,
- spatula for grouting,
- straight and notched trowel
- tassels,
- sandpaper or whetstone,
- construction gun or a regular plastic bag.
Also useful materials such as:
- glue - if it came with a stone, you need to use it; tile adhesive or gypsum compounds (Knauf Perflix, Volma Montazh) are also suitable,
- wall primer,
- grout for seams,
- if necessary - paint for seams and the tile itself,
- varnish (water-based).
As an adhesive, you can use silicone sealant, cement adhesive, gypsum plaster, PVA glue, mastic.
To stick the tiles, you first need to mark the wall. So the lining will turn out even. To do this, you need to mark the horizontal and vertical lines, relative to which the stone will be laid. Usually they start to mount it from the corner, so the markup is tied to it.

Gypsum tiles under the stone can be different shapes, so when laying out, select elements so that they do not repeat. Brick-like gypsum tiles are simpler in this regard, they are the same in shape. In order to accurately mark out, you need a water or laser level. The latter is easier to use, including alone, but it is more expensive.

Next, start gluing. Before this, the base is primed. The glue is kneaded with a drill with a mixer nozzle according to the instructions; in terms of consistency, it should be close to thick sour cream. Apply glue to the base with a smooth trowel with a layer of about 5 mm, remove excess with a notched trowel. At one time, a plot is smeared for 3-5 elements. The stone is pressed tightly to the base, adjusting its position.

If the gypsum tile is made to look like a brick, then they must do the jointing. To do this, use special "crosses" or any suitable material at hand. For multi-format artificial stone, seams are not required.

Advice! The gypsum tiles under the brick are laid with an offset so that the vertical seams are not located one above the other.
Gypsum is quite easily sawn with both a regular hacksaw and a grinder. The latter is easier to give the elements the necessary shape, but this tool makes a lot of noise and dust. It is best to cut along the relief line, but if you use a grinder, you can cut the tile along any desired contour.

It is important to carefully arrange the connections of switches, sockets, floors, neighboring walls. To make external corners, the gypsum tiles are cut with a grinder at an angle of 45 degrees.
The seams are rubbed with gypsum glue or a special mixture. For this, a spatula or a construction gun is used, it can also be made from a plastic bag (dense, like milk) like a confectionery syringe, and squeeze out the glue with a strip 4-5 mm thick. The grout is poured into a gun or bag up to half.

Advice! Do not squeeze out a large amount of grout at once, otherwise it will seize before you have time to distribute it. Make sure that the composition does not get on the tile - porous gypsum is difficult to wash off traces of putty.
Some design solutions imply a contrast between gypsum tiles and seams. If the color of the tile is different from the color of the grout, and this is not included in your project, then the seams are painted over with dyes after the fugue has set. Also, dyes can mask chipped tiles. After the glue has dried, the tile under the stone is coated with a water-based varnish.

Independent production of gypsum tiles
Gypsum stone tiles can be made independently. For this you will need:
- building plaster, better brand GF10 - 6 parts;
- slaked lime - 1 part;
- water - 10:7 in relation to gypsum.
Watch the video on how to make your own gypsum stone for interior decoration.
You can cast it both in ready-made silicone molds, and in self-made ones. For example, you can make shapes in the form of a stone, as in the photo. Molds can be cast from liquid polyurethane. To do this, a matrix is first made, and then a layer of liquid polyurethane is poured into it.

Gypsum mortar is prepared at one time and immediately poured into the mold. Gypsum is poured into the water and mixed with a construction mixer, then lime is added. The solution is not stirred for long so that the gypsum does not begin to set. The solution is poured into the mold, leveled with a spatula and left to harden. Forms are placed on a strictly horizontal surface. To release air bubbles, use a vibrating table.

Gypsum sets in 15-20 minutes, but it takes about a day to completely solidify. The tile under a stone has to be at the room temperature in the room without drafts. Then the gypsum tiles are removed from the mold and left to dry. You can use a drying chamber, but you should not expose products to the sun.

Gypsum stone can be painted. To do this, either color is added immediately to the gypsum mortar, or individual parts of the mold are painted with a brush before pouring. You can also apply paint with a spray gun to the finished tile, and this can be done both before laying and after. When the paint dries, the facing material is covered with acrylic varnish in two layers.

Conclusion
Gypsum tile under brick or stone is finishing material, which can be used in a variety of rooms. It can be painted, applied on top of other decorative coatings, you can make your own tiles of the desired size, shape and color. This gives ample opportunities for its use, but it is important to remember its weak points- brittleness, instability to shock and moisture


