Not a single self-respecting installer can do without the use of such devices that perform the function of a kind of switch. In addition to the fact that junction boxes for electrical wiring significantly reduce the time for carrying out the corresponding technological operations, they serve as a reliable protection of wire junctions from mechanical damage and guarantee fire safety.
Any House master must navigate the assortment of junction boxes and know what types, sizes and specifics of the use of a particular variety.
Types of junction boxes
Mounting method
- Open. They are mounted on surfaces, and, as a rule, are used in the arrangement of electrical wiring in administrative, industrial, and household buildings. In relation to residential buildings, they are mainly installed in houses made of wood.
- Hidden. In everyday life, this type of junction boxes is used much more often. They are placed in natural recesses or "nests", which are specially equipped in the walls of the building. Some samples are equipped with decorative covers, therefore, in order to facilitate access to the conductor connections, they are not covered with plaster, wallpaper or other cladding.

Housing material
- Plastics. There are several options - fluoroplastic (cast), polypropylene, polyamide and a number of other artificial materials. Such junction boxes are most in demand, regardless of the specifics of the structure. There are many advantages - good insulating properties; sufficient mechanical strength; resistance to aggressive chemical compounds, liquids and flames.
- Metals. This type of box is practically not used in everyday life, except for wiring in utility rooms, sheds, garages, and so on. They are mainly used in buildings. general purpose by installing in an open way. Production materials - tinned steel and aluminum-based alloys.
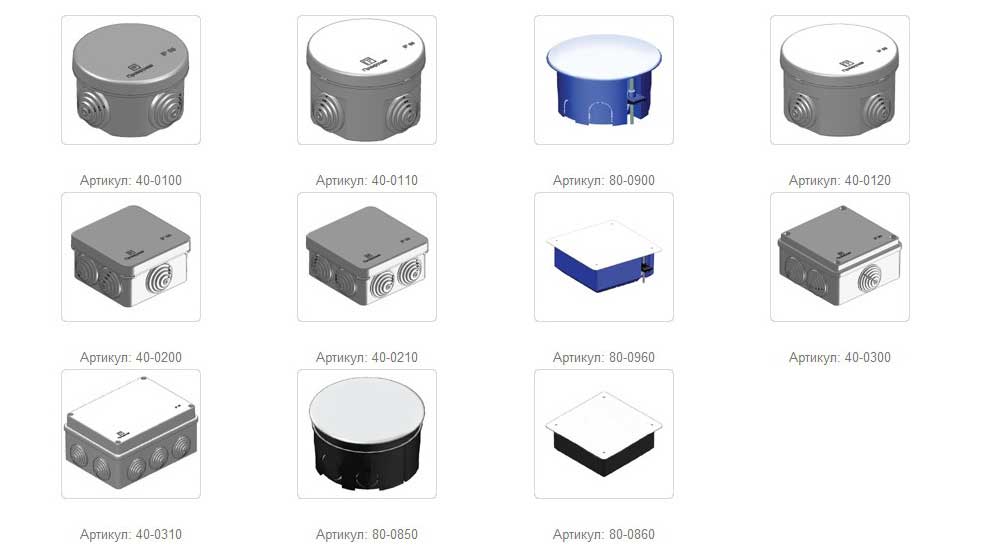
The form
There are few options - rectangular and round boxes.
Number of inputs
At least two. That is, such a junction box is designed to connect 2 wires (cables). Maximum - 16. Depending on the wiring diagram, it is not difficult to choose the desired modification.
Equipment
"Empty" junction boxes. They consist only of a body and a cover. The practice of long-term use shows that for electrical wiring, especially if it is laid on its own, this the best choice. And there are explanations for this.

Firstly, the joint of wires in such boxes can be done in any way convenient for the installer - twisting, soldering, crimping, depending on the size of the box and the number of connections.
Secondly, such contacts are more durable, since they do not oxidize and do not “loose” (provided that the installation is done correctly).
With clips, terminal blocks. This type of junction boxes wins in terms of ease of installation. It is only necessary to strip the tip of the wire, insert it into the contact group and tighten the fixing screw (or snap the latch). But this category of boxes has a serious drawback - when installed in rooms with high humidity, its differences, especially outdoors, oxidize over time. In some cases, contact failure occurs due to the weakening of the fixing element (for example, a spring). As a result - sparking wires. That is, the use of such junction boxes has some limitations.
If it is supposed to connect wires from dissimilar materials (copper and aluminum) by clamping method, then you should choose junction boxes with brass contact groups. Otherwise, there may be problems with the reliability of the joint caused by electrical / chemical processes.

Degree of protection
When choosing a junction box, you need to decide what factors (external influences) the junction box should protect the electrical wiring contact groups from. It is especially important for "problem" rooms (with high temperature, humidity or their differences) and for outdoor installation.
What do the boxes protect against?
- The standard version has a rubber seal. It is enough for an apartment and most rooms of the house.
- From dust. It is advisable to mount in industrial premises.
- From moisture. Worth using in bathrooms toilet rooms(if there is such a need), laundries, kitchens, swimming pools and the like.
- From mechanical damage to electrical wiring. For outdoor installation - the best choice.
- From thermal influence. These boxes should be purchased for houses made of wood, as well as if the surface wall cladding is made with combustible materials (for example, clapboard).
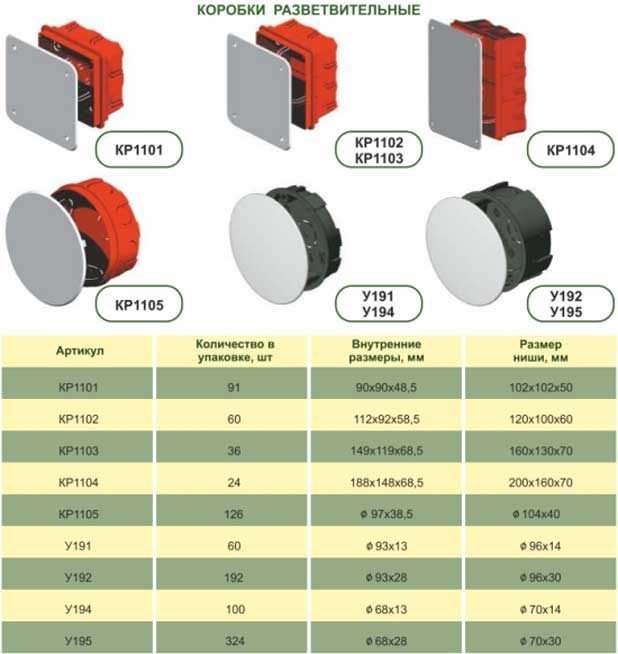
Junction box dimensions
It is difficult to answer this question in a few words, indicating the exact linear parameters, for a number of reasons:
- Different manufacturers have their own specifications for products. Especially when it comes to imported distribution boxes.
- Much depends on the type of sample - material, method of installation and where exactly (in the building or outside it).
- The number of inputs directly affects the size of the junction box, including its depth.
The above photos give only a general idea of the product range.
When planning electrical wiring work, it's worth visiting local electrical outlets to find out what's available. From this and proceed, drawing up the installation diagram and choosing places for installing junction boxes.
Price
The price range is significant - from 18 rubles (plastic, empty, 45 x 65) to 2,814 (outer, made of special strength polymer, 40 x 60).
That, in fact, is all you need to know about junction boxes in order to understand which one to purchase for electrical wiring in your home.
In any electrical network (power system) there are two most important elements - a shutdown (protection) circuit breaker that will prevent an accident, or even a tragedy, and the connection of various sections of the network - the same junction box that will be discussed. We are not in vain talking about the special importance of this element, this box, not having protection, is designed to redistribute the load on the entire network in the right way. Illiterate or incorrect installation of the junction box is the second most important cause of all accidents in the power grid.
Types, types and purpose of distribution devices of the electrical network
Power to any system, for example, to an apartment, is supplied through an input cable, from the shield to the first, introductory junction box (less often there are several shields, this is more common for a private house). The difference of this box is that several “input” cables go from it to different rooms (rooms, etc.), as a rule, there are no direct consumers. The terminal junction box has an input, internal switching, and several outputs (cables), each of which feeds its consumers. Depending on the purpose, the following types of boxes are distinguished:
- Internal concealed installation embedded in the wall;
- Internal exposed mounting (may be hidden by false ceiling, etc.);
- Outdoor for outdoor use, having protection, including from flooding with water;
- Having built-in terminal blocks for connecting wires or not having them.
If we talk about the design, then this is a plastic installation box (which is mounted on the surface), which has holes along the walls with sealed caps for cable entry and a removable cover. The cable connection in the junction box provides a terminal block, a simple and inexpensive device for reliable contact of two conductors. For complex power systems, industrial devices are used, but they are not applicable for domestic purposes.
When choosing, remember that the junction box in the apartment should always have a margin for expansion. If you need four cables, take 8. If there is enough terminal block for 5 pairs of contacts, leave three - this is the case when the stock pocket does not pull!
Do-it-yourself installation and assembly of junction boxes
For do-it-yourself work, the electrical junction box is the simplest element, although the most important. To do it for a long time, it is enough to follow a few rules, know a few tricks and have patience. We will not bore you with wise schemes, we have them on our website in other articles, let's touch on the practical side of things. First of all, the order of installation work:
- We determine the locations, keeping in mind that the junction box for electrical wiring must be accessible for maintenance without the cost of breaking walls, ceilings or floors. If this possibility is not visible, move the box, find any other place. Ultimately, the cost of a hundred meters of corrugated cable will still be less than the cost of expensive restoration of a damaged finish area.
- If necessary, we unload each node, since the junction box in the apartment does not have to be alone in the room. At least three - the main task is to minimize the load on each section. In this case, the box can be through or terminal. If there are two boxes on the line, the checkpoint becomes the "input" for this section of the network.
- Before we start fixing the box on the wall or ceiling, we make sure that we understand how we will do the switching inside. Additionally, we provide a supply of cable at the input-output. This will, if necessary, allow the box to be detached from the surface (see examples below).
Advice. Take a screwdriver in your hand, raise your hands up, stand like this for 10 minutes. Then, without lowering your hands, try, holding the terminal block with one hand, tighten the bolt with the other hand. Something like this will look like working with an already fixed junction box with terminals.
Mounting the boxes, we move from the input point to the distribution points for consumers. Attention! The introductory connection is made last on the shield! Until the installation is completed and the power supply is tested, the connection is prohibited, otherwise there will be trouble!
When switching inside the box, do not use twists, even if “experienced electricians” give arguments like “it is not known what the terminal block is made of, a twist of 4 centimeters never sparks”, etc. Sparks twist always. Any terminal block is more reliable than twisting. If the junction box is with terminals, it is reliable connection. If the terminal block is purchased "on the side", just choose a reliable store and products from a well-known manufacturer. If you are not ready to do this work yourself - invite professionals who will crimp the cable and offer a guaranteed high-quality connection of conductors.
But never leave the switching in the junction box in the form of "temporarily so I will connect, then I will finish it." Then it could come very soon!
After the installation is completed, first power the consumers, at least carrying it in the outlet, a temporary lamp holder, or something else. It all costs a penny, but the carrying and temporary cartridge with a lamp cost a penny. Not only will they give light, they will practically allow you to "test a section of the electrical network before commissioning." Make sure that the sealing caps cover all the holes in the box, and where the cable passes, cut to the correct diameter. This is not beauty, this is a precaution against the formation of condensate (moisture) inside the junction box. No electrical appliance is compatible with moisture, and the junction box is no exception.
Put the lid on the box last. Only after the test has been carried out and there is confidence that everything is done correctly.
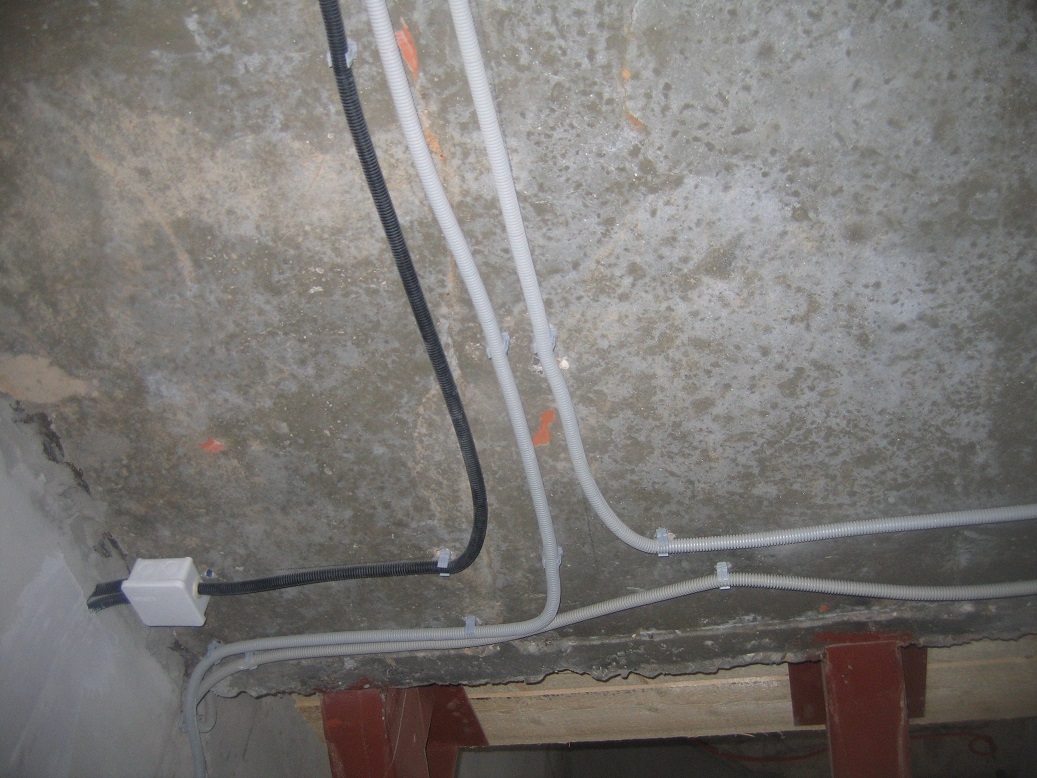
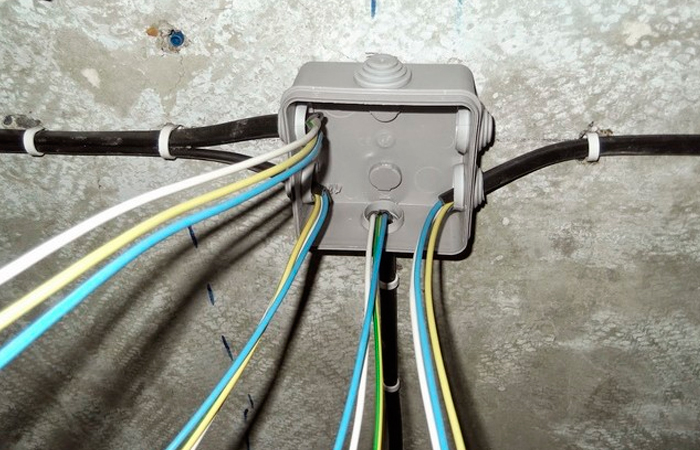
A few photo examples with comments from someone who did a lot himself
Let's start with the title photo for the article. Despite the intimidating appearance, the work was done by professionals in a box with a “two-story” terminal block and for several years of operation did not cause any complaints. The number of cables is determined by the configuration of the false ceiling - in this place it was possible to make an "inspection hatch" measuring 28 x 40 centimeters. Despite the double illumination of the room and three outlets to the outside, no other boxes were required in this room.

An example of a passage and terminal boxes. This decision was caused by the need to install walk-through switches that allow you to turn off or turn on the light in different places in large rooms. The terminal outlet was mounted on the table, after which the box was already attached to the ceiling. In order to fix the cables in the clips, the help of two people was used.
 "The stock pocket does not pull." The "extra cable" loop is now used to light up the fresco on the wall. Without this reserve, the room might not be as cozy as it is today.
 This box is round because the light underneath it couldn't be big. For ease of maintenance or repair, this form is chosen. Note! The loop input cable allowed during the repair to unscrew the box, carefully remove it through the hole of the lamp (which is slightly to the right, if you look at the photo), do the work and carefully return everything to its place.
 "Very strange box." Looking at this photo, a reasonable question arises, why? But when all this was being done, there was a vague idea that did not materialize then, but a backlog was left “just in case”. This is the entrance area to the basement, and in the photo there is a switch assembly. The box originated from the idea that it might be scary for children to go to the basement, since from the stairs to the switch in the dark there are as many as two meters of "darkness". When this happened, the second cable from this box was used. Now the light in the basement can be turned on, just like the light on the stairs, with one switch (although the switch has become double).
In conclusion, we note that the whole story with junction boxes is not knowledge of electricians (although this will not hurt, of course), logic, common sense and an understanding that your apartment is your comfort are more needed here! And of course, you need to remember that an electrician, like plumbing, does not forgive mistakes, but, on the other hand, made with love and scrupulousness, allows you to forget about yourself for many years. And we hope that our examples will show that “not Gods burn pots”, and that you can sometimes find everything you need on the Internet yourself. Unless, of course, you're looking in the right place.
When organizing electrical wiring from the switchboard to each room or group of rooms, power cable. From each cable, in turn, you need to power a number of sockets, switches and stationary electrical appliances. To do this, several wires are diverted from it, according to the number of consumption points. For safety reasons, wire connections must be closed. For these purposes, junction boxes are used - boxes inside which wiring is carried out. They are also called mounting, branching, branching, soldering. These products are divided into 2 large groups according to the type of installation. box for concealed wiring recessed into the wall, for open - mounted on the surface.
Design and purpose of junction boxes
Junction boxes perform several functions:
- protect the junctions of wires from external influences;
- exclude electric shock in case of insulation failure at the joints;
- provide access to them for revision, repair;
- prevent the spread of flame in case of overheating and ignition of the electrical wiring at the junction.
To fulfill its purpose, the junction box must meet several requirements:
- be made of mechanically resistant, chemically inert, non-combustible material;
- have openings for the entry of wires, equipped with glands (seals that prevent the penetration of dust and moisture into the box);
- have a lid that closes securely, but is easy enough to remove.
Once upon a time, junction boxes were made from improvised materials - tin cans, cutting holes for wires in them. I had to tinker to process the sharp uneven edges of the holes, seal the wire entry points, and it was also not always possible to provide a home-made box with a lid. Now mounting boxes can be bought at any electrical store, and their choice is quite wide.
For the manufacture of distribution boxes, high-strength non-combustible plastic or a non-corrosive metal alloy is used. In apartments, plastic products are more often used. Their mechanical strength is lower than that of metal, but in apartments they are rarely subjected to intense shock loads. But plastic is resistant to corrosion, does not collapse in conditions of high humidity. Its main disadvantage is poor thermal and fire resistance, it melts in case of fire. Therefore, in wooden houses you can use only metal junction boxes, and it is highly recommended not to hide them in the wall.
Boxes for hidden wiring are usually cylindrical in shape; it is more convenient for them to choose recesses in the wall with a crown drill. They have a standard degree of protection (not lower than IP24, more often IP54, IP55), rubber seals, a snap-on cover. Since the wire connection is hidden inside the wall, the wall also protects it from various adverse effects. Therefore, a flush-mounted junction box does not require a dust-proof, splash-proof, high-strength design. Inner boxes may have fixing holes, but usually they are fixed with mortar.
Box mounting and wire connection
First of all, you need to choose a place where the box will be installed. Usually they are located 15-30 cm from the ceiling, often above the entrance to the room, closer to the switch. To determine the installation location, you need to look at the wiring diagram, where the largest number of wires converge. Sometimes 2 junction boxes are mounted in one room, one for a group of sockets, the other for a lighting group. This is done if these groups are powered by different automata. Installation work is carried out with the power off.
Mounting order
Markings are made on the wall, gutters are made for wires (they must go strictly horizontally or vertically) and a round hole for the box. The most common diameter of the installation box for hidden wiring is 60 mm, it corresponds to the diameter of the crown drill, standard socket boxes and installation boxes for switches. If a large number of wires are connected in the box, the standard size may not be enough, choose a model with a larger diameter, it can reach 100 mm. First, the wires are laid and fixed, their ends must be marked by taping a paper tag with an inscription with tape or making a mark on the insulation with an indelible marker. Then the hole under the box beats. Procedure after wiring:
- Mark a place for the hole and bend the ends of the wires so as not to hurt them with a drill (perforator).
- Drill a mounting hole of the desired diameter and depth, try on the box. It should freely enter the hole and not protrude from the wall, the closed cover should be flush with the wall.
- Install the box on the seat and lead the wires into the holes, having previously broken the plugs.
- Secure the pre-aligned box with building plaster, gypsum plaster. It is also possible to fasten with a dowel-nail.

AT drywall partitions, frame structures, seats for boxes are prepared in advance. Fastening is carried out using screws or clamping, spacer elements - antennae, paws. Additional fixation to the walls of the hole in drywall with a mortar is recommended.
After installing the junction box for hidden wiring in place and fixing it, you can start connecting the wires.
Rules and methods for connecting wires
When putting wires into the box, you need to follow a number of rules:
- the wires are wound up by about 20 cm, with a margin of length so that, if necessary, reconnection can be made;
- it is better to roll the stock into a ring, arrange the wires so that they are not stretched;
- each wire is cut into cores, the ends are stripped of insulation by 1.5-2 cm, the outer sheath is removed by 4-5 cm;
- the stripped tail should not extend beyond the box, on the contrary, each wire inside it should have an insulated section at least 5-10 mm long.
The electrical wires inside the box are connected in accordance with a pre-made diagram and marking. There are several connection methods:
- soldering - was once used quite widely, hence one of the names of the mounting boxes - junction (soldering). Today, this method is rarely resorted to, since it requires high qualification and accuracy of the installer, over time, the soldering is destroyed;
- welding - one of the best methods, fast and reliable, is carried out by a special apparatus with a carbon electrode;
- twisting is a fairly simple and popular method, but not the most reliable, it is the connection of wires in this way that most often causes a fire;
- crimping is a reliable but time-consuming method, a special tool (press tongs) is required and expendable materials(metal sleeves, heat shrink tubes);
- using terminal blocks - performed in boxes with such blocks.
The connection point by twisting or soldering is closed with electrical tape or a plastic cap. When crimping, first a piece of tube is put on one of the wires, then the cores are inserted towards each other into the sleeve and crimped with press tongs. After that, for insulation and additional fixation, a tube is pushed onto the sleeve, which, after heating, tightly wraps around the junction. In the presence of terminal, mounting blocks in the box, the wires to be connected are attached to each block using screw clamps. It is necessary to choose a model with a sufficient number of terminal sets. For three-phase networks Preferably boxes with multiple tires.
Important Points
Improper installation of the box or connection of wires may result in short circuit, ignition. Therefore, you need to remember and follow a number of rules:
- these switching products cannot be mounted near heating devices, sinks, water risers, open water sources;
- in the junction box, both power and signal, control wires can be connected. But you can’t put wires belonging to networks with different current parameters into one box; for each type of wire, you need a separate box of the appropriate type;
- insufficiently tight connection of wires is fraught with overheating and fire, therefore it is forbidden to connect them by twisting without finalizing this connection.
The terminal connection is quite secure, but can loosen over time, so you have to tighten the screws more tightly. Access to the box may be needed for other reasons. Therefore, no plaster is applied on top of the box cover, the cover must be flush with the wall, a piece of wallpaper or other finishing material so that it does not stand out from the general background. in tension, false ceiling a hatch is made at the installation site of the mounting box. Sometimes the wiring runs under the floor, and the junction box is mounted in the floor covering, in this case a model with a hatch type cover is used.
Externally electrical distribution box looks like an ordinary box, which is made of plastic and has a lid. At the ends of the box there are several holes designed to enter inside it. Distribution electrical boxes There are two types - for installation with hidden and open wiring.
In the event that open wiring is being laid, then junction box also installed on top of the wall. In the case of hidden electrical wiring, such a box is installed in a place prepared in advance for it in the wall and fastened there using any plaster mixture.
Everything is quite simple, but with a hidden installation, the box should be positioned so that its cover is clearly visible and provides constant unhindered access to the wires inside the box. This is necessary so that during the installation of the wiring it is possible to connect the electrical wires, and also so that in case of any problems during operation, they can be easily eliminated. By the way, quite common electrical wiring problems are eliminated precisely in its junction box, for example, the contact disappears and the voltage in the electrical network disappears.
One of the main tasks to be solved during the installation of electrical wiring is to ensure a uniform and extremely reliable distribution throughout the apartment. electrical energy. To do this, all wiring is divided into separate highways. For example, for each room in the apartment, a separate electrical power wire is allocated, to which all electrical appliances and lighting devices located here are connected. Appointment junction box is the interconnection of all wires, both consuming and supplying.
Usually, junction box located in the corner of the room, about 30 cm from the surface of the ceiling. So that she can't mess up appearance the interior of the room, it is most often glued with wallpaper. In this case, it is necessary to remember its location, so that if the need arises, it would be easy to find junction box under wallpaper. It is very important to remember that setting junction boxes in bathrooms and shower rooms, as well as in bathrooms, is strictly prohibited.
Connect electrical wiring inside junction box You can either by soldering, or by simply twisting the wires together. It is good to use special clamps for these purposes. It is especially important that after the installation is completed, all bare parts of the connected wires are reliably insulated. In this case, there will never be any unexpected troubles.
We advise you to read
 Psychological characteristics of children in adolescence
 Transferring a child to another school - the procedure and necessary documents Whether to transfer a child to another school
, diagnosis, treatment Treatment of urogenital chlamydia") Chlamydia urogenital - description, causes, symptoms (signs), diagnosis, treatment Treatment of urogenital chlamydia
Chlamydia urogenital - description, causes, symptoms (signs), diagnosis, treatment Treatment of urogenital chlamydia The benefits and significance of hydroamino acid threonine for the human body L threonine what

