The main requirement for electrical wiring is safety. It is impossible to allow a short circuit to occur during operation, which can lead to disastrous consequences and even fire, therefore all wire connections are protected by heat shrink or electrical tape. We recommend that you use large diameter heat shrink tubing during assembly junction boxes, and not electrical tape, which eventually dries out and unwinds, exposing the wires.
Heat shrink is a flexible thin tube, made of a polymer material that contracts linearly with increasing temperature.The main advantages of the polymer over the insulating tape:
- High density and homogeneity of the material. Heat-shrink tubing perfectly insulates the surface of the wires, “soldering” the insulation. It does not unwind and does not slip, unlike electrical tape.
- Installing the tube is easier than conventional tape. Just put it on the contact and heat it with a hair dryer or a lighter.
- Long service life. The polymer is not afraid of moisture or ultraviolet, it does not disintegrate over time, serving 30-50 years without loss of quality and shape.
When heated, the polymer shrinks and tightly fits the wires, protecting the place of twisting or soldering. Similar the connection will be tight and durable, protected from oxidation and short circuit . The only thing you need is to choose the right, so that the polymer isolates the contacts and cables as much as possible.
Purpose of the product
Heat shrink tubing was originally used to insulate and protect wires, but it has found many different uses. We will talk about this a little later, but now we will consider what goals can be achieved using it in everyday life:
- Protection of any connections from moisture and water leaks. For example, you can connect two pipes or a junction of a pipe and a battery.
- Protection of connections from ultraviolet, dirt, mechanical damage, corrosion. Since the tube does not allow moisture to pass through, rust does not begin under it and corrosion does not occur.
- Surface protection from chemicals. The polymer is not afraid of contact with aggressive media.
- Protecting the surface or joints from deformation.
- Ability to repair cuts and other defects in cable insulation, insulation of wires and connections.
- Wire marking in different colors.
The material is used wherever there are wires and cables - in car repair, wiring, restoration household appliances and various electrical equipment. It is used when installing alarms or head units on cars, protecting hose connections with filters or other devices, used in plumbing, etc. A wide range of colors and heat shrink tubing diameters opens up great opportunities for the repair and insulation of various surfaces.
 Wide range of colors of heat shrink tubing
 Material properties
The main properties of the polymer tube include:
- The ability to shrink by 100-600% when the temperature rises from 70 to 120 degrees. When repairing electronics, fusible tubes with a compression temperature of 70 degrees are usually used, in cars 125-130.
- Ability to withstand sudden changes in temperature. The tube can be operated in damp and unheated rooms or outside buildings, it operates in the range from -45 to +130 degrees.
- Due to the addition of dyes to the polymer, it is given different colors, which makes it possible to mark cables. The default color is black, but stocks are available in red, yellow, blue, green, and more. There are even transparent tubes - they allow you to monitor the state of the connection.
Material characteristics
let's consider main features of heat shrink tubing:
- The possibility of compression (shrinkage ratio) from 100 to 600 percent of the original size.
- Wide range of colors to control groups of wires.
- The possibility of waterproofing and sealing joints due to the presence of an adhesive composition in the product. When heated, the adhesive spreads over the surface, and then hardens and turns into a single whole with the cable, reliably isolating it.
- Good resistance to solar radiation, temperature extremes, technical oil and gasoline, acids and alkalis.
Heat shrink is made from special polymers. Depending on the purpose, it can use polyvinyl chloride, polyolefin, elastomer, etc. There are self-extinguishing polymers, polymers for high loads, for hermetic joints, for bending surfaces, etc.
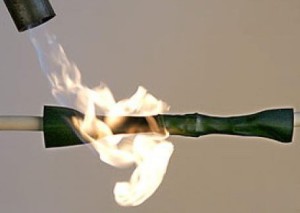
 Heating the tube with a hair dryer
 Terms of Use
Despite the fact that manufacturers recommend “activating” their products with a special hair dryer, in most cases no special installation equipment is needed. The tube is simply put on the wires or the surface, after which it is gently warmed up by the fire from the lighter. Heat shrink tube shrink temperature - about 70-100 degrees, it immediately begins to shrink and tightly fits the surface. The main thing is not to overdo it and not burn it, drive the flame over the polymer carefully and over the entire plane. A hair dryer is good because it heats the air to a predetermined temperature and evenly heats the surface without causing a fire, but it is not possible to use it everywhere. In addition, it is quite expensive and bulky, so the vast majority of electricians and installers use lighters.
The only difficulty of the installation lies in the correct selection of the diameter and the degree of compression of the material.
Attention:non-linear compression of the tube is allowed. For example, you need to insulate two wires with a diameter of 3 mm, connected by a terminal with a thickness of 6 mm. You need to choose a heat shrink with an inner diameter of 8-10 mm and a shrink ratio of 4:1 or 6:1. When heated at the terminal, the tube will shrink less, and more on the wires.
The main thing is that the fully compressed tube should not be larger than the diameter of the wires, so it is not necessary to insulate the cable 1.5 mm2 with 20 mm heat shrink. With an actual thickness of wire with insulation of 3 mm, take an 8-10 mm pipe. There is no need to strive to select diameters with a minimum margin - the more you compress the product, the thicker the insulating layer will be and the higher the strength of the polymer.
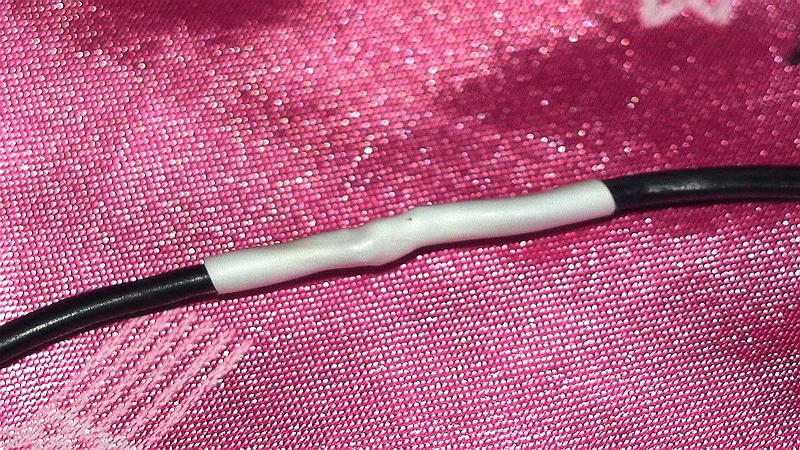 This is what an insulated wire looks like
 Installation rules
Consider an example of connecting a cable consisting of two wires of 2.5 squares. The actual diameter of one wire with insulation is 4 mm, the diameter of the cable is 10 mm.
Important:when connecting two wires, separate the connection points 3-5 cm apart. This will avoid a short circuit in the event of a thermal insulation break.
This can be done quite simply - you make one wire shorter, the second longer, on the other side of the cable, vice versa. You connect a long one with a short one (the connection is best done with a terminal or by soldering a twist), a short one with a long one. As a result, you will get two connections, separated from each other by several centimeters.
You already know everything you need to know aboutso you can pick them up yourself. Before twisting the wires, you put heat shrink on each piece. Keep in mind that when heated, it will “dry out” by 7-10 percent. In our case with 4 mm wires, we take a tube with a diameter of 10 mm, we put a 20 mm shrinkage on the cable itself. First we twist the two wires (connect them by color so as not to get confused, that is, brown with brown, blue with blue), then move the heat shrink so that it closes the connection, and heat it with a lighter until it tightly wraps around the wire. We repeat the operation with the second one, and then we isolate the junction from above with the last thick tube.
Warming up is recommended to be done either from the middle to the edges, or from one edge to the second. No need to first “solder” the two edges, and then heat the center - air will accumulate inside, which will prevent the cable from being well insulated.
 The tube can take on a variety of shapes
 The length of the tube should be chosen so as to create insulation on each side of the connection by 30-50 mm. In this case, consider shrinkage by 10 percent. The thicker the cable, the wider the insulation - our 10 mm can be protected 5-7 cm in each direction.
When heating the polymer, be prudent. You do not need to heat one place for a long time - try to drive the lighter over the entire surface, evenly warming it up. When the polymer begins to shrink, smooth it with your fingers - it will not burn the skin. It is necessary to exclude the appearance of air bubbles under the PVC. If heat shrink with glue is installed on the cable, then the surface is recommended to be degreased and cleaned of dust. Working with the material for the first time - practice on wire scraps. You will understand how to properly heat, from which side to start shrinking, how to properly level it.
Dimensions
When buying heat shrink for wires, consider the size and diameter of the tubes. All manufacturers put markings on them so that the buyer can immediately determine the size he needs. It is the inner diameter that is indicated, so you do not need to calculate the proportions.
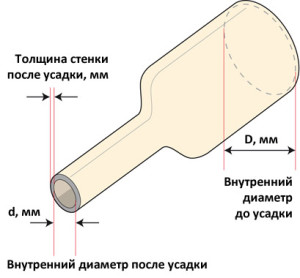
If you see the inscription 10/3, then it means that the inner diameter is 10 mm, after shrinkage it shrinks to 3 mm. Sometimes the compression ratio is simply indicated (in our case it will be 3:1).
American and European manufacturers write the diameter in inches, so you will need to recalculate the size based on the fact that 1 inch equals 25.4 mm. Everything is simpler for Russian and Asian manufacturers - they indicate it in mm.
In stores, products are sold in lengths of 1000 mm, although at wholesale they are bought in bays of 50-100 meters, after which they are cut to the desired size.
Now consider the types of heat shrink:
- Thin-walled, adhesive-free, compression ratio up to 4:1. These are the most common materials that form insulation up to 1 mm thick. Produced in various color scheme, are inexpensive. They are not afraid of ultraviolet radiation and temperature changes, they have self-extinguishing properties.
- Having thick walls, during shrinkage they form an insulating layer 1-4 mm thick. Usually contain adhesive composition allow the surface to be waterproofed. With a shrinkage ratio of up to 6:1, they are suitable for insulating pipes, power cables, making bundles, etc.
There is nothing complicated in installing heat shrink - with practice, you can make neat and tight connections on any surface. It is advisable to clean it from dirt and dust before shrinking in order to improve the effect.
For secure connection isolation electrical wires several types of materials can be used. These include the classic insulating tape made on the basis of dielectric polymers. But recently, heat shrink tubing / couplings have gained particular popularity. They are easy to install and have good performance.
Definition and specifications
Outwardly, they resemble a plastic insulating layer. But that's where their similarities end. Heat-shrink sleeves (TF) are designed to create a reliable layer of protection at the junctions of electrical conductors.
The principle of using TF is quite simple - it is installed on top of power cable until the moment of joining the current-carrying conductors. After their connection, the shell is placed over the joint. In this case, the edges of the coupling must be on the cable insulation. Further, with the help of an industrial hair dryer or a gas burner, the temperature on the surface of the TF is increased, as a result of which the diameter of the product decreases and its surface is compressed with the junction of the leads.
This principle of installation became possible due to the material used - a polymer based on polyolefin. Under the influence of temperature, the specific density of the material increases, as a result of which its dimensions decrease.
The main technical characteristics of the thermal coupling are:

Couplings of various colors can be used for marking wires. Many models are processed with an adhesive composition inside. When exposed to temperature, it improves the insulating properties and serves as an additional factor in the reliable fixation of the sleeve on the surface of the wire.
Benefits of use and installation rules
 In addition to insulating electrical cables, heat shrink tubing is used when laying sewer and water supply pipes. However, their design differs from the above. Most often they consist of several components, the installation of which occurs in stages.
Subject to the installation technology, TF provides the following insulation qualities:
- mechanical strength. Due to the relatively high rigidity, a wire break at the installation site is practically excluded.
- Reliable protection against moisture. This reduces the likelihood of corrosion on the conductors, and also contributes to a lower rate of contact oxidation.
- Electrical insulation.
Installing heat shrink tubing is easy. To carry it out, you must first prepare the connecting wires. After stripping the ends from the insulating layer, the total length of the wiring is measured, where it is necessary to install the TF. For stranded wires it is best to use a complete kit, which has tubes of various thicknesses. It is selected according to the diameter of each cable. After compression, the diameter of the TF should be less than the cross section of the drive. For example, for a core with a thickness of 2.5 mm, a coupling with a diameter of 3 mm with a KU of at least 2 is needed.
Each of the cable components must be insulated separately. For example step by step instructions you can see the order of insulation of the 3-wire wire.
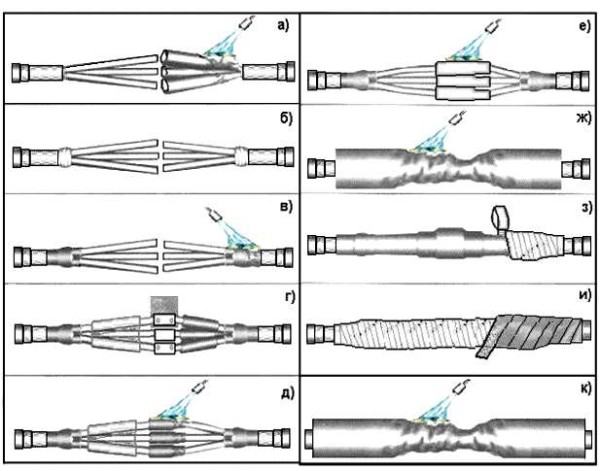
After completing the work, each of the sections is checked for tightness and tightness of the coupling to the cable.
The cost of TF directly depends on their type, size and configuration. The price of the 1st set with products of various diameters will be from 600 to 1300 rubles. This is the cost of a professional set of European production. Piece sales are rare. On average 1 m.p. will cost from 30 (2.5 mm) to 90 (35 mm) rubles.
When choosing, you should pay attention to the geometric dimensions of the product, wall thickness and color coding. The shrinkage factor should also be taken into account.
For right choice heat-shrinkable tube, it is necessary to take into account a large number of parameters depending on the conditions of its further operation as part of the equipment complex. The most important technical parameter any heat shrink is its diameter. Incorrectly selected tube diameter can lead to damage during shrinkage or during operation, preventing full use of all the possibilities of a heat-shrinkable tube. In the most innocuous case, the heat shrink tube simply will not fit on the shrinkable product. Properly selected tube is the key to reliable and durable operation of the equipment.
For the correct selection of the diameter of heat shrink, you need to follow a few simple rules:
1. The minimum diameter of the product (object) on which it is planned to shrink the tube must be at least 10% larger than the minimum internal diameter of a fully shrinkable heat-shrinkable tube in a free state.
Comments: This is very important, because if this condition is not met, the heat shrink tube will not fit the product well, the elastic compressive forces holding the heat shrink will be small, the tube may very loosely adhere to the surface of the product and even slip off it.
The optimal result is achieved when the diameter of the product to be insulated is larger than the diameter of the shrink tube by 20-40%. At these values, the heat-shrinkable tube will fully provide the characteristics of mechanical and electrical strength, durability, and temperature resistance inherent in it.
If the diameter of the insulated product is more than 50-70% of the minimum internal diameter of a fully shrinkable heat-shrinkable tube in a free state, then such situations are allowed provided that the product is not operated at temperatures close to the maximum design temperatures for this type of heat shrink tubing. Otherwise, at high operating temperatures (from + 90 to + 125 ° C), the heat-shrinkable tube may break due to the fact that the elastic compression forces exceed its tensile strength. It can also get worse performance characteristics tubes.
A tube rupture can also occur at the time of shrinkage, especially at a shrinkage temperature that exceeds the recommended one, so the shrinkage of tubes on such large products should be carried out slowly, at the lowest possible heating temperature.
2. The maximum diameter of the product (object) on which it is planned to shrink the tube must be at least 10% less than the inner diameter of the heat shrink tube before shrinking.
This rule is dictated primarily by the very possibility of stretching an unshrinkable heat shrink tube onto an object before shrinking, so as not to damage the tube itself. For products with complex surface relief, this parameter should, if possible, be increased to 20-30%.
In addition, if the internal diameter of the tube before shrinkage is only slightly larger than the diameter of the product, it may be damaged during shrinkage or subsequent operation at elevated temperatures. (See comment to the first rule).
Addition: Most heat shrinkable tubing has a 2x compression ratio. This is usually enough to select the right size of heat shrink for almost any product. However, there are cases when the insulated object (part) has a complex surface relief with large differences in diameters, for which it is impossible to pick up a tube so that all recommendations are followed.
For example, you need a reliable waterproof insulation of the area between a thin cable and a thick connector attached to it. We have to face a choice: either the tube will not tightly compress the surface of the cable, or we will not be able to pull the tube onto a thick connector!
An example of a simple calculation:
It is required to shrink an insulating heat-shrinkable tube onto a 10 mm round conductive busbar operating at room temperature. We have tubes of the following diameters (before/after shrinkage): 20/10 mm, 19/9.5 mm, 18/9 mm, 16/8 mm, 13/6.5 mm, 12/6 mm, 11/5.5 mm, 10/5 mm.
Since we have no temperature restrictions, we are guided by the rules of 10%. Tubes 10/5 and 20/10 are immediately discarded. In the first case, we will not be able to pull the tube onto the tire, and in the second case, after shrinking the tube, its diameter will be more than 10 mm and it will not be able to compress our product.
According to Rule 1, the inside diameter of a fully loose-fit tube must be at least 10% smaller than the tire diameter, i.e. 9 mm or more. This value does not correspond to tubes 20/10 mm and 19/9.5 mm.
According to rule 2, the inner diameter of the tube before shrinkage must be at least 10% larger than the diameter of the tire, i.e. not less than 11 mm. Thus, all remaining tubes: 18/9 mm, 16/8 mm, 13/6.5 mm, 12/6 mm, 11/5.5 mm are formally suitable as insulation for our tire.
If we take into account the additional recommendation that the most optimal is the case when the diameter of the shrinked tube is 20-40% less than the diameter of the insulated product, then the optimal diameter of the tube after free shrinkage should be from 6 to 8 mm.
Thus, the best solution for insulating our tire would be 16/8 mm, 13/6.5 mm and 12/6 mm tubes. And which one to choose is up to you based on their availability, required color, availability, economic feasibility, because smaller diameter tubes are usually cheaper.
Good isolation of the two contacts is the key to long-term operation of electrical wiring, plus high safety. Therefore, insulating tape is one of those materials that an electrician always has on hand. But it is gradually giving way to heat shrink tubing, which in many ways technical specifications surpass the first. So, let's figure out what heat shrink for wires is (dimensions, what materials it is made of, and how it is installed).
Let's start with the fact that the main property of a heat shrink tube (HER) is to decrease in size under the influence of high temperatures. That is, put it on the contact of two wires and is exposed to temperature, the tube immediately decreases in size and tightly fits the electrical contact. What can cause fever? The best option is a special hair dryer, which is used specifically for this operation. If there is none, then you can use a lit candle, lighter, matches, and so on. That is, the flame of an open fire is suitable for this. But consider the fact that contact with fire is contraindicated, and overheating of the tube will not lead to anything good. The material will blister and become hard, so it will crack quickly.
Specifications
Currently, a large number of heat shrinks can be purchased on the market, which differ from each other in their properties. How do they differ:
- Shrinkage coefficient, that is, the ability to reduce its size (2-6 times).
- Resistance to various operating environments - heat-resistant, oil-and-petrol resistant, chemical-resistant, light-stabilized.
- With adhesive layer and without it.
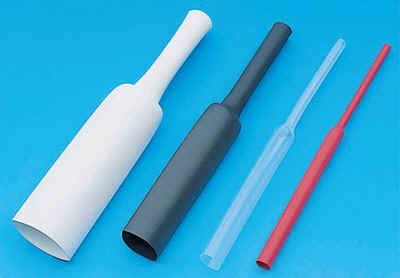
In addition, it can be added that heat shrink tubes differ in colors and the material from which they are made. As for the color design, there is not a very wide variety here, because manufacturers try to approach this issue from the position of the color design of the cores in the cable. By the way, tubes are also available for yellow-green ground wires.
Now, as regards raw material. In principle, any polymers are suitable for the manufacturing technology of HERE. These are polyvinyl chloride, and fluoroplasts, and elastomers, and polyolefins, and so on.
Main parameter
And yet the main indicator of heat shrinkage is the diameter of the tube, which indicates the size before and after shrinkage. The first dimension shows the diameter of the product that enters the distribution network from the factory. The second shows how much the first can decrease during the heating process. Usually this is the designation of the product. But there is another type of marking, where only the initial diameter is shown, and in addition one more indicator is the shrinkage coefficient. For example:
- This is how heat shrinkage is marked according to the first option - 6/4 or 6 mm / 4 mm.
- So it is marked according to the second option - 10/2: 1, that is, shrinkage will occur twice. In fact, this is the same as 10/5 (in the first case).
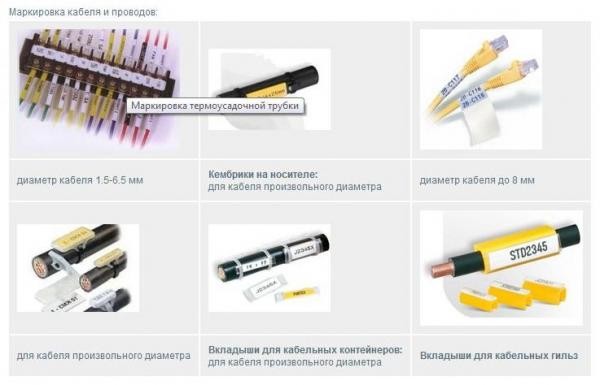
Asian manufacturers, including Russia, indicate the diameter of heat shrink tubing in millimeters. European and American in inches. Converting one to the other is easy, because 1 inch is equal to 25.4 mm. By the way, inch tubes are more expensive than millimeter tubes, but keep in mind that the size in inches does not always mean that the product was made in America or Europe.
Attention! The higher the shrinkage factor, the better. But such products are also priced higher.
Most often, manufacturers offer these ratios: 4:1, 3:1, 2:1. Adhesive heat shrink does not have a standard ratio, it varies from 2.8: 1 or 4: 1, it all depends on the diameter of the product itself.
The form
As for the shape, in stores you can find round, oval, and flat (flattened) tubes. Why such diversity? It's all about ease of storage and transportation.
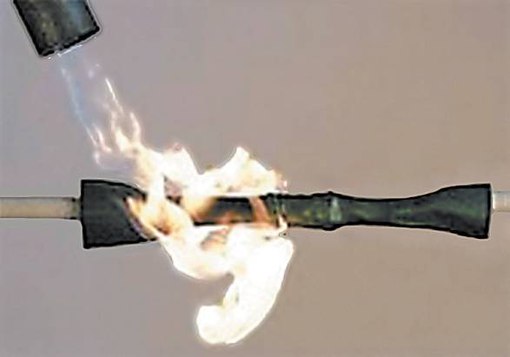
- Flat and oval - this is thin-walled heat shrink or with a large diameter.
- Round - these are thick-walled tubes and heat shrink with an adhesive layer. Sometimes products are thin-walled with a small diameter.
Delivery to the trading network is carried out in coils and cut. By the way, it is flat models that are supplied in coils. Depending on the diameter, pipes with a length of 10 to 100 mm are placed in the coils. In the cut, the heat shrink comes in a length of one meter or 1.22 meters - that's four feet. But tubes with an adhesive layer have a standard length of only 1.22 m. They are not supplied in coils due to a break. The same applies to pipes with thick walls - they are not sold in bays.
How to determine the diameter
The lack of marking creates problems with determining the diameter of the heat shrink tubing. But defining this parameter is not a problem. There are several options for this.
- The first option is to lay flat heat shrink on a ruler and measure it from end to end.
- The second option is to measure with a caliper.
These two methods are best for measuring large diameters. With small tubes, you will not only have to take measurements, but also do some mathematical calculations. Therefore, you first need to measure the circumference, which will require a thread that frames the tube strictly in diameter. Then remember the formula for the circumference of a circle:
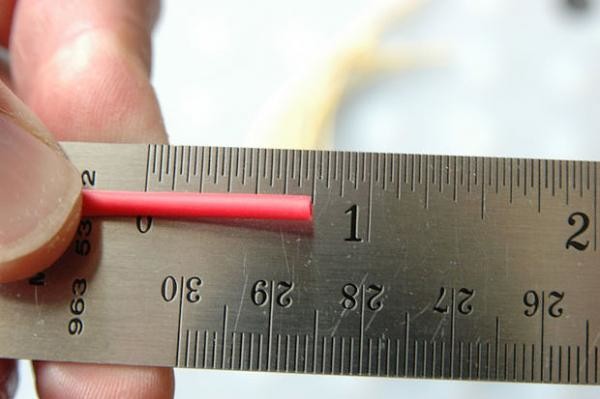
L=2πR or L=πd, where R is the radius equal to half the diameter (d). And the sign "π" is an Archimedean number, approximately equal to 3.14.
That is, it is easy to calculate the diameter using this formula. This will be the formula:
d=L/π. You measured the circumference with a thread, everything else is known.
Of course, any type of measurement gives a certain error, even in the case of calculation. Therefore, the final result will have to be adjusted to the standard. For example, if you get, say, 20.8 mm, then this is most likely a tube with a diameter of 20 mm.
How to use correctly
A piece must be cut off from the product, a little longer than the length of the open connecting section of the two wires. The cut should be straight. Then the cut piece is put on the joint and it is heated. This process can be carried out from one end of the tube to the other or from the middle to the edges.

adhesive model
Adhesive heat shrink tubing was invented to perform several functions at once. More specifically, the functions of waterproofing and anti-corrosion protective layer. In fact, this is a conventional heat shrink only with a special hot melt adhesive applied to the inner surface.
- Firstly, the adhesive composition hermetically fills all joints and voids, thereby sealing the joint from external moisture.
- Secondly, the glue is evenly distributed over the entire joint and hardens in it. It turns out a solid construction that cannot be dismantled. Therefore, this type of heat shrinkage is most often used for underground laying of electrical cables or wires.
- Thirdly, this tubular material can also be used as protection for metal and wooden products from external influences of climatic conditions. For example, use a large diameter tube that is put on a wooden table that is installed in the ground. Such heat shrinkage will replace hot bitumen or roofing felt as a waterproofing material. True, the tube is many times better, and its service life is a level higher.
Conclusion on the topic
So let's sum it up. Let's start with the fact that heat shrink in its technical characteristics exceeds the usual insulating tape. And it seems that the way to install it is a little more complicated, but this is high quality and long-term operation, plus a guarantee that the insulation of the connection of two wires will not burn or crumble. But the most important thing about heat shrink for wires is the dimensions (correctly chosen). Therefore, when choosing, always be guided by the diameter.
Related posts:


