You can understand people who want to reduce the cost of construction and actually on the installation of floors on the ground. Here is one example. There is a foundation. In order to save money, backfilling is not always used. Instead, you can simply put a panel on top. Most often these are round-hollow panels. But there are a few caveats to their use.

The first thing you should pay attention to is that the round-hollow panel is not designed to work in such conditions. To date, all such panels are prestressed. It is understood that the panel is attached to the base of the foundation with anchors. And this is her weak point. The protective layer of these mounts is thin. And first of all, it is the steel anchors at the edges of the slab that are affected. Then the reinforcement begins to collapse. And then concrete.
This process occurs because there is free space between the soil and the slab. The moisture coming from the ground evaporates and condenses on the concrete, since its temperature is quite low.
At the moment, people rarely pay enough attention to frost protection. As a result, a large amount of frozen condensate forms at the junction between the slab and the foundation. Namely, there is the least protective layer of reinforcement anchors.
This can be avoided quite simply. To do this, you need to punch through ventilation holes in the supports on which the plate is placed. They work due to the fact that the wind blows excess moisture out from under the plate. In fact, this is an eternal draft, created by oneself.
But even here everything is not so simple. The height of the plinth must be taken into account. In winter, snowdrifts can block the vents. Therefore, the distance from the ground to the holes must be at least 50 cm. Depending on climatic conditions, this value may vary.
Unfortunately, not all houses meet these conditions. The panel is located much closer to the ground, and as a result, organizing such vents becomes very problematic. In this situation, in the absence of a well-built basement, it is necessary to make floors on the ground.

But their implementation is not within the power of every builder. And the question is not the exceptional complexity of the work. Rather, the problem lies in a misunderstanding of the importance of fulfilling certain conditions. For example, such elements as crushed stone backfill and concrete preparation are mandatory, but not every professional can name the reasons for this. Therefore, it is so important to understand the reasons why this or that layer is made.
So, the first thing to do is the foundation. Then it is waterproofed and sprinkled. The next important step is backfilling. Of course, this will require additional financial costs. But without this, it is impossible to make floors on the ground. Naturally, the situation is implied that there is simply not enough space for vents.
When performing backfilling, it must be borne in mind that this must be done in stages, in several layers. In this case, the layers should not exceed 20-30 cm in thickness. The reason is very simple. A typical rammer has a mass of about 150 kg. Therefore, it can compact no more than 30 cm of soil.

To make tamping more efficient, crushed stone backfill is used. But it is not enough to level it with a shovel. The gravel should also be compacted. The crushed stone fraction should be about 40-60 mm. When it is rammed, the force will be redirected to the ground. Since it will be concentrated in small pebbles, the impact will also penetrate deeper. This is the difference between crushed stone backfill and soil compaction with crushed stone.

The next step is concrete preparation. In this case, it is used as a basis for sticking a hydrovapor barrier. Not to be confused with waterproofing. It only protects against water. And in this case, it is necessary to protect yourself, including from steam. Since the soil has natural moisture, and the temperature inside the building is positive, the moisture will begin to evaporate accordingly. Without a vapor barrier, moisture will enter the floor structure and condense there.

Vapor barrier based on bitumen or mastic can only be laid on a rigid base. Since the workers have not yet learned to fly, they will have to walk on this foundation. If it is soft, under the vapor barrier there may be a void that has arisen under the weight of a person. Or a pebble will just roll in there. As a result, the vapor barrier has a high chance of simply tearing. Accordingly, it will no longer be able to perform its functions. Therefore, concrete preparation or screed is carried out on compacted soil. Preparation is done using low-strength mortars, there is simply no need for high-strength mortars, concrete grade B7.5 is enough.

Next - laying insulation. To do this, you can use various materials, but best of all - extruded polystyrene. It has a low water saturation coefficient and is quite durable. At the same time, it has high crushing strength.
After it is laid on the hydro-vapor barrier both horizontally and vertically, a screed is made to protect against cold coming from the walls. It is also called floating, because it does not have a rigid hitch with the base. It is necessarily reinforced with a welded mesh. If the floor is located in the living room, then 100x100 cells and a diameter of 3 mm and a screed thickness of 5-6 cm are enough. If it is a garage, then a mesh with a 50x50 mm cell and 4 mm wire is taken. The height of the screed is at least 10 cm. At the same time, it will have to be made of concrete using crushed stone with a fraction of 10-20 mm.
Next on this screed is the finish coating. And absolutely anyone. It can be wood, as the vapor barrier is done, or ceramic coating. This whole complex of works is expensive, but reliable. Of course, it can be made cheaper. But if expensive finishing materials or floor heating, water or electric, are used, then it is better not to use economy options.
How to save on floors on the ground?
It is still worth mentioning the opportunities to save on floors on the ground. Instead of a vapor barrier, you can use a regular plastic film, always in two layers. It is also sold by the sleeve. It is necessary to lay it with an overlap of 15-20 cm on a compacted base. But do not lay the film on rubble. It's quite soft material. Therefore, under the weight of the builder, it can break. Accordingly, moisture will get into the floor covering. The result is fungus and unpleasant odors.
But if the thickness of the backfill does not exceed 20 cm, then the soil can be compacted with clay, even slightly moistened. And already on this clay base you can lay polyethylene, always with an overlap. It is also safe to say that the plastic film does not give a full guarantee that moisture will not get into the body of the floor. But if the decision was nevertheless made, then the entire subsequent set of works remains the same. The heat insulator is laid in the same way. Then a screed reinforced with steel mesh is made.
Of course, such a design will also perform its functions. But professionals advise using it in less critical areas. It can be guest houses, sheds, garage. That is, those premises in which expensive coatings will not be used. Just not to take risks.
These were the basic principles of building a floor on the ground.
How not to do it?
Thanks to the Internet, a huge amount of incorrect information is now freely available, in particular tips and recommendations regarding flooring. One such recommendation is the use of geotextiles. This is the advice of one of the regular visitors to the construction forums. He suggested laying geotextiles on the ground. Then it is planned to backfill it with crushed stone or expanded clay. But this is highly inappropriate. If we recall the above, then when trying to tamp the soil, geotextiles simply will not allow this to be done. Whatever the tamping force, the geotextile will hold the crushed stone and will not allow the soil to be compacted. This material has a sufficiently high tensile strength, so the rammer will be useless.
Therefore, the soil must be compacted prior to laying the geotextile. Is it logical? No. In this case, the need for geotextiles completely disappears. It is neither vapor barrier nor waterproofing. To be a little clearer, geotextiles are used in completely different conditions. For example, if you want to make drainage, filter sand or gravel. Accordingly, such a design is completely inefficient, irrational and unacceptable.
In addition, the recommendation referred to the use of expanded clay. This point also requires clarification. Expanded clay is a specific material. It absorbs moisture very quickly. Accordingly, as a heater for this design, it is completely unsuitable. The reason is extremely simple. In just a week, it will be completely saturated with moisture coming from the ground and will cease to perform the functions assigned to it. That is, it will be money thrown to the wind.
After that, it was recommended to do a screed and topcoat. Without waterproofing and insulation. Again, this will be wasted finance. That is why it is necessary to be extremely careful about the information read on the Internet, be sure to double-check it and not be led by such "specialists".
Also on the forums, the question is often asked: “Why is it not recommended to use expanded clay concrete for floors on the ground? It's lightweight and durable." This question deserves a more detailed answer. Yes, it is light weight and is quite durable material. But at the same time it is a terrible heat insulator. Today, there are many much more suitable materials. This is both extruded polystyrene foam and foamed glass. As for glass, it costs almost 2 times more than polystyrene, but is an ideal protection against rodents. Not even moles can break through. So this is an additional guarantee of peace for the inhabitants of the house.
And if we return to expanded clay concrete as a material, then it should be borne in mind that it is very capricious. When the expanded clay concrete mixture is being prepared, the expanded clay itself gains a lot of moisture. And he takes it from the concrete. And just a day later, when the cement had just set, the following situation occurs. The porous expanded clay has absorbed moisture from the concrete. Days passed. As a result, the cement mortar, which is a kind of glue, envelops the expanded clay. Accordingly, all moisture is clogged inside. Thus, expanded clay concrete will not dry for a month, unlike ordinary heavy concrete with granite filler. This process will take 2-3 months. And if such concrete is used in a basement with poor ventilation, then it will not even be possible to stutter about any subsequent floor finishing for a long time.
Otherwise, the moisture that will continue to evaporate from expanded clay in the absence of a vapor barrier will ruin any finish. It will just undermine the wooden floor, it will just swell and rise. If ceramic tiles were used, then a fungus will appear on its seams, and a persistent unpleasant odor will appear in the room.
Thus, if the decision to use expanded clay concrete was nevertheless made, then a much longer technological break will be required to dry it. It is also necessary to measure the moisture content of the substrate before laying the floor finish.

As mentioned earlier, there are two fundamental approaches to creating floors on the ground. This is an economy and budget option. In the first case, a polyethylene film is used, which is laid on the ground. From above, the laying of insulation, screeds and finishing materials is already taking place. This option is preferable in rooms where an inexpensive finish is planned: cheap ceramic tiles or inexpensive floors.
But if you plan to make heated floors or lay an expensive finish, then saving is no longer recommended. The reason is that the probability that the film will be broken through with a mesh or pressed with a stone during the work remains quite large. Therefore, during the subsequent laying of expensive floors, you should not save on the preparatory stages.
But the forums regularly ask questions about the use of the film. And they demand an answer.
Can black be used? polyethylene film in one layer, not for vapor barrier, but in order not to pour concrete on the ground? It's inexpensive and seems to work better that way.
But do not forget that the best is the enemy of the good. As has been said more than once, the film does not give one hundred percent tightness. When dismantling such structures, professional builders regularly observe a layer of water between the film and concrete. After all, moisture is always in the ground, and concrete or mortar always remain inertial materials. Therefore, it is at the soil/concrete boundary that the dew point will form. Accordingly, moist air will condense between the film and concrete. This is a natural physical process.
It turns out the following situation. There is concrete. A film was laid under it. Just like that, it's cheap. But there is always an excess of moisture in concrete, because in order for cement to seize, only 5-10% of water from its mass is enough. Naturally, there is much more water in the solution and it needs to go somewhere. Question: where? She will not be able to go upstairs, since a vapor barrier will be laid there, and she will not be able to seep into the ground due to the laid polyethylene. Accordingly, the water chemically bound in the concrete structure will not go anywhere, and the excess moisture will condense in the layers between the concrete and the polyethylene film.
A humid environment at a positive temperature is an ideal environment for the development of microorganisms. And the concrete will begin to be covered with a black coating. This does not always happen. But often, when dismantling such screeds, the concrete is completely painted over in black and blue shades. Of course, there is no particular danger to the health of residents. Above is a vapor barrier and insulation, for example, the same extruded polystyrene, which does not allow any fungi to go up. But concrete one way or another will work in difficult conditions and its service life will be much less.
If the film under the concrete is damaged somewhere or there are loose joints, then the moisture that will rise from the ground will only enhance the effect. And the film will retain moisture and prevent it from leaving. Accordingly, moisture gradually accumulates and leads to various unpleasant moments.
But what if there is no such film? If groundwater is located deep enough, then the moisture content of the soil itself will be about 15%. The reason is capillary moisture. She rises from the level ground water and increase humidity. It all depends on the type of soil. If these are sandy soils, then the height of the rise of capillary moisture will be no more than 30 cm. If the soils are clayey, then the height will already be a meter and a half. Accordingly, the humidity in the area of \u200b\u200bthe boundary between the soil and the screed can be much higher.
On the other hand, the humidity of the solution is 100% at the time of pouring. Even if it's 90%. And even with high soil moisture, excess moisture will still go into it. Based on the physical laws of diffusion, it turns out that after some time the moisture content of concrete and soil will even out over time. Up to the same 15%. Naturally in different situations this value may change. But in any case, the lower the moisture content of the concrete screed, the better.
And if you lay a film, then this humidity of 90% will be maintained throughout the entire life of the screed. Of course, to pay money so that the concrete, also bought for one's own savings, works in worse conditions is an inalienable right of the consumer. But still, you shouldn't do that. There is simply no need for this.
The use of vapor barrier in floors on the ground
Next questions:
- Is it necessary to round the concrete screed at the transition to the wall so as not to tear the vapor barrier?
- How much does he need to dry in order to lay the deposited hydrovapor barrier on top?
The fact is that vapor barrier, unlike waterproofing, does not require mandatory gluing to the base. If there is a screed that is closely adjacent to the wall and it is necessary to make a vapor barrier, then it is most important to glue all the joints. But it must be borne in mind that all adhesions of the vapor barrier strips must be very reliable.
As a result, when the membrane warms up, it becomes very elastic, wraps itself on the wall, and everything seems to be going fine. But do not forget that after a short time it will cool down. And then the vapor barrier layer will necessarily decrease in volume and a kind of stretch will occur.
If, when laying the screed, all the corners between the wall and the floor were not rounded, then a void forms there. There is nothing wrong with that. But there is a serious danger that during the subsequent laying of the mesh, it is very easy and easy to break the vapor barrier. To do this, it will be enough to hit the edge of the net into a corner, hit with a boot, press rubble - whatever. And it is impossible to protect yourself from such accidents. This is construction. That is why the device of this rounding is necessary. It will serve to minimize the human factor and the likelihood of such unforeseen situations.
If you make a rounding, then such voids are not formed and the vapor barrier is protected. And some random blow won't do anything to her. The vapor barrier will not tear, as there is a rigid base under it.
Therefore, when the base has been formed and the vapor barrier is soldered to the walls, then gluing it to the screed simply does not make sense. It is enough to solder the joints. That is, to ensure the integrity of the layer. And then it just loads from above.
Of course, if the screed is completely dry, then the vapor barrier can be welded on. Pre-concrete is primed with a bituminous primer, and then a layer of vapor barrier is welded. Labor intensity will be an order of magnitude higher, but it will be soldered to the base. There will be a reason to be proud of yourself and sleep peacefully at night.
But in general, once concrete screed will withstand the weight of a person, then you can start laying the vapor barrier. The main thing is to solder it to the walls and be sure to solder all the joints. And the canvas can just lie on the concrete.

One of the frequently asked questions: "To what height should the floor waterproofing be formed on the ground?".
Euroruberoid is usually used as insulation. It is heated on one side with a burner to form a kind of built-up waterproofing. It must also be laid not only close to the wall, but also with an overlap on the wall. In this case, you can protect yourself from various accidents, such as moisture suction along the wall. As a result, the entire floor patty is protected from possible moisture penetration.
Accordingly, after laying the waterproofing, it is possible to lay extruded polystyrene foam with a thickness of 30-50 mm as a heater. Some people believe that this is not enough, that much more is needed, but in reality this is not the case.
If the base is insulated, then there simply cannot be freezing. And the temperature of the soil is usually about + 5-10 Celsius. Therefore, in a heat engineering calculation, assuming even a heated floor with a temperature of 20-25 degrees, the difference will be no more than 15 degrees. In this case, the wall works at differences up to 50 degrees. Therefore, 30-50 mm. Polystyrene will be enough for protection.
Returning to laying the floor, after waterproofing and laying insulation, a screed is performed. It must be reinforced without fail. The fact is that when laying concrete on a non-rigid base, for example, on insulation, polystyrene foam, mineral wool or sand, it is desirable to reinforce it. This will help to compensate for all possible nuances of unevenness.
It is up to the top of the screed that it is necessary to carry out a vapor barrier. Waterproofing is carried out a few centimeters higher. It is laid on a layer of insulation to protect it from wet concrete. It must be borne in mind that PSB foam is afraid of an alkaline environment. And cement is just an alkaline medium. Accordingly, upon contact, it will be destroyed. But if you use extruded polystyrene foam, then it does not need a film at all. This material is much more reliable in quality and is made using more expensive technology. Therefore, there is nothing to worry about if the film does not fit. Even with subsequent dismantling after a long time, no signs of corrosion or incompatibility were ever noticed.
Accordingly, this film is completely unnecessary. Moreover, euroruberoid is currently covered with a film on both sides so that its layers do not stick together and it can be stored longer. And after its laying, this film retains its integrity, so there is no need for additional coating. It is enough to lay extruded polystyrene foam on the euroroofing material vapor barrier, and you can stop there.
Moreover, the additional film will definitely damage the fittings or pipes that will be laid in the screed.
Wall insulation with polystyrene foam
The thermal insulation layer is 50 mm of expanded polystyrene simply laid and it is not necessary to additionally fix or glue it, and categorically. The fact is that when a screed is made from above, and about 5 cm, then its weight will be somewhere around 400 kg per square meter. So nothing can happen. Styrofoam will not fall lower than the vapor barrier. The screed presses it so hard that any additional fasteners are simply not needed.
Laying insulation on the wall is not always required. Usually, external insulation of the basement is quite enough. But in some cases, it is possible to lay polystyrene foam not only on the floor surface, but also to the level of the screed. This will extend the path of cold air along the wall. Accordingly, it will have more time to warm up. Its use depends solely on the project and external insulation. If this is not provided for in it, then there is no need to use polystyrene foam.
But it’s worth laying a damper tape around the edges. At the same time, even before laying polystyrene foam. It will compensate for the deformation of the screed due to temperature differences. This is especially important when laying underfloor heating. They are heated to 25 degrees, respectively, the screed will increase in size. Damper tape compensates for these changes, and polystyrene foam does not completely. It can shrink, but it will no longer be able to regain its previous volume. Foamed polyethylene or damper tape is able to restore its volume. This is important so that no debris gets between it and the concrete.
Therefore, it is worth checking with the project to check whether additional insulation is required. If yes, then it is better to lay polystyrene foam, if not, then you can do without it.

Is it necessary to weld (tie) reinforced mesh? When laying a concrete screed on the insulation, a mesh with a mesh size of 100x100 and a diameter of 3 mm is used. It is believed that it must be welded or tied and then poured with a solution.
But the mesh is not a load-bearing element in the full sense. It is necessary to compensate for deformation in the screed, so that in case of concrete deformation and cracks, shrinkage, the screed does not resemble drifting ice floes. That is, reinforcement is required so that the screed always lies flat. And even if microcracks appear, it will be possible not to worry about anything.
Laying pipes in floors on the ground
What to do if pipes are laid in the screed? How to fix them? Is it worth attaching them to the reinforcing mesh or maybe it needs to be strengthened much better? On the Internet, there is even advice to break through all layers, including hydro-, vapor barrier and install fasteners in concrete preparation.
A perfectly legitimate question arises. And how will these layers perform their functions in this case? The answer is also simple - no way. Therefore, do not listen to crazy tips. Even 15 years ago, when floors on the ground were just becoming popular, all materials were imported from Germany. Then a film was laid down as a vapor barrier, and white foam was placed on top. It had pimples and pipes were laid between them. In the case of a smooth surface, plastic fasteners were used, but they were also fastened so as not to reach the waterproofing. Apparently, such advice arises when someone sees the process of laying floors on the ground, but does not understand exactly how this is done. No one ever fastens pipes through all layers.
Pipe fasteners are required solely for fixing pipes during pouring of the screed. It is necessary that the pipes do not move away from the positions laid down by the project. There are no large loads there, therefore, special efforts are not required to fix the pipes.
As for the heating and plumbing pipes, they must be dressed in myrilon. The fact is that these pipes are much larger than the pipes of a warm floor and they change their dimensions not only from temperature differences, but also as a result of water hammer. As soon as the taps open, a micro-hydraulic shock goes through the pipe, respectively, the pipe increases in size. So she should have that opportunity. Otherwise, the pipe will burst in weak point. This is especially noticeable after a long absence of residents in the house, and as soon as it is turned on hot water, the pipe will expand significantly.
But in this case, a small space remains above the pipe to the top of the screed. So that a thin layer of screed does not collapse from walking and other loads on the floor, it is worth laying a plaster mesh over the pipes, preferably in two layers. In this case, it will protect the concrete screed from destruction.
On top of the floor heating pipes, it is considered necessary to make a screed 5 cm thick. In fact, there is no consensus on this issue. If we consider the physics of underfloor heating and heat distribution vectors, then the following situation arises. From each pipe, heat covers a certain surface of the floor. At the same time, it is good when the heating sectors overlap each other. In such a situation, the floor warms up evenly, it is very pleasant to walk on it.
But if you reduce the thickness of the screed, the so-called "zebra effect" occurs. In fact, it is an alternating strip of cold and warm floor. The fact is that the pipes do not heat the entire floor, but only the surface directly above the pipes. As a result, walking on the floor turns into a "find a warm spot" game. One step is warm, the other is cold.
This effect is strongly manifested exclusively at the first stages of using the floor. When the heating system has been operating for a long time, this zebra is leveled due to the horizontal distribution of heat and temperature changes are felt much less.
A certain thickness of the screed is necessary just in order to minimize areas of temperature changes. If there is a distance of 15 cm between the pipes, then the screed should be about 4 cm thick. On top, for example, there will be another centimeter ceramic tiles and that will be enough. If the pitch of the pipes is greater, then the thickness of the screed should increase. But even if this condition was not met, the temperature difference will disappear over time.
On the other hand, if you make a concrete screed that is too thick, then much more energy will be required to warm it up. This will increase the inertness of the floor and its warm-up time. But if people live in the house permanently, then over time a certain temperature is reached, the sensors are triggered and the system turns off. So the thickness of the screed on the floor should not exceed 7 cm.
It is believed that before pouring the solution, it is required to heat the floor heating pipes to the maximum temperature. In this case, the pipes will be expanded as much as possible. And subsequently, when the screed hardens, the pipes will not break through the floor, expanding from the temperature. But this is also advice from the category: “I heard a ringing, but I don’t know where it is.” It is necessary that the floor is constantly under pressure. But there is no need to warm it up. The fact is that cement dust can get anywhere. Therefore, at first they use a temporary boiler or even wood heating. Accordingly, there can be no talk of starting a floor heating system. It's just not installed. Work can still continue in the boiler room. So the launch of equipment during civil works is simply out of the question.
That is why it is wrong to start the underfloor heating system until all construction work is completed. Also, do not forget that too high a temperature is by no means useful for a concrete screed. She won't pick up maximum strength and will lose moisture too quickly. Therefore, a sauna will be created in the room and this will not lead to anything good.
Underfloor heating pipes must be under pressure. They will indeed increase in size, but thanks to this, all the loops will take their places. In addition, in a situation where someone punches a hole in the floor, for example, by trying to punch a hole in the floor with a perforator to secure something, this will become immediately clear. The pressure gauge needle will immediately fall, signaling low pressure in the system, and the tenant will be able to quickly determine the location of the breakthrough by a trickle of water shooting out of the pipe and a wet spot on the floor. There are two reasons why pipes must be under working pressure. But there is no point in specifically pumping up the temperature when pouring the screed.
Laying ceramic tiles and porcelain stoneware
Now there is a general fashion to use the most expensive solutions for laying ceramic tiles and porcelain stoneware, especially elastic adhesives. But it's completely pointless. The fact is that these expensive adhesives expand with temperature in the same way as cheaper ones. All of them are made on the basis of cement, that is, if the cement mortar expands by 1 mm from heating, then the more expensive glue will also increase in size by 1 mm in the same way.
But it is still worth adding a special additive to the cement mortar for screed. It is done in order to perform the functions of a postifier and obtain a higher grade of concrete at the same cost. Here you should work on the basis of the rule - the underlying base should have a higher grade than the upper layers. This will prevent delamination while ensuring a normal bond. Therefore, the grade of the solution should not be lower than M-50 or M-70. This is required in order to properly operate the tile and it simply does not fly off the floor. This is the only limitation and there are no additional requirements and additional measures to strengthen the cement adhesive. Even ordinary cement glue will last without complaints for at least 10 years.
Ground floor alternatives

If you fulfill all these conditions and carefully approach the creation of a floor pie on the ground, then it will become a very reliable basis for all future decoration of the room.
Unfortunately, a situation is possible when the soils are unstable. In this case, various unforeseen problems may arise. One of the most striking examples is subsidence of the floor. One has only to imagine how, after the repair is completed, after some time the floor sags sharply, and the baseboards remain hanging on the wall. It's annoying and scary. Therefore, in some cases it is worth thinking about alternative solutions.
If we go back to the beginning and remember the whole scheme of flooring on the ground, it turns out that most of all the work is aimed at preparing for laying the waterproofing. And already on top of it, insulation, underfloor heating, communications and a cement screed are laid.
Thus, any subsidence of the floor and any possible problems often associated with improper preparation or problems with soils. In order to avoid such situations, you can use monolithic slabs instead of backfill and lean concrete. But unlike round-hollow panels, they do not fit on the base of the foundation, but are part of it. Therefore, there is simply no problem with the fact that the anchor will rust and its integrity will be violated. Waterproofing and all subsequent work is carried out on top of this plate.
Unlike soil floors, a monolithic foundation requires much less construction costs. Its thickness should be only about 10 cm. Moreover, this coating can be formed right during the laying of the foundation. Thus, instead of many split plates, a single disk will be obtained. Its strength and performance characteristics in this case will be much higher.
But how to do that? It's actually quite simple. During the laying of the foundation at the stage of creating the formwork, it is necessary to make the basis for such a slab. The only space between the ground and the slab is to leave a protective space. The formwork can be made one-piece and left under the floor after all work is completed. She can easily rot. On the other hand, soil can play the role of formwork. It can be anything, as long as the builders are able to walk on it and do their job. But it does not require special layer-by-layer tamping. The only important thing is to ensure that there is a protective layer of at least 20 mm of protective space between the future slab and the ground. A reinforcing mesh is laid on top and everything is concreted.
But this procedure also has its drawbacks. First of all, this high flow formwork boards. Or you will have to fill up a sufficiently large amount of soil under the monolith. Of course, you can do without soil by sacrificing a board. On the other hand, sometimes filling the soil is much cheaper. The only question is which option will be more profitable from a financial point of view. By the way, in order to save money, you can use the formwork boards several times, pouring the foundation in stages. After completing one part of the foundation, you can remove the boards and move on to the next step. Thus, the consumption of the board, and, accordingly, the money for its purchase will be several times less.
When pouring the grillage, you can leave reinforcement about a meter long on top of the slab plane. Subsequently, after the solution dries, it will bend and become a bond and an additional fastener of a monolithic slab, just in the places where the greatest load falls.
But in this case, as in the floors on the ground, it is important to foresee all communications in advance. It is mandatory to check under pressure water and sewer pipes. In case any mistake is made, financial expenses for repairs can be very, very large.
In general, which flooring option to choose depends on many different factors. So if there is free space up to the floor of the first floor and you can draw vents, then the best option will be the use of round-hollow slabs. Otherwise, you should not save and it is better to use the technology of floors on the ground. If the soils are unstable, then in order to avoid problems, it is worth using other technologies. The choice always remains with the client. But consultation with a specialist will help you not to make a mistake and perform quality work on the foundation and floors of the house. This is the basis of all future decoration of the room.
May differ from , although specific differences depend on:
- groundwater level;
- planned load on the floor;
- use of "warm floor" technology.
If groundwater lies closer than 2 meters from the surface, then the presence of waterproofing is mandatory, as well as "pillows" of sand and coarse gravel. The use of a "warm floor" implies a 2-centimeter thermal gap between concrete and walls, otherwise the fill may be damaged during operation.
The filling procedure must be carried out in compliance with a number of requirements:
- the soil should not be mobile;
- groundwater must lie at least 5 meters;
- the ground must be dry.
In winter, the room must be heated, otherwise the structure may be deformed due to freezing of the soil and, as a result, mechanical loads will increase.
Note! If we are talking about a house that is still under construction, then the flooring should be started only after the roof is ready. So subsequent work will be performed as efficiently as possible.
Stage 1. Definition of the "zero" level
First, determine the "zero" (fill level of the solution), which should be equal to the bottom of the doorway, and mark it around the perimeter. To do this, mark a meter from the bottom of the opening (as shown in the diagram) and transfer them to the walls of the entire room (obviously, it is better to use a laser level for this). Further, from these marks, measure back 1 meter down and draw the second line - it will be the “zero”, along which the floor will be filled. In order to simplify the procedure, hammer nails in the corners and stretch the cord.
Stage 2. Foundation preparation
After determining the "zero" level, take out construction garbage and remove the fertile layer of soil. The floor in our case will be a multi-layered "pie" approximately 35 cm thick. Therefore, remove the soil until the depth from the "zero level" is equal to the thickness of the future "pie".
Next, tamp the surface. It is advisable to use a vibrating plate for this, although in its absence you can take an ordinary meter-long log, nail a board on the bottom, and two handles on top, and use such a tool to compact the soil. The result should be an even and, most importantly, dense base. From walking on such a basis, no traces should remain.
Note! If it happens that the soil level is lower than 35 cm, then simply remove a little fertile layer, tamp and fill it with sand to the desired mark. Then compact the sand itself.
To improve the waterproofing properties of the base, cover the “native” soil first with a layer of clay, then sand, pour water over it and compact it thoroughly.
Stage 3. Further backfilling
Having finished with the main layer, start backfilling the gravel. Fill the material with a layer of 10 cm, pour and tamp. To facilitate thickness control, drive a number of pegs of the required thickness into the base and set them at a single level. After tamping, pull them out.
Cover the sand with a similar layer of crushed stone (fractions of the latter should be approximately 5 cm). Compact the rubble, sprinkle a thin layer of sand on top, level and tamp. If you notice that protruding edges of rubble remain on the surface, then remove them or lay them in a different way. Remember that the result should be a flat plane without any corners.
Note! Check each filled layer with a mounting level.
Stage 4. Isolation
For waterproofing, you can use an insulating membrane or ordinary polyethylene film, the thickness of which will be equal to 200 microns. Cover the entire area of \u200b\u200bthe room with an overlap of several centimeters with material, bring the edges to the walls slightly above the “zero” level. Seal all joints with tape.
There are a lot of materials for thermal insulation, you can choose any. So, for a concrete floor may be suitable:
- expanded clay;
- isolon;
- Styrofoam;
- moisture resistant plywood;
- mineral wool, basalt wool;
- perlite;
- expanded polystyrene (both regular and extruded).
Stage 5. Reinforcement
In order for the future floor to be strong enough, it should be reinforced. You can use both metal and plastic mesh for this, and if large loads are planned, then tie reinforcing bars 0.8-1.6 cm thick together by welding.
Do not lay rebar directly on the base pie. Use small pegs ("chairs") - lay them in rows, substituting a plate cut from asbestos under each to raise it to a height of at least 20 mm. In this case, the reinforcement will be inside the concrete screed and form one whole with it.
Note! If using a plastic net, stretch it over stakes driven into the ground for a similar purpose.
Stage 6. Formwork and guides
In order to withstand the "zero" and at the same time facilitate the filling procedure, install the guides. First, divide the room into equal segments no more than 2 m wide, then divide them with guides. For the manufacture of the latter, you can use both bars or boards, and iron pipes. Make sure that the height of the guides is equal to the "zero" level. Fix them with a thick cement mortar.
Then proceed to install the formwork between the guides, forming special "cards" (identical rectangles, the dimensions of which are selected in such a way that each of them is poured in one go). The use of "cards" will greatly simplify the work, especially on a large area, and will help to withstand the "zero". For the manufacture of "cards" use fresh boards (not dry) or moisture-resistant plywood.
Note! Align the guides with the formwork under the "zero" level, otherwise the floor may turn out to be uneven. Use the building level for this. Also, treat these elements with a special oil (such as Agat-C5, for example) so that they can be easily removed from the concrete.
Stage 7. Preparation of the solution and pouring
Fill the solution in a maximum of two passes, although it is advisable to do this in one. To this end, you can order "factory" concrete (it will be delivered immediately in large quantities) or do the cooking yourself (it will cost less). If you resort to the second option, then you will need:
- shovel;
- concrete mixer (you can rent it);
- "four hundredth" or "five hundredth" cement;
- crushed stone;
- sand;
- one assistant.
| Concrete brand | Mass composition, C:P:Sh, kg | Volumetric composition per 10 l of cement P/Sch, l | |
|---|---|---|---|
| 100 | 1: 4,6: 7,0 | 41/61 | 78 |
| 150 | 1: 3,5: 5,7 | 32/50 | 64 |
| 200 | 1: 2,8: 4,8 | 25/42 | 54 |
| 250 | 1: 2,1: 3,9 | 19/34 | 43 |
| 300 | 1: 1,9: 3,7 | 17/32 | 41 |
| 400 | 1: 1,2: 2,7 | 11/24 | 31 |
| 450 | 1: 1,1: 2,5 | 10/22 | 29 |
| Concrete brand | Mass composition C:P:Sh, kg | Volumetric composition per 10 liters of cement P/Sh, l | The amount of concrete from 10 l of cement, l |
|---|---|---|---|
| 100 | 1: 5,8: 8,1 | 53/71 | 90 |
| 150 | 1: 4,5: 6,6 | 40/58 | 73 |
| 200 | 1: 3,5: 5,6 | 32/49 | 62 |
| 250 | 1: 2,6: 4,5 | 24/39 | 50 |
| 300 | 1: 2,4: 4,3 | 22/37 | 47 |
| 400 | 1: 1,6: 3,2 | 14/28 | 36 |
| 450 | 1: 1,4: 2,9 | 12/25 | 32 |
Video - How to mix concrete or how to make concrete
To prepare the mortar, pour cement, sand, crushed stone and water into a concrete mixer in a ratio of 1: 2: 4: 0.5 and mix everything until a homogeneous mass is obtained. Pour the finished solution from the corner opposite the front door. After filling in several "cards", level the solution with a shovel and spread it around the perimeter. To compact concrete, use a vibrator - it will not only compact the mixture, but also remove air bubbles from it.
Having processed the filled cards with a vibrator, proceed to leveling. To do this, you need a 3-meter rule - put the tool on the guides and pull it towards you. This will remove excess solution. In the aligned "maps", dismantle the formwork and fill the resulting voids with concrete. When the entire floor is filled, cover it with plastic wrap and leave for two to three weeks to dry completely, do not forget to periodically moisten the surface with water.
After this time, you can apply a self-levelling mixture to the finished floor, which is able to smooth out minor defects and make the surface perfectly even. Wait three more days for this mixture to dry.
Such a floor is distinguished by the presence of an air layer between the soil and the screed, which is advisable in those areas where the level of soil moisture is increased, that is, if groundwater is closer than 2 meters from the surface. Also, this technology can be used when the site is located in the northern region of the country, and the heating system will work periodically.
Note! It is very important that the ground level be at least 10-15 cm below the concrete floor. If the gap is large, then heat loss will increase, and if it is smaller, then ventilation will be less effective.
Consider how the flooring technology in this case differs from that described above.
Stage 1. Preparation
Prepare the soil first.
Step 1. Remove the vegetation layer and fill in with regular soil instead. Pour the soil with water and tamp in such a way that in the end the layer height is approximately 15 cm.
Step 2 Pour gravel on top, re-tamper.
Step 3 Cover the finished base with a crushed stone-lime mixture (although it can be replaced with broken bricks or, for example, construction debris).
Next, at the same distance from each other (about 70-100 cm), install brick posts under the logs. Use red brick for this, but in no case silicate. Having installed the posts, cover each of them with roofing material for the purpose of waterproofing, and on top of it attach bars of 3 cm thickness, pre-treated with an antiseptic.
Stage 3. Lags
For the manufacture of lags, use halves of logs, also covered with an antiseptic. The joints between the lags should be located above the posts, but place the extreme lags 2-3 cm from the surface of the walls. Check the logs with a level, if necessary, place wooden bars under them. Remember: the maximum allowable horizontal unevenness in this case is only 3 mm.
Note! Instead of brick for posts, you can use metal pipes.
Step 4. Next steps
Nail the floorboard to the joists. Try to keep the boards as tight as possible. If you wish, you can use a more reliable scheme:
- 1 layer - uncut boards;
- 2 layer - waterproofing;
- 3 layer - floorboards.
The subsequent stages of pouring are no different from those described above.
Note! High-quality ventilation is required in the underground, so make ventilation windows measuring 100x100 mm in the corners. Close the windows with metal bars. Equip special air vents in the basement (at least two per room).
Video - Arrangement of the floor on the ground
This set of rules applies to the design of floors in industrial, warehouse, residential, public, administrative, sports and domestic buildings. Free download
When building private houses, the least expensive way of arranging is concreting the floor on the ground. In the process of performing this work, a reinforced screed is poured onto the compacted soil, a waterproofing layer is laid, and thermal insulation is performed.
With proper observance of all technological subtleties, a solid rough base is formed, on which any type of flooring can be laid. In addition, in this case, there is no release of radon into the environment. Concreting on the ground is not particularly difficult, this work can be done by hand, you just need to know how to do it right.
Concrete floor in a private house on the ground is quite popularThe scheme and conditions for pouring a concrete floor in a private house on the ground
In order to qualitatively equip concrete floors in a private house, certain conditions must be observed. These include the following circumstances:
- the need to form a solid base for the installation of a finishing coating;
- there should be no contact of the floating screed with the walls.
The floating screed is supported by well-compacted soil, so it is not threatened with deformation as a result of subsidence or swelling.
In addition, there is no need for underground ventilation, there is no accumulation of radon, and heat loss is reduced. Financial costs for the construction of the formwork are also excluded, since soil acts as its lower part. Schematically, a concrete floor on the ground is made as follows:
- the upper part of the soil, which is a hard-to-compact fertile layer, is removed, the base is compacted;
- alignment is provided with an underlying layer of up to 40 centimeters of sand or gravel;
- to prevent damage to the waterproofing layer, a concrete screed is made;
- then waterproofing material is laid;
- on top of it - a heater;
- then a concrete solution is poured onto the reinforcing mesh;
- to prevent contact with the walls, a damping layer is laid along the perimeter;
- with the help of special corners, an expansion joint is made.
 Scheme of the device of the concrete floor on the ground
 Such a do-it-yourself flooring scheme makes it possible to ensure high performance of a concrete floor poured over the ground. Trying to save money on its arrangement, some owners of private houses exclude the implementation of individual elements of preparing a concrete screed from the scheme, which leads to the risk of damaging it in the future.
When performing work, it must be understood that a floating concrete screed is not a power element, therefore, for separately located structures with significant weight, a fundamental foundation is made.
Do-it-yourself step-by-step floor concreting technology
Before proceeding with concreting, it is necessary to mark the zero level of the floor. Then you need to properly prepare the base, while not forgetting about engineering communications. Next, a pillow is made with a pile of crushed stone and sand, and an underlying layer is laid on it.
Next, waterproofing, insulation and reinforcement of the structure are carried out. The formwork and guides are mounted, the concrete solution is prepared, and it is poured. A separate foundation is provided for junctions, partitions, walls and stairs.
 An example of the stages of laying a concrete floor on the ground
 It is necessary to fill the floor with concrete along the lighthouses. It should be understood that it is necessary to equip a concrete floor on the ground only if a private house regularly heated, otherwise deformation and destruction of the coating will occur due to freezing of the soil.
The advantage of this design is the ease of installation work, the strength and reliability of the base, high resistance to impact negative temperatures environment. An important factor is the low cost Money compared to traditional floors.
First, mark the "zero" level of the floor
In order to mark the zero level of the floor, the following steps are performed. At a height of one meter from the future floor surface, marks are made on the door jamb and all corners of the room at the same level, which are connected by a common line. Now, in order to set the floor level, you should step back from the markings down, based on the level of the highest point of the prepared base, where another line is drawn, indicating the zero level of the floor.
 Zero level marking scheme for arranging a concrete floor on the ground
 The concrete mixture will be poured along it. The desired thickness of the coating is achieved by moving the markings to the appropriate distance. The use of a laser level greatly facilitates the implementation of these manipulations. Nothing prevents you from setting the correct level with the help of a conventional hydraulic level in the form of a tube of water.
Then prepare the base
To prepare the base for pouring concrete, its surface is cleaned of various kinds of debris. Then the arable layer is removed, since organic compounds are always present in it, which, decomposing, will lead to subsidence of the concrete screed if they are left in the base. Soil extraction is carried out to a depth of approximately thirty-five centimeters from the zero level of the floor, this is the total thickness of all layers of the concrete floor.
Then the soil is compacted. It is best to use a vibrating plate for this, but if it is not available, an ordinary meter-long log can be adapted to perform this work. To do this, a board is nailed to its lower part, and a rail is attached on top as a handle.
 It looks like tamping the soil manually
 The use of such a tool requires a significant expenditure of physical strength. After compacting the soil in one way or another, a dense base is formed, when moving along which there should be no prints of work boots.
Don't forget about communications
When concreting on the ground, one should not forget about engineering communications. Repair of network entry points in a floating concrete screed is not possible, so water and sewer pipes are placed in pipes of a larger diameter so that they can be removed and replaced if necessary.
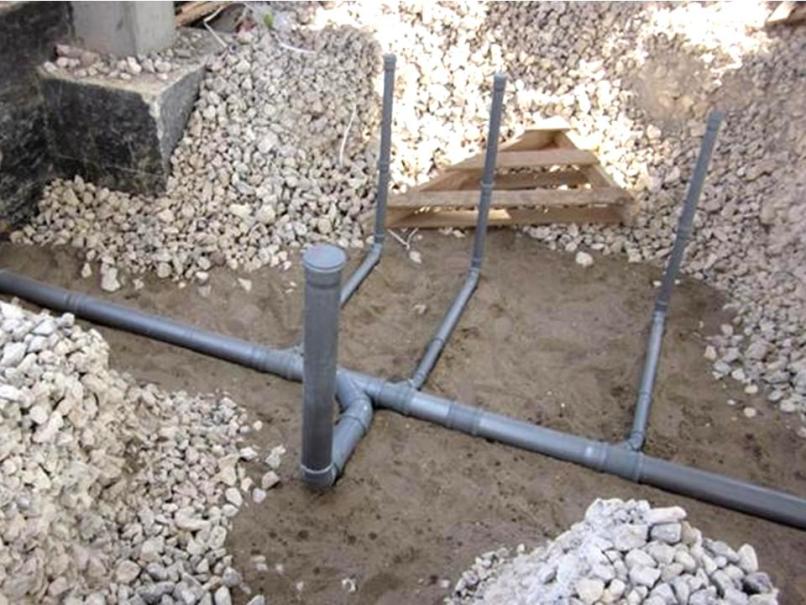 Obviously: sewers must be laid before concrete is poured
 The ground under a heated house does not freeze, so the water lines are buried by about one and a half meters, and one meter is enough for sewer networks, since wastewater warm enough. Power electric cable is laid under the house at a depth of fifty centimeters.
Now you need to make a pillow of rubble and sand
A pillow is laid on the compacted soil, which is about eight centimeters of crushed stone and sand. It protects the structure from the influence of soil water that has risen during the period of rains and snowmelt. In addition, the arrangement of the pillow allows you to better align the base.
 After the sand has been properly compacted, the builder's shoes should not leave marks on it.
 First, a layer of sand is poured, moistened with water and compacted, followed by a layer of gravel, consisting of fractions, with a diameter of about five centimeters. The sharp edges sticking out are sprinkled with sand, and the pillow is leveled.
Underlay required
The underlying layer serves as a support for the floating concrete base. The underlying layer is compacted in layers of fifteen centimeters.
 An example of the arrangement of the underlying layer of crushed stone
 Sand can be used for its manufacture only at a low level of groundwater, as it has a good ability to absorb moisture. In soils with high level humidity, crushed stone should be used, since in this material the rise of water through the capillaries is impossible.
Arranging insulation and waterproofing
 Waterproofing can be done, for example, with a polyethylene film
 Warming can be carried out using a wide variety of materials. The most commonly used for these purposes is foam, mineral wool or expanded clay. Installation of the selected insulation is carried out in accordance with the recommendations of the manufacturer of this type of product.
 Styrofoam used as thermal insulation
 Reinforcing the structure and laying the "warm floor"
Reinforcement of the structure is carried out using a mesh made of metal or plastic. Lay it on pre-made stands, the height of which is approximately 2.5 centimeters. This is done so that during the curing of the poured concrete, the reinforcing mesh is inside it, providing the required strength characteristics.
 Plastic fittings for the floor are quite appropriate, linings are a must!
 In the event that significant loads on the base are expected, reinforcement is performed from reinforcement rods up to one and a half centimeters thick. The laying of a warm floor is provided by a 2-cm thermal gap between the floating concrete screed and the wall ceilings. Cracking and damage to the concrete can occur if the gap is not left.
 An example of installing a water-heated floor after insulation and fittings
 Installation of formwork and guides
The surface on which the concrete mixture will be poured is divided by guides made of wooden bars or a metal profile into cells with a side of about two meters. They should be well fixed with a thickly mixed solution and be sure to be placed on the same level, as they act as beacons for leveling the surface. Laying guides is carried out according to a pre-compiled scheme.
 The lighthouses have been set and the concreting can begin.
 To ensure the separation of the concrete layer into fragments, a formwork made of boards or moisture-resistant plywood is placed as guides. The whole structure is carefully leveled using the building level, wooden blocks or boards are placed under the formwork elements in the right places, which are hemmed in the upper part. To facilitate the removal of the formwork after pouring the mixture, it is lubricated with oil.
Mortar preparation and pouring
The solution is prepared from 1 part of cement, 2 parts of sand, 4 parts of crushed stone and 1/2 part of water. The composition is thoroughly mixed to the desired consistency and is first poured into the cells most remote from the entrance in order not to walk on the concrete mixture until it is completely cured. Of course, before pouring the floor, you need to remember to insulate it.
 Concrete laying on lighthouses
 After filling in several cells, the surface is leveled with reciprocating movements of the rule. Having poured the solution over the entire area of \u200b\u200bthe base, it is necessary to give it time for complete curing, covering it for this period with a waterproof film. To prevent cracking of the surface, it should be periodically sprayed with water.
Junctions, partitions, walls and stairs
To reduce heat loss in the junction nodes, a single layer of heat-insulating material is laid. Partitions, walls and stairs exert significant local pressure on the floating screed, which is not a load-bearing element of the structure, so a separate fundamental base is arranged under them. You can do it differently and in the right places increase the thickness of the concreting to the required level.
 Penoplex is laid in the places where concrete adjoins the walls
 Arrangement of the floor in a wooden house with an underground
For concrete flooring wooden house with the underground, first of all, you should properly prepare the base. Then the supports are installed, and the logs are fixed. Next, the mortar is poured onto the manufactured flooring.
In this case, there is a gap filled with air between the floor and the soil, and in regions with severe winters this helps to save heat. In addition, the washing away of the concrete structure by groundwater located close to the surface is prevented.
When preparing the base, fertile soil is removed from the surface of the earth. Instead, a layer of 15 cm of ordinary soil is placed, and it is compacted. This manipulation is repeated with gravel poured on top.
 Preparing the base for the floor
 A mixture of limestone and gravel, which can be replaced with crushed brick, covers the prepared base. An additional layer of waterproofing should be laid on top of the compacted soil.
Arrangement of supports
The supports for the logs are made of red brick and are columns with wooden bars fixed on top, treated with an antiseptic composition approximately three centimeters thick. They are placed evenly over the entire area of \u200b\u200bthe base at a distance of 70 cm to one meter between the posts. To prevent the aggressive effects of water, the supports are wrapped in sheet waterproofing material.
 Supports are ready for laying the log
 We fasten the logs
Logs are strengthened on the supports, made of logs cut in half, treated with a composition that prevents the development of pathogenic microflora in them. The joints should be placed above the supports, while maintaining a gap between the logs and the walls of approximately 3 cm. The fabricated structure must be carefully leveled using a building level, and the maximum height difference should not exceed 3 cm.
We equip the flooring and pour concrete
The most reliable arrangement of the flooring is made of uncut boards tightly nailed to the logs, a layer of waterproofing laid and the subfloor boards fixed on top. The mixture is poured onto the flooring in the usual manner. In the corners of the underground, square ventilation holes with a side of ten centimeters are made, covered with a mesh made of metal.
A concrete floor on the ground in a private house is a long-known universal way of arranging a reliable and warm foundation. Through the use of new types of insulation, we get good thermal insulation of the entire floor, which leads to a reduction in the cost of utilities. And also the insulation is an obstacle to the penetration of moisture and the appearance of fungus and mold.
And the most important thing is that you can build this type of floor with your own hands. In this article we will analyze all the advantages and disadvantages. Consider in detail the arrangement of the floor on the ground.
Floor on the ground: the pros and cons
Let's start with the fact that this type of floor is a "layer cake". And each layer has its own functions and purpose, thanks to such a device, the floor on the ground has a number of advantages:

There are not many disadvantages, but they are all there:

Cannot be used on loose ground.
How to make the right floor construction on the ground
We will consider the correct classic floor structure, which will consist of 9 layers. We will analyze each layer separately.

It’s worth saying right away that for each master and specialist, the number of layers can change, and the materials can also differ.
This type of floor is ideal for a strip foundation. The average thickness of the “floor pie” is approximately 60-70 cm. This should be taken into account when building the foundation.
If you do not have enough foundation height, then select the soil, to a given depth. Level the surface and tamp. For convenience, in the corners around the entire perimeter, a scale should be applied in increments of 5 cm, so it will be more convenient to navigate in layers and levels.
Importantly, it is best to rent a vibrating plate for compacting the soil, since the manual method will take a lot of time and will not give such results as a special device.
Clay. If during the sampling of the earth you have reached a layer of clay, then you should not fill in a new one. The layer thickness must be at least 10 cm. 
Clay is sold in bags, we pour it out and moisten it with a special solution (4 liters of water + 1 teaspoon of liquid glass), and we carry out ramming using a vibrating plate. After tamping, we spill a layer of clay with cement milk (10 liters of water + 2 kg of cement).
We make sure that there are no puddles. As soon as you spill clay with this composition, the process of glass crystallization begins.
You should not do anything for a day, it is worth waiting for the crystallization process to seize, and it will end in about 14-16 days. This layer prevents the main flow of water from the ground.
Layer of waterproofing material. The purpose of this layer is to protect the insulation from moisture. You can use roofing material, polymer-bitumen materials, PVC membranes and polyethylene film with a thickness of at least 0.4 mm.
In the case of using roofing material, it is preferable to lay it in two layers, on liquid bitumen. Lay waterproofing overlap with each other and on the walls.
Between themselves 10-15 cm, and on the walls to the height of the floor level. The seams must be glued with construction tape. Walking on waterproofing material should be in soft shoes.
insulation+ layer of vapor barrier. The best material for insulation is extruded polystyrene foam (EPS). For reference, EPPS 5 cm thick can replace a 70 cm layer of expanded clay.
But so, you can use perlite concrete and sawdust concrete. Insulation sheets are laid without joints, so that one plane is formed.
The thickness is determined depending on the region, the recommended thickness of the insulation is 5-10 cm. Some use mats 5 cm thick, and lay two layers, with offset seams, and glue the upper seams with special adhesive tape.
In order to remove cold bridges from the foundation or basement, the insulation is laid vertically and fastened with dowels with inside. Experts recommend insulating the basement from the outside, with one sheet of insulation and also fixing it with dowels. 
On top of the insulation should be laid a layer of vapor barrier. As a vapor barrier material, it is best to use PVC membranes, they do not rot and have long term operation. The disadvantage of this material is the high cost.
The main task of the vapor barrier material is to protect the insulation from the harmful alkaline effects of the concrete solution. The material is laid with an overlap of 10-15 cm and glued with construction tape.
We make smoothing with the help of a rule or a vibrating screed. As soon as the solution dries, the beacons should be removed, and the cavities filled with a solution.
The entire concrete floor should be covered with a film and watered periodically. In a month, the concrete will gain full strength. To pour concrete with my own hands, I make a solution of the following composition: cement + river sand in a ratio of 1 to 3.
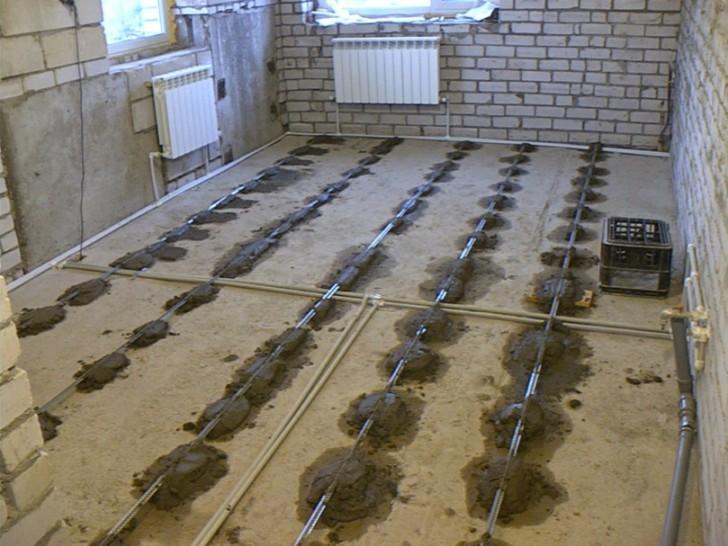
In the case of using underfloor heating technology, water or electric. Be sure to mount the rough floor screed on the ground. 
After laying the insulation, pipes or wires are laid. Then we fill the cavities with concrete, lay the reinforcing elements and continue pouring concrete to a predetermined level.
The ground floor technology can be used not only in brick and stone houses, but also in wooden houses. With the right approach and correct calculations, the layers do not harm the wooden elements.
Finish flooring. The resulting concrete surface is suitable for any type of fine flooring. It all depends on your preferences and financial capabilities.
As mentioned above, the combination of components, and the number of layers may be different. It all depends on your finances and capabilities.
Conclusion
As we all know, from 20 to 30% of heat can go through the floor. In cases where there is no “warm floor” system, the floors should be as thermally insulated as possible, and this in turn increases the energy efficiency of the entire house.
The owner of a private house receives comfort, coziness and savings on utility bills. Floors on the ground with insulation are a highly effective and long-term choice for every owner.
10 best construction and furniture stores!
- Parket-sale.ru - A huge range of laminate, parquet, linoleum, carpet and related materials!
- Lifemebel.ru is a furniture hypermarket with a turnover of more than 50,000,000 per month!
- Ezakaz.ru - The furniture presented on the site is made at its own factory in Moscow, as well as by trusted manufacturers from China, Indonesia, Malaysia and Taiwan.
- Mebelion.ru is the largest online store selling furniture, lamps, interior decor and other goods for a beautiful and cozy home.
Any, even the most durable boards, eventually become covered with fungus and rot. The floors in the house on the ground, that is, in the form of a monolithic concrete base, are devoid of such a disadvantage.
Design features
Read also:Foundation: description of the device, types, complete step-by-step instructions for bookmarking with your own hands (Photo & Video) + Reviews

When erecting a strip foundation or a foundation with a grillage of small height, it is possible to use floors on the ground - a structure consisting of the following layers:
- sand and gravel cushion designed to stabilize the concrete layer and protect it from underground moisture
- screeds (concrete preparation, footings): according to the recommendations of SNiP, in middle lane It is enough for Russia to arrange a layer 5 cm thick
- roll waterproofing
- insulation layer
- concrete underlayment 1 cm thick
- clean floors: they can be used, for example, tile, linoleum or laminate; the use of a classic base in the form of wooden floors along the logs is also allowed
Unlike a slab foundation, the screed in the floors on the ground in a private house is not made too thick. After all, it must withstand the load of only the weight of furniture, household appliances and other things in the house. 2 layers of screed: rough, laid immediately after the pillow, and finishing, top, will be enough. A similar foundation is made only after the construction of the structure itself.
Read also:

There are two types of floors on the ground. They can:
- tie to the tape base;
- be made in the form of a floating screed, not connected to the foundation
Each of these designs has both advantages and disadvantages. With a rigid bond with the foundation, the screed lying directly on the foundation shrinks less, so it does not crack. But when the foundation subsides, it can simply “hang” in the air. Although with high-quality reinforcement of the base, this is not such a big problem. Backfilling will help to avoid lowering the slab with soil removed from the pit, but with specially imported non-metallic materials, sand and gravel.
When using a floating screed, when the base shrinks or the ground moves, stress will not be transmitted to the concrete slab, and cracks will not occur in the floors. However, it can "play" on its own, which often leads to defects - cracking or the appearance of gaps between them and the wall. Therefore, when pouring the floor over the foundation, the strength of the concrete solution and the use of high-quality reinforcement are essential.
Advantages and disadvantages
Read also:Which floor in the kitchen is better: an overview of modern views. Tiles, self-leveling floor, laminate, parquet and other materials (100+ Photos & Videos) + Reviews
There are many advantages to concrete floors on the ground in a private house. We list the main ones:
- Can be used on most types of soil
- minimum consumption of concrete and, as a result, low cost
- sufficient resistance to the forces of frost heaving
- thanks to careful insulation in a house with a similar base in winter, it is easier to maintain a positive temperature, since a screed with a heat insulator laid inside is able to accumulate heat well, as a result, heating costs for the building are reduced; it is enough just to insulate the basement and the blind area well
- such floors do not need ventilation and annual drying
- unlike wooden floors, they do not require periodic replacement of rotten beams
- The disadvantages include the complexity of repairing communications. Therefore, it is imperative to lay duplicate sleeves in concrete, in which additional sewerage and water supply systems are located. They can be connected quickly and without problems in case of clogging of the main communication systems.
- Another disadvantage of such grounds is the lack of a basement. However, the underground in a private house can be quite organized in another utility room.
Some developers advertising their own services claim that under such floors it will be constantly wet. But in the case of arranging high-quality drainage, stormwater drainage and drainage of flood and groundwater, moisture accumulation can be completely avoided.

Ground Requirements
Read also:The blind area around the house: views, device, schematic drawings, instructions on how to do it yourself (30 Photos & Videos) + Reviews

Unfortunately, such a base may not be used on all types of soil. After all, with movements and heaving of the soil under the floor of the house, concrete damage is possible. The laying of such a foundation is permissible only if the groundwater is located below the level of 0.5-0.6 m from the surface.
The main stages of construction
Read also:Self-leveling floor: device, recommendations and step-by-step instructions on how to do it yourself (50 Photos & Videos) + Reviews

It is better to start work on laying the floors of the house on the ground in the summer, after the construction of the building, the erection of walls, and the roof. Since when digging a foundation pit for a strip foundation, the depth of the pit turns out to be significant, it is covered with the same soil with layer-by-layer compaction.
To determine the lower point of the mark, a point called the zero mark should be noted at the bottom of the door threshold. It is from her that the countdown of the deepening into the ground begins. On average, it is 30-35 cm
You can outline the highest (zero) point of the floors with the help of nails and a cord driven around the perimeter of the structure
In floors on the ground, be sure to carefully prepare the base. The ideal backfill for them is sand. It is rammed in small layers with a height of no more than 15 (or even better 10) cm. According to SNiP, the total height of the layers is 60 cm
Each of them is first compacted dry, and then spilled with water and pressed again. A jet of water can erode the layers, so such work should be carried out through a spray nozzle. Excessive oversaturation of sand with water is useless - it should be sufficiently moist, but not wet. They spill it with a hose and pass through it with a vibrating plate twice with a change in direction of movement
It is more convenient to control the height of the sand filling with the help of wooden pegs with a mark. They are located in the corners. After backfilling the next layer, the stakes are removed and new ones are placed.
To compact the layers, gravel of a large fraction is poured on top. When it is rammed, due to the strong pressure of the stones, even the lowest, deepest layers of sand are well compressed.

The next layer is a screed. As we have already pointed out, its large thickness is useless. Enough 5 cm
In the rough screed (concrete), the heaving load on which is small, the use of reinforcement is not necessary - it is required only for arranging the last concrete layer - the finishing screed. Reinforcing the footing is advisable only in the presence of soils with increased frost heaving or with a significant mass of structures in the house
To fill this layer of screed, it is allowed to use lean concrete mortars with a minimum percentage of cement. With high loads on the floors, its amount in the solution can be increased. In these cases, it is also recommended to use cement with improved strength characteristics.
The third layer is waterproofing. To create it, you can use a fairly thick plastic film. The recommended thickness is 150 microns. It is required to lay the film on the base with an overlap on the walls and overlapping layers of 15-20 cm. Each of the seams is carefully glued or fastened with a construction stapler. It is desirable to lay waterproofing not in one, but in two layers.
You can replace the film with bituminous roll materials. They are welded onto the concrete layer with an overlap of 2 layers.
As a heat insulator, it is better to use not rolled, but plate material, which has a high compressive strength
An ideal insulation for the floors of a house on the ground is a layer of extruded polystyrene foam. You can also use regular foam (although working with this fragile material is a little more difficult). Both expanded polystyrene and polystyrene completely retain their heat-shielding properties even when wet.
When using materials that absorb moisture well (for example, mineral wool or expanded clay), they must be additionally waterproofed. Otherwise, their thermal insulation properties will decrease.
Insulation plates are laid only apart (in a checkerboard pattern). All joints must be filled mounting foam. The thickness of the layer depends on the area of \u200b\u200bresidence. It can be 5-20 cm

When laying expanded polystyrene in 2 layers, the slabs are positioned in such a way that the seams of the second layer pass through the center of the slab of the lower layer
It is desirable to protect the porous heat insulator with a film. Otherwise, moisture from the concrete will go into its smallest holes, and the strength of the concrete will decrease.
When pouring the top, finishing screed, cement M400-500 is used with the addition of sand without clay impurities (preferably quarry or river) and crushed stone of a fraction of 5-10 mm. The strength of concrete must be at least M150
Reinforcement of the finishing screed is carried out using a 100x100 metal mesh or a 3-4 mm bar. The compressive strength of fiberglass wire is much worse, so it is used for reinforcement only in soils that are not prone to movement

To avoid rust, the reinforcement should be in the center of the concrete screed, so it is laid out on plastic stands 20-30 mm high
When using a net, it is stretched between hammered metal pegs. Wood subject to decay is undesirable for these purposes.
It is possible to equip additional waterproofing to protect against capillary moisture using a layer of carefully compacted clay located under a sand and gravel cushion.
Read also:Two-pipe heating system of a private house: device, types of systems, schemes, layout, wiring, installation and launch of the system (Photo & Video) + Reviews

Formwork is being prepared for pouring the screed. In order for the floating screed to be located at a certain distance from the walls, it must be leveled with a building level. For ease of formwork removal, the tree can be pre-treated with oil.
In order to avoid the appearance of cold bridges, the solution is poured in one stage, so that a monolithic screed without seams is obtained. You should work as quickly as possible so that the concrete does not have time to grab.
Its proportions during mixing directly depend on the brand of cement (see table). In order for the cement and sand to be evenly distributed in the solution, the dry components should first be thoroughly mixed, and only then the liquid should be added.

Mixing mortar in large quantities without using a concrete mixer in this case is simply unrealistic. In its absence, it is better to purchase a ready-made solution, mixed in a mechanized way, from a trusted manufacturer. For pouring the footing, it is desirable to use cement of a grade not lower than M200-300, which does not crack when solidified.
Work starts from the far corner. A vibrator is used to remove voids. The concrete is leveled with a special construction tool in the form of a long metal rail - the rules. After filling all the sections between the beacons, they are carefully removed and concrete is poured into the holes formed. In order for the solution to dry evenly, the surface is covered with a film and left to dry. In the first week, concrete should be periodically moistened with water. It finally gains strength for at least a month. Any work started before this time may weaken the strength of the concrete.
floating floor
How to make floating floors on the ground in a private house? The principle of creating both structures - floating and rigidly fixed floors - is similar. To ensure the mobility of the base, a damper gap is provided between it and the foundation, with the help of which linear expansions of concrete are compensated.
A special tape is used as a damping layer. It is laid around the entire perimeter of the foundation. Insulation (polystyrene foam) is laid on the edge along the entire height of the screed.
What are load-bearing walls based on?
Read also:Do-it-yourself sewerage in a private house - quickly and without problems. Description of the device, what are the types and schemes (20 Photos & Videos) + Reviews

Since this type of base is not load-bearing, leaning heavy stoves, brick partitions and massive stairs on it is highly discouraged. In these cases, as a basis for internal walls use a strip foundation.
When erecting partitions, the following method can also be used to avoid breaking concrete:
- stiffening ribs are mounted under them - reinforced concrete girders, which rest on the foundation; when the foundation moves, they will act as elastic inserts, damping such deformations
- a gap is made in the thermal insulation layer with the installation of a reinforcing cage in it, which is connected to the main floor frame; if the thickness of the insulation layer is insufficient to prevent the appearance of cold bridges, you should go down 20-40 cm
In areas with severe frosts, concrete with the addition of cement of at least M400 grades, which is frost-resistant, is used for pouring. Cement of similar grades should also be taken for pouring the screed on wet ground. Such material also has higher water-repellent properties.


