Inexpensive and reliable infrared motion detectors find wide application in the most various fields. Initially, sensors that respond to the appearance of an object emitting heat in the detection zone were used only in burglar alarm systems. Then the area of use of such sensors has significantly expanded. It turned out that they work great as switches for various external devices.
The motion detector can work in the following systems:
- Security alarm;
- Turning on the lighting;
- Ventilation and air conditioning.
First of all, this automatic systems turning on the lighting - entering a dark room, you do not need to look for a switch. The infrared sensor will react to the appearance of a person and turn on the light. This is very convenient in cluttered warehouses. In everyday life, motion sensors are used to turn on the lighting in the entrances of residential buildings. The motion detector can be used to turn on and off various devices when a person appears.
Connection overview
Connection of infrared motion detectors is carried out depending on the area of use. The connection of the motion sensor for the security alarm system is carried out by representatives of the company performing the installation of the security system. You can connect a motion detector to turn on the lighting yourself. In this case, it is necessary to follow the safety regulations and connect the device strictly according to the attached one.
Any motion sensor has certain parameters:
- The length of the detection zone horizontally;
- The angle of capture of the object horizontally;
- Vertical capture angle of the object;
- Sensitivity;
- Supply voltage.
The total capture area of the motion detector is the sum of the distance from the sensor to the object detection point, and the viewing angles in the horizontal and vertical planes. As soon as an object (person) is inside this zone, a sensor will operate that controls the operation of the relay. It, in turn, will turn on any device. It can be a burglar alarm device, a siren or.

The response of the infrared sensor to the mass of the object depends on the sensitivity. Very often, the motion detectors used in give a false alarm, reacting to dogs or cats. Security sensors are powered by an alarm loop, which varies in the range of 12-24 V.
Sensors designed to turn on the lighting are powered by a 220 V network, so the independent connection of the motion sensor can only be carried out when the electrical network is completely turned off.
When installing the sensor, first of all, you need to decide on its location. The device is mounted at an inaccessible height within 2.0-2.5 meters. A swivel base bracket is usually included with the sensor, which is attached to the wall. It allows you to accurately orient the motion detector to the desired area.
There are certain installation rules that must be observed when installing an infrared motion detector.

Sensors are not installed:
- In the area exposed to direct sunlight;
- Near lighting fixtures;
- Near radiators and heating pipes;
- Near sources of strong electromagnetic radiation.
Violation of these rules will lead to numerous false positives, which is highly undesirable, both in security alarm systems and in devices automatic start Sveta.
Many users have noted the reaction of such sensors to fluorescent and LED lamp. False alarms or failure of the electronic components of the sensor can cause an electromagnetic field, as well as short pulses that occur during the operation of devices using thyristors.
Wiring diagram for lighting
This work can be done independently by any person, at least a little versed in electrical engineering. The wiring diagram for a motion sensor for lighting is extremely simple. If you open the back cover of the detector, there you can see a double-sided terminal block, to which three wires fit from the side of the sensor. They are different color and are designed to connect the network and the lighting device.
The color of the wires may vary, so you need to navigate by letter designations:
- L - phase wire;
- N - neutral wire;
- A - phase wire to the lighting fixture.
The 220V mains voltage is connected to the L and N terminals, and the lighting device to the A and N terminals. Since the lamp is controlled via a phase wire, it is unacceptable to change the zero and phase coming to the sensor in places. To determine the phase wire, use an indicator screwdriver with neon light bulb. When you touch the phase, the lamp will light up. First you need to connect the lighting fixture, then the neutral wire and phase. When performing work, the electrical panel must be completely de-energized.

Often the system for automatically turning on the light is duplicated with a conventional switch. It is connected between the phase wire of the network and the phase coming from the sensor to the lamp. When it is closed, the sensor is switched off from the circuit. If it is necessary to connect two or more motion sensors operating on the same load, then the phase wires going to the lighting device are connected together. Many types of sensors have sensitivity adjustment and a delay timer.
To make sure that the device itself is working, before installation, you should assemble the motion sensor connection diagram on the table. You can determine that the device is operational without connecting a lighting device, but by lighting up the indicator LED or by clicking the control relay.
The principle of connecting a motion detector for alarm
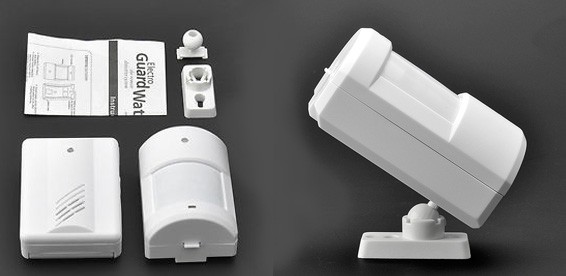
A person who understands the circuitry of security alarm systems can independently equip his apartment or house with infrared motion sensors. The motion sensor is connected to the alarm via a four-wire line, which can be used as a low-current wire KSPV 4 X 0.5. First you need to carefully remove the front cover, being careful not to damage the plastic Fresnel lens. Behind her is printed circuit board, in the upper part of which there is an infrared detector (PIR sensor), and in the lower part there is a block with screw lamellas.
Usually there are only six of them, and they are marked as follows:
- + 12V;
- -12 V;
- TAMPER;
- TAMPER;
- RELAY (Relay);
- RELAY (Relay).

We will send the material to you by e-mail
BUT automatic switching on of the light in the yard, in the rooms will allow you to save on electricity and secure your home. Lamps or lanterns will turn on when a person moves. To learn how to connect a motion sensor for lighting, read this article carefully. We will tell you about all the nuances of selection, installation and configuration that will be useful to you in order to install the device yourself, without resorting to the expensive help of electricians.
All motion sensors according to the type of power supply can be divided into autonomous and wired. The former work on batteries or other batteries, but are not common. The latter are more common, but require connection (see below).
According to the type of action, devices can be divided into active and passive. Active sensors work on the principle of radar or echo sounder. They react to the movement of an object (the principle is based on the Doppler effect - a wave is reflected from a moving and resting object in different ways). They are:
- Ultrasonic(UZ). They emit ultrasound at frequencies that are not audible to humans. Pets pick up the signal and may become anxious, so this type of device is not suitable if you have a dog or cat.

- Microwave(UHF), they are also radio transmitters. Due to the potential harm of microwave radiation emitted by them constantly, they are suitable for humans only for use in places where people rarely appear.

- Passive sensors are infrared(IR) motion sensors. They are absolutely safe, because they do not emit any waves, but only capture the heat emitted by the object. The settings allow you to adjust the sensitivity so that the device responds, for example, to a temperature of 36.6. Thus, the device is triggered if a person appears in the radius of action. However, IR sensors, ideal for equipping rooms, are categorically not suitable for outdoor use: the sun's rays, warming or cooling, and changes in illumination have a bad effect on them.

Finally, there are combined motion sensors. They are more expensive, but will compensate for all the disadvantages of each type.
Pros and cons of using
The positive aspects of using motion sensors for lighting are obvious:
- no need to leave lamps or lanterns on if you are going to return home at night - electricity is saved;
- if an outsider enters the territory, the device will work and the lighting will turn on, you will not encounter an unpleasant surprise in the dark;
- when mounted indoors, for example, in a corridor, the light will be on exactly at the time you are there - this is convenient, eliminating the need to move by touch.
However, there are also some downsides:
- false positives - cheap sensors react even to the swaying of tree branches, not to mention running dogs, cats and flying insects;
- equipping the territory with devices will give attackers information: a wealthy person lives here. Often the sensors themselves are stolen;
- From inexpensive motion sensors for lighting, there are more problems than good, so the cost of equipment should also be attributed to the minuses.
To avoid false positives, you can purchase a sensor with the function of ignoring animals. You can set the mass of the object to which you do not need to react - for example, up to 25 or up to 40 kilograms, which is quite enough for a medium-sized dog. It will also help to install the device at a sufficient height or place it above the visor.

However, the main thing for correct operation is the correct installation of the device.
Motion sensor connection diagram for lighting
ATTENTION!
You can connect a motion sensor to light your home yourself if you know how to work with the mains. In case you have never installed (the procedures are similar) - call a professional, do not risk your health or life.
Each motion sensor is equipped with a Fresnel lens. It is quite fragile, so you should be careful when working.
Below we will tell you in detail, with illustrations, how to connect a motion sensor for lighting.
So let's get started. First, based on the characteristics of your sensor, determine its location. The device is not recommended to be installed near heating elements, windows or doors. The usefulness of sensors in rooms where a person is inactive for a long time (for example, in a toilet) is doubtful. We will consider the installation of a device for lighting the local area.

- Before proceeding with the installation, de-energize the object.

- Carefully study the instructions, set the required settings - they depend on the brand, the principle of operation of the device.


We mark the installation location of the device
- You can choose two options for connecting the sensor for lighting: with or without a switch. The switch will allow you to leave the lighting working for the required period of time. In accordance with the selected method, connect the device according to the diagram.

We connect the device according to the scheme

To illuminate the site in the country, the approach to the entrance, the tunnel, the arch on the street, to bring light to the garage and other buildings use powerful lighting fixtures - searchlights. Modern technologies make it possible to make this type of lighting economical and automatic. Such tasks are solved by connecting a motion sensor to the lighting device. It is not difficult to mount a device that controls the appearance of a person to a lamp. Even a person without special knowledge can perform the work.
Work principles
The main task of the motion sensor is to turn on the spotlight when a person appears in the control zone and turn off the light after a certain period of time until the next turn on. With proper installation, this system saves up to 70% of electricity. In addition, a light device with a sudden switch-on sensor can scare away uninvited guests, performing a security function.
The operation of the lighting device is carried out by connecting to the power supply in the event that the sensor detects infrared radiation other than environment. Using the Fresnel lens, the presence of movement in the controlled area is determined. When the object moves, the electrical circuit closes, turning on the spotlight.
The motion sensor can be purchased separately or in a set with a lighting fixture. The question of how to connect a motion sensor to a spotlight arises during the initial installation of a lighting device or during the reconstruction of an existing lighting system.
Wiring diagram
Incorrect inclusion of the sensor in electrical network may result in equipment failure or short circuit. The instruction for the motion sensor necessarily contains a diagram for connecting the device. But even in its absence, connecting the device is quite simple.
Before connecting, you should determine the optimal location of the motion sensor and spotlight. They may differ. The sensor should be oriented to the place of the expected appearance of people. Consider the viewing angle and maximum response distances. The devices should be positioned to allow for the size of the required cable and to easily install the system after verification.
The figure shows standard scheme device connections.

L (brown wire) - incoming phase;
N (blue or blue wire) - zero;
A (red wire) - outgoing (switched phase).
Compliance with the rules for marking electrical wires simplifies the task. To connect the motion sensor to the electrical network, it is necessary to open the cover for connecting the wires on it.
You can determine the phase by ringing the cable with a tester. The phase wire is connected to the sensor terminal with the brown wire. Zero must be connected to both the spotlight and the fixture (blue wire). Then you should connect the remaining IR sensor terminal with the red wire to the free line of the lamp.
It is often useful to leave a switch in the circuit. By connecting it in parallel, it is possible, if necessary, to leave the light on for a longer time than is provided for automatic control. A diagram of how to connect a spotlight with a motion sensor and a switch is shown in the following figure.

In this case, the automatic inclusion of the floodlight will only work when the switch is in the open position.
There are situations when it is necessary to connect several sensors to the luminaire. This is required in situations where there are several approaches to the illuminated place, or when the coverage area of one sensor is insufficient. In this case, the IR sensors are connected in parallel. The lamp turns on when power is supplied through any sensor. The following figure shows the connection diagram of a spotlight with two sensors.

It is best to connect a searchlight with a motion sensor to a shield with machine guns. However, the cable can be connected to the nearest outlet through a plug or direct contact.
Some spotlights have a green/yellow ground wire. If available, connection is required.
Some lamps are immediately designed with a motion sensor. This is the easiest option. To connect a spotlight with a motion sensor, you need to connect the wires of the device to the electrical wiring, observing the color match.
IR sensor adjustment
Modern motion sensors have two or three regulators.
The first - "SENS" is designed to control the sensitivity of the device. By changing the position, you can set the size of the object to which the sensor will respond, the distance to the object.
The second - "TIME" determines the duration of the lamp glow after the machine is triggered. You can set a few seconds. Experts advise setting 1-2 minutes to prevent the device from constantly working.
The third - "DAY LIGHT" adjusts the sensor's operating time depending on the daylight hours. It is possible to turn on the device only at night, or at any time of the day.
The user defines the position of the controls empirically. The sensors themselves can move up and down, left and right, depending on the model. This allows you to determine the optimal angle of inclination and the area covered by the device.
Classification of searchlights with motion sensors
The motion sensors on the market can be divided according to several parameters.
- According to the method of fastening - wall and ceiling;
- Protected from dust and moisture. For outdoor use, sensors with a protection level of at least IP65 are recommended.
Light fixtures can use different light sources. Due to their unreliability and high energy consumption, incandescent lamps are rarely used in spotlights. Until recently, the most popular halogen lamps. However, the low lifespan and high energy consumption of halogen spotlights lead to their replacement with more modern fixtures.
LED spotlights are the best. They consume less energy and last longer.

The connection scheme of the spotlights does not depend on the light source. However, motion sensors must be selected taking into account the power of the lamps used.
Related videos
5 tips, or how to connect a motion sensor to the light, 2 basic schemes and 2 ways to mount the motion sensor, 3 main rules for setting up lighting.
Motion sensors(DD) is an intelligent electronics that is used at home, office, hotel. This modern switching device has many more functionalities than traditional light switches. For example, a motion sensor with an automatic lighting function provides a person with more comfort and freedom than a conventional rocker switch. In everyday life, this equipment is most often used for automatic turning on lighting in residential premises and entrances.
TEST:
Mini test to determine the user's erudition- Which alternating current used in residential areas?
a) three-phase;
b) single-phase.
- When connecting several sensors in parallel to each other, which connection is correct?
a) a separate phase for each device;
b) one phase for all devices.
- Is it possible to embed DD in a concrete ceiling?
Answers:
The correct answer to 1 question: single-phase alternating current. Three-phase is produced on an industrial scale.
The correct answer to question 2 is: when connecting several devices in one chain, all devices must be connected to the same phase.
The correct answer to question 3 is: no, built-in models of devices are only suitable for installation in false ceilings.
Motion Sensor- this is electronic equipment that helps to identify the intruder in case of unauthorized entry into the controlled area.
There are 3 types DD:
- 2-wire;
- 3-wire;
- With 4 wires.
There are 5 types according to the way of response. detectors:
- Ultrasonic, react to sound high-frequency waves;
- Microwave, triggered by high-frequency radio waves;
- Infrared, function when thermal radiation is detected;
- Active, work in the presence of a transmitter and receiver of infrared radiation;
- Passive, do not use the transmitter.
Infrared sensor with 3 wires
The most popular devices infrared radiation. Its principle of operation is very simple. Sensor DD starts working when infrared radiation coming from living objects hits it. To do this, the device is equipped with pyrodetectors, heading in different directions, dividing the controlled space into narrow segments. This division is carried out by the Fresnel lens.
When a person moves into the area of responsibility of the device, an alarm is triggered and changes in the operation of the sensors occur. Electronic circuit captures these changes and generates a signal for the output relay.
There are three terminals inside the sensor:
- L - for connecting the phase;
- N - to connect to zero;
- A - for connection to the load.
If you don't know how connect infrared DD to the lamp, then everything can be understood by understanding the wires. The phase and neutral wires connected to the L and N terminals supply power to the device. day off relay connected between phase L and the load cable. The light bulb is connected between terminal A and zero.
How to set DD to turn on the light: 2 basic schemes
system sensor - lamp it is recommended to install separately from general lighting. To DD to turn on the light worked instead of a switch, mount a separate line, where only the device and the lamp will work. But often there is a need to include a switch in this circuit. This will allow you to turn off the lights if necessary.

Wiring diagrams: 4 examples
If you choose to connect DD into the light and purchased it in a store, then you need to install it according to the scheme indicated on the package. But there are advanced connection schemes that add functionality to the device.
 In the photo: 1 - connecting the device without a switch; 2 - connection with a switch; 3 - connection of several devices; 4 - viewing angle.
 If there is a need to keep the light on, but Motion Sensor does not function, then a parallel switch is used when connecting. An additional device is installed when there is a need for the lamp to be constantly supplied with voltage, regardless of the presence of a person in the controlled area. When the switch is activated, the lamp will go out immediately or when the sensor turns off.
There are situations where one DD does not cover the entire premises as a controlled zone. In this case, they resort to connecting two or more devices in parallel. For each sensor a phase with zero is supplied separately, and then all outputs are connected to the lamp. PUE requires that a phase wire be placed in the gap.

Important: With this installation, all sensors are connected from one phase, otherwise a phase-to-phase short circuit is possible.
If the layout of the room is such that the viewing angle does not allow monitoring important areas, then it is recommended to DD connect multiple light sources. But so that the load power does not disable the equipment, they use a magnetic starter by including it in the lighting system.
How to connect motion sensor and switch
Wiring diagram D. movement for lighting without switch: 2 mounting methods
Manufacturers now offer users two types DD: ceiling and wall. Their principle of operation is similar, but you need to select a model on an individual basis, taking into account the installation location.
Ceiling devices are able to cover a zone within a radius of 360° and their protected area in the diagram looks like a cone, where the rays diverge by 120°. When a person enters the sensor's field of view, he crosses the multi-beam barrier, which is fixed automatically, and puts the sensor into alarm mode.
Ceiling devices are installed at a height of 2.5 to 3 meters. They are able to cover the area in the lower part of the room with a diameter of up to 20 meters. It is advisable to install such equipment in small rooms in order to simultaneously control all sides of the room.
wall sensors capable of covering a large area of space. The device is used not only indoors, but also outside. It also closes electrical circuit when a person crosses the multipath barrier. Install equipment at a height of 2 to 2.5 meters. It is recommended to mount the sensor in the corner of the room. In this position, the opening of the rays is the most effective.
DD to turn on the light with the 1st switch: wiring diagram
The connection process is not complicated and resembles the installation of a conventional switch. But if we compare these two wiring devices, we will see significant differences:
- When installing a motion sensor, it is strictly forbidden to swap the conclusions. In a traditional switch, this is not prohibited.
- Both devices, when the system is turned on, tear the phase conductor, but to DD you still need to connect the neutral wire.
- The switch is triggered by manual operation, the sensor reacts to movement in the working area.
- The switch disconnects the system immediately, and in the case of a detector, after a set time.
Wiring diagram with switch
How to connect DD through a switch: 3 types of devices
Variety 1 - conventional switch
Installation begins with the cable connection to sensor. There are two types of cable entry into the detector: from behind or from the side. The rear connection is most often used for concealed wiring, and the side is used for external laying of the power cable.
At the next stage, we connect the cable conductors to the terminals of the device. Then we mount the device directly on the ceiling or wall. The connection to the switch occurs through the phase to the wire located between the light bulb and DD.
You can also use an existing switch. In this case, the current single switch is replaced by a double switch, in which the free contact will supply power to the sensor. If in operation double switch, then it needs to be changed to triple.
- Manufacturers do not advise connecting DD to energy saving lamps due to the fact that their service life is significantly reduced;
- Trees and shrubs should not fall into the field of view of the device installed outdoors, they are capable of radiating heat, which negatively affects the operation of the equipment;
- You need to direct the action beam in the direction where there is a need to turn on the lighting when a moving object is detected.
Variety 2 - DD with smooth switching on and off of lighting
infrared detector independently controls the level of lighting, but for smooth switching on and off, special equipment is required. The microcontroller, having received a signal from the sensor, is able to slowly increase the brightness of the lamp, and when the signal disappears, gradually reduce the brightness to zero. Smoothness is adjustable over a wide range, and the process lasts several minutes.
Variety 3 - automatic light switch with DD
Such equipment is capable of switching on and off lighting fixtures without pressing. The device reacts to the movement of objects and independently manages manipulations. The device is able to control the zone at a distance of up to 8 meters.
Motion sensor to turn on the light with your own hands: 3 elements
Homemade DD is easier to do with an infrared or ultrasonic sensor. Such a device consists of a transmitter, a receiver and a block nutrition. Any 12 V power supply is taken. The transmitter is assembled according to the NE 555 chip, and the transmitting element is an LD 274 diode with a viewing angle of 10 °.
The BPW40 phototransistor acts as a sensitive element of the receiver and controls the entire BS-115C relay. During installation, it must be taken into account that the viewing angle of the phototransistor is 20 °. With this assembly, the distance between the transmitter and receiver will be 5 meters.
2 sensor installation options
The classic scheme for connecting a device, a controlled movement, and a lamp is very simple. DD acts as a key switch and requires power to function.

Exist various options installation, differing from each other in the arrangement of cables:
- To DD the power cable comes and goes to the lighting fixture.
- cable from DD goes into the mounting box, connecting in it with power cable and a lamp.

If the lamp power is large and the connection DD completed through junction box, then the magnetic contactor takes over the control of the increased load.
A suitable option is selected individually, taking into account the possibilities for the purchase of cable products. An addition to the classical scheme is a key switch for independent switching on of lighting, this process is regulated by clause 6.5.7 of the PUE.

In the figure, phase L in the junction box is connected at point 1 with cable A. Then it is connected to the lower contact of the switch and cable A through the upper contact returns again to the junction box, where it is connected to core B at point 2. Then the wire goes to the terminals DD, returns back to the box and at point 3 joins with core C, leading to the contact of the lamp. The neutral conductor N, passing through the box, exits from point 4 to the sensor terminals and the lighting device.
DD to turn on the light: how to make 3 mistakes
The most suitable place for installing equipment in apartments is the entrance hall, where everyone leads interior doors. The installation location is determined on the layout of the apartment, taking into account the diagram of the operation of the sensor beams.
In rooms where the effect of only wall DD ineffective, use a combined installation of both ceiling and wall equipment.
To connect a light switch, no special knowledge and skills in the field of electronics are required. Producers for everyone DD Attached are instructions for proper installation. The user needs to correctly connect the wires of the cable and DD.
But there is a situation when one detector does not cope with the tasks and does not cover the entire area of the room. Then you need to install optional equipment connected as follows.

The sequence of connecting an additional DD is the same as the main one. To sensor the phase and zero are connected, the phase passes through the detector and is connected to the lamp, and the second end from the lamp goes to zero.
How to avoid 3 installation errors
- Place of installation. You need to install the device in the place that is most suitable for specifications. There are cases when the ceiling detector is mounted on the wall, which leads to incorrect operation.
- Installation of mask lenses. These curtains are included DD and are intended for setting the coverage area. If they are not removed after adjustment, the device will not detect movements.
- Incorrect switch position. If you install a switch before the sensor, the power will turn off and the operation of the device will become impossible.
How to set up DD for lighting? 3 main rules
Correct work sensor depends on how correct scheme connection, and from the correct choice of its placement. But to avoid false positives of the device, you need to follow the rules:
- In the controlled area there should not be heating devices and devices with electromagnetic radiation;
- The device must not be exposed to air flow from the air conditioning system or fan;
- Avoid exposure to direct sunlight.
But there are other reasons for equipment failure. For example, if there is an animal in the family, then every time when it crosses the coverage area of the device, the light will turn on. In this case, the sensitivity of the sensor is adjusted and the minimum value for alarm is set, or another model is purchased that has the function of ignoring objects weighing less than 25 kg.
Setting 3 main parameters
Modern DDs regulate sensitivity, viewing angle, illumination and turn-off delay time. Properly configured settings can significantly save energy costs. In older devices, it is possible to adjust only two parameters: turn-off time and sensitivity, or turn-off time and illumination.
Setting up the equipment must begin with adjusting the viewing angle. Modern models are equipped with special detectors mounted on hinges. These elements must be installed so that the direction of the infrared rays covers the largest area of the room. This takes into account not only the angle of installation, but also the height of the location. devices.
Next, adjust the sensitivity. On the case, it is indicated by the "SENS" key. Regulation occurs in the range from minimum to maximum. This is the most difficult step in setting up the device - you need to adjust the operation of the sensor so that it does not work on animals, but turns on the light when a person appears.
The next step is to set the illumination threshold. The "LUX" key adjusts DD to turn on the light when it gets dark. It is recommended to set the key to the maximum position and adjust the sensor in the evening.
The final step is to adjust the turn-on delay. The time is set with the "TIME" key, operating in the range from 5 to 10 seconds. Setting is carried out individually for each user, taking into account his wishes.
How to adjust the motion sensor for lighting in the entrance: 15/30
Installation scheme and rules for adjusting work DD installed at the entrance are the same as for devices intended for residential premises. The only difference is that a large area of the landing may not be fully covered by the signal reception area of the equipment. In this case, it will be necessary to install additional sensors connected directly to the phase and zero. The light bulb is connected to phase through the wire.
A properly configured motion sensor installed in the entrance has a range of 6 - 8 meters. The viewing angle is set, taking into account the dimensions of the landing, but most often 15 ° vertically and up to 30 ° horizontally.
How to check DD for lighting: target - 0 false signals
During the operation of the device, owners may encounter situations where the equipment does not work properly or false alarms occur.
To set the necessary parameters, you need to wait for such an intensity of natural light at which the sensor will work and turn on the light. Turning the LUX knob, we find the position at which the light will turn on.
If the device does not respond to the presence of a person in the controlled area, then you need to increase the sensitivity level. And in the case of a false inclusion of lighting without detecting a person, the sensitivity threshold must be lowered.
Top 3 best DD models
The leading positions according to buyers who evaluated quality and reliability are occupied by the following models:
- MrBeams MB980
- Sapsan PIR-80
- Redmond SkyGuard RG-G31S
These devices are high technical specifications and long term services.
Answers to 5 frequently asked questions
1 question. When connecting a DD in the bathroom, the device spontaneously activates. What is the reason?
Answer. The lamp is too close. You can replace it with a model with a matte surface.
2 question. I purchased a model with a forced power button. Connected the equipment according to the recommended scheme. The button works, but the sensor does not. What to do?
Answer. Probably the power wires to the device were connected incorrectly. Perhaps the terminal to the “load” on the DD is not involved or confused.
3 question. If you change a 300-watt halogen lighting device connected to a DD to a 50-watt diode one, will such a circuit work?
Answer. It will be if the connection is made according to all the rules.
4 question. I installed 5 spotlights and 5 DDs around the perimeter of the house. How to make the lamps turn on individually.
Answer. Probably all the switching was assembled in one box. A 3-wire wire runs around the house and the load was connected to all the lamps at the same time. Therefore, when one sensor is triggered, all lamps are lit at the same time.
5 question. Is it possible to use plastic dowels for mounting DD?
Answer. It is possible, but keep in mind that such a mount is not durable.
Automation of lighting systems plays a huge role in savings electrical energy. It also allows you to increase the life of lamps and conductors. A photo relay and motion sensors can help with this. It may seem that the scheme for connecting a motion sensor for lighting is rather complicated, but this is not so if you know all the nuances and possible options. The article will consider the available types of motion sensors, as well as how to install them.
What to choose from motion sensors
Motion sensors differ in many ways, so it is important to navigate them in order to choose the best one for a particular room. According to the principle of action, among them are:
- microwave;
- ultrasonic;
- infrared;
- active;
- passive.

In the first, microwaves are used for monitoring, which are similar to those used in mobile phones or stoves. If the reflected wave changes its range, then a trigger occurs. Ultrasonic devices send sound high frequency which is not audible to the human ear. Infrared are the most commonly used. Such displacement sensors emit a special light spectrum, which serves as an indicator. Active motion sensors work in tandem with the receiver.
According to the location of the movement sensors, as well as the detected territory, they are divided into:
- peripheral;
- for the perimeter;
- internal.
The first ones are most often mounted on the corners of buildings or in those parts of it where there is infrequent movement, but it is still possible. Perimetric motion sensors most often have a 360° directionality. This allows you to turn on the lighting for people who move around the area with different parties. Internal displacement sensors are used inside buildings. They can also have different directions. According to the location of the sensors, there are:
- monoblocks;
- on-off;
- modular.
Monoblock motion sensors contain both a transmitter and a receiver in their housing. Thanks to their synchronous work, an analysis of what is happening takes place. Two-position devices have a transmitter and a receiver. Most often they are opposite each other. As soon as the beam or wave intersects, a trigger occurs. Modular designs of motion sensors can have one transmitter and multiple receivers. Some movement sensors are combined and respond not only to movement, but also to the level of illumination. According to the method of installation, they are divided into:
- invoices;
- mortise.
The first type can be mounted on any surface. The second implies some preparation, since it is mounted in specially prepared boxes. Overhead motion sensors have some freedom in adjusting the angle of impact, if required.
How the motion sensor works
The motion sensor is a transitional link. Its purpose is to detect objects and trigger certain actions. Most often it is used for lighting systems, but this is not the rule. In some cases, for example, a motion detector can start ventilation as soon as someone enters a certain room. There is no need for the load from the instruments to fall on the sensor. For this, additional nodes are used that facilitate this task. There are a few simple tips, which will be the key to the smooth functioning of the sensor:
- presence of obstacles;
- interference;
- corner;
- purity;
- rated loads.
It is important to remember that the displacement sensor does not emit X-rays. This means that he cannot work through obstacles. Various objects in the path of the beam may interfere with its operation. Depending on which motion detection device is selected, it is necessary to ensure that its operation is not interfered with by electromagnetic or thermal radiation. Each sensor has its own angle of coverage, so it is important to correctly calculate the area that it should track. The emitter window of the sensor must always be kept clean. The maximum load must be connected as specified by the manufacturer.
Where to install the sensor

It was said above that it is important to choose the right viewing angle, and hence the place of installation of the motion sensor. In this case, you must follow several rules:
- location closer to the door;
- avoid the central part of the wall;
- correct location in relation to light sources;
- the need to install several sensors;
- correct location in the entrance.
If it is meant that the light should only turn on when entering or leaving the room, then the motion sensor should be placed as close to the door as possible. Do not choose the central part of the wall, because the sensor beam may not cover the doorway. It is good if the motion sensor is mounted in such a way that direct rays from the sun or an artificial source do not fall on it. This may interfere with his work. If there are several doors in the room, then it makes sense to consider mounting several devices or one with a wide coverage angle. When installing in the entrance, it would be rational to install the sensor above the landing so that the light turns on during the ascent.

Possible connection schemes
There are several schemes for connecting motion detection devices. Some of them involve interaction with other modules. Among them are:
- straight;
- with switch;
- with photorelay;
- with starter.

The switching circuit directly implies a direct power supply from the detector to the lighting device. It implies continuous operation of the sensor. When using a motion sensor connection scheme with a switch, there are several work scenarios. One of them involves connecting a break detector to the switch. That is, the device is powered only when it is needed. Another scheme provides the ability to turn on the light bulb regardless of the detector. Often a connection scheme with a photorelay is used. It is useful in that the motion detector is activated only at night. If you want to include in the circuit a load that is more powerful than the one that the detector can withstand, then it is necessary to use a starter.
Mounting process

All precautions must be observed during installation. It is important to de-energize the network in the place where the detector will be installed. It is desirable that all tools have insulated handles that can withstand a breakdown of 1 thousand volts. For the whole process you will need:
- perforator;
- screwdriver;
- insulation stripper;
- terminal block;
- tips for wire;
- dowels and screws.
Advice! Most often, the connection diagram is indicated on the back of the device itself, so you can safely follow it.

The first step is to choose a place to mount the device. Most often, places for self-tapping screws are already marked on the case. Focusing on them, you can make markings on the wall and drill holes for the dowels. The next step is to dismantle the back cover and inspect the place and method of attaching the wires. Most often, a terminal block with three outputs is hidden under it. They can be designated with three Latin letters L, N, A. Zero must be connected to the first, to the second phase, and the third output is the power wire that goes to the consumer. The neutral wire for the consumer is taken from the main source. If the permanent operation of the motion detector is meant, then the connection can be made directly in the device case.

In the case when it is planned to have a switch in the circuit, then it is worth mounting a separate junction box in which the wires will be connected. The wires from the detector are brought into the junction box, and the main network is also connected there. If the switch is to turn off the detector, then the phase wire that comes from the source must be passed through it. In a circuit in which the switch forcibly turns on the light source, it is necessary to apply a phase wire through the switch to the contact that goes from the motion sensor to the end device, as shown in the figure above. But at the same time, you should make sure that the detector supports this mode of operation.

Note! Sometimes it may be that the detector does not indicate which wire and where to connect. In this case, you can focus on the color of the conductor. Zero is usually connected to blue, phase to brown, and the third wire goes to the consumer.
When, at the signal of the detector, it is necessary to start a load of high power, then a starter for the required power is purchased. In this case, the power wire from the motion detector is connected directly to the contactor, and it completes the circuit to supply power to the lighting. If you want to mount a photorelay, it must be connected to the break of the phase wire that comes to power the detector.
Connecting multiple sensors
There are times when the room is too long for one detector. In this case, it may be necessary to install several devices in such a way that they feed one consumer. Such a scenario is also possible. The method of parallel connection of several detectors is usually used. An example can be seen in the diagram below.
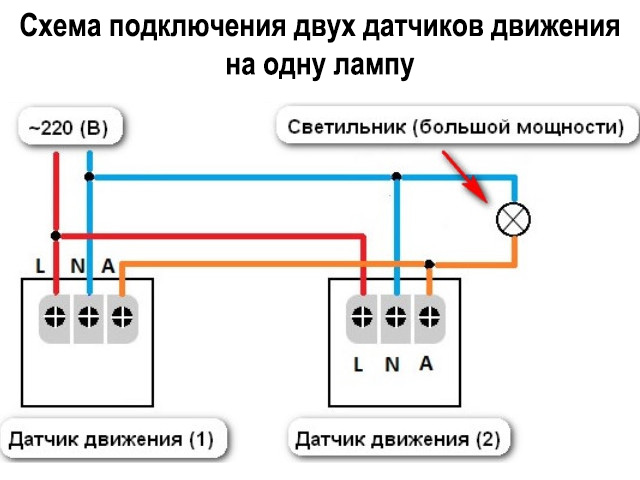
It becomes clear that power must be supplied to all detectors that will be mounted indoors. The wires that should go to the consumer are interconnected. This makes it possible to close the circuit at any time to turn on the lighting. You can watch a video of this below.
Instrument setup
It doesn't just end with installation and connection. It is important to properly configure the device for its operation. Usually on the detector you can find two regulators, but sometimes there are three:
- time;
- sensitivity;
- illumination.
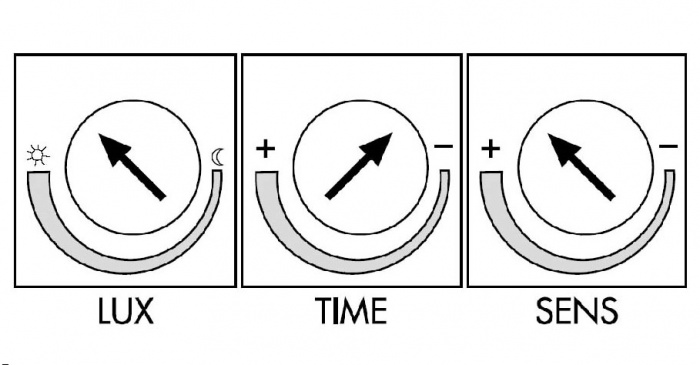
Typically signed on English language or special pictograms are applied to indicate. Time or Time indicates the period during which power will be supplied to the lamp. The minimum value of this parameter is at the level of one second, and the maximum is ten minutes. Sensitivity or Sens sets a parameter that allows the detector not to work on rodents and small animals. It makes it possible to reduce the number of false positives, and therefore save electricity. The illumination or Lux parameter is important in order to set the detector triggering process. This is especially important when there is a natural light source. The detector will trigger when the illumination value is lower than that set on the body.
Conclusion
Connecting a motion detector is not a difficult task if you follow the instructions above. When purchasing the device, you should ask the seller to write out a check and fill out the warranty card. In this case, there will be confidence in the possibility of returning a defective or non-working product.
We advise you to read
, diagnosis, treatment Treatment of urogenital chlamydia") Urogenital chlamydia - description, causes, symptoms (signs), diagnosis, treatment Treatment of urogenital chlamydia
Urogenital chlamydia - description, causes, symptoms (signs), diagnosis, treatment Treatment of urogenital chlamydia The benefits and significance of hydroamino acid threonine for the human body L threonine that
 To wait or not to wait for a guy from the army For what reason can they be commissioned from the army
 Baked apples with cottage cheese Baked apples with cottage cheese

