Suppose that you are a bit of an electrician and decide to mount or replace the wiring in your own house or apartment yourself. But if you don’t know any other way than how to connect the wires in the junction box using a simple twist, we recommend that you familiarize yourself with this material. After all, there are many methods for reliable docking of contacts: welding, soldering, crimping, as well as the use of electrical connectors. Each of the options must be applied correctly and to the place.
Soldering and welding wires
Modern requirements set forth in regulatory documents (PUE) prohibit the splicing of electrical wiring by conventional twisting, regardless of the insulation method. But if the twisted cores are soldered or welded, then the contact will turn out to be reliable and will comply with all the rules.
Let's look at how to connect current-carrying parts of cables in junction box using desoldering:
- Remove the insulation from the wires at a distance of about 3 cm and clean them with fine sandpaper.
- Twist the strands tightly together with pliers.
- Using rosin and solder (POS 61 grade is suitable), carefully tin the joint so that the molten tin flows into the space between the wires.
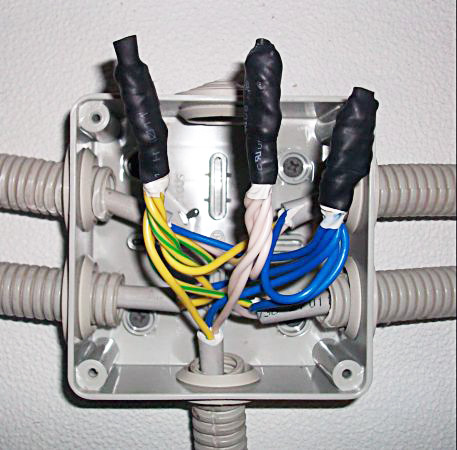
- Isolate the joint heat shrink tube or wrap with duct tape.

Note. Soldering copper is not difficult, but oxidized aluminum sometimes has to be treated with acid.
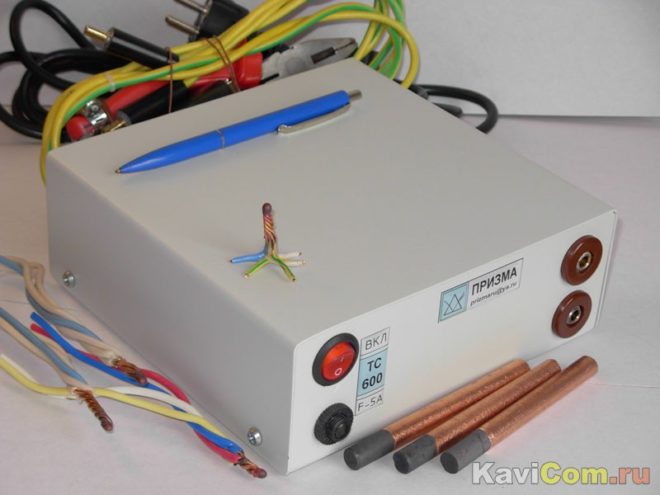
The connection of wires by welding is carried out in the same order, only instead of a soldering iron, a device with a carbon electrode is used. A special recess is made in it, where the flux is poured, after which the device is connected to the network, and the electrode is pressed against the twist until an influx is formed in the form of a small ball.
Advantage this method consists in the durability of the joint and the ability to connect wires of different sections in the junction box, including stranded ones. Due to its reliability, the connection is successfully used in lines of force with different load, but has some disadvantages:
- do not solder or weld copper conductors with aluminum;
- this connection is one-piece and in case of alteration according to the new scheme, the contacting sections have to be bitten off.
Reference. Soldering contacts is often used when installing low-voltage networks, for example, telephone cables and radio points.
Disconnection by crimping
In this case, the reliability of the connection of wires in the junction box is ensured using sleeves made of the same metal as the cores - aluminum or copper. To complete the work, you will also need special press tongs shown in the photo.
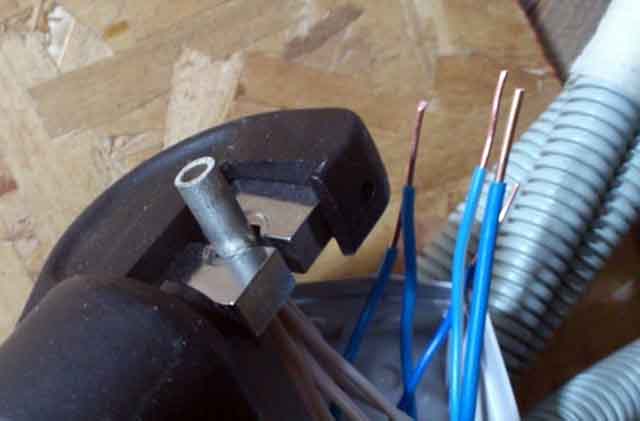
Note. Some unfortunate electricians practice crimping sleeves with ordinary pliers, which is unacceptable. Correct fixation of contacts is carried out only with pliers.
Now about how to connect the electrical wires in the box in this way:
- Perform the termination and twisting of the wires as described above.
- Put a sleeve on the twisted ends (it must be selected according to the diameter and put on tightly).
- Press the sleeve with pliers in two places.
- If the distribution boxes are installed outdoors, the connection is insulated with heat shrink to ensure tightness. PVC tape can be used indoors.

This docking option has the same pros and cons as welding: you can connect wiring of different sections and numbers of cores, but you can’t connect contacts made of dissimilar metals.
Application of connecting terminal blocks
Terminals for quick connection of wires are of 2 types:
- screw terminals in the form of pads;
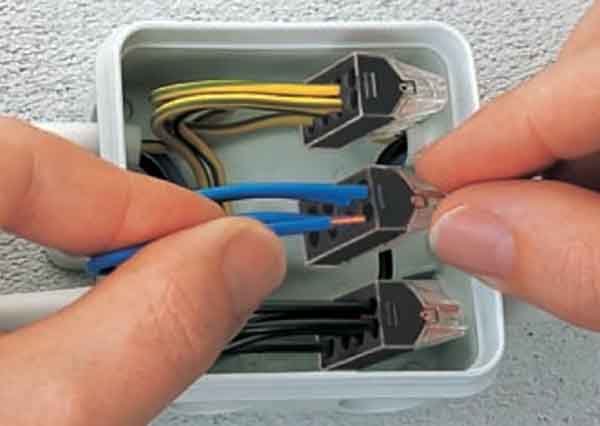
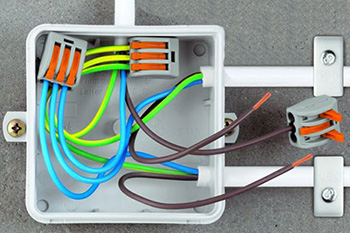
- self-clamping Wago type connectors
The technology for splicing electrical cables using terminal devices is quite simple. The wires need to be bare only 1 cm and inserted into the clamps. In the first case, the cores are fixed with screws, in the second - with levers or automatic latches. By the way, terminals with latches are disposable, and with levers they are used repeatedly.
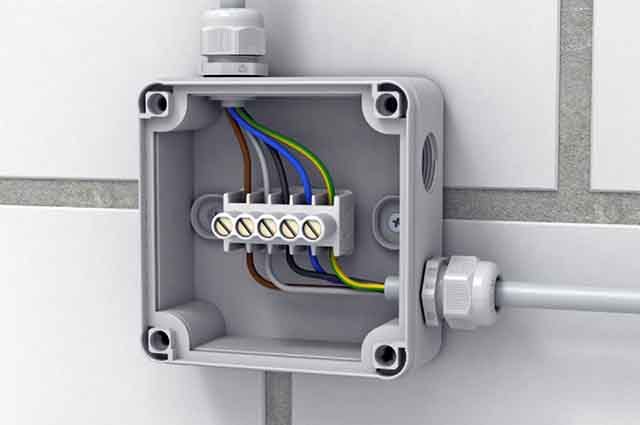
We list the advantages of screw terminals:
- Fast and reliable connection.
- Ability to connect copper wiring to aluminum.
- Provides a detachable connection.
- Do not need additional insulation.
Of the shortcomings of the pads, their size can be noted. It happens that with a large accumulation of wires coming from several switches or sockets, the screw connector does not fit inside the junction box. Moment two: single-core wires are fixed without problems, but multi-core ones are flattened with screws, which is not good. Therefore, it is better to tin such ends first.
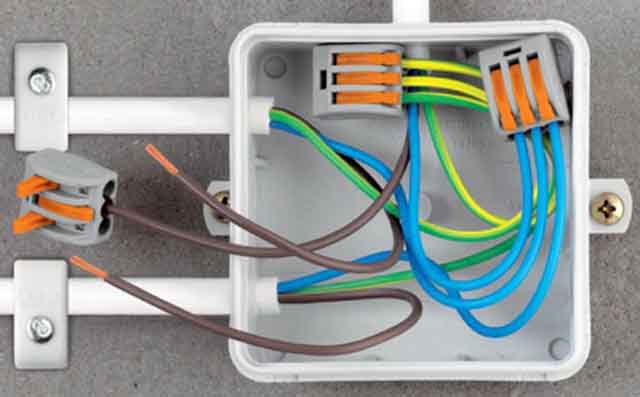
Wago clamps, allowing you to connect from 4 wires of the same cross section, have the same advantages as screw terminals, but take up less space. In this case, the operation of disconnecting the entire junction box will take about 5 minutes, which is very convenient for wiring. Judge for yourself: the bare end must be inserted into the clamp with pliers until it stops and that's it.
Reference. Similar devices are often used for laying cables for the Internet and other low-voltage networks.
Since there are cheap products from various Chinese manufacturers on the market, self-clamping terminal blocks have gained a dubious reputation. The fact is that in low-quality connectors, contact weakens over time, which is why they overheat and melt. If you purchased original Wago products, then there will be no problems, in other cases it is better not to take risks and connect only lighting wires (power switches, chandeliers, and so on) with clamps. Wiring to sockets is done in a different way.
How to use self-clamping terminals correctly, the master will tell in his video:
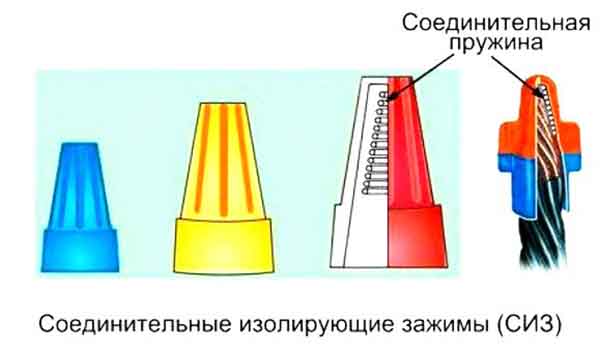
PPE plastic caps
The abbreviation PPE stands for connecting insulating clamp. It is a cone-shaped cap made of plastic, where a steel spring with an anodized coating is placed.
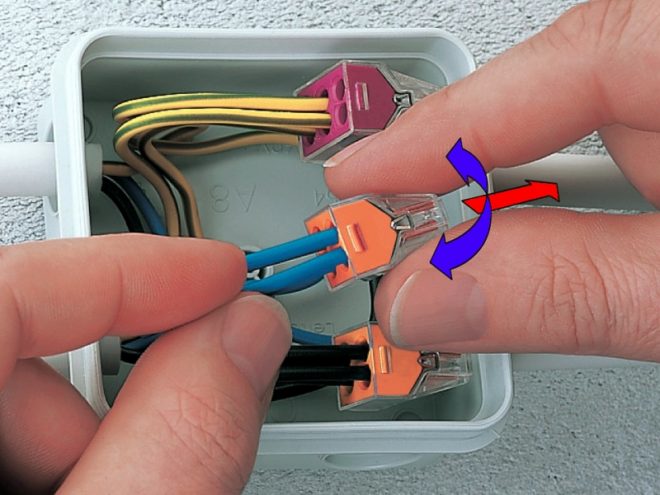
The technology for using the product is as follows:
- Remove the insulation from the connected wires at a distance of 2-3 cm.
- Collect the cores in one bundle and insert inside the cap until it stops.
- Applying force from the side of the blind part, turn the cap by hand 2-3 turns. Inside, a traditional twist is formed, fixed by a spring.
These clips are quick-release and reusable, provided that the spring has not been damaged during the dismantling process. With their help, the connection in the box is made quite quickly, does not need insulation and does not take up much space.
An important point. In order for the PPE cap to provide reliable and durable contact, it must be selected according to the diameter corresponding to the total cross section of the connected wires. For the correct selection, use the table:
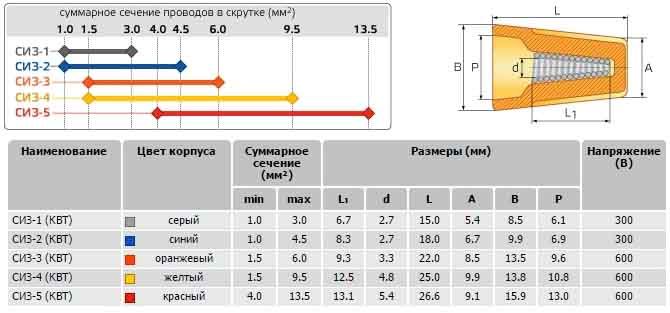
Details on how to connect the wires in the junction box in various ways, including using caps, are described in the video:
Conclusion
Now, knowing the features of all methods of connecting contacts in a junction box, you can choose the best option and apply it successfully. Finally, we mention another old method of joining conductors - bolted, when the cores are bent around the thread to the right side and pressed with a nut. But this option is practically not used due to the inconvenience and cumbersomeness of the connection, although it is considered reliable and complies with the PUE.
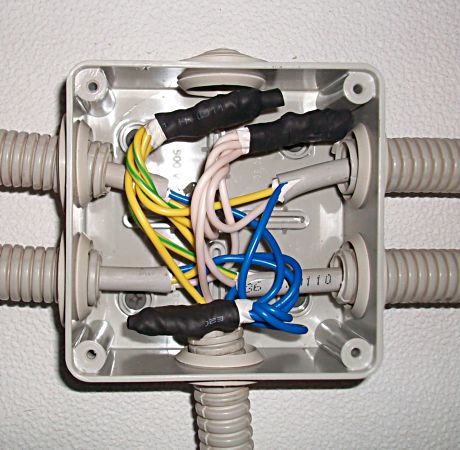
Usually, most of the problems in the operation of the electrical wiring arise from the fact that the connection of all the wires in the electrical junction box was incorrectly made. This can lead not only to weak contact, but also to its complete loss. Sources of consumption must receive electricity uninterruptedly, therefore, a high-quality connection of all conductors is one of the most important stages in the process of installing electrical wiring. This article will talk about how you can connect wires in a junction box.
The main task of the junction box is to ensure high-quality fire safety. It helps isolate wire connections from combustible wall materials. Also, by hiding the wires in it, you can get rid of their unaesthetic tangled appearance.
Boxes are divided into inner and outer. The former can be inserted into the wall, while the latter are designed for installation on an external surface.
Wire connection methods
Now, knowing the functions of the junction box, you can figure out how to connect the wires in it.
Use of terminal blocks
It can be used to connect electrical wires made of aluminum and copper, since subsequent oxidation will not be observed. Before purchasing terminal blocks, it is necessary to determine exactly the amount of current that will pass at the joints, as well as the required number of mounting terminals in the comb.
The installation process is quite simple. First you need to take a block with the selected cell size, cut off the required number of sections and insert the cores inside the terminal cell. Then, with the help of special screws, each conductor should be lightly clamped, having previously removed the insulation from them and cleaned the current conducting surface.

The advantage of such pads is that any segment can always be cut, and the correct one in this way will result in a quality contact.
This method is considered one of the best, but requires minimal knowledge of the soldering process. Although there are special fluxes for joining aluminum wires in this way, it would be preferable to use it only for joining copper wires.

First, insulation is removed from the electrical wires, and then they are cleaned to a metallic sheen. You need to melt not the metal itself, but the solder, and at the same time make sure that it flows into the twist. Stranded wires must be treated with flux or rosin and lowered into the solder bath for a few seconds, then allowed to cool natural way and never use water for this. As a result, it is possible to isolate the twist using ordinary electrical tape.
This method is as good as the previous one, and time will not affect it at all, since the result is obtained in the form of a solid wire. Such methods are used to connect copper conductors.
The scheme of actions is similar to the method associated with soldering. As always, to begin with, a small piece of insulation is removed from the electrical wires. Next, they are twisted, after which it is cut so that no more than 5 cm remains. Then a heat-removing copper clamp is installed on top and the “mass” of the welding machine is connected. The tip of the charcoal pencil charged in the holder must be brought to the end of the twist and held for a couple of seconds. Wrap the result with electrical tape. The welding process can be carried out using both alternating and direct current.
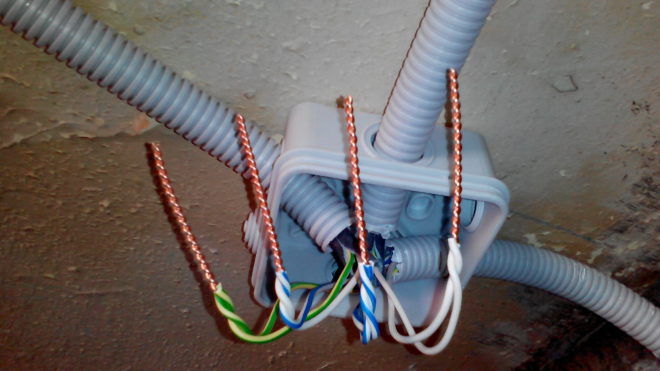
Twisting
The connection of conductors can also be made by twisting. This method is considered one of the oldest and simplest, because for its execution it is enough to have only a knife and pliers with you.
The main thing is to remember during the twisting that both electrical wires must be twisted at once, but you can’t wrap one around the other. It is also unacceptable to twist electrical wires from different materials.
If necessary, you can carry out simultaneous twisting of several wires. Usually their number does not exceed six, and stranded wires always converted to single-core. If it is important to twist copper and aluminum specimens, the copper wire should first be tinned with solder.
Crimping
known various ways wiring connections, but the most controversial is the method of crimping them. On the one hand, it is extremely popular, because it will not work to separate or somehow deform the result. But also this method has many nuances such as choosing a tool or sleeves for the procedure.
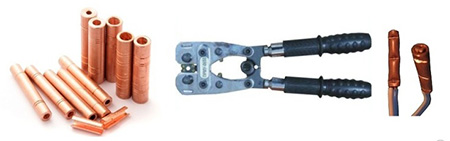
The process itself may consist of indentation or local compression. Both copper and aluminum wires are treated with a special lubricant that reduces friction and the risk of damage. Before connecting, they must be inserted into the sleeve so that they are in contact, while the docking point must be located exactly in the middle of the sleeve. After crimping, the connection point must be insulated with high quality.
The most homemade type of connection of all possible. To implement it, you need to acquire a bolt and nut of the required size, washers, wrenches and insulation.
To begin with, small loops are made on the experimental wires, corresponding to the diameter of the bolt. Then the circuit is assembled according to the following plan of action: a washer, a copper wire loop is superimposed on top, a washer again, an aluminum wire loop, a washer, and the final nut will be. It is tightened as much as possible so that the result does not come loose. The entire electrically conductive part of the connection is wrapped with insulating material.
The method differs from others in that there is no direct combination of copper and aluminum conductors.

Self-clamping connections
Self-clamping terminal blocks (spring) are considered the most modern assistants in the process of connecting electrical wires in a junction box. They do not require any narrowly focused knowledge and specialized tools. If necessary, such devices can always be unclenched and the required wire can be removed. Also, many of these clamps have the advantage of having a paste inside that prevents the formation of oxidation of copper and aluminum wires.
The only disadvantage of such a connection is that you cannot use it when transferring high current or you need to choose only extremely highly specialized varieties of terminal blocks. You also need to first find out if they are suitable for stranded wires.
Cable clamps
Cable clamps, also known as "nut", are used by many. They are preferred due to the ability not to cut the main conductor.

The action plan includes the following steps. First, the clamp body is disassembled using some thin tool. Next, the electrical wires are cleaned, and the bolts on the compression plates are loosened. Electric wires must be inserted into pre-prepared grooves and, if they are made of different materials, a plate should be placed between them. As a result, it is necessary to tighten the bolts so as not to damage the thread and insert the die into the “nut”, the body of which is assembled in its original form.
Thus, electrical wiring must always be properly organized. Any wiring diagram in a junction box must be carefully considered. The main thing to remember is that each method, excluding the method using terminal blocks, must end with careful wire insulation.
In contact with
Each house is already equipped with communications. To connect some devices that consume electricity, it is important to understand the details and subtleties. Today we’ll talk about how to make a wire connection in a junction box in stages.
The junction box is considered an important object in the home electrical network, having the task of distributing conductors for the purpose of their use by various electrical appliances. Well, we suggest that you thoroughly analyze all the features of the process of installing electrical conductors and connecting them.
Important! To facilitate the task of connecting the conductors in the junction box, you can use plastic terminals.
Types of wire connections in the junction box
Today, electricians use a lot of methods that involve working with wires in home circuits:
- twisting wires in a junction box is one of the traditional methods for connecting conductors to each other. However, based on the latest standards, this option is considered unreliable. Since you risk using this method, first strip the conductors from insulation. Remove about 10 mm, then create several turns: for a core section of 1 mm, 5 turns are made, and with a greater thickness, 3 are enough;
- pressing is a more popular and not forbidden type of connection. A sleeve is used for such a case. In this matter, wire cutters or pliers should not be used. It is ideal to purchase special pliers. To remove the insulation, they are guided by the dimensions of the selected sleeve.
Important! The sleeve must be made of exactly the same material as the connecting conductors.

- Using plastic clips. Such means can also be used to merge dissimilar conductors. The advantage is in the quick connection of wire cores. No more than 5 mm of insulation is peeled off from the ends.
- The connection was made with special bolts. This method is recommended to be used in cases where it is impossible to make a different type of connection. A bolted connection cannot guarantee permanent strength, because vibrations often cause such connections to become loose. For installation, an insulating layer of 10-15 mm is removed.
Obviously, the way you connect the wires in the junction box can be different, so you should choose a decent technique that suits your conditions.
Wiring diagram in the junction box
If you are going to make a connection of conductors in a junction box, you should not only understand the circuit, but it is also important to know the exact marking of the cable. Thanks to this, you have a chance to create a secure, and most importantly, workable connection.
See the illustration of the correct connection of the conductors in the distributor.
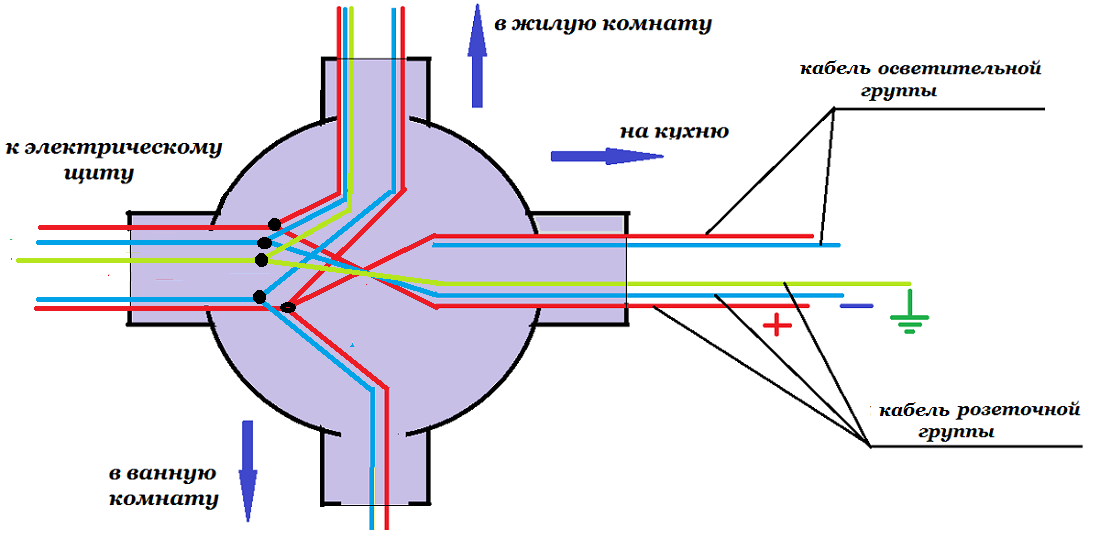
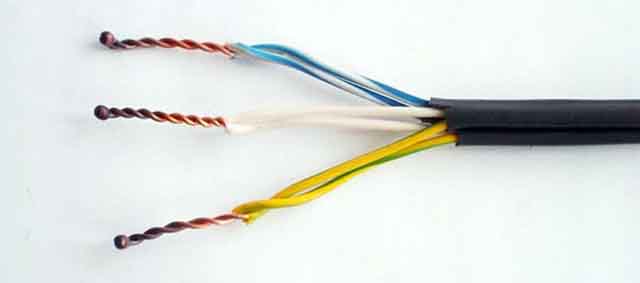
Wiring diagram in the box
Currently, the wiring has the same markings as before. For example, the insulation of the neutral wire is blue, the ground is most often yellow-green, and the phase can be brown or any other color. Therefore, for correct connection wires of the same color are connected.
Important! In some individual cases, the connection and soldering of two phases is provided.
How to install a junction box: procedure
In the process of mounting the junction box, indirect actions are necessarily included that unambiguously affect the correctness of the methodology.
Important! The removal of the insulating layer must be carried out in accordance with the selected wire connection methods. Each of them has its own measurements.

In addition, in the case of the installation of a junction box and the direct connection of conductors, it is important to use standard standards and PUE. If there is uncertainty about the successful completion of the case, the ideal option is to call professional electricians, because improper handling of electricity is dangerous to health.
When building a house or renovating in new apartment at the first stage, a household electrical network. Deciding where sockets, switches, junction boxes and chandeliers will be installed is a small fraction of the total amount of work required. Most importantly, lay a network around the house with many branches for lighting and connecting household appliances. Such a network is carried out with electric wires, which must be selected according to the cross section according to the expected load and laid according to certain standards. Here we will talk about how to properly connect the wires in the junction box.
There are many options for connecting wires, but among them it is impossible to single out one and call it ideal. Something more convenient and simpler, but not recommended by the Electrical Installation Rules (PUE). Some method is suitable for single-core wires, but not suitable for several cores. But more complex methods in execution guarantee the quality and reliability of contacts. All connection methods electrical wires in a junction box have their advantages and disadvantages. Let's consider each of them in more detail.
Twisting method
The most common and simplest option is twisting. For it, you will need only two tools - a knife with which you can strip the insulation on the cores, and pliers to ensure reliable twisting.
Connection principle
This method is often called "grandfather", electricians have been using it for more than a dozen years, despite the fact that it is not recommended to connect the wires in this way according to the PUE. It is often used as a temporary option, for example, when you need to check how the wiring diagram in a junction box works. Subsequently, the places of twisting are replaced by more reliable types of connections.
The essence of the method is that several wires are twisted together. It is important that all the wires to be connected are twisted together at the same time; it is not allowed to wrap one around the other.
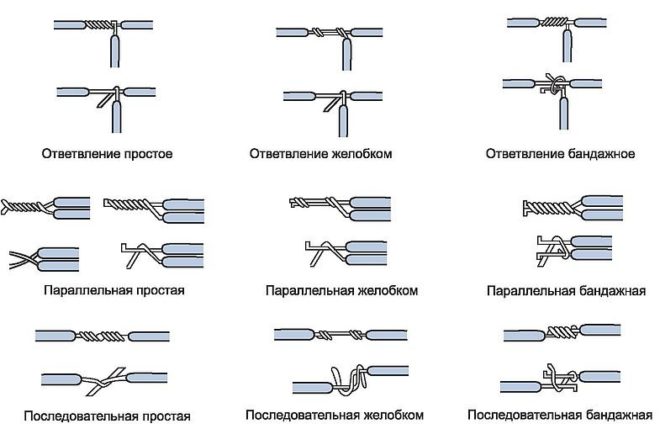
The whole job is incredibly simple. First, the insulating layer is cut off with a knife from the wire cores to the same length (10-30 mm). Then twisting is done with pliers and isolated from above. There are many options for twisting itself, the most common of them:
- Mutual twist.
- Band connection.
- Groove twist.
Let's explain in a little more detail simple example. Attach each twisted wire to each other so as to align them with the removed layer of insulation (in this case, you will have to cut 40-50 mm). At the end of the wires to be connected, make a 1 cm bend at 90 degrees. Hold the insulating layer with one hand, grasp the fold with the other hand and begin to produce rotational movements clockwise. Some people ask the question, is it possible to turn counterclockwise? It is possible, but backwards is somehow not very accepted, the whole world is used to existing in the course of the clock. If at the end it is already difficult to twist with your fingers, do it with the help of pliers.

You can connect 5-6 wires in this way, but then it will be difficult to twist, you need to make the bend longer (by 20 mm) and immediately make rotational movements with pliers. When a beautiful even twist is obtained, the bend is cut off.
Important to remember! It is necessary to wrap with insulating tape not only the place of the twist itself, but also go 2-3 cm on top of the wire insulation. This will prevent moisture ingress and provide better insulation.
A heat pipe can also be used as an insulating layer at the place of twisting. Keep in mind that it must be put on one of the connected wires in advance. When the twist is ready, the tube moves to this place. If you heat it around the edges, then due to the effect of temperature, the thermotube will shrink and tightly wrap around the wires.
How to properly twist the wires is described in detail in this video:
Advantages
The most important advantage of this method is the ease of operation.
The second advantage of twisting is the absence of any material costs.
If this is necessary, then at the same time several wires can be twisted in this way, but their total number should not be more than six.
Flaws
The main disadvantage of twisting is unreliability. And we know that in electrical engineering such a concept is not allowed.
In the main regulatory document of electricians PUE, in the section listing all permitted types of wire connections, the twisting method is not mentioned, so it is not recommended for use. That's right, experts cannot allow a compound that is sensitive to impulse current and high transient resistance.
With the twisting method, the area of contact of the cores is small, which results in unreliable contact. As the load increases, the cores will heat up more, and the contact connection will become weaker, which will eventually lead to burnout.
Twisting cannot be used to connect cores made of different materials (copper and aluminum).
Remember! If you use twist as permanent way connection, you take full responsibility for the possible consequences.
welding method
For a more reliable contact, welding is carried out connecting wires in the distribution box. With this option, the ends of the cores are fused and form a single whole, which is a guarantee of safety and reliability. Solid contacts do not oxidize and welds do not weaken over time.
The disadvantage of welding is that you must be able to handle special equipment, or you will have to invite a professional.
Required Tools
In addition to knowing how to cook, you will need:
- knife (to remove the insulating layer from the cores);
- sandpaper (to clean the surfaces to be joined);
- welding inverter;
- gloves (protect hands during welding);
- glasses or a mask (protect the eyes during welding);
- graphite electrode (carbon);
- flux to protect the melt from air.
Welding algorithm
- Remove the insulation from the cores by 70-80 mm with a knife.
- Sand the strands to a shine with sandpaper.
- Using the method described above, twist the wires, its length should be at least 50 mm.
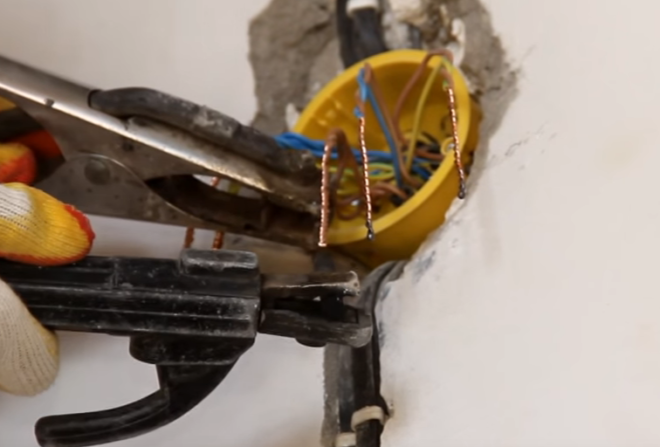
- Carefully hook the grounding pliers to the top of the twist.
- From the bottom of the twist, bring the electrode, lightly touch to ignite the arc, and remove. Welding of wires takes place literally in a fraction of a second.
- After that, allow the welding site to cool down and insulate the connection.
Another important question is how many amperes to put on the welding machine? For cores with a cross section of 1.5 mm 2, 30 A will be enough welding current, for 2.5 mm 2 - 50 A.
Welding of twists in the junction box is clearly shown in this video:
soldering method
No less reliable than welding is the soldering of the connected wires in the junction box.
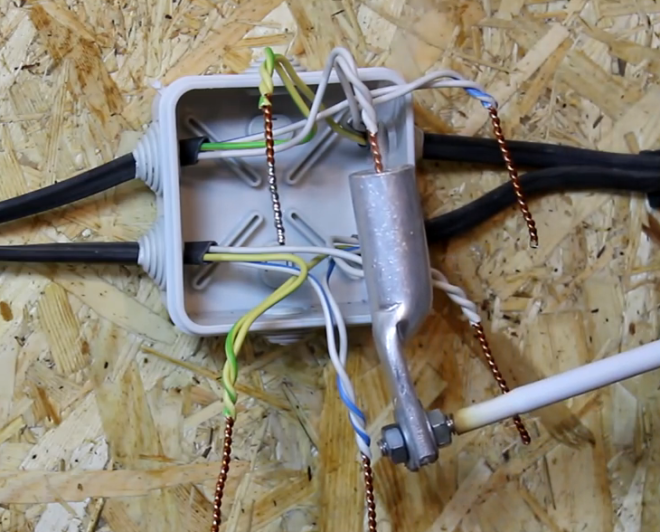
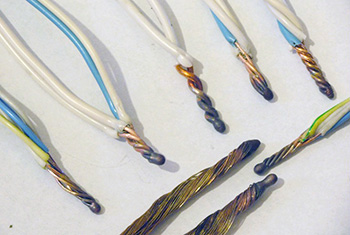
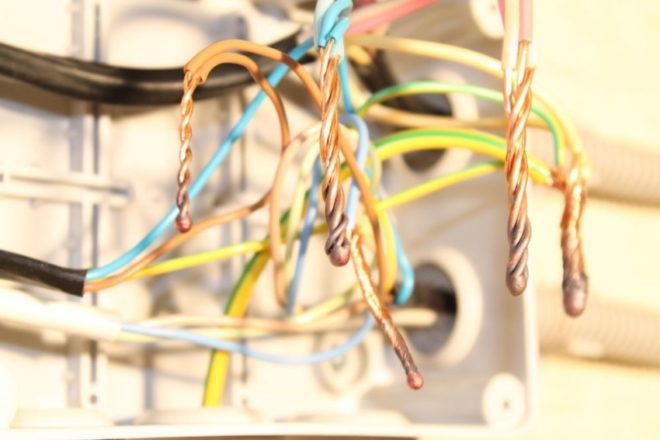
The essence of the soldering method is similar to welding, only now instead of an inverter apparatus with electrodes, solder with a soldering iron is used. You will also need rosin or soldering flux. There is one small nuance here, before twisting the veins they must be tinned. To do this, heat the soldering iron, dip it in rosin and run it through the wires stripped of the insulating layer several times until a characteristic reddish tint appears.
Now make a twist, as we described above. Take the solder on the soldering iron and heat the place of the twist until the tin melts and begins to fill the space between the turns. Thus, the place of twisting is enveloped in tin, due to which it is ensured correct connection wires and reliable contact in the box.
Most often, copper wires are soldered this way. But there is a special solder with which you can do the same with aluminum conductors.
The soldering of twists by the method of immersion in a sleeve with molten tin is shown in this video:
Terminal blocks
Connecting wires in a junction box is greatly facilitated by using terminal blocks.
The modern market provides a wide range of pads, which differ both in features and sizes, as well as in price. The terminal itself can be small or large, it all depends on the cross section of the connecting wires. However, they are all structurally based on the same principle.

As a rule, terminal blocks are sold in sections, but sometimes they are bought by the piece, asking the seller to cut off the right amount.
Device
The terminal block is a transparent plastic case, inside of which there is a brass sleeve. It is these sleeves that differ in diameter, depending on which section of the core this block is designed for. There are two threaded holes in the sleeve, screws are screwed into them, clamping the wires.
Connection principle
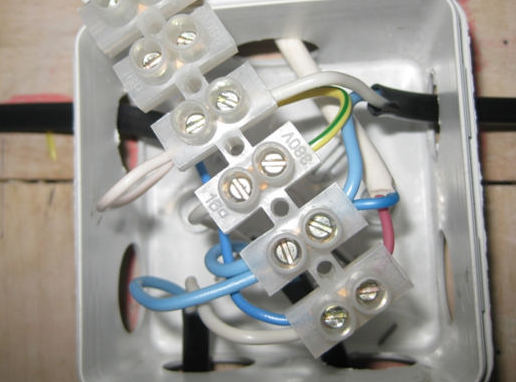
How are wires connected in such terminal blocks? For example, in a junction box, you need to connect an outlet to the mains. You take the block into two sections, unscrew the clamping screws, thereby freeing the sleeve for the wires to pass into it. On the wires to be connected, remove the insulating layer (5 mm is enough) and carefully clean the conductive surface of each core. Insert the phase conductors of the socket and the mains into one terminal, and zero into the other. And by tightening the screws, clamp the wires in the sleeve.
Advantages
Why is it good to disconnect the wires of the junction box using terminal blocks?
Firstly, in most houses, the electrical network is made with solid wires (not flexible and not stranded), and with the help of such terminals, the installation of solid wires becomes very simple and will not cause difficulties even for novice electricians.

Secondly, with the help of a terminal block, it becomes possible to connect aluminum and copper conductors to each other. Twisting in this case is not suitable, because these two metals are characterized by internal heterogeneity. Aluminum and copper mutually oxidize, which leads to the appearance of an oxide film on the surface, then, as a result, poor contact, heating and failure of electrical wiring. And due to this connection option, aluminum and copper do not come into contact with each other, which is an indisputable advantage of using a terminal block.
Remember! It is very important during the direct connection of the core to the terminal, first unscrew one screw and insert, for example, copper wire, then twist. Then do the same with aluminum. This is done in order to exclude the possibility of their contact with each other inside the brass sleeve.
Plus, such a connecting method of wires using terminal blocks will require a minimum of your time.
In addition, this option is detachable, that is, at any time you can disconnect the desired wire or cable.
Flaws
The disadvantages of the terminal block include the undesirable connection of stranded flexible wires. Such a seemingly convenient terminal combines everything that a stranded wire “does not like” - rotational movements, an uneven clamping surface of the screw and the so-called point (uneven) pressure. While clamping them with a screw, it can push through and break one or more small thin veins. The wire will no longer have the necessary current carrying capacity, which will lead to heating of the contact. If such a need arose, to connect stranded wires in the terminal blocks, then it is advisable to use sleeve lugs that compress the bundle of veins.
In such a block, it is necessary to tighten the screw with extreme caution if you are connecting aluminum wires. You don’t need to demonstrate all your strength and power here, otherwise you will simply break the vein.
Varieties
The most modern type of terminal blocks are self-clamping. The connection is very fast, for this you do not even need to pick up a screwdriver. Each hole has a spring-loaded contact. The core is inserted into the hole until a characteristic click, which means the terminal is snapped into place.
Lever terminal blocks proved to be even better. The small lever must be raised, thereby freeing the contact hole into which the core is inserted. Then the lever is lowered and a reliable connection is ready. If it is necessary to remake the contact, the lever is raised again and the core is pulled out.
O various types terminal blocks are described in this video:
bolt method
Reliable connection of wires in the junction box is achieved through the use of bolts. The only drawback of this method is its cumbersomeness. And the main advantage is that due to the bolted connection, it is possible to provide a high-quality connection of cores made of dissimilar materials (aluminum and copper). Modern manufacturers of junction boxes make them small in size, it will be difficult to put a bolted connection into such a device. But if your house still has enough old-style boxes with large sizes, then this method suits you.
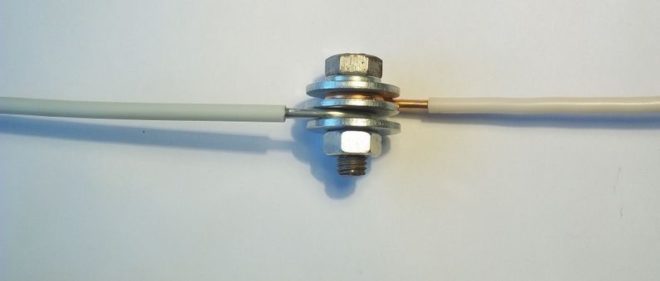
In addition to the bolt, you will need three steel washers and a nut. The stripped parts of the wires must be twisted in the form of a ring. Next, put on the bolt in turn:
- puck;
- a ring of one core;
- puck again;
- a ring of another vein;
- puck;
- nut.
It is due to such a pyramid that the bolt method is cumbersome. It is not suitable for connecting several pairs of wires.
We looked at several options for how to connect wires in a junction box. Choose the appropriate method for price and ease of installation. But remember that the main concepts in electricity were, are and will be quality, connection reliability, durability and safety.
The reliability of the power supply to consumers depends, first of all, on how the wires are installed in the junction box. Whether a private house or an apartment in a high-rise building, production room or warehouse. In addition, it is the junction boxes in which the wires are connected with various violations of the rules and regulations that most often become a source of fire. Weak contact at the connection point of the conductors causes an increase in current and, as a result, heating of the wires, the box body, as well as the surrounding space.
You can connect the cable in the box in different ways. The main thing is that it is reliable and does not contradict the provisions of the EIC. So, you can connect the wires in the junction box using a screw terminal or self-clamping terminal, twisting followed by soldering or welding, or even using the most common bolted connection.
Cables from different metals - what is the way out?
It is not recommended to combine copper and aluminum wires. Aluminum quickly oxidizes and a sufficiently strong oxide film forms at the point of contact of the wires. It leads to a decrease in the current conductivity of the connection, and sometimes even completely breaks the electrical circuit.
However, it is possible to connect copper and aluminum wires. But for this it is necessary to apply self-clamping terminal blocks with special paste preventing the formation of an oxide film. A good result is the use of special self-piercing clips of the "nut" type. Such clips can be used even outdoors.
The easiest and most affordable way to connect wires from different metals is bolted connection with a steel washer between the wires. The disadvantage of this connection is its large size and the need to apply reinforced insulation.
The main thing is that the connection is reliable and secure. For ease of subsequent repair or detection of a faulty wire, it is advisable to mark the conductors in junction boxes. This marking must comply wiring diagram wiring.
Connecting wires in the junction box on video
We advise you to read
, diagnosis, treatment Treatment of urogenital chlamydia") Chlamydia urogenital - description, causes, symptoms (signs), diagnosis, treatment Treatment of urogenital chlamydia
Chlamydia urogenital - description, causes, symptoms (signs), diagnosis, treatment Treatment of urogenital chlamydia The benefits and significance of hydroamino acid threonine for the human body L threonine what
 To wait or not to wait for a guy from the army For what reason can they be commissioned from the army
 Baked apples with cottage cheese Baked apples with cottage cheese

