When electrifying a private house or cottage, you have to decide whether the route will run through the air or in the ground. Laying a cable in the ground requires more work, but it provides greater safety: it is more difficult to pull wires out from under the ground than to cut them from a cable. Therefore, despite the high cost, this method is more often chosen.
The route of underground cable laying from the pole to the house will be drawn for you in the project and all that remains for you is to follow all the instructions. But when distributing electricity around the site, you have to develop the route yourself. The most economical option is a straight line from one point to another. But the real route is almost never like this. Most often this is a broken line, as there are many obstacles to bypass.
How to lay a track
When planning a route, you must adhere to the following rules:
Drawing a plan
After you roughly imagine the route, transfer it to a piece of paper. This plan should also include the main structures, water supply, sewerage, etc. After you dig a trench and lay the cable (before backfilling begins), measure the distance to all "long-term" objects and transfer them to the plan.
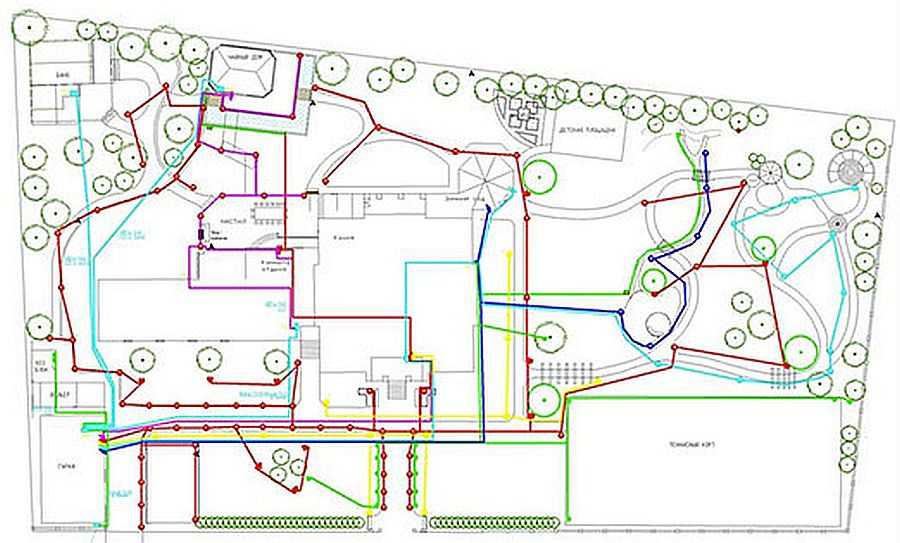
Professionals call this process "localization". This plan with distances can be very useful later - when redeveloping the site, planning new buildings, etc. Also it will be if there is a need to repair the transmission line. According to the plan, you will restore the place where the route passes.
Top cable protection
When laying a cable in the ground, there is always a high probability that it can be damaged during any earthwork. Therefore, the PUE provides for the presence of protection over the route. For high-power cables (1 kW and above), protection with concrete slabs or solid brick. For low-power lines, which usually feed our houses, it is allowed to lay a cable in the ground with signal plastic tapes. This method of protection is allowed if there are no more than two conductors in the trench.

Lay signal tapes along the cables at a distance of 250 mm from their outer cover. If there is only one power line, the tape is located above it, if there are two or more, two or more tapes are placed. Their edges should protrude beyond the cable by at least 50 mm, and adjacent tapes should be placed with an overlap of 50 mm.
Underground cable laying technology
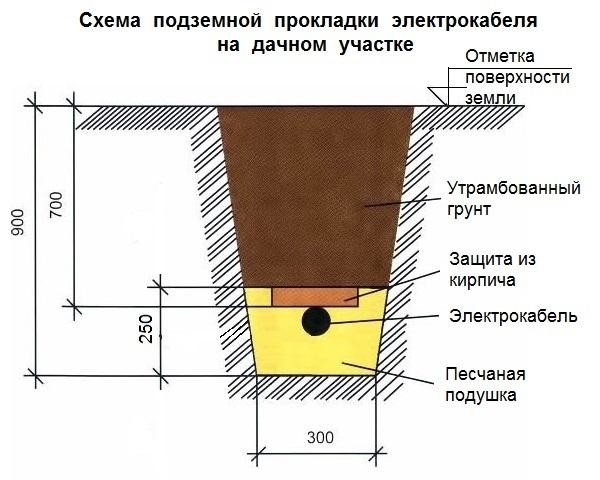
Laying a cable in the ground means digging a trench all along the route. The recommended depth is 70-80 cm. If for some reason it is not possible to dig to such a depth, you can reduce it, but lay a line in pipes or a protective shell. This can be a corrugated hose or special pipes, in which the outer sheath is made of more rigid polypropylene, and the inner part is made of softer polyethylene.
You can also use asbestos-cement or plumbing plastic of suitable diameters. Why not sewers? Their walls are thinner and they will not be able to protect against a serious load. It is not recommended to use metal pipes, but already because of their excessive rigidity: when the soil moves, their hard edge can fray (and often fray) the shell. Therefore, if you lay the cable in metal pipes, they will need to be welded along the entire route and figure out how to make the edges not so hard.

If pipe cases are used on the cable route, it is better to seal their edges. So earth will not be poured into them, water will not flood. The easiest way is to add a little on the edge polyurethane foam, but you can also use a cement-sand mortar, rags soaked in cement milk. Who is more comfortable. Just do not forget that the cable inside should not be stretched. There should be a slight slack.
In addition to the depth, you also need to decide on the width of the trench. For one cable, it is recommended to have a width of 25-30 cm. When laying two or more, there must be at least 100 mm of distance between them. In addition, the distance from the outermost cables to the wall is at least 15 cm. In accordance with these recommendations, the width of the trench is determined.
List and order of work
Cable laying in the ground begins with earthworks. According to the marked route and the selected parameters, we dig a trench, simultaneously removing all hard and sharp objects from the walls. It is advisable to make the walls with a slight slope - so they will crumble less and work more conveniently. When the trench is ready, the order of work is as follows:

This completes the laying of the cable in the ground. But there are still features and nuances.
Before laying the cable in the ground and after backfilling, it is very desirable to check the insulation resistance. For this case, a megaohmmeter is used, which supplies high voltage checking the quality and condition of the insulation.
After checking, do not forget to remove residual voltage by shorting the wires to ground. This operation must be carried out with great care, as good quality isolation and a long route, the voltage can be very considerable. Their defeat has serious consequences - up to a lethal outcome. Therefore, when working with an ohmmeter and when removing residual voltage, do not forget about dielectric gloves, glasses.
Since an ohmmeter is rare in the household, vinyl-insulated cables can be tested with a conventional tester or voltmeter. They will not measure the insulation resistance, but they will show the presence of a breakdown or a short between the conductors. We call all the conductors with each other, as well as each with the ground, screen or armor. If there are any problems, it is better not to use this piece.
When laying and backfilling with sand, make sure that the insulation is not damaged. After laying, also check the insulation, or ring the wires. What happens if you apply voltage to a conductor with broken insulation, you probably know.
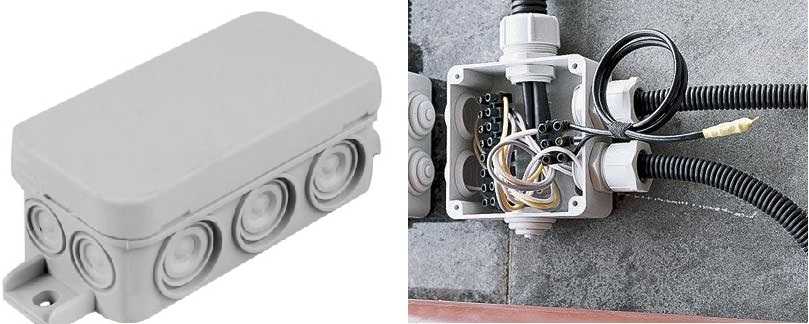
It is better to bury a single piece of cable without connections in the ground. If this is not possible, connect the two pieces above ground in a special outdoor junction box. The box can be mounted on a post that is dug in at the point where the cables exit to the surface. Making homemade couplings is unwise, as they are of poor quality and they are usually the source of problems.
If several lines are laid in a trench, and they must pass in a protective sheath, then each sheath should have its own.
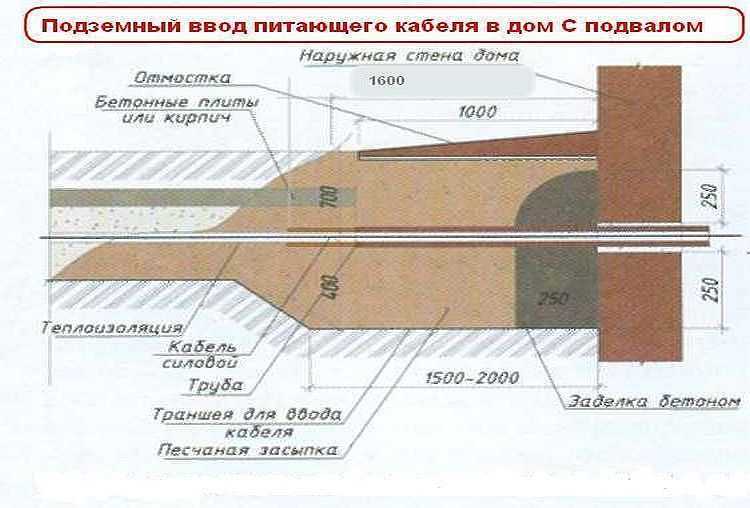
How to enter into the house
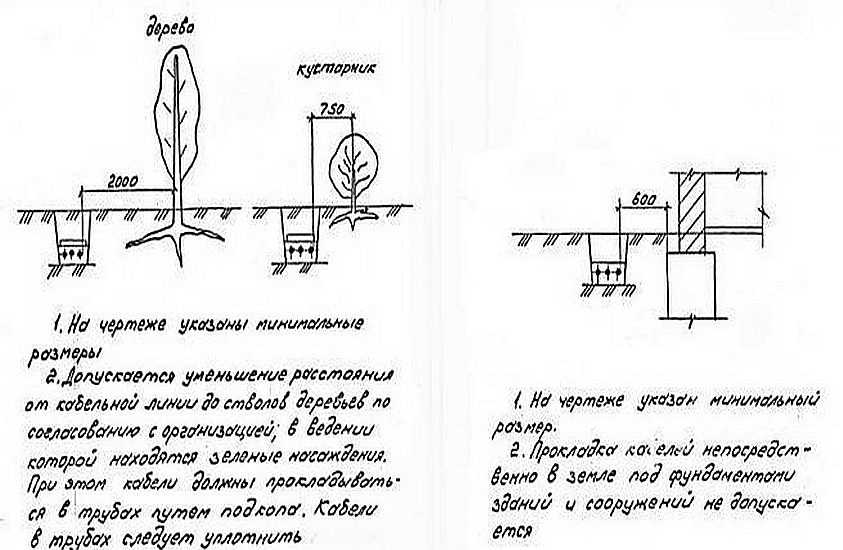
Entering a cable laid underground into a house can be done in several ways, but the PUE does not allow it to simply be passed through the foundation. There are other methods:
Cable laying in the ground requires attention. It is very important not to damage the insulation during work, otherwise you will have to redo everything again.
Which cable can be used
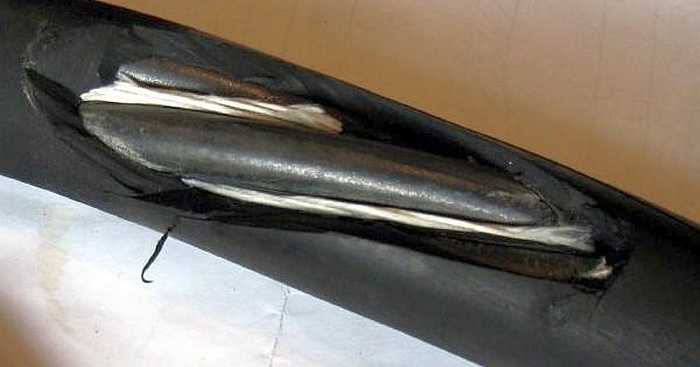
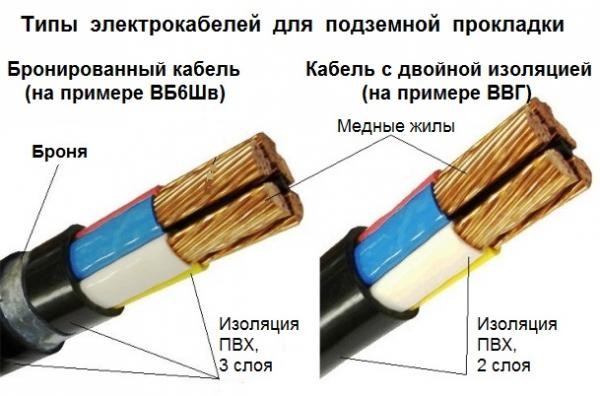
For laying the cable in the ground, it is necessary to use products with a high degree of protection against moisture, in a rigid sheath. These conditions are met by vinyl and polyethylene sheaths. It is these cables that are usually used: VVB (armored), VVBbG (armor + waterproofing), VBBSHV (armor + polyethylene hose). But they are expensive, although they last a long time. It is advisable to use them to introduce electricity from the pole to the house.

When choosing the type of armor, you need to pay attention to the acidity of the soil, the number of large stones, construction debris. For neutral soils with small inclusions of stones, steel armor is suitable. She will go for clays and loams. For acidic or alkaline soils, lead or aluminum armor is already needed. The same cables are best used on soils with normal acidity but with a large number of stones.
Wiring around the site can be done with cheaper conductors. NYM and CIP feel fine. They can work up to 5 years. VVG is definitely not worth using for underground laying. It is enough for a maximum of a couple of years, which, taking into account the amount of land work, is not at all pleasing.
In general, it is more reasonable to lay more expensive cables, but with a better protective sheath. Let it cost more at the device stage, but there will be no problems and you won’t have to think about replacing it with a new one in a couple of years.
Liked the video? Subscribe to our channel!
One of the most popular types of cable products is a cable for laying in the ground. It is used to provide power supply to buildings and structures, decorative, street and landscape lighting, power supply to change houses and tents, as well as in many other situations.
Regardless of the purpose of the work, the laying of the cable underground must be carried out in accordance with the PUE and PTEEP. Before starting work, it is necessary to choose the optimal brand of cable. Most often, the best option is an armored cable for laying in the ground, which is well protected from mechanical damage. It is possible to lay other cable brands that do not have armor, but then it is imperative to lay them in asbestos-cement or special PVC or PE pipes.
trench preparation
Before starting installation work, you need to check if there are any intersections of the cable route with any other engineering networks. This information can be obtained from the results of studying the geo-base of the cable route being laid.
If there are no engineering systems on the way of laying the cable route, you can start preparing the trench. Its depth depends on the area in which it will pass. If the cable laying in the ground is planned under the road, then the depth of the trench should be at least 1.25 meters. At the same time, you need to dig a trench carefully, since there may be engineering systems in the ground that are incorrectly plotted on the geo-base scheme - such incidents are very common. If it is planned to lay a cable in the ground under the lawn, it is enough to dig a trench from 0.9 meters deep.
A pillow of sand up to 15 cm thick must be poured into the finished trench - this is required by the rules for laying cables in the ground for additional marking of lines and their greater protection against mechanical damage. The sand is abundantly wetted with water and compacted.
Cabling
As a rule, laying a cable underground implies the use of a cable with armor, which will provide protection against mechanical stress. If, nevertheless, it is supposed to use unarmored cables, then it is necessary to select brands that have the necessary resistance to thermal and mechanical stress during repair and maintenance work. Due to increased requirements, it is armored cable for laying in the ground that is most often used.
When laying a cable for voltage up to 1 kV, it must be protected with a brick laid across the cable route in places with an increased likelihood of mechanical damage. Also, the cable can be protected with reinforced concrete slabs. After completion of each stage of electrical installation work in trenches, in order to make sure that the cable sheath is in good condition and integrity, it is necessary to perform control electrical measurements - and first of all, measure the insulation resistance. The resistance value is indicated in GOST or TU for the cable, and by its deviation from the standard, it is possible to determine the presence of external damage.
Types of cables used when laying in the ground
In many ways, the characteristics and durability of the cable depend on its insulation. A modern cable for laying in the ground can have the following types of insulation:
- impregnated paper insulation;
- plastic insulation (polyethylene or PVC).
The impregnated paper core insulation has excellent electrical characteristics, a long service life, a fairly high allowable temperature at a low cost. The disadvantage of paper insulation is hygroscopicity, which requires complete tightness of the cable sheath. Also, the composition impregnating the paper, with a significant difference in the levels of the gasket along the length, can gradually drain to the lower end, which somewhat reduces the insulating strength, worsening the cooling conditions and reducing the service life of the cable. Information on the permissible difference in the levels of laying such cables can be found in the reference literature and cable specifications.
Plastic insulation for power cables made of polyethylene or PVC (polyvinyl chloride). Such cables are laid in tunnels, fire hazardous channels, in an aggressive environment, provided there are no mechanical effects. Most commonly used for installation in trenches plastic cable power for laying in the ground, reinforced with tape armor, such as, for example, or PvBShv.
For laying in soil containing substances that have a destructive effect on the cable sheath (salt marshes, bulk construction material and slag, swamps, etc.), as well as in areas of increased exposure to electrocorrosion, lead-sheathed cables are used. Also, under these conditions, a power cable for laying in the ground with an aluminum sheath, for example, will be effective. In places with an increased risk of mechanical damage, cables with wire armor, such as (steel wire) or PvKaShp (aluminum wire), can be used.
Common brands of cables for laying in the ground
In soils with low corrosive activity, a cable is used for laying in the ground of the following grades -
suburban area and Vacation home This is a large volume of problems that arise every day. They have to be solved, not left for later, because the unsolved problem is doubling every day. Therefore, when the owner of a suburban area is faced with the question electrical connection some device or office building located near the main house, then this is another problem that is easy to solve, knowing the requirements and rules for electrical wiring. So, let's in this article consider the question of how the cable is laid in the ground on suburban area.
Please note that it is in the ground, and not by air. Although, according to experts, both options are usually used by summer residents when a particular task is solved.
Let's start the analysis of our topic by denoting some concepts and terms, where the main concept is the branch. That is, any cable wiring from the house, with the help of which, for example, a garage, a bathhouse, a summer gazebo, street lighting are called branches. It doesn't matter if it's overhead or underground.
We do everything according to the law
Smart people try to conduct their business according to one very important principle, which says - you need to do everything so that you have everything, but for this you would have nothing. And since one organization is engaged in the supply of electricity, it turns out that you are dealing with a monopolist. And, therefore, it is impossible to change the conditions for the provision of its services. That is, in this case, you play on his field.
Therefore, you cannot change the laws. And they say that any branch from the original power line is the property of the power grid. Even if you run the wire from your own house to your own garage with your own hands, it is not your property. Therefore, a monopolist, or rather, its representative in the form of City Light or Paradise Light, must serve any branch and monitor its quality and condition. And, of course, he bears full responsibility for all this.
Therefore advice. If you want your new branches to be accepted by a representative electrical networks immediately, coordinate them in advance. For this, you can invite a representative to your site, you can draw a wiring plan (diagram) and take it to the company's office. The ideal option is to completely transfer the project to the power supply organization.
- First, the project will be done according to SNiP.
- Secondly, the company itself will carry out the installation.
- Thirdly, the connection and act will also be carried out by the company.
- Fourthly, they will serve this branch.
You will have to pay for all this. As practice shows, this is the best option to avoid problems and stress.
Do it yourself
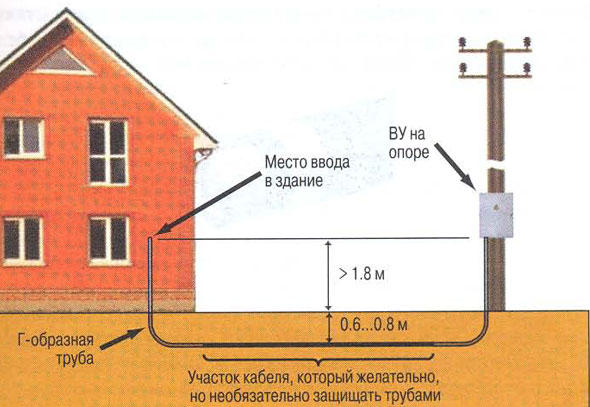
If you think that you can handle all the work yourself, you will have to plan the ongoing process. So, our task is to carry out the installation of the cable in the suburban area underground with our own hands. Let's start with the fact that the transition of the cable underground can be made from overhead line or from general switchboard, which is most often installed on the wall.
Most often, armored cable is used for underground wiring. For example, VBbShv. This is a copper cable with different area sections. By the way, before purchasing wires, it is necessary to accurately calculate what current load they will withstand. If the budget for ongoing electrical work is limited, then instead of an armored cable, you can use a regular one, for example, VVGng. It is simply cheaper due to the lack of armored braid.
underground laying conditions
- The vertical section from the shield to the ground surface can be completed with a metal pipe or a corner.
- In horizontal sections are used plastic pipes. And in this case, the length of the branch does not matter, because the pipes can be connected to each other in any length.
Attention! The height of the closed vertical section should not be less than 1.8 meters.
- As for laying the cable under the roads, in this case, either metal pipes or asbestos pipes are used.
- The trenches to be dug must be at least 70 cm deep. In this case, the bottom must be covered with a sand layer 10 cm thick. If the cable for laying in the ground in the country house is laid outside the pipe, then after installation it is also covered with sand. In this case, the thickness of the second layer above the cable must be at least 10 cm.
- The entrance to the house must be carried out through a special metal sleeve if the wiring passes through the wall. If through the foundation, then it fits metal pipe. This element is necessary only so that the shrinkage of the house and the foundation does not lead to damage to the electrical wiring.

Trenchless laying
This type of cable installation is also used for the construction of a branch in a summer cottage. In this way, you have to overcome obstacles, or if the house is built on rocky ground.
There is one way in this category of branches that many summer residents use today. They call it a puncture. Of course, this is not the kind of puncture that is made by special equipment. This process is carried out manually using a pipe and a sledgehammer, so the one who will make a puncture in your area must have great strength and endurance. How is the piercing done by hand?
- First of all, holes are dug on both sides of the obstacle, which will be located on the same axis of the puncture.
- Teeth are cut out at the end of the pipe, that is, the end will be in the form of a crown. This can be done with a grinder. In this case, the pipe diameter is selected to match the cable diameter, but it should not be less than 20 mm.
- The pipe is installed in the hole on one side of the obstacle with the crown forward. Then on it from the back side you need to hit with a sledgehammer.
- Every half a meter, the pipe is removed and the internal cavity is washed under the pressure of water. If the soil is sandy, then you can do without water by tapping the pipe walls with a hammer.
- If the length of a piece of pipe is not enough to break through the soil to the second hole, another piece is welded to it, which is additionally fastened with reinforcement.
- As soon as the teeth of the crown have appeared on the opposite side, the process can be stopped. The crown is cut off, and the part of the pipe sticking out from the opposite side is also cut off. The pipe itself remains at the puncture site, it will perform protective functions.
We advise you to read
, diagnosis, treatment Treatment of urogenital chlamydia") Chlamydia urogenital - description, causes, symptoms (signs), diagnosis, treatment Treatment of urogenital chlamydia
Chlamydia urogenital - description, causes, symptoms (signs), diagnosis, treatment Treatment of urogenital chlamydia The benefits and significance of hydroamino acid threonine for the human body L threonine what
 To wait or not to wait for a guy from the army For what reason can they be commissioned from the army
 Baked apples with cottage cheese Baked apples with cottage cheese

