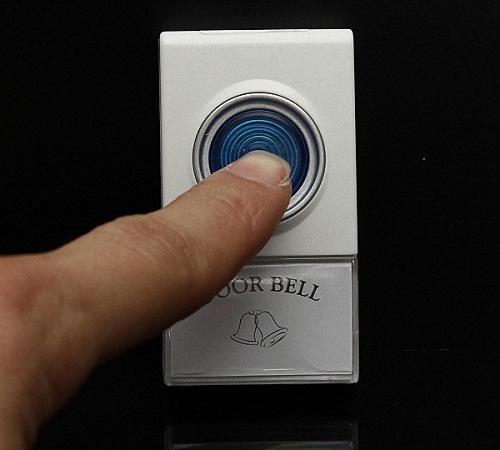
To notify the residents of the apartment about the arrival of guests, a specially created door bell. Today it is represented by two types: wired and wireless devices. In order to use it to receive a sound signal, it is necessary to connect the device. How to do it right?
Attention! All work, except for determining the phase and neutral cables, is carried out with the power off.
First, how to connect an electric bell in an apartment with wires. Open the box with the device and inspect it. How many lived out? Now compare their number with what looks out of the wall in the place where you decided to put the bell box. Several options are possible.
Wall - 2, bell box - 2
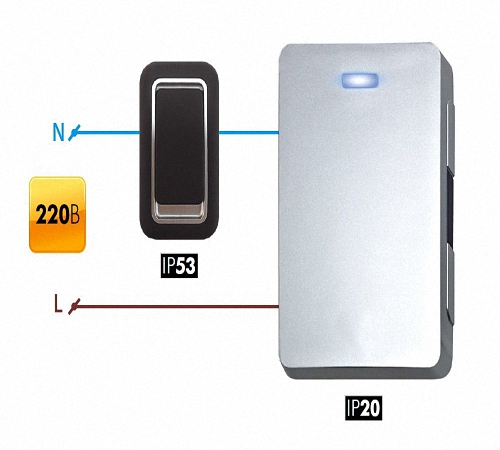
The work plan is to search for the phase and zero. To do this, use indicator screwdriver. Touch the end to the bare wire. If the bulb does not light up, it is zero. It is directly connected to the common wire in junction box. It is advisable to use a terminal block for connection, not twisting.
The phase on contact with the screwdriver will be detected by the indicator light. The core is passed through a button that plays the role of a closing electrical circuit key. And then the wire is connected to the phase in the junction box.
Wall - 3, appliance box - 3
If a three-core cable comes out of the device and the hole in the wall, then you have grounding provided. This can only be in new buildings, where the wiring has a standard color:
- The ground wire is always yellow-green;
- Zero - blue;
- Phase - white, brown or black.

You can easily identify the wires by color, but for better safety, still make sure that the wiring is correctly constructed with an indicator screwdriver. How to connect a doorbell 2 wires, you already know. With three wires, everything is the same, except that you additionally need to combine the ends of the ground wires.
Wall - 3, box - 2, and vice versa
If the wall and the bell have a different number of wires, the one that is “extra” is the ground wire. It is only needed to improve security, and does not affect the operation of the device. You know the wiring diagram for a 220V doorbell with two wires. It remains only to qualitatively isolate the tip of the grounding cable.
Connection with two buttons
Have you decided to wire your front door bell so that you can be signaled from two different locations? Then you need a second button, but you can use three, four, or even more. The main thing is to follow the rule: they must all be connected in parallel.
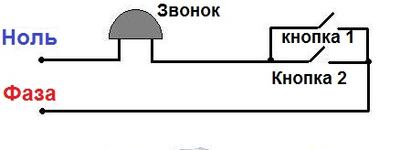 The two-button doorbell, the connection diagram of which is given above, is convenient for use in cottages with several entrances to the house.
Wireless models
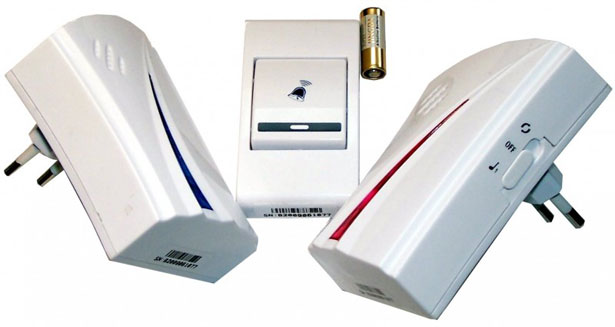
Wireless analogs can be powered from an outlet or from batteries. The first is inconvenient in that it does not work when the power supply is turned off, the second in that it requires regular replacement of batteries. Their advantage: they do not require connection.

Let the doorbell not be the calling card of the house, like the front door. But he leaves some idea of his owners. Typically, doorbells are selected by a melody that turns on when a button is pressed. More sophisticated buyers pay attention to specifications such a device. A wireless doorbell is a great way to show your guests your status and taste.
How wireless call works
The principle of operation of a wired call is very simple. From the button installed in the outer part of the door, a wire is laid connected to the speaker, which is located inside the apartment. Electricity is connected to the speaker. When the call button is pressed, the circuit is closed and the speaker is turned on, playing a melody.
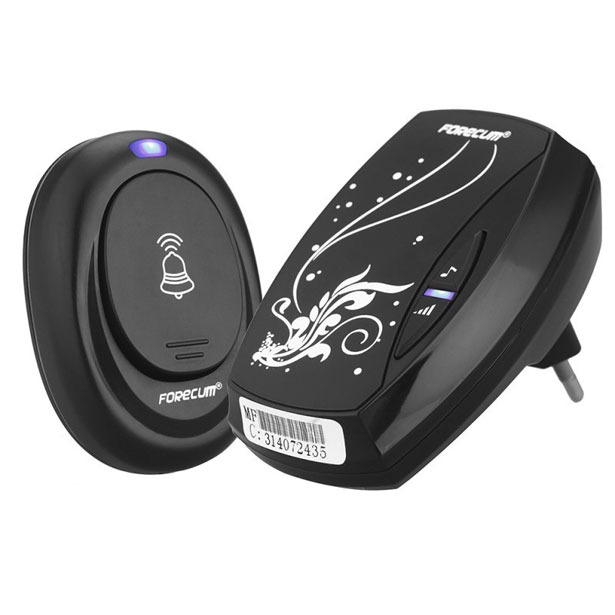
Wireless calls use the same principle as their wired counterparts. But to turn on their speaker, you do not need to close the electrical circuit with the bell button. The signal from such a button is transmitted to the call receiver using radio waves. The sensor reads them and activates the speaker - a melody sounds.

Due to the absence of wires in the device, the installation of wireless calls is greatly facilitated. No need to drill holes and run a wire from the button to the speaker of the call.
Wireless calls can be of two types:
- call speakers of the first type are connected to electrical network, and the button is battery operated;
- in some models, not only the button, but also the speaker is powered by a battery. The installation of such wireless bells consists only in installing a button on the outside of the door and installing a speaker inside the apartment. It does not need to be connected to electricity.
Attention! When setting up a wireless bell, you need to consider the maximum possible distance between the button and the speaker. Depending on the materials from which the walls are made, this distance may vary.
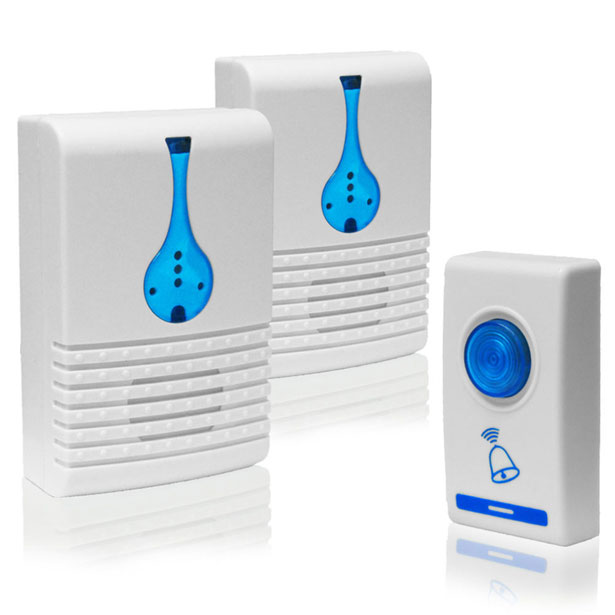
Some wireless calls are equipped with several speakers at once. They can be installed in different parts of the house: in the kitchen, in the garage, in the workshop, etc. - where there is a possibility of not hearing the speaker at the front door.
Setting up a wireless call
- Equipment inspection.
After purchasing such a device, you need to inspect its equipment. In addition to the main components, modern doorbells can have intercom modules, a video eye, a motion sensor, etc. Check that all accessories are in place.
- Choosing a place to install.
We unpack all the components of the call and select the place where its modules will be attached. If the “internal” parts of the bell are powered by the mains, you need to think about how to provide them with access to electricity.

For the external button, you also need to select a location. Typically, manufacturers of wireless calls provide buttons with double-sided adhesive tape ("Velcro"). I must say right away that this option is not very practical. It is best to fix the call button with self-tapping screws.
You can do this next to the doorway. If this is not possible, then a door leaf can be used for this purpose.
- Setting the wireless call button.
After you have decided on the place, you can proceed to the installation of the button. If it will be mounted near the doorway on the wall, then using a perforator, you need to make holes for the dowels. To do this, you need to choose the appropriate diameter of the drill and drill to the desired depth. We install the button with self-tapping screws.

Attention! The button of the old wired bell, if you have one, must be carefully removed. To do this, you need to de-energize the wires that fit it, disconnect them from the button and completely remove them from the wall. Technological holes that remain from such wiring must be sealed with putty.
- Installation of indoor wireless bell units.
The internal parts of the wireless bell do not need to be hung on the wall. Some modules can simply be placed on the nightstand next to the door or in the place where they will be used. If you decide to attach them to the wall, then again you need a puncher for this.
Attention! If the internal parts of the wireless bell are powered by the mains, they must be connected to it. To do this, use the instructions. This procedure is no more complicated than connecting a conventional outlet.
- Functionality check.
We insert the battery into the button and check the operability of the system. If a melody starts to sound when you press the button, then everything is set correctly. You can use.
Wireless calls for an apartment: video
Call for an apartment wireless: photo

On each front door of a residential, office or production premises a doorbell needs to be installed. This device is indispensable, as it allows you to timely announce the arrival of guests with a sound signal.
Currently, there are several call designs that differ not only in functionality, but also in various options connections.
Therefore, you should correctly determine the availability of technical conditions for their installation and perform this procedure yourself. This will not only save money, but also gain installation experience.mechanical bells
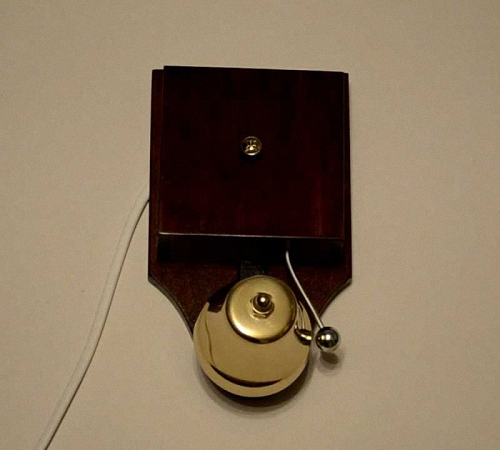
They are a fairly simple design, which, under external influence, creates various sound signals. These include small bells hung indoors and set in motion with an external rope, or simple rings attached to the door. Currently, they are outdated and used for decorative purposes. Their advantage is independence from any power source, as well as simplicity of design. That is, connecting a doorbell does not require complex installation work and the use of special knowledge in the field of construction and electrical engineering.
doorbell kit
Electromechanical bells
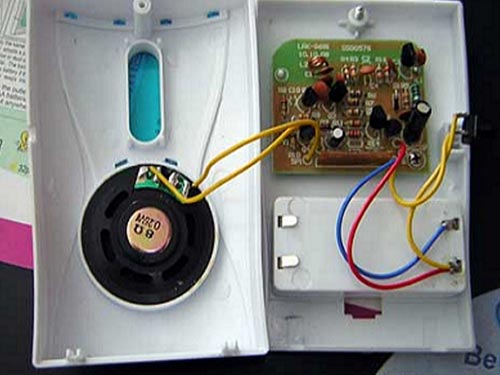
This type of bell is an improved model of mechanical bells. It consists of two blocks: a remote button and a housing with a resonator located inside. Between themselves, they are connected by wires, and the main unit is connected to the electrical network. Inside the main unit is an electromagnetic coil, which, when voltage is applied, transmits force to the attached metal plate and thus creates an audible signal.
Note!
Such models are practically not used, since their mechanical parts are very unreliable, and the sound tonality does not change.
Calls based on electronic chips
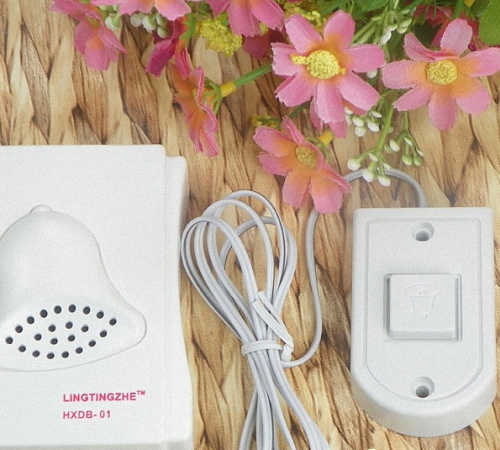
This type of call is a modern solution based on chips. They are available in two versions: wired and wireless. Both options have compact dimensions, several built-in melodies, as well as additional functions, including motion sensors, an autonomous power system, etc. The main difference between them is that the wireless doorbell circuit is greatly simplified and it is enough to place a button to install it - The transmitter and receiver of the signal are within the allowable zone of reliable signal transmission.
How to connect video doorbell:
Advantages and disadvantages of wired connection schemes
Installing a wired connection of the bell button to the main unit will require laying a hidden cable in the wall, and, accordingly, cause a violation of the external decoration of the walls. Experience with cabling and refurbishment will also be required. exterior finish walls. If the bell is installed in a private house, then it is quite difficult to pull the cable along the street, and then enter it into the room. But after the installation is completed, a reliable warning system will be obtained, which can operate from the mains in the main mode and from batteries in the emergency mode, and can also be easily replaced with another one without dismantling the cable.
Basic limitations of setting up wireless calls
- Exposure to high or low temperatures can damage the power supply elements or microcircuits. Therefore, attention should be paid to technical specifications terms of use of the call upon purchase.
- The number of massive concrete and steel barriers should be kept to a minimum, as the transmitted signal from the button will be absorbed and the wireless call will not work.
- The distance from the button to the main unit must be within the safe signal transmission zone. Usually it is up to 100 m, but you need to leave a small margin of up to 20% so that in the event of temporary obstacles, the signal is not lost.
Wireless call device
Cable laying methods
Cable laying is required only for wired calls. To do this, the surface of the walls inside the room is examined near the exit from the house or apartment for the presence of the nearest junction box. Usually it is located at the top of the wall at the point where the cable enters the house from the meter. Indoors, the cable can be laid outside or in a hidden way, and outside the apartment only hidden to provide reliable anti-vandal protection. For concealed wiring with the help of a perforator, grooves in the wall of a suitable size are cut. External wiring is placed in boxes fixed on self-tapping screws.
Features of laying hidden wiring
To connect a doorbell with your own hands, make a sketch, taking into account all technical features room for the optimal location of the button and the main unit. Then a groove is made along the wall in a horizontal direction with a depth three times the diameter of the cable being laid. All cable turns are performed at a right angle, so that later there are no problems with their search. The wires are fixed with plastic clips every meter. In the junction box and nodal connection points, a margin of approximately 10-15 cm is left.
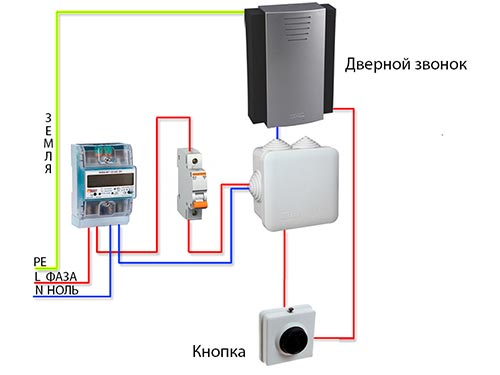
Main unit connection
The main unit is attached to the wall with dowels, after which it is connected to the laid cable in the gap of the neutral wire. If connected to a phase cable, then when you press the call button, you can disable the electronics. The blue or black wire is zero, and the red wire is phase.
Note!
You can accurately determine the phase using a special indicator.
Connections must be made on clamping blocks to avoid short circuit. The block is disassembled in accordance with the instructions and the cable is connected to the terminals. A battery-powered doorbell is easy enough to mount on the wall without laying and connecting wires.
Installing and connecting the call button
It is advisable to install the call button at a level of at least 1.5 m from the floor for ease of use. First, the button is disassembled, fixed with screws or dowels to the wall or door, and then the wires are connected. The housing cover fits neatly over the fixed interior and is screwed or snapped into place. The wireless button only needs to be fixed to the wall with double tape or in any other way.
Connecting to the network and checking the functionality
After completing the installation work, it is necessary to connect to the power supply network. First, on the input shield, the electricity supply to the apartment is turned off using circuit breakers. Then connect the neutral wire and phase to the corresponding supply wires in the junction box. A connection error may cause damage to the main unit, so you need to use the phase indicator before connecting the doorbell. If everything is done correctly, then after turning on the power, the circuit should work. If the bell does not work, then it is necessary for the tester to ring the wiring and fix the breakdown.
Conclusion
Connecting a doorbell on your own with the right step-by-step approach is quite simple. Enough to study specifications for wiring, select the appropriate bell design and type, and follow all installation instructions.
We talked in more detail about all the main schemes for connecting apartment calls in the article "".
For our installation example, we chose a wired electromechanical doorbell. Zamel (Zamel) model Bim Bam (Bim Bam) - two-channel gong. This electric bell is designed to be installed in a standard wiring diagram, so the delivery set is as simple as possible.

Getting Started with Doorbell Installation
Be careful! The scope of delivery does not include a power cord with an electrical plug for connecting to a bell socket. In our installation example, we'll show you how to turn the lack of an electrical cord into an advantage, resulting in an aesthetically better installed doorbell.
For the correct operation of the bell, according to the connection diagram, a control button is required that is brought out to the entrance.
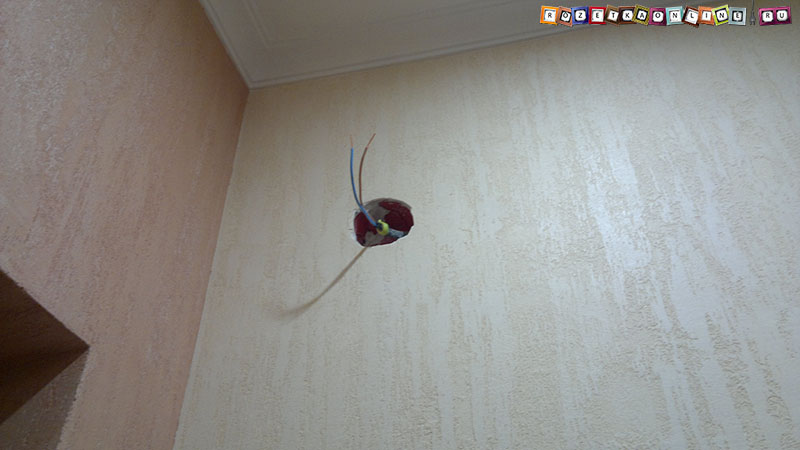
And a socket for connecting the bell itself, which is often located inside the apartment next to the front door, under the ceiling.
In our case, since the Zamel electric bell does not have an electric cord for plugging into a socket, we removed the socket mechanism in advance and brought out the cores of the power cable necessary for connecting. In our case, this brown(Phase wire coming from the button) and blue(zero). From the ends of the cable cores, the insulation was removed to a distance of approximately 10mm - 12mm.
How to determine which of the wires is phase, zero, and which is grounding on your own, our detailed instructions - .
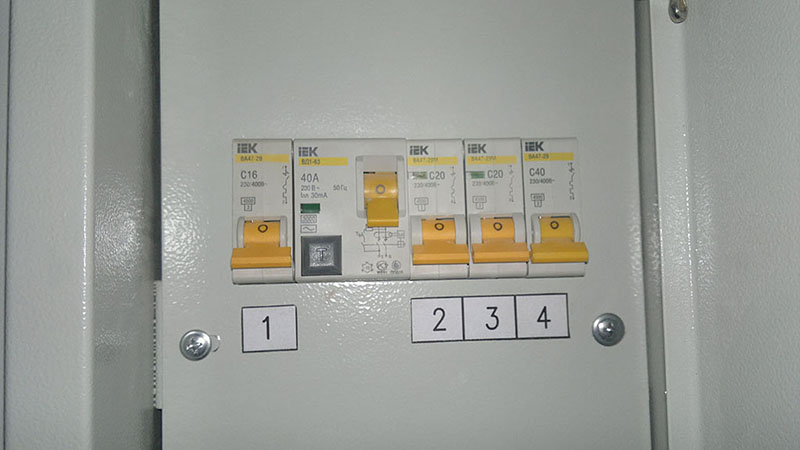
If the wiring is done correctly, exactly according to the diagram, there should be no voltage on the wires until the button is pressed. But it's best to force feed off electric current in the distribution board.
To do this, in the electrical panel, it is necessary to transfer the levers of the circuit breakers to the “off” state, usually this is the position in which the lever is pointing down. Which particular machine must be turned off if they are not signed is determined by empirically, turning them off one by one, and checking, for example, with an indicator screwdriver, the presence of voltage in the wiring for the switch. As a last resort, turn everything off. But then once again make sure that there is no electric current at the installation site!
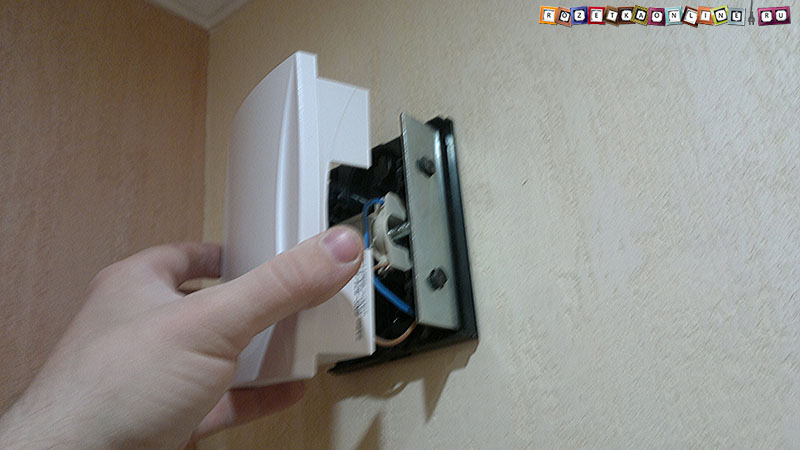
We lay the cores of the supply wire into the bell housing, from the back, through a special hole, as shown in the image below.
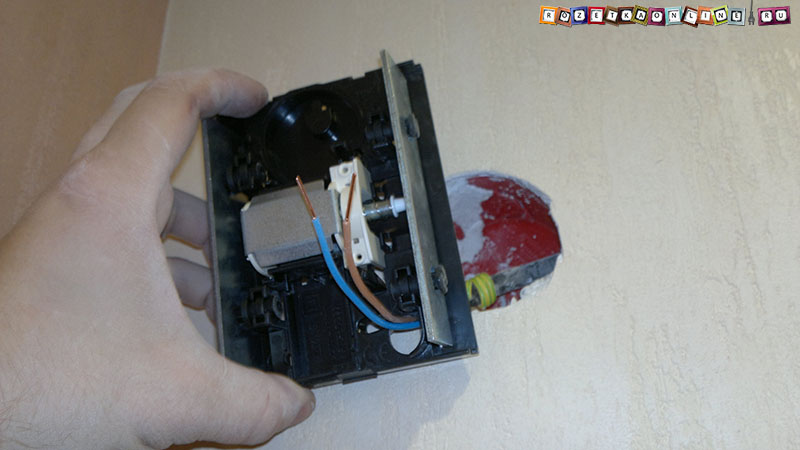
We connect the wires by placing them in the terminals located directly in the doorbell mechanism. In the Zamel electric bell, self-clamping spring terminals are used for connection, which greatly speeds up and facilitates installation.

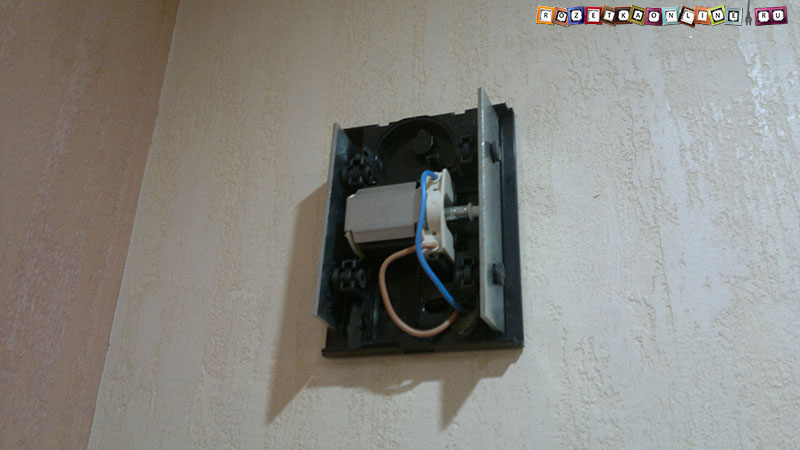
Slightly above the socket, from which the wires for connecting the bell are removed, we screw in the self-tapping screw. At the same time, its head should not enter the wall to the end, but should stick out at a distance of 3mm - 5mm, as shown in the image below. Depending on the materials of the walls, different fasteners can be used, the main condition is that the head matches the size of the seat in the fastener of the bell.
Be sure to check that there is no electrical wiring at the installation site of the fastener., if you are not sure, it is safer to step back from the installation axis of the socket to either side.

We dress the body of the bell on the head of the self-tapping screw, using a special seat on its back side. By adjusting the distance that the fastener sticks out of the wall, you can achieve the most reliable fixation of the bell on the wall.
After the housing of the house bell is securely fixed, put the cover back in place, as shown in the image below.
This completes the installation of a wired electric bell, you can turn on the electricity supply and check its operation. If everything is correct, when you press the control key (bell button) located in the entrance, a pleasant, melodic sound will be heard, which subsides when the button is released.

As you can see, the bell completely blocked the socket behind it and, due to the lack of extra wires, looks very attractive in the interior.
This method installation, in our opinion, the most convenient and aesthetically attractive. The main disadvantage is the lack of a simple possibility of forcibly turning off the doorbell. Call switches are rarely equipped, but you can’t just turn it off from the outlet. Another question is how often you need this opportunity. In any case, it is always quite easy to implement any type of switch in the bell, for example, a rope switch.
Now you know how to install a doorbell and you can easily do it yourself.
If you have any questions about installing a doorbell, of any type, leave it in the comments to the article, we will try to help.
Also, if you have found inaccuracies or have any additions to the article, be sure to write!
The use of an electric bell allows you to solve a number of problems associated with the supply of a sound signal to the room. It is this type of call that is distinguished by a variety of melodies and sounds that are pleasant for human perception. On the features of the device and the connection of electric calls, we will consider further.
Electric bell device and its purpose
In order to understand the device of an electric bell, you should first of all familiarize yourself with its main components. The electric bell consists of:
- electric magnet;
- hammer;
- anchors;
- direct bell or cup;
- contacts;
- springs;
- buttons;
- battery or element responsible for supplying electricity.
The main element that is part of the electric bell and carries out its work is an electric magnet. It is thanks to him that the signal is sent.
The principle of operation of an electric bell is based on the nearby location of an electromagnet and an armature, which includes an electric rigid plate and a hammer. Near the armature there is a contact, of a movable type, made of brass. In the absence of electricity on the surface of the electric magnet, the contact is pressed against the screw section, which is connected to one terminal. The second terminal is connected to the surface on the coil of an electric magnet, and its second section is connected to the armature.
Thus, when the button is pressed, the circuit is closed, an armature device is installed in the coil, and it is attracted to the pole with the help of an electric magnet. Next, the process of hammer impact on the surface of the bell cup takes place, the contact of the movable type, made of brass, opens the circuit moving away from the screw section. The supply of current through the coil of the electric magnet is stopped, and the electromagnet is no longer able to attract the armature. The spring helps the armature to move away from the pole of the electric magnet, and the brass contact is again pressed against the surface of the screw, thus completing the circuit. The current again passes through the surface of the coil, the hammer gives a signal and the procedure is repeated again until the button is no longer pressed. Thus, at the time when the button responsible for the current interrupter is closed, the armature constantly oscillates and the hammer hits the cup area, and, accordingly, the signal is reproduced.
The main function of the electric magnet is the self-shutdown of the device, it is due to its presence that the electrical circuit is closed and opened.

The work of an electric bell and its types
The standard electric bell is in the form of a button that connects or opens the buzzer circuit. For the location of the outdoor unit, use the place near the door, and the indoor unit is placed in the room. The wire helps to connect these two parts into one complete structure. To lay communications, you need to drill a hole in the wall. This process is not convenient.
The electric bell 220 requires power, that is, a bus that will supply electricity to the unit located indoors. This type of electric bell is distinguished by the presence of a simple installation scheme, consisting of pressing a button and instant signal transmission. In addition, he does not need frequent maintenance. The installed equipment has a long service life and is able to work for one or two decades without replacing parts. Despite the large number of advantages, electric wired bells are becoming less popular, as they have been replaced by more advanced wireless-type electric doorbells.

A huge advantage of this type of calls is the lack of work to implement a communication connection between its two parts. Installation work does not require any skills, it is enough to install one part of it in the place of direct arrival of guests, and the other - near the door. Fixing of the external block is carried out by means of a double-sided self-adhesive adhesive tape. Installation of the internal block is carried out in any convenient place of the apartment or the house. This call is able to work in various modes, such as:
- silent;
- intermittent;
- lengthy.
An electric bell with a button allows you to select a wide variety of melodies in the form of a bell sound, birdsong, crickets, water noise, etc. Because of this, these products are in great demand and high popularity.
It is possible to completely turn off the buzzer, select the desired type of melody and power supply. Modern wireless calls work on both finger and little finger batteries.
An even more advanced type of electric bell is the video peephole combination bell. Its design consists of a powerful camera and a liquid crystal screen that delivers excellent image quality. It is he who allows you to consider the person who came to visit. In addition, this device has additional functions:
1. Most of the products have an individual video eye and a wireless electric bell. This combination allows you to replace the purchase of two devices with only one. The image transmission from the video eye is carried out by a golden cable, it is quite short, so these two devices should be as close as possible to each other. In addition, it is possible to turn off the buzzer, program it and select the type of signal.
2. Some models are equipped with a video eye that allows video surveillance. In addition, it captures images and records videos. Recording is done using built-in motion sensors.
3. To feed the video eye, its own sources are used in the form of batteries, built-in batteries that work due to recharging. Please note that in this case, you will need a socket located near the door, since charging is done directly at the place where the device is installed.
4. It will take a small amount of time to carry out installation work. To do this, the usual door peephole is removed, and an individual one is installed in its place. A video camera loop is pulled through the peephole and installed near the door. The speed of this operation is another advantage of this type of device. Programs allow you to automatically set the time at which registration will begin.
In addition, electric calls are divided in relation to their power, standard devices are capable of operating on a voltage of 220 volts, some models have a power of 4.5 to 60 V. For their performance, you will need to purchase batteries or step-down transformers.
We invite you to familiarize yourself with simple advice to help you choose the right electric bell for your home:
1. To buy an electric bell, just go to a specialized store, where experienced consultants will provide detailed information about any device you are interested in.
2. First, determine the type of electric bell you need. You should choose from wired, wireless and video cameras. During the selection procedure, the price, appearance, type of connection and the complexity of the installation work affect the call.
3. Determine the ringtone, it can be classic - standard or in the form of a call-melody.
4. When setting up a bell in a large house, consider purchasing a loud device so that its sound can be heard even in the most remote corners of the house.
5. The use of gong bells that make sounds using a trumpet is very popular. They are distinguished by excellent design and respectable appearance. Some options for these calls even have a built-in clock.
6. Great solution for installation in country house, in the country or in the cottage is the purchase of wireless electric bells. One part of them is attached to the gate, and the second at the front door or directly in the house. Wired calls, in this case, are inconvenient in installation and expensive in laying the cable.
Electric bell: diagram and connection of a wired bell
For self-installation of a wired electric bell, you will need:
- electric drill or perforator;
- indicator screwdriver;
- pliers;
- screwdrivers with a thin sting;
- wire cutter.
In addition, you must have:
- directly doorbell;
- button to turn it on;
- two two-wire cables.
To carry out the installation, prepare a cable consisting of two cores with a cross section of 0.5 to 0.7 millimeters square. Since the bell has little power, the use of thicker cables is impractical.
In addition, please note that the material from which the cores are made are aluminum or copper. Choose material that has the same cores as all house wiring.
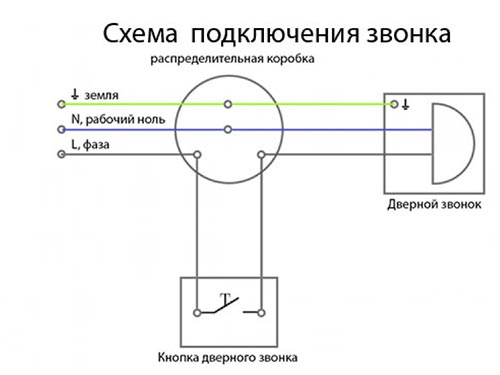
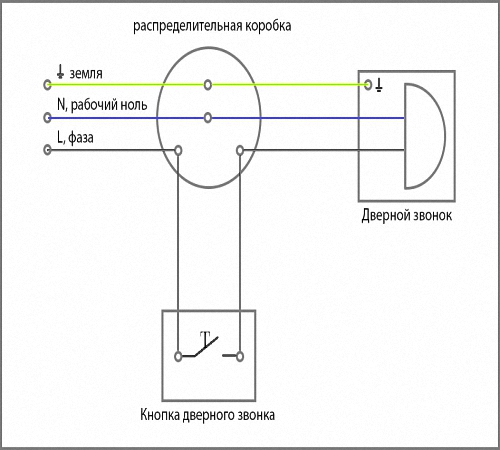
The scheme of the electric bell device consists in the closure of contacts, which occurs after pressing the button. To obtain a certain signal, the occurrence of zero and an open type phase is necessary. The electric bell circuit also includes a two-core cable, consisting of two sections, laid from the distributor box to the installation site.
We suggest that you familiarize yourself with the instructions for installing a bell with the presence of low voltage:
1. First of all, turn off the power supply - this is done for the safety of the person who carries out the installation work.
2. From the distributor box, lay the cable to the bell and its button. To do this, in a distribution box, using a light indicator, they find the wires that supply electricity, determine the phase and zero wires.
3. In doorway or in the wall, drill a hole to help bring out the wire to connect to the button.
4. Using the terminals, connect the wire and the button, and fix it near the door, on the wall.
5. To the second end of the wire, connect the two terminals that are located on the surface of the batteries. When the battery is located directly inside the case, it is necessary to run a cable from the box to the button and connect them together. Next, divide the cable into two cores, and connect each of them to a specific terminal.
6. If there is a step-down voltage transformer in the case, connect it to the distribution box, and to the terminals that correspond to the specific type of voltage.
7. After completing all the above points, check the performance of the entire system.
Tips for connecting various kinds of electric bells
All electric bells have a network operation indicator and a separate button for turning them on. It is these elements that require connection. We offer to consider options for connecting a variety of electric bells:
1. Connecting a wired bell with a button is the simplest and most common option. From the mains, the zero phase is connected directly to the bell, and the phase, through the operation of the button, affects the circuit and the signal is triggered. That is, a cable is inserted into the distributor box from the electrical network, which is divided into two cores, one core goes to the button, and the second to the cable going to the bell. The remaining cable is connected to the zero twist section located inside the box.
2. If it becomes necessary to connect two or more call buttons, it is enough to connect them in parallel by adding a twist to connect.
3. To install wireless bells with batteries, disassemble its case or open the cover of the area where the batteries are located, install it and check for operability. Fix the call in a place convenient for you.
4. In order to connect a wireless bell that runs on electricity, make a direct connection without breaking zero and phase. Some models of calls involve their installation directly into an electrical outlet.
5. In order to connect a wired bell with four contacts, connect one pair to the mains, and the second to the button. These types of calls are very rare and are distinguished by the inconvenience of use and installation.
6. To directly connect the button, disassemble it and fix it on the wall using self-tapping screws or dowel-nails. Next, strip the wires and connect them to two contacts. Choose an arbitrary connection order.
7. If the button is wireless, then it is enough to purchase batteries and install them. Its fixation is carried out using double-sided tape.
We advise you to read
, diagnosis, treatment Treatment of urogenital chlamydia") Chlamydia urogenital - description, causes, symptoms (signs), diagnosis, treatment Treatment of urogenital chlamydia
Chlamydia urogenital - description, causes, symptoms (signs), diagnosis, treatment Treatment of urogenital chlamydia The benefits and significance of hydroamino acid threonine for the human body L threonine that
 To wait or not to wait for a guy from the army For what reason can they be commissioned from the army
 Baked apples with cottage cheese Baked apples with cottage cheese

