Even ten or fifteen years ago, almost all of us bought postcards to congratulate our relatives and friends on the holidays. Today, we are less and less likely to treat this as something significant and valuable: it is easier to call distant relatives, and give a gift to relatives without “loading” with extra waste paper.
However, postcards made with children can become not just a greeting card, but also a holiday decoration for your loved ones. They can be hung on a Christmas tree, put on a shelf along with other New Year's accessories. Here are some easy DIY postcard ideas.
Christmas tree made of threads
You will need:
Knitting;
hot glue;
pasta in the form of letters;
can of artificial snow.
Make the base of the postcard out of cardboard according to your desire (you can double or single, large or small). Cut out a triangle from another sheet of cardboard - this is the future tree, it should be slightly smaller than a postcard.
Take a triangle and wind the threads around it in any shape so as to hide the cardboard base of the Christmas tree. Threads can be plain (preferably green), or multi-colored.
Glue the finished Christmas tree with hot glue to the base of the postcard. Make sure the threads are not unraveling. Glue beads on top - decorations. Spray with artificial snow.
From pasta or other letters, fold the inscription of your congratulations. You can paint the letters in bright colors.
Serpentine can be cut out of self-adhesive or plain colored paper using a hole punch.

Application "Snowman"
A regular application will be interesting if you run it from different materials. We took felt and shiny self-adhesive paper. You can use other materials: foil, velvet and corrugated paper, pieces of fabric of different textures.
Otherwise, this craft does not differ from the usual application: plot details are cut out and pasted. Here it is better to use PVA glue.

Postcard "Mittens"
You will need:
Knitting;
PVA glue;
sequins, confetti or colored paper;
gel pen.
On the cardboard - the basis of the postcard - draw the outlines of the mittens with a simple pencil. Then generously shade this pattern with PVA glue. It is desirable that the jar of glue has a sharp nose, then you can more accurately “draw” it.
Cut 15-25 pieces of about 5 cm from the thread. Connect them in a bundle so that the ends are at the same level. Then start finely crumbling them with scissors right above the “mittens” filled with glue. Thus, you need to cover the entire surface smeared with glue. Correct the drawing with a sharp object - a toothpick, etc. Let the mittens dry and shake off excess lint. Make sure there are no bald spots - places where the cardboard shows through.
Draw a rope on the mittens with a gel pen and write your congratulations.
Stick on sequins, confetti or colored paper details.
Outline the card with PVA glue along the contour and glue a knitting thread of a different color (or the color of mittens) onto it.
In this way, you can make “knitted” patterns not only of mittens, but also of other items: socks, hats, scarves, as well as decorate postcards, turning the details on them into fur, giving fluffiness to animals, snow, etc.

Postcard from beads
You will need:
PVA glue;
beads or beads;
green felt.
Draw two circles on the cardboard different sizes- These are future Christmas decorations. Shade them liberally with PVA glue. Gently pour in beads or beads so that the circles keep their shape and there are no empty spaces left in them.
Cut out a spruce branch from green felt and glue it on top.
Make Christmas balls "pendants" in the form of a string of beads.

Christmas tree from magazine sheets
A Christmas tree made from the multi-colored pages of a magazine will look original if you stick it on colored cardboard (we took velvet paper). Just cut magazine sheets of different widths and twist them into tubes, securing with PVA glue.
When the tree is glued, place a star or other decoration on top. You can also stick beads on the Christmas tree itself.

Tree of tangerines
Prepare tangerines in advance by cutting them into circles and drying them on a battery or in another way. This craft will be a good decoration for the kitchen.
You will need:
tangerines in circles;
hot glue or PVA;
flax seeds, sesame seeds, coriander;
sugar or gelatin.
Glue mugs of dry tangerines in the middle of the cardboard, creating a triangle.
Then, with PVA glue, outline them along the contour and draw the trunk. Sprinkle these places with coriander and flaxseed.
Sprinkle sesame seeds on top of tangerines. This can be done without glue. If the circles are very dry and the sesame seeds are not sticking to them, run a wet finger over them, then decorate with seeds and let dry.
Draw snowflakes around the Christmas tree with PVA glue and sprinkle them with either sugar (they will be white) or gelatin (they will be tinted).
On such a postcard, you can make a loop on top so that it can be hung in the kitchen.

Christmas tree made of pasta
You will need:
pasta of any shape;
hot glue;
colored paper;
golden paint.
Cut out a Christmas tree from cardboard. Glue pasta in the middle and cover them with gold paint. Then glue the beads on top of the pasta.
Decorate the ends of the branches with sequins. Make a star out of colored paper.
This postcard can also be hung on a Christmas tree, so a loop at the top would be useful.

Volumetric Christmas tree
You will need:
velvet paper or colored cardboard;
sequins, confetti, colored paper;
Fold the card base in half.
Fold the velvet paper or colored cardboard in half and cut out the Christmas tree.
Stick sequins, confetti or colored paper appliqués on the Christmas tree.
Glue the Christmas tree by the ends of the branches in the middle of the card so that it becomes voluminous when opened.

Bouquet with holly
As you know, the holly is a symbol of Christmas, so it, like the spruce, can be used in holiday decorations.
You will need:
green paper;
hot glue;
velvet paper;
toothpicks;
Take 30 toothpicks, connecting their ends with a "fan". Liberally grease with hot glue the place on the velvet paper where you will attach the bouquet. Quickly, before the glue has hardened, stick the “fan”, if necessary, grease with glue not only the base, but also on top of the toothpicks in the place where they are attached. It is important that all toothpicks hold firmly.
Then put glue on the hole in the bead and put it on a toothpick, creating a bouquet to your taste.
From green paper, cut out two holly leaves and stick them at the base of the bouquet so that all the glue is hidden. From paper of a different color, cut a bow and glue it to the holly.
If desired, you can make toothpicks of different lengths and then the bouquet will be more magnificent, because. the beads in it will be at different levels.

Postcard in the style of "quilling"
You will need:
colored paper;
PVA glue;
pasta letters.
Cut 4 long strips from green paper and twist their ends with a tube: bend one in one direction, the other in the other. Make several strips from colored paper, twist them also with a tube and glue the ends to make balls.
Lubricate the cardboard with PVA glue in the places where your ornament will be, and glue the twisted strips, creating a pattern.
Decorate the card with glittery paper snowflakes. Cut a ribbon out of red paper and stick it on the bottom. Glue your congratulations from pasta letters to a red ribbon.
Hello friends and readers!
Today I will share five simple Christmas card ideas that you can do with your children with your own hands. I tried to choose such works so that the guys could fully participate, and not just a mother draws with a child’s hand. And at the same time, to make the card look spectacular!
Everything that I propose, we did with Mark and Gleb, so I can say for sure that the ideas are simple and accessible for children from 1.5-2 years old.
gouache prints
- smooth surface: magnetic board, kitchen smooth board, clean tray
- scotch
- gouache paint
- cotton buds
How to do?
- On a smooth surface, we make a square / rectangle of their adhesive tape.
- We paint it inside with gouache - not a thick, but not a thin layer.
- Draw a simple outline with a cotton swab.
- Attached is a postcard.
Perhaps you just need to prepare the surface. All other steps can be performed by a child of 2 years. Even at the very beginning, I showed Gleb what layer of paint is needed so that it doesn’t come out too much or too little.
By the way, during work, ask the child what he thinks, why it happens and where does the pattern on the print come from? I'm sure the answers will surprise you =)
buttons
For this job you will need:
- Ball blanks: we have wooden buttons (you can use cardboard circles)
- Acrylic paint or gouache
- white cardboard (postcard base)
How to do?
Another kid-friendly idea is to color in the colored circles and then stick them on a white/blue surface. I gave the kids buttons and they quickly colored them. Then they glued them on a postcard blank and finished drawing the strings
Garland and Christmas tree
- Gouache or watercolor
- White cardboard (postcard base) with a "blank"
How to do?
Children simply dip their fingers into the paint and leave prints. Agree that it is necessary not to lead with a finger, but to poke! And of course, draw more blanks!
Volume balls
For this job you will need
- Beautiful paper with an ornament
- White or colored cardboard
How to do?
Cut out 2 circles (Christmas toys) or 2 Christmas trees. To make the objects voluminous, we glued 2 elements folded in half. In general, like this:
While cutting, try play this game: fold the sheet in half and start cutting, and the child, while you have not yet unfolded the paper, must guess from the half what it will be. For children under 2-3 years old, this is not an easy task, because you need to complete the symmetrical half of the object in your head!
we give gifts to our loved ones self made. Once, together with my husband, we sculpted angels from clay, then I painted them and signed for each person personally. And another time, Christmas decorations were sewn from fleece. It's nice when you come to visit friends in a few years, and they have gifts made by your own hands hanging on the Christmas tree.
The imprint of a small foot is a green Christmas tree
Last year, when our little daughter Ksyusha was born, for the first time I made gifts with her, although at that time she was only 5 months. I prepared a lot of paper, folded in half, and imprinted her small pile of green paint on it. We got little trees. Then I made bright prints with my fingers - balls on the Christmas trees. These postcards were scattered different sides: one - in St. Petersburg, the other - in Gomel, the rest settled in Vinnitsa and Kyiv. Great-grandfather was especially pleased with such a gift :)
This year I found interesting idea, for the implementation of which I also needed the help of Xenia.
Here's what we did this year:
1. For DIY New Year cards, we chose thick art paper in delicate shades to make the cards strong enough. To prevent the paper from fading from excess water, we used acrylic paints, although gouache or tempera could also be used.
2. Before drawing, I make sure to dress Ksenia in clothes that we have allocated specifically for this purpose. I think it's important point: the child should know that he needs to draw carefully, but if he accidentally stains these clothes, he will not be scolded. What is the point of drawing if parents constantly say: “do not get dirty”, “do not go beyond the line? Although, of course, I also swear when Ksyusha tries to draw not on paper, but on the table :)
3. So, we took sheets of paper folded in half - future postcards - smeared our hand with white paint and made an imprint. This was repeated many times. First, we made clear handprints with white paint, and then I allowed Ksyuna to make arbitrary prints with pink paint.

Putting paint on the palm

Putting a handprint

4. After this rather difficult lesson (we made about 20 prints for New Year's cards with our own hands). Ksenia demanded a sheet of paper and a brush for free creativity. I think she deserves it :)

Free creativity
It seems to me that at it makes sense to change not only the type of work(sculpting, appliqué, drawing) and materials(paints (watercolor, finger, gouache), pencils, felt-tip pens, etc.), but also the approach to work. That is, one time we draw what our heart desires, and another time we do some specific work with mom. Firstly, it gives the child an understanding that creative work should still make sense. He must know what is shown in his drawing. The kid will try to figure out what to draw, sculpt, cut. Secondly, works with meaning can often be used as gifts. Children love to give their crafts! This, by the way, raises self-esteem and gives an additional incentive to continue working.
But independent free creativity should also stand on an equal footing with joint thoughtful activities. Since it is it that gives the baby the opportunity to learn the properties of materials, get used to working with tools, experiment, turn on his imagination and just enjoy the scribbling and scribbling.
5. After all the postcards dried up, my mother got to work, that is, me :)
Following an example found on the Internet, I drew these snowmen:
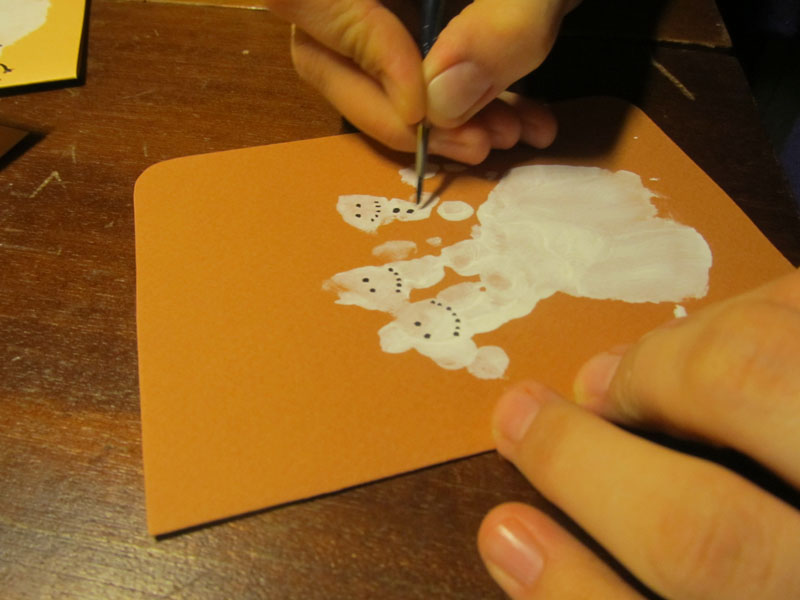
I draw the faces of snowmen

Christmas cards with snowmen
And I turned arbitrary Ksyushina's prints into the following:

christmas angel

Good afternoon. Today we will make New Year's cards with our own hands. I will show you the most interesting ways and techniques. You will not only see photos, but also receive detailed instructions and schemes for creating each such postcard. I will give you the necessary workshops to illustrate complex techniques (quilling, origami) step by step.
I decided to divide the entire article into 5 parts - on the topics of New Year's cards.
- First, we will look at a variety of Christmas trees on postcards.
- Then I will show which Santas can decorate your postcard.
- Then we will make Snowmen in different techniques.
- Then we move on to Christmas wreaths.
- And of course, consider the applications of snowflakes on postcards.

So let's get started...
Part one
FIR-tree on New Year's cards.
Method number 1 - paper triangles.
If you still have old signed New Year's cards, you can no longer re-gift them in the second round. But you can use them to create a NEW postcard. From a New Year's card, you can cut a triangle, put it on a leg and get a Christmas tree. The New Year's motive on the postcard turned out by itself - like the colors of the Christmas tree.

Or you can carve a Christmas tree from an ordinary cardboard box - rough corrugated packaging will be in harmony with delicate lace or pearl beads. And you will receive an elegant New Year's card made by yourself.
You can cut out a triangular Christmas tree shape with wavy edges, and glue it with sequins that imitate Christmas decorations on the Christmas tree.
You can give the triangular silhouette of the herringbone a scalloped edge (as in the postcard photo below). And also you can cut out several silhouettes at once and arrange them on one New Year's card.
On the blue New Year's card from the photo below, we see how a three-dimensional lobed Christmas tree is glued together from three triangles.
Or one Christmas tree silhouette can be larger in size and with a different shade of color - we put it as a duplicate background under the top silhouette (as on the right New Year's card from the photo below).

Method number 2 - paper ribbons on a New Year's card.
From paper or textile ribbons, you can quickly and easily form a herringbone appliqué.
You can use regular strips of colored paper. Or buy a braid with embroidery in the sewing department of the store. Or, in the gift department of the store, buy a sheet of elegant wrapping paper and cut patterned stripes from it for a Christmas tree appliqué on a New Year's card.
Here in the photo below we see several options for creating such a Christmas tree application.

Paper strips do not have to be glued in a strict order and symmetry. You can cut strips of four lengths - 10 cm, 8 cm, 5 cm, 3 cm. And arrange them in a chaotic oblique order starting from the bottom of 10 cm, in the middle we lay strips of 3 cm and 5 cm, and at the top 3 cm. We crown it all paper star and get a New Year's card with your own hands as in the left photo below.
You can also take a triangle cut out of thick cardboard and glue it with strips of paper or fabric, bending the edges of the strips to the inside of the cardboard triangle. And we will get a ready-made elegant Christmas tree, which you can safely stick on your postcard (right photo below).

But with paper strips, you can do not only planar applications. You can make Christmas trees in three-dimensional technique. Here I give detailed description how to make a looped Christmas tree with your own hands on a red New Year's card from the left photo below.

Step 1 - cut strips narrow and long - their lengths will also be different: 2 strips of 15 cm, 2 strips of 12 cm, 2 strips of 9 cm, and one strip of 7 cm.
Step 2 - we make cuts in the front side of the card with a blade - 2 slots on both sides along an imaginary line(the width of each slot is such that our strip can easily fit into it).
Step 3 - push each strip at one end through 2 slots- turn the loop and again return to the same slots. The ends of the strip met at the side glue in the same loop as on the opposite side.
We repeat the same procedure with the rest of the strips. Naturally, it is necessary to arrange the strips from the bottom up in decreasing order (long at the bottom, short at the top).
Or you can cut 6 paper strips of the same length in 12 cm. Bend each strip in half and interlace the folds of the halves with each other cross to cross - in a checkerboard weave. It just looks difficult. But really simple. Here you can tear out a sheet from a notebook and cut 6 strips of any length and practice on such rough material - to see how simple and easy everything really is.
And here is another New Year's card, where Christmas tree is also made of strips of paper. Only here crepe paper is used (with a wrinkled effect) - it is sold in stationery stores in rolls (like wallpaper).

Step 1 - We cut wide strips of different lengths - 12 cm, 10 cm, 8 cm, 6 cm, 4 cm.
Step 2 - On the postcard, we outline tier lines (rounded), to these lines we will glue each tier of our Christmas tree made of paper. We attach a strip of double-sided tape to these drawn lines.
Step 3 - We take the longest strip (12 cm) and fold its entire upper edge into small folds - tucks - and put these tucks on the bottom line of the adhesive tape. We take the next strip in size (10 cm) and do the same. And so we move to the top tier of the Christmas tree. Then we decorate the Christmas tree on the New Year's card for any design at our discretion.
Method number 3 - paper circles.
And here is a way to make a Christmas tree on a New Year's card using circles cut out of paper. You can cut out circles of the same size (as in the blue postcard from the photo below). Or you can cut the circles into 4 different sizes - 2 circles for each size. And then the Christmas tree will turn out to be triangular in shape (tapering up) as in the red New Year's card from the photo below.

Method number 4 - quilling technique for postcards for the New Year.
And here is another technique by which very beautiful DIY New Year cards are obtained. You can make beautiful twists from paper strips.

This is how the process of creating a Christmas tree using the quilling technique looks like. Cutting paper into even strips(this is convenient to do under the ruler with a paper knife - on wooden board so as not to cut the table. Or you can buy ready-made quilling strips. Or get a machine for cutting quilling strips.

We lay each twist in the circle of the template(so that the twists are the same size). We allow the tight twist to open up a little, unwind - but within the framework of a round stencil. And then glue the tail-tip of the twist to the barrel of the twist itself. That is, we fix its size. So it will be possible to remove it from the stencil frame and not be afraid that it will unwind and increase its size.
If you don't have a stencil, you can use round caps for creams or drinks. Lay the twist on the bottom of the glass or lid and let it unwind to the diameter of the lid. Then carefully remove with tweezers and fix the twist tail with glue.

We pinch round twists on one side with a finger to give it the shape of a drop.

We add drops of different sizes in pairs - and we get a quick and simple Christmas tree.

Quilling technique allows you to create a variety of Christmas tree models from paper twists.


Method number 5 - paper rolls.
Or you can cut the paper into wide strips of different lengths - and roll each strip into a roll. It's easy to do if wrap it around a pencil- glue, wait until the glue grabs - and only then remove it from the pencil. From such rolls of different lengths, a beautiful Christmas tree on a postcard is obtained. Quick and easy to do by hand. paper can be used simple color. Or buy sheets gift wrapping paper(sold in the gift section).

Method number 6 - a mosaic Christmas tree on a postcard.
You can use any small details as a material for creating a Christmas tree. Sliced snowflakes or butterflies. Buttons or origami stars or bolts and nuts (if you are preparing a card for your husband and want to make it brutal).

Method number 7 - a lace Christmas tree on a New Year's card.
You can make beautiful lace on a New Year's card. you can use ready-made lace paper napkins(sold in a hardware store, in the same place where cupcake molds are). Such napkins are often placed under cakes and other culinary products).
Or you can create your own paper lace- folding paper as for cutting out a snowflake. And along the folded edge, start up an interesting pattern with holes.
Can you fold the cut-out snowflake itself in the shape of a Christmas tree and stick it on a Christmas card.

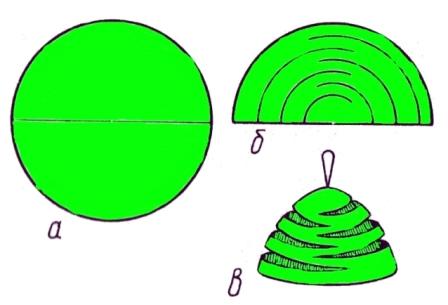
Method number 8 - origami technique.
But New Year's cards, which are decorated with a Christmas tree folded from a napkin. Such folding origami in the form of a Christmas tree is made quite quickly and from a simple square (nothing needs to be cut out). The main thing is that each upper square should be slightly smaller in size than the lower one. And then the tiers of our Christmas tree will go to the narrower to the top.

Below I have drawn a diagram that illustrates the process of creating paper blanks for a Christmas tree for a postcard.

But you yourself can come up with YOUR interpretations of a modular paper Christmas tree. Come up with your own triangular bends and create your own individual New Year's card with a Christmas tree.


Method number 9 - a folding Christmas tree on a postcard.
And here is another folding Christmas tree. Everything here is quite simple and is made from a single piece of cardboard. And if you wish, you can additionally decorate the Christmas tree with colored paper and decorations.


And also you can quickly fold an origami paper Christmas tree in such a semicircular pattern. You can copy the shape of the Christmas tree and the fold lines directly from the monitor screen. To zoom in or out on the screen, roll the mouse wheel forward or backward while holding down the Ctrl key.

Or you can make such a Christmas tree yourself without a drawing. And just bending the semicircle back and forth several times, as shown in the figure below.

If such a semicircular scheme for a folding Christmas tree is made not with a smooth edge, but the circumference of the scheme is serrated into soft ruffles or teeth, then the edges of our tiers near the Christmas tree will turn out to be curly, as in the photo of New Year's cards below.

Method number 10 - paper carving.
Also for Christmas cards, the carving technique with lapels is suitable. This technique is very easy to do. Part of the picture is cut with a razor blade and folded back. We see the most primitive sample in the right photo below - half of the contours of the Christmas tree and the snowflake are cut off there and simply bent.
You can make a double contour - and then the bend will turn out in the form of a narrow silhouette strip, as is done on the left postcard from the photo below.

And you can cut and bend down each tier silhouette of a Christmas tree on a postcard. And we will get a Christmas card with the photo below.

You can first practice on any draft piece of paper - to make sure how easy it is to actually implement such a postcard carving technique, and make your own unique New Year's craft.
We have considered New Year's cards with a Christmas theme, and now let's look at all the other New Year's stories that you can decorate our postcards with your own hands.
Part two
Santa Claus on postcards.
Large applications in the form of Santa Claus will decorate any Christmas card. No need to make a silhouette of Santa Claus in full height somewhere in the corner of a postcard in the form of a small booger. It is better to take the largest size of the hat, beard and take the entire part of the card with these main elements of Santa Claus - a red nose, mustache, beard, hat.

You can fold Santa Claus using the origami technique for a postcard - as shown in the photo below.

Part three
SNOWMAN on New Year's cards.
And now you can move on to a new character of the Christmas holidays - a snowman. Usually we are used to seeing him on crafts in the form of three white rounds and a bucket on his head. But you can get creative with the task of depicting a snowman on a postcard. For example, make it peeking out from behind the Christmas tree - as in the left photo below.
Or take a ready-made postcard with a snowman - cut it into strips of different lengths - and fold a Christmas tree pyramid out of these strips. Fold in such a way that on some strips a sly snowman's face is visible (as on the left New Year's card from the photo below).

Also, you don't have to appliqué a snowman on a classic white paper card. You can take a musical staff of a New Year's song on the Internet - put it on print, and cut out round disks from such paper for a snowman appliqué.
Or take a printed text that tells about New Year's traditions and cut circles for a snowman from such text.

You can make a snowman on a postcard from a paper fan. When the fan is bent in half - and its blades unfold in a circle.

You can make a snowman on a postcard using the quilling technique. Twist from white paper strips the twist modules, and fold the quilling snowman.

You can depict a snowman in an interesting unusual angle or setting. It can be a snowman from the TOP VIEW (as in the left photo below) ... or a snowman inside a snow globe (as in the right photo).

You can make an applique of a snowman who pierces a snowflake with his nose. Or a snowman-lord in a top hat and with a red bow around his neck.

It is not necessary to put a bucket on a snowman. The snowman looks good in a neat black hat with a brim, decorated with a sprig of holly.

A snowman on a postcard can be depicted quite schematically. Semicircle, scarf stripe, two beady eyes and an orange triangle nose.

You can make a simplified silhouette of a snowman the side of a two-layer postcard as in the photo below.

Or you can use the entire white background of the card as the body of a snowman. On New Year's cards with a photo below just this principle is shown.

The most difficult thing is to make a three-dimensional 3D postcard with a silhouette of a snowman.

Part Four
DEER on Christmas cards.
Another New Year's character that looks festive on New Year's cards is a deer.
It can also be portrayed outside the box, but in an interesting situation. For example, it can be a deer singing Christmas carols with inspiration, playing a drum, or skating - it's all up to your imagination.

You can choose the simplest silhouette application ONLY DEER HEADS on postcards.

And you can decorate a New Year's card with the silhouette of a whole deer - from horns to hooves.

Part Four
SNOWFLAKES on New Year's cards.
You can cut out 2 ordinary stars from paper and fold them on top of each other with an offset of one ray - and we will get an elegant snowflake on a Christmas card with our own hands.

You can make a beautiful snowflake using a voluminous convex technique.

Or embroider a snowflake out of thread. That is, apply a symmetrical pattern of punctures. And then, in a certain order, lace these puncture holes with threads to make an openwork snowflake.

You do not have to come up with very complex weaves of threads. Even small thread and needle patterns will decorate your New Year cards.

In this thread technique, you can make not only snowflakes, but also any other New Year's motifs.

And of course a quilling snowflake.

Here in the photo below we see the stages of creating a complex snowflake from ordinary quilling modules - you need to start each snowflake from the center - and increase the petals to the middle - circle by circle.

Your Christmas card with snowflakes can look like a layered cake with all sorts of details mixed in, layering and bumping into each other in an ornate chaos of beauty.

The snowflake on your postcard can be made from origami paper modules.

Part five
WREATHS on New Year's cards.
And here is the theme of festive Christmas wreaths. On a postcard, they can be depicted in any technique. It can be a planar applique of any geometric shape, decorated with ribbons, buttons and other tinsel.

You can make a New Year's card in the form of a door on which such a Christmas wreath hangs.


Quilling technique is also ideal for creating modules for a Christmas wreath.

New Year's cards can decorate birds. They can sing winter songs while sitting on birch musical branches.

Also, New Year's cards can depict a winter window through which you can see either a snowy landscape or a festive room with a Christmas tree.

And here are some more ideas how to give money in a New Year's card . We are accustomed to investing money inside postcards. But you can put money outside, making it part of the general New Year's application. I will now explain how to place the money on the front side of the postcard and not ruin it with glue.

Here on the first postcard we see a bill that was folded in a triangular cone - a ribbon was glued to the postcard (not money, we don’t spoil it with glue) and glued the ribbon so that it sticks to the glue in the middle, and its tails hang freely. We put a Christmas tree-money cone on the ribbon - and tie it, tie it with the free ends of the ribbon.
In the second case we glue the snowman - but we don’t just glue it - but on plump pieces of styrofoam. That is, the snowman turns out towering on the postcard. Thus, the neck of the snowman turns out to be moved away from the canvas of the postcard - and under his neck you can safely slip a banknote folded into a strip.
And in the third case - we roll candles out of paper. We glue them with ribs to the postcard. And in each tube we put a banknote folded into a narrow roll.

These are the original ideas for New Year's cards I found for you this holidays.
Good luck with your New Year's crafts and a happy New Year.
Olga Klishevskaya, especially for the site ""
If you like our site, you can support the enthusiasm of those who work for you.
Happy New Year to the author of this article, Olga Klishevskaya.
No matter how good a gift is, it is considered incomplete without a postcard. The range of greeting cards today is very large. However, if you want a unique unique postcard, then it is better to make it yourself with your own hands. This is exactly what we will do now: consider the ideas of greeting cards for the New Year with our own hands.
You will need: A4 thick colored cardboard, scissors, corrugated paper, PVA glue or double-sided tape, a simple pencil, decoration elements (sequins, beads, ribbons ...).
Master Class

New Year card in scrapbooking style

scrapbooking- this is a whole art that teaches how to create and decorate photo albums with your own hands (in our case, a postcard). Scrapbooking has a whole story of how a notebook turned into an album. At the end of the 17th century, notebooks appeared with additional blank pages. Their owners pasted images, creating entire collections. This is how scrapbooking began.
You will need: thick colored A4 cardboard, PVA glue or double-sided tape, scissors, scrap paper, pencil, decoration elements (sequins, beads, rain, buttons, sequins ...).
Master Class


You will need: A4 color cardboard, wrapping paper or candy wrapper, thin black marker, scissors, PVA glue or hot melt adhesive, stapler, decoration elements (sequins, beads, rain, buttons, sequins, bows ...).
Master Class

New Year's card in the style of minimalism

Minimalism(from Latin - the smallest) - this is a style that is distinguished by simplicity and brevity of composition.
You will need: A4 color cardboard, a shaped hole punch or a stationery knife, thread, needle, sequins, a simple pencil, a ruler and scissors.
Master Class
- On the right half of the card, sketch out the Christmas tree and star tops. Use a ruler and pencil.
- Cut through the star with a shaped hole punch or a clerical knife.
- Make holes in the shape of a Christmas tree with a needle - a triangle.
- Take a thread with a needle and make stitches. String sequins after each stitch.
- Carefully fasten the thread from the back.
New Year card in origami style

Origami- This is a type of arts and crafts, literally translated from Japanese as "folded paper" into various figures.
You will need: multi-colored A4 cardboard, PVA glue, scrapbooking paper or thick paper, decoration elements (sequins, beads, rain, buttons, sequins, bows ...).
Master Class


You will need: A4 color cardboard, scissors, a simple pencil, ribbons, PVA glue, decoration elements (sequins, beads, rain, buttons, sequins, bows ...).
Master Class
- Make the base of the card by folding a sheet of cardboard in half.
- Glue the tree trunk to the right side of the card in the center. The barrel should be made of brown ribbon in the shape of a trapezoid length.
- Cut 6 strips of ribbons 2 cm wide, 2, 4,6,8,10,12 cm long.
- Trim the corners of the ribbons on both sides.
- Glue the tapes from the bottom up, in the shape of a triangle.
- Decorate the Christmas tree to your taste with sequins, sequins, buttons, rhinestones, an asterisk, bows ...

You will need: A4 color cardboard, scissors, a double-sided round napkin, a ruler, a simple pencil, double-sided tape, decoration elements (sequins, beads, an asterisk, rain, buttons, sequins, bows ...).
Master Class


You will need: A4 color cardboard, A4 color paper, scissors, a ruler, a simple pencil, a stationery knife, flat paper decorations (snowflakes, stars ...), decoration elements (sequins, beads, an asterisk, rain, buttons, sequins, bows ...).
Master Class


You will need: colored cardboard and A4 paper, scissors, stationery knife, compasses, thick thread.
Master Class

You will need: colored cardboard and A4 paper, double-sided adhesive tape with a backing, scissors, tape, hole punch.
Master Class
- Make circles out of colored paper using a hole punch. (If you do not have a hole punch, do not despair, the circles can be drawn and cut out by hand).
- Make the base of the card by folding a sheet of cardboard in half.
- Apply adhesive tape in a circle shape to right side postcards.
- Remove the protective layer from the tape pads.
- Glue the circles in several layers to get a voluminous wreath.
- Tie the ribbon into a bow and glue it up.

You will need: colored cardboard and A4 paper, PVA glue, scissors, tape.
Master Class
- Make the base of the card by folding a sheet of cardboard in half.
- Cut out a square of cardboard with a side of 5 cm.
- Glue the square to the right side of the card in the center.
- Make a ribbon bow and glue it to the top of the square.
- Write a small congratulations (since most men don't like to read).
We advise you to read
 Healthy eating scenario "Vitamins visiting children
 How to quickly and easily wake up in the morning - easy and effective tips
 Psychological characteristics of children in adolescence
 Transferring a child to another school - the procedure and necessary documents Whether to transfer a child to another school