Paper cutting shapes and shapes helps young children develop fine motor skills in game form!
How to teach a child to cut paper?
- First of all, your baby's hands should be ready for instilling the skill of cutting. Best Exercise for a baby - squeezing water out of a simple sponge, it trains the necessary muscles.
- Then show your child how fun it is to tear apart old newspapers and pieces of paper - this will teach him to hold the paper in his hands without dropping it.
- Now you can learn paper cutting using special materials for children! Start by cutting out straight and wavy lines, then teach your child to cut out the shapes before offering pictures to cut out.
Important! Remember to take breaks if your child is tired or bored. Be sure to encourage the child verbally, praise him and try to interfere less in the cutting process itself.
Paper cutting safety
Before teaching, show your child how to hold scissors properly and talk to them about safe use of scissors. The child must clearly understand that:
- You need to cut in the direction from the body and fingers.
- You can not play and indulge when scissors are in your hands.
At what age do you start learning to carve?
All children develop differently. The age limits below should be used as a guide, taking into account the interests, temperament and attention span of individual children.
2 years: children at this age will enjoy tearing paper into small pieces and cutting something out, only repeating after adults;
3 years: at this age, with a child, you can try to cut out any shapes, sitting next to him and continuously watching the process;
4 years: the child is able to cut out simple lines and shapes by himself with a little help from an adult;
5 years and older: the child himself should easily cut out the pictures and even stick them on paper, making applications.
All children love to decorate the Christmas tree, but they will also definitely like to make voluminous Christmas tree toys out of paper with their own hands. After all, how interesting it is to decorate a Christmas tree with your creation, to admire it every day, to demonstrate it to everyone around.
For crafts you will need:
- Colored cardboard of various colors (not very dense);
- Threads, braid, twine (optional);
- Double-sided or regular tape;
- Glue stick, scissors, pencil.

Volumetric Christmas toys made of paper step by step
1. Bell

Using this template or one from the internet, trace and cut out 6 bells flat.


Fold each in half, trying to carefully fit the edges.

Glue together one half-side of one part with a half-side of the second.

Glue all 6 parts together, then put a thread in the center and secure it with tape. In principle, glue will also cope with this task, but with adhesive tape it is faster and more reliable.

Glue the last two sides together to make a solid three-dimensional Christmas bell.

2. A complex DIY Christmas tree toy

Redraw or print the template.

Cut out 6 shapes.

Fold them in half.

Take one part and apply glue to its half, glue the second part to it with one side, adjusting the ornament.

Repeat the steps until you have glued all 6 pieces together.

Before gluing the remaining edges, do not forget to place a rope or thread in the middle of the toy, making a loop out of it.
3. Christmas tree toy in the form of a multi-colored top

Now we complicate the work a little, although it still remains as easy as the previous ones.
Cut out 6 pieces according to the template, but different color. Alternatively, some may be repeated in color.


Glue the sides, after placing the thread-loop inside.

4. Paper bear

Children will especially enjoy making this Christmas decoration and then contemplating it on the Christmas tree. Cut out 6 bears according to the template.


Fold them in half.

Glue one side of the teddy bear blank to the other side of the second blank.

Before gluing the last sides, glue the thread to the center of the adhesive tape, making a loop out of it.

In the end, on all parts, you can draw the eyes of a bear, a muzzle. You can also color it completely. Draw a smile, claws, circle the ears.

5. Volumetric Christmas tree toy made of paper in the form of a star

The craft is made in the same way as the previous ones, but you can also add an insert of a different color to the middle.
Cut out 6 stars from paper of the same color according to the template. And 6 stars slightly smaller from paper of a different color.


Glue the small stars in the middle of the big ones.

Fold in half.

Glue the half sides, place the thread inside and glue the remaining two halves of the sides. The asterisk is ready.

These are the paper Christmas decorations for the Christmas tree. They can be very different, because it all depends on the template used, of which there are thousands on the Internet. The Christmas tree can even be completely decorated with hand-made paper animals, birds, decorations. different shapes, which are mastered in exactly the same way as presented above step by step photo instruction in the creation of volumetric objects.
Currently, you can buy any toys in stores, but do-it-yourself paper crafts do not lose their relevance. Despite its primitive appearance, the very process of making them will please the baby and help develop his perseverance and fine motor skills.
DIY paper toys are made using the following tools and materials:
- Various paper (thin, thick, metallized, color).
- Paper napkins.
- Cardboard.
- Wallpaper scraps, foil, various candy wrappers.
- Fabric for decoration.
- Glue pencil.
- PVA glue.
- stapler.
- Scissors are small and medium with rounded ends.
- Ruler.
- Toothpicks.
- Awl.
- Pencil.
Volumetric paper toys
For the development of creative abilities in children, it is worth making voluminous paper toys together.
Cat Matroskin
To make a Matroskin cat out of paper, you should transfer the proposed template to the landscape sheet, print it, then color the picture with the desired colors, and then cut it out along the contour lines.
Print and cut out a toy from paper, glue it together and get a matroskin cat
In places where a dotted line is laid, it is necessary to bend parts of the product inward and form the figure of an animal. The folds on which the pink dots stand should be glued together.
Dog
To design the product, you should print the given pattern and color the figure at your own discretion. Then, along the dotted lines, you need to bend the parts of the template and glue them in those places where the unpainted parts of the layout are located. After the paper craft is ready, glue the tail on the back.
Butterfly
When creating voluminous multilayer butterflies, several pieces of blanks of the same configuration are cut out of paper material (the size and color scheme may be different). After that, the parts must be folded on top of each other and connected with glue, and the wings should be bent at different angles.
A beautiful effect can be obtained if you make moths of the same shape, but from paper in contrasting colors or different shades. Make some of the blanks openwork, and the rest - simple. Then they must be combined by laying down a link without a pattern.
Dymkovo toy
To make a Dymkovo toy, you can use templates in the form of a laying hen, a lamb, a horse and a cockerel. Fragments should be printed, decorated to your liking and cut out along the contours.  To give brightness, it is better to choose color scheme, which is dominated by blue, scarlet, green and yellow shades. The parts that need to be glued together are indicated by arrows.
cardboard house
The house can be built from cardboard.
Step by step design:
- First you need to print or draw a pattern and cut out the cardboard elements according to its outlines.
- Then the blanks should be circled on the fabric, while leaving an allowance of 1.5 cm. In the cut out fabric fragments, it is necessary to cut the corners.
- In the window area on the fabric, it is necessary to cut the material in the form of the letter X, then wrap the resulting shreds inward and glue them.
- When all parts of the cardboard house are ready, they are glued together.
Airplane
The following steps are provided for the formation of the aircraft:

boat
Step by step process making the simplest paper boat:
- Fold a rectangular piece of paper in half.
- Bend the upper corners towards the center at a right angle.
- Bring the corners of the base of the figure together to form a square.
- Bend the bottom corner points on both sides up, a triangle should come out.
- Connect the corners of the resulting figure together to form a square. You need to hold it by the upper corners and spread them around until a boat is formed.
- Align the figure so that it becomes stable.
Volumetric toy made of colored paper
Step-by-step production of a lion cub:

Paper models of cars
DIY paper toys that boys prefer to make are various cars.
Racing car
Toddlers can make their own racing car.
Its design technology:
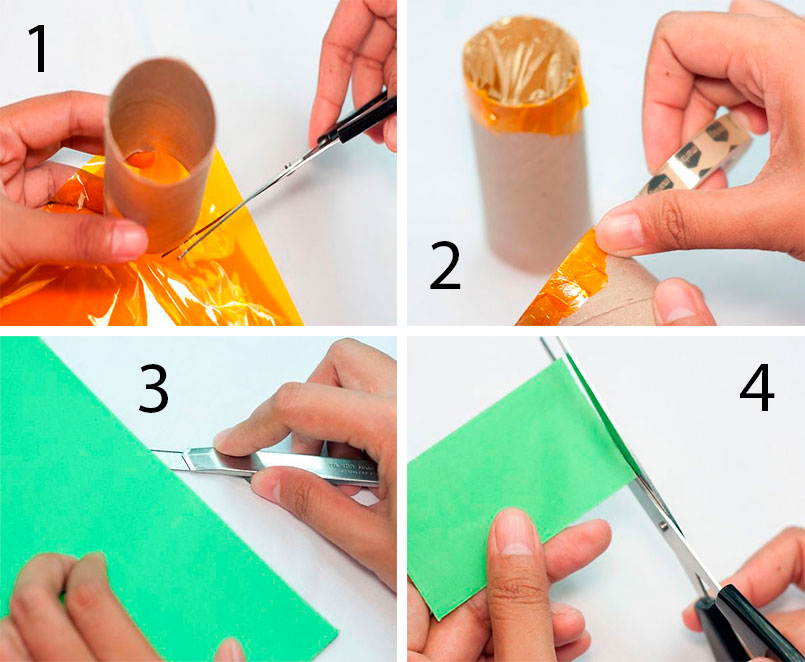
- Paste the cylinder from used toilet paper with paper material of any color and draw numbers with a felt-tip pen.
- Use a compass to draw 4 black circles and 4 circles white color slightly smaller diameter, cut and paste the smaller parts onto the larger ones.
- In front and behind the cylinder, pierce holes with a pin for an axle made of a toothpick.
- Put a roll on the toothpicks and fasten the wheels on both sides.
- In the upper part, make a semicircle with scissors and bend its outer fragment in the form of a windshield.
Fire engine
The proposed fire truck template should be enlarged and cut along the contours.  Then decorate the model, bend in the right places and glue the PVA.
Truck models of cars
The recommended scheme must be drawn according to the indicated dimensions, and the details cut out. You can decorate at your discretion or as shown in the picture. Bend the paper along the drawn lines and form parts of the machine. Connect the darkened areas with glue.
Police car
Enlarge the model of a police car, then print it on a printer and decorate it. Cut along the extreme lines, then fold the model and fix it with glue.
sports cars
Print the pattern of the car, and cut along the contour borders.  Decorate the layout as desired, bend the parts to form the machine and fasten the PVA.
military vehicles
Transfer the military truck template to a paper sheet and preferably print using a color printer. Cut out the sample and glue it in the area of the white parts.
Other paper models of cars
The car can be made in the origami style according to the diagram below.
Paper toys according to templates
Do-it-yourself paper toys can be made different methods. This will require perseverance and attentiveness with the correct addition of paper sheets.
giraffe pattern
Giraffe is easy to glue with this template. It must be printed on a printer or drawn by hand, then decorated with paints or pencils and cut out along the contours. In places of dotted lines, the workpiece should be bent and form the body of the animal. Then you need to coat with glue on the white areas and fix the model. Separately glue the head and tail of the giraffe.
Pet templates
Pets are easy to make using origami from a colored paper sheet.  In this case, you must follow the step-by-step technology shown in the picture.
Fruit
Fruits can be created using the templates below, which are formed by transferring to paper, coloring, cutting, shaping crafts and gluing.
Here it is better to choose the following colors for fruits:
little gremlin
To make a small gremlin, you need to increase the recommended pattern, make a blank out of paper and color it. Then you need to fold the shape and glue it in the gray areas.  There are stripes on the body of the creature, you should glue the handles and beard to them, and attach the legs below.
kitty pussy
Kitty's pussy can be made using the specified template. The craft is done by enlarging, printing on paper, then the cutting process takes place. The layout needs to be decorated, all parts of the body must be formed separately and glued one with the other so that the indicated icons match. At the end, glue all the parts together.
Olaf
Olaf is made in the manner indicated in the previous paragraph.
Elsa
Other cartoon characters and animals
In a similar way, given in the previous paragraphs, you can create a bird, a princess and a bear cub. 
paper weapon
Do-it-yourself paper toys provide for the manufacture of weapons that will become good choice for boys.
kunai
Step-by-step technique for making a kunai blade:
- Prepare 2 thick dark paper squares. One of them should be smaller.
- At a smaller workpiece, bend one corner to the opposite edge, a triangle will come out. Fold the resulting figure in half and get another triangular shape.
- Open end fold.
- Bend the short base of the figure to the center, so that the side line coincides with the line from the fold in the middle. Make a fresh fold on the paper.
- With 2-3 folds, you need to wrap the remaining piece of paper around the formed narrowed triangle. Push the protruding ends inside.
- Press the product from the sides and press the additional bends so that the blade of the weapon turns out to be four-sided.
The handle should be done in the following way:
- From a large square, roll a thin tube and fasten it with tape.
- The tube must be inserted into the hole of the manufactured knife.
- Pick up a roll peeking out of the tip, flatten the excess paper.
- Using the folds on the flat edge of the handle, make a ring and secure it with tape.
- Connect the blade and handle with a stapler.
Dagger
Making a dagger by gluing material:

Nunchaku
To make nunchucks, follow these steps:
- Fold the landscape sheet along the narrow edge like a cylinder. The diameter should be 5 cm.
- Secure the edges with tape.
- Form a similar cylinder from twisted old waste paper and put it into a paper blank.
- In a similar way, make part 2 of the nunchaku.
- Wrap the resulting sticks with twine, while fixing the thread with hot glue, attach the ends with tape.
- To secure the cord must be stretched along the entire length of the weapon.
- Insert the twine into the cylinder and fasten to the knot from the outside. Make such a process with 2 parts.
A spear
Paper spear design technology:

Morgenstern
Morgenstern making process:
- Crumple a ball from the newspaper and glue it with colorless tape.
- Attach the ball to the stick (length 20 cm) with adhesive tape.
- Wrap newspaper sphere corrugated paper and fix at the base with tape. Trim off excess paper stock.
- From paper, make blanks in the form of small cones with a base for glue.
- Fold the parts, bend the legs inward.
- Apply glue to the support and stick them to the base.
Paper katana for kids
The proposed scheme needs to be enlarged, cut along the contours. The white cloves should be bent and the layout glued on them.
Pistol
To design a pistol, you need to follow these steps:

Christmas toys made of paper
Christmas tree toys are made of paper with their own hands. Such crafts are inexpensive, but look original and elegant.
Christmas ball
Method for making a New Year's paper ball:

Volumetric snowflake
Step by step paper snowflake making

paper candy
Step by step execution of paper candy:
- From the colorful packaging material, cut a piece measuring 30x30 cm.
- In the middle of the edge of the segment, place a cardboard sleeve from toilet paper and secure it with tape.
- Wrap the cylinder in wrapping paper, and attach the seam with adhesive tape.
- Tie the edges of the resulting part with ribbons, the length of which is 40 cm.
- With the reverse side of the scissors, curl the ribbon on both sides.
Flashlights
To decorate a New Year's lantern, you need to follow these steps:

Garland
How to create a Christmas garland:
- Draw stripes on multi-colored sheets (width from 1 to 5 cm, and length from 7 to 15 cm).
- Lubricate the ends of the fragment with glue and connect to form a ring.
- Then thread the strip into the ring and glue the next ring.
- In a similar way, form a garland of the required length.
paper rainbow toy
To make a paper rainbow, follow these steps:

spinner
Spinner manufacturing technique:
- For 2 multi-colored squares (19x19 cm), fold the edges to the center to form a narrow triangle, then bend the strips in half.
- On each of the strips from the bottom, bend the corners towards each other, and wrap the top ones in different sides.
- Perform addition in the opposite direction. The formed blanks must be turned inside out and folded one on top of the other.
- Place the corners in the pockets of each part for fixing.
- The workpiece should look like a star with 4 ends.
- Then, using an awl, punch a hole in the center, and insert a toothpick there so that it does not touch the walls of the product.
- Shorten the toothpick to 1.5 cm, fix it with beads on both sides with glue.
- The spinner needs to be untwisted with your fingers, while holding it by the beads.
Yula
Step-by-step manufacturing of a spinning top:

pinwheel
Step-by-step method for designing a turntable:
- It is necessary to prepare 4 yellow and 4 red squares from paper.
- Fold the red figure in half, then unfold it and fold the side edges to the center line.
- The straightened square should be divided by folds into 4 longitudinal strips.
- Similar folds should be made across. As a result, the figure will be divided into 16 squares. In one of them (located in the right second lower row), diagonal bends should be made. On the left side, make symmetrical bends.
- Bend the side corners at the bottom.
- The right edge of the part must be folded back, while its lower segment must be at an angle.
- Do the same with the left half.
- Bend the top of the module back (to the width of 1 square).
- Run 7 more similar modules.
- To connect, take 2 fragments, and place the protruding segment of one of them in the pocket located on the back edge.
- In a similar way, connect all the parts and close them in a ring.
boomerang that comes back
A cardboard boomerang is made like this:

Kite
Technology step by step manufacturing kite:
- Place an A4 paper sheet vertically and fold it in half so that the fold is at the bottom.
- At a distance of 5 cm from the edge on the left side, put a dot on the fold. Put another mark 5 cm from the first, on the same line. They are needed to attach the thread.
- To fix the wings, you need to bend the upper left paper corner to the first mark. Do the same procedure with the bottom of the paper so that both halves of the product are symmetrical. Fix the corners connected together with a stapler in the place of the first point.
- Paste over with tape the area where the thread is attached in the area of the second point. With a hole punch, make a puncture over the pencil mark in the craft.
- Thread the thread into the hole of the snake and tie it with a strong knot.
Giving gifts made with love with your own hands fascinates with its originality, even if these are paper toys. Crafts made with the child will help to show children's Creative skills, build relationships and bring a lot positive emotions.
Article formatting: Vladimir the Great
Paper craft video
Making a paper face-changing cube:
Colored paper is an excellent material for crafts. You can make applications, various figures and many other creative things from it. In this article we will consider: how to make crafts from colored paper for primary school children with their own hands.
You will need: thick colored paper, glue gun, ruler, scissors, adhesive tape, stationery gum, pencil, pen spring.
Master Class
- Take a sheet of paper and a pencil, twist the tube diagonally from the corner, then fix it with tape and pull out the pencil.

- Twist the second sheet of paper around the first tube, then pull them apart. The second paper tube should be slightly larger in diameter than the first so that it can be fired from in the future.
- Fix the second tube with tape, then cut off the edges.
- Twist 2 more paper tubes in the same way.
- Cut the tubes into segments of this length: trunk - 2 tubes 15 cm long; handle - 7 tubes 5 cm long; trigger - 1 tube 8 cm long.
- Glue 5 cm tubes diagonally to make a handle.

- Glue the 8cm tube on top of the handle so that the remaining 3cm protrude to the right. This is a trigger.
- Glue two 15cm tubes together and glue to the top of the gun as a barrel.
- Twist two thin tubes from yellow paper.
- Bend the thin tube into a "U" shape and insert one end into the trigger and the other end into the top tube of the handle. Cut off the excess. This will be the trigger.
- Make a trigger guard from the second thin tube. To do this, place one end of the tube in the handle (in the second tube from the top) and glue the rest of the tube to the bottom of the barrel.

- Twist the pink paper tube, flatten it and tape the handle as shown in the image. It is worth noting that the rear hole in the trigger must be open.
- Remove the trigger from the top tube of the handle and insert the spring. It is worth noting that the spring should rest against the tube covering back handles. Reinsert the trigger.
- Twist a thin thick tube of yellow paper, secure with tape and cut off the edges so that they are even.

- Bend the edge, put on an elastic band and fix with glue.
- Insert the tube with the rubber band into the down tube of the gun barrel and pull the rubber band forward, hooking it between the two tubes.
- Roll up bullets out of paper, load the gun and shoot.
You will need: colored cardboard, scissors, glue stick, cotton wool, stapler.
Master Class

The rainbow in the clouds is ready!
Binoculars
You will need: yellow cellophane, scissors, adhesive tape, black paint, brush, green and black paper, glue, rubber band, wine cork, string or elastic band.
Master Class
- Cut out 2 circles of yellow cellophane and stick with tape on the circumference of the bushings as binocular lenses.
- Paint the circumference of the wine cork with black paint and cover it with green paper.
- Tape the sleeves with green paper and glue the black stripes as shown in the image.

- Glue the bushings together and fix by putting on a clerical gum. After a while, remove the gum.

- Glue the glued cork between the bushings.

- Prepare an elastic band or rope of the desired length, make a hole on the side of the bushings and fasten the elastic band.
Binoculars are ready!
Origami rose
You will need: double-sided colored paper, scissors, a simple pencil.
Master Class
- Fold a sheet of colored paper diagonally as shown in the photo and cut off the excess strip to make a square.
- Bend the square to form a second diagonal.

- Bend the square in half to form lines like a snowflake.
- Move the sides of the workpiece in this way: the top - from the right side to the left, and the bottom - from the left to the right, to make a triangle.
- Bend all 4 peaks to the middle and run your fingers along the folds.
- Expand the workpiece to a double triangle and fold the top corner back.

- Spread the bud and bend the folded corner inward.
- Gather the double corner back and run your fingers through the folds.
- Raise 4 side corners to the top.

- Flip over, then fold each side to the center to the middle. You should get a blank with a hole at the bottom.
- Blow strongly into the hole from below to straighten the bud.
- Twist the petals using a simple pencil.

- Take the strip of paper cut off at the beginning.
- Fold the stem and insert it into the bud.
The origami rose is ready!
Moving 3Dfish
You will need: colored paper, scissors, glue, pencil, black felt-tip pen.
Master Class
- Take a sheet of blue paper and make a square.
- Fold the sides to the fold line, then open the paper.

- Fold the paper in half in such a way that you get a triangle, as shown in the image.
- Make cuts along the fold line, then open the paper and glue the overlapped parts that are not cut.
- Flatten the fish's face by cutting off a corner.

- Cut out the fins and tail from the pink, then draw stripes with a felt-tip pen.
- Cut out the eyes from white paper and draw the pupils with a black felt-tip pen.

- Glue the fins, tail and eyes, also do not forget to draw eyelashes.

- Cut out an elongated semi-oval and glue it as the lower jaw.
You will need: a sheet of colored paper, a felt-tip pen and scissors.
Master Class
- Fold a sheet of colored paper in half.
- Place your palm on the piece of paper so that the thumb and forefinger touch the edge of the piece of paper, thereby forming a half heart.
- Circle your palm.
- Cut out the palm and unfold the craft.
The heart in the hands of colored paper is ready!
You will need: colored paper in white and yellow, a simple pencil, ruler, glue, coin or compass.
Master Class
- Cut 9 strips of paper to the same size.
- Make 2 circles on yellow paper.
- Cut them out.
- Glue the ends of the strips to form petals.
- Glue the petals to the yellow circle, then glue the second circle on top.
You will need: red colored paper, a simple pencil, scissors, a round object.
Master Class
- Trace a round object on colored paper.
- Draw a spiral in the circle.
- Cut out the circle.
- Cut the spiral in such a way that you get a "spring"
- Twist the rosette, in the same way make the desired number of roses.
Original colored paper roses are ready! I recommend watching the video tutorial!
You will need: double-sided colored paper, glue gun, stick or skewer as a stem, button.
Master Class

A creative flower made of colored paper is ready!
You will need: 4 sheets of colored paper, double-sided tape.
Master Class
- Fold each sheet into an accordion.
- Fold each harmonica in half to form a fan.
- Glue 4 sheets together in such a way that you get a circle.
A fan flower made of colored paper is ready!
You will need: colored paper, stapler, cut out butterfly (from a magazine, notebooks, pictures), felt-tip pen.
Master Class

A case for surprises made of colored paper is ready!
You will need: colored paper in black and yellow, a simple pencil, scissors, ruler, glue, compasses, sequins.
Master Class

Colored paper owl is ready!
You can also make a cute bunny out of colored paper, but see how in this video!
colored paper sisters
You will need: paper of two colors, 2 wooden sticks, buttons for the eyes, rubber bands or ropes for hands, pencil, glue.
We advise you to read
 Psychological characteristics of children in adolescence
 Transferring a child to another school - the procedure and necessary documents Whether to transfer a child to another school
, diagnosis, treatment Treatment of urogenital chlamydia") Chlamydia urogenital - description, causes, symptoms (signs), diagnosis, treatment Treatment of urogenital chlamydia
Chlamydia urogenital - description, causes, symptoms (signs), diagnosis, treatment Treatment of urogenital chlamydia The benefits and significance of hydroamino acid threonine for the human body L threonine what

