What renovation has the most immediate and lasting visual impact in your home? For some, it's the coloring of the room or the furniture, but all these things depend very much on something else that is ubiquitous in any room of any home: from lighting. Your choice of lighting determines the type of mood a room has or how objects within it are displayed. Where to begin?
We will help you with a huge selection of lighting products at amazingly low prices. Choose a room and we will advise you what you need. Whether it's updating the lighting in the kitchen to add warmth and ambiance to mealtimes or adding modern lighting in the living room, to give an instant sense of lightness to your loved ones and guests, we have the best options available just for your home. Make your beautiful kitchen household appliances shine with updated lighting in the kitchen. You will find that this seemingly small thing has a huge impact on any space.
Don't stop there. Perhaps you need to breathe life into an outdated bathroom. Start with a bathroom light! A simple installation of a modern fixture can change the energy of any part of your bathroom. Don't forget modern LED lighting that will give a modern look to any room.
Check out our product line
Electricity costs for lighting needs can reach up to 25% of the total budget for electricity supply at home. The electricity consumed by an incandescent lamp during its life costs 5-10 times more than the light bulb itself. With the advent of LED bulbs and compact fluorescent lamps energy-efficient lighting has made a qualitative leap forward. LED home lighting may soon become the standard for most consumers.
Compact fluorescent lamps are miniature versions of full-size fluorescent lamps. They screw into a standard socket and emit light similar to the light of ordinary incandescent bulbs. This is not at all the fluorescent lighting that we used to see quite recently in factories and schools.
Over time, small but very efficient lamps based on LEDs became available, which are arranged in groups in combination with diverging lenses. They have greatly expanded the possibilities of using LED in the home. LED technology is developing rapidly, new forms of energy-saving lamps are emerging. Initially more expensive than compact fluorescent lamps, LEDs are very valuable due to their long lifespan. In addition, the price of LED lamps is decreasing every year as the technology for their production continues to improve. LED lighting in the apartment, having its pros and cons, nevertheless confidently replaces the familiar, but outdated incandescent lamps and compact fluorescent lamps.
LED (light emitting diode) lamps are solid lamps with extremely low power consumption. Previously, LEDs were used as light bulbs in dashboards, electronics, garlands, etc. Manufacturers have expanded the use of LEDs by grouping them into small lamps. The first such lamps were powered by rechargeable batteries and were used in lanterns and lamps. Today, LED lamps are manufactured using up to 180 LEDs per group and housed in a housing with reflectors that scatter the light at wider angles. Now they are available with standard sockets, which make them suitable for indoor lighting applications.
An essential feature of LEDs is directional light, unlike incandescent lamps, which spread the light flux spherically. This advantage led lighting for recessed lighting or furniture lighting, but disadvantage for table lamps. New solutions in the design of LED lamps make it possible to remove the lack of directional light. For this, diffuser lenses and reflectors are used, which reflect light into different sides just like an incandescent lamp.
The high cost of manufacturing LEDs has hindered their widespread use. However, scientists have developed technology to use inexpensive silicon wafers as a replacement for expensive sapphire-based technologies. This allows us to hope that the prices for led light bulbs become competitive with compact fluorescent lamps and incandescent lamps.
Benefits of LED light bulbs
Durability- LED lamps work up to 10 times longer than compact fluorescent lamps and, moreover, conventional incandescent lamps;
Strength- due to the fact that the LEDs do not have a filament, they are not damaged by mechanical stress, which would be fatal for other lamps. The robust housing and the absence of glass elements allow LED lamps to withstand shocks and shocks well;
No heating - LEDs generate 3-4 kJ/h of thermal energy compared to 80-90 kJ/h for incandescent lamps. Heating the lamp increases the temperature in the room. LEDs prevent heat buildup, thus helping to reduce home air conditioning costs.
Harmlessness– mercury is not used in the production of LEDs;
energy efficiency - LED bulbs consume 2-17 watts of electricity, which is from 1/3 to 1/30 of the consumption of incandescent lamps or CFLs;
Profitability- although LEDs initially have a high cost, the cost of them pays off over time. LED lamps have begun to be widely used where the cost of Maintenance and replacing conventional lamps were too much. But the cost of modern LED lamps has dropped significantly over the past few years and continues to decline. Today, there are many LED bulbs for home use and cost is becoming less of an issue.
Availability– thanks to their low power consumption, LED luminaires in combination with portable generators and/or solar panels are ideal for lighting remote and hard-to-reach areas. LED lighting is also ideal for use in combination with small portable generators used in private homes for backup power in emergency situations.
Choice of LED lamps
Today, a huge number of different models of energy-saving LED lamps have appeared on the market. When choosing a lamp, keep the following in mind:
- Estimate the desired brightness. To do this, study the characteristics of the lamp indicated on the package. For a rough estimate of brightness, you can compare the power of the lamp with an incandescent lamp. For example, the brightness of a 9W LED lamp is equivalent to a 45W incandescent lamp. However, the brightness of the lamp can be more accurately estimated by the value luminous flux measured in lumens (lm) and listed on the lamp label. Lumen is a measure of perceived brightness. The more lumens, the brighter the lamp. The US Federal Trade Commission has specified that all lamp packaging must display lumen output as the primary measure of lamp comparison.
- Choose between warm and cold light. The new LED lamps are available in cool white versions ideal for lighting applications and warm light for accent lighting or illumination of small areas.
- Choose the type of plinth. LED lamps are available with almost all types of base available today. The choice is determined only by the location of the lamp.
- Decide on the possibility of adjusting the brightness of the light. Some LED lamps can work in conjunction with a dimmer to increase or decrease the brightness of the light. Dimmable lamps are labeled accordingly. As a rule, such lamps are more expensive than conventional ones.
Terms Related to LED Lighting
The color rendering index - CRI - is a parameter of the quality of light and the correctness of color display in it, that is, it determines how much light allows us to perceive colors as we know them. The ideal CRI is 100, and some incandescent bulbs reach this level. LEDs and lamps daylight have a color rendering index ranging from 70 to 95, while the best compact fluorescent lamps have it around 80. For example, LED lamp CREE CR6 has one of the highest color rendering indexes for this type of lamp - 90 for warm white light.
Correlated color temperature is a measure used to describe the color of an external source relative to white light. It indicates whether the light source is more yellow or more blue in terms of the range of available shades. Color temperature is measured in Kelvin (a unit of absolute temperature). Warm light has a temperature of 2700K, and cold - 5000K. The light color commonly used in home lighting is "warm" and has color temperature 2700 - 2800K.
Lumen- a unit of measure that is used to describe the amount of light falling on the surface of a certain area, and is perceived by the human eye. The more lumens, the brighter the light. Lumens can be used to compare the brightness of any lamp, regardless of its type and manufacturing technology.
Light flow- Light output is measured in lumens. With a light bulb it provides an estimate of the apparent amount of light that the bulb will produce. Depending on the application, most of the incandescent bulb is wasted because it is created in every direction. LED bulbs, on the other hand, put out directional light, sending out all the light exactly where it's needed.
AT practical application, when buying a light bulb, we should look for those that produce more light but consume less energy. The concept of lumens as a measure of brightness makes it easier to select the most efficient lamp for your needs.
LED light color
Most LED lamps in use today have clear or white bulbs, and are widely available in cool white or warm white versions. But LED lamps are also available in other colors, both with individual LEDs and connected in groups. Moreover, in groups there can also be both LEDs of the same color, and various combinations multi-colored LEDs. Such lamps are often used for special purposes.
- Red is the traditional color for maintaining night vision. Some LED lights and lanterns have the ability to turn red for use at night.
- Green is often the color of choice for pilots and the military today. Green light is also great for maintaining night vision. It does not make red markings on maps and charts invisible.
- Blue - Many people prefer blue light because it is easy on the eye. Blue light is good for reading, especially for the eyes of the elderly. Under blue light, they can read for a long time without eye fatigue, while under conventional incandescent lamps, strong eye strain occurs after only 30 minutes of reading.
- White color is the most popular among LEDs. They emit a soft white light, without heavy reflections, glare or shadows.
- Amber Color - Amber LED bulbs do not attract flying insects like regular white bulbs do. Amber LED lighting is used outdoors in areas such as patios or decks where flying insects are often a nuisance.
- < Назад
- Next >
Led backlighting has been known for a long time. One of the clearest examples is the Christmas tree lights.
Thanks to science and technology, and the work of creative designers, this Christmas attribute has evolved into safe, economical and convenient LED lamps, led, ribbons and various lighting fixtures. LED lighting is alternative source lighting available on the market today.
LED lighting has a number of advantages. It is safe, environmentally friendly, very economical and gives the interior of the house a modern look.
Safety
A real home is one where you can be safe. Led lighting is highly efficient, safe for eyesight and health.
The LED does not heat up, so your children will be safe even if touched led lamp or led strip. Since LED lighting is made of plastic and metal, there are not many small fragments left when damaged.
Environmental friendliness
Ice lighting is environmentally friendly. The LED does not contain mercury or any other toxic substance, so it is the only safe solution for your home.

Due to lack toxic substances ice lamps do not require special disposal.
Economy
One of the main differences between traditional household incandescent lamps and LED lamps is the lifespan. LED lamps will last 3 times longer than conventional ones. This type of lighting can last up to 20 years. This means that if your home has LED lighting, then you no longer have to spend your money to buy a new one.
Just think about how many hours an LED lamp will light up a room without causing problems. This will help reduce your costs. During the time that the LED lamp is on, you can replace a conventional incandescent lamp several times.
Modern and comfortable design
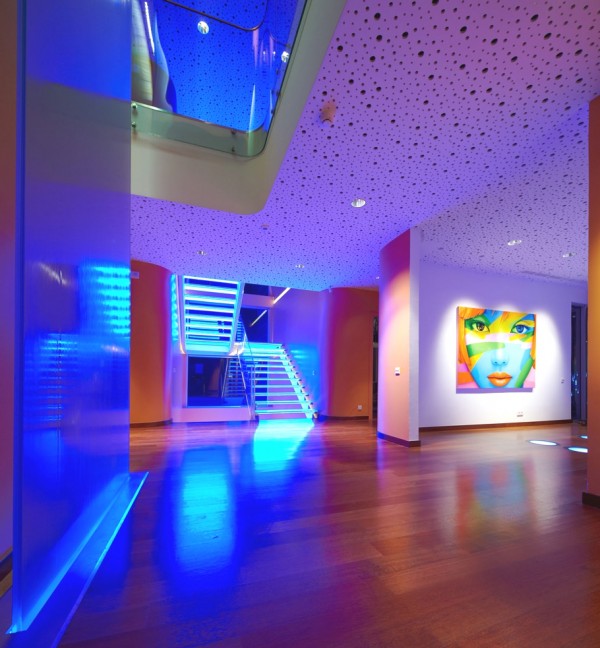
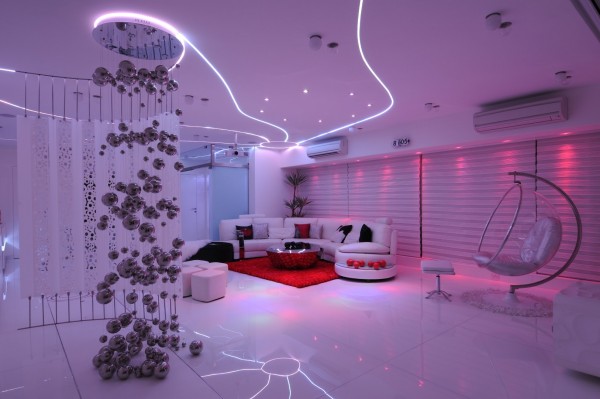
Ice lighting for home is the best choice for you if your house is made in a modern style. And if you have high ceilings in your home and want to lighten the space, then LED lighting is exactly what you need.
There are modern types of ice lamps, which are made in various color scheme and are used to create a certain desired lighting effect in the room. Thanks to them, you will bring beauty to your home, make it sparkle with new colors.
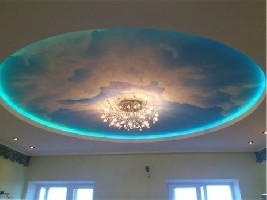
For example, with a shimmering ice ceiling lighting effect, it will look like a night sky with shining stars. LED lamps can be of various light shades and are regulated by the glow power. Thanks to this, you can create the desired atmosphere by filling the room with light or create twilight by dimming it.
LED lighting in the interior
LED lighting is suitable for both indoor and outdoor use. Outdoor lighting has become very fashionable. It would be a good idea to buy LED Street lights for long term benefits.
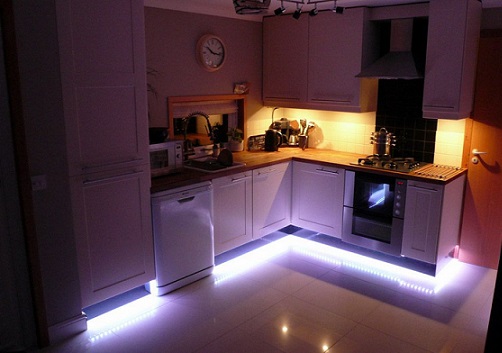
You can use ice lighting in different rooms your house. It is effective in small spaces such as the kitchen or bathroom. If you install LED strip under wall cabinets in the kitchen, it will not only become an element of light decor, but will also help you see things much better when working on work surfaces. However, even though the light will be directed downwards, surface heat from the lights is minimal and the risk of heat damage is very low.
A rather original way to decorate a bathroom is to illuminate the furniture and the bathtub. To create a romantic atmosphere, you can install LED strips. For beauty treatments, it would be better to install recessed LED lights above the mirror, which will fill the bath with light.
LED strips in the bedroom will help create a cozy atmosphere. It will be relevant to use LED lamps in the bedroom for extra light. You can place such lamps above the bedside table near the bed for comfortable reading.
In the corridor, the floor and ceiling lighting. It allows you to create an extraordinary mood. To illuminate the floor, it is better to use LED strip.
The choice of the shape and shade of a led chandelier or lamp directly depends on the style in which the interior of a particular room is made. By installing ice lighting, you reduce energy costs and create comfort in your home.
See in the following video the option of ice lighting in the apartment:
Most of all, the LED strip is suitable for stretch and plasterboard ceilings.
What is LED strip
An LED strip, or, as it is also called, duralight, has the form of a flexible conductive board with LEDs and resistors placed on it, which are responsible for the resistance.
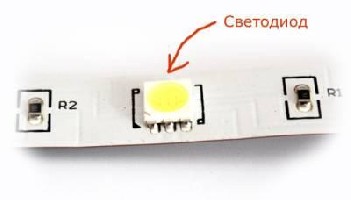
Such a tape has a width of 8 to 10 mm and a thickness of 2 to 3 mm. If we are talking about a multi-color tape (RGB), then a controller is also attached to it, which will allow you to adjust the intensity of the glow and switch the lights, creating an atmosphere in the room that suits the mood.
How to make LED lighting with your own hands
When installing an LED strip, in addition to the strip itself, you will also need a power supply and connectors to connect the strip.
When choosing a power supply, you need to focus on its power. To do this, you need to make the appropriate calculations using the data given in this table:
To calculate the required power, it is necessary to multiply the power of one meter of the LED strip by its total length:
W/m x L tape = W
After the calculation, it is necessary to add another 20% to the result, because the “end-to-end” power supply will not be enough for the power supply and some margin is needed for its full and safe operation.
And now a little about connectors. As mentioned above, they will be needed to connect the tape to the power supply, as well as to other tapes, since many users are not limited to the standard tape size of 5 meters and add the same or even several tapes to it.
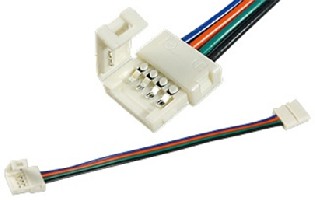
To connect with the connector, you do not need to resort to any tricks, you just need to move the clip, putting the connector on the edge of the tape and returning the clip to the opposite position. After that, you just need to correctly connect the wire from the connector to the power supply.
In some cases, a soldering connection method can be used, which, by the way, is much cheaper than buying connectors. The connection is very reliable and durable.

Important! When soldering contacts, it is very important to heat the soldering iron to a maximum of 250 degrees and solder no more than 10 seconds.
Connecting the LED strip
There are two types of LED strips:
Single color ribbon
Multicolor (RGB)
The principle of their connection is somewhat different, so it makes sense to consider their installation separately.
How to connect a single color LED strip
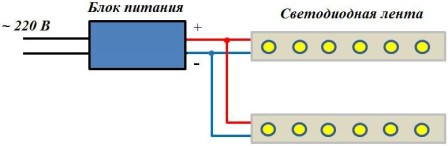
To connect a regular tape 5 meters long, you need to connect the wires of the power supply to the wires of the tape. There is a standard wire marking, indicating “+” in red and “-” in black. If there is no marking, you can measure the polarity with a multimeter, however, even if the polarity is not observed, nothing will happen to the tape, it simply will not glow.
If you need to connect more than one tape, then you need to place them not in series, but in parallel, because when serial connection the tape may overheat and burn.
This is how the connection diagram of one LED strip looks like:

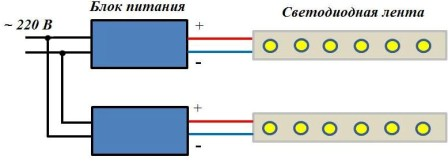
This view has a parallel connection of two tapes:
You can also use two power supplies and connect two tapes:
In some cases, when there is a need to connect a small piece of tape, it can also be connected in series. But it is necessary to check whether the voltage drops or not, if the readings remain unchanged, then such a connection will be safe.
The cutting of the tape is carried out in places specially designated for this, where scissors or something else is drawn.
Info! The tape is cut every 3 LEDs; if it is cut incorrectly, not one LED is disabled, but the whole section of the tape at once.

Attaching a piece of tape is done using connectors or soldering.
How to connect LED multicolor RGB strip
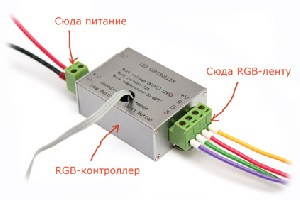
A multi-color LED strip differs from a single-color one in that it needs a controller, which becomes another link in connecting the RGB strip - controller - power supply.
Connecting the controller to the power supply is similar to connecting a single-color tape: the wires are connected in accordance with the polarity. But connecting the tape to the controller is somewhat more complicated, since not 2, but as many as 4 wires are involved in the connection, 3 of which control the color intensity, and the 4th is responsible for supplying power:
B - blue
R - red
G - green
V+ - common
The general picture of the connection looks like this:
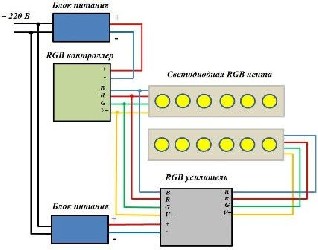
As with the connection of a single color ribbon, when using several ribbons, a parallel connection is necessary. However, since RGB tapes consume more current, you need to use an RGB signal amplifier in addition to the controller and power supply. This device allows you to regulate the intensity and uniformity of the glow of the LEDs.
A second tape is connected to the RGB amplifier, and the amplifier, in turn, is connected to the power supply. It is advisable to use a separate power supply unit for the amplifier, because if there is one, then its power supplying both the amplifier and the controller should be higher.
The ideal connection diagram for 2 RGB strips looks like this:
And this is what it looks like in practice:

Advice! Having dealt with the diagrams and the principle of connection, it is necessary to assemble the tape on the floor and plug it into the network to check its performance. If everything is in order, then you can proceed with its installation on the ceiling.
Do-it-yourself LED lighting installation
Most often, for a duralight device, a special drywall niche is erected on the ceiling, which will hide the LED strip itself, and then the light from it will not enter the room directly, but will be reflected from the ceiling. It is because of this soft glow that LED strips are so successful.

Plasterboard niche installation
The plasterboard niche looks like a cornice that runs around the entire perimeter of the room or along the edge of a multi-level ceiling. This cornice, consisting of plasterboard sheets, is attached to a crate of metal profiles.
Before installing the crate, you need to make the correct markup: first you need to step back from the ceiling along the wall down 70-100 mm and draw a flat horizontal line. To do this, you need to use the level. Then you need to attach the profile along the drawn line.
To mount the second profile, you need to step back from the wall about 20 cm and also draw a line on the ceiling parallel to the first. A profile is attached along it and, thus, an internal perimeter is formed.
Then, retreating from the starting profile by 40 or 50 cm, you need to start installing profile segments that form the crate. The length of such segments must correspond to the distance between the base profile and the profile lying at the base of the ceiling.
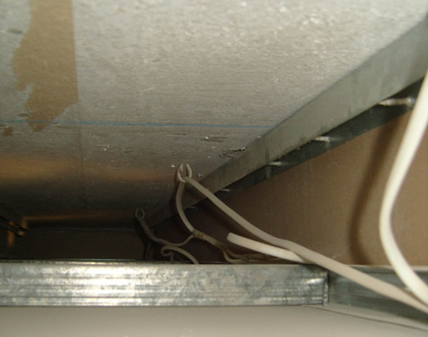
It looks like this:

The main profile is connected to the starting one with the help of small segments (up to 300 mm), and the bearing cornice will lie on the ledges that are visible in the photo.
Plasterboard sheathing
After the profile is ready, it is sheathed with drywall sheets: first, its vertical part, which allows you to hide the wiring. After that, the lower part is also closed, and the following construction is obtained:
Installing a cornice is a rather laborious process, so you can choose an easier way and install a plinth (fillet) on the ceiling for LED lighting.
It looks like this:

Here you can see that it does not completely cover the space between the wall and the ceiling, this is necessary so that the light from the backlight is visible.
And here is the layout of it:

The plinth is fastened very simply, sometimes even with putty or glue. It all depends on the surface to which it will be attached.
Attaching the Tape
When absolutely everything is ready, you can begin to attach the tape. To do this, be sure to clean the surface with alcohol and stick the tape. Usually for this it is enough to peel off a special strip on the back of the duralight and carefully press it against the wall.
Important! If the tape will cover the entire perimeter of the room, then it should not be strongly bent (no more than 2 cm).
To mount the controller, amplifier and power supply, special niches must be provided in advance.
Do-it-yourself LED backlight installation requires responsibility and some knowledge, which can be easily gained by watching a few videos and carefully reading all the instructions regarding the duralight installation process. It does not take much effort to decorate your home with one of the best design ideas.
Video description of the LED strip device and the principles of its control:
Installing a drywall niche to illuminate the ceiling with LED strip:
Correct connection of the LED strip:
We advise you to read
 Psychological characteristics of children in adolescence
 Transferring a child to another school - the procedure and necessary documents Whether to transfer a child to another school
, diagnosis, treatment Treatment of urogenital chlamydia") Chlamydia urogenital - description, causes, symptoms (signs), diagnosis, treatment Treatment of urogenital chlamydia
Chlamydia urogenital - description, causes, symptoms (signs), diagnosis, treatment Treatment of urogenital chlamydia The benefits and significance of hydroamino acid threonine for the human body L threonine what

