Good day everyone!
Once again, I became interested in knitting pillows, so to speak, my hands came to the realization of some ideas. When the works are ready, and there will be a lot of them, I promise to show them. But it's still not realistic to connect all the beautiful things that catch your eye on the Internet and magazines. Therefore, the knitted pillow cover presented today is a picture from the network with a diagram, to which I made a description and shot a video.
The square cushion cover is made of gray yarn and crocheted, and it seems to me that this one looks very impressive in a sofa cushion. You can knit several of these pillows for the interior.
Yarn suitable for knitting pillows is knitted, acrylic, cotton, wool mixture. It is better to take not too thick, but not very thin thread. I always advise you to choose a hook according to the thickness of the thread.
Knitted cushion cover: pattern
The pattern for the cover is so openwork and very simple, in fact it is made of two alternating rows with single crochet and single crochet.

The pattern for the cover is in front of you, and for those who find it difficult to read, I will make a description.
How to knit a pattern for a cushion cover
First, we will knit a sample, and then we will calculate the required number of loops for a pillow cover from it.
The cover we will have is a square shape and knitting in rotary rows.
For the sample, I dialed 21 air loops.
Row 1: at the beginning of the row, ch 1 for lifting, 2sc, and then single crochets in every second loop, between them 1 air loop; at the end of the row - 2SBN.
Row 2: 3VP, 1С1Н, *1VP, under the column of the previous row - 1С1Н, 1VP, 1С1Н*; 1VP, finish the row with two double crochets.
Row 3: 1ch, 1sc, *1ch; 1СБН under the arch (air loop) of the previous row; 1VP; in the gap between the columns with a crochet of the 2nd row - 1СБН, 2VP, 1СБН *; 1VP, 1SBN.
For beginner needlewomen, my short video is also useful.
Knitted cushion cover: video
Each of the two halves of the cover will need to be tied around the perimeter with single crochets, while in the corners we knit two more air loops.
We connect the two parts with the same columns along the face, folding the canvases inside out to each other. If desired, you can connect from the wrong side.
You can sew a zipper along the edge and insert a sofa cushion into a knitted cover.
More beautiful ideas for cushion covers and pillowcases:
Very often, pillows remain from old sofas, which are a pity to throw away, but they are not very suitable for the design of the room. These pillows can be decorated and transformed with a cover. self made. Today we will talk about how to crochet a beautiful crochet pillow case yourself in an easy and simple way. With the help of a simple technique, we will not only decorate an old pillow, but also refresh the interior of the room.
Crocheting allows you to create really amazing things.
Interesting video on the topic:
We begin to knit a pillow cover with a crochet hook according to the patterns
We will need: yarn of the required color, hook number 3.
Let's look at some loops:
Stitch step - knitted like a single crochet, but from left to right.
Knob - knit 5 single crochets from the 1st loop closed together.
Working on the back and front detail
You need to dial a chain of 69 air loops (the number of loops is adjusted according to the size of the pillow).
Knit, alternating rows of double crochet and single crochet.
Total height 40 cm.
Cast on 69 air loops and knit according to the pattern.
1st p. Double crochets are knitted to the end of the row.
2nd p. Single crochet stitches are knitted.
3rd p. It knits similarly to the 1st.
4th p. It is knitted similarly to the 2nd row. All even rows are knitted in this way.
7, 9, 11, 13 rows. 7 double crochets are knitted, “bump”, 53 double crochets, again “bump” and then 7 double crochets.
15th p. 7 double crochets are knitted, “bump”, 11 double crochets, then the combination: “bump”, 2 double crochets. Repeat the combination 9 times. After that, we knit a “bump”, 11 double crochets, a “bump”, 7 double crochets.
All odd rows from 17 to 33. Work 7 double crochet, “bump”, 11 double crochet, “bump”, 29 double crochet, “bump”, 11 double crochet, “bump”, 7 double crochet.
35th p. It is knitted similarly to the 15th row.
All odd rows 37 to 43 are knitted similarly to the 7th row.
45th p. It is knitted similarly to the 5th row.
47 and 49 rows. Knit with double crochets.
Fasten and break the thread.

Sew the front and back piece, leaving one side unsewn. We tie the edges of the product with a row of columns with a crochet and a “crustacean step”. The cover is ready for use. Putting it on a pillow, you can sew up the open edge, but you can also sew on buttons and loops for easy removal and washing.
By tying the pillow case according to this scheme, you will get such a nice product as in the photo.

There are many ways to bring touching comfort to your home - pay attention to - one of these options! Try it too!
See the video for a detailed tutorial.
We create a round case with diagrams and descriptions
To do this, you will need: yarn of the desired color (or several colors), hook number 3.
The round cushion cover is knitted in two parts.
To get started, you need to attach any thin fabric to the pillow and circle it. Then cut out the resulting circle from the fabric. According to it, we will navigate with the size of the pillow.
The photo shows an example of tying fabric for a pillow cover.

And here is another usefulness in your home with your own hands: - a fun knitted accent in your kitchen!
In the provided photo, a chain of air loops is knitted from white threads, and a three-dimensional pattern is knitted with a yellow thread. Having connected a certain length, you can sew it to the fabric so as not to make a mistake with the length.
For a three-dimensional pattern, you need to dial 20 air loops from the base threads. From the threads that will be used for the three-dimensional pattern (yellow in the photo), knit a combination: 1 single crochet, skip 1 stitch, 5 double crochets, skip 1 loop. Repeat this combination to knit a pattern. The number of double crochets can also be adjusted.
When the first round is over, without tearing off the thread, knit the second round. You need to apply the pattern in a spiral. By sewing the coils closer to each other, a more voluminous cover is obtained. An example is in the photo below.

Knit the second side in the same way as the first side.
After finishing knitting, the sides of the pillowcase should be carefully sewn to the pillow itself. Threads for sewing should be chosen according to the color of the yarn itself. They will not be visible behind the pattern.
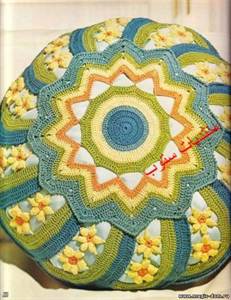
An example of the resulting round pillowcase can be seen in this photo.

And here are a few more options. So, for inspiration:


Thus, having studied the proposed schemes, you can knit a cover with your own hands very quickly. The accessory turns out to be original and will look beautiful in any interior. The cover will look especially elegant, the master class of which is specially laid out in a separate article at the link.
Be sure to watch this video:
Throw pillows are a great way to update your home, add bright accents and zest, and by changing the covers, you can change the interior to suit your mood at least every day. And even though there are a huge number of various options decorative pillows, it is not always possible to find exactly what you need. But this does not matter, because it is very easy to make pillow covers with your own hands.
sewing basics

In order to sew such a wonderful cover, we need: a piece of decorative fabric, preferably a light tone (possible with a pattern), a piece of dark-colored decorative fabric (it is advisable to choose a dense material), scissors, a sewing machine.
First of all, you need to take measurements from your sofa cushion and cut out the necessary details from two fabrics, not forgetting about 2 cm for the allowance.
Now let's get creative. Using chalk, we apply a pattern that you like on a plain case (in our case, it is a rose).

We impose a dark fabric on a light one and with the help of a sewing machine we sew according to the pattern, thereby sewing them together. Next, very carefully, trying not to damage the lower part, cut out according to the pattern on the dark part. In principle, at this stage our creativity ends, now it only remains to sew our cover together along the contour.

Here we have such a wonderful, interesting and original pillow on the sofa. For those who are interested in knitting, we can offer the following options for knitted covers using a hook and knitting needles.
Decorative motif covers
One of the simplest and most successful crochet patterns is the "grandmother's square". This pattern is convenient in that it can be knitted from the remnants of yarn, thereby creating a bright, individual cover.

The scheme of the "grandmother's square" is very simple, even a beginner can handle it. You can choose the size yourself, reducing or increasing the number of loops and rows.

You can also use other square motifs that look very elegant.


With the help of a hook, you can knit not only motifs and squares, solid works also look very harmonious. Below is a selection of such works with diagrams.
Pillows-napkins


Size 40 by 40 cm.


Volumetric figures


When knitting, you can knit two parts separately, or you can knit in one piece and bend in the middle.


Minimalism is in fashion now, so you don’t have to bother looking for complex patterns.


These cute pillows are also made of simple patterns, but they look very original and elegant.

This model uses three main patterns: satin stitch, rice knit (pearl pattern), and the bow is made in garter stitch.


Pillows with braids.

/ 20.02.2016 at 22:51
Good day, friends!
If you have the time and patience, and you cannot imagine yourself without needlework, then you probably thought about how to decorate your home. After all, home comfort cannot be imagined without cute gizmos created for the interior with your own hands. It is from such things that a special energy emanates, which creates a warm homely atmosphere.
It just so happens that I don't often make things for home decor. I prefer to dress up. But then there was a desire to create something from this series and start with pillows. For some reason, they are most associated with home comfort, relaxation and some special warmth, the feeling of which can only be given by home furnishings.
And before I came up with something of my own, using the available materials, I decided to peep ideas on the vast expanses of the Internet.
And having seen enough, I wanted to systematize these ideas a little and make an article in which we consider various knitted pillows with diagrams and descriptions. More precisely, we will talk about knitted pillow covers.
So, let's start the review with a description general principles work on creating pillow covers, and then consider their various possible options.
It is noteworthy that for knitting pillow covers no special patterns and descriptions are required (except for rare, very difficult to make copies). It is enough just to carefully look at the chosen model, and it immediately becomes clear how it needs to be knitted using the pattern patterns already in the arsenal.
 Knitting such things will be mastered by any novice knitter. Just on pillows it is easy to learn and hone your knitting skills. After all, in fact, you don’t need to knit any complex details - we just knit exactly a rectangle or square, and that’s all.
So, before starting work, we select a pillow on which we will knit a cover, and measure it.
We knit a small sample from that yarn, those knitting needles and the pattern that we chose for work. We calculate the density of knitting. Then we estimate the dimensions of the parts of the cover. They must be at least 1 cm larger than the size of the pillow so that it fits normally in it. Yes, we also take into account that some part will climb onto the seams.
We collect loops and knit a rectangle, or a square of the desired size. Moreover, you can knit only one, the upper part of the cover, and the lower part can be cut out of some kind of dense fabric that matches the color of the knitted fabric.
Or you can spend more time and tie both halves of the cover. Suddenly you have to turn the pillow on all sides? Everything needs to be beautiful.
After the parts are connected, we sew along the edges on three sides, folding the parts face to face. Then we turn it out. For a fastener along the edges of the open part of the cover, we sew a zipper.

Note. You can "sew" the details of the crochet in the face. At the same time, in addition to connecting the parts, you can additionally make a beautiful crochet strapping - even with cloves, even with lace, even with ruffles - a matter of taste and imagination.
Depending on the type of pattern that the cover is knitted with, you can knit a solid long piece at once. Then simply fold it in half facing inward and sew the sides together.

You can make a pillow cover in the form of an envelope with an overhead valve and make a button fastener. But as for me, this option is not very practical for operation: the welt loops are often stretched, and the buttons are unbuttoned. But that's how anyone likes it.
Now let's look at the options.
The simplest pillows
Such specimens are suitable for beginner knitters, as well as those who prefer a minimalist style in the interior. They are carried out by simple patterns, but agree, and there is something in this. Moreover, as you can see, the yarn and knitting needle can be taken thick enough, which will allow you to knit the cover very quickly.

The blue pillow is made in the most ordinary garter stitch, and gray - with a pattern resembling a wicker basket for berries. At the request of readers, I give a diagram and description of this pattern:


Pillows with openwork patterns
Here it is enough to choose the openwork pattern you like and tie the details of the cover with it. You can tie the top half of the cover with an openwork pattern, and the bottom, for example, stocking stitch.

If desired, beads can be sewn on an openwork canvas, a satin ribbon can be threaded somewhere into the holes. Only under such a cover you need to additionally hem some fabric of a contrasting color so that the openwork looks more expressive.
You can crochet additional decorations and sew on top, decorating with beads. Like, for example, on this pillow with a heart and knitted flowers.

Pillows with jacquard patterns
It's the same here - choose the jacquard pattern that you like, select the yarn - and go!


Interesting solution obtained using different colors in openwork wavy patterns. Knitting is easy, but it turns out beautifully. We select the colors and width of the stripes to your taste.

Cushion covers assembled from individual elements
Such covers can be made both monophonic and multi-colored. The bottom line is that different flaps are knitted, and then combined into a single whole. Moreover, the direction of knitting when assembling these “spare parts” can be different, which, in fact, gives the product a special charm.
In this photo, the pillow on the right is just made using this technique: individual rectangles are knitted in a pattern of stripes with offset loops, which are connected in different directions of knitting.

For variants of covers assembled from individual elements, it is advantageous to use the remnants of yarn. Here are pillows assembled from multi-colored elements:

The cover for the first pillow is sewn from separate strips, made with the pattern " pigtails» from yarn of different colors. And for the second pillow, the shreds are simply knitted in different patterns and from different yarns.
Good afternoon, dear needlewomen!
Today I have prepared for you a beautiful openwork crochet pillow cover.
Probably, many of you remember the autumn competition and works by Nelly Stefan, among which were snow-white round pillows with crochet covers. These works hooked me right away and fascinated me, and I began to look for patterns for knitting covers for round pillows.
In principle, you can use the pattern for knitting any large napkin, for example, we recently had one - Napkin "Peacock Feather"».
But I also liked the white-pink cushion cover, the scheme of which I present to you.
Crochet cushion cover
For such an elegant crocheted pillow cover, cotton yarn or acrylic in pink melange, green and white flowers, the hook, as always, is suitable for the yarn.
The crochet pattern for a round cushion cover looks like this:

How to crochet a pillow cover. Description
Crocheting a pillow cover is similar to crocheting round napkins.
We start knitting from the center and move in a circle according to the pattern.
First, we knit a flower with several rows of petals with pink yarn.
In the first row in a ring of 10VP we knit 6С1Н and 3 VP between them.
In the second row in each arch of the 1st row we knit 1СБН, 1С1Н, 2С2Н, 1С1Н, 1СБН. We get 6 petals.
In each even row, we knit the petals in the same way as the 2nd row, with each row increasing the number of columns according to the scheme.
We knit the last row of petals with green yarn.
When the flower is connected, we continue to crochet the pillow cover according to the green yarn pattern (17-19th rows).
Rows 20 to 27 are knitted with white yarn.
And the last rows of arches are again with pink yarn.
It is advisable to wash the finished openwork part of the cover, pull it over the pillow and dry it.
Thus, only the upper part of the cover is connected. I would leave it like this. We sew it on top of a pillow cover made of satin or other fabric.

But if you wish, you can also tie the lower part of the pillow cover and sew both parts together.
Such openwork crocheted pillow covers are always performed together with fabric covers. You can, of course, put on an openwork cover immediately directly on the pillow, if the pillowcase is made of a beautiful dense fabric that matches the color, and fluff and feathers that can crawl out are not used as a filler.
If you liked the openwork crochet pillow cover, be sure to knit it! This pillow reminded me of one of our napkins in white and pink, it would just be a set in the same style.
Creative success, joy and sunny mood to you!
We advise you to read
, diagnosis, treatment Treatment of urogenital chlamydia") Urogenital chlamydia - description, causes, symptoms (signs), diagnosis, treatment Treatment of urogenital chlamydia
Urogenital chlamydia - description, causes, symptoms (signs), diagnosis, treatment Treatment of urogenital chlamydia The benefits and significance of hydroamino acid threonine for the human body L threonine what
 To wait or not to wait for a guy from the army For what reason can they be commissioned from the army
 Baked apples with cottage cheese Baked apples with cottage cheese

