It is not so difficult to make it with your own hands. There are many drawings and videos on the Internet for this. In selecting material for this article, we considered a number of various ways: from simple to more complex, requiring special skills. We tried to systematize everything we read and saw and make interesting material for you. We hope we succeeded. We present to your attention some of the most interesting and simple ways to implement.
First, let's decide on a list of tools and materials for manufacturing. Whatever desk we decide to make, the list of tools is about the same:
- electric jigsaw;
- drill;
- hacksaw;
- chisels;
- screwdriver;
- a hammer;
- drill;
- milling machine;
- Grinder;
- clamps.
The last three points are used to make more complex models.
Materials can be very different, but, basically, it is a tree and its derivatives:
- Chipboard or chipboard, furniture board, boards, plywood;
- bolts and nuts with washers;
- self-tapping screws;
- wood glue;
- dowels and dowels;
- liquid Nails;
- paint and brushes;
- building level;
- tape measure, pencil, square.
Simple and stylish DIY desk
How to make a desk with your own hands?
When the necessary materials are purchased and the tools are prepared, it's time to decide on the model of the product. As we promised, we will talk about the most popular and easy to manufacture.
Of wood and similar materials
Wooden desks can be made with your own hands both from solid wood and from wood-containing materials. Natural products always look more noble and beautiful, but require special skills and abilities in the production process. In addition, they are more expensive due to the higher price of the material. Tables made of MDF, chipboard or furniture board are much easier to process, which does not require professional knowledge and is cheaper in cost. We will talk about both simple and complex ways to make a table with your own hands.
To begin with, we will describe step by step a simple way that even a person who decides to make something for the first time can cope with:
- we take a drawing of a table of four rectangular parts. It consists of a cover, two sidewalls and a crossbar;
- we go to the hardware store for chipboard. It is better to immediately buy a laminated board;
- you can order a cut to size right there in the warehouse, it is inexpensive, and you will bring home ready-made parts for your table;
- in case you refused to cut in the store, mark the dimensions on a chipboard sheet and cut out the details with an electric jigsaw;
- we paste on the ends of the chipboard an edge previously purchased in the same place as the plates. By the way, if you ordered a chipboard cut, then you can paste over the edge in the same place. Planted on the end using professional equipment, it looks much better and will last much longer;
- we take a drill and drill holes in the end parts - the future legs of the desk;
- then, with a slightly larger drill, we make a shallow groove over the hole for the confirmant's hat;
- we attach the transverse partition to the side legs with holes so that their upper parts are on the same level;
- we connect the structure with furniture screws;
- on top of the resulting base we put the countertop and also twist it with confirmations, having previously drilled holes;
- we close the recessed screw heads with special plastic plugs.
Thus, the simplest desk made of chipboard is completely ready. As you can see, a minimum of effort was spent, and no special skills were required. Now let's talk about making a desk for a student with your own hands, the drawings of which you will find at the end of the article.
DIY desk model

For a student
Now let's talk about a slightly more complicated way. But almost everyone can implement it at home. This table is ideal for use by a student. detailed instructions for manufacturing:
- we disassemble the old wooden pallet into separate boards;
- if you have an old hollow door lying around on your balcony or in the garage, then it will ideally fit under the countertop. If not, then you will have to cut out two sheets of thick plywood in size and connect them in thickness using self-tapping screws and glue;
- sawing boards under the supports. The simplest and at the same time spectacular looking legs are those in the form of construction "goats";
- the height of the supports at your discretion: from 70 to 80 centimeters;
- it is better to make the upper horizontal of the goat the same width as the working surface;
- the optimal size of the indent from the edge of the tabletop for attaching the legs is six centimeters;
- we measure the angle of inclination of the legs, it must exactly match the height of the supports;
- we install a horizontal bar between the upper parts of the legs, having previously drilled holes. We twist it with drywall bolts. Please note that the holes must be drilled with a slightly larger diameter than the screw itself, this is due to the fact that the legs are at an angle;
- at a height of about three centimeters from the floor, we fasten a wide bar (about twenty centimeters), it will significantly strengthen the supporting legs and serve as a platform for the shelves;
- we attach the last boards remaining from the pallet to the bar - the shelves are ready;
- we take the door and trim the sidewalls with a special edging, it is sold in furniture stores;
- from the bottom of the countertop we nail two parallel strips on each side. This is done so that the work surface does not drive over our "goats";
- heels on the legs can be made from wine corks and double-sided tape.
How to make a sliding desk with your own hands, we will tell further.
The ideal table for a student with their own hands

retractable
One of the most popular desk models is this. The modification that we will describe is a great example of an expensive homemade natural wood desk. Manufacturing scheme:
- we buy glued furniture board, always from hardwood;
- we take the drawing attached to the article and use it to mark up the details. Do not forget to make a small tolerance on the dimensions of the blanks;
- we cut out eight blanks for desk supports from the purchased shield. Their dimensions are 18x36x570 millimeters;
- we glue each leg of two parts and fix them with a clamp;
- cut out notches from the inside of all crossbars of the product frame;
- choose a long groove along inside kings (crossbars);
- on the upper side of the supports with a chisel and a hacksaw, we select a ledge to the height of the notch in the crossbar;
- in the sidewalls of the tsarg we drill two holes for dowels. Their diameter is eight millimeters;
- insert pencils into the holes and apply to the legs to mark the place where the dowels are inserted;
- we connect the base and supports with the help of dowels and wood glue;
- while the base of the desk dries, we cut the table top and top cover;
- select the grooves for fastening the upper right side. This operation is performed using a milling cutter. The width of the grooves is ten millimeters;
- with an electric jigsaw, we cut out the side walls of the superstructure according to the template. All sections are carefully sanded;
- we also select grooves in them;
- details for drawers are cut out of ten-millimeter plywood;
- glue them and strengthen the fastening with small nails;
- on the front part we attach a facing board, previously sawn out of wood. We fix it with small screws;
- from all the prepared parts we assemble a desk with a superstructure and drawers. We coat all blanks in the attachment points with carpentry glue. Leave the product to dry completely;
- we attach the table top to the base with legs with the help of dowels and glue in the folds we have cut in advance;
- after that, it remains to pick up the accessories for the drawers and varnish the table. Please note that we cover with varnish in two or three layers, but each new one is applied after the previous one has dried.
Photo of a handmade desk with drawers

Angular
The corner desk is one of the most functional. In addition, it occupies the usually unused area of \u200b\u200bthe room, freeing up space for other furniture. Here is a short description of making a simple one:
- we buy sheets of MDF or chipboard and ask in advance to cut it right in the store according to the drawing attached to the essay. Any shipping department of a building supermarket provides this service for a relatively small price;
- we connect the side walls with the tsarga with the help of dowels smeared with carpentry glue (PVA familiar to all of us since childhood);
- fasten with clamps;
- back wall from fiberboard we nail with small carnations;
- do not forget that all visible sections of MDF or chipboard are cleaned with sandpaper and glued with an edge. As we wrote above, such a service can also be ordered at a construction hypermarket;
- we mark the inside of the tabletop for the place of attachment of the dowels;
- we drill holes for them, but so that they are not through, but remain deep enough;
- we smear the dowels with glue and put the top cover on them;
- after drying, turn the product over. Our corner desk is ready.
Now you know how to make a corner desk with your own hands, it's time to study the drawings with dimensions, diagrams and useful photo and video materials.
If the family grows up child, who will soon go to school, you need to take care of acquiring desk.
But buying furniture in a store is very expensive, so we offer you make table by yourself.
Need to prepare material, tools and execute blueprints future interior design.
Make a desk for a student simply, with this task can deal any House master.
Desk options
Before proceed to the manufacture of the table, you need to decide on its variation.
Depending on the chosen design, it is necessary to make drawings and calculation materials.
Desks are like this options:
Straight desk
It is necessary to assemble such a table in strict sequences. end parts are first attached to the inner wall. Only then attached countertop.
In preparations for legs need to drill a hole. The top ends must be on the same level. If any error is made, it will be difficult to assemble the table.
Note! If you use ready-made drawings, it is not necessary to adhere to the indicated dimensions, it is important to observe the proportions, and the table can be made for any child (first grader or teenager).
Corner desk
Thanks to this piece of furniture for classes student can be involved any corner of the room.
This table perfect fit into the room small size.
The tabletop will turn out spacious and it can easily fit a computer monitor, textbooks, notebooks and various school accessories.
The manufacture of a corner desk is divided into the following stages:
- table design difficult so if you are not sure that cut MDF or chipboard can be done independently, it's worth order it is in the store at the time of purchasing the material;
- guides elements for drawers are attached to lateral racks;
- rear the wall is attached with self-tapping screws;
- gather at the same time retractable elements;
- on the tabletop it is necessary to make markings and drill nests;
- attach to the table pedestals and back wall
- the last step is to attach decorative elements.
Folding desk
 hinged or folding desk is perfect for a family that lives in one-room apartment. The table can be used as lunch, when the student has already studied.
The folding tabletop is very comfortable, because at any time it can be put away, so as not to interfere and not take up space.
On the wall to which the structure is attached, you can hang shelves, so that the child can put textbooks and various school supplies on them.
Most common the folding table option consists of only two elements - kerchiefs with loops that are attached to the wall, and countertops. You can make two instead of a scarf legs, that will hold the top of the table.
Window sill desk
For such a table, you can use wood array, MDF board, chipboard, artificial or natural stone. Old window sill needed dismantle, and in its place fits countertop future table, which should be the size more, than a windowsill. The supports will be two pedestals or metal racks.

Note! The table top can be extended to the nearest wall. Thanks to this, the table will be large and comfortable.
Table transformer
 Written fine saves space and helps the student to store necessary for classes, things are always at hand.
When folded it nightstand, which, with the help of a slight movement of the hand, turns into a full-fledged table.
To on one's own to make such an interior item, you can take ready cabinet and attach to it additionally countertop. Installed on the bottom wheels for ease of use.
Fastening parts should be done using large self-tapping screws. The guides are attached to profile retractable design.
interesting and practical transformers such as table-wardrobe.
Advice: In the manufacture of a transforming table, you can use natural wood. For example, to make legs or a countertop from an array.
There are also other desk options.


How to make a table for a student, step by step instructions:
Materials and tools
 For the manufacture of a desk, you can use the following materials:
- array tree;
- plates MDF, Chipboard;
- laminated furniture board.
Every home master can choose the material that corresponds his requirements and financial opportunities. For example, you can use a tabletop as a top, back or side element. old table.
In addition, it will be necessary auxiliary materials:
- bar 40 x 40 mm for the manufacture of legs (you can use metal racks, pipes small diameter, pre-painted with varnish or paint);
- wooden dowels;
- carpentry glue;
- edge tape.
To finish the finished product, you can use varnish, paint, paper for decoupage, various elements decor.
 You will also need tools:
- pencil, ruler 30 cm;
- drill;
- screwdriver, screwdriver;
- jigsaw;
- hexagonal key;
- a hammer;
- corner clamps;
- grinding machine.
Note! The desk looks original, the legs of which are made of balusters.
Desk with two side tables

Dimensional drawings


Note! The dimensions of the table are chosen individually, because one needs to make a table for a first grader, and the other - for a teenager.
Stages of work
When the drawings are done and moved on the material, you need cut out elements with a jigsaw and fasten them. To , it is necessary observe the following manufacturing steps:
Step 1. The ends of the niche must be greased glue and connect with the inner sidewalls of the cabinet. Self-tapping screws need to be screwed carefully, so as not to damage the material from the outside.

Step 2 For the design to be reliable and rigid, must be attached back wall to the bottom central shelf.

Step 3 On the side where it will be nightstand, shelves need to be added. It should be remembered that ends all elements, before they are attached to each other with dowels and grooves, must be smeared carpentry glue.

Step 4 Two are attached to the bottom partitions using self-tapping screws. A countertop will be installed on these elements.
How to make a round dining table with your own hands, step by step instructions:
Step 5 Make a markup on the underside of the tabletop. Paste dowels, make grooves at the ends of the niche. Install countertop.

Step 6 Various niches can be attached to the tabletop, compartments and recesses. Their shape and size are selected individually.

Step 7 Attached along the contour of the tabletop decorative edges.
Step 8 On the this stage it is necessary to fasten and insert them into the cabinet, in which they were previously attached guides elements.


How to decorate a desk?
 To make a desk beautiful and stylish, need to produce it finishing. You can execute it in the following ways:
- If the countertop is not made of laminated chipboard, surface should be treated with drying oil or stain, and then covered varnish.
Currently, you can buy these materials in any shades with imitation colors of wood of different species. - You can order a sheet processed on the edges glass or plexiglass - put it on the finished table when the varnish dries.
- Baby will love it striped table. First you need to paint the surface countertops any light paint. Then stick masking tape, making stripes suitable width. Between tape paint over dark paint. When the paint layer is dry, remove the tape. If desired, such a striped table can be applied on stencil any drawing.
- Another spectacular way to decorate -. Suitable for both finishes new, and to update and restoration old desk. With cut and glued images from paper, fabric or leather can be made from the table a real work of art.
Children love to create together with parents. The table made by the father and decorated by common efforts will give the child a huge pleasure, and he will gladly do for him lessons, draw or just sit at computer.
For details on how to make a desk, see this video:
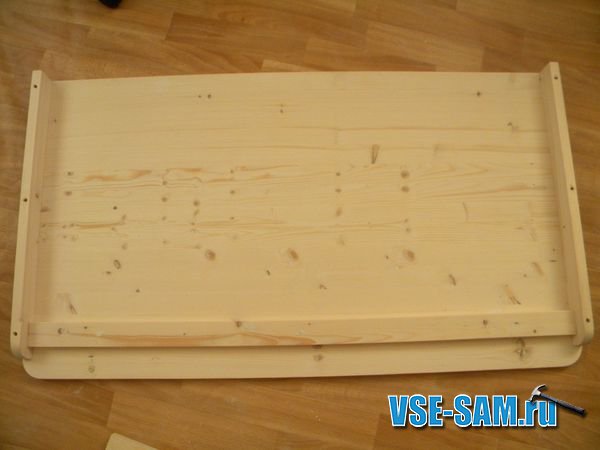
For the manufacture I used furniture panels, because. it is eco-friendly, convenient and inexpensive. And so, I started with the countertop. In order not to deviate from the generally accepted sizes, I decided to make it 1100x600. To avoid injury, we cut the front corners 2x2 cm, and round off with sandpaper. Considering that the countertop will protrude from the overall structure by 20 cm, it was necessary to reinforce it with a 20x45 bar. This must be done, because children are very mobile and reckless and can climb onto the table, the design must withstand everything!
We put the left and right bars on the edge, measure from the back, to the rounding of the countertop, saw off and round in the same way. Next, fix them with screws. First, with a thick drill, we drill the beam halfway so that the self-tapping screw freely enters the hole, and then, already inside the hole, we screw it. After the side strips are fixed, we measure the longitudinal. We fasten it with three self-tapping screws, as shown in the photo.
The tabletop is ready. We turn to the manufacture of pencil cases.
The left one includes drawers, an upper compartment with two shelves and a door, as well as a niche between them for office folders and an upper shelf. The pencil case itself was made from two sidewalls 1600x400. The upper front parts of the sidewalls are rounded off (angular washed down 2x2cm), the rear lower parts are washed down under the plinth 4.5x5.5cm. The internal dimensions of the shelves were 400x350mm. We fasten four shelves from the sides with 50x60 self-tapping screws (without tightening them too much), not forgetting to drill holes for them so that the workpieces do not crack, at the distances shown in the figure. We will fasten the fifth shelf at the end to special fasteners. Then I sawed out the upper back bar for the shelf and also fixed it with self-tapping screws. I sawed out the bottom panel of the base, but did not fix it yet, I will mention this later.
After the frame of the pencil case was assembled, I made corners from plywood. On plywood we draw two squares 7x7cm, divide them diagonally and saw off four triangles. We put them on the back of the pencil case, first in the lower left and in the upper right corner.
The tabletop is ready. We turn to the manufacture of pencil cases. The left one includes drawers, an upper compartment with two shelves and a door, as well as a niche between them for stationery folders and an upper shelf. The pencil case itself was made from two sidewalls 1600x400. The upper front parts of the sidewalls are rounded off (angular washed down 2x2cm), the rear lower parts are washed down under the plinth 4.5x5.5cm. The internal dimensions of the shelves were 400x350mm. We fasten four shelves from the sides with 50x60 self-tapping screws (without tightening them too much), not forgetting to drill holes for them so that the workpieces do not crack, at the distances shown in the figure. We will fasten the fifth shelf at the end to special fasteners. Then I sawed out the upper back bar for the shelf and also fixed it with self-tapping screws. I sawed out the bottom panel of the base, but did not fix it yet, I will mention this later. After the frame of the pencil case was assembled, I made corners from plywood. On plywood we draw two squares 7x7cm, divide them diagonally and saw off four triangles. We put them on the back of the pencil case, first in the lower left and in the upper right corner.
Using a square, we align the structure, fix the corners, and tighten the shelves from the outer sides of the sidewalls. Fasten the remaining two plywood triangles.

The left frame of the pencil case is ready.
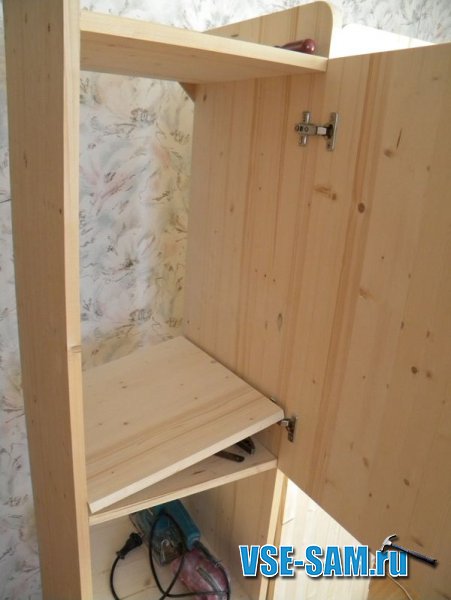
I made the right pencil case in a similar way, but with slightly different parameters. In the upper part, a small shelf is also provided, a little lower is a compartment with a door and two shelves, and at the very bottom there are niches for a briefcase. Precisely niches, because I have two daughters, in a couple of years the youngest will also have to go to school, so I have to prepare in advance. We fix shelves with the same dimensions at the distances indicated in the figure. The sequence of work is the same as in the first case.

Both frames are ready. Next, I made a lower cross member from a furniture board 200 mm wide (to give the structure strength), and a central shelf. To do this, I sawed off three blanks to the width of the countertop. The first part is this crossbar, the other two are the shelf. I will make a reservation right away that I attached the crossbar to a height of 29 cm from the floor.
And so, the shelf. We fasten two blanks together with self-tapping screws so that the shelf rests against the back wall. Then, according to the internal dimensions, he made two partitions. I rounded them in the same way in the upper front part, attached them with screws in the middle. We fix the shelf to a height of 49 cm, from the table top. I fastened the table top with self-tapping screws to a height of 75 cm from the floor, but this was preliminary, then I fastened it with bolts.

All the main elements are ready. I fastened the structure with self-tapping screws, made sure that everything fits, that everything is smooth and beautiful.

The lower part is deliberately left free so that nothing interferes with the child, namely the useless lower shelves, on which we all put our feet in childhood, thereby distracting from the lessons.
Everything came up! For the convenience of continuing work, we disassemble the middle.
Left pencil case. In the lower part we measure the drawers. They were made from 6mm plywood, pre-treated with a grinder (so that later the boxes would not be dismantled, but immediately varnished). To do this, I measured the bottom, taking into account the dimensions of the roller guides.
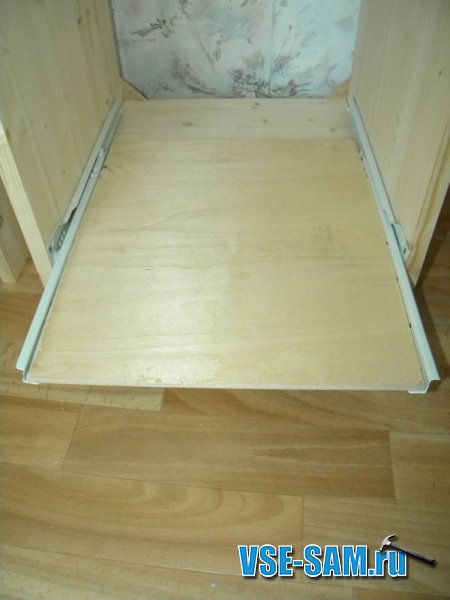
Then he made the side and end walls. Between themselves, I fastened them in the following sequence: I fastened the front partition with self-tapping screws to the bottom; back baffle to the bottom; side partitions to the bottom; then between each other from the end sides. Don't forget to drill holes for the screws. Here I used self-tapping screws measuring 3x20. In this sequence, he made three boxes, the dimensions were determined arbitrarily.

Since the front parts will overlap, I fastened the boxes flush with the frame of the pencil case. I divided the niche for the drawers into three equal parts, taking into account the upper and lower shelves, as well as the gaps between the front parts. Then he sawed them out of furniture boards.

I hung out the doors, made sure that everything fits. In the manufacture of doors, it must be taken into account that they will open in different sides. In the left pencil case - to the left, in the right - to the right!
All elements of the table are ready. We understand the design. We carefully process each part with a grinder. Next, we cover everything with varnish in two layers, the countertop can be three or four.
On the Internet you can find a lot of video tutorials and master classes that will allow you to make any piece of furniture with your own hands. In this article, we will present several options for how to make a desk with your own hands - from simple to the most complex models. We tried to systematize all the data so that this material becomes really useful for you, and you can realize any of your ideas.
What is needed to make a desk?
Before you make a desk with your own hands, prepare in advance according to the list below all the necessary materials, fasteners, tools.
Moreover, it doesn’t matter which option you choose, since the list of everything that can come in handy is almost the same:
- Drill.
- Electric jigsaw.
- Screwdriver.
- Hacksaw.
- Chisels.
- Drill.
- A hammer.
- Grinder.
- Milling machine.
- Clamps.
Materials can be used very different, but more often it is a tree and all its derivatives:
- Chipboard or chipboard, furniture board, plywood, boards.
- Nuts with washers, bolts.
- Self-tapping screws.
- Dowels, dowels.
- Joiner's glue.
- "Liquid Nails".
- Brushes, paint.
- Pencil, tape measure, square.
- Building level.
How to make your own wooden desk?
Once you have purchased all the materials on the list, prepared the tools, the next step is to choose a model, it is important to decide what kind of wooden desk you want to make with your own hands. It is better to start with the simplest model.
Important! You can make an item from solid wood or wood-containing materials. Naturally, natural products look more beautiful and noble, but only special skills and abilities are needed for their manufacture. Yes, and this work will cost a lot. Tables made of chipboard, MDF, furniture panels are much easier to process, cheaper, do not require professional knowledge.
Perform fabrication simple table according to this scheme:
- Find a drawing of a desk, consisting of four rectangular elements. These will be two sidewalls, a cover, crossbars.
- If you did not find all the necessary tools, then order a cut according to your size in order to get ready-made parts.
- If you decide to do all the work yourself, then apply dimensions to the chipboard sheet using electric jigsaw cut out all the details.
- Glue the edge on the ends.
- In the end elements, drill holes for future table legs with a drill.
- On top of the holes with a drill, make shallow grooves for the caps of confirmations.
- Attach a transverse partition to the side legs so that the holes in them and their upper parts coincide.
- Connect the structure with furniture screws.
- Place a countertop on top of the resulting base, twist it with confirmations, after making holes.
- Close the recessed screw heads with special plastic plugs.
As a result, you will get a wonderful table, for the manufacture of which you will spend a minimum of time and effort, and you will not need any special skills. Let's look at more complex ideas next.
How to make a table for a student at home?
If a child is growing up in your house, then this master class will also come in handy, because in it we will describe how to make a do-it-yourself desk from chipboard for a student. Almost anyone can implement this idea.
You will need to perform the following series of actions:
- If you have an old wooden pallet lying around at home, then take it apart into separate boards.
- Perhaps you have a hollow unnecessary door - it can be used as a countertop. If there is none, then simply cut two sheets of thick plywood to size, connect them in thickness with glue and self-tapping screws.
- Saw out boards for supports. Legs look perfect, shaped like a construction goat.
Important! The height of the supports must be at least 80 cm. Make sure that the upper horizontal of the goat coincides in width with the working surface.
- To attach the legs, step back from the edge of the table top 6 cm, while the angle of their inclination must match the height of the supports.
- Between the upper parts of the legs, install a horizontal bar, pre-drilling holes in it. Screw it with special drywall bolts. The diameter of the holes should be slightly larger than the screw itself, because it is important that the legs are at an angle.
- Measure 3 cm from the floor, screw a wide bar about 20 cm at this level to strengthen the supporting legs, thereby equipping the platform for the shelves.
- Attach the boards remaining from the pallet to the bar, in the end - you will get shelves.
- Take the door, use the edging to process its sides - it is sold in furniture stores.
- From the bottom to the countertop, nail two parallel strips on each side. This is necessary so that the work surface is securely fixed.
- Use wine corks and tape to make heels for the legs.
How to make a sliding table with your own hands?
Now we will consider the most interesting model, we will tell you how to make a desk with drawers. The presented modification is best example high-quality, expensive products made of natural wood.
Do everything clearly in accordance with the instructions:
- Buy glued furniture board, preferably hardwood.
- Take a drawing to make markings on it.
Important! Be sure to make a small tolerance on the dimensions of the blanks.
- Cut out eight blanks from the shield as supports for the table. They should have the following dimensions: 18 by 36 by 570 mm.
- Glue each leg from two parts, then secure them with a clamp.
- From the inside of all the cross bars of the frame, cut out notches.
- Select a long groove along the inside of the crossbar. With a hacksaw and a chisel on the upper side of the supports, make a ledge in the crossbar to the height of the notch.
- In the side parts of the drawer, drill two holes for the dowels, while they should have a diameter of 8 mm.
- Insert pencils into the holes, carefully attach to the legs to mark the places for inserting dowels.
- Using wood glue and dowels, connect the supports and the base.
- Cut out the top cover and countertop while the base dries.
- To attach the top right side, select the grooves with a router - their width should be 10 mm.
- According to the template, cut out the side walls of the superstructure with a jigsaw. Then sand all cuts. They also select the grooves.
- From 10 mm plywood, cut out the details for the manufacture of drawers. Then glue them together and strengthen the fastening with small nails.
- Saw out a facing board from a tree, then attach it with self-tapping screws to the front of the product.
- Assemble a table for a student with your own hands with drawers and add-ons from prepared parts. Coat all blanks with carpentry glue at the attachment points, leave them until completely dry.
- Attach the tabletop to the base with supports with glue and dowels in the pre-cut folds.
- Pick up accessories for the boxes and varnish the product. It is better to apply it in several layers.
Creating a desk with your own hands is quite simple if you have the skills to work with wood, raw materials and tools. You can make a product using standard drawings or come up with your own, original design. If there is an old table, there is no need to make a new one - there are many ways to restore, give furniture a modern look, for example, decoupage. Decor old furniture- the easiest and cheapest way to get an aesthetically attractive piece of furniture. However, it will be unique.
Table made of wood materials
Above are drawings of the simplest product. This is a desk, which, as a rule, is made of chipboard. It requires a minimum amount of time, effort and materials.
Before you make a desk with your own hands, you need to prepare the following materials and tools:
- Several chipboard sheets 20-30 mm thick. It is necessary to purchase them in such a way that 4 canvases (1400x600, 450x1300, 750x500 mm - 2 pieces) can be made with minimal costs.
- Furniture edge. Sold in rolls, very cheap.
- Saw or jigsaw.
- Furniture conductors.
- Hardware - bolts and nuts or dowels.
- Carpentry glue or PVA glue (if dowels are used).
Using the drawings, this table is very easy to create:
- Part preparation
- Cut out canvases of the required size. When cutting, it is important to keep the saw at the maximum slope - this will avoid the appearance of chips. If a jigsaw is used, it is better to set it to minimum speed.
- Make holes for the bolts in them. To do this, you should use a furniture jig - it will allow you to clearly observe the location, so during assembly there will be no mismatch between the holes between the legs, the table top and the lintel. You can also connect parts of the table with dowels.
- Finishing. Laminated chipboard does not need to be further processed, and not laminated chipboard must be opened with varnish and special protective compounds. The operating procedure is indicated on the label of the substance.
- Assembly.
- When using bolts, no explanation is required.
- When using dowels, it is necessary to install the part in one of the holes, after smearing it with glue. Then the parts are knocked together with a mallet. You can use a hammer, but in this case you should hit through a thick rubber or a wide board.
- Final work. All edges must be glued with a furniture edge - otherwise moisture will enter the material through them, it will quickly swell and become unusable.
- Decor. You can decoupage the resulting table - paste it with wallpaper, drawings and varnish it.
If necessary, you can make a table for two. To do this, it is worth making a wider countertop. It does not make sense to make it longer - the product will be too bulky. A table for two will save space and create comfortable working conditions.
Table with drawers for 2 persons
A table for two can be made from chipboard or wood, depending on your skills and planned costs. A wooden table for two will last longer, it is more resistant to various factors.
- Solid wood or chipboard. To determine the quantity, you need to view the drawings of the table for two.
- Plywood. It is easiest to create cases of boxes from it. The required quantity will also be prompted by the drawings.
- Hardware - bolts, nuts, washers, etc.
- Dowels.
- Furniture edge.
- Saw or jigsaw.
- Furniture conductors.
- Carpentry glue or PVA glue.
The order of work does not differ from the order of creating a simple school desk - first all the details are harvested and processed, then assembly is performed and, if necessary, decor.
We give an aesthetically attractive look to old furniture
Today, decoupage is very popular - the decor of various objects, based on the addition of a drawing, picture or ornament and coating the composition with varnish for durability and creating a special visual effect. In this technique great importance has a fantasy - the final result largely depends on it.
Decoupage, as a rule, requires a small set of tools and materials:
- Sandpaper with different grain sizes. You can also use USM.
- Brushes for applying varnishes and paints. You can also use an airbrush, but it is quite expensive, and decoupage will have to be done in a specially designated room. Therefore, such equipment is only advisable if the decor is a professional occupation or a very strong hobby.
- PVA glue.
- Acrylic lacquer. Volumes depend on the total surface area, the decor of which is performed. Each manufacturer indicates the consumption of a particular substance on the can - carefully read the labels when choosing.
- Paints of various colors.
- Pasting material. Decoupage involves the use of wallpaper, napkins, newspapers, color magazines - any printed drawings.
Decoupage is performed in several stages:
- Sanding and degreasing all surfaces.
- Covering a table or other piece of furniture with primer. The easiest way is to first apply the substance with a brush, and then immediately roll it out with a roller. This saves time and effort spent on decoration.
- Opening all surfaces with background color paint. It is necessary to cover in 2 layers, between layers there should be enough time for drying. The drying time depends on the specific paint and is indicated on the bank.
- Attaching pictures with glue. The more accurately the images are cut out, the better the decor will turn out. If desired, you can achieve the effect of invisibility of the transition - it will seem that the pictures are drawn, and not glued.
- Completion of work. Decoupage is almost done - it remains only to open the surface with acrylic varnish. It will keep the original look of the product for a long time. It is not worth using alkyd enamel instead of acrylic - the latter dries much longer, has a specific smell.
Decoupage is an interesting activity that allows you to give new life old things. In addition, such decor is available to absolutely everyone, both in terms of finances and in terms of skills.


