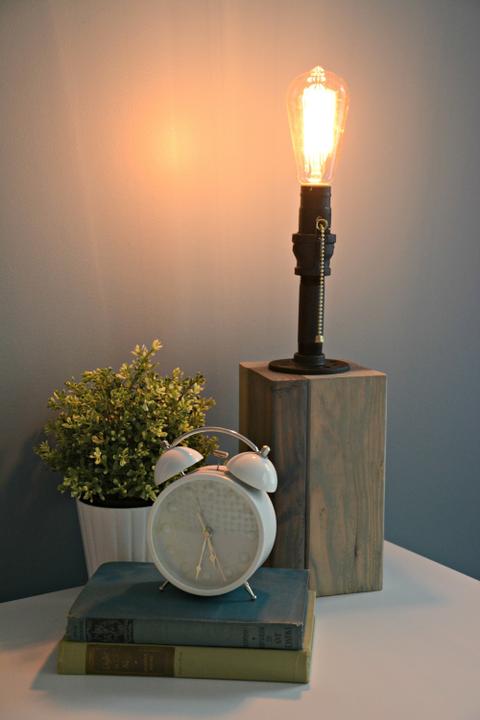
A table lamp, of course, can be bought in a store, but it is far from always possible to find exactly what you need, especially if you want no one else to have the same one. However, this lighting device is not so complicated, and if desired table lamp you can do it yourself, which will save a lot of money. Yes and homemade lamp in any case, it will be exclusive, and it will be much more pleasant to use it, because a piece of your soul is invested in the product.
In this article we will tell you how to make a table lamp with your own hands.
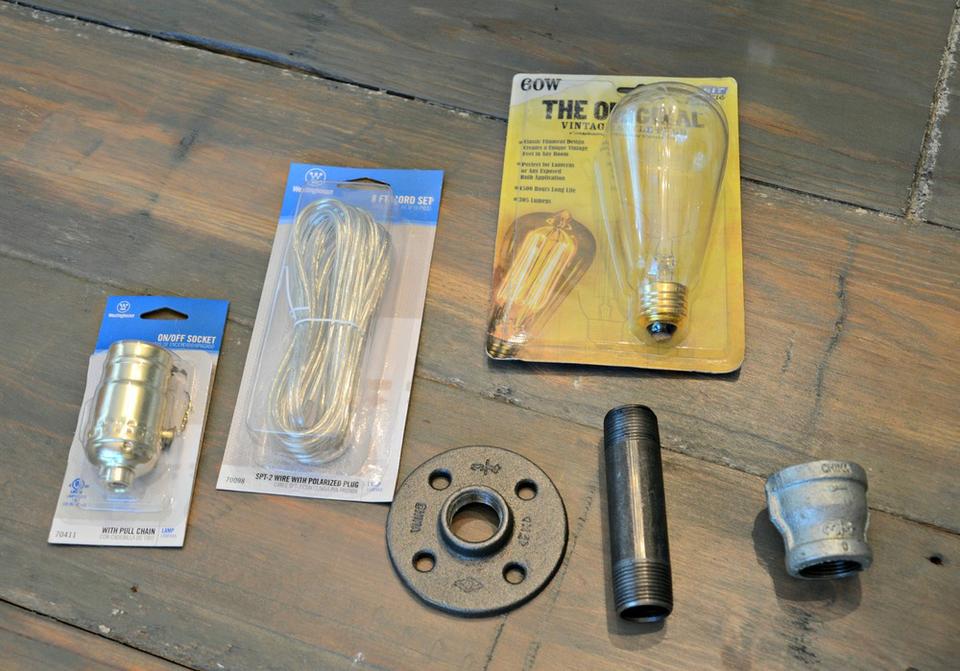
To make a table lamp with your own hands, you will need:
- 2.5 meters of two-core cable (in our case, in a transparent sheath)
- chuck with switch
- incandescent lamp (it is desirable to choose a lamp of an unusual shape)
- board 50×100 mm (dimensions may vary, it all depends on the size of the lamp)
- flange with hole for ¾-inch pipe
- 100mm tubing with ¾" threads
- adapter from ¾ to 1 inch
How to make a table lamp
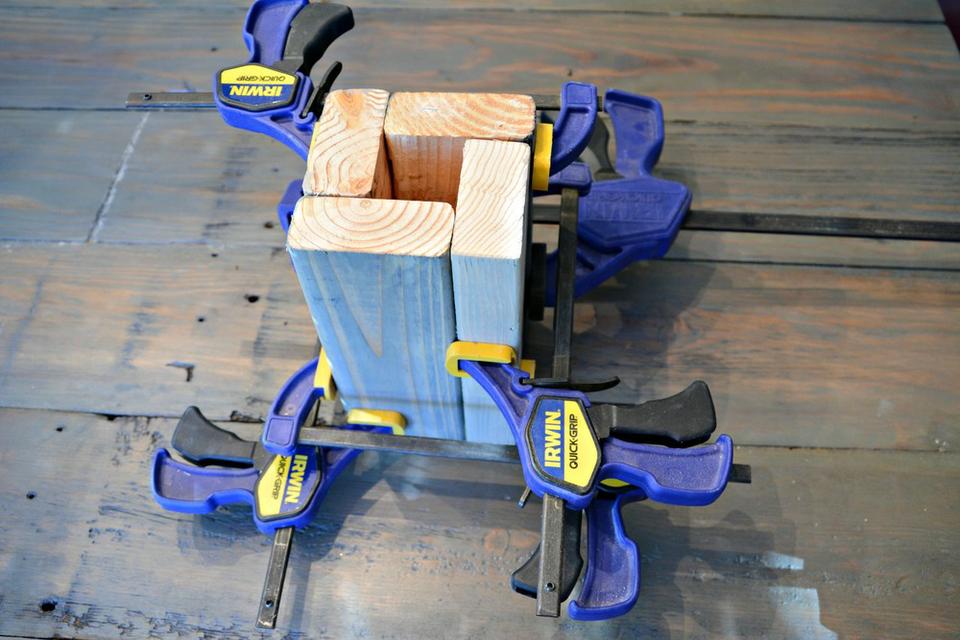
Saw a board with a section of 50 × 100 mm into 4 pieces of the desired length. In our case, the length of the segments was 220 mm. Planks can be stained or painted in the desired color. Glue the boards with wood glue and fix them with clamps.
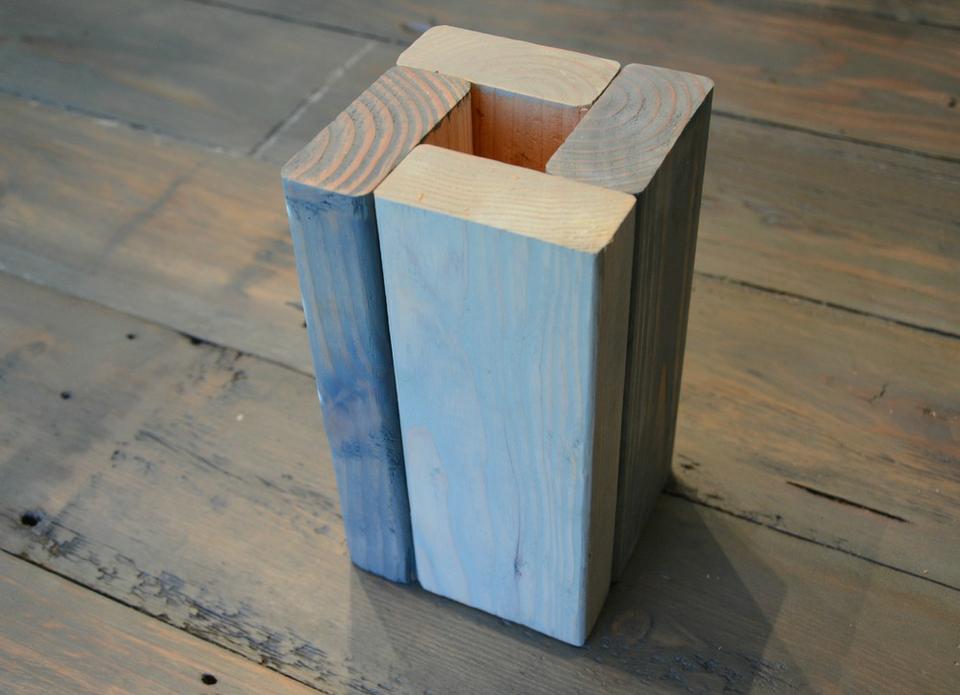
Assemble the flange, pipe and adapter together. metal parts can be painted or left as is.
Drill a hole at the bottom rear wall wooden base. The hole diameter is selected according to the cable section.
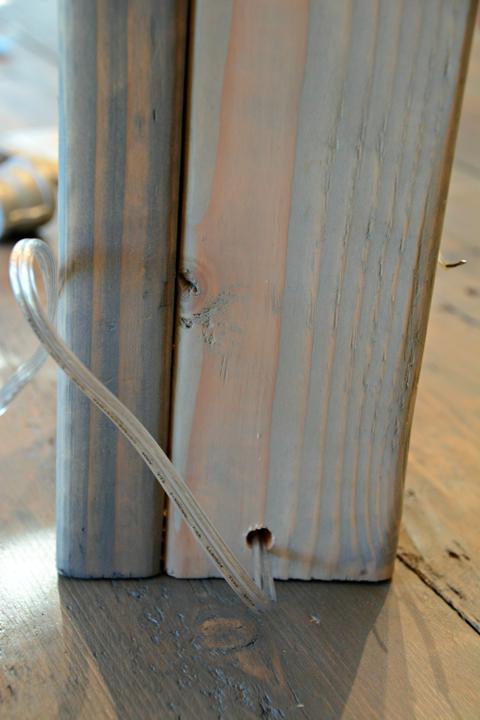
Pull the cable through the base and metal post
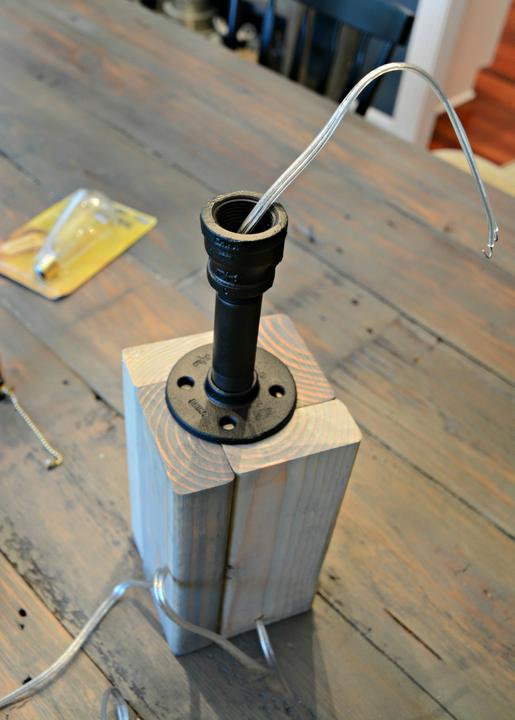
Connect the cable to the socket with the switch. Insert the cartridge into the adapter and fix it there. To do this, simply press on the cartridge, and it will fit tightly into the adapter.
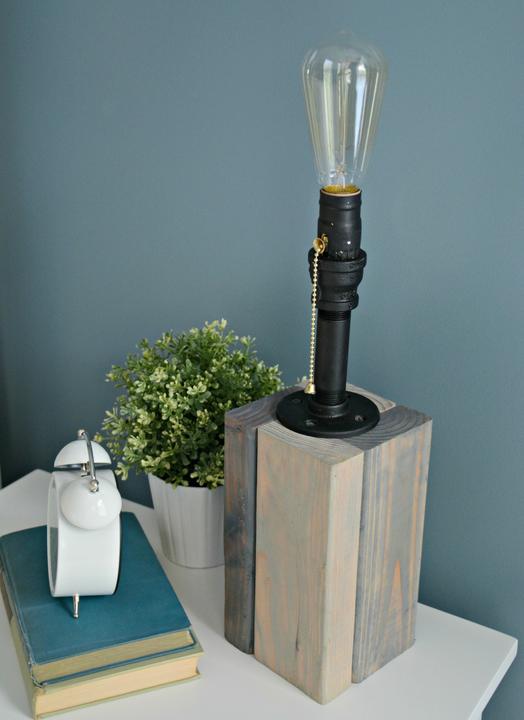
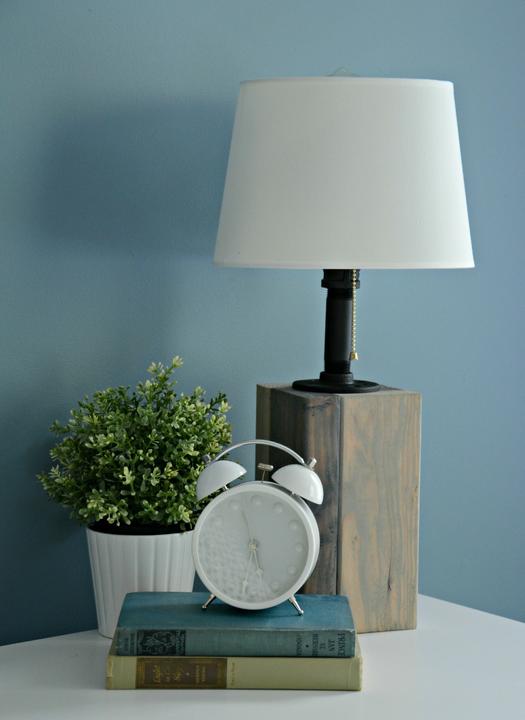
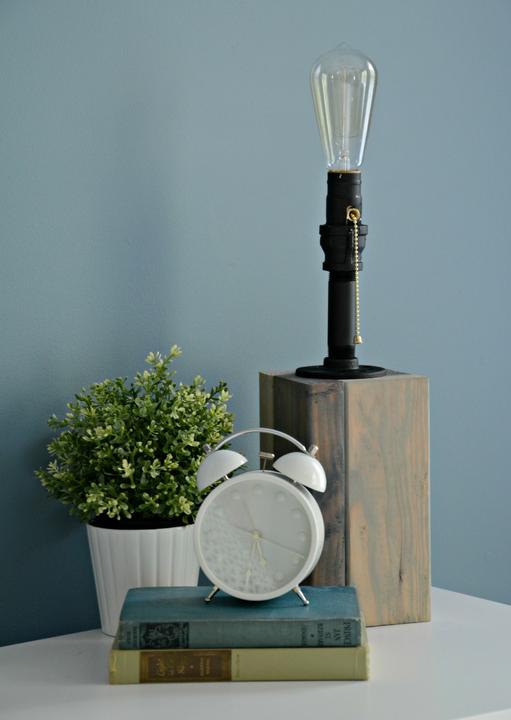
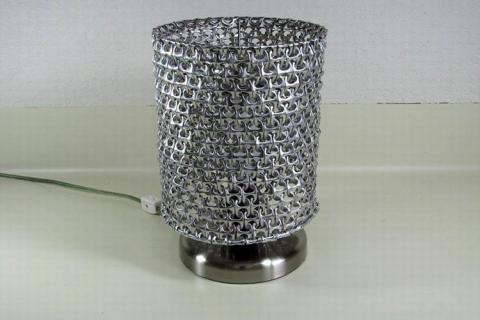
So the steampunk or industrial design table lamp is ready. It remains only to find a place to install it.
If such a lamp does not quite fit into your interior, you can give it a more familiar look by installing a lampshade.
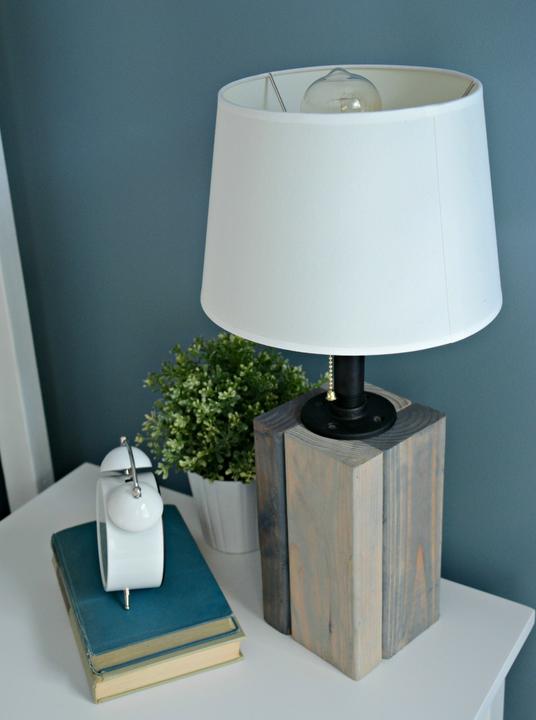
The lampshade is better to buy in the store.

Lamp made with my own hands, has a number of significant advantages over the purchased one. Firstly, you know exactly the interior design features of the room in which you will place the future device, which means you will make it exactly the way you want to see it. Secondly, the manufacturing process itself will capture you and give you a lot of pleasure.
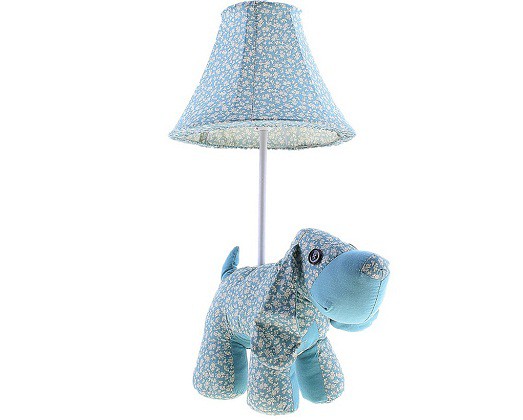
Therefore, today the topic of our article is how to make a table lamp with your own hands. Our lamp will be very original. Small children's legs in jeans and hilarious shoes peek out from under the lampshade.
Materials and tools:
- lamp base and lampshade;
- glossy acrylic paints;
- old jeans
- wooden bars;
- glue "titanium";
- a set of acrylic paints for fabric;
- modeling clay;
- brushes;
- needle with thread.
Step by step master class
It's time to start our master class.
1. From clay for modeling terracotta color, we form “shoes”: we put inside the bars glued together, as we wrap them with clay.
2. With the back of the brush or any other stick, we outline the line of the sole and holes for the laces.
3. We glue the "legs". We use for this glue "Titan" or PVA.
4. While the glue dries, let's start making small jeans for our lamp. We tear the fabric on old jeans and, applying it to the legs, measure the desired length and width. We sew fabrics by hand or on a typewriter. We should get two denim legs.
5. Turn the legs inside out and iron the seams properly at high temperature. Half of our lamp is done.

6. We paint our shoes with acrylic glossy paints, mixing the desired shades in advance. Let the shoes dry.
7. Wet the surface of the fabric lampshade with water. And we begin to apply multi-colored stripes at different intervals. For this we use acrylic paints, which are designed for painting on fabric (cotton). And this technique is called “wet” and it is indispensable when you want to achieve a smooth flow of color or a fuzzy (blurred) shape.
After the paints have dried, we fix them on the surface of the lampshade using a household hair dryer. It will allow the dye to be fixed in the fiber and make the color more lightfast. We recommend cleaning such a lampshade in a dry way (with a vacuum cleaner with a special nozzle or a synthetic roller).
8. We apply acrylic varnish with a matte effect on the surface of the shoes. It will protect their porous surface. We put the "legs" on the base of the lamp and attach it to the "Titanium" glue. We put on jeans. If necessary, they can be fixed on the legs with a hot glue gun. We put on the lampshade, screw the lamp.
Japanese traditions
We also want to offer you a master class on making a Japanese paper lamp. You will need:
1.5 m thin bamboo;
2 m thick bamboo;
Square wooden plate (2 cm thick and approximately 35x35 cm);
Rice paper;
Glue "Moment";
Decorative rope-straw.
Manufacturing process:
1. Take a bamboo stick and cut into 4 identical pieces, about thirty centimeters each (five centimeters for gluing and twenty centimeters for the lantern frame). Cut four more sticks twice as thick as the previous 4, about 40 centimeters long.
2. Make 4 holes in a wooden plate exactly the size of the bases of forty centimeter sticks at a distance of 30 centimeters from each other. The sticks should fit very tightly into the plate. Make a hole in the center of the plate for the light bulb and cartridge.
3. Assemble the top of the frame. Take two thirty-centimeter sticks, put one on top of the other crosswise at a distance of 5 centimeters from the edge. Fasten them with glue, and then wrap them with decorative straw.
4. Make a few turns before crossing and a few - after on each stick, and then - in the place of crossing along and across, in order to additionally pull the sticks together. It should be a triangle.
5. Fasten two more sticks of thirty centimeters in the same way. Gently glue the two triangles together with the free ends of the sticks to make a square. Wrap the joints with decorative straw tightly and thickly enough so that it serves not only as a decoration, but also as an additional fastener.
6. Apply a little glue inside on the edges of the holes in the wooden plate, insert long forty centimeter sticks into the holes smeared with glue, pull them down so that about 5 centimeters of the free end remain below.
7. Wrap each stick with decorative straw under a wooden plate tightly enough to form a plump splint on which the plate seems to rest, tie, fasten the straw. Wrap the sticks over the plate in the same way.
8. Insert the cartridge into the center hole. Secure the square top frame at the long ends with glue and decorative straw. Tighten the lantern on four sides with rice paper, gluing it to the bamboo sticks.
Video materials on the topic of the article
An original lamp that can be easily and quickly made:
Here is such a lamp can be made from ordinary rails:
Topiary lamp:
If you have a box of computer disks, then you can make a beautiful lamp out of it:
As you know, a thing created by oneself can become a worthy decoration of any interior. Moreover, the more such designer and cozy items, the more interesting and colorful the space looks. For each room of your house or apartment, you can create desktop ones that will be a great decoration. Moreover, for this you can use improvised materials, and very often those that are initially difficult to imagine as this functional and necessary device.
Where to begin?
Of course, first you need to think about the design, but we will return to this issue a little later. In the meantime, let's decide how to make a table lamp from what we have at hand. We will use the following elements and devices:
The basis for the lamp (this can be a piece of plywood or a DVD disc);
Frame from an old lampshade;
Tube (it can be any);
Various adhesive compositions;
A piece of cable;
Decorations for the base;
Switch, plug, cartridge;
The material from which we will prepare the lampshade;
Aerosol paint.
Table lamp diagram
The classic table lamp consists of several parts. Firstly, this is the base, column and light diffuser. In this capacity, it is quite possible to use a glass shade or a lampshade, for example, made of fabric. There is a switch that is located on the power cord or on the base itself, sometimes it is mounted on the base. Depending on the purpose of the lamp, it can have a different design:
- A classic lamp that is used to illuminate the workplace. The diffuser here is a glass shade or a textile lampshade.
- The device on a clamp fastens to a table. The column of such a lamp is flexible, that is, you can tilt it as you like. Plafond - an opaque socket that focuses light in one direction. As a light source, a conventional or LED is used.
- A dimmer lamp is the ability to adjust the brightness of the light source.
We embody ideas
So, we have prepared the details from which the simplest do-it-yourself are made. Now we take glue, a base and a tube and glue them together, for example, using paper or an old newspaper. Yes, do not forget to make a hole in the base - then the cord will come out through it. We let the designs dry, after which we begin to decorate our pipe.
To do this, we use anything: beads, buttons, beads, bows, figures from kinder surprises and much, much more. Thanks to such original and at the same time simple decorations, your lamp will look very non-standard, which means there will be an opportunity to transform the interior. The very last task is to cover the lamp with paint. It is best to choose formulations that will not contain toxins, as well as those that dry quickly. After the device has dried, you can start making a lampshade.
Lamp from an old vase - fresh ideas
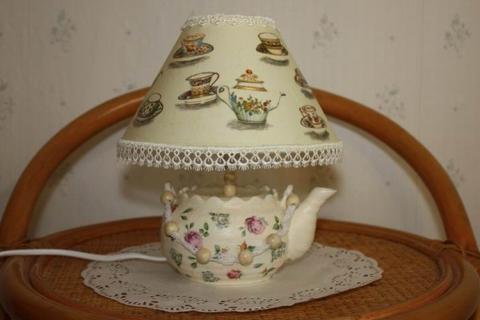
To create original table lamps with your own hands, it is not at all necessary to look for some design ideas or strive for effect. It is enough just to take an old vase and make a lighting fixture based on it. So you immediately kill two birds with one stone: on the one hand, give new life an old thing, and on the other hand, decorate your home with something unusual.
So, we need the following components of the future device: an old vase, a cartridge from an old lamp with a holder or a holder, for example, from a cork. As a base, a piece of foam into which the reinforcement is inserted will also do. It must be thoroughly poured, not forgetting to comply with safety rules, since this composition emits harmful substances. A structure is created from the prepared materials, which is inserted into an old vase. Now it's up to the small - to make a lampshade.
Lampshade - the crown of business
Probably, the basis for creating a lamp can be anything. But with the help of a lampshade you can change appearance lighting fixture every day. In addition, this element is created easily and simply, and again from the materials at hand. You can design in a variety of styles, but it is important that the hand-made table lamps are in harmony with the surrounding space. What way to create a lampshade to choose?
Firstly, the best option is to make a ceiling from the same wallpaper that the room is pasted over. To do this, we take the wallpaper and cut off a strip with a width slightly larger than the width of the lampshade. Then you need to carefully glue it to the lampshade, while it is important not to break it or wrinkle it. We give time to dry, after which you can safely put the product on the lamp.
Secondly, the fabric lampshade is popular. It is very simple to make it, and if you want, you can always remove it and replace it with another variety. Such a lampshade is created according to the same scheme as above.
Children - all the best
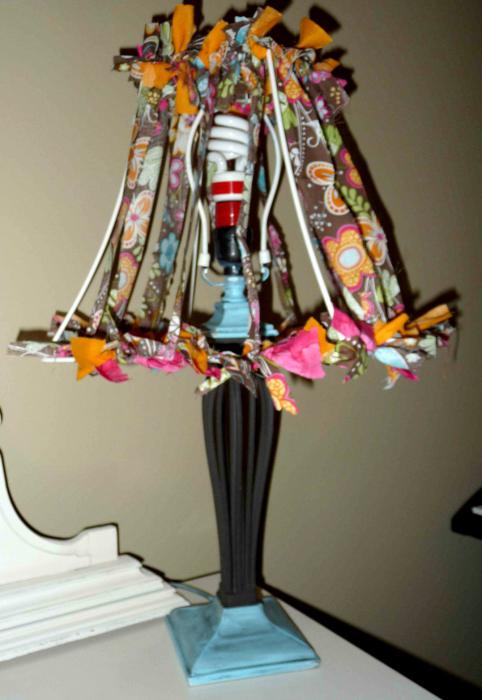
As you already understood, in order to create a table lamp, it is not at all necessary to be a generator of ideas and thoughts. It is enough just to show imagination. Modern children's table lamps are bright in design, but you can change their look a little and make them more interesting. For example, those who know how to handle fabric can make original lampshade in patchwork style. In addition, this technique can be implemented in a slightly different way, for example, make the base for the lamp from children's toys - cubes, puzzles, or decorate the lampshade with toys from kinder surprises.
For a girly version, you can use more romantic drawings and decorative elements. For example, a lampshade, richly decorated with satin ribbons, bows, beautiful buttons or an interesting appliqué, will definitely appeal to cheerful fashionistas.
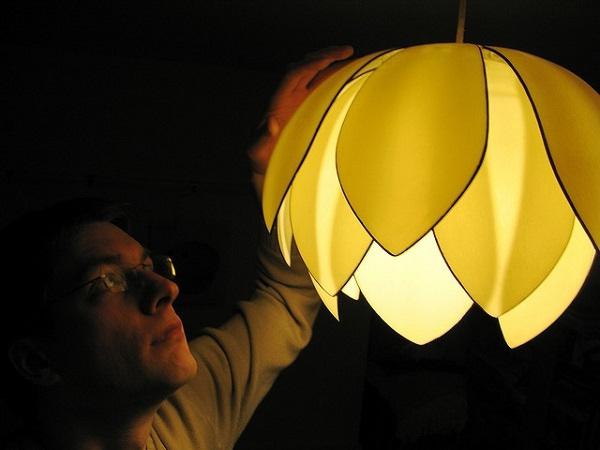
original designs
Now let's look at how unusual a table lamp can be. With your own hands (the photo confirms this), you can make it very, very catchy, spectacular and memorable. For example, if you have an old globe, then it is quite possible to adapt it to the original shape of the lamp. By the way, this can be safely given to avid travelers - they will definitely appreciate it.
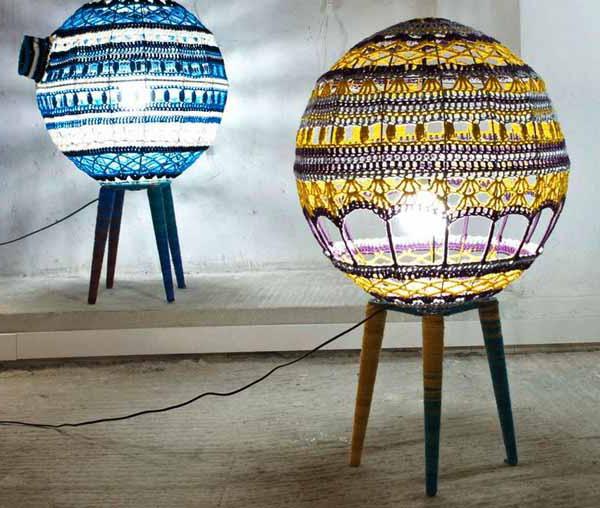
But needlewomen probably have a huge number of balls of threads of the most different colors. You can knit a beautiful and bright cover and put it on a lampshade. Or you can simply complement the fabric dome with original knitted ornaments. Such a lamp will give the room coziness and create a favorable atmosphere for pastime.
Many will laugh, but for the sake of originality, you can use almost everything. For example, plastic dishes in the form of forks, cups, spoons, sticks, umbrellas for cocktails. To create a non-standard lampshade, we need a balloon, on which we will glue all this plastic and cheap stuff with glue. By the way, if you wish, you can paint it with acrylic compositions - so your lamp will shine with new colors and will look very original!
What is the result?
Thus, there are a lot of ideas for creating a table lamp at home. Choose the method that suits you best in terms of style and constructive solution. After all, fresh ideas in the interior are the easiest way to update it. And this method is also beneficial, since you can create original lighting fixtures from what is in your pantry.
There are table lamps in almost every home, and such a device is considered simple and mundane. And to turn it into a bright designer thing, make a lamp with your own hands!
How to do?
To make a lamp, first of all, you need to prepare everything you need. And since you have to work with an electrician, follow the safety rules. Keep wires and other parts away from water and other liquids, and if in doubt, seek professional help.
As for the manufacture itself, you can fantasize and experiment using different materials and slightly changing actions and techniques. But it is better not to change the main and important stages, since the serviceability and safety of the device depends on them.
Below are some interesting ideas.
Idea one

An original do-it-yourself table lamp made from a glass bottle.
Here's what you need to make:
- light bulb with base, wire, switch and plug;
- Glass bottle;
- glue;
- a large clear or white plastic cup;
- any fabric;
- drill;
- scissors;
- pencil;
- acrylic paints.
Preparation method:
- First you need to make the base of the future lamp from the bottle. To do this, at the very bottom, right above the bottom, drill a small hole that will be used to pull the wire through. Place the wire in it so that the switch remains outside, and the base with the light bulb is above the neck of the bottle. To stretch the wire, you should remove the base with the lamp from it. But it’s not worth returning it to its place yet, as other work is coming. The frame is ready.
- Now you can start decorating. Turn on your imagination and paint the bottle with acrylic paints, let it dry.
- Now you can proceed to the manufacture of impromptu. His role will be played by a plastic cup. Make a round hole in the bottom, equal to the diameter of the bottle neck. Now decorate the cup using fabric for this. You can cut a circle out of the material and attach it in the center to the edges of the glass. And you can cut a strip and wrap it around a glass, again gluing the material to the edges.
- You can move on to the final step. Put a glass lampshade on the bottle base. Connect the base to the wire and use the finished original lamp.
Idea #2
How to make an original colored lamp from an ordinary glass jar? Very simple!
Here's what's required:
- a medium-sized glass jar (it is best to use one and a half or two liters);
- lamp with cartridge, wire and switch;
- self-adhesive colored translucent film of different colors;
- ordinary polyethylene lid for a jar;
- scissors.
Manufacturing:
- Everything is very simple. From the jar, both the base and the lampshade will turn out at the same time, that is, it will be, in fact, the only part of the future lamp. And the role of fastening the light bulb will be performed by the cover. Make a small hole in it with scissors, place a light bulb with a base in it so that it comes out from the back. Before pulling the wire, remove the base, and then put it back in place.
- Now put the lid on the neck of the jar.
- Start decorating the lamp. This can be done in several ways. You can first paste over the entire structure with a colored film of the same color, then cut out multi-colored figures and glue them to the background. Or you can assemble a mosaic by joining together many pieces of film. And so that the wire does not interfere, you can glue it to the jar with a film during the decor.
Idea #3

Try making a trendy and bright lamp out of old CDs. For this you will need:
- LED strip with USB connector;
- thick wire;
- container for disks;
- awl;
- glue;
- self-adhesive colored film.
Preparation method:
- First you need to prepare the base for the lamp. Its role will be played by the lower part of the disk container. It is better to immediately decorate this part by pasting it with self-adhesive colored tape. Using an awl, make a hole in the bottom of the container through which the wire with the USB connector will exit.
- Now you need to attach a wire to the center of the container, which will act as a frame for the disks. Twist one end of the wire, wrapping it around the base several times. Glue it to the center of the container. Now stick to it led strip so that the wire is at the bottom. Immediately pull it through the hole, disconnecting from the tape, then reconnecting.
- Now put the disks on the frame with the tape so that they completely cover the structure. Place the lid of the container on top of the discs. It should also be covered with tape.
- Such a lamp, which is powered by a computer, will be very popular with the child.
Idea #4
Prepare the following materials and fixtures:
- several plastic bottles;
- stapler;
- cutter or scissors;
- glue;
- base from an old lamp with a base, wire, switch and light bulb.
Manufacturing:
- You will only need to make an original impromptu lampshade for a table lamp. To do this, take one bottle and cut off its bottom, capturing 2-3 centimeters of the base. Do the same with the rest of the bottles. It will be much more interesting if you use bottles of different colors. But you can take and transparent. And to refresh the lamp, just paint the bottoms with acrylic paints and dry well.
- Now start collecting the lampshade. To do this, connect the two bottoms of the bottles and fasten them with a stapler. Attach another bottom, also attach it with a stapler. Connect all the parts in such a way that in the end you get a spherical structure, but there is a hole in it for attaching to the base.
- Put the ball on the base of the lamp and glue it.
Going to the store and choosing exactly what suits a particular room is an activity that requires a lot of free time, extra finances and a love of shopping. Enough to get involved creative imagination, arm yourself with improvised materials, and an original do-it-yourself table lamp made and decorated will transform the interior and make it brighter and richer.
“Why exactly a table lamp?”, you might reasonably ask. First, in any room, small or huge, high or low, the supply of light plays an important role. With the help of light, you can interestingly beat the interior, highlight a zone of space, hiding from the eyes that part of it that is the least spectacular.
Secondly, the original lamp on the table is a bright element of the interior. And most importantly: with your own hands you can create something extraordinary, unique, make your own “I” a reality, which will most clearly and fully correspond to the inner world and the space created around.
Needlework is a special art
Handmade, or in Russian the art of making useful and decorative gizmos from various materials, originated at the end of the 19th century. It’s hard to even imagine what materials just didn’t go into use:
- Plastic bottles, caps, yogurt jars;
- Newspapers or scraps of old magazines, books;
- Cocktail umbrellas;
- Children's toys, including miniatures from kinder surprises;
- Textiles, knitting threads, shreds of fabric, bows, braid;
- Buttons, beads, glass beads, pebbles, shells.
What can I say - even "garbage" people have learned to use as design inventions.
Everything new is well forgotten old
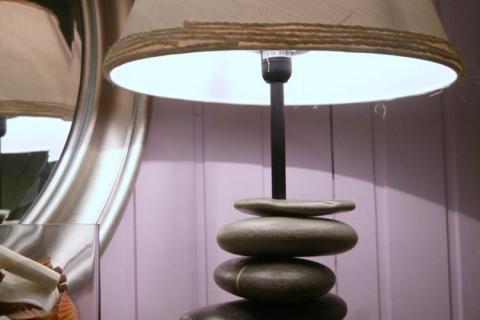
How to make a table lamp quickly and inexpensively? The easiest and most affordable way is to transform the old one. To begin with, a table lamp consists of a light diffuser (or lampshade), a column and a base. To change a time-worn column, you will need glue, spray paint, decoration elements:
- beads,
- toys,
- colored stones,
- bows,
- shells,
- coins.
It is enough to wrap the old column with toilet paper or newspaper, carefully coat it with glue, attach decoration details and let the product dry for several hours. Then, with the help of spray paint of the desired color, carefully cover the part to be decorated. By the way, a spectacular bottle of frosted colored glass, an elongated vase or a ceramic planter is quite suitable for the base.
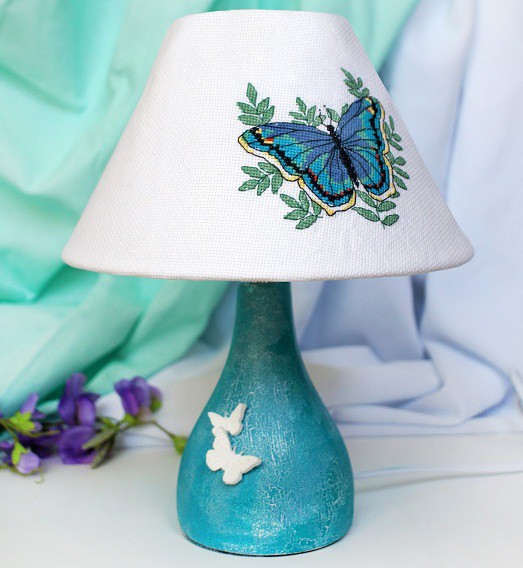
The light diffuser is the most popular part of a table lamp in terms of decoration. The fabric lampshade is easy to change with a bright ribbon and a bow at the bottom of the lampshade, in the center of which you can fasten a spectacular brooch, button, bead. Ribbon and bow should be in gamut with the main fabric.
If the lampshade requires a complete replacement, then you can make a table lamp with your own hands, using the old “top” under the frame, or make it from metal rings. It is more logical to choose a fabric for curtains, or for the color of upholstered furniture. If this is a room for a child, then it is better to purchase something creative, suitable for the character of a baby or teenager, even if it is the brightest “spot” in the nursery. Some use wallpaper as a material, exactly the same as in the room.
Having measured all the dimensions of the lampshade with a thread or centimeter, you need to make a pattern using chalk. Then put it on new material including seam allowances. Another option is allowed, when the product is planned to be made draped, then the dimensions of the pattern in width must be increased by 15-20 centimeters. Then the part must be cut and stitched onto sewing machine along the chalk lines.
The lampshade, clearly stretched over the frame, is fixed on the wrong side with threads to match the color, but in such a way that, if desired, it can be removed and washed. If the lampshade is draped, then extra machine stitches are made along the upper and lower lines of the fabric so that elastic bands can be pulled through them. In the bedroom, a table lamp made of lace fabric, which can be slightly corrugated, will look spectacular, then the lampshade will look more voluminous and the room more refined.
What can be used for the frame
Instead of a frame, you can use a beach ball or a balloon that needs to be inflated to the required size. The inflated balloon can be round or oval. It must be properly glued and decorated with the material that is selected for decoration. It can be an ordinary rope, knitting threads, plastic parts. The main thing is not to forget to make a hole on the lampshade through which it will be installed on the base of the table lamp.
When the glue is dry (that is, after at least 8 hours), the balloon or ball inside should be pierced and very carefully pulled out. Thus, the finished ceiling will remain in the hands. It can be dyed if desired. quick dry paint such as latex. However, do not keep the product in the paint for a long time, otherwise the glue may get wet.

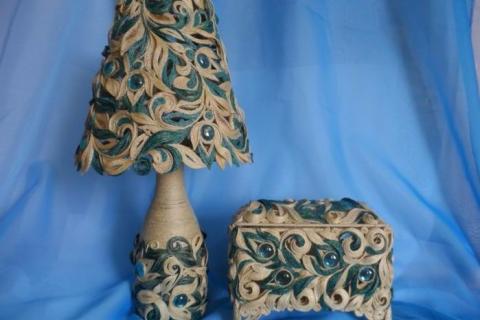

Filigree work or string table lamp
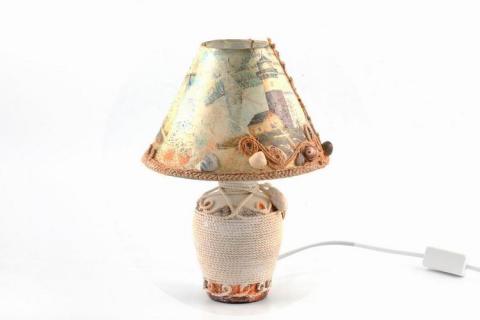
One of the most original and elegant ways to make a table lamp is to use a material such as a tourniquet. Jute cord is an unusually spectacular, durable and environmentally friendly and often used decoration element. With skillful handling of it, you can create delightful products for the home: lamps, vases, candy bowls, flower stands, wall panels and various folklore figures.
It takes a lot of patience to work with it. For this jewelry, almost filigree work, you will need tweezers or a thin knitting needle, with which a tourniquet soaked in glue is glued onto the traced base. A pattern of curls and various curves, like delicately woven lace, is applied to the frame of the lamp. Exact observance of the lines is not necessary, the main thing is that the “wet” tourniquet is fixed.
Using the filigree technique of their jute cord, your table lamp or lamp will become the epitome of sophistication and nobility. Each petal, eyelet and curl creates an exceptionally beautiful pattern. This is painstaking work, the results of which will be beyond praise.
The lace charm of a rope table lamp would be more appropriate to use together with at least one more object made using the same technique. Let it be an elegant butterfly in a frame on the wall, a candlestick on the table or a knitting box - any of these products will bring joy to the hostess and create an incredibly pleasant atmosphere in the room. Creative success to you!


