It takes ~3 minutes to read
In this article, we will consider options for making panels for the kitchen with our own hands.

Save
The main types and options for the location of kitchen paintings

Save
Faceless kitchen set will come to life if you add panels to its facades. Decorative wall panels can be made from materials of natural origin, as well as from artificial ones. Both kinds are acceptable for genres known as:
- still life,
- landscape,
- portrait,
- animal world.
According to the artistic form, contour graphic drawings, tonal, pictorial, relief and high relief (semi-volumetric) are distinguished.

Save
Decor for different styles (Provence, modern, high-tech)

Save
In the loft style, collections of coffee grinders, beer cans, steel lids, and other brightly colored urban garbage are appropriate. For the integrity of the collection they whiten with aerosols, silver.
Art Nouveau is prone to bright colors among black. Particularly suitable are curvilinear mosaics, beads, buttonholes on velvet, small golden details. Example: a mosaic from a disassembled alarm clock.
Hi-tech is necessarily metal, imitation of metal is possible. The mysterious spark on the surfaces is a reminder of the boundless space.

Save
Folk without garlic, pepper, onion garlands is impossible to imagine. And also stocks of pots under rags entwined with cords. Shelves made of deliberately cracked wood - littered, full.
Provence - the same folk, but with a protrusion of overseas wealth: pepper, saffron, poppy, nutmeg. The gifts of India are laid out in jars, they smell, provoking culinary masterpieces. The shapes of glass containers are especially important.
The above is nothing more than motifs of still lifes within frames, without them, on cutting boards, saw cuts of wood, inside a grid of flattened shelves, where each section is a bin.

Save
Master class: making panels for the kitchen with your own hands (photo)
We start with a small master class.

Save
You will need:
- dried gifts of nature, the remains of blanks,
- corrugated cardboard,
- metal ruler,
- dry remnant,
- PVA glue,
- burlap or linen canvas,
- plywood board.
Let's start creating the plaque. We pour out on the table orange peels, grains, spikelets, dry peppers, nutshells - everything that is prudently preserved and dried. We give the cardboard under the ruler the shape of a square.

Save
We make a dragonfly. The body is a chain of beans, wings are made of lavrushka, beady eyes and paws are made of dill stalks. We paste over the square of cardboard with matting, we throw the composition with strokes of dry soap. Glue is squeezed out with thick veins. We press the laid out mosaic with books. Dries for days.
After 5-10 such exercises, the flair for the material comes, the idea of a large composition matures. But the first experiments should not be thrown away. Squares with moths, flowers, birds are collected as a sectional wall panel.
Wall panel-picture from an eggshell

Save
The tradition has its roots in medieval Japan. Quail eggs, storks, and, of course, chickens were used. This is our excess. The shells (white and beige are collected separately) are washed through a colander and dried.
Crushed shells are used as background. Large plates lay out the forming elements of the image. The motive "Fuji" and "peonies" are also from the land of the rising sun. In the first case, a mountain under a cloud is created on a glue drawing using the “sprinkling” method. In the second case, you need to put a photo of a flower in front of you and, starting from the center, lay small pieces, picking up, as in a mosaic, the coincidence of contours, expanding the flower to the desired size.

Save
All you need is tweezers, PVA glue, a glue brush. With a stick, an awl, the end of the shell brush is moved along the glue that has not yet dried. The pieces are carefully pressed with a dry calico napkin.
The cellular structure of the image is akin to a cobbled stone on an old street, where there is a bridge, mountains, a distant castle, bushy thickets, thunderclouds...
Alternating backfilling and styling with selection of contours, they create mosaics that decorate home interior. Shiny from baguette frames, tinted only with black, colored, lacquered with acrylic for durability, impregnated with only one building primer, in silver decoupage - they delight without acquiring expensive materials. So you can beautifully decorate the countertop of a coffee table. The final cycle is pouring with acrylic varnish.
Decorative panel of prints of fruits and vegetables
The work of the English craftswoman Rachel Dane is magic. Since 2012, her works have been bought flower shops. It began with the fact that she wanted to get prints of freshly picked flowers on rolled clay.

Save

Save
In a frame with a padded fiberboard bottom, Rachel placed a rolled clay pancake. She laid raw wild flowers, spread the inflorescences. Laid covered with soapy water. Then she cut the old ball, poured a third of the water into the resulting container, added gypsum, stirring quickly. The mass was poured into a box on clay.

Save
The removed gypsum ingot turned out to be beautiful, but the artist decided to turn it to the original one - that is, to get a relief. Again soaping, pouring. She came up with the idea of tinting the reliefs, applied the tone with liquid paint, then lightly wiped the paint layer in a damp way (decoupage).
It is easier to work with slices of apples, stamps from potatoes on a layer of flour and salt, mixed in a ratio of 3: 1. Such plaques clogged with stamps dry for a week, and then retain their shape without baking.
Even easier when acrylic paint on paper. Pressed dill inflorescences are blown out of the spray can, a scattering of coins - a background is obtained. Sinuous leaves, poppy cups are imprinted from above. Acrylic glitters beautifully. Under glass, in a passe-partout - on the wall!
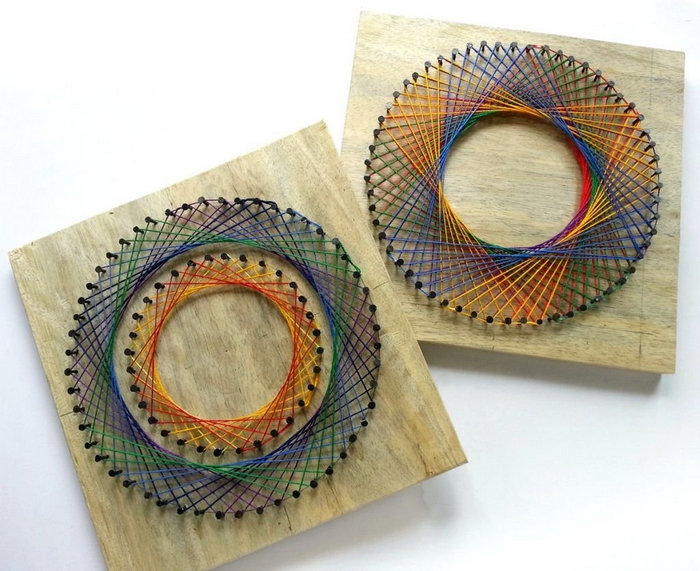
Images and inscriptions with threads on the wall (nails + threads)
You need a solid wooden or plywood board, shoe (preferably bronze furniture) nails, multi-colored threads.

Save
We make the first plaque as simple as possible:
- We beat the square around the perimeter, stepping back from the edge 2 cm. We do not drive in completely, with one blow, but so that the carnation does not stagger.
- We tie the thread around the corner nail, pull it to the opposite diagonally, and so on in a circle. A stereometric star forms in the center.

Save
Sailboats, northern lights, flashes of new stars are good in this technique - especially when the threads are multi-colored, embroidery.
Without a clear order, motifs are trees, leaves, inscriptions with greetings.
For inscriptions, it is appropriate to make a stencil, where each letter is verified. Then the paper is simply punched through, then torn off.
Pallet Jewelry

Save
They rebuilt the cottage, but the pallets remained? You can’t throw it away: they are ready-made shelves for cans!
Where there is a rough tree, there are ideas for Provence cuisine. You can wear orange, green, blue. Impregnation compositions are available, varied.

Save
From the dried planks we create openwork "beards". They, like the edges of napkins, hang perpendicular to the surfaces.
The plate is clamped in a vise. According to the drawing outlined in pencil, an ornate contour is cut through with hammer blows on the chisel. Holes are possible - with them the wooden lace is airier.
Composition of dishes

Save
Now it's time to load the shelves. In the pantry, in the country, there will always be saucers that have gone out of use. Let's start blending:
“Globe”, “Moment” glues better to glass. Crumpled “ribbed” foil, fix baking paper, add dry twigs, tint with different colors. It turns out a sacred tree.
We lay out the gilded anise stars, the bases of the cones, and the juniper “legs” by adding satin bows and beads. Get a New Year's souvenir.
Combination of dried berries and spices

Save
In contour mosaics of cereals, seeds, maple impellers expressive birds, sunrises, landscapes, cityscapes. The board is marked, if necessary, the background color is changed with paints. The same groats can be placed on a plot with a base of a different color, that is, gaps can be used in a common range.
The easiest way:
- the area is smeared with glue,
- crumbles into grains
- the excess is shaken off after drying.

Save
In the picture “Vase with sweets”, the table and bowl are bulk. Chestnuts, nutshells, seeds, saffron tubes are attached with a hot glue gun. It costs nothing, but is needed for creativity. In addition, sets of gold, black, transparent, mother-of-pearl inlays are sold. Such stained-glass windows can be painted on glass.

Save
Cork is easily cut with a clerical knife. Cross cuts form circles, longitudinal cuts form straws and "chips" for petals, leaves, feathers of the future image. We crumble the rest: a good backfill for the background.
We frame the kitchen plaquette with a cork:
- We cut several corks with a knife;
- We lay the plywood on the glue along the perimeter, alternating 2 pcs. horizontally, 2 - vertically;
- Another way: alternating two rows for brickwork.
- Craquelure- special compounds create cracks in aged things,
- Patination- taken from bronze, when the oxide is cleaned off, but remains in deep places.
- potal– thin foil, mica plates create the effect of gilding.
- Toning- created with translucent paints.

Save
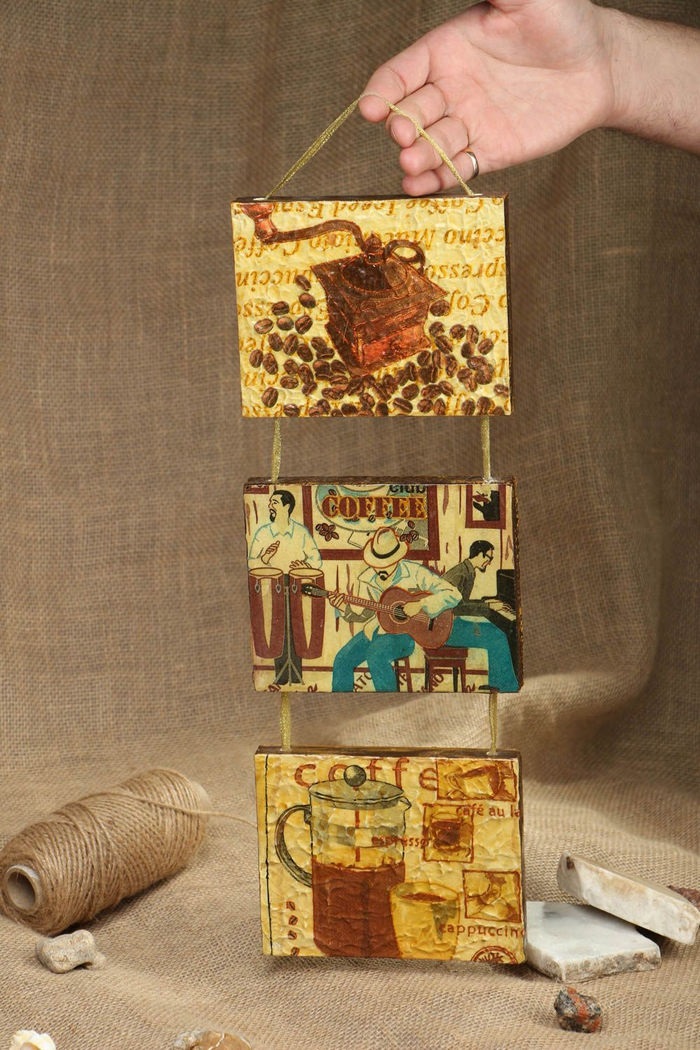
Glue a piece of burlap onto the plywood. You can chintz by dipping it in liquid PVA completely. We outline the contours of the cup, saucer, the inscription "Coffe". We sprinkle the contours with thick glue, covering the environment with a paper stencil. We use buttons for fastening. The remaining mosaic elements are attached with nitrocellulose glue or a thermal gun.
Volumetric decoupage allows a combination of quilling, planar backgrounds, layout, applications, mosaic layouts. Decoupage effects:
The kitchen is the most visited room in the home. Cooking takes place in it, the whole family sits down at a common table for a meal. When guests arrive - a feast or simple tea parties with friends while viewing photos. Therefore, I want this particular room to look wonderful, be cozy and contain a wonderful zest.


It is not necessary to run around the shops and spend crazy money to achieve a result - just go over the Internet and find great options that you can make yourself. For example: making a decorative panel for the kitchen will not be difficult, it will not take much time, and a minimum of funds is required.
How to start creating a decorative panel for the kitchen?
Before rushing to do something - you should try on the size, application and placement, i.e.:
- Location in the kitchen crafts: on the table, wall or door.
- What material will it be made from?
- Purpose of production: aesthetic value or practical application.
- The choice of direction and technique of execution.
- Product size. A hand-made panel for the kitchen should not get lost in a large space and not stand out much if the room is small.
- Variants of a decorative panel for the kitchen made of fabric
The easiest to make is a patchwork panel. Various pieces of fabric converge to work. You can find them at home or go to the studio - there are a lot of them there, they are usually thrown away, so you can get them for free.

To make an abstract craft, you need to cut out various curly pieces from scraps and sew them together. The joints can be draped with braid. The finished product is placed in a frame and takes its place on the walls in the kitchen.

A landscape panel made of felt will be a wonderful accent. How to make such decoration for the room? Very simple. First you need to make a sketch of the future picture. Then cut out the components from the felt. Each piece is glued to its place, according to the picture. After that, the craft is placed in a photo frame.

Ideas for making decorative panels for the kitchen from various materials
After the holidays, a sufficient number of wine corks are usually left, and drinks from plastic bottles, their caps can also fit for a beautiful panel. Such a panel can become the basis for a craft or an accent for a place where a planter with a flowerpot is placed. Also, such a product can be used as a hot stand or placed on the table as its addition.

A do-it-yourself panel for the kitchen made from dishes is a wonderful option for decorating a room. It is suitable for giving, a house where the family lives permanently, as well as for an apartment.

Especially such a composition will be relevant for a Provence-style kitchen. Plates can be placed on the wall itself or you can make a wooden base, where the dishes will subsequently be located.
A small master class on making decoupage panels.
To work, you need a small amount of materials:
- Napkin large with colorful ornaments.
- PVA glue.
- Sanding materials.
- Base (glass, wood or plastic).
- Scissors.
- Thread and tape with a needle.
- Several brushes.
- Since the panel is made for the kitchen, it is better to choose a regular wooden cutting board.
The first step is to drill a hole so that the craft can be placed on the wall.

In order for the surface to be smooth, it must be sanded with sandpaper. You should choose from which surface.
After that, the napkin is laid out on top of the sanded side. Then it needs to be glued with PVA. Glue should be applied with a brush or sponge with gentle movements.

After the napkin is glued, the work is varnished.
A band is made from the tape, which is threaded through a hole in the plank.
A finished panel on the wall, made with your own hands, you can hang and admire your work.

A beautiful decorative panel for the kitchen from products and photos
A variety of cereals, pasta, coffee, beans are in this room. All lockers are occupied with some utensils, products or small things. They can also be used to make your own kitchen masterpiece.


For example: white and black beans make a beautiful black and white photograph of cats admiring the sunset. Coffee beans and spices can create charming drawings. Also for these purposes, dried fruits and shells from walnut. They can become an addition to the photo frame.

If one of the walls is very wide, its accent will be a beautiful panel of their photos, which are hung out in the form of an apron or a new fashionable style in decor - butterflies.
The desire to update a recently renovated, but already fed up kitchen interior, often visits many of us. One of the ways to add bright touches to the interior without major alterations, thereby breathing into the room new life, - decorate a section of the wall panel with mural elements. A do-it-yourself panel is the very “highlight” that can reflect the character and preferences of the hostess of the kitchen, setting the atmosphere in the right way. What types of panels will look appropriate in the kitchen interior and how to make such an element of decor with your own hands, we will consider in more detail.
Some mistakenly believe that the panel is the same picture. In fact, the picture is a work of pictorial art. The panel does not have to be a masterpiece. It is intended only to act as a bright "spot", which acts as a finishing touch in the decoration of the kitchen, giving integrity to the look.
Panels - a stylish way to decorate the kitchen interior
Panels for the kitchen can have any shape and size. Depending on the material used, they are of several types:
- Fabric. Appliqués, embroideries on fabrics and tapestries can be mass-produced or hand-made.
- Graphic. Thematic images and reproductions of works of art are created using modern technicians print.
- Wooden. Carved panels made of hardwood and coniferous wood are often complemented with semi-precious stone inlays.
- Ceramic. Mosaic paintings are laid out from small elements and fragments ceramic tiles.
- Sculptural. They are mini-sculptures made of metal, textured plaster or ordinary plaster.
Separately, it is worth highlighting the panel self made, which are made from a wide variety of materials: clay and salt dough, dried flowers and cereals, beads and seashells.

To protect the surface of fragile materials that suffer from high humidity and temperature fluctuations in the kitchen, the compositions are coated with a transparent or tinted varnish of the selected shade.
The main thing to consider when choosing or making a decorative element with your own hands is that the kitchen is a functional room. All sorts of smells often hover in its space, and the smallest particles of edible fats settle on the walls. For this reason decorative elements must be made of practical materials that can withstand exposure to moisture when frequent washing.
Accessory options
Wall panels are placed in those areas of the room that they want to visually highlight. It can be a work wall apron or a place near the dining table.

Carved panels look great in a classic interior
When designing a large kitchen, designers recommend using several elements of the same type from the same series, suspended on different walls rooms.
Tip: ceramic tiles mosaic paintings are resistant to moisture, and therefore it is better to use them to decorate the working area of the kitchen.

Ceramic panels, matching with others finishing materials able to create a unique interior
When choosing a panel for the kitchen, it is important to consider its size. Walls small kitchens worth decorating with small compositions. They will not attract too much attention to themselves, thereby visually reducing the space.
Leave large images for large kitchens. They can occupy a significant part of the wall, be built into niches and be decorated with lighting. Small paintings can easily be "lost" on the spacious wall of a large kitchen.

It will be interesting to look at the panel-blende with the image of a spiral staircase
A painted spiral staircase located in the corner of the room visually pushes the boundaries. To achieve the desired effect of creating the illusion of additional space, it is important to correctly fit the panel so that the staircase organically complements the interior, and does not look like an unnecessary element.
Decor for different interior styles
When arranging kitchen interior should be guided by the rule: each room has its own look, pattern and size. The theme of decoration should match the style of the interior.
For kitchens designed in classical style, panels depicting ripe fruits and vegetables, alluring picturesque landscapes and reproductions of works by great artists are perfect.

A panel with fragrant coffee beans will cheer you up every time, reminding you of a pleasant meeting with friends.
Carved wooden and ceramic panels will organically fit into the interior of the kitchen, decorated in country or Provence style. These can be wall compositions using dried fruits, spices and flowers.


Panel for country style and Provence
Worthy addition modern interiors such as hi-tech or minimalism, dynamic pictures will appear depicting evening cityscapes or unusual abstractions. Graphic panels in a minimalist strict frame will fit well here.

Kitchen panel for the interior in a modern style
Wall compositions made from old posters, yellowed pages of books and illustrations from magazines can emphasize the exquisite rigor and beauty of a loft-style kitchen.

It's hard to believe what it is original decoration made from ordinary wine corks
All sorts of collages, abstractions and landscapes are perfect for the dining area.

Modular compositions look interesting, in which the image is divided into several separate parts.
Images hung side by side create a single holistic picture.
Properly selected in terms of design and style, the panel can favorably emphasize the interior design, giving it its own “zest” and individuality.
Creating a still life from an eggshell
AT contemporary art the effect of artificial aging of the surface, called "crackle", is very popular. It is obtained by coating products with special spray paints or carquelure varnish. But you can create such an unusual effect with the help of an ordinary eggshell.

The convex surface of the crushed pieces allows you to create three-dimensional mosaics
The technique of making a decorative panel from an eggshell is not too difficult to perform, anyone can master it. It includes a number of main steps.
Selection of necessary materials
To make a bright and appetizing still life, you will need:
- 2 pieces of fibreboard;
- napkins or rice paper;
- peeled eggshell;
- transparent file A4 or A3 format;
- acrylic primer;
- decoupage glue;
- acrylic paints;
- PVA glue.
It is convenient to use hardboard as a solid basis for creating a composition. It holds its shape perfectly and has excellent moisture resistant properties. The size of the workpiece depends on the dimensions of the composition being created.

It is convenient to apply the image with a brush and foam rubber sponges
In advance, you need to prepare the shell from several eggs. Shells from both raw and boiled eggs of any shade are suitable for work. The shell removed from the eggs should be cleaned of traces of organic matter by removing the inner film and washing them in a soda solution.
Formation of egg crackle
Laying the blank cut out of the plate face up on a flat surface, cover it with a primer. Acrylic primer is conveniently applied with a foam sponge. So it is distributed more evenly, and dries faster.
The process of creating egg crackle is quite laborious. It takes the most time. Start spreading from the center or from the corner of the sheet, placing the eggshell with the convex side out.

On the workpiece area covered with PVA glue, lay out a small piece of eggshell and lightly press
When pressed with a finger or a toothpick, the shell will be covered with a network of cracks and break up into several pieces, covering part of the surface of the base. With the help of a match or a toothpick, move the pieces, giving them the desired position and filling the voids on the sheet.
![]()
Having covered the sheet with pieces of crushed eggshell, to give the surface strength, the product is covered with another layer of PVA
Pieces of the shell cover the entire surface. The base with the finished shell mosaic is left for 5-8 hours until completely dry.
Drawing an image
After the glue has completely dried, the workpiece is covered with acrylic primer and dried again.

To speed up the process, the surface can be dried with a hair dryer.
As an image for decoupage, you can use any beautiful multilayer napkin or printout taken from the network. Rice paper is excellent for these purposes, which can be easily purchased in specialized stores. When creating a panel, you can not take the entire pattern on the napkin, but only cut out a piece of the desired size from it.

Your task is to glue the napkin without wrinkles
To obtain a smooth, wrinkle-free surface, you need to put the top layer of the napkin on which the image is applied, face down on the file. The file is carefully applied to the dry workpiece so that the pattern takes the desired position. The applied fragment is leveled with fingers. Remove the file carefully.

The image is covered with decoupage glue
When the glue dries, only a couple of strokes remain: paint on some elements in the picture with paints, giving them greater expressiveness, and cover the panel with varnish.
Installations from improvised materials
Hand-made panels are a real author's work that can act as a worthy decoration of the interior and a source of pride for its owner.
Fabric "pictures" in patchwork technique
An elegant decoration of a kitchen in the style of shabby chic or Provence can be a textile panel using the patchwork technique. Wall compositions sewn from the remnants of fabric, which echo the design of furniture and windows, will harmoniously fit into the design of the room.


Original compositions from textile accessories
To make such a panel on a sheet of paper, you need to draw a full-sized sketch. Then, from separate paper sheets, make patterns of drawing elements for appliqué. After making sure that the sizes match, the patterns are transferred to fabric cuts. Having laid out the elements of the application on the basis, they are adjusted to each other, carefully fastening with pins.

Threads for fabric appliqués are selected to match, or a contrasting contour is made
When using figures in a composition to give volumetric forms, they are stuffed with the remnants of a thin synthetic winterizer. The composed composition is glued or sewn to the base.

On a patchwork panel, pockets for small items and hooks for towels will look appropriate.
To create a functional composition, a “picture” made of fabric can be supplemented with capacious pockets for storing kitchen accessories.
"Delicious" compositions of dry berries and spices
The use of dried flowers, fruits, nuts and fragrant spices is a trendy theme.
To create a composition, you will need a frame with a substrate and the contents of your lockers. Feel free to use:
- coffee beans;
- citrus fruits;
- cinnamon sticks;
- dried flower heads;
- nuts and beans;
- any kind of cereals;
- even bagels and bagels.
The process of creating a composition is quite simple. A piece of cardboard, the size of which corresponds to the size of the frame, is covered with burlap or any other selected fabric. The material is fixed on the base, fixing it with nails or “planting” it on hot melt adhesive.


Large compositional elements are laid out on the front side of the fabric, choosing the most attractive arrangement option: a common pattern or an ornament from individual mini-paintings.
Having determined for themselves what the finished composition will look like, the materials laid out on the canvas are alternately lifted above the base and, after applying the glue, are laid out in their original place. You can hang the "picture" on a regular cord, or attach it to metal surface using magnets.


Any materials at hand can serve as the basis for the manufacture of luxurious installations: yellowed atlases, bottle caps, cutlery ... The choice is limited only by the style direction of the kitchen interior and your imagination.
Video master class: three-dimensional panels for the kitchen
The panel is a picture that is created from three-dimensional components using various techniques. A wall panel for a small kitchen does not have to be very large. It is also impractical to use miniature paintings in a large kitchen. The ideal option is the small size of such an element of interior decor.

photos
When using several panels, it is important that they correspond to a single theme.

Varieties
Glass
An option available to many and capable of radically changing the interior of a kitchen is drawing a pattern on a glass surface. In this case, you can choose a ready-made panel or it will be made to order according to the provided sketch.

The most budget-friendly ways to decorate your kitchen with a glass panel are vinyl wrap or UV printing. These two methods differ in that the film is glued to the wrong side, and the print is applied to the front. UV printing looks more saturated and bright.

You can place such decor between the top and bottom rows. kitchen cabinets. Different themes allow you to significantly change your kitchen. Appetizing citrus fruits will give sunny mood orange kitchen. If there is black and Orange color, then a tropical theme with black palm trees on a red and yellow sunset background will look stylish enough.

ceramic
A panel of ceramic tiles performs not only an aesthetic function. It perfectly masks the flaws and flaws of the repair on the walls. Plus, depending on the pattern, it can visually change the space of the kitchen.

At the moment, you can find tiles with a wide variety of patterns: flowers, imitation of a mosaic or an old canvas, reproductions of paintings by famous artists. Some options are reminiscent of old tapestries.

Tiles with tulips will add coziness and comfort to any kitchen.

Look very impressive different kinds painting. To do this, use a special paint designed specifically for ceramic surfaces. Designers create amazingly beautiful decor: flowers, abstractions, patterns.

Tiles - the material is quite durable. It will not be spoiled by high humidity and temperature changes. Ordinary detergents will quickly and easily clean the surface. Ease of care makes tiles indispensable in the kitchen.
But the most important advantage is safety, as the tile is made of clay. Even if the surface is exposed to heat, no chemical harmful substances she will not separate.

Modular
Currently, modular paintings are at the peak of popularity. They are photo panels on various topics. In this case, one large picture is divided into several, often different in size, often without a frame. It may even be part of an image. This decor looks unusual and very stylish.

Panoramic modular panel - ideal for a small kitchen. At the same time, its most suitable subjects will be fruits, still lifes, plants. The predominance of green color will bring a touch of calm and fill the kitchen with positive emotions. But dark colors, massive frames are completely unacceptable for the kitchen. They will only make her design heavier.

The advantage of modular paintings is obvious:
- There are no restrictions on the choice of topic. Indeed, you can choose whatever your heart desires and even offer your own version to companies that manufacture such panels.
- Durability and easy care due to the laminated coating.
- Affordable price.

Modular painting can drastically change a kitchen, especially one devoid of bright colors. A bright still life will become that necessary accent, a highlight of the room.

The panorama from the coffee theme looks very stylish.

Creation options
The panel can be made independently. There are techniques in which you do not need to have any special skills in order to make an original and unique decor element.

Depending on the material used, a hand-made wall panel can be:
- From fabric. The most common technique is patchwork or patchwork. In order to create such an amazing picture with your own hands, you will need the remnants of fabric different colors both plain and printed. Patchwork will fit perfectly into the interior in a rustic style.

- From cereals and seeds. Groats are suitable not only for cooking porridge. You can make a wonderful panel out of it yourself with minimal financial costs, while receiving an exclusive and interesting thing. There are many manufacturing options: from simple (use only two types of cereals in contrasting colors) to complex, which are real canvases.

Groats can lay out a single object on thick paper, plywood, or complete a picture by completely filling the background with this material. The easiest and fastest way to work with large particles. Smaller ones will take longer. To fix the grain particles, PVA glue is used. So that there are no voids left unfilled with grains, the picture should be turned over. Then poorly fixed particles will fall out, and it will be possible to modify the product.

In order to facilitate the process of caring for such decor, the picture is covered with a special varnish.
- From coffee. Coffee beans allow you to create amazingly beautiful kitchen panels. The product turns out to be voluminous, stylish and perfectly complements the interior of the kitchen. The technology of its manufacture is somewhat different from the creation of paintings from cereals, where glue is applied to the base. For a coffee picture, glue will have to process each grain separately. Otherwise it will fall off.
As a basis, you can take burlap. This decor is well complemented by cinnamon sticks, dried citrus fruits.


For a panel, it is not necessary to take coffee beans. By using ground coffee incredibly stylish things are created. To do this, you need a stencil, glue and coffee. The desired areas are smeared with glue, and then coffee is scattered over them. Minimum cost and maximum yield. This method is especially good for those who have difficulty with drawing.


- From salt dough. Salt dough is a material from which voluminous and very beautiful paintings are obtained.


In order to make dough suitable for modeling, you will need the following ingredients: fine salt - a glass, flour - 2 glasses, water - 125 g (maybe more, navigate along the way), dry wallpaper glue - 1 tbsp. a spoon. If you add different spices to the dough (cinnamon, cumin, nutmeg), then it will become fragrant.
Working with salt dough is like modeling from plasticine. You can use toothpicks, garlic press, cookie cutters, buttons (for prints). No glue is needed to connect the parts, it is enough to moisten them with water and press them together.
Any wall decoration after repair is boring, you want to change something and find a way to show your imagination, talent and creative skills.
A three-dimensional panel made from improvised materials is one of the fashion trends in design 2017.

Looking through the spectacular work in the illustrations, it may seem that it is difficult. But if at school labor lessons the figures made of plasticine and salt dough turned out to be “excellent”, there is experience in working with beads or natural materials - everything will work out.

What material to choose for wall decoration
A handmade wall panel is a special decor that can enliven the most ordinary environment, introduce a new design concept and enliven the atmosphere.

The choice of material and technique to implement the idea depends on many factors:
- Functionality of the premises;
- Wall decoration;
- Creative inclinations;
- tastes and preferences;
- Availability of materials and tools;
- Skills in working with materials (sewing, knitting, modeling, weaving, drawing).
It is better to place a large panel on the entire wall in a large room, where there is a lot of empty space. Buying a picture or sticking a photo wallpaper is the easiest way. But there is nothing original in this, plus high costs, and the new facility will soon get bored.

Another thing is your own “masterpiece”, which you can proudly show to all visitors to the house.

Looking at a unique work, friends and relatives will be interested in how to make such a panel with their own hands?

First, it is better to choose a free wall, and then decide what it will be - a collage of photos, drawing, modeling or a mosaic of broken tiles. The general idea and plot of the image should correspond to the functionality of the room and practicality in care.

For example, it is not difficult to paint aquarium fish on the wall of the bathroom on a smoothly painted wall, but the paint must be resistant and indelible.

If the material is subject to destruction or accumulation of dust, it is better to cover the finished product with a colorless varnish, like a photo panel of salt dough.
The paint base for the panel should match the material of the wall cladding. For example, if it is acrylic enamel, then acrylic paints are also suitable for painting walls.

The walls in the nursery can be decorated with a wallpaper panel, which is easy to build together with the child from the remnants of rolled materials left after the repair.

Tip: Give the kids some of the fun DIY decorating process. They willingly join the creative process. This will help the development fine motor skills fingers and spatial thinking.

Children can collect natural materials- beautiful twigs, leaves and cones for panels. If they don’t know how to draw, instruct the child to spray paint from a spray can on a stencil.

They will enthusiastically trace large maple leaves on cardboard, cut out their outlines in order to spray gold and silver contour drawing on the walls in the hallway. Spray paints and a stencil in the decor of any room are the best solution for those who cannot draw.
Panel of edible products for the kitchen
The kitchen is the realm of products, where many bulk materials are suitable for decoration. Before you make a panel with your own hands, make an audit in your lockers.
Note!


Novice decorators have at their disposal a whole natural palette that retains its natural color for years. A panel of coffee, cereals and spices will decorate a free wall fragment in the dining area.

The work is carried out in several stages:
- Choose your favorite sample.
- Make a sketch with your corrections and apply the markup with squares to enlarge the drawing on the wall when enlarged.
- Apply the markings and outlines of the panel with a simple pencil.
- Glue decorative fragments for a specific product.
- Finished sections should dry naturally, after which you can move on to neighboring elements until the whole picture is completed.

Tip: In order to avoid disagreements, it is recommended to coordinate the plot of the panel with all family members.

Any "appetizing" materials are suitable for the kitchen:
- dried drunk tea leaves are black and brown contours of any drawing or soil in a picture;
- semolina is an excellent light base that can be additionally decorated, it also fills empty areas;
- coffee beans (green and roasted) great material brown and green tones;
- white and colored rice - a variety of sizes and shades;
- peas, beans, lentils and beans - white, yellow, orange, reddish and green fruits different shapes applied to the glue in halves;

- poppy - black base of the picture;
- instant coffee and chicory, cocoa powder and ground cinnamon - a loose base of brown shades;
- pumpkin, watermelon and cucumber seeds are excellent material for do-it-yourself panels, they are also glued in halves;
- cut or groats of millet, corn and wheat, cereals and barley - an inexpensive base of different colors and textures.
It is advisable to carefully open the finished panel with a colorless varnish in 2-3 layers, so that over time it can be easily cleaned of dust.
Note!


The image can be left as if unfinished or limited to a side (frame). Decorating a kitchen together is a fun activity that can easily involve three generations of family members.

Interesting ideas will be suggested by specialists who recorded a master class on making panels with their own hands:

Those who are good at sculpting figures, small sculptures or making dolls from any material should master the technique of working with salt dough.

For a relief panel, fine salt is mixed with flour 2: 1, adding a little vegetable oil, water and dry wallpaper glue, kneading like a regular dough. It should be plastic, but hard enough.

The finished mass should not stick to the hands. Small pieces or balls are separated from it, from which the faces of the characters, fruits, leaves and other elements of the panel are formed. It will hold up better if framed as a portable decor or attached directly to the kitchen wall.
Note!


You can add any other material to complete the plot, such as embroidered fabric, beads or yarn.

The relief picture dries for about a week, but then a solid durable material is obtained. The finished creation can be decorated and varnished, like a photo of the presented panel.

Expert advice on making panels from various materials
Making decor with your own hands is a fascinating creative process. Usually, after mastering one of the techniques on the example of decorating dough or cereals for the kitchen, I want to move on to decorating other rooms.

In the children's room, it would be appropriate to decorate with autumn leaves or colored paper panels made of fabric using the patchwork technique.
The bedroom of the needlewoman will be decorated with a panel of flowers, leather, fabric or buttons. A popular plot is a money tree, where coins or green coffee can be added to the buttons.

For a bathroom or bathroom, “marine” material will be an excellent decoration - smooth colored pebbles, shells and coral twigs.

The living room will be decorated with cork, bamboo, ornamental stone. In skillful hands, any material will become the basis for a homemade masterpiece.

DIY photo panels


