I have been interested in this question for a long time - indeed, what is better to use when installing electrical wiring: wago clamps or making copper twists?
There are serious disputes on this issue, whole battles flare up))) on the forums, but the truth, as they say, is somewhere nearby.
Personally, I think that there is nothing wrong with using Vag clamps - under certain conditions they are quite applicable.
However, there is one BUT! Since the contact with the wire at the clamp turns out to be point, then, in theory, the transition resistance should increase compared to twisting.
And besides, it is not known how the clamp will behave at the limit of its capabilities - with high current and high temperature wire.
That is what I decided to check.
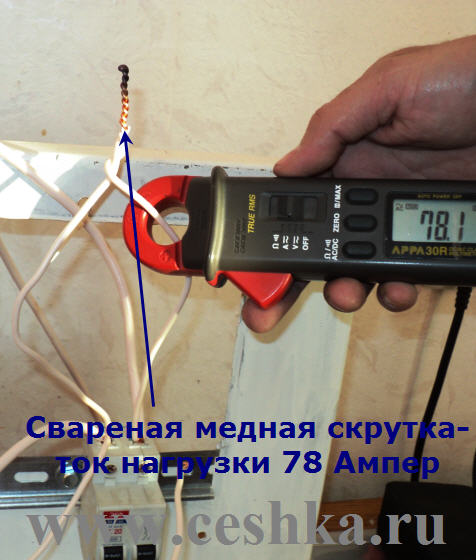
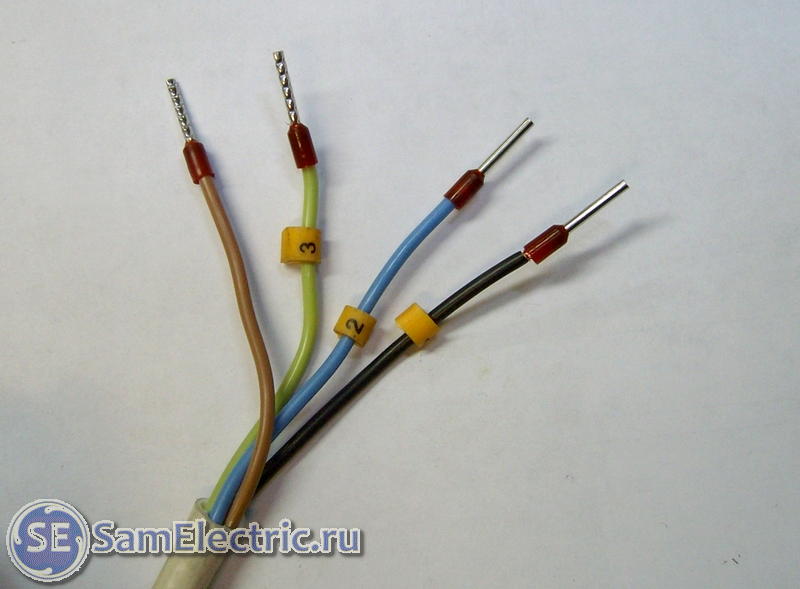
I took a mounting wire with a cross section of 2.5 sq. mm, cut it into four equal parts of 15 cm each and connected the two wires - twisted and two for the Vagovsky clamp.
 Twist 4 cm long, welded with your own ,
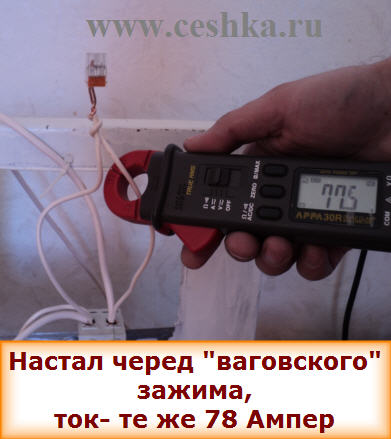
I bought a wago-clamp specifically for a section of 2.5 sq. mm and a current of 25A.
Twist 4 cm long, welded with your own ,
I bought a wago-clamp specifically for a section of 2.5 sq. mm and a current of 25A.
I decided to determine where the transition resistance is less in the following way: apply a load to the wire three times more than the permissible one, so that the wire begins to heat up intensively.
I reasoned like this: if there is a transition resistance in the wire section, then the heating will be stronger in this place and the wire insulation will melt in this place earlier than in the rest of the wire section.
It remains only to note the time when the insulation begins to melt near the transition resistance and compare two indicators with each other - for the twist and for the wago clamp.
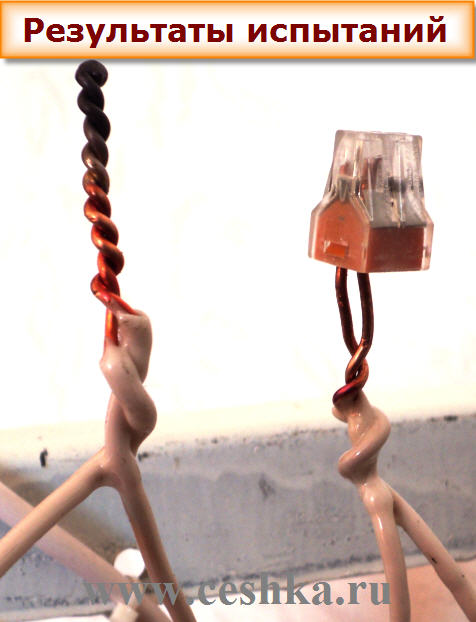
 I’ll say right away that the test results showed the complete superiority of the twist!
So, tests. Applied a load of 80 amps. In the process of heating the wire, the current decreased to 76-77 Amperes, as can be seen in the photographs.
And a very important detail:
the wire with the twist was heated almost evenly along the entire length, and even at the end of the test it was visually visible that the insulation melts equally both near the twist and along the length of the wire.
How did I define it? And you can see where the smoke came from))) And it went evenly from all over the wire.
 The tests were stopped after 170 seconds as soon as the wire insulation near the twist was sintered.
The turn of the wire with the Vagovsky clamp came. After turning on the load on it after 96 seconds. the smoke came from the clamp area, it was even clear that the smoke was coming from the insulation directly near the wago clamp.
And already after 130 seconds, the insulation of the wire near the clamp completely melted and sintered.
Conclusion: at high multiples of the overload current in the wiring, twisting is more preferable than wago clamps.
 This can occur, for example, if it’s wrong, which I observe all the time - they put a 1.5 sq. mm automatic machine at 32 Amperes on the wire and turn on a 6-kilowatt electric boiler ...
After all, the machine was chosen according to the load in the store! And what will happen in this case in the distribution boxes? Naturally, the wire insulation will overheat and even melt, and in this case, the use of wago clamps will only aggravate the situation ...
I don’t finish this test, I’ll think of something else, or maybe you can tell me something, I’ll do it and show the result.
Write comments, I will be grateful if you click on the +1 and tweet buttons at the top of the article.
Video of testing with increased current of twisting and clamping of the Wago type:
Be the first to know about new site content!
Terminals on wires are an integral part of any electrical network. After all, it is poor contact that is the main cause of breakdowns and incorrect operation any electrical device.
And some electricians even joke that electrical engineering is the science of contacts. Therefore, the highest attention should be paid to the high-quality connection of wires and cables.
Terminal types
At the moment, terminal blocks can be very conditionally divided into several main types. First of all, these are special lugs for wires, which provide the subsequent possibility of switching. In addition, there are terminals themselves that provide contact between several conductors.
Tips for wires
First of all, let's look at a variety of wire lugs. Usually they have a crimp type of fastening, but there are models equipped with screw terminals. The range of their application is truly enormous. They are used both in low-current networks and for switching power cables for which they are mandatory.
So:
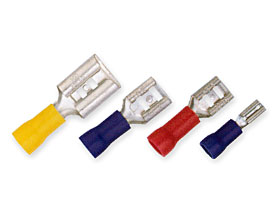
- First of all, let's look at the terminals on the knife wire. They found wide application in the automotive industry and in general in low-voltage networks. The design of these terminals suggests the presence of two types of fastening - father and mother. Some tips look like a knife, from where the name came from, and the second terminals have a design that ensures reliable fastening of this “knife”.
- Knife terminals can be made straight and swivel, which greatly expands their scope and simplifies installation. To isolate the connections, special insulating covers are used. If there is no point in insulating the direct contact connection, then it is possible to use terminals with insulation of the crimping point.
- Typically, these terminals are available with the possibility of crimping wires up to 2.5 mm 2. Although you can find models with the ability to use wires with a cross section of up to 6 mm 2.
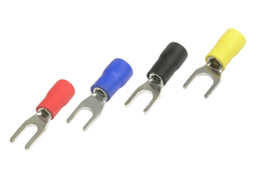
- Fork-type terminals are designed for switching power and secondary circuits. Such ferrules are designed for subsequent fastening with screws directly to the equipment or to the busbars. The instruction advises using them as a temporary or requiring frequent reconnection of a contact.
- The design of the fork tips is a two-pronged fork, hence the name. This design makes it quite easy to switch without completely unscrewing the screw clamp. At the same time, in the connected state, it provides a fairly tight contact.
- Fork lugs are available for wires with a cross section of up to 6 mm 2. The wires are attached to the terminals by crimping. This place in various variations may or may not have an insulating coating.
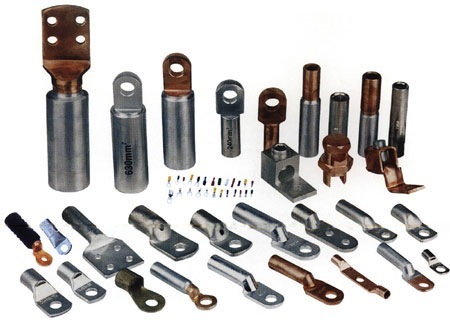
- A more reliable contact is provided by the so-called ring terminals. Like their fork counterparts, they are designed for subsequent screw clamping. But due to the round shape of the contact part, they provide a large contact area and reduce the risk of “popping out” of the tips.
- Ring terminals for wires are such a good solution that they are used not only in low-voltage networks, but are also a mandatory attribute of power cables of any section. At the same time, the method of attaching a wire or cable to lugs of this type can vary from welding and soldering to crimping.
- Ring terminals are available in copper, aluminium, brass and copper-aluminum. Their cross section can vary greatly, ranging from small terminals for a triple screw and ending with bolts of 27 or more. At the same time, terminals for low-voltage networks can be supplied with insulation of the crimp part.
Note! In addition to those presented above, there are other types of terminals. So you can find terminals for speaker wires, a variety of needle, plug and connecting terminals. They are not common and for the most part use a crimp type of attachment to the wire.
Crimp terminals
For connecting power lines to rated current up to 25A sometimes up to 50A screw and clamp terminals are used. This type of connection does not require additional lugs on the wires and allows you to simply mount a high-quality connection.
So:
- First of all, consider the clamping terminals for screw-type wires. Usually they are made of a dielectric (plastic, carbolite, etc.) inside which are brass terminals with screw clamps.
- The advantages of such terminals include high-quality contact, ease of installation and a wide range of wire cross-sections with which such terminal blocks can be used.
- The disadvantages include poor combination with aluminum wires and stranded copper wires. The fact is that when clamped, the screw can either completely crush the soft aluminum wire, or significantly reduce its cross section. The same thing happens with stranded copper wire.
- A partial way out of this situation may be the additional use of needle tips or brass tubes, due to which the price of such an installation increases somewhat, as does its time. A wire is first inserted into such tubes, and only then it is clamped with a screw. Thereby rotary motion screw does not cause significant damage to the conductor.
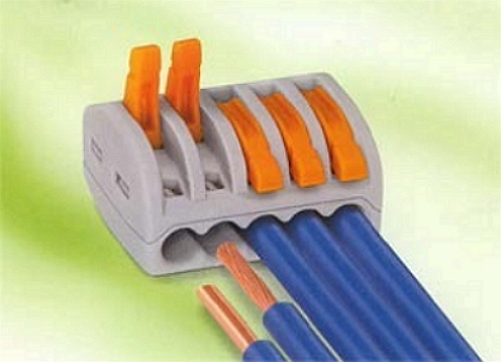
- The so-called quick-clamp terminals are even easier to install. The body of such a terminal block is made of a dielectric, inside of which there is a spring. When installing the wire in the terminal block, this spring provides proper pressure on the wire and reliable contact.
- The advantages of such terminals include ease of installation and reliable clamping of aluminum and copper wires. Possibility to use needle tips for mounting stranded wires.
- But there are many disadvantages of such terminals. First of all, this is the impossibility of using stranded wires, in addition, under the influence of temperature changes, the clamping reliability decreases sharply as a result of the weakening of the spring.
Note! If the terminal for the wires must crimp precisely stranded cable, then special spring terminals are used. They have a special lock that provides the wire with the opportunity to get into the attachment point. After installing the wire, the lock closes and the spring clamps the wire. Such terminal blocks are practically ideal solution for stranded wires.
- Connecting terminals can become a separate topic for discussion. Mostly they have crimp connections, but soldering is also possible. Such terminals are mainly used in cases where there is no stock of wire for connection with conventional terminals.
- Such terminals are often also called connecting sleeves. Usually they are made of brass tube. Sometimes it has an additional insulating coating.
- Thanks to this design, you can insert the wire from both ends of the sleeve and crimp it with your own hands. In this case, the proper level of contact will be ensured, and you will not have to resort to additional soldering of the wire.
Conclusion
Our brief review did not include all types of terminals currently on the market. After all, now there are a huge number of them for a wide variety of compounds.
Many of them are intended only for certain types of connections or wires, so it is simply impossible to describe them all. To facilitate the issue of choosing terminals specifically for your tasks, you can watch the video on the pages of our website.
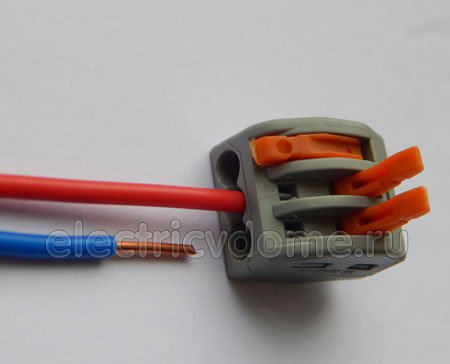
Vago terminals. This is not an advertisement!
I am delighted with the Wago terminals, which appeared on the market a few years ago. They have greatly simplified the life of an electrician, made the wiring process quick, simple and enjoyable. Twisting and electrical tape in junction boxes are safely a thing of the past.
I must say right away that it is more beautiful and interesting about the Wago terminal blocks in the official catalog, which can be downloaded at the end of the page.
For simplicity, Wago terminals are divided into two types - disposable and reusable. Both types theoretically hold current up to 25 Amps, are used to connect wires with a cross section of up to 2.5 mm2. More current is not needed in most cases. The insulation also disappears.
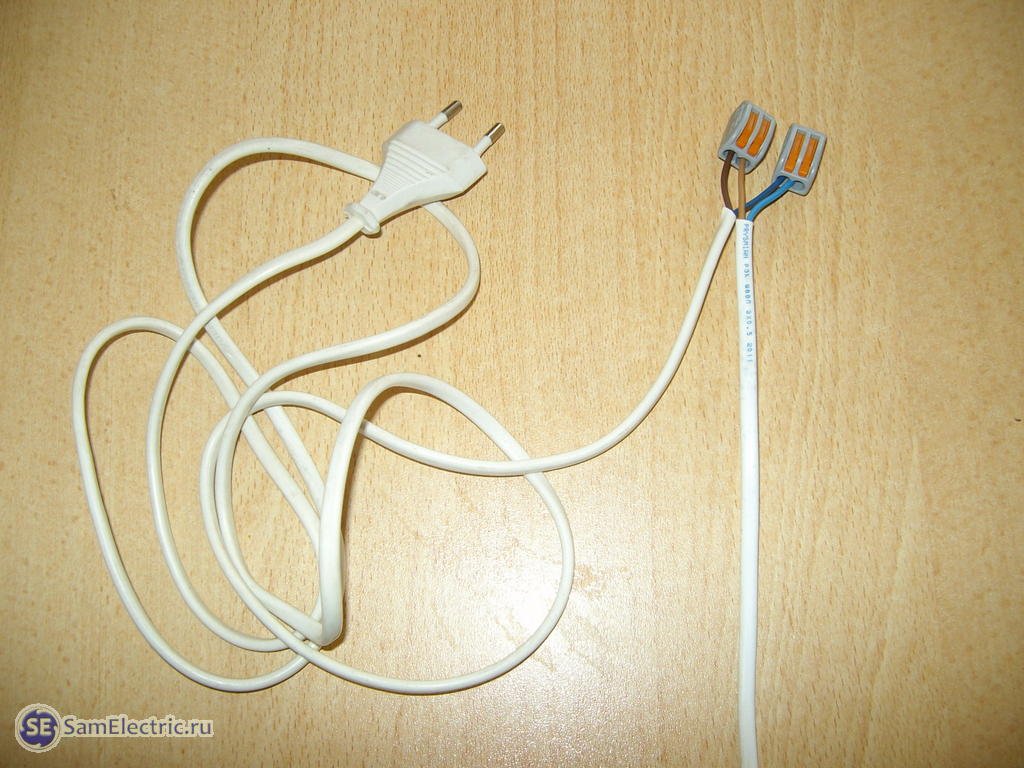
Disposable mounting clamps Vago(Wags) are used for quick installation "once and for all", "done and forgotten". Only rigid (single-core) wire can be connected. The popular model is 773 .
They can also be used to connect stranded flexible wires, only having previously pressed them into the tips.
For a better connection of aluminum + copper or aluminum + aluminum, it is advisable to use terminals with paste, they are usually black or dark grey.
Here is the official reference information from the Vago terminal catalog, which can be downloaded at the end of the article.

Table 1. Wago 773 terminal connectors (disposable) for junction boxes
Model name -
In fairness, it must be said that these terminals can be used more than once by pulling out the wire and inserting it again. Try it and see how well the wire holds in these clamps.

But it seems to me that the quality of the re-clamping then deteriorates.
Reusable Wago terminals with a lever are much more versatile.
Here is information on Vago universal reusable terminals. The name of the most popular (if you buy in the store) - Wago 222.
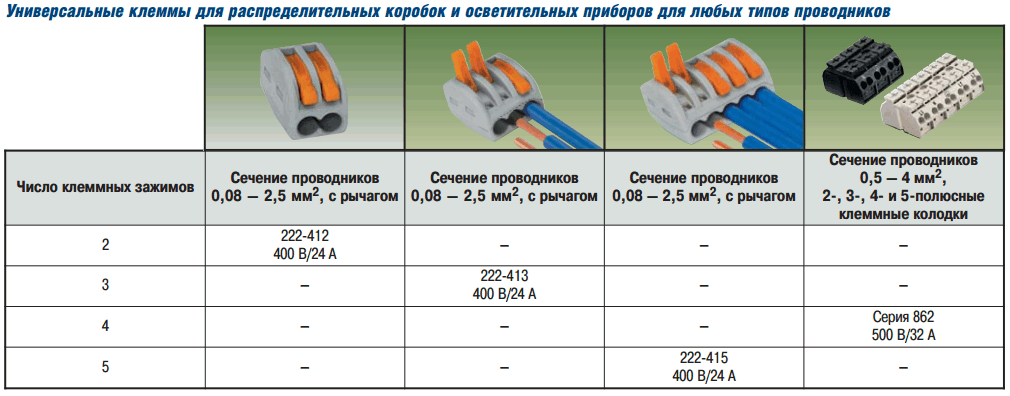
Table 2. Vago 222 universal terminals (reusable) for junction boxes
By the way, the price of universal ones is about 1.5-2 times higher than that of disposable ones, but the advantages cover the price.
You can use stranded and solid wire of different sections in any combination.
Theoretically, you can shove a wire from cable VVG with a section of 2.5 squares and wires from the ShVVP cord with a section of 0.5. But only theoretically. Since such a design is needed.
Vago's universal terminals are easy to reuse - raised the lever - pulled out the wire, inserted it - lowered the lever. Out of habit, it seems that this lever is tight, and can break. But it only seems. I used Wago with a lever thousands of times, I didn’t break a single one.
Such terminals are available for 2, 3, 5 wires (places for connection)
One terminal is electrically the same as one twist or one junction. It seems obvious, but I really saw an “electrician” who connected zero and phase to one double Wago terminal block when installing the lamp. We turn on the lighting - it knocks out!
Despite the fact that such terminals were invented in Germany, now almost all of their production has been transferred to China (however, this applies not only to terminals). Made in China, they almost completely match the original German-made terminal blocks, while being 30-50% cheaper. True, there is a problem of choosing high-quality analogues. Here you need to rely on experience and reviews, choose certified models and cut off counterfeit products.
There will be other articles; in modern wiring, Vago terminals are used very widely.
Download Wago catalog
And here is the promised Wago catalog. As usual, everything on my blog can be downloaded for free. Popular models (Vags for household electrics) - on pages 105-107.
/ It is worth downloading to look at all the diversity and beauty of Vago, pdf, 20.63 MB, downloaded: 7973 times./
Other directories and more useful information can be downloaded from the Wago official website.
I have written more than once about the terminals and clamps of Vago. Here is my main . I decided to supplement and highlight the examples of use in a separate article, since a lot of photos have accumulated. I will describe in detail the practical application of these terminal blocks, the pros and cons of each specific case.
I foresee that the topic is very ambiguous, I can’t state everything, therefore I accept criticism and the exchange of experience in the comments.
To start -
Basic rules for using Vago
1. For lighting and other circuits limited in current to 10A, the terminals fit perfectly, you don’t need to know any subtleties. Plugged it in and let's go!
2. If the current is from 10 to 20 A, you need to think about the cleanliness of the surface of the wires. Moreover, the current must really be limited by the corresponding circuit breaker (10, 13, 16, 20 A), and the wire. Otherwise, it might look something like this:

Terminal block Vago 773 with paste burned out, because old aluminum wire was not stripped
3. At currents of 25 A or more, I would limit the use of Vago by going to crimping, welding or. Although, for a quick repair of home electrical wiring, Vago cannot find better and more convenient ways.
How to use the Wago 773 terminals at high currents
If I need reliable operation of the Vago 773 connection terminals at maximum currents (up to 25A), I recommend using the method - strip the wires by 20-30 mm, connect them with the connection terminal as usual, and twist and insulate the remaining bare parts.
Strengthening Wago 773. We insert the wires

We isolate, and calmly mure the contact, its reliability has increased many times.
Attention! All connection points must have access!
Examples of connecting clamps Vago 222
To start - how not to properly mount the Vago terminals, I wrote about this above in the first part of the article.

Or: How to arrange beautifully short circuit using terminal blocks Vago 222.
How to use the Vago 222 terminals correctly
The main thing is to understand that one terminal block is one electrical contact.

How to connect Vago_larger clamps correctly
Now from common cases let's move on to the discussion practical application these wonderful terminal blocks.
Example 1. How to use Wago 222 terminal blocks
The example shows how easy and simple it is to put things in order in the panel with automatic machines, where there is a mess, it is very crowded, there are different wires, and you need to connect more. There is no photo of what was originally, but it may be good. I'll look at the pros and cons.
In the utility room, where everything is done with corrugation, it is necessary to install and connect an additional plastic shield with 4 circuit breakers. Moreover, it must be connected to the existing shield, minimally interfering with it.
It is correct to say "plastic modular case", but I say "shield", it's easier and more understandable.
Here is the old shield to connect to.
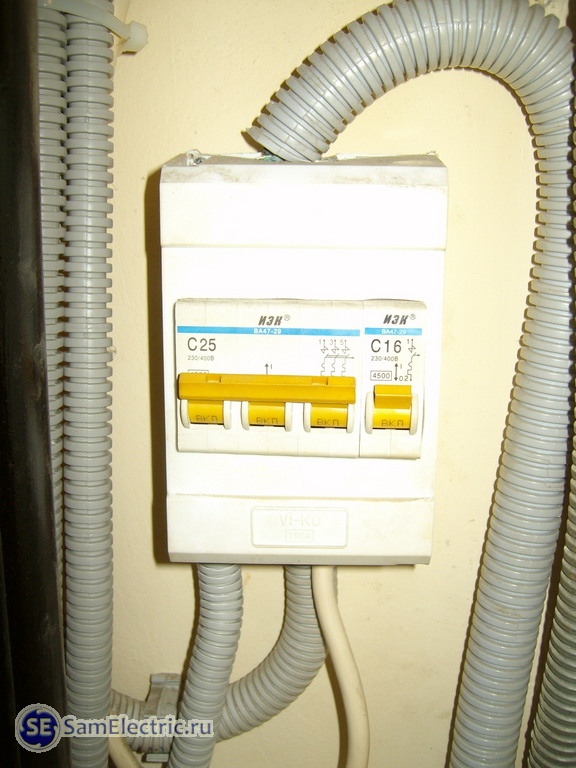
Old electrical box assembled
What is the main problem with such shields (pictured)? Despite the fact that it is positioned as a case for 4 circuit breakers(4 modules), 4 machine guns fit in there with a very big creak. After all, you still need to connect zeros and earths. And these are two more terminals. Therefore, you should always leave about 20-30% of free space in the shield in reserve.
The zero and ground wires were connected to plastic screw terminals (Lego type), without tips. And where do I go with my rigid single-core VVG 3x2.5?
Fortunately, German engineers came up with universal clips Wago 222 who rescued me. Here is how the connections were mounted by me.
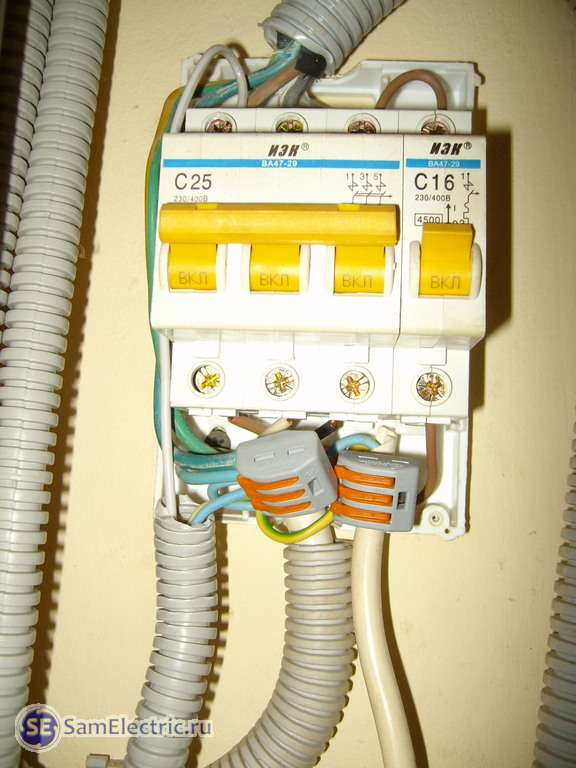
Old shield with the cover removed. The wires are connected through Vago clamps
Involved in the connection: stranded PVC wires section 2.5 (introductory from above) and 1.5 mm and single-core VVG 2.5 mm (this goes to my shield, bottom left). If there is another way to connect in this situation, write in the comments.
My shield is set below and the connections in it now look like this:

Please note that this is important - I chose a shield for 6 modules for installing 4 modules of automatic machines. There are 3 reasons for this:
- Space for laying wires, you can leave a small margin;
- There is where to place the clamps (terminals), you can put the terminals on a DIN rail;
- For the future - if you need to connect another consumer (but not two!), There will be where to put an additional machine.
We close the shield.
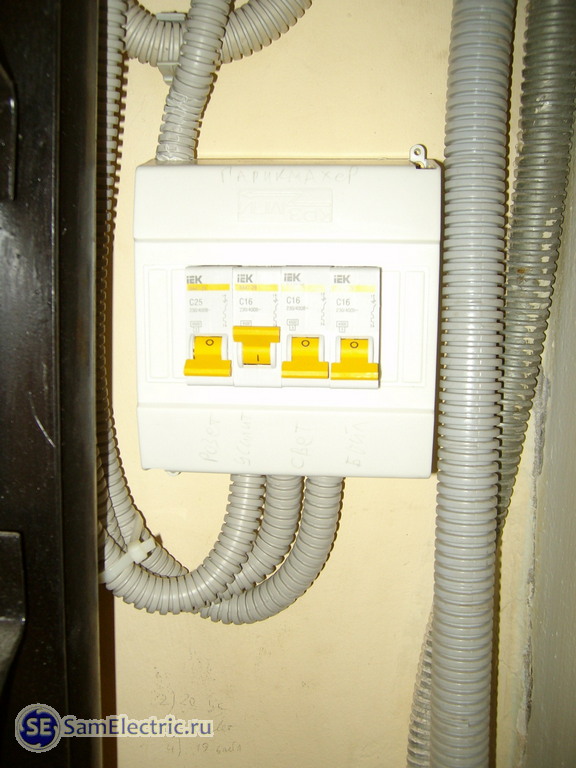
New shield assembled. Sockets room, utility sockets, lighting, boiler.
This is what both shields look like. All work on installing the shield, automatic machines, connecting wires, laying 4 cables in three corrugations took no more than an hour.
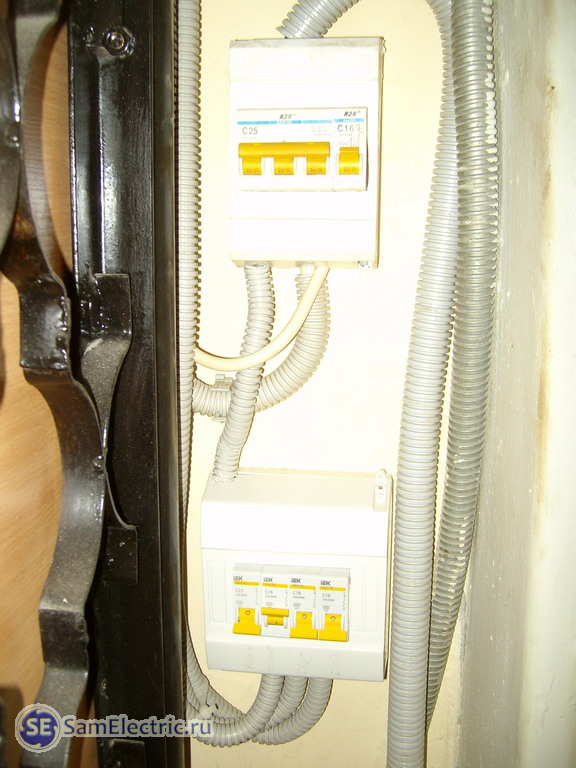
Result - both shields assembled
The main thing is that the current is limited by the machine to 25 A, the wires are all copper and new, the heating will be minimal.
The disadvantage of this use of the Wago 222 connecting terminals is that in case of a possible overcurrent, the terminals may begin to melt. Therefore, for peace of mind, it is better to reduce the ratings of circuit breakers.
Example 2. Using Wago terminals to repair electrical wiring
The following example shows how to quickly repair electrical wiring that was literally broken with an axe. The man tried to twist something himself, arranged a short circuit in the house, and then called me:

Here's how I did a quick wiring repair using the Wago 773 connection terminals:

Quick repair of wiring to the outlet using disposable Vago terminals
The phase is wrapped with black electrical tape. Then you need to turn off the electricity, carefully hollow out a place for new connections, and plaster all this disgrace. It is better to insulate the places where the wires enter the terminals with electrical tape before that.
And how to put an outlet in such socket boxes is described in detail in my articles on how to securely install an outlet and. Be sure to read!
Example 3. Distribution node repair
In this one (I don’t dare to call it a box) ... This cube of wires has everything - and the input from the entrance (wires are thinner than one and a half, turning into aluminum, turning into a ball screw screw with single-layer insulation, and wires are rigid and flexible, and copper, and lumin.
How did it work? Don't know. The owner called me when he arranged a short circuit, and the floor of the apartment was left without tension. At the same time, the access Soviet automatic machine 25A did not work, which is natural.
I temporarily restored the power (the wires burned out) using two Vagos (222 and 773, you can see it at the top of the photo):
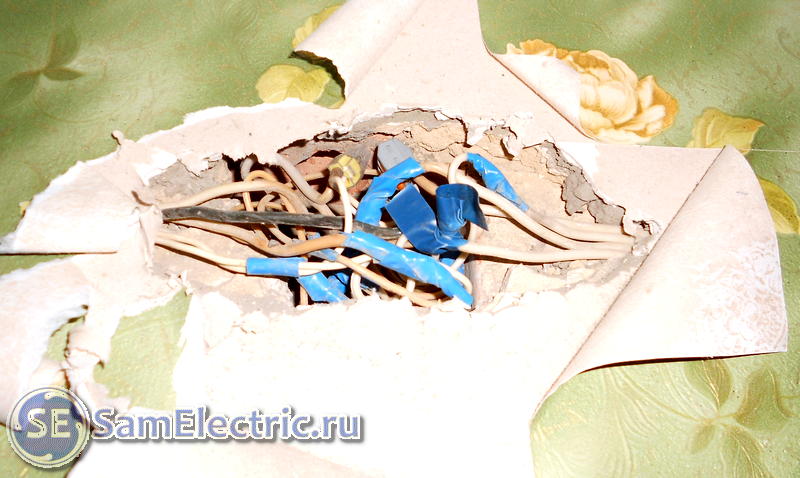
Repair of old aluminum wiring. The worst thing is that people lived with it for many years, it was just covered with plaster, and the machine was set to 25A!
A couple of days later he came again, for a start he threw out everything superfluous, and figured out what was coming from and where. I also threw out the wires from the entrance, I will then lay new ones:

Repair of old aluminum wiring. To the left of the wires are the light for the toilet and the power supply of the entire apartment. Downstairs is a toilet and bathroom switch. To the right is the light bathroom and the food of the kitchen.
Now, using pieces of hard copper wire and Vago terminal blocks for a different number and different types wires, I collect the circuit:

Repair of old aluminum wiring. From the bottom, the VVG3x2.5 cable from the entrance is suitable. Used Wago 222, Wago 773 with and without paste.
Here's what happened in the end:
![]()
Repair of old aluminum wiring. Vago help out great!
Of course, if everything is done wisely, it is necessary to completely change the wiring in the entire apartment. But such a task was not before me.
I am calm about my work and this apartment, especially considering that it is now powered by a 16A machine. And the most powerful consumers are a washing machine and a refrigerator.
Example 4. Wago terminal blocks: how to use when installing a new junction box
I will give an example of how I make connections in the junction box when installing new electrical wiring.
Here is a cheap option. This is the hallway. Through the 20A machine, a cable with wires with a cross section of 2.5 mm² comes into the box, and diverges into 1 socket (2.5 mm²), lighting and a bell (1.5 mm²).
Initially, after the plasterers, we have this:
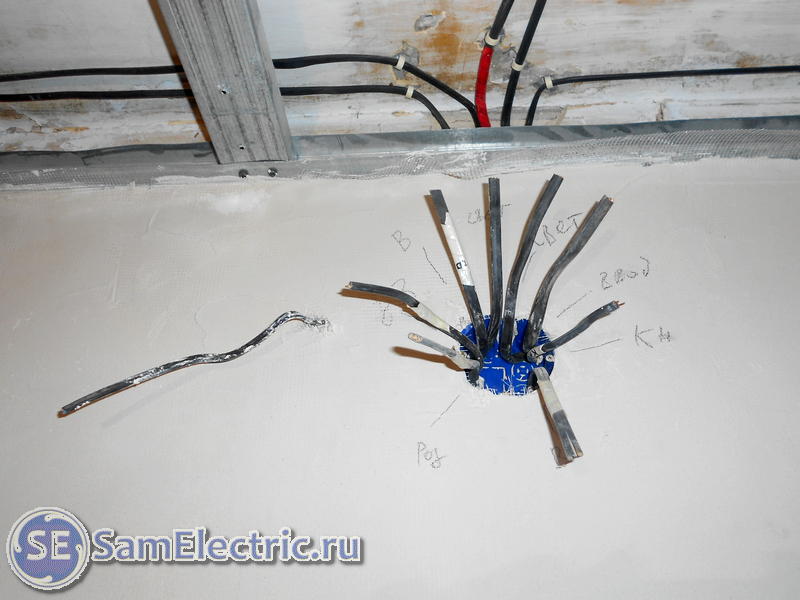
Connecting wires in a new junction box. We sign the wires. To the left, a VVG2x1.5 cable sticks out of the wall to the bell. Guess what terminals I will connect it through)?
We clean the wires, determine where we have what. As usual - white phase, blue zero, yellow-green - earth. For switches - white phase, blue first key, yellow-green - second.

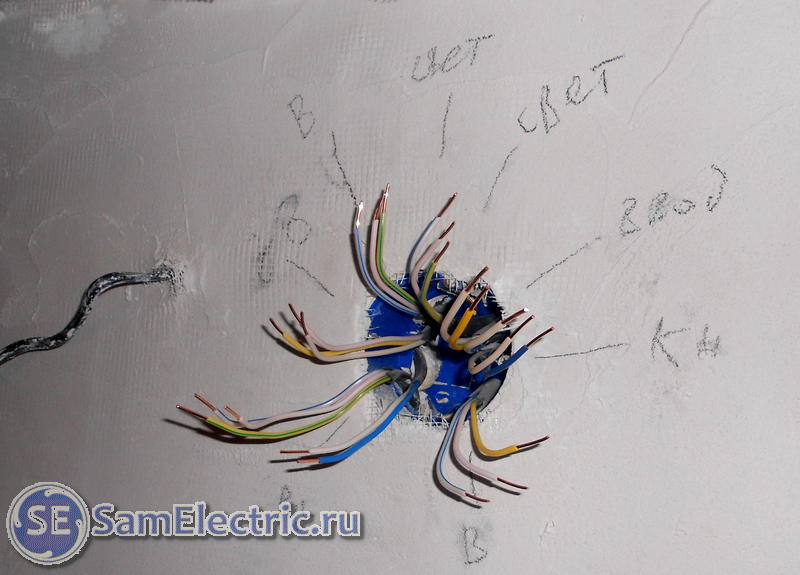
3-5 minutes - and you're done:

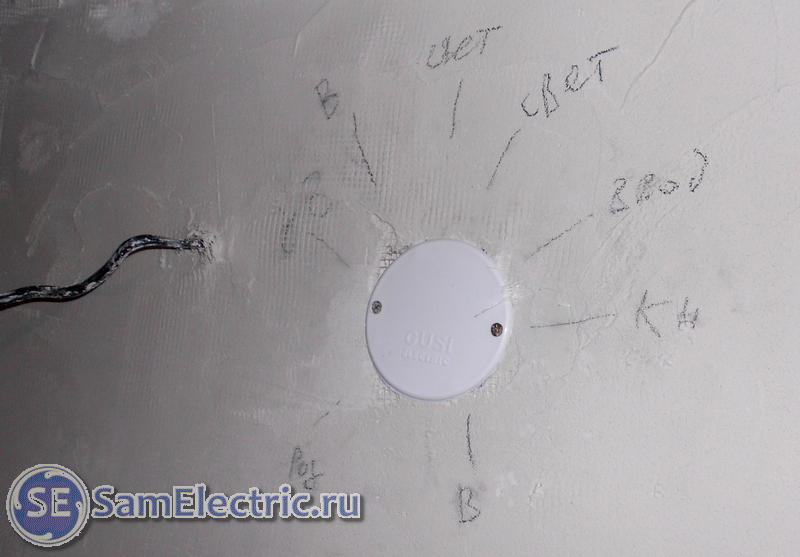
Now you can plaster and paint or wallpaper. Important - the box must be accessible, at least its location must be known. You never know what can happen in 20-30 years?
5. Another example of the use of Wago 773
Below is a photo showing the use of Wago terminal blocks when disconnecting wires in junction box.
![]()
The use of terminal blocks Vago. Another example
What can you say about this photo?
1. The wire used is 1.5mm2. This means that the circuit breaker through which this box is powered must be 16A, and preferably 13A.
2. A terminal block is adapted for connecting the lamp Wago 773-302 with paste, which actually holds more current than the orange terminal blocks 773-324 through which the power goes to the sockets. Better vice versa, if possible.
3. It is better to separate power outlet lines and lighting lines, since currents of different sizes flow in them (the difference is an order of magnitude). And, accordingly, different circuit breakers for different currents. The advantage of such a connection is also that if the machine knocks out due to an overload or a short circuit in the outlet, then the light in the room will remain on.
6. Connecting a call button
The picture is short aluminum, but you need to put a new button for the call.
We hollow out a recess into which two new small-sized Wago 2273-242 terminal blocks are placed. To them - pieces of copper and a half.

Application of stranded wires
As I said in the articles, stranded flexible wires are connected through Wago 222 terminals with a lever. However, flexible wires can also be connected through disposable 773. To do this, you need to use lugs:
The tips are crimped using a special tool; pliers are indispensable here:
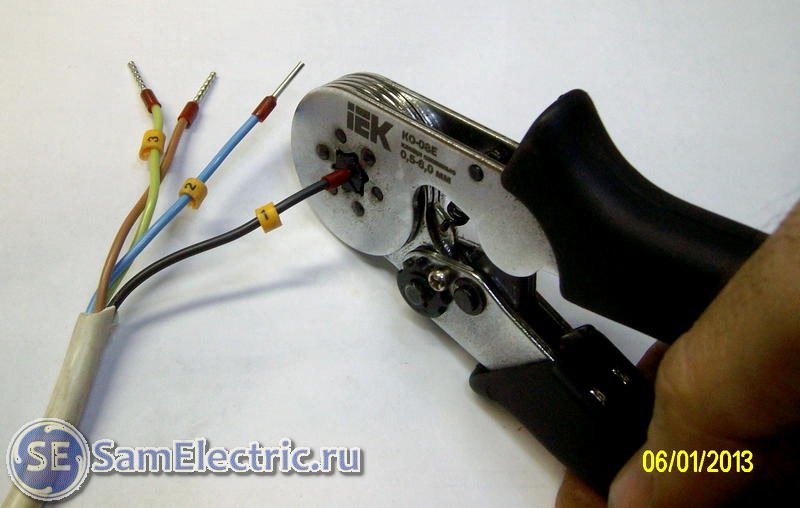
Tips for wires. Crimping in action
After that, flexible wires can be used on a par with rigid ones using one type of Wago clamp. For example, as in this photo:

Another bonus is the tool and tips.
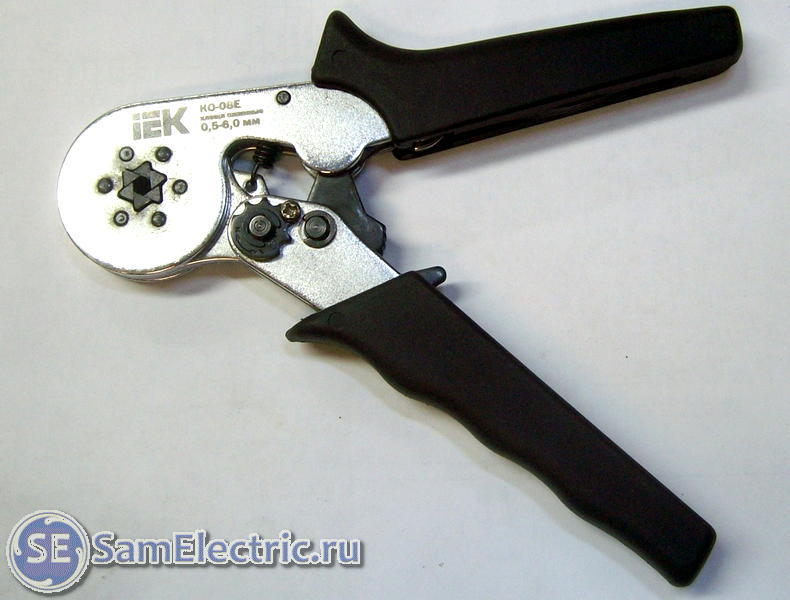
Crimping pliers, popularly - crimping tips

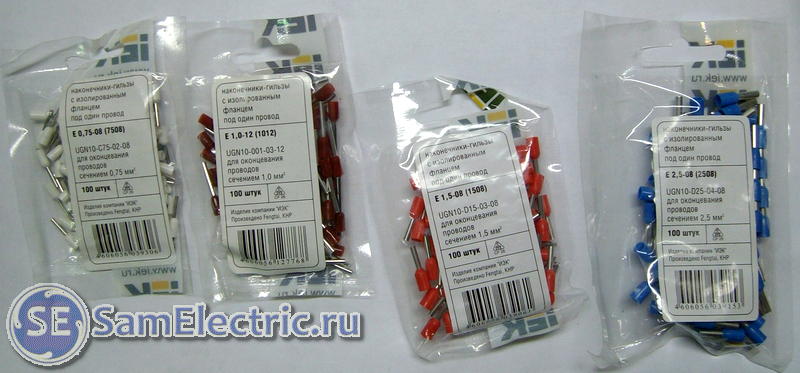
They have different colors for convenience. Different manufacturers may differ.
![]()
All good contacts!
Download Wago catalog
Below you can download the Wago catalog, which shows different types of terminal blocks and application examples. Beautiful and interesting, I recommend to look through. As usual, everything on my blog can be downloaded for free.
Our terminal blocks, which are discussed in the article, are on pages 105-107.
/ It is worth downloading to look at all the diversity and beauty of Vago, pdf, 20.63 MB, downloaded: 7973 times./
It is impossible to imagine electrical work without the need to connect wires. Previously, twisting was used for this, at best, supplemented by soldering the resulting contact. This method, which is often used today, requires time and a certain skill.
And the connection itself turns out to be sloppy and cumbersome. The screw terminal connection eliminates these problems, but it is not without its drawbacks. If the screw is “not tightened” or “tightened”, the contact is less reliable.
In the first case, the junction can heat up and even cause a fire in the wiring, and in the second, there is a risk of damage to the wire and the terminal itself. Wago terminal blocks eliminate these and other similar problems.
In this article, I propose to consider the main brands of terminal blocks, their design, the advantage over alternative connection methods, and of course how to use them in practice. For young professionals often wonder bought them?
Abroad, the most common terminal blocks for connecting wires from Wago are the most used way to connect wires. Our professional electricians know about them, but they use them with caution.
Many mistakenly believe that such connectors do not create the necessary contact, especially when installing large-section wiring. Meanwhile, this progressive method of connection, based on insulated spring clips, ensures that all requirements for reliability and quality in electrical work are met.
What are WAGO terminal blocks for?
Everyone knows that when wiring, it often becomes necessary to connect several wires together at once. In this case, using terminal blocks to connect the wires is the best solution.
Unlike twists or adhesions, which are, in fact, one-piece connections, allow you to easily and quickly disconnect wires, change the circuit, connect an additional circuit or device. Of course, in especially critical cases, soldering can also be used, but in most connections that will work under normal conditions, the use of Wago terminal blocks is quite enough.

As already mentioned, working with Wago terminals does not require the use of additional tools. The only thing that may be required is a special tool for stripping insulation.
After that, the wire is simply inserted into the terminal block and fixed in it. Another important advantage of Wago terminals is that they allow you to securely connect or extend wires made of different materials and different sections.
As you know, it is unacceptable to connect, for example, copper and aluminum conductors using ordinary twisting. Among other things, the application Wago terminal blocks allows you to save space in a junction box or shield, and the connection itself is neat and reliable.
Most often, Wago terminal blocks are used in switchboards and boxes, as well as for connecting lighting or other equipment. With their help, you can connect single-core and multi-core wires. Depending on the installation location and connection requirements, terminal blocks of various series are available.
Wago terminals are available in two versions: disposable, that is, not allowing the reverse removal of the wire, and reusable, in which it is fixed by retracting a special clamp. How to use wago terminal blocks Let's consider both options using the two most popular series as an example.
Wago 222 series terminal blocks are reusable. A special lever is used to fix the wire. orange color. It allows you to easily disconnect the contact when reconfiguring the circuit or testing the circuit.
Each conductor is inserted into a separate detachable socket. The terminal block is based on a flat-spring clamp that allows you to fix conductors with a cross section of up to 4.0 mm2.
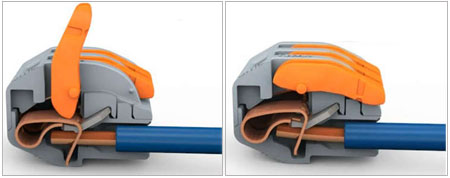
To carry out installation using such a terminal, strip the wire insulation by about 1 cm, raise the clip flag, insert the wire and release the clip.

Connection is ready! Due to the compact size of the terminal, it can be placed anywhere, including compact boxes for switches and sockets. At the same time, this type of terminal block does not require crimping of a stranded conductor.
Wago 773 series terminals are designed for single connection and only solid conductors. You can also connect stranded ones, but before that, their lugs should be crimped.

These terminal blocks can be produced with filling special conductive paste or without it. The paste serves to prevent oxidation aluminum wires. Paste terminals are easy to identify and are available in black or dark grey.

The connection is similar: the wire is stripped and inserted until it stops. But, unlike the detachable one, there is no lever here, and fixation is carried out using an internal clamp that bites the wire and does not allow it to come out back.

In case of emergency, you can, by scrolling and applying sufficient force, remove the wire from the terminal block. But it is strongly not recommended to do this, since this causes deformation of the fixing contact and the reliability of the subsequent connection is not guaranteed.
Advantages of WAGO products
Based on the foregoing, we list the main advantages of Wago terminals:
- 1. Installation speed. Stripping the insulation and fixing the wire in the clamp takes just a few seconds;
- 2. Connection with using Wago terminal blocks, unlike twisting or crimping, does not require additional insulation;
- 3. Ability to connect conductors with different cross-sections and made of different materials;
- 4. If necessary, the connection can be easily redone. Twisting wires, especially brittle aluminum ones, does not allow this;
- 5. The ability to diagnose the circuit without breaking it, as they are equipped with holes for connecting indicators or other devices;
- 6. Accurate installation, ability to connect in tight spaces or if the accessible part of the wire is too short.

Many electricians do not use Wago terminals in their work, not wanting to bear the additional costs associated with their acquisition. This is especially true for reusable terminals, which are almost 2 times more expensive than non-detachable ones.
At the same time, most people forget about the time that will be saved when using such products. And the well-known statement “time is money” has a direct bearing on the work of an electrician.
Related content on the site:
We advise you to read
, diagnosis, treatment Treatment of urogenital chlamydia") Urogenital chlamydia - description, causes, symptoms (signs), diagnosis, treatment Treatment of urogenital chlamydia
Urogenital chlamydia - description, causes, symptoms (signs), diagnosis, treatment Treatment of urogenital chlamydia The benefits and significance of hydroamino acid threonine for the human body L threonine what
 To wait or not to wait for a guy from the army For what reason can they be commissioned from the army
 Baked apples with cottage cheese Baked apples with cottage cheese

