Photo retouching- one of the most popular features when working in Photoshop. The number of methods for achieving this or that result is excessively large, and the methods have a fairly wide variety. Traditionally, every professional photographer or photo retouching designer has his own tricks and subtleties to achieve this or that effect. Various techniques are described below, which will allow you to expand your skills in this area.
In natural light shots, sunlight somehow creates some texture. Some places look overly shaded, while areas where the sun's rays hit without any obstacles look too bright. In such cases, it becomes necessary to somehow control the intensity of light and brightness in the photo. To do this, create a new layer using the key combination Shift + Ctrl + N, or go to the menu “Layers” (Layer) → “New” (New) → “Layer” (Layer), and change the blending mode here: “Lightening the basics » (Color Dodge). Opacity should be set at 15%.
Using the eyedropper, select a color in the area of the photo that you want to make lighter. Next, take a brush with soft edges and start to adjust the light, each time choosing the tone that best matches the area you are working with. Using this method, you can not only increase the brightness of some areas in the picture, but also adjust the saturation. colors. As a result, you can achieve an effect that is closest to the real picture.
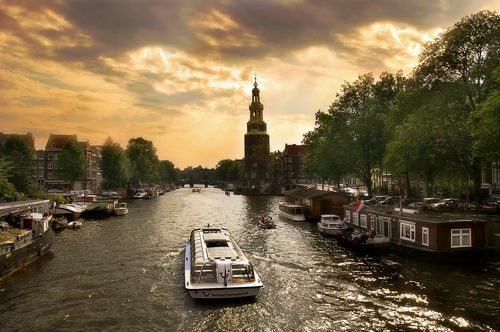
First, open the photo using the Camera Raw format. You can do this in the Photoshop program itself, following the path “File” (File) → “Open as a smart object” (Open as Smart Object). In addition, you can use Bridge, here, by right-clicking on the mouse, select “Open in Camera Raw”. To optimize the original image, you will need to set the basic settings. You can do this, for example, by playing with the Fill Light or Recovery sliders. Now we go to the “Grayscale” tab (HSL / Grayscale), there we click on the item “Convert to Grayscale” (Convert to Grayscale) and select the value “Yellows” at about +20, “Blues” at -85, “Greens » to +90. The result should be an almost black sky, and the bushes will turn white.
You can not stop at this result and give the picture more grain. To do this, go to the tab "Effects" (Effects) and set following options: for roughness 80, for size 20 and 15 for amount. You can also use the Vignette effect using -35 for roundness, -30 for amount, 40 for midpoint. Thanks to the actions taken, the picture becomes like an infrared image.

Level manipulation
With the "Levels adjustment" tool, you can set the white and black points to adjust the hues different colors. But when working, there is a problem with determining the darkest and lightest places in the photo. To resolve this issue, you need to go to the menu “Layers” (Level) → “Adjustment Layer” (New Adjustment Layer) → “Isohelia” (Threshold), or click at the bottom of the palette “Layers” (Layer). Set the slider parameters in such a way that only a couple of spots remain on the image white color. Set a dot on one of these spots using the Color Sampler tool. Now move the slider to the left until there are only a few black spots left, put a second dot on one of them.
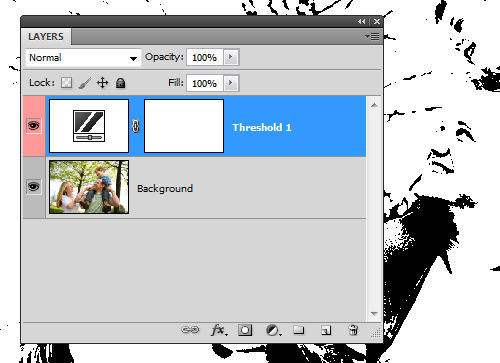
We are looking for a neutral gray halftone in the resulting image. Create a new layer between the original image and the Threshold adjustment layer. Now you need to go to the item “Editing” (Edit) → “Fill” (Fill) or hold down the keys Shift + F5, fill the new empty layer with gray by 50%, selecting in the field “Contents” (Contents) 50% “Gray”.
Make active layer "Isohelia" (Threshold) and change the blending mode to "Difference" (Difference). Select "Isohelia" (Threshold) again, move the slider all the way to the left, and then smoothly move it to the right until small black dots appear - these are neutral midtones. On the black area add a “Color Sampler spot” and delete the layer filled with gray (50% “Gray”) and the adjustment layer (Threshold). Create a new empty adjustment layer and use the first pipette on the blackest area, and the third on the lightest area, and use the middle one on the third point of the color standard. Thus, we reduced the number of shades in the original photo.
In the menu “Layers” (Layer) select “Adjusting new layer” (New Adjustment Layer) → “Hue / Saturation” (Hue / Saturation), select the blending mode “Soft light” (Soft Light) and check the box on the position “ Toning ” (Colorize). By manipulating the sliders “Brightness” (Lightness), “Color tone” (Hue), and “Saturation” (Saturation), we make the tones of the image colder or warmer.

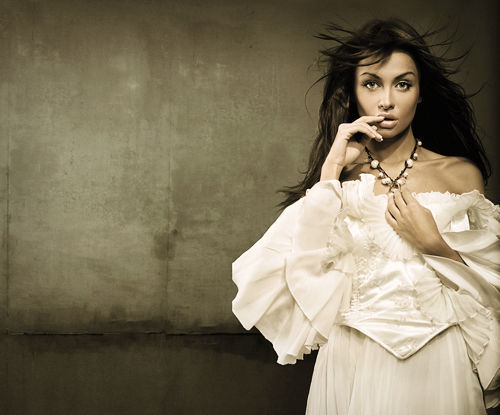
You can also use color layers. To do this, use the function “Create a fill layer or a new adjustment layer” (Adjustment Layer / New Fill), change the blending mode to “Bright light” (Vivid Light) and set the layer opacity to 11-13%, hold down the keys Ctrl + I and invert the layer mask. We paint over the area that needs to be tinted using a large brush with white soft edges. The result of the work is especially visible in portrait shots with a textured background.

Often when editing landscape and landscape shots, there is a need to enhance the details. To achieve this goal, you can try to increase the contrast of the midtones. Press Ctrl + J to copy the background layer to a new one. We move to the menu “Filter” (Filter) → “Convert for Smart Filters” (Convert for Smart Filters), then again “Filter” (Filter) → “Other” (Other) → “Color Contrast” (High Pass), where set the pixel radius to 3. Change the overlay to “Overlay” (Overlay) and open the window “Layer Style” (Layer Style) by double-clicking near the name of the layer.

For the first gradient "This layer" (This Layer) set the values at the level from 50/100 to 150/200, while holding down the Alt key and expanding the sliders. This will increase the contrast only in the middle tones. In the layers palette, double-click again to activate the filter “Color Contrast” (High Pass) ”and adjust the radius values. The result is a photo with increased midtone contrast.

We imitate a sunset
The sunset itself, as a natural phenomenon, can already be extraordinarily beautiful. If we are talking about the sea in the rays of the setting sun, we can confidently talk about the picturesqueness of such a photograph. With a few tricks and tricks in Photoshop, it's easy to simulate a sunset. You can change the tones using the gradient map. Go to the menu “Fill layer or new adjustment layer” (Adjustment Layer-Gradient Map / New Fill), open the gradient panel.
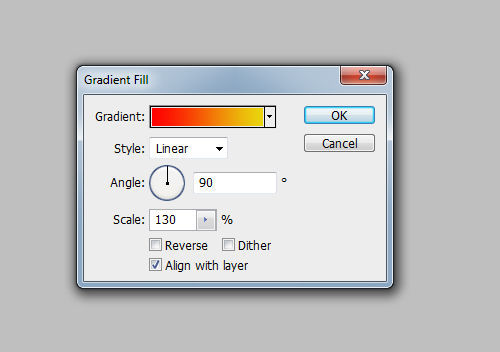
Open the editor by clicking on the gradient itself. For the first marker, change the color of the gradient to red, for the other marker, set the color to yellow and at the same time change the blending mode to “Soft light” (Soft Light), while lowering the opacity to 50%. The result should be a warm, golden sunset.

Using the method described below, you can easily create a beautiful and relaxed smile.

Select the tool "Polygon Lasso" (Polygon Lasso tool) and select the area around the mouth, this can be done quite conditionally, far beyond the edges of the lips. In the menu “Select” (Select) → “Modification” (Modify) → “Feathering” (Feather), select a radius of 10 pixels. Next, hold down Ctrl + J and copy to a new layer. Going to the menu “Editing” (Edit) → “Puppet deformation” (Puppet Warp), as a result, a grid will appear around our previous selection. In the options panel, find the "Expansion" parameter, with it you can adjust the volume and size of the grid. Place the pins at the anchor points - that is, at the places that should remain stationary. Modify the network by dragging it until you get a beautiful smile.
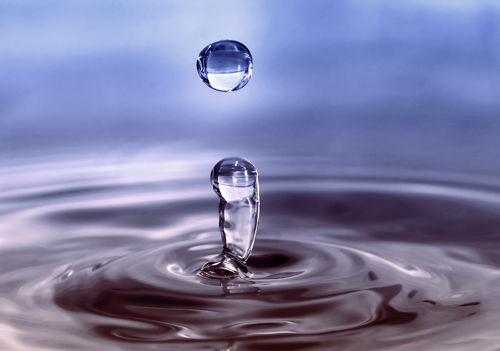
With macro photography, you can create colorful shots of water and water droplets. Sometimes it is not superfluous to emphasize their picturesqueness with the help of color correction. To get water drops with optimized colors, you can use a gradient: “Layer” (Layer) → “Layer Style” (Layer Style) → “Gradient Overlay” (Gradient Overlay). Change the overlay to “Color” (Color), reduce the opacity to 50%, the gradient “Foreground to background color” and set the angle to 90 °. This way the gradient is saved as a layer style and can be changed at any time by double clicking on the layer in the palette.
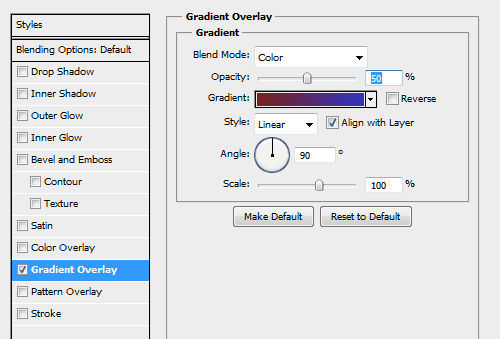
You can also paint the surface with a linear gradient, create a new layer style and a gradient from #772222 (RGB 119, 34, 34) to #3333bb (RGB 51, 51, 187). As a result, we get illuminated water drops.
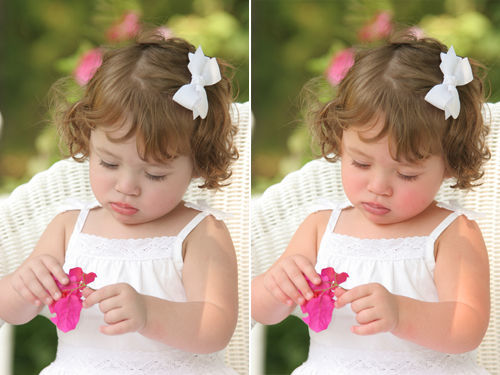
Sometimes, after retouching, the skin in the photo does not look quite natural and perfect. This may be due to the overall color tone of the image. This flaw can be eliminated by creating a “New Adjustment Layer” (New Adjustment Layer) → “Hue / Saturation” (Hue / Saturation). Now invert the layer mask by clicking on its thumbnail and hold down the keys Ctrl + I. Paint over the areas of the skin, the color of which you consider unsatisfactory. In this case, we use a brush with soft edges in white. You can also adjust the colors using the sliders "Brightness" (Lightness)
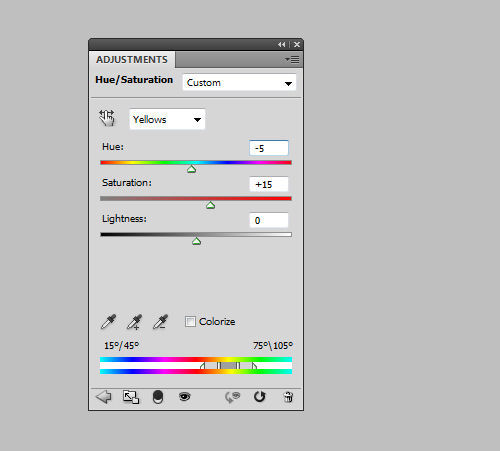
Hue, Saturation. It is difficult to recommend specific values here, it all depends on the photo, so be guided by your preferences.
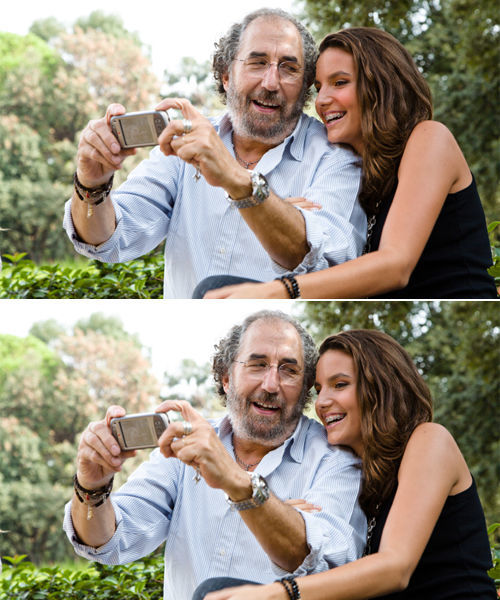
Skin Tone Matching
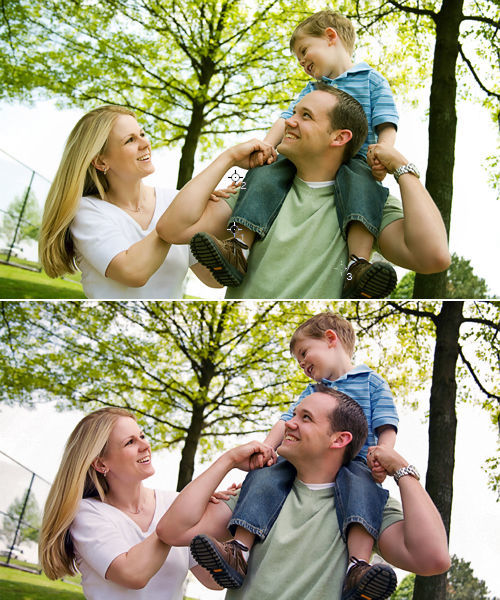
In paired or group shots, the paleness of one person's skin may unfavorably set off another's tan, or vice versa. To optimize different skin tones, they resort to using the Match Color tool. Let's say that in a photo where there are 2 people, the skin of one person is very red. We start working with such an image by opening it using the Quick Selection tool. First, select the red skin, apply to the selection
Feather by 10-15 pixels, and copy to a new layer with the keyboard shortcut Ctrl + J.
Acting according to the sequence described above, work on pale skin.
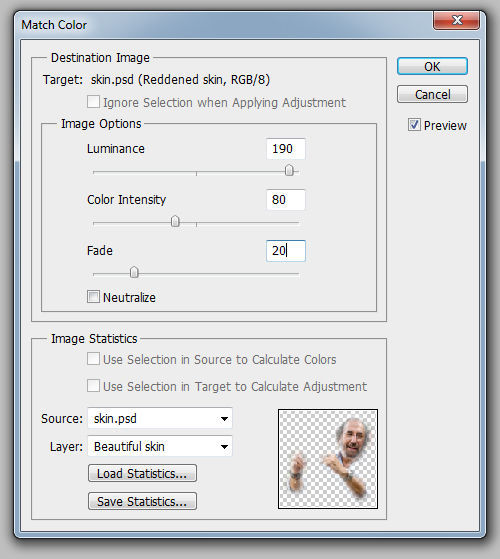
Make active the layer on which the red skin is located, and go to the menu “Image” (Image) → “Correction” (Adjustments) →> “Pick up the color” (Match Color). Use the sliders to adjust the tone until the desired result is obtained. The intensity of the effect can be adjusted by moving the "Luminance" and "Color Intensity" sliders. Once the result is saved, you can vary the effect by changing the layer's opacity.
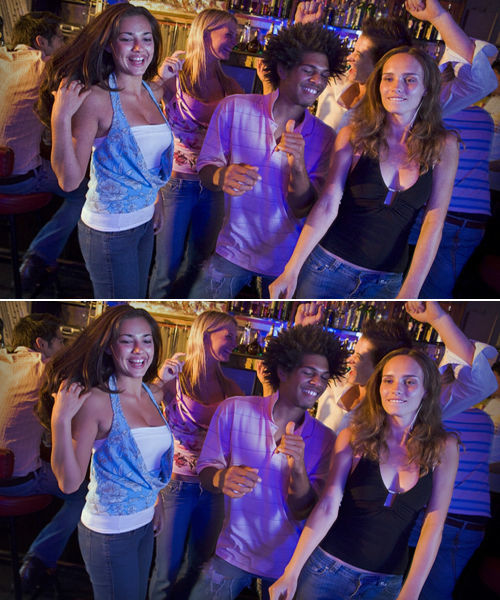
Reducing the intensity of noise
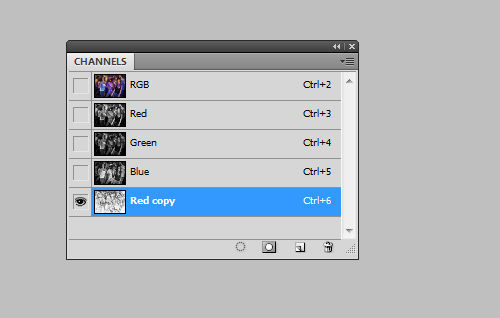
"Noisy" images may not be very pleasing to the eye of the beholder. Try to reduce noise by using channels. Press Ctrl + J to copy the original layer. In the “Channels” palette, select the channel with the lowest noise level, drag it with the mouse to the “New Channel”, which is located next to the basket. Next, go to the menu “Filter” (Filter) → “Stylization” (Stylize) → “Select edges” (Find Edges) and apply “Gaussian Blur” with a radius of 3 pixels.
Now hold down the Ctrl key and click on the thumbnail of the new channel, thus selecting its contents. Turn on the RGB mode again and go to the Layers panel, where we create a mask “Add layer mask” (Add Layer Mask). Click on the thumbnail to make the layer active and go to the filter menu: “Filter” (Filter) → “Blur” (Blur) → “Blur on the surface” (Surface Blur). Now we adjust the values of the sliders "Radius" (Radius) and "Isohelia" (Threshold) so that the noise is reduced as much as possible. The essence of the described method lies in the fact that the contours - that is, the darkest places in the photo, thanks to the created mask, remain untouched, while everything else becomes blurry.
Retro effect in Photoshop
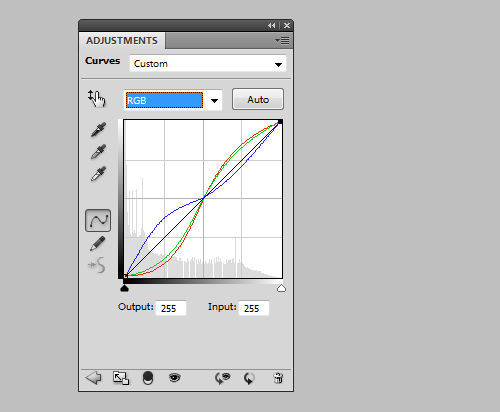
We will achieve the desired effect using curves. Go to the menu “Layers” (Layer) → “New Adjustment Layer” (New Adjustment Layer) → “Curves” (Curves) and change the RGB mode to Red. Play with the slider by dragging it down a little for the shadows and up a little for the highlights. Next, change the mode to Green. And we do everything for him exactly as for Red. For the Blue channel, you need to do the opposite, so that the shadows begin to cast blue light, and the lighter areas become yellowish.
Now create a new layer, hold down Shift + Ctrl + N, and set the blending mode to “Exception” (Exclusion). Fill the created layer with color #000066 (RGB 0, 0, 102). Press Ctrl + J, copy the background layer of the image, set the blending mode to “Soft light”(Soft Light). If desired, you can group the photo layers by pressing Ctrl + G, and play with their opacity until you get a suitable result.

Definition of layers
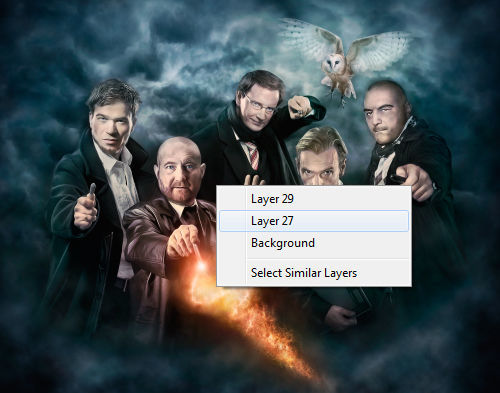
Often when working with a complex template and collage, there is an overabundance of layers with standard names, since the original layer names are most often neglected. As a result, we have a lot of similar names like “layer 53 / layer 5 copy 3”, etc. There are problems with layer identification. To prevent confusion, Photoshop offers several solutions. For example, you can select "Move" (Move tool) and right-click on it, so you can see which layers are located behind the current layer. This method is convenient for a relatively small number of layers, otherwise it will not be very easy to find the desired layer in the drop-down list.
You can click on the “Move” item (Move tool) with the left mouse button while holding down the Ctrl key, this will move you to the layer that you clicked.
In addition, you can change the size of the thumbnails themselves and the style of their display. To do this, click on the arrow in the upper right corner of the “Layers” panel (Layers) and select “Panel Options” (Layers Palette Options), the layer palette settings window will open. Set the options and style as you like.

We save resources
When using plugins in your work, you may have noticed that the work Photoshop programs noticeably slows down, loading and response time increases. To eliminate this shortcoming, you can create a new folder in the directory Adobe → Adobe Photoshop CS5 , name it Plugins_deactivated. All currently unused extensions are dragged there and, the next time the program is loaded, these plugins will not start, although they will be ready to work at any time. Thus, you will free up the computer's RAM, which will significantly increase its performance.
Sepia
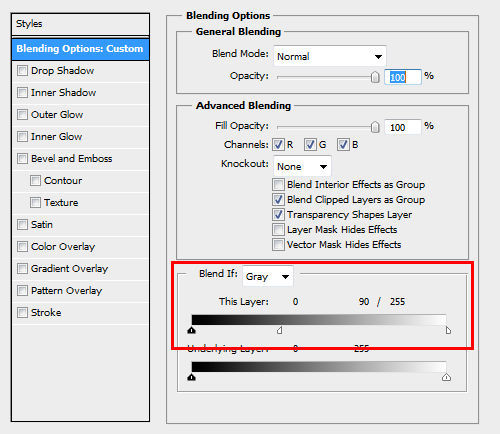
Classic sepia shades are unlikely to ever lose their relevance. To enhance the sepia on a black and white image, move along the path “Layer” (Layer) → “Adjustment New Layer” (New Adjustment Layer) → “Photo Filter” (Photo Filter) and apply the filter “Sepia” with 100% density. Open the Layer Style window by double-clicking on the layer. Move the white slider on the first gradient to the left while holding down the Alt key. So the transition between the adjusted and uncorrected area of the photo will be smooth and soft.
Often the program, trying to help us, puts objects in the wrong place at all, where we would like. Sometimes this feature is useful, sometimes it just gets in the way. The fact is that Photoshop, by default, binds our element to other objects. To temporarily remove the anchoring of elements, you just need to hold down the Ctrl key while positioning the elements.

Multiple shadows for one object
Sometimes it becomes necessary to create two or three shadows from one object. At first glance, it seems complicated, but it is quite possible to create such an effect. We will create shadows in turn, first we discard one. Follow the traditional path “Layers” (Layer) → “Layer Style” (Layer Style) → “Shadow” (Drop Shadow). Right-click on the layer icon and select "Convert to Smart Object" (Convert to Smart Object), now the shadow and our object are one, you can also cast a shadow from it in the same way. And again convert it to a smart object. Similarly, you can create as many shadows as you like for one object.
Plus, the shadow can also be converted to a new layer by right-clicking on FX. Here we select “Form a layer” (Create Layer). This is useful in order to apply a different filter to each of the created shadows.
Based on materials from the site:
Often the photos we take come out dark and dull. This can happen for a variety of reasons, such as when you were photographing in bad cloudy weather, at night, or in a poorly lit room. And of course, when viewing photos on a monitor or printing them out, you were simply upset and no matter how you tried to select, the result of yours left much to be desired. But don't be discouraged, as in this tutorial, you'll learn how to improve your photos in just a few steps!
The beauty of this tutorial is that all these steps are very easy to understand and universal for almost all photos. Using a simple example, we will walk you through processing steps such as: cropping and correcting the horizon, increasing contrast and brightness using curves, creating a bokeh effect using texture mapping and sharpening. So let's get started!
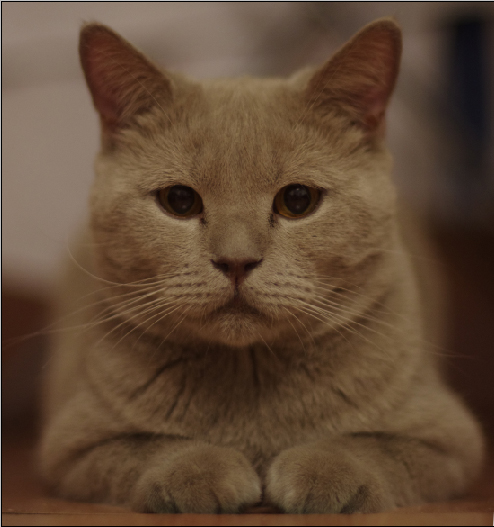
For example, I chose this photo of the cat Snowball:
Photo taken with Pentax K-5, 50 mm lens at f/1.6, 1.40c and ISO 800

The note: I'll make a small digression. I used Photoshop CS2 to edit this photo. Why? First of all, Adobe now officially lets you download and use Photoshop CS2 absolutely free! I wrote about this. For beginners, this is just a fairy tale. Secondly, all the tools are present here necessary tools, as is allowed in the CS6 version. So, let's finally start correcting the photo.
Step 1 - Correcting the Horizon and Framing
Some pictures are obtained with a littered horizon, as well as with extra objects captured in the frame. To fix this, you need to use two tools:
- Transform Selection(Selection Transform Tool)
- Crop(Crop Tool)
About these two tools, I wrote a separate lesson: where everything is described and described in detail. However, let's take a quick look at how they work again.
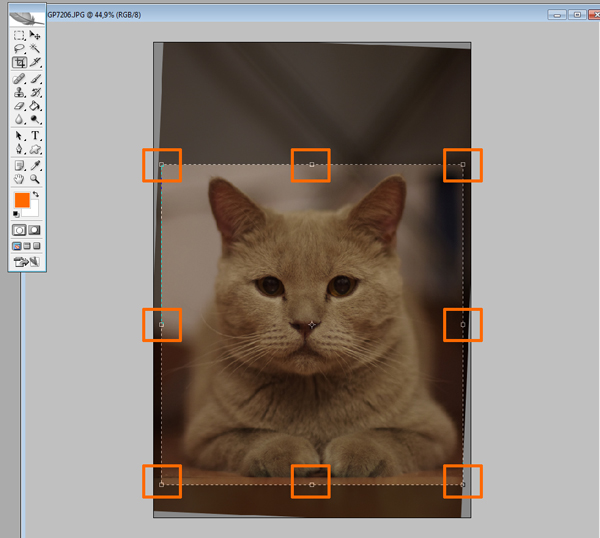
To use the tool Transform Selection, first you need to make a selection of the canvas by pressing the keyboard shortcut CTRL+A.
Remember: without a selected object, you won't be able to activate the transform tool.
You will notice dashed lines appear around the canvas. This is our selection. Now you can activate the tool Transform Selection pressing a keyboard shortcut CTRL+T:

Pay attention to the highlighted points. Thanks to these points, you can stretch the image. However, for now, we just need to rotate the image and flatten the horizon. To do this, move the mouse cursor outside the canvas. The cursor should take the form of two arrows. Now hold down the left mouse button and rotate the photo:
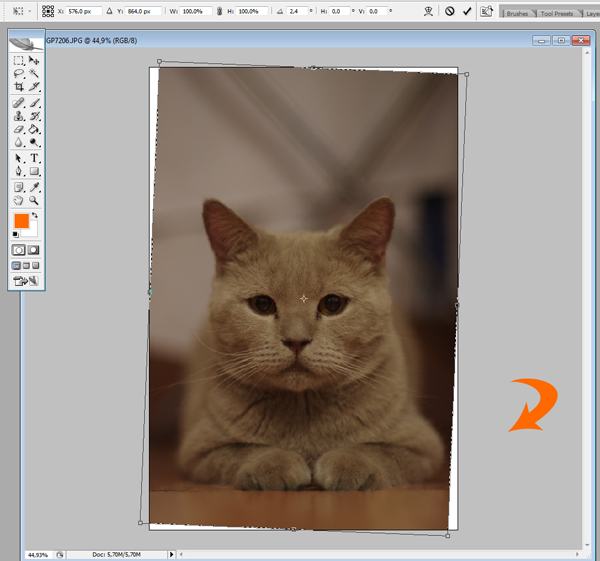
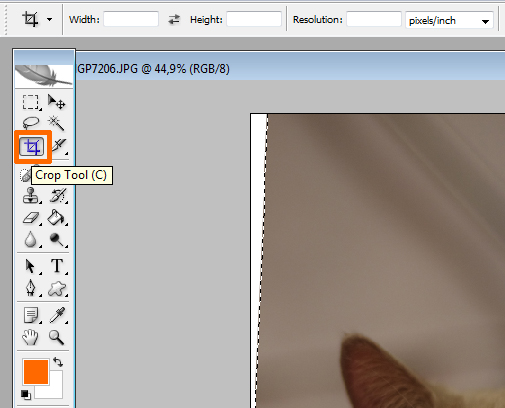
Now let's use the tool Crop for cropping and trimming everything superfluous. This tool, you can activate both from the palette and with the power of a hotkey C:
Deselect by clicking CTRL+D and dragging the points, crop the area as shown below:
Then press the key Enter:
Step 2 - Brightening Up with Levels
Now let's make our photo brighter and more contrasty. We can use an adjustment layer for this. Curves(curves) or just a tool Curves(Curves).
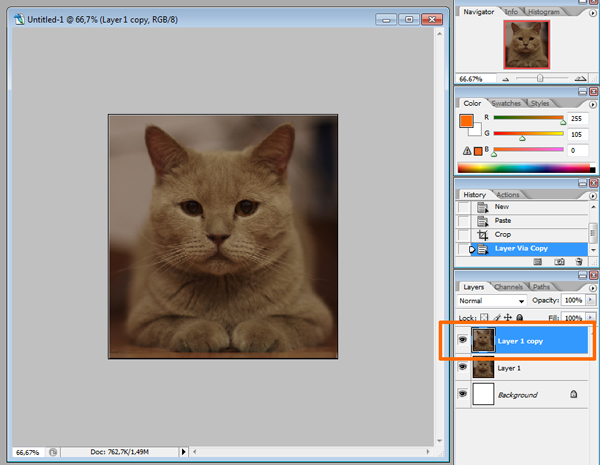
For this photo we will use the tool Curves(Curves), but first make a duplicate of the main layer by pressing the keyboard shortcut CTRL+J:
After that click CTRL+M to activate the tool:
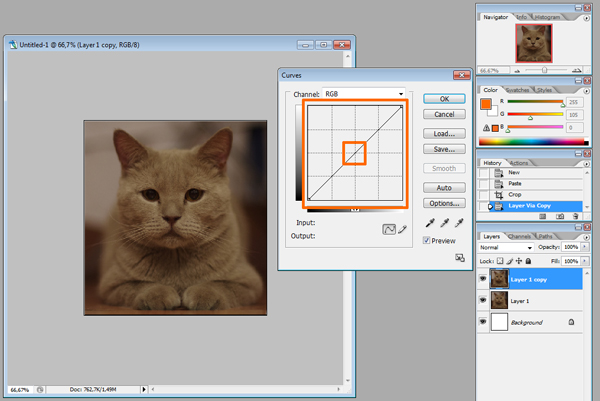
Experiment with the curve until the image gets brighter and lighter. Raising the point of the curve up, you increase the brightness, lowering the point down, you make the tones darker. That's what I did:
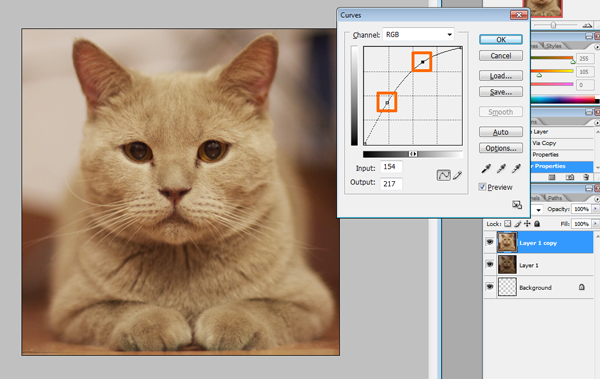
More often than not, you will need to create multiple points on a curve, as in this case. You can know more about curves.
Step 3 - Create highlights and shadows in the eyes and remove defects
In this step, we will give the cat's eyes expressiveness. The best way to do this is to use two tools:
- DodgeTool(Dodge Tool)
- BurnTool(Dimmer Tool)
Select DodgeTool(Clarifier) and in its settings set the parameter Highlights (Light). Thanks to this, the tool will only affect the light areas:
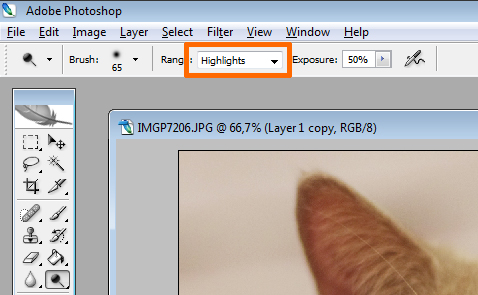
Now try to make the highlights in the eyes brighter:

After that, activate the tool Burn(Dimmer), and in its settings set the value Shadow(Shadows) so that the shading effect affects only the dark areas. Darken some areas in the eyes:

Apart from the eyes, I also darkened the cat's nostrils. Let's remove the defects in the eye area. In this case, it is most convenient and easiest to remove defects using a conventional tool. stamp(Stamp). But in order to make it as high quality as possible, you need to lower the opacity of the tool's effect in its settings.
Choose a tool stamp(Stamp) and in its settings set the parameter Opacity(Opacity) value at 25%
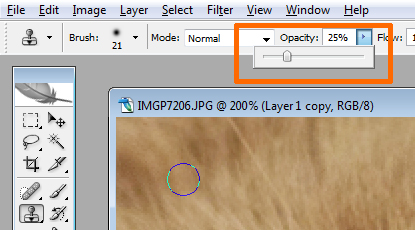
This tool allows you to use the texture from anywhere on the canvas. To select the texture, hold down the ALT key and click on the area next to the eye:

All the texture is selected, now release the key and with a few mouse clicks retouch the "dirty" area:

Do the same with the other eye:

Step 4 - Sharpening
Now the photo does not look as clear as we would like. But Photoshop allows you to correct this shortcoming. The method that will be presented here, in my opinion, is one of the most successful and correct, since it is more flexible and, moreover, does not “destroy” the image, unlike filters.
First, merge all layers into one by pressing the key combination CTRL+SHIFT+E. And then make a duplicate of this layer (CTRL + J)

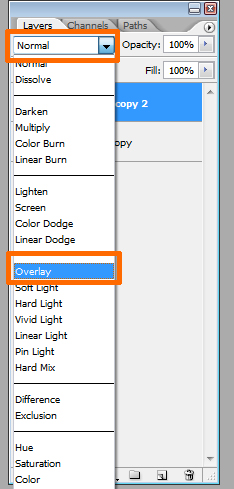
Change the Blending Mode of the first layer to overlay(Overlap)
After that, apply the Hight Pass filter ... (Color contrast)

Watch the contours in the filter settings. Adjust it so that the contours become a little noticeable, but be careful, the main thing here is not to overdo it. You will immediately see the result of the sharpness adjustment.

When you are satisfied with the result, click OK and merge all layers into one by pressing CTRL+SHIFT+E.
You can find out more about setting clarity.
Step 5 - Create the Bokeh Effect
In the final step, we will give the photo some mood by creating a bokeh effect. To do this, you can use a variety of textures, for example, for this photo, I used the texture from here.
All you need to do is add the required texture to the canvas:

Then change its blend mode to soft light(Soft light) and lower the opacity a bit:

You can use the eraser to erase part of the texture on the cat's body. Then you can increase the brightness a little with the same Curves tool.
That's all. Remember that these steps are universal for almost all photographs. Now you know the sequence of actions and the necessary tools. I hope you found something useful for yourself. Ask questions, subscribe to site updates, add to social networks, like and all the best to you.
Instruction
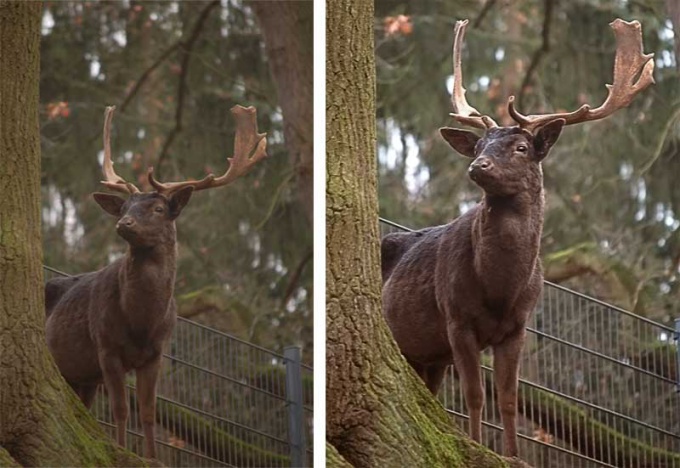
Take a random photo. For example, here it is.
Improving the quality of a photo always starts with a detailed analysis of it. As we can see, this photo is faded, dark, it lacks sharpness, minor details caught in the frame distract the viewer's eye from the animal. First, cut off the unnecessary part of the frame. The Crop tool is located on the toolbar between the brush and the eyedropper. Hold down the right mouse button and frame the frame as you wish.
The next step is to click on the menu Image - Adjustmens - Levels. You will see the level adjustment window. As you can see, the histogram is strongly shifted to the left, which explains the overall underexposure of the image. Move the sliders under the histogram until they reach the edges of the histogram. It will look something like this.

You will immediately notice how much brighter your picture has become. But he lacks sharpness. Duplicate the layer by clicking Layer – Duplicate Layer. Apply Filter – Other – High Pass to the top layer. Adjust its parameters so that the contours of the image are slightly guessed on the gray picture. Press OK, change the layer blending mode to Overlay. Right click on the top layer in the palette, Megre Down.
![]()
In general, the photo has already become noticeably better, but somehow it is too brown-green. Go to the menu Image - Adjustmens - Photo Filter. Cooling Filter was more suitable for this photo, it balanced the colors and made the photo harmonious.
Let's look at the "before" and "after" photos. In general, the photo has become better. You can, of course, still work on it, muffle the out-of-focus highlights in the background, use the clone tool to retouch the fence mesh, maybe slightly blur the tree bark in the foreground. Photo processing never has a single algorithm, each photo needs an individual approach, over time you will learn to determine what kind of processing a particular image needs. The skill will come to you with experience.
Adobe Photoshop is one of the most advanced programs for creating and editing graphics. It contains a huge number of tools that can be used for editing photos. Of course, it will take time to master this variety, but on the other hand, the result can be obtained from the best graphic editors available to a simple user.

You will need
- Graphic editor Adobe Photoshop.
Instruction
Launch Photoshop and load your photo into it. To open the download dialog, use the key combination Ctrl + O. This dialog, except for the presence of a preview image, does not differ from those used in other application programs.
Create a copy of the layer with the photo - press the keyboard shortcut Ctrl + J. Most likely, the photo file is in jpg format, and the background layer of such pictures is protected by the graphic editor from changes. The duplicate created by you can be edited without restrictions, and if necessary, create one or more copies from the background layer in the same way.
If the purpose of editing is to improve the quality of the photo, use the "Correction" section in the "Image" section of the photo editor menu. It contains more than two dozen links that open various tools for changing image properties. Many link names clearly define which parameters are adjusted by the tools they open - for example, "Brightness / Contrast", "Hue / Saturation", etc. The action of others can be determined visually - change the settings while monitoring the change in the image.
To add a variety of graphic effects to a photo, use the menu items from the "Filter" section. The tools in it are grouped into separate sections, united by transformation methods.
We advise you to read
, diagnosis, treatment Treatment of urogenital chlamydia") Urogenital chlamydia - description, causes, symptoms (signs), diagnosis, treatment Treatment of urogenital chlamydia
Urogenital chlamydia - description, causes, symptoms (signs), diagnosis, treatment Treatment of urogenital chlamydia The benefits and significance of hydroamino acid threonine for the human body L threonine what
 To wait or not to wait for a guy from the army For what reason can they be commissioned from the army
 Baked apples with cottage cheese Baked apples with cottage cheese

