" Equipment
In this article, we will talk about what the simplest household incubator consists of and how you can make it yourself without large investments. The components of a household incubator can vary depending on whether you want to make it fully manual, semi-automatic or automatic.
You will need:
- lid with a viewing window;
- frame;
- lattice for eggs;
- light bulbs with chambers;
- containers for water;
- fan at 12 V;
- Regulator voltage 12 V;
- thermometer;
- thermostat;
- temperature sensor;
- controller flipping frequency (digital timer).
What can you make this useful thing at home?
- from polystyrene;
- from cardboard boxes;
- from plywood or tree;
- from the old refrigerator.
This list is not final. Specified list different materials involves the manufacture of the cover and body from these materials. FROM detailed description, characteristics and device of each type of incubator can be found below.
Incubator Dimensions will depend primarily on:
- number of eggs that you will put.
- from location light bulbs that heat the incubator.
For reference: with an average length of the incubator of 450 - 470 mm and a width of 300 - 400 mm, egg capacity, pcs. (depending on size):
- chicken up to 70;
- duck or turkey up to 55;
- goose up to 40;
- quail up to 200.
Homemade foam incubator, description and drawings
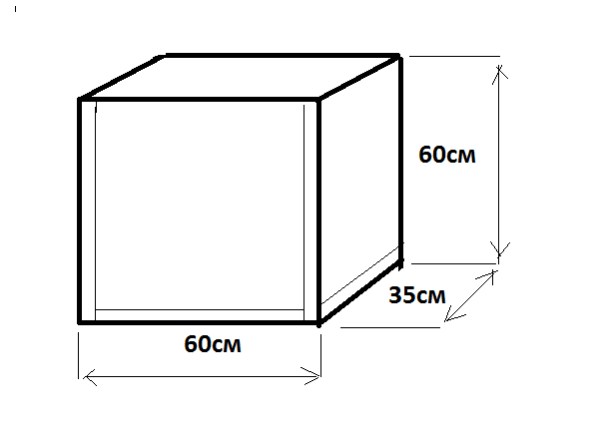
You will need: sheets of foam (expanded polystyrene) measuring 50 x 100 cm. Thickness - 50 mm.
We mark the sheet with a pencil and a ruler. We take arbitrary sizes. Example:
Side wall: Length - 50 cm, height -50 cm.
End wall: length - 35 cm, height - 50 cm.
Cut the foam to size with a sharp knife. If the foam is not extruded, then it is better to cut stationery knife- it is very sharp, the blade is thin.

We do the same with the second sheet.
Further assemble the body according to the drawing shown. This is done with rubber glue or simply wrap the joints with wide tape. Thus, we get the side, end sides and bottom of the case. At the bottom of the hull, which is also cut to fit the walls, be sure to make 2-3 holes for air ventilation.
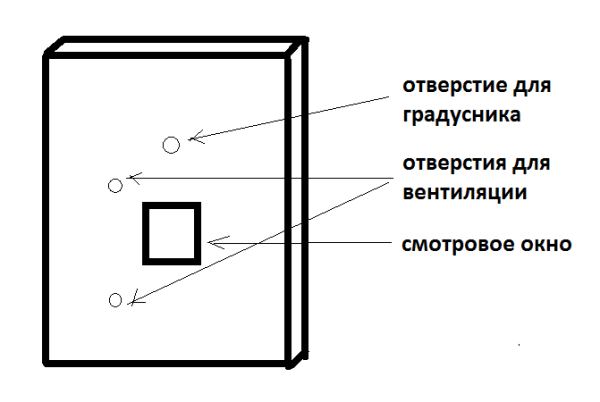
Lid we manufacture separately with a viewing window and a pair of holes for ventilation as shown in the diagram below.
Glass You don't need to "tightly" fix it. After the chicks appear, we adjust the temperature in the incubator by moving it a quarter or half. The proposed design of the incubator assumes that it will be heated by three electric 25 watt bulbs, this is enough to maintain the required temperature. The lid must be made with partially cut out sides so that it does not move along the body. For this purpose, you can also glue bumpers. The material used is wooden blocks or foam blocks.
On the lid, fasten three electric chuck with light bulbs.

We install a thermostat on top (if the design suggests it).
The egg rack is made from welded galvanized mesh 16 x 24 mm, closed from the inside with a plastic mosquito net. The net is needed so that small chicks do not fall into the cells with their paws. In addition, they stick their heads in the cells, which ends up badly for them (and for you). Growing on the grid bumpers(walls), the height of which should be at least 8 - 10 cm, otherwise the chicks will jump over it. If you do not plan to roll the eggs by turning the grate along its axis, then we make the sides smaller than the grate around the entire perimeter, and the grate will cover the entire interior of the incubator and will lie on the bars. In this design, you have to turn each egg by hand, marking them on one side with a plus (+), and on the other, respectively, with a minus (-). Come up with your notation.

This design can improve, equipping it with an ordinary computer 12-volt fan, using a voltage regulator, an adapter (respectively, 12 volts) and a thermostat.
It is possible to construct an indicator with heating from light bulbs, which will be located below, under the tray (lattice) with eggs. Then the design will be more compact. Its height may not exceed 25-30 cm. Light bulbs and chambers for them can be taken as in the usual household refrigerator. You can use a different type of heater (film from underfloor heating systems).

To do not turn each egg, you can put the grate (tray) not on the bars at the bottom, but make holes closer to the bottom of the incubator, insert bushings there, attach the grate to the bushings with corners or other clamps. Outside, attach handles or holders. Thus, the grate can be rotated along its axis, changing the degree of inclination of the eggs and, accordingly, heating one side of the eggs, then the other. The grate in this case should be smaller in size than the inner walls of the incubator so that it can change the angle of inclination without interference. Lattice sides then they should be higher than 5 cm, because otherwise the chicks can roll over the side and fall to the bottom of the incubator to the light bulbs and water containers.

From a cardboard box, diagram and device
Perhaps the simplest and cheap incubator- This is a cardboard box. Cardboard is very inferior in strength to all other materials, so this type of incubator has certain features.
Ventilation holes are located from the bottom by 3-4 cm; on the side walls, at a distance of 6-7 cm from the bottom we attach wooden slats to the walls. Instead of rails, you can put bars on the bottom of the box, which we cover with foil. It should be larger than the bottom so that its edges go onto the walls. per pallet install any container with water.
We lay the usual egg packaging on slats or bars. Cut a hole in the middle for better air ventilation. He makes a lid on the box with two holes: in the middle, for the lamp, and on the side for the thermometer.

From plywood do it yourself
If you make an incubator from this material, then it walls should be double. The top cover, as in the previous versions, is removable. A viewing window with glass is cut through it. Doing ventilation holes similar to the previous options.
Mounted on the inside of the incubator lamp holders, and slats for the tray are nailed below. We also drill holes in the plywood floor for ventilation. They can be 4-10 pieces.
Tray or a lattice of eggs arrange also frame type. On the grate we put a mosquito net or construction mesh for puttying. The incubator is installed in a warm room.
Attention! Do not forget that the minimum distance from the lamp to the eggs should not be less than 25 cm if low power incandescent lamps are used as a source.
From an old refrigerator
If you have on the farm old refrigerator, which you managed to replace with a new one, and the old one has not yet been thrown away, you can use it as a homemade incubator.
We throw away everything superfluous, including freezer. From above are done ventilation holes. They are also made at the bottom of the incubator. Bottom install 12 volt fan.
Next you need to install heaters. This role is played by electrical 25 watt bulbs. You need 4 such bulbs. Two bulbs are placed at the top of the refrigerator, and two at the bottom. Below we fix the chambers in such a way that at the bottom it is possible to place a tray with water.
Egg trays are also made from galvanized welded mesh with sides. If you choose plastic fruit boxes as the material, that’s also good. Then they are cut to a height of 6 cm. All trays are mounted on the axis and are connected to each other with a bar, with the help of which the inclination of the eggs changes.

Auto
In some of the above options, it was proposed to manufacture manual or semi-automatic incubator. To make automatic incubator, you need to additionally purchase:
- block thermostat;
- tray automatic egg turning, which turns the eggs at a certain angle;
- frequency controller coup (timer).
Differences in temperature regimes for different types of poultry
In the first two days, you need to warm up the eggs well, so the temperature in the incubator is set at 38-38.7 ° C.
Remember! An increase in temperature adversely affects the embryos.
Chicken eggs in the first days of incubation, they are kept at a temperature of 39 to 38 degrees, gradually lowering it. In the last days (20-21) - 37.6.
duck- from 37.8 to 37.1 degrees down.
Goose– from 38.4 to 37.4.
Turkeys– from 37.6 to 37.1.
Quail all 17 days of incubation are kept at the same temperature of 37.5 degrees.
As you can see, doing home incubator, the material can be varied and depends on what is at hand. In order to orient the reader what will be the financial benefit from this event (meaning the difference between a ready-made incubator bought in a store and a do-it-yourself one), we can say that benefit is at least threefold. If you do not buy automation, then the difference will be even greater. Of course, what you make will have and minuses: does not look so aesthetically pleasing, perhaps not such a long service life. Despite this, many prudent owners prefer make an incubator rather than buy.
Comparing the material from which the body of the incubator is made, we can say that foam incubator has the lowest heat loss, from a cardboard box- the cheapest. From what material you will make - it's up to you.
If you plan to breed chickens at home or in the country, then you can design an incubator with your own hands. So you can save a lot of money and create exactly such a device that is best suited to your goals. In our article you will find a description of several interesting designs that you can do yourself.
Myth or reality?
Many novice farmers believe that a homemade incubator is a very complex device that requires expensive materials and tools. But in fact, it can be made at home with your own hands and at minimal cost. At the same time, you can make both a simple incubator and a complex device with automatic egg flipping and temperature control.
A homemade incubator will allow you to choose the desired dimensions of the device, as well as the presence of various additional functions in it. In addition, this design will allow you to save a lot, because there will be almost no expensive materials in it. But at the same time, when assembling, everything must be done very accurately, because the slightest violation of temperature or humidity can lead to damage to the eggs.
Device manufacturing
There are several options for creating an incubator with your own hands at home. You can use an old refrigerator or a box as a base. Also, this device can be assembled using foam. Below are diagrams of the most popular designs that you can do yourself.
incubator out of the box
This type of device will be the most profitable from an economic point of view. Do-it-yourself manufacturing does not require expensive materials and will take place as quickly as possible.
- First you need to cut a small hole in the side of the box for ventilation, and fix the bulb holders in the lid of the box.
- For 60 chicken eggs you will need to insert 3 light bulbs with a power of 25 watts. They should be located at a distance of 15 cm from the tray.
- For reliability, it is recommended to sheathe all edges of the box with plywood or chipboard sheets.
- Below the eggs, you need to place a container of water. The area of the evaporated surface depends on the volume of the case and is selected empirically using a hygrometer.
- The egg tray is installed in the middle of the box.
- It is recommended to choose a gyroscope and a thermometer that can be viewed without opening the box. It is recommended to tear off the lid of the box only for turning the eggs.
Simple incubator out of the box
Styrofoam
Styrofoam has excellent thermal insulation properties, and most farmers will be able to find this material at home. That is why do-it-yourself incubators are very often made of foam. The principle of its manufacture is in many ways similar to the creation of a structure from a cardboard box. But you can choose the size of the shell yourself based on the desired number of eggs.
- First you need to make a box out of foam sheets. This can be done without problems with your own hands, using adhesive tape. Just cut the edges to the desired size and fasten them into the box in a way that is convenient for you.
- This design will provide high thermal insulation and allow the use of light bulbs with a power of about 20 watts for heating. Of course, you can include special heaters in the design, but the option with light bulbs is the most budgetary and they do their job perfectly.
- As in the previous design, it is recommended to insert light bulbs into the top cover at a distance of about 15 cm from the eggs.
- As a tray, you can use a finished structure, or make it from wooden planks. It is best to place the tray in the middle of a homemade box so that the distance to the water containers and heating elements is approximately the same.
- When making such an incubator with your own hands, do not forget to leave space between the tray and the walls, because air circulation is very important when hatching chickens at home.
With automatic flip
The most difficult thing is to make an incubator with automatic egg flipping at home. But such a design will help to breed chickens at home as conditionally as possible, because regular egg turning is the most important factor. Such a mechanism will be indispensable for people who are often absent and cannot pay enough attention to hatching chickens from eggs. In addition, this design will minimize the number of lid openings, which is also a very important factor.
by the most in a simple way The implementation of automatic flipping is the purchase of ready-made trays with a special mechanism. Such a device will cost many times less than a ready-made incubator, but you will need to create a suitable case, as well as purchase a thermometer and a gyroscope. The case of an old refrigerator is perfect for assembling a house. It has good thermal insulation, as well as a convenient door. You will need to perform the following sequence of actions:
- Dismantle unnecessary parts, including the freezer.
- Cut a window in the door and glaze it.
- Fix the trays with automatic flipping where the shelves used to be.
- Install 4 bulbs at the bottom of the refrigerator and 2 at the top.
- Place a water tank at the bottom.
- Mount the thermometer and gyroscope so that they can be seen through the window.
You can also try to assemble a do-it-yourself automatic flip device at home, but its manufacture will require special tools, materials and skills. On the forums of craftsmen, you can find a variety of diagrams, drawings and videos that will help realize this idea. But in most cases, it is easier and more profitable to install a ready-made tray with an automatic flip.
Photo gallery
The photographs and drawings below will help you make a device for hatching chicks at home. You can find more information in the video.
Video "An example of a finished incubator from the refrigerator"
In the next video, you can look at a working device that was assembled by hand at home from improvised materials.
On farms or individual farms, it often becomes necessary to breed chickens at home. Of course, laying hens can be used for these purposes, but it will take a long time to grow chickens naturally at home, and the offspring will be small.
Therefore, for breeding chickens at home, many use an incubator. Of course, there are industrial devices used for large industrial productions, but for small farms, simple incubators are also perfect, which you can easily do with your own hands.
Today we will tell you how to make an incubator with your own hands, from the simplest to the more complex.
How to make an incubator out of a cardboard box with your own hands?
 The easiest do-it-yourself incubator for breeding chickens at home is a cardboard box design. It is done like this:
- cut a small window in the side of the cardboard box;
- inside the box, pass three cartridges designed for incandescent lamps. For this purpose, it is necessary at an equal and small distance make three holes at the top of the box;
- lamps for the incubator should have a power of 25 W and be at a distance of about 15 centimeters from the eggs;
- in front of the structure, you should make a door with your own hands, and they must correspond to the parameters of 40 by 40 centimeters. Door should be as close to the body as possible. an incubator so that the design does not release heat to the outside;
- take boards of small thickness and make a special tray out of them in the form of a wooden frame;
- put a thermometer on board such a tray, and place a container of water measuring 12 by 22 centimeters under the tray itself;
- up to 60 chicken eggs should be placed in such a tray, and from the first day of using the incubator for its intended purpose, do not forget to turn them.
So, we have considered the simplest version of the incubator with our own hands. If it is necessary to grow chickens in a minimum number at home, this design will be quite enough.
High Complexity Incubator
Now let's look at how to make a more complex incubator with your own hands. But for this you need to follow the following formalities:
- if the openings of the chamber for ventilation are closed, then the chamber must be completely sealed;
- when opening the ventilation holes, the air should be mixed evenly, otherwise the temperature inside the chamber will not be uniform and this is very bad for the chickens;
- it is desirable to equip the incubator with forced ventilation.
 You can also equip your home incubator with a special device that can automatically turn the tray over with eggs and save you from this work. So, turn eggs once an hour with your own hands. In the absence of a special device, the eggs are turned over at least every three hours. Such devices should not come into contact with eggs.
The first half day, the temperature in the incubator should be up to 41 degrees, then it is gradually reduced to 37.5, respectively. The required level of relative humidity is about 53 percent. Before the chicks hatch, the temperature will need to be lowered further and the importance should be increased to 80 percent.
How to make an electronically controlled incubator with your own hands?
A more advanced model is an incubator equipped with electronic control. It can be done like this:
- the frame for the incubator is made on the basis of wooden beams, then it is sheathed with plywood on all sides;
- the axis is attached to the upper part of the chamber, then a tray is attached to it at the rate of 50 eggs maximum;
- the dimensions of the tray are 250 by 400 mm, its height is 50 mm;
- the tray is made on the basis of a 2 mm metal mesh;
- from the inside, the tray is covered with a nylon mesh. Eggs are laid out so that their sharp end is at the bottom;
- for heating, take incandescent lamps (4 pieces) with a power of 25 W;
- to create the required level of humidity in the chamber you need a white tin bath 100 x 200 and 50 mm in size, filled with water. Three copper arcs of wire in the form of the letter P are soldered to the bath, 80 mm high;
- you need to attach a fabric to the wire, which can increase the surface of water evaporation;
- to get air inside the chamber in the ceiling, you need to make 8 holes with a diameter of about 20 mm each. 10 holes of the same size should be made in the bottom panel. Thus, air will enter the chamber from below, be heated by incandescent lamps, and when it exits through the upper holes, it will heat the eggs;
- install in the incubation chamber special temperature sensor, which will regulate the temperature level.
 In the first six days of operation, the temperature inside the incubator should be kept at 38 degrees. BUT then it can be gradually reduced half a degree a day. In addition, you will need to turn the tray with eggs.
Once every three days, you will need to pour water into a special bath and wash the fabric in soapy water in order to remove salt deposits.
Self-assembly of a multi-tiered incubator
 An incubator of this type is automatically heated by electricity, it must operate from a conventional 220 V network. To heat the air, six spirals are required, which taken from the tile insulation of the iron and connected in series with each other.
To maintain a comfortable temperature in this type of chamber, you need to take a relay equipped with an automatic contact measuring device.
This incubator has the following parameters:
- height 80 centimeters;
- depth 52 centimeters;
- width 83 centimeters respectively.
The build looks like this:
- the frame is made on the basis of pine bars 40 mm long;
- on all sides, the bars are upholstered with plywood with a thickness of 3 mm;
- free space between the bar and plywood filled with dry shavings or sawdust, you can take foam plastic in order to insulate the structure;
- the door in the form of a separate panel is attached to the rear wall of the incubator frame;
- hinged type canopies are used as fasteners.
Inside the incubator is divided into three compartments by installing three partitions. The side compartments should be wider than the middle compartment. Their width should be 2700 mm, and the width of the middle compartment - 190 mm, respectively. Partitions are made of plywood 4 mm thick. Between them and the ceiling of the structure there should be a gap of about 60 mm. Then, corners measuring 35 by 35 mm made of duralumin should be attached to the ceiling parallel to the partitions.
Slots are made in the lower and upper parts of the chamber, which will serve as ventilation, thanks to which the temperature will be the same in all parts of the incubator.
 Three trays are placed in the side parts for incubation period, and one will be needed for output. To the rear wall of the central part of the incubator a contact type thermometer is installed, which is attached with a psychrometer to the front.
In the middle compartment, a heating device is installed at a distance of about 30 centimeters up from the bottom. A separate door must lead to each compartment.
For better tightness of the structure, a three-layer flannel seal is covered under the cover.
Each compartment should have a separate handle, thanks to which each tray can be rotated from side to side. To maintain the required temperature in the incubator, you need a relay powered by a 220 V network or a TPK thermometer.
Now you are convinced that you can make an incubator for breeding chickens at home with your own hands. Of course, different designs have different complexity of execution. The complexity depends on the number of eggs and on the degree of automation of the incubator. If you do not make high demands, then a simple cardboard box will be enough for you as an incubator for growing chickens.
Since the foam is a poor heat transfer, it can be used to make a home incubator. Styrofoam can be purchased at any hardware store, the case is small. It is necessary to calculate the number of eggs for laying, temperature, humidity and proceed to the manufacture of the incubator. We have already done all the calculations for you, so we propose to do it step by step according to the scheme, which is described below.
How to make an incubator with your own hands from foam: step by step
To build a foam incubator with your own hands, you need to use 2 sheets of foam (or rather, one and a half, but they won’t sell half a sheet) (5 cm thick), four light bulbs, including electric cartridges (I took a mini-cartridge and 25 W lamps), 2 scraps of welded galvanized mesh, glue - for fixing sheets and foam bars (I processed it with universal polymer glue), adhesive tape (50 mm wide), and a thermostat - industrial or home-made.To build a tray for an egg, a variant with a welded galvanized mesh or a finished plastic tray for vegetables or other products can be used.
We work with a standard foam sheet - 100 x 100 cm.

One sheet must be cut into 4 equal parts, with sides of 50 cm. These parts will serve to glue the incubator body - they will be its side walls.

After that, you need to take the second sheet, cut off half - 50 cm, and divide it into two rectangular pieces, their sides are 50 x 40 and 50 x 60 cm.

During gluing, the case is conveniently fastened with adhesive tape.

From the first rectangle we make the bottom of the incubator, from the second - the lid. The lid should be with a hole - it needs to be cut, it is approximately 12 x 12 cm, and then closed with a piece of glass. So it will be convenient to view and control the temperature. During the first 5–6 days, the hole is completely covered with glass, which then gradually needs to be moved back by 1–2 cm. When removing half of the hole or more, you need to open it.

Taking the squares of the first sheet, you need to glue the case, focusing on the diagram - shown from the top point. As a result, we get the walls of the box, with external dimensions of 50 x 60 cm, and with internal ones - 50 x 40 cm.

About an hour later, when the case dries out, we proceed to gluing the bottom (40 x 50 cm).

Then we use tape for additional fixation. First we paste over the bottom, with fly fishing on the sides - about 20 cm, then the sides over the entire area. Thus, the body will become stiffer, and as a result - durable.

After that, to a long inside case (50 cm), where the junction of the bottom and the wall, should be glued to a foam bar 5 x 3 or 6 x 4 cm. We will install the tray on it. Inside, on sides of 40 cm, retreating 1 cm from the bottom, you need to make 3 ventilation holes on each side (diameter about 10–12 mm), with a uniform distance between them and from the edge of the case. After drilling, you need to insert something like tubes into these holes, otherwise the foam dust will block them. Therefore, it is better to burn them with a soldering iron. Now the body is ready.

We present the scheme of the incubator with our own hands at home (section):
1. Bath;
2. Hole for viewing and ventilation;
3. Tray;
4. Temperature controller;
5. Thermal sensor;
6. Distance from lamp to egg.
Let's take the cover again. On its side inside, stepping back 5 cm from the edge, it is necessary to glue a foam block measuring about 2 x 2 or 3 x 3 cm. With it, the lid will be fixed. Then, on the inside of the lid, you need to fix all the electric cartridges (4 pcs.) And light bulbs - for this I used a base of two strips of welded galvanized mesh.

A thermostat must be mounted on the cover. For the temperature sensor in the lid, you need to take an awl and make a hole, pass the sensor with the wire and place it above the egg at a distance of 1 cm.
For the tray, I used a 16 x 24 cm welded galvanized mesh, inside it is covered with a plastic fly net. The walls should be 8–10 cm high and higher so that young quails do not jump over them. To make the bottom of the tray, it is better to navigate along the bottom that the incubator has. The design requires a retreat of 5 cm from the side walls - for normal air circulation. Such a tray holds about 160-170 quail eggs.
Any bath with walls of 3-4 cm can serve as a water container - for example, cut out of a plastic canister.
So my incubator worked for 2 years. After that, I covered it with foil on foam rubber (a popular building material for underfloor heating, etc.), and in this way improved the heat capacity.

This is how a simple do-it-yourself incubator has a height of 55 cm. We take this parameter into account, since the light bulbs should be installed at a distance of 25 cm from the egg. Let's install it closer - and excess energy will harm the development of the bird.
Conclusion
As a result, making a foam incubator with your own hands is not difficult and does not take much effort. Naturally, such incubators can be made different in size, egg capacity and degree of equipment. various equipment. To do this, we propose to plan the project well before assembling the incubator, think through all the details, set realistic tasks in order to correctly calculate everything and then bring it to life.On a small farm or there are many things in the personal household, among the main concerns - bird breeding.
And first of all, for this purpose, you need a special apparatus for artificial breeding chicks.
Buying young animals or using factory serial incubators require a significant investment funds. The expectation from brood hens is not always justified: amount chicks with this approach is small. Yes, and laying hens during the incubation period require special favorable conditions. The process is laborious, lengthy and ineffective.
Practice shows that poultry farmers, able to hold tools in their hands and knowing the basics of the device electrical appliances, prefer to make incubators do it yourself tailored to the needs and economic profit in this business.
Whole process hatching of chicks - from the beginning to the very end - takes place under supervision poultry farmers, and result worth the effort! Subject to certain rules, the hatched young will be strong and healthy.
Advantages of homemade incubators
Virtues do-it-yourself incubators can be called the following characteristics:
- reliable in application;
- consume a little electricity;
- contain laying from 50 to 300 eggs;
- provide survival young animals up to 90%;
- let you get chicks in certain timing after laying eggs;
- allow breeding different birds: chickens, ducks, turkeys, geese, quails, even exotic parrots and ostriches.
Preparation for work
 Incubator Dimensions determined independently and calculated on the need for the number of young animals and the conditions for placing the incubator.
Quail incubator can be smaller sizes, or you can put in trays larger amount eggs.
Special tool or special materials, standards for manufacturing are not required, it is quite possible to get by with traditional henchmen materials that can be found in any household.
It must be taken into account that options temperature, humidity, angle of inclination of trays with eggs for correct embryo development different types birds are different. General requirements for conditions for normal development embryos are to provide:
- permanent heat;
- humidity;
- regular turning over eggs.
The simplest incubators for school experiments can be done from an ordinary bucket or basin and desktop lamps.

But although primitive options and give a certain effect, not all chickens survive. For getting brood of 50 or more eggs, it is recommended to focus on options for creating an incubator with body, homemade or from an old one.
Anyway main components incubators are as follows:
- frame(box, box, refrigerator) with insulation;
- heating system incubator;
- trays for eggs;
- control devices humidity and temperature.
Important! A fan is required to evenly distribute heat in the incubator. With a small laying of eggs (less than fifty), you can do without a fan, but the heating elements must be installed evenly around the perimeter of the body.
Making an incubator with a homemade case
Case manufacturing
 The body of the incubator make from sheets plywood using wooden beams chipboard sheets or cardboard boxes.
Fantasy tells some craftsmen take over the old hives or hulls out of order TVs.
Internal walls the incubator is better to finish plastic or other moisture-resistant material, convenient for washing. It is important to prevent the growth of the fungus, mold or other microbes.

Note! The height of the incubator can be approximately 1 meter for one or two egg trays.
Housing insulation and ventilation
 After the construction of the hull, it begins warming. To do this, you can use various materials:
- asbestos;
- Styrofoam;
- batting;
- synthetic insulation;
- felt;
- foam rubber.
Plywood walls are desirable to make double, thermal insulation will better.
In the upper wall of the incubator you need to make viewing window to monitor egg maturation. For the supply of fresh air at the top and bottom of the case, from 4 to 8 holes are made with a diameter of up to 30 mm and one for the room temperature sensor.


Bottom body can be made from construction mesh, cover it with plastic grid - so ventilation will also be ensured. Consideration should be given to the need for clearance between the floor and the bottom of the case for inflow air.
Production and installation of trays
 Craft egg trays can be made of metal rods in the form of a large grids and fit them with nylon fabric, can be made from plywood or a tree with a side height of 6-8 cm.
Between walls body and laid eggs need to keep free space for air ventilation.
Under trays bath filled with water, to create a high humidity. Fabric holders can be soldered to it to increase the surface evaporation.
Trays can install:
- for special mounts according to the principle of sliding furniture drawers, for this it is planned to open front incubator walls;
- on the axis, which serves as a support for the trays. The incubator can be opened above, lifting the lid.
Installing the Incubator Heating System
 The heating of the incubator is carried out by conventional light bulbs power from 25 to 40 W, connected parallel. Please note that it is better to use 4 x 25W lamps than 2 x 40W lamps.
To to avoid embryo overheating, distance from lamps to eggs should be not less than 20 cm.
You can use heating spirals from the old iron(on a metal sheet covered with asbestos). It is recommended to place the heating elements on top or along perimeter corps.
Use thermostat power of 300 W to control the temperature mode. It is installed outside, and its sensor is inside incubator. The operation of the thermostat must be around the clock.
Before laying eggs experience temperature regime incubator during the day to make sure in the ability to change the temperature at each stage of incubation. Yes, for chickens in the first two days temperature 38 ºС, then until the 10th day 37.8 ºС, from 11 to 16 days - 37.5 ºС, from 17 to 19 days - 37.2 ºС, from 20 to 21 days - 37 ºС.
Attention! Do not exceed the maximum allowed temperature in the incubator! A temperature of 40 ºС for 10 minutes will lead to the death of the embryos.
Incubator Humidity Control
 Humidity maintenance is carried out installed inside the case psychrometer. His testimony must be visible through the viewing window of the incubator. Psychrometer can be buy at any pet store.
Humidity in the incubator, at first it should be 40-60%, and during the hatching period - 80 %. Before sampling chickens, the humidity is lowered.
Can be selected from computers from old power supplies. Thanks to him, uniform warming up the case, leveling the humidity and temperature.
Poultry advice: Avoid drafts when opening the egg turning incubator.

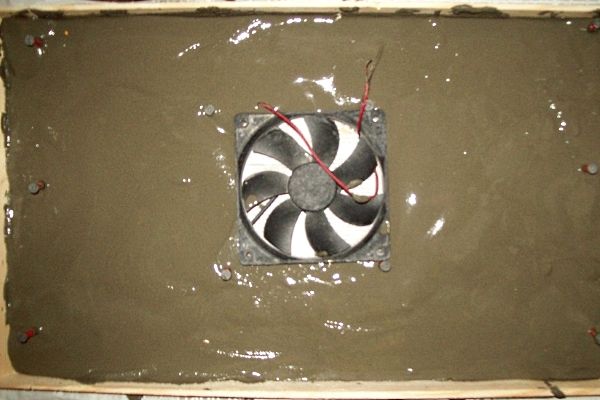
Inside the frame, between the rails and the fan, there is a heating spiral and filled with tile adhesive cement basis. As a result, after the glue dries, the concrete wall with heating.
Making an incubator from a refrigerator
 Application old refrigerator of any model, according to recommendations poultry farmers, optimal option for making an incubator in three reasons:
- least expenses;
- excellent finished thermal insulation;
- possibility of using several cameras.
Scheme the arrangement is the same, only the refrigerator does not require insulation. Recall that we need ventilation openings, installation of a thermostat, lamps incandescent.
For amplification distribution lights can be installed reflectors under each lamp - simple tin jar lids. Do not forget trays with water and fan.
Note! If the electricity that feeds the heating system is suddenly turned off, you can heat the eggs by temporarily placing a closed container with hot water.
Get ready for service your incubator: splashing eggs, systematic ventilation of the chamber, turning over eggs 180º 2-3 times per day for proper maturation.
You can improve the product -. It's essential complicate construction, but your work will undoubtedly pay off and bring satisfaction and joy.
For details on how to make an incubator at home, see video:
We advise you to read
 Psychological characteristics of children in adolescence
 Transferring a child to another school - the procedure and necessary documents Whether to transfer a child to another school
, diagnosis, treatment Treatment of urogenital chlamydia") Chlamydia urogenital - description, causes, symptoms (signs), diagnosis, treatment Treatment of urogenital chlamydia
Chlamydia urogenital - description, causes, symptoms (signs), diagnosis, treatment Treatment of urogenital chlamydia The benefits and significance of hydroamino acid threonine for the human body L threonine what

