Despite all its external inconspicuousness, the generator is one of the most important units in the entire vehicle system, the correct operation of which also affects the smooth operation of all other components. And even though the working life of a modern generator is designed for about 180 thousand kilometers, it is not uncommon for it to fail prematurely, as a rule, through the fault of the driver himself. In such a situation, there are only two solutions - replacing the unit or repairing it.
In this article we will consider the question of how to repair the generator with your own hands.
Generator and the most common faults
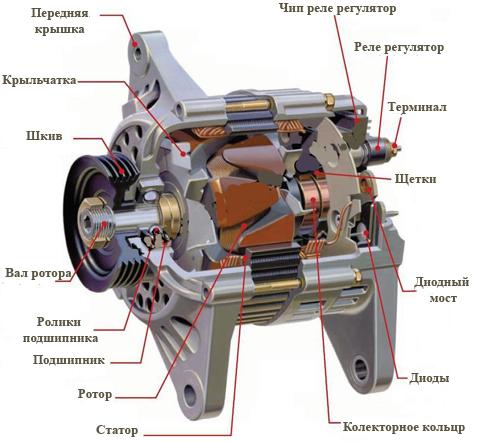
And first, let's find out what a generator is. So, this is a device through which the mechanical energy received from the engine is converted into electrical energy, which is used to power all vehicle systems and.
 Among the most common breakdowns, experts distinguish the following:
- Extraneous noise that occurs during the operation of the generator;
- Supply of insufficient voltage;
- Activation on the dashboard of the corresponding indicator;
- Lack of electric power supply to vehicle units.
Dismantling the generator
Before starting the repair of generators, it is necessary to dismantle. To do this, you must perform the following sequence of actions:
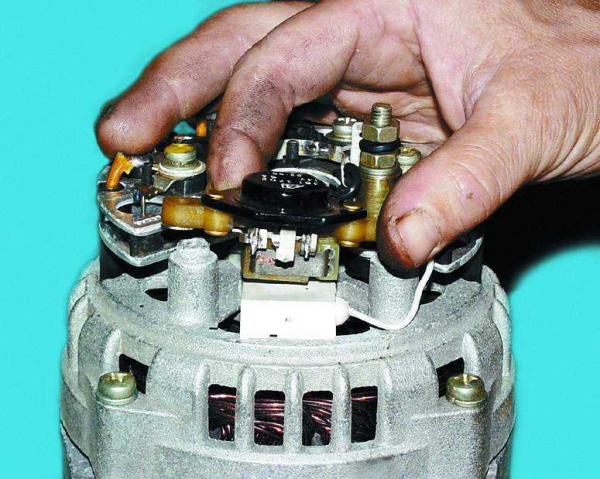
- First of all, the brush holder and voltage regulator are removed;
- Carefully remove all fasteners;
- The tension bolts are removed, the phase winding is disconnected from the rectifier unit;
- The starter cover is removed;
- The pulley is dismantled from the shaft and the front cover of the device is removed.
Everything, you can start repairing generators. It must be carried out using special tools and devices - an ammeter, voltmeter, rheostat and tachometer.
Self-repair of generator malfunctions
 So let's start the renovation. automotive alternators. Consider each group of breakdowns in more detail:
- Extraneous noise during operation - first of all, it is worth carefully inspecting the rotor bearings. If they are faulty, you should immediately replace them with new ones, otherwise, everything may end up quite serious problems. If there are no defects and play, they must be removed and washed in gasoline, then lubricated with grease so that it covers about 30 percent of the bearing area. After that, you can put them in place;
- There is a voltage supply that is insufficient for normal operation - as a rule, problems of this kind lie in the battery relay, which needs to be replaced. Also, one of the reasons is the breakdown of one or more diodes located on the diode bridge. As in the previous case, everything is solved here by replacing the component;
- The charging process is in progress, but the light on the dashboard is flashing - often, the reason for such a breakdown is a breakdown of the diode, whose function is to ensure the operability of the power circuit going to this indicator. The diode is located on the diode bridge, and the repair of generators with a similar problem consists in replacing the diode bridge, for which it is necessary to remove the fasteners holding the stator winding and replace the bridge;
- The generator does not charge - in such a situation, the reasons may be the following: failure of the fuses, problems with the regulator relay, wear, sticking or breakage of the brushes, open stator circuit or short circuit in the winding. If in first three cases, everything is solved solely by replacing the component with new part, then in the latter, there is every chance to reanimate the unit with your own hands. Often, an open or short circuit is observed in the immediate vicinity of the slip rings, where one of the ends of the winding is desoldered. To repair generators, you should unwind one turn of the winding back, so that the resulting length of the wire is enough to solder it to the ring. The old, broken wire is removed, and a new wire, obtained by unwinding, is soldered in its place.
At the end of all procedures, the generator is assembled, performed in the reverse order.
Summing up
On this, the independent repair of the generator can be considered completed. And even though this work is quite complicated, requiring certain knowledge and skills, it is, nevertheless, quite within the power of an ordinary motorist. The main thing is to be careful and not to rush anywhere.
Happy repair.
An example on the VAZ 2110
Another example on the Subaru Legacy 4th generation
Our services
Delivery

Typical malfunctions
The bulk of cars, in recent years, is equipped with computer-controlled voltage regulators (feedback). The regulators are controlled by the internal combustion engine control unit, and it determines the optimal mode of operation of the generator, sufficient for charging the battery, uninterrupted operation of the internal combustion engine, as well as the operation of security and comfort systems.
To test computer-controlled voltage regulators, a special device is needed - a tester that allows you to simulate an internal combustion engine control unit - to give commands to the voltage regulator and receive feedback from it. The tester is indispensable when working with simpler voltage regulators. The tester allows you to determine the health of the voltage regulator in the shortest possible time, which reduces the repair time and customer waiting.
1. After starting the car, the generator health lamp does not go out, as a rule, the battery is shown on the control panel.
2. overvoltage. This is signaled by headlights. They shine brighter than usual, like all possible lights in the cabin.
3. The alternator malfunction lamp flashes on and off intermittently.
The performance of the stator winding is evaluated according to several criteria, the most important of which is its resistance.
The stator winding must be checked under load, since at rest it may not manifest itself in any way. To check the stator winding, specialists service center uses a special device that allows you to measure resistance readings under high current.
A visual inspection for corrosion, peeling of plates, darkening or peeling of varnish is also carried out.
1. With an increase in the load on the generator (turning on the lighting, climate system), the voltage drops below the permissible limit.
2. No charging, generator not working.
When diagnosing diode bridges, specialists use a special device that allows you to check diode bridge under load.
This allows you to instantly draw a conclusion about its suitability. Without this procedure, it is very difficult to determine its malfunction, since a faulty diode bridge does not always have characteristic signs of failure: a darkened or burned out diode, a short circuit between the buses, etc.
1. There is a flickering of headlights, dashboard.
2. With an increase in the load on the generator (turning on the lighting, the climate system), the voltage drops below the permissible limit.
3. From the side of the generator, a hum is heard similar to the sound of a washing machine in the spin mode.
4. No charging, generator not working.
When diagnosing the generator rotor, its resistance, the condition of the slip rings, as well as the condition of the rotor shaft at the bearing seats are measured.
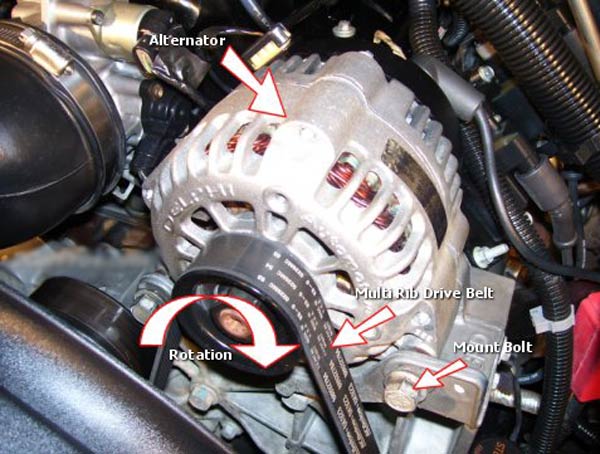
Alternator malfunctions include the absence of charging current when the engine is running, as well as increased or decreased charging current.
The absence of the generator charging current during engine operation is determined by control devices, which include an ammeter, voltmeter, control lamp. It can be caused by a malfunction of the alternator itself, a broken or stretched alternator drive belt, or a malfunction in the battery charging circuit.
When determining the reasons for the absence of the generator charging current, it is necessary to check the condition and tension of the generator drive belt, then you need to check the regulated generator voltage with a voltmeter or probe. To do this, the voltmeter is connected to the “+” terminal of the generator and to the “mass” with the polarity observed, after which the average engine speed is set, which is approximately 2000 min-1 (rpm). After that, the main consumers of the electric current of the car are turned on, which include parking lights, heater, high beam headlights. In this case, the voltmeter should show a voltage in the range of 13.7-14.5 V. If the voltmeter readings are within these limits, then the generator is working and the cause of the problem lies in the battery charge circuit. If the voltmeter shows a voltage that is out of range, then it is necessary to remove the brush assembly with the voltage regulator, check the wear of the brushes, and also make sure that there are no jams in the brush holder, contamination of the slip rings of the generator armature, check the reliability of the contacts of the voltage regulator. After performing the above measures, the voltage must be checked again. If the steps taken do not bring a positive result, then it is possible that the malfunction lies in the voltage regulator, which should be replaced with another one that is known to be good. If, after replacing the regulator, the voltage does not recover, then it is necessary to remove the generator from the car and conduct a more detailed check of its condition and replace the failed parts with new ones.
The reduced strength of the charging current leads to undercharging of the battery, as a result of which the glow of the lamps of the lighting devices decreases and the timbre of the sound signal changes. The reasons for the reduced strength of the charging current may be a malfunction of the brush-collector assembly, slippage of the generator drive belt, damage to one of the diodes of the rectifier unit, an open or interturn short circuit of one of the phases of the stator winding.
In order to determine the malfunction, it is necessary to check the tension of the alternator drive belt, as well as the reliability of the wire contacts. After that, remove the brush assembly and check the contamination of the slip rings, as well as the wear of the brushes and their jamming. If, after the measures taken, the voltage is not restored, then the generator is removed from the car for a detailed check and replacement of failed parts.
Increased charging current leads to overcharging of the battery. In addition, at high engine speeds, the arrows control devices begin to go off scale, and the electrolyte boils and splashes out of the battery. The reason for the increased strength of the charging current may be a malfunction of the battery or voltage regulator. In this case, to identify the problem, you need to check the voltage of the generator, as described above, and replace the faulty battery or voltage regulator.
Generator repair consists in checking its technical condition, disassembling, checking the technical condition of its parts, replacing faulty parts with new ones and subsequent assembly.
Checking the technical condition of the generator is carried out on a special control and measuring stand, which is equipped with an electric drive that provides a smooth change in the frequency of rotation of the generator rotor, an ammeter, an unloading rheostat and a tachometer. The bench test consists in determining the minimum rotational speed of the generator rotor, at which a voltage of 12.5 V is reached without load and with load. In addition, the bench checks the magnitude of the load current and regulated voltage.
The generator is disassembled in the following sequence:
1) unscrew the fasteners, remove the brush holder together with the voltage regulator;
2) remove the coupling bolts, remove the generator cover together with the stator;
3) disconnect the phase windings of the stator from the terminals on the rectifier unit, remove the cover of the rectifier unit;
4) unscrew the nut fastening the fan pulley, remove the pulley from the rotor shaft;
5) using a puller, remove the front cover of the generator;
6) if it is necessary to replace the front bearing, then you need to unscrew the screws of its holder and press the bearing out of the cover using a puller.
The assembly of the generator is carried out in the reverse order of its disassembly. Checking the technical condition of the generator parts includes checking the excitation winding of the rotor, stator windings, as well as checking the diodes of the rectifier unit.
The excitation winding of the rotor is checked with an ammeter. To do this, the ammeter probes are connected to the armature rings and the absence of breaks or short circuits in the excitation winding is determined by the resistance value. In addition, a winding break can be determined using an indicator; for this, a battery is connected through it to the contact rings of the excitation winding. Such a test can be performed without removing the generator from the car, for this it is only necessary to remove the brush assembly from the generator.
Checking the stator windings for a short circuit or an open circuit is carried out using an indicator and a power source. Checking the stator windings for an interturn short circuit is carried out using an ohmmeter, if the stator windings are in good condition, then their resistance should not differ by more than 10%.
The diodes of the rectifier unit are checked using a lamp and a battery. A good diode can only pass current in one direction. A faulty diode can pass current in both directions (in the case of short circuit) or not pass current at all (in case of an open circuit). If one diode is damaged in the rectifier unit, then the entire rectifier unit is replaced with a new one.
A short circuit of the rectifier unit diodes can be checked without removing the alternator from the vehicle. To do this, it is necessary to disconnect the wires from the generator and the battery, as well as disconnect the output from the voltage regulator and the generator. The check can be carried out using an indicator and a battery or using an ohmmeter. If the test lamp lights up during the test, then there is a short circuit in one or more diodes and the rectifier unit is faulty.
When servicing the generator, pay attention to its cleanliness. Operation of the generator with the “+” terminal of the battery disconnected from the clamp is not allowed, because during such operation a short-term overvoltage may occur on the “+” terminal of the generator, which, in turn, can damage the voltage regulator and electronic devices and the vehicle’s on-board network . It is necessary to monitor the operation of the generator on the instruments daily.
Every 10,000-15,000 km of run, it is necessary to tighten the generator mounts on the engine. In addition, it is also necessary to check the tension of the drive belt and, if necessary, tighten it.
Every 60,000 km of run, it is necessary to remove the generator, disassemble it, clean and wipe all its parts, and blow them with compressed air, then you need to blow out the inside of the case and covers, check the condition of slip rings and brushes. If necessary, clean the rings with fine-grained sandpaper or grind them. In addition, if the brushes protrude from the brush holder by more than 5-8 mm, they must be replaced.
3.875 rating 3.88 out of 5 (4 votes)
A car alternator is a device that takes mechanical energy engine and converts it to electricity, thus providing electricity to the rest of the car units. The generator provides battery charging and power supply to the car engine. Therefore, the “engine-generator” connection should not be interrupted, because an idle generator is a battery that does not receive a charge and, accordingly, the main organ of the car is not working.
Replacing the generator will entail significant financial costs. Therefore, if you have everything at hand necessary tools and knowledge of the devices of the engine compartment of the car, then you can fix the breakdown yourself (read about what to do in our other article).
So the generator is broken. What malfunctions can cause the failure of this device? Consider them:
- The generator produces current at a very low voltage.
- The generator does not produce electricity at all.
- The failure of the device is displayed on the dashboard in the form of a flashing light bulb.
- The generator is charging in excess of the optimum rate.
- The operation of the generator is accompanied by extraneous noise.
Before you start repairing the generator with your own hands , it is necessary to check its technical condition and disassemble the unit into parts. Before disassembling the generator, check the condition of the belt and its tension and see if it is waiting for you in the near future (read more,). The check consists in pressing a finger on the middle of this part of the generator. If the belt is in good condition, then it should not fall more than half a centimeter when pressed. It is worth noting that the new belt should not sag by more than 2 mm. If the belt is not worn out, but the tension is weak, then the deficiency can be corrected by tightening the alternator belt. Also scroll the tension roller of the generator, if it scrolls with difficulty and creaks, then it will need to be lubricated with oil, or a new roller should be put in its place.
The technical condition of the generator can be checked using the following measuring instruments:
- ammeter;
- voltmeter;
- rheostat.
The rotor speed is measured using a tachometer (usually located next to the speedometer on the instrument panel). At normal operation generator indicators of this device should not be less than 2000 rpm., The norm is 5000 rpm.
Do-it-yourself generator repair - reasons for repair
Consider the reasons that can cause a generator to break down. So, if the generator does not generate a charge, then the following phenomena may be the reasons for this:
- Blown fuse or contacts.
- Broken or worn alternator brushes.
- The regulator relay has failed.
- Due to the short circuit of the winding, an open occurred in the stator or rotor circuit.
In order to fix the first three malfunctions from the list, you just need to replace the worn parts of the generator, having previously, of course, disassembled it.
How to remove the generator and disassemble it.
- First of all, remove the brush holder together with the voltage regulator, carefully unscrewing all the fasteners.
- Remove the tension bolts and then the cover with the stator.
- Remove the cover from the stator, having previously disconnected the phase windings from the output wires on the rectifier unit.
- Next, remove the pulley from the shaft and the front cover of the generator using a special puller.
The assembly of the generator is carried out in the reverse order.
In the event of a winding short circuit, you will need more serious action than a simple replacement of the part. So, a broken winding can either be repaired or replaced with new wires. Often the winding breaks near the slip rings. In addition, a breakdown can occur due to the desoldering of any of the ends of the winding. Such a malfunction can be repaired by unwinding the turn in the gap area back from the rotor winding. Next, the broken end of the winding must be removed (soldered) from the slip ring and the previously unwound wire is soldered there. Desoldering is very easy to fix by resoldering the wiring.
A damaged relay indicates a weak or too strong charge of the generator, which must be replaced when repairing the generator.
If checking the generator voltage showed that the device is working, but at the same time the indicator flashes on the instrument panel, then most likely one of the diodes that are responsible for powering the light in the indicator has failed. These diodes are located in the generator itself, and the replacement is carried out after disassembling the device.
Noises unusual for the generator may indicate wear on the rotor bearing. If during inspection it is found that the alternator bearing is worn, it will need to be replaced. If the incomprehensible sounds of the generator are associated with the lack of play in the bearing, then it can simply be filled with oil, after washing in gasoline. Extraneous sounds will then disappear.
Thus, you can even repair the generator on your own in your garage (as well as, in fact). When checking and replacing parts of the device, follow safety precautions and be careful, because the electrical system should not be damaged.
Generator repair: video


