Hello, dear readers and guests of the Electrician's Notes website.
Today I decided to automate the control circuit of the cold water supply pump of our workshop.
The fact is that at present, before the work shift at 7-00 in the morning, you have to manually turn on the pump using a push-button post, and in the evening after the end of the work shift at 18-00, turn it off.
In the morning you sometimes forget to turn on the pump and each time you need to return to the control panel, and in the evening, sometimes, you forget to turn it off and it can continue to work all night. Even worse, when you forget to turn off the pump, leaving for the weekend, and it will remain "threshing" all these days.

So, for the process of automating the switching on and off of the pump, I decided to use the TE-15 weekly electronic timer from IEK.


In one of my articles, I talked in detail about, but in this case it will not suit us, because. during the week we do not have the same pump operation algorithm: from Monday to Friday it is on from 7-00 to 18-00, and on weekends it is turned off. With the help of the Orbis Mini T QRD daily timer, this is not possible, so I used the weekly TE-15.
Similar weekly timers TE-15 are available in catalogs not only from IEK, but also from TDM and EKF. Look, they are completely identical, both in appearance and in technical characteristics. Just like twin brothers - spot the differences?


In this article, I will tell you about technical specifications, connection diagram and programming of the TE-15 timer from IEK.
Appearance and overall dimensions.


Application and Specifications
The weekly electronic timer TE-15 is necessary for counting the time and automatic switching on (off) of electrical consumers at set intervals. The scope of the timer is very wide and you can list examples indefinitely, here are a few of them - this is automatic control:
- lighting of advertising banners, billboards, building facades, street shop windows
- room ventilation motors
street or yard lighting
lighting of administrative and domestic and industrial premises
pump motors, for example, for pumping water from a well or watering plants
heating electrical appliances
Technical characteristics of the electronic weekly timer TE-15:
- supply voltage 230 (V)
- rated current of output contacts 16 (A) at cosφ=1 and 8 (A) at cosφ=0.4
- number of channels - 1 (single-channel)
- own power consumption 5 (W)
- number of programmable cycles - 8 on and 8 off
- minimum programmable time interval (discreteness) - 1 minute
- error not more than 2 seconds per day
- weight - 159 grams
Of the advantages, I would like to note the simple setup and programming - it is even easier to set up than an alarm clock on a modern phone.
I would like to say a few words about its shortcomings. In my opinion, it would be possible to increase the number of programmable cycles. In this regard, an increase in output channels immediately suggests itself, i.e. to control 2, 3 or 4 independent loads with one timer. By the way, while setting up the timer, I found that the number of programmable cycles is actually 8, and 16, which could not please - so keep that in mind.
The listed shortcomings, or rather even wishes for this model, are smoothed out by its cost, which ranges from 1300-1800 rubles as of the date of writing the article.
Installation and construction
The TE-15 digital timer is allowed to be installed in electrical panels with a degree of protection of at least IP30. The operating temperature must be between -5°C and +40°C.
The timer is mounted on a standard DIN rail. In width, it occupies 2 modules, i.e. 36 (mm) - see drawing of its overall dimensions.
![]()
The timer has a built-in battery that ensures its operation up to 150 hours, i.e. up to about 6 days. During this time, all programmed cycles are completely stored in the device's memory.
On the front side of the timer there is a protective cover, under which are hidden buttons for control and programming, and an LCD display.
Read about the purpose of each button below in the text.


When the lid is closed, only the screen with the current time is visible in the window. Here, for example, the current time is 22-43.

There is also an "On" LED indicator on the front side. red color, which symbolizes the state of the timer. If this indicator is on, then the timer is in operation and its output relay is on, i.e. executes the programmed cycle, if it is not lit, then the timer is in the waiting mode for its next cycle.

TE-15 timer connection diagram
Here is the TE-15 connection diagram, taken from the passport.

To power the timer, an operating voltage of 230 (V) is required, the phase and zero of which are connected to terminals (1) and (2) - polarity does not matter.
Here is an example of a timer connection diagram with a load of up to 16 (A).

Installed as a protective device circuit breaker, in this case VA47-29 with rated current 16(A). The phase from the machine is connected to terminal (1).

We take zero from the zero bus N and connect it to terminal (2).

The load is connected to the output contacts of the relay, which are made switching. Terminal (4) general conclusion. Contact (3-4) is normally open (NC) and contact (4-5) is normally closed (NO). Here is proof of that.


The rated current of the output contacts is specified in the technical specifications (see above in the text). Here I will explain a little that 16 (A) is about 3520 (W) at cosφ=1 or 8 (A) is about 1760 (W) at cosφ=0.4. The former include a purely resistive load such as electric heaters or incandescent lamps, and the latter - active-inductive load, for example, fluorescent lamps, electric motors, transformers, household appliances, etc.
If you need to connect a more powerful load to the timer or three-phase load(electric motor, etc.), then a contactor must be added to the circuit, for example, or even better, otherwise the output contacts will very quickly melt, stick or burn out due to increased or starting currents, and generally fail.
In my example, power three-phase electric motor pump is 2.2 (kW) with a rated current of 5 (A), which means that I need to connect a contactor to the timer, and control the electric motor with its power contacts. In my example, I will connect the ESB 24-40 modular contactor from ABB to the timer.

Control circuit:


Shield "Tyco" for 9 modules, IP40.

Power circuit.

After connecting the timer, you can proceed to its configuration and programming.
Programming and setting the timer TE-15
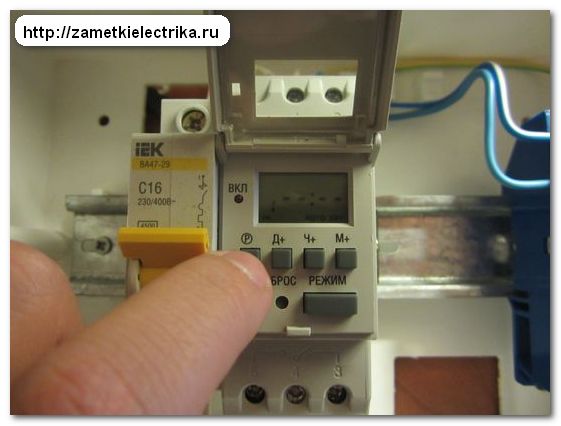
Turn on the power supply. When you turn on the timer for the first time, the LCD on the timer will be off. Click on the "Reset" button.

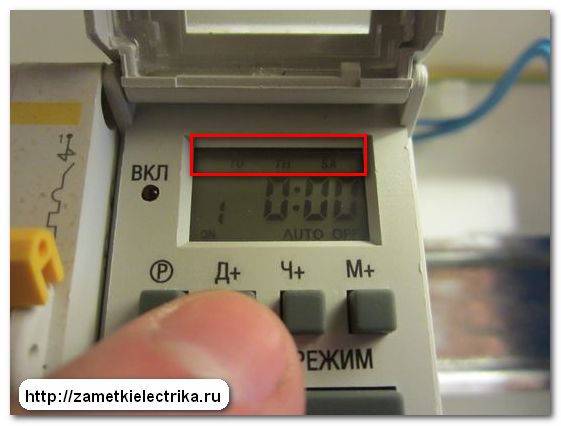
Within a few seconds, the previously programmed cycles (setpoints) are cleared (reset). At this time, absolutely all symbols will light up on the display.
![]()
After the reset, the display shows the initial time 0-00, the set timer mode "Auto Off" and the day of the week "Su" (Sunday).

The days of the week are displayed on the screen in the form of well-known Latin abbreviations:
- Mo (Monday - Monday)
- Tu (Tuesday - Tuesday)
- We (Wednesday - Wednesday)
- Th (Thursday - Thursday)
- Fr (Friday - Friday)
- Sa (Saturday - Saturday)
- Su (Sunday - Sunday)
The timer can be displayed either on a 24-hour scale or on a 12-hour scale with an "AM" (am) or "PM" (after noon) indicator. To switch between one or another scale, you need to press and hold the "Clock" button for 6 seconds (in fact, switching takes about 3 seconds).

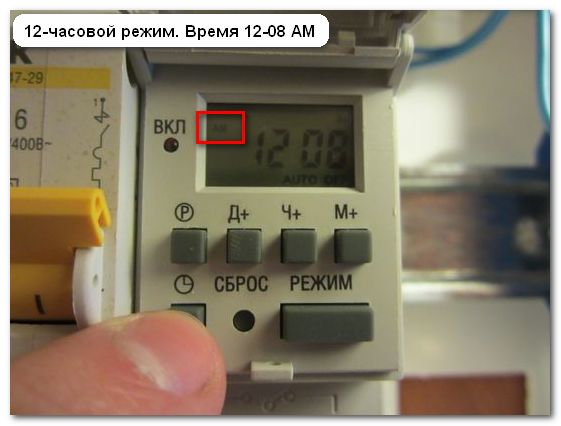
Personally, I'm more comfortable when the time is calculated on a 24-hour scale, so I'll leave it.
First of all, we need to set the current time and day of the week. This is done in the following way.
We press the "Clock" button and, without releasing it, press the "D +" button. With each subsequent press of "D +" on the screen, the day of the week will change in a circle. For example, I set Tuesday, i.e. Tu.

Then, without releasing the "Clock" button, press the "H +" button. Each subsequent press of "H+" on the screen will change the hours of the current time, depending on the set 12-hour or 24-hour scale. In the same way, we set the time in minutes, only now we press the "M +" button.
I set the current time to 21-07.

The weekly timer TE-15 has 4 operating modes.
Switching between modes is carried out by alternately pressing the corresponding "Mode" button. The selected mode is shown on the display. The difference between the modes is the initial state of the relay output contacts, according to this table.

Thus, I can control the load, both in automatic mode "Auto Off" and "Auto On" according to the set time, and in manual mode - "On" or "Off".
And now let's program the timer for my example - pump motor control.
Once again I will repeat about the necessary algorithm for the operation of the pump. On weekdays (Monday to Friday), the pump should run from 7-00 to 18-00, and on weekends it should not turn on at all.
First, select the “Auto Off” mode: contact (3-4) is closed, (4-5) is open, the timer output relay is off, the LED is “On.” does not burn.
So, the set pump operation algorithm is not complicated for us - for this we will need to program only one cycle.
Press the "R" button. The display will show "1 ON" and dotted lines - this indicates that the first cycle of switching on the load is ready for programming.
Then alternately press the "D +" button and select the necessary days of the week.
Here you can set many different variations:
- any one day of the week
- three days of the week (Mo, We, Fr)
- three days of the week (Tu, Th, Sa)
- two days off (Sa, Su)
- three days of the week (Mo, Tu, We)
- three days of the week (Th, Fr, Sa)
- five days of the week (Mo, Tu, We, Th, Fr)
- six days of the week (Mo, Tu, We, Th, Fr, Sa)
- all days of the week (Mo, Tu, We, Th, Fr, Sa, Su)
We just need five working days, i.e. Monday to Friday - Mo, Tu, We, Th, Fr.

Now press the "H +" button and set the time (hours) at which the timer will turn on the load. Each subsequent press of "H+" on the screen will change the hours of the current time, depending on the set 12-hour or 24-hour scale.
I set it to 7 o'clock in the morning.

Similarly, we set the minutes using the "M +" button, but in my example they do not need to be set.
Press the "R" button. The display will show “1 OFF” and dotted lines indicating that the first load off cycle is ready for programming.
![]()
By analogy, we set the days of the week and the load off time. In my example, the pump should be turned off at 18-00 on weekdays, i.e. Monday to Friday - Mo, Tu, We, Th, Fr.

Ready. Now, to save the set timer settings, press the "Clock" button.

This completes our programming. It remains to connect the load to the timer according to the above schemes and check its performance.
If suddenly you made a mistake with the time or date, then you can make changes to the programmed cycle. To do this, press the "Clock" button until the number of the cycle in which you decide to make changes appears on the screen. Then press the "Mode" button - the time of this cycle will be reset (dotted lines will appear on the screen) and use the "D +", "H +" and "M +" buttons to make the necessary changes. Then press the "Mode" button twice and the "Clock" button once to save the changes.
An example of a lighting control scheme using a timer
I will connect the socket to the output contacts (4-5) of the timer, and I will turn on the light bulb in the socket.

To do this, I connected the phase from the machine to terminal (5), from terminal (4) to one of the socket terminals. On the other terminal of the socket, I connected zero from the zero bus N. Protective conductor PE in this example was not connected to me - you should not forget about it.

As a load, I connected led lamp with a power of 9 (W), with which I repeatedly carried out my experiments ( and ).

For clarity, I programmed 3 cycles of lighting control and checked the operation of the timer. Works properly.

The principle of operation of the digital timer, see my video.
P.S. On this, perhaps, everything. There will be questions - ask them in the comments or by personal mail. Thank you for your attention.
To find out the scope of its application. Devices of this type are usually rated for currents up to 16 A and have a limit on the power of the connected device. A mechanical household timer plugged into an electrical outlet can be used with resistor-type appliances, which include incandescent lamps and electric furnaces, and inductive type. The last category includes fluorescent lamps and electric motors.
Set the current time on the household timer scale, as well as the time to turn the device on or off. The most common timer design is a device equipped with a disc with teeth. These teeth, located on the outer disk, need to be pressed. Each tooth will correspond to a certain timer operation time. The usual step is 15 minutes.
Plug the timer into a socket electrical network and connect to the device the corresponding device whose operating time you want to control. If you later need to change the mode of the timer, the teeth on the disk will have to be returned to their original position, and then set new parameters to turn the device on or off.
Use the switch located on the side of the case when working with the timer. It has a symbol that looks like a clock and an icon that looks like a Roman numeral I. When you set the switch to the first symbol, the timer will perform its main function of turning on or off. household appliances. If you select the I symbol, the timer will operate as a standard outlet, supplying continuous power.
When using the timer, follow the instructions in technical description. Do not use a mechanical timer to connect devices of complex design that require the selection of a specific program. Such devices include a programmable multicooker. A household timer, unfortunately, will not be able to set several cycles of sequential switching on and off of complex equipment.
systemic ohm timer, connected to the interrupt request line IRQ0, is provided with any computer. They can be easily controlled and, if desired, disabled. The timer is visible at the very bottom of the desktop, as it is directly a component of it.
You will need
- - a computer with a timer installed on it.
Instruction
Please note that if the timer on your computer is running in normal mode, you will not be able to manipulate its controls using the Enter button. In order for access to management to be opened, close the program and restart it again. The timer interface is designed in the style of the Winamp Modern skin, so using it is not difficult at all. It is usually implemented on chips such as Intel 8254 or Intel 8253. Each of these chips is suitable for its own computer. For example, the Intel 8254 chip is for IBM AT and IBM PS/2 computers, and the Intel 8253 chip is for IBM PC and IBM XT computers.
To completely stop the timer, you must call the Windows Task Manager by pressing the key combination Ctrl+Alt+Del or Ctrl+Shift+Esc. In the list that opens, find the process called Stoppc and click the "End Process" button. After this command, the timer on your computer will immediately be disabled. It is worth noting that before completely turning off the timer, ask yourself if the situation really requires it, so
The lighting control timer is an indispensable device for houses, summer cottages, shopping centers, outdoor advertising objects. It automatically turns on and off the light (lamps, illumination, billboards) at the specified time. Many timers today are equipped with the functions of a motion sensor and a photo relay, which automatically turns on the lighting when it gets dark.
Connection
Usually, for simple lighting control devices, power is supplied from above, and switching takes place from the lower contacts, that is, direct lighting control. If the terminals are arranged in one row, the first two are responsible for "zero" and "phase", the remaining terminals are responsible for turning on, off and switching contacts. The blue wire traditionally means "0", the red one - "phase", the brown wire is responsible for the output to the light bulb. The jumper between the zero-phase terminal group and the contact group must also be supplied with power.
In the device of any company there is a time button, holding which you can set the current date. You need to set the parameters for the operation of a digital light control device using the "Programs" button. The first press will allow you to set the time for turning on the light, the second press will turn it off. A lit "On" button will indicate that the light control timer is now running in the automatic mode that has been programmed. If you need to specify midnight in the program, it is better to choose the hour value of 23.59 or 00.01 so that the program works without failures.
Important! Light control devices have automatic time shutter speed, the light will turn on / off immediately. This is necessary so that there are no false positives, for example, from the headlights of a passing car.
Video for acquaintance:
To use electricity efficiently, there are other ways to control light. You can also turn the light on and off manually in the old fashioned way; a light-sensitive photorelay device that “sees” the level of illumination or a burglar alarm with motion sensors will also cope with this function, which, when triggered, will turn on not only the sound, but also the light.
At the moment, almost every person plans to automate certain processes. This process is not considered difficult, but an outlet with a timer will allow you to complete it. She can easily control the inclusion of lights for poultry, illuminate the greenhouse, and also turn off the equipment in certain time. Properly setting up an outlet with a timer will help complete this process.
After reading this article, you will learn how to set up a mechanical and electronic socket with a timer. In the instructions you will also find videos that will help you set up all the processes.
Mechanical setting
The heart of such a timer is a special drum, which has a switch lever. executive device considered a special microswitch. At the moment, devices that have a daily timer are very popular. As a rule, one hour in such devices is divided into 4 marks of 15 minutes each.

As you can see, the design of the outlet is considered quite primitive. Using this socket will not cause any difficulty, since you will need to set the time on the timer yourself. When the arrow reaches the required indicator, then the device will automatically turn off or turn on the power. Now you need to learn how to set up a mechanical outlet with a timer, model Feron TM50.
In this diagram, you can see the time the filter pump in the pool works:
- From one to two in the morning, power will not be supplied to the pump.
- After two in the morning the pump will run automatic switch on for 15 minutes.
- From 4 to 5 in the morning it will be in off mode.
- At 6.00 the filter will automatically turn on.
- Now, until lunchtime, automatic activation will be performed every 3 hours for 15 minutes.
- At 15.00 there will be a peak of swimmers and therefore the pump will turn on for 30 minutes.
- Now at 18.00 and at 21.00 the pump will turn on again for 30 minutes.
- The final cycle is considered to be that the pump will be turned on for 15 minutes at midnight.
As you can see, the process is considered quite rational. If you set up the timer outlet correctly, then you can save a lot of money. If you are using two-rate counter, then you should remember that the setting should be done differently.

Electronic outlet setting with timer
Now we will consider the TM24 electronic socket model.

This is an outlet that is very popular. At the moment, almost everyone uses it. If you have just started using the device, then it must be left in the outlet for 12-14 hours.


The diagram indicates that you can quickly configure all the necessary parameters. Tuning can be done from Monday to Sunday. It is during this period that your device will work in the specified mode.
If you plan to start using such an outlet, then remember that you will first need to set the current time. To do this, you should hold the SET key for a few seconds. To select the required day, press the RIGHT and LEFT keys. After pressing the SET key again, you can enter the time setting mode. You can manage such a setting in the same way. Now you can easily proceed to configure the basic settings. You can complete the process as follows:
- If you wish to see the first timer, then press the RIGHT key until you see "1_ON".
- After that, select the SET key. After pressing it, you can see the setting of the days of the week.
- Now you can press this key again and select the minute setting.
- Now you should again hold down the RIGHT key and select the value "1_OFF".
- You can now exit the setting mode by pressing the CLK key.
If you plan to simulate the presence of a person, then you can find the RND button on the device. This feature allows you not to tie your outlet to the exact time. Turning on or off the equipment can be carried out with a certain delay.
Setting up other outlets that have a timer is practically the same. For correct adjustment, you can also change the clock to winter or summer time. We hope that our instructions will be useful and interesting. Now you can easily set up an outlet with a mechanical and electronic timer.


