LED lamps are a relatively new type of lighting, which is gaining more and more popularity in our country every year. Experts predict that in the future they will crowd out all others.
The main advantage of LED lamps is efficiency. They consume 50-70% less electricity than conventional incandescent lamps, and at the same time last about 10 times longer. And although their price is higher, in the long run, the LED lamp allows you to save a lot. There are also a number of other great features. LED lamps which are less known to the general public:
- no flicker;
- safety for the environment;
- strength and resistance to damage;
- lack of ultraviolet radiation;
- high light output;
- noiselessness;
- ability to work at low temperatures;
- large operating voltage range;
There are many various kinds LED lights as well as many ways to use them. LEDs can successfully replace conventional lamps in a residential building or apartment, provide bright and economical light on the streets, highways, squares and parks. LEDs are especially effective in industrial facilities. Just 1 powerful LED spotlight can completely illuminate a construction site, warehouse or even a railway station.
How to calculate light?
When choosing LED lamps, the question always arises of how to choose the right number and brightness of LEDs so that the illumination of the room is pleasant for the people there.
The calculation of the number of LED lamps can be done in several ways:
- translating the usual "watts" into "lumens";
- using special formulas;
- with the help of computer programs;
Suitable for different situations various ways counting.
Replacing conventional lamps
If conventional incandescent lamps were already working in the room, which created comfortable illumination, you can determine the required number of LED lamps based on the power of the old lamps.
We just need to compare the luminous flux of the LED lamp and the old lamp.
Luminous flux refers to the brightness of light. It is measured in lumens and is denoted by the letters Lm. Manufacturers of LED lamps are required to indicate this parameter on their product. In most cases, the number of lumens emitted is indicated on the packaging of the lamp.
The calculation is based on the fact that a conventional 100 W incandescent lamp gives approximately 1200 - 1300 Lm of light. Thus, if a 70 W lamp coped well with lighting a small kitchen, it can be replaced with an LED one, which has a value of 800 - 900 Lm.
But what to do if the required value is not indicated on the LED lamp? In this case, the luminous flux can be calculated based on the power of the lamp.
Usually, LED lights consume from 5 to 12 watts. At the same time, they transform 1 W of energy into at least 50-80 Lm. Therefore, a 5 W LED lamp will provide a minimum of 500 - 800 lm, that is, it is quite possible to replace a conventional 70 W lamp with it. Lamps are constantly being improved, and today you can already find models that provide 200 - 300 Lm at a power of 3-4 watts.
If you can not do without mathematics
It is not always possible to calculate the lighting "by eye" in large new buildings, rooms where the lighting system is radically changed or where the illumination must strictly correspond to sanitary standards- SniPam.
They establish certain standards of illumination for each type of premises, measured in Luxors:
- Offices where computers are installed - 300 Lk;
- Conference halls – 200 Lx;
- Stairs - 50-100 Lx;
- Children's rooms - 200 Lx;
- Living rooms, living room, kitchen - 150 Lx;
To calculate the value luminous flux(the one measured in lumens) in a room of the correct geometric shape, it is enough to multiply its area by the illumination norm established by SNiP and by the ceiling height factor.
More and more users are realizing how beneficial it is to use LED lamps. They shine very evenly and brightly, without flicker. And it consumes just a small amount of energy. Plus, all of them normative term service is about ten years. What other lamp is capable of such a long life cycle?
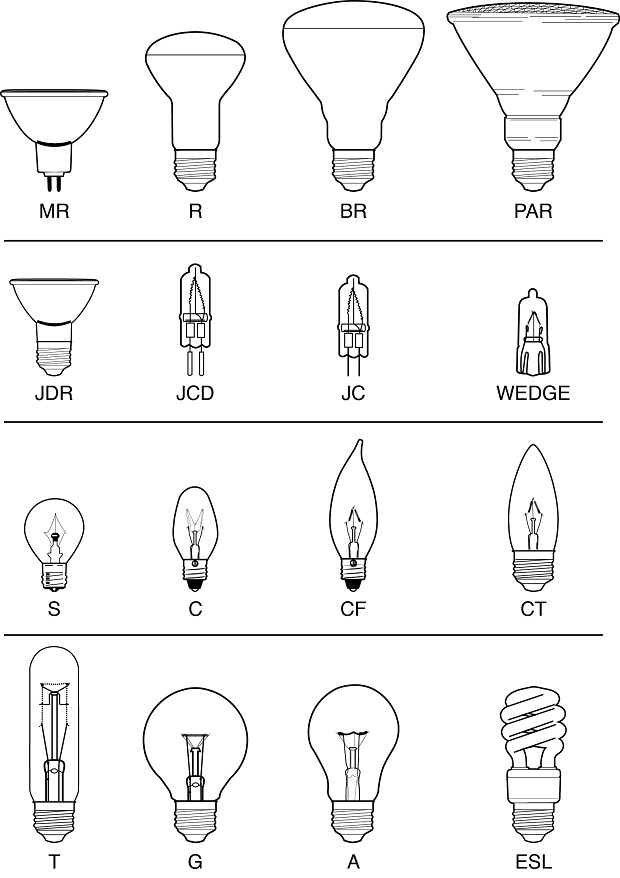
Today, different models of LED lamps are produced - with a base for any cartridge. So you don't even have to change an obsolete, but still usable lamp for a new one. However, having decided to purchase such lamps, the buyer is often confused. Unusual power figures are indicated on the box, and it is not clear which and how many lamps are needed to illuminate the selected room.
Basic calculations
Not surprisingly, in the case of LED models, the usual rules for determining the number and appropriate wattage of lamps do not apply. After all, they are several times more productive. And the usual calculation: 20 watts per square. m. cannot be applied here, since the result will be clearly overestimated.
If you want to perform a more or less adequate calculation of the number of LED-lamps, you must, first of all, start from the area and purpose of the room. So, for example, for residential premises, the norms of Russian SNIPs suggest comfortable lighting at the level of 150 lux (for each square meter of area). And based only on these data, it is possible to calculate what intensity of lighting should be indoors.
So, it turns out that for a room of 15 sq.m. lighting intensity should be 150 lux * 15 m2 = 2250 lux / m2 (or lumens). Based on this result, it is already possible to choose the appropriate number of LED bulbs.
Often, manufacturers on the box of LED - lamps indicate their equivalent to incandescent lamps. If this information is not indicated, focus on the light flux generated by the diodes. For convenience, we present the most popular incandescent lamps and their LED counterparts, equivalent in power and luminous flux.
Lamp Ratio
It turns out that for our example (a 15 sq. -watt.
You are free to choose - whether to put a couple of more powerful lamps or a dozen weak ones, the main thing is that their total calculation corresponds to a given level of illumination. But in the case of choosing the latter (i.e. "weak"), the light background in the room will be more uniform and comfortable for perception, especially if they are not installed in one lamp, but are dispersed over the entire surface of the ceiling (walls or floor).
Plus, low-power LEDs are much cheaper than their more productive counterparts, which means they will pay off much faster. In addition, they are better suited for optimizing energy consumption. Installed in different luminaires, they can be zoned on and off as needed, and therefore will not "waste" fill the entire room with intense light when there is no need for it.
Corrections to calculations
Considering that part of the luminous flux is inevitably absorbed by surfaces or furnishings, we recommend that you always round the resulting value up. It also does not hurt to throw a lamp or two into the calculation if the interior design of the room is made in dark colors or matte, light-absorbing materials.
The same applies to the height of the ceilings - if they are above three meters - increase the calculated parameter by one and a half times. Otherwise, the intensity of lighting in the residential area will be insufficient - the luminous flux simply will not reach the work surfaces, scattering in vain.
It should also be taken into account that, due to their design features, LED lamps have a narrower dispersion angle than conventional ones - about 130-150˚. Therefore, for a uniform distribution of light, it is desirable to place lamps around the entire perimeter of the room, or simply use several lamps at once, installed at different levels: walls, ceiling, floor.
Well, a purely aesthetic recommendation - for residential premises it is better to choose LED models - lamps that shine in the "warm" yellow spectrum, and for workers where increased illumination is needed - in the "cold" white-blue. The first one is subjectively perceived as soft, the second one seems to be more intense and bright.
LED strips
Today, along with traditional lamps, LED strips have also become very common. They appropriately complement any central chandelier and the interior as a whole. Before installing them, it also does not hurt to perform approximate calculations.
In this case, not only the power of the diodes built into the tape matters, but also the length of it itself. If you plan to lay tapes on a ceiling or floor plinth, simply calculate the perimeter (adding the length by the width and multiplying by 2).
Length calculation LED strips looks like this. For example, for the previously mentioned living space of 15 m2 (with walls 3x5 m), the perimeter will be 16 m. And if even the most low-power tape is installed, we can get the lighting intensity that corresponds to the standard (2250 lumens): 16 m * 150 lumens (taken from tables below) = 2400 lm.

Characteristics of LED strips
Please note that LED strips are usually produced in lengths of five meters. It makes no sense to make them longer, since the current and voltage are significantly reduced as they pass through the circuit. Those. In any case, you will have to connect two (or more) segments into a single chain. You can connect them using special terminals. And without fail, each segment must have its own power supply.
Otherwise, the tape will glow unevenly: brightly - directly near the power source, and then - the farther along the segment - the dimmer. But most importantly - so it will fail much faster. And the power supply itself, constantly working at maximum loads, will not last long.
Therefore, it is extremely important to choose the right power supply for tapes of suitable length and power. To do this, we multiply the length of the tape (for example, 16 m) by the power indicated by the manufacturer (let's say 2.4 W), calculation: 16 * 2.4 = 38.4 W.
However, it is imperative to make a small margin so that the unit does not work at its limit, usually the margin is + 20% of the calculated value, so we multiply by 1.2: 38.4 W * 1.2 = 46 W - exactly this (or a little more power) must have a power supply.
Also, if you plan to use a colored tape, you can’t do without a controller responsible for controlling the colors of the glow. Because of this additional element such systems cost an order of magnitude more expensive than single-color ones. But they have much higher functionality and margin of safety.
But still, if you want to simplify your task, it is better to purchase a ready-made LED kit with everything you need. The components of the kit, correctly selected by specialists, are simply assembled as a constructor. Even a child can handle it.

LED system
Just remember that it is better to connect several segments to each other in parallel, and not in series. Then all sections of the tape will shine evenly, and at the same time respond to user commands.
Whichever model you ultimately choose, in any case, it is most beneficial to use LED lamps (or ribbons). None of the analogues available at the moment can provide you with such a high functionality, with minimal energy consumption.
 Calculation of lumens per one square meter for different rooms
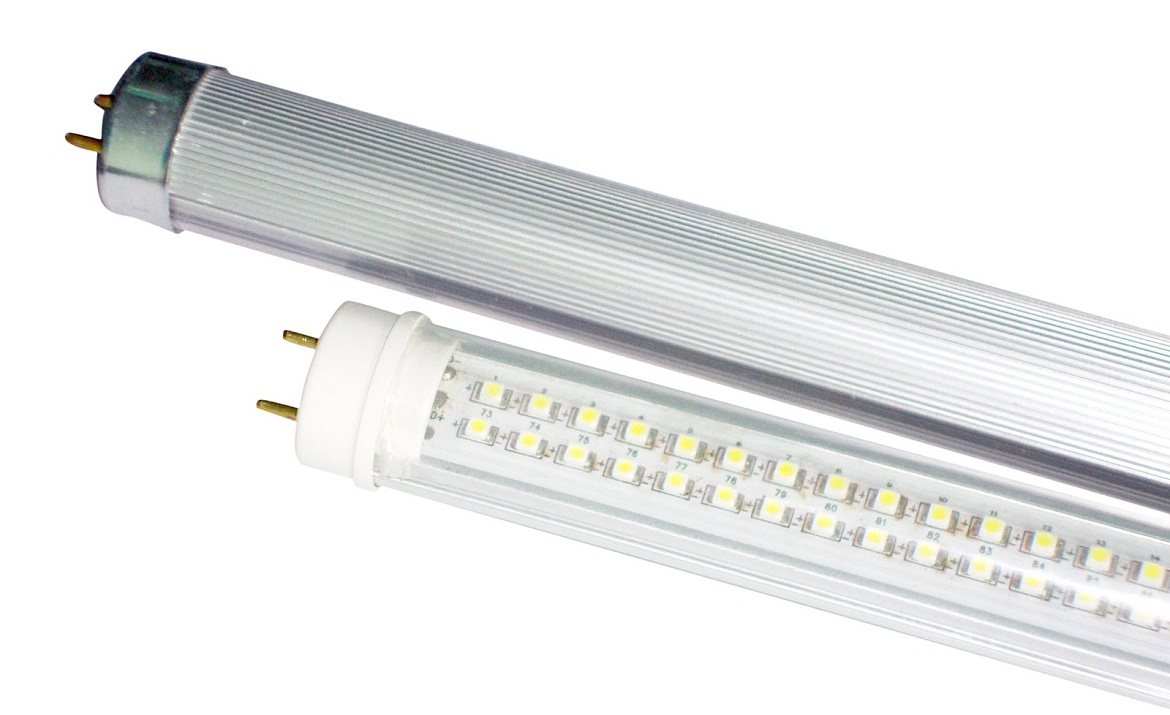
 How to make a fluorescent lamp with your own hands?
Initially, an ordinary chandelier was planned for the main lighting of one of the rooms where a major overhaul was underway. But recently, I came across a super-bright Ultra 5000 LED strip with smd 5630 LEDs from the Arlight brand. The decision was made quickly, finally and irrevocably - I want such a tape as the main light in the room.
Theoretical brightness
The manufacturer claims that the Ultra 5000 smd 5630 tape provides a luminous flux of as much as 1200 lm per meter. For comparison, the luminous flux of a 100-watt incandescent lamp is about 1600 lm.
In my case, for a room with an area of 14 m 2 15 meters of tape should have been used, laid around the entire perimeter. The resulting luminous flux, it seems, cannot be calculated by simply multiplying lumens by meters.
I decided to be puzzled how to correctly calculate the total luminous flux, but, after googling, I realized that this task cannot be solved with a swoop. I need to spend n-th time studying the theory of lighting calculations using the luminous flux utilization factor method and somewhere to find some data unknown to me:
- reflectivity of walls, ceiling, other objects;
- honest luminous flux of one LED tape;
- characteristics of the profile diffuser in which it was planned to place the tape;
- voltage drop along the tape and the dependence of the LED luminous flux on it.
In the end, I decided that I would just do it and see what happens. But, just in case, I also bought a dimmer for LED strips. Maybe it will be too bright :)
Theoretical spectrum
Bright LEDs are, of course, cool. But, one thing is brightness, and another is the spectrum of light.
If again compared with an incandescent lamp, it is good because it emits light in a wide range, its spectrum is relatively uniform and in some part close to the spectrum of sunlight. Such light is familiar and pleasing to the eye, it does not irritate or tire.
The spectrum of white LEDs is significantly different from the spectrum of an incandescent lamp, and not for the better: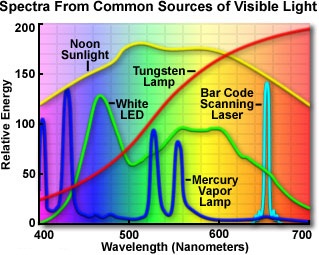
White LEDs in this case, of the phosphor type, two humps on the spectral characteristic are formed from radiation blue LED (blue region of the spectrum) and phosphor (yellow region of the spectrum).
In my lower brain, I knew that I had to be careful using led lighting and leave including the usual chandelier. Who knows how the eyes will react to such a spectrum. It is also hardly possible to calculate this in advance.
By color temperature I chose the medium tape from the three options offered by the manufacturer - the so-called. Day White, 4000 K. Just seemed the most pleasant.
Accessories
Profile
I have a simple stretch fabric ceiling, without any multilevels and cornices, and since it was planned to place the lighting perimeter tape under the ceiling in plain sight, it was necessary to ennoble it appearance but make it as invisible as possible. Wondering which profile to use, straight or angled? It turned out that the intensity and uniformity of illumination did not visually change from the direction of the glow of the LEDs of the tape located near the ceiling. What is down, along the wall, what is along the ceiling, what is at an angle to them - the same. This is understandable, the passport glow angle of these LEDs is 120 °, but in reality it turned out to be close to 180. Therefore, the angle of the tape was not important, and I chose a straight profile as the most compact:
Ribbon
Tape Ultra 5000 is supplied from the factory on spools of 5 meters, the tape cutting ratio is 10 cm, the store cuts for sale in multiples of a meter. In my case, I didn’t have to cut, I took three whole packages: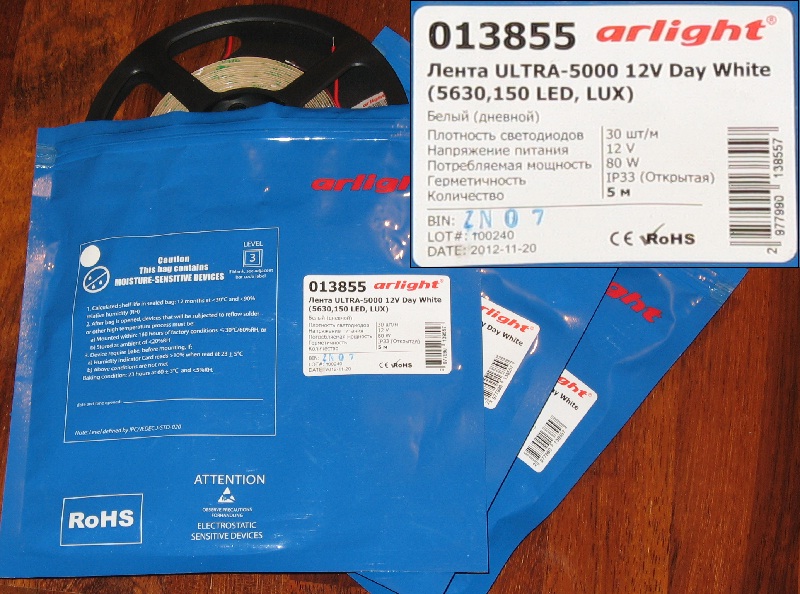

The width of the tape is 12 mm, it does not fit into the selected profile quite normally, but it fits: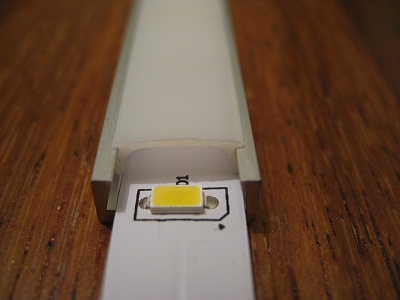
Power supplies
Passport power consumption of 15 meters of tape is 240 watts. Calculated by real measurement - 180 W (measured on a 3-meter segment, the current consumption was 3 A).
But, in addition to power consumption, there is also a factor of voltage drop along the tape, which leads to a gradual decrease in the brightness of the glow towards its end. Power supplies for LED strips (all or not - I don’t know, but those that I took - yes) allow you to power one common load in parallel. To equalize the brightness along long powerful tapes, instead of one power supply at one end, two less powerful power supplies are turned on from both ends of the tape, and in especially difficult cases, also in the middle of the tape. In my case, the perimeter is closed, I divided it in half, and simply took two 130 W power supplies and connected 7.5 meters of tape to each separately:
The choice of sealed power supplies was due to the fact that they have significantly smaller dimensions compared to open ones and do not have coolers, that is, they do not make noise, which is important. In addition, I planned to place them all in a sealed (for fire safety) shield located in hidden place inside the closet, where there are problems with the heat sink.
Dimmer
The dimmer that I liked the most in terms of functionality from those that were available was originally designed for wall installation:![]()
This dimmer has both mechanical brightness control and remote control. remote control. Moreover, in addition to smooth adjustment, the remote control has four buttons for preset brightness levels (25%, 50% 75% and 100%), and four more buttons for programming user levels.
But for connection, it requires four wires, which I did not have in the walls. Therefore, I decided that I would install the dimmer in the shield along with the power supplies. By mechanically adjusting the brightness level, I will only set the starting level when the tape is turned on, and I will adjust the desired brightness from the remote control.
But for this you need to unsolder the IR receiver: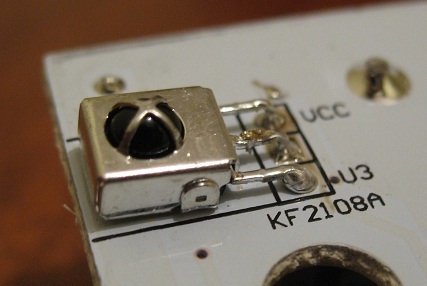
take it out on the wire from the shield and place it in a convenient, inconspicuous place. Will it work like this? Checked it works: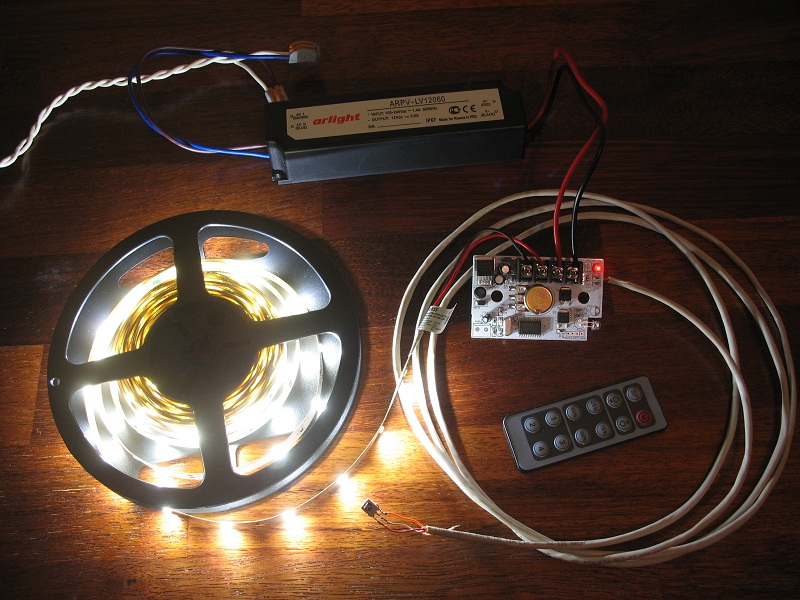
Looking ahead, I note that the dimmer has one significant drawback.
The role of the memory of the brightness level set before turning off is performed by a potentiometer. When 12 volts is applied to the dimmer, the tape turns on at the brightness level that was set by the potentiometer. After that, the brightness can be changed both from the remote control and the potentiometer. But, regardless of how the potentiometer was installed, in the first moment when turned on, the dimmer does not immediately start the PWM, and a clean 12 volts comes out. At the moment of switching on, the tape necessarily flashes for a fraction of a second at maximum brightness, and then it is set to the specified one. It hurts badly in the eyes.
Amplifiers
The dimmer power was not enough for my tapes. I had to buy additional amplifiers for it - one for each power supply: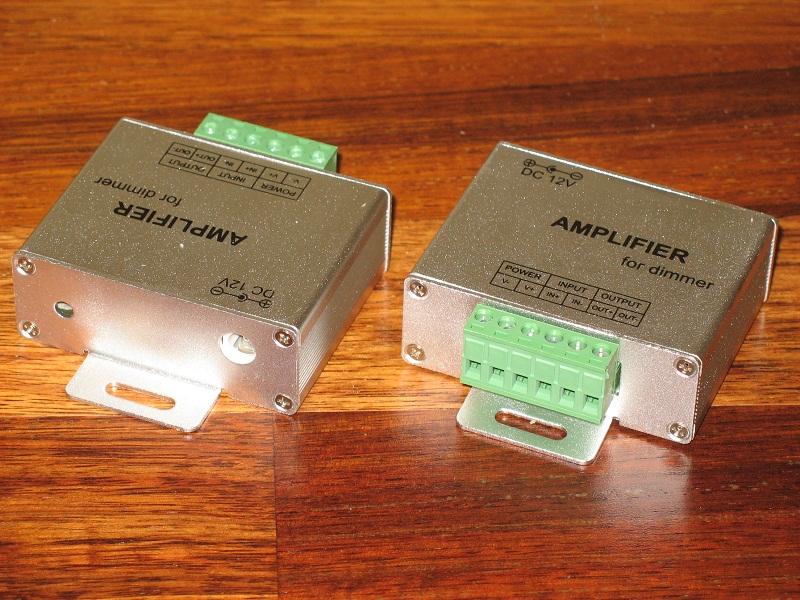
Shield mounting
In addition to the main lighting, I decided to use another 3 meters of the same tape for local lighting above the cabinet, with a separate wall switch and limit switches in the sliding doors. I also had planned decorative lighting from a simple LED strip and an on-duty night light on a short segment of a dim tape with switching on from a photo relay. All this is not directly related to this article, but since it was necessary to place an additional three different power supplies in the shield, this should be mentioned. Initially, the photorelay has a rather large size and an unaesthetic appearance, so I also wanted to hide it in a shield so that it does not loom before our eyes:
I did the same with it as with the dimmer - I unsoldered the sensor and took it out on the wire, after checking that this would also work:
I found a sealed shield of suitable sizes:
Zatar corners and fasteners: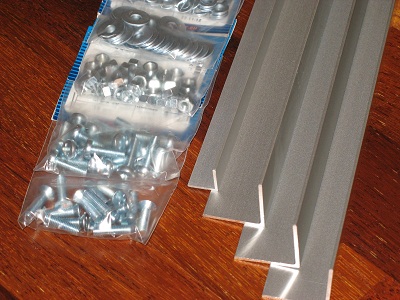
And proceeded to install: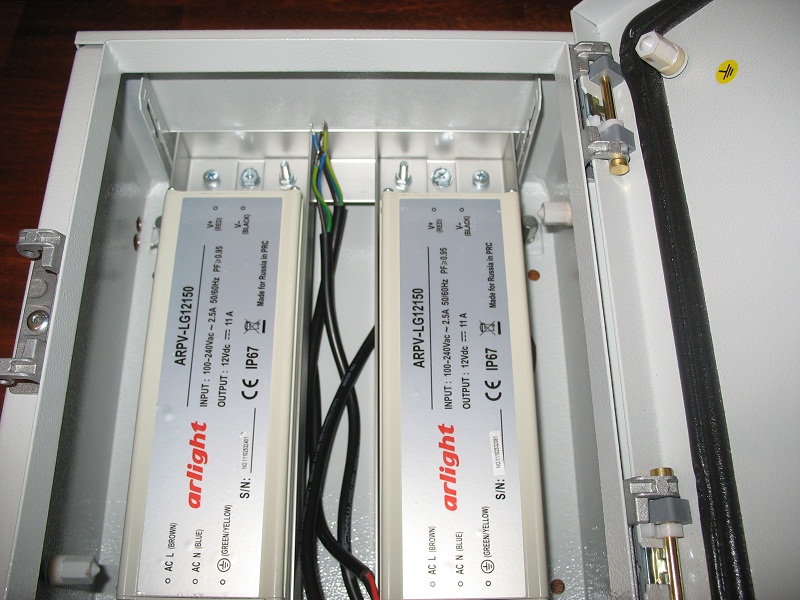
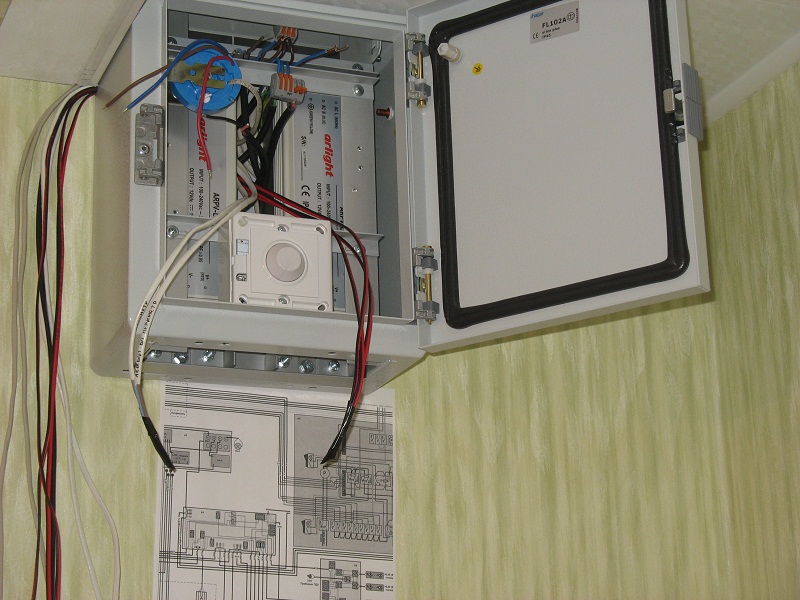
The shield is ready: 
Mounting profile and tape
To increase the light output, it would be desirable to mount the tape not close to the ceiling, but a little lower, at least 5 centimeters. In this case, the reflection of the light from the tape from the ceiling will be better. But I didn’t have such an opportunity for some subjective reasons, so I mounted it close to the ceiling.
On the left is a piece of profile for the local lighting tape above the cabinet, mounted on the lower end of the cornice, behind which the decorative lighting tape will be located: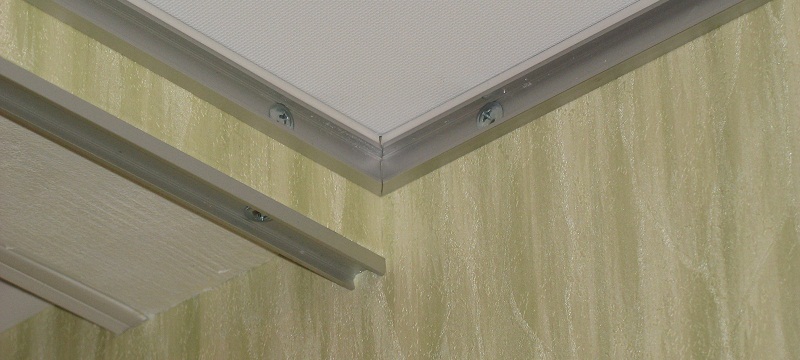
It is easy to cut a profile with a hacksaw for metal with a fine tooth exactly at an angle of 45 ° if you use a miter box, for example: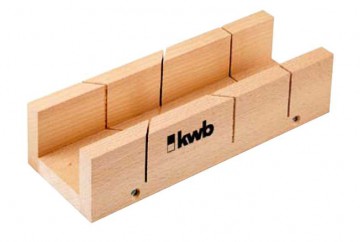
The profile was fastened with gypsum-tapping screws 32 long directly into the drywall, without dowels (the drywall is glued to the walls on Perlfix), having previously drilled holes in it (in the profile) with a step of half a meter:![]()
Then he laid the tape in a profile, soldered the power wires. The perimeter profile has not yet been closed with a diffuser (the store has not yet delivered part of the diffuser), only the local lighting profile above the cabinet has been closed:
First power on
So - let's turn it on!
Wow! It's awesome!
Of course, I'm not blind from the brightness. Bright, yes, but not overwhelming. And very beautiful!
Flash photo:
Without Flash: 
View from the street (4th floor):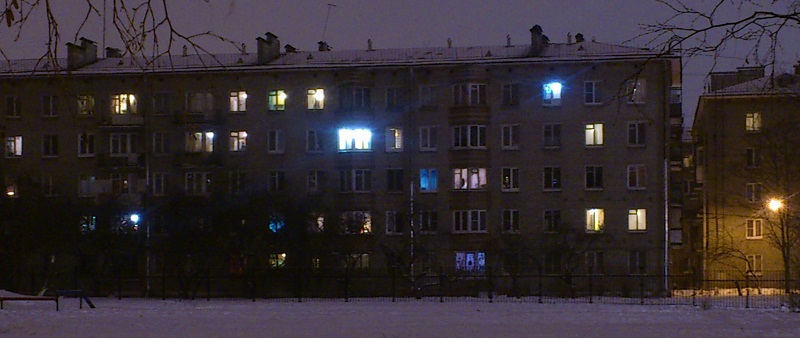
I tried to photograph the difference in illumination between the tape and the 200 W incandescent lamp, which I still hang instead of a chandelier. I fixed the camera settings with one light source, launched the camera for a series of shots, and in the meantime switched the light source. Here's what happened.
First, I tuned in to the light of an incandescent lamp and launched a series, the first photo is a lamp, the second is a tape:
Now, on the contrary, the first is a tape, the second is a lamp: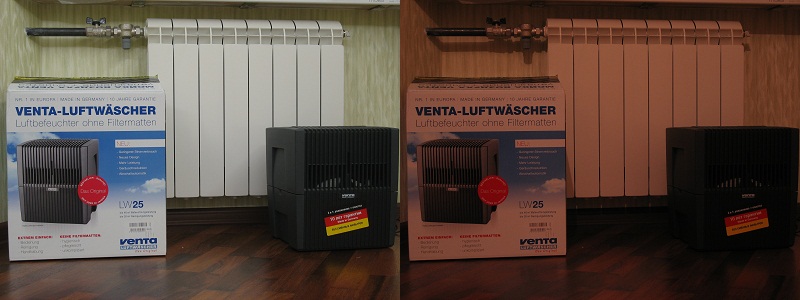
An interesting effect - under the light of the tape, there are almost no vertical shadows. This can be seen, for example, by the shadow from the horizontal pipe and the missing shadow from the vertically located regulator knob on it.
These pictures show that 15 meters of tape shines brighter than a 200 W incandescent lamp. But it seems like not much. In fact, the comparison is certainly not entirely correct. The light bulb is a point source, and the tape is a distributed source. Under the light of a lamp, the corners of the room are much darker than in the center, and under the light of a tape located around the perimeter, it is equally light everywhere.
I measured the illumination with a luxmeter: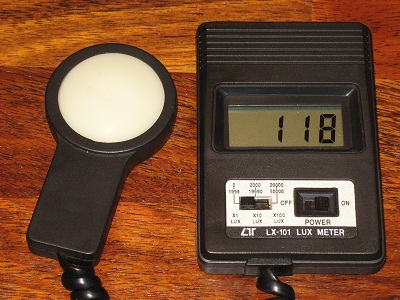
Here are the results in numbers:
| measuring point | Lamp 200 W, lx | LED strip 15m, lx | Lamp + tape, lx |
|---|---|---|---|
| In the center of the room at floor level | 121 | 240 | 358 |
| In the center of the room at eye level | 1200 | 300 | 1500 |
| In the corner of the room at floor level | 58 | 152 | 205 |
| In the corner of the room at eye level | 43 | 382 | 428 |
| At a distance of 1 meter from the source | 323 | 530 | - |
| close to the source | 90000 | 150 | - |
As can be seen from the table, the illumination under the light of the tape differs slightly between different measurement points in the room, near the floor, at eye level, in the corners or in the center - the difference is no more than 2-3 times. Of course, this is a consequence of the uniform distribution of a large number of point light sources along the perimeter of the room. What is not observed in a light bulb that hangs in the center of the ceiling - the difference at different points reaches almost 30 times.
When turned on at the same time, both the lamps and the tapes of their illumination simply summed up.
If someone explains to me on the fingers why the lumens do not add up directly (or add up?), And the lux add up (maybe this is a consequence of the large difference in the spectral characteristics of the LED and the lamp in the long-wave region?), And how with a declared light intensity of 1200 lumens per meter when measured at a distance of 1 meter from a piece of tape 4 meters long, the illumination is only 530 lux, I will be very grateful.
On a small segment, I put a diffuser on the profile, took a picture of the difference at a short shutter speed:
I measured the illumination at a certain distance: without a diffuser 600 lx, with a diffuser 520 lx at the same distance. Absorbs more than 10%. It is a pity that there is no diffuser for the entire perimeter yet, so as not to assess the overall decrease in illumination.
Voltage drop
The voltage along the tape drops significantly.
At the beginning, it was 11.5 V, and at the end of a segment of 7.5 meters it was already 8.5 V. Total - 0.4 Volts per meter.
The drop in brightness is not striking, but if you specifically compare it, you can see that in one corner the tape is much brighter than in the other.
Measurements with a luxmeter at a distance of about 30 cm in opposite corners of the perimeter gave results of 1600 and 600 lux, a difference of more than 2.5 times. Measurements at other distances gave the same difference of 2.5-3 times. Therefore, the value of 530 lux in the table for measuring at a distance of 1 meter from the tape is a certain average value, measured at a distance of about 2 meters from the beginning of the tape.
Tape heating, shield temperature
The tape heats up, and heats up noticeably.
At the beginning of the tape, the temperature of the aluminum profile was 55...57°C, but at the end it is already quite cool, about 30°C. When the diffuser is installed on the profile, the temperature does not differ significantly.
Inside the sealed shield at maximum load (which is unlikely to happen in reality), the temperature also did not rise above 57 ° C after a 4-hour run. This is slightly higher than the passport operating temperature of the power supplies, but it didn’t stink, everything worked. In normal operating mode, when only the perimeter tape is turned on, the temperature in the shield was set exactly at the level of the power supply rating of 45 ° C. Quite satisfactory.
Summary
I am quite satisfied with the technical side of the LED lighting system. Convenient and easy installation, high-quality components, turning on the light without delay (which is not provided by all power supplies for LED strips), silent operation, moderate heating, low consumption with high light output. There are only two minuses, but both are in principle solvable - the voltage drop along the tape (although the total illumination in the room is already quite enough), and the incorrect operation of the dimmer at the time of switching on (you can solve it by introducing a delay circuit for switching on the tape after turning on the dimmer, but then instead of flashing it will be this is the delay, I don’t know which is better).
It's too early to talk about the operational side, it takes time.
The first impression is that this light is completely different. And you can't say it's better or worse. Just different.
For several days I was engaged in assembling furniture while lighting the tape, I did not feel any discomfort. In general, so far I like everything.
I did not like the financial side - the whole system cost me about 20 thousand rubles. The cost of a meter of tape in the profile is approximately 1 thousand rubles. Plus power supplies and other equipment. It's not known exactly how long this will last. For LEDs, a service life of about 100 thousand hours is declared, by which time they lose up to 30% of brightness. If you use the tape an average of 5 hours a day, then it should last for 50 years. We'll see.
Lipskiy
http://habrahabr.ru
Today I will show you the calculation of the payback of LED lamps and try to convince you once again that LED lamps are not only good light but also economical light. Main specifications I checked personally with the help of a luxmeter and an energy meter.
Let's start with the technical specifications.
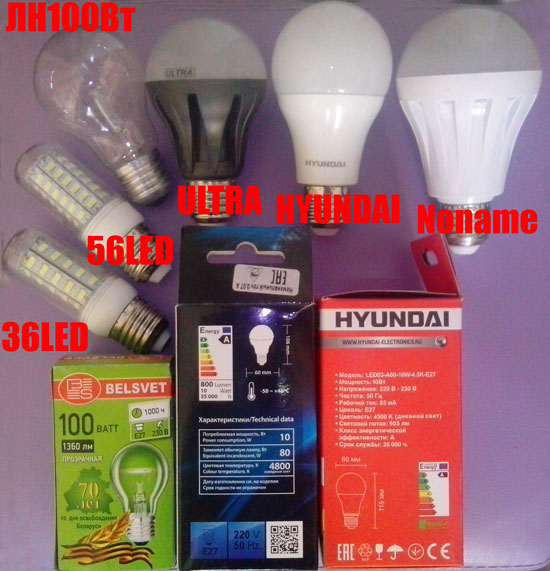
In one of them I have already compared LED lamps. At that time, I did not have an energy meter. Then I liked the inexpensive SDL lamp from China and the ULTRA lamp. I took measurements in the corridor and now I have black glossy there stretch ceiling, so the results may differ slightly from the previous values.
I made a more objective comparison of incandescent and LED lamps on three points to determine the analogues:
- at a distance of 1.8 m from the lamp;
- in the middle of the wall of the room;
- from above under the ceiling in the horizontal plane of the lamp.
Measurement results - incandescent lamps:
| LN | R, W | Osv1., lux | Osv2., lx | Light 3., lux |
| 40W | 39 | 10 | 20 | 13 |
| 60W | 55 | 18 | 17 | 29 |
| 75W | 71 | 28 | 53 | 35 |
| 100W | 95 | 42 | 81 | 47 |
Measurement results - LED lamps:
| SDL Lamps: | R, W | Osv1., lux | Osv2., lx | Light 3., lux | Price, $ | Analog |
| 36-56LED (China) | 4,0 | 9 | 21 | 18 | 2,8 | 40 W |
| Noname (China) | 4,4 | 25 | 34 | 7 | 4,8 | 60 W |
| HYUNDAI 10W | 6,4 | 37 | 56 | 30 | 5 | 75-100W |
| ULTRA 10W | 6,3 | 64 | 78 | 18 | 10 | 100 W |
After the first article, where I compared LN with SDL, I ordered 3 lamps with SMD5730-56pcs LEDs, because I liked the lamp with 36 LEDs. I expected that the more LEDs, the more light output. 2 months have passed, but I still have not received my lamps and they returned the money to me. The other day 2 out of 3 lamps arrived, i.е. I got them absolutely free of charge As it turned out, the luminous flux of the lamps and the power have not changed at all.
Like many poor Belarusians, taking advantage of the situation, I recently went to Russia for small purchases and bought a 10 W HYUNDAI lamp for 310 rubles in one of the stores. I really liked this lamp. Although it is written on the packaging that it is an analogue of a 100 W lamp, in reality it falls short a bit. It fits perfectly in my hallway.
To calculate the payback time, let's take the ULTRA lamp, because both visually and according to the measurement results, it is indeed an analogue of a 100 W LN, let's take its power not 6.3 W, but 7 W.
Lamp operating time.
I will consider my case. I live alone for now and like to sleep, so in the morning my light is on for no more than an hour (from 7-30 to 8-30). This time is enough for me to have breakfast, put myself in order, do a little exercise. In the evening, the light is on from 18-00 to 24-00. Total: per day the light is on for 7 hours. In the calculation of the lighting operation time, we will take 5 hours for a more objective assessment, because in summer days the light is less.
The cost of electricity.
In Belarus, the cost of electricity today is 820 rubles or $0.06/kW.
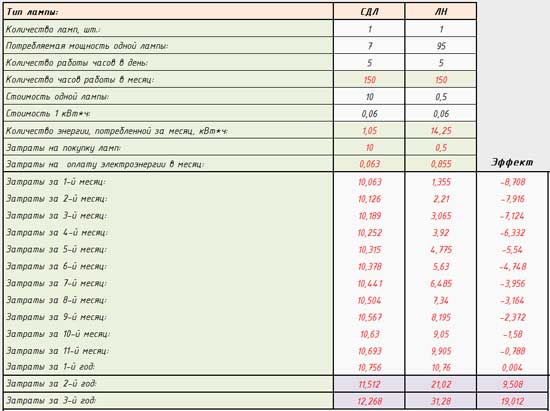
From the table we see that this lamp will pay off for me in a year, despite the fact that the guarantee for the lamp is 2 years. The payback time directly depends on the electricity tariff, the lamp operating time and the cost of the LED lamp. For example, a HYUNDAI 10 W lamp will pay off for me in about 6 months. When calculating, I tried to degrade the parameters of the SDL lamps in favor of the LN and did not take into account the fact that the LN needs to be changed every six months (1000 hours of operation).
Conclusions:
- The payback of a good SDL lamp costing about $ 10 will be about a year.
- When replacing LN with SDL, we get very good light. The fact that the SDL lamps pulsate a little is absolutely not noticeable to the naked eye. This can be seen through a cell phone camera. I really like white cold color, rather than warm, like incandescent lamps.
- In a year we will start saving our finances, and in reality even faster.
- Theoretically, the SDL lamp should work for more than 10 years (35,000 hours). You will only need to wipe the dust from time to time.
- SDL lamps are more resistant to voltage drops, safe, durable, and environmentally friendly.
- Replacing LN with SDL - saving energy with improving your comfort.
- Taking into account the fact that restrictions are currently being introduced on the electricity consumed by the population, the installation of LED lamps is very relevant. For example, replacing 3 lamps can save you about 40 kW.
Did I convince you that you need to buy LED lamps?
We advise you to read
 Psychological characteristics of children in adolescence
 Transferring a child to another school - the procedure and necessary documents Whether to transfer a child to another school
, diagnosis, treatment Treatment of urogenital chlamydia") Chlamydia urogenital - description, causes, symptoms (signs), diagnosis, treatment Treatment of urogenital chlamydia
Chlamydia urogenital - description, causes, symptoms (signs), diagnosis, treatment Treatment of urogenital chlamydia The benefits and significance of hydroamino acid threonine for the human body L threonine what

