Transforming and duplicating an element is one of the easiest and fastest ways to create 3D objects in Photoshop. This tutorial will help you create 3D text using this method, and then by modeling different layers, you will be able to create text with a retro effect, metallic colors. Let's start!
The following are the points that we used in the process of creating this manual.
- In order to load the used outlines, go to Edit> Presets> Preset Manager (Edit> Presets> Preset Manager, and select Outlines from the Preset Type that appears in the menu. Then click on the small arrow to the right of Preset Type and click on Outlines , at the bottom of the pop-up menu When the dialog box appears, just click the Append button and you'll have outlines.
1. Creating a background
Step 1
Create a new 900 x 675 px document. Set the Foreground color to #252927 and the background color to #0d0e0e. Select the Gradient Tool, select the foreground to background color of the gradient fill, and click on the Radial Gradient icon.
Then click and drag from the center of the document to one of the corners to create a background gradient and duplicate the background layer.
Step 2
Double click on the Base Background copy layer to apply the following layer style.
Add a Color Overlay with the following settings:
Color: #1c1f26
Blend Mode: Color

Step3
Add a Gradient Overlay with the following settings:
Blend Mode: Overlay
Style: Reflection
Viewing Angle:45
Check Reverse Window
Use Silver 20ss fill

Step4
Add an Overlay with these options:
Blend Mode: Soft Light
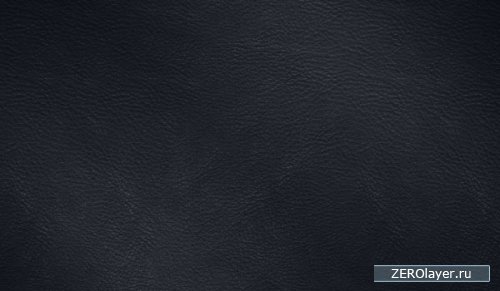
Image: webtreats_grey_leather.jpg
Scale: 50%
A simple leather texture will be applied to the background.
2. Create text and smart objects
Step 1
Create text using the Nexa Rust Script font. Size 245 pt and color #f4f4f4.

Step2
Duplicate the text layer and drag the copy of the layer below the original.
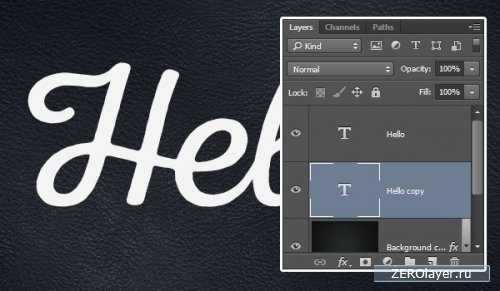
Step 3
Enter Free Transform Mode by going to Edit > Free Transform (Ctrl - T). Press the right arrow key once, then press the down arrow key once to move the copy of the text one pixel to the right and one pixel down. Then press the Return key to accept the changes.

Step 4
Change the copied text color to #4e4e4e. Press the Command -Option -Shift -T (Control -Alt -Shift -T for Windows) keys 17 times to duplicate the transform layer to create a 3D extrusion.
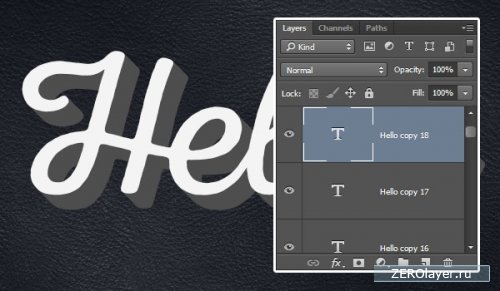
Step 5
Select all the copy text layers, and go to Filter> Convert for Smart Filters (Filter> Convert for Smart Filters). Rename the smart object layer to add copy 1 after the text you have.
Copy the smart object layer two times, rename the copy layers to add copy 2 and copy 3, and then change copy 3's Fill layer to 0%.

3. Design the original text layer
Double click on the original text to apply the next design with options.
Step 1
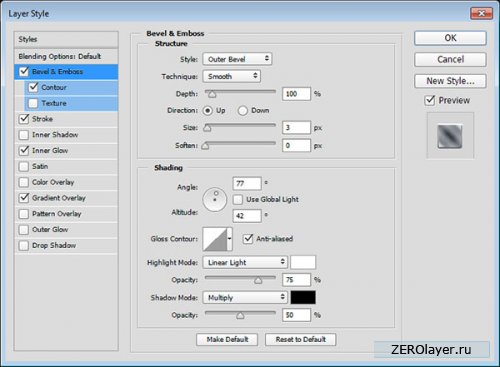
Add Bevel and Relief (Bevel and Amboss) with these settings:
Design: External Bevel
Size: 3
Uncheck the option Global illumination (Use global light)
Angle: 77
Height: 42
Check antialiasing method (Anti-aliased)
Lighting Mode: Linear Light
Shadow Mode: Opacity 50%
Step2
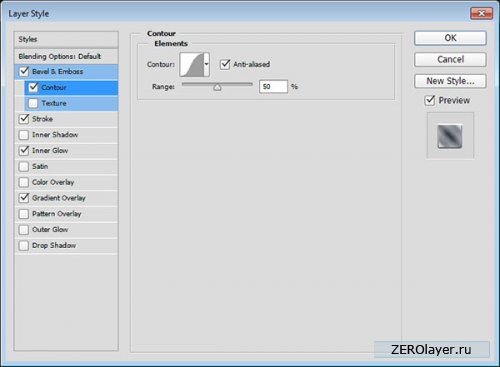
Add a contour with the following parameters:
Contour: Gaussian
Check smoothing method
Step 3
Add Stroke (Stroke) with settings:
Size: 1
Fill Type: Gradient
Angle: -135
Use aluminum 150e

Step4
Add outer glow with settings:
Blend Mode: Color Burn
Noise: 10%
Color: #8c8c8c
Source: from the center
Size: 18

Step5
Design: Reflected
Angle: 45
Scale: 150%
Use aluminum 150e
Step 6
This is the original text layer design. What we're going to do next is to try and use other gradient fills and layer effects that match the 3D design of this piece of text.
4. Design the first layer of 3D extrusion
Double click on the smart object layer 2 copy to apply the following design layers:
Step 1
Add Inner Shadow with options:
Color: #424242
Uncheck the Global Illumination option
Angle: -42
Distance: 57

Step 2
Add Gradient Overlay with settings:
Design: Reflected
Angle: 45
Scale: 150%
Use dark chrome (Dark chrome) to fill the gradient
Click on the Gradient to change the fill of the gradient.
Step 3
Click on the color stop of the light color near the end of the right side of the gradient, and click the Delete button to remove this stop, since we don't want the light color there.

Step 4
Add a Drop shadow with the settings:
Opacity: 60%
Distance: 10
Size: 10
This is the design of the first 3D extrusion layer, with the addition of a metallic color gradient.

5.Design the second layer of 3D extrusion.
Double click on copy 3 smart object layer to apply the following design:
Step 1
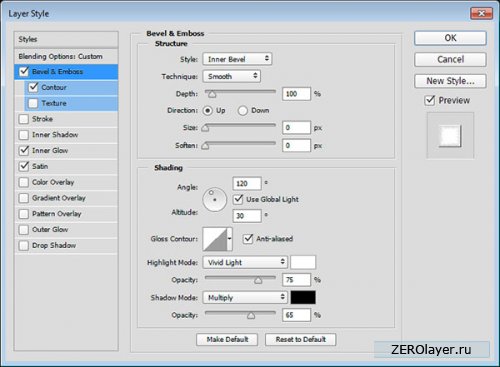
Add a Bevel and Emboss with the following settings:
Size: 0
Check smoothing method
Backlight Mode: Bright Light
Shadow Mode - Opacity: 65%
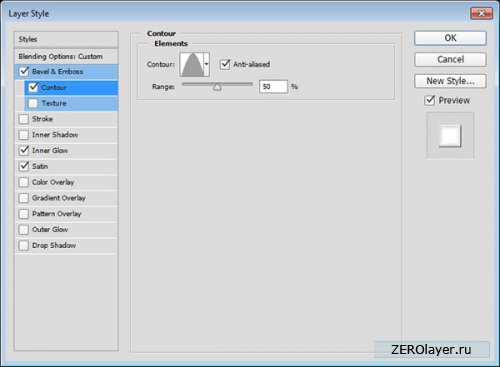
Step 2
Add an outline with the following settings:
Contour: Cone
Check smoothing method
Step 3
Add an inner glow with the following settings:
Blend Mode: Bright Light
Noise: 10%
Color: #c5c5c5
Method: Precise
Creating a texture that imitates metal is one of the widely used Photoshop features by designers. Today, there are many ways to imitate metal surfaces, in particular shiny chrome, nickel, iron, corroded, acid-etched, elegant surfaces of noble gold, silver, platinum, and mercury. These effects can be implemented either with the help of special additional filters or actions that help to give letters or other objects a metallic sheen and bulge, or based on standard Photoshop tools that provide no less professional results.
The easiest way to achieve a metallic effect is to use the right action, of which there are many on the web. For this purpose, it is worth looking, for example, at the addresses: http://www.webmaster.ru/~porcupine/actions/index.cfm?row=19&curpage=5 , http://easyphotoshop.chat.ru/actions/actions. htm , http://gribnick.da.ru/ , http://www.fotoshop.ru/cgi-bin/actions/detail.pl?id=76 etc. However, there are not so many options here, and those who wish to get non-standard effect, this method will not work. It is better to try to achieve the desired effect with the help of special plug-ins, which, as a rule, will allow you to get a good imitation and at the same time quite quickly. In more complex cases, you will have to act manually, relying only on the standard features of the program.
Metal imitation using standard Photoshop tools
This option is very time-consuming and far from simple, but it opens up wide opportunities for creativity, especially since various metal imitation techniques can be found on numerous network resources. Interesting ways to create metal rings, corroded metal effect and chrome, gold and bronze text can be found on the site. The original imitation of blue metal can be found on the website http://ash.aiq.ru/. Looking at http://www.savvy.net/ , it's easy to figure out how to create metal textures, chrome and mercury objects. The site http://www.pegaweb.com/tutorials/ shows how to create spectacular metal buttons. This list can be continued for a long time, but we will limit ourselves to only the most interesting options.
Bronze
A strong impression is made by the imitation of a shiny bronze surface, presented at http://www.eyesondesign.net/. To implement it, create a new image in RGB mode and fill it with a light brown color, and then depict the intended metal object with a dark brown one (Fig. 1).

Rice. 1. Original image
Select the future metal object and save the selection as a new Alpha1 channel using the Select → Save Selection command. Then merge the layers, change the foreground color to darker and use the command Edit → Stroke (Edit → Stroke), setting the appropriate parameters. In this case, selected Width (Border width) 5 pixels, Location (Position) Inside (Inside), Opacity (Opacity) 100% and Mode (Mode) Normal (Fig. 2).

Rice. 2. Image after applying the Stroke command
Apply the command Select → Modify → Contract (Selection → Modify → Compress) with a compression width of 15 pixels, and then fill the selected area with white (Fig. 3). Refuse to highlight.

Rice. 3. Image after squeezing the selection and filling the selection with white
Apply the Gaussian Blur filter: Filter → Blur → Gaussian Blur (Filter → Blur → Gaussian Blur) with a blur radius of 5 pixels and change the layer mode from Normal to Overlay (Fig. 4).

Rice. 4. The result of Gaussian blur and layer mode change
Make a copy of this layer and name the new layer Chrome. Go to the Alpha1 channel and successively apply a Gaussian blur: Filter → Blur → Gaussian Blur (Filter → Blur → Gaussian Blur) first at a blur radius of 9 pixels, then at 6 and 3 and finally at 1 pixel. The result will look something like in Fig. 5.
Rice. 5. Image after multiple Gaussian blur
Activate the Chrome layer and add lighting effects: Filter → Render → Lighting Effects (Filter → Render → Light Effects) with the parameters as in fig. 6. The result will resemble fig. 7.
Rice. 6. Window for setting the parameters of the Lighting Effects filter

Rice. 7. Chrome layer after applying the Lighting Effects filter
Activate the main layer with the object, select the background, invert as a result, the object will be selected, and then expand the border by 1 pixel using the command Select → Modify → Expand (Selection → Modify → Expand). After that, delete unnecessary parts of the border by pressing the Del key, and discard the selection (Fig. 8).

Rice. 8. Result of clearing the border
Activate the Chrome layer, create a new layer Curves 1 using the command Layer→New Adjustment Layer→Curves (Layer→New layer setting→Curves), enabling the Group With Previous Layer checkbox (Merge with the previous layer) and with all other default settings, and adjust the curves according to fig. 9. Reactivate the Chrome layer and again use the command Layer→New Adjustment Layer→Curves (Layer→New layer installation→Curves) with the same settings and with the Group With Previous Layer checkbox enabled (Merge with the previous layer) a new Curves 2 layer will appear ; curves should be adjusted according to fig. ten.

Rice. 9. Curves settings window for layer Curves 1

Rice. 10. Curves settings window for layer Curves 2
Merge the layers with the Flatten Image command and apply the command Layer → New Adjustment Layer → Hue / Saturation (Layer → New layer installation → Color / Saturation), turning on the checkboxes Group With Previous Layer (Merge with the previous layer) with the Colorize parameter activated and adjusting parameters Hue (Hue) and Saturation (Saturation). In this example, the option is selected: Hue - 33, Saturation 34. The result that you should get is shown in fig. eleven.
Rice. 11. The final look of the bronze surface
For greater persuasiveness, you can introduce a suitable texture as a background, imitating, say, rusty metal, with such a texture, the result should resemble the image in Fig. 12.
![]()
Rice. 12. Sparkling bronze on rusty texture
Gold
One of the most interesting imitation gold options is available at http://iolabs.virtualave.net/photoshop/gold/. To get a similar imitation, print black text on a white background (Fig. 13), select the entire black area and save it as a selection using the Select → Save Selection command (Select → Save selection). After that, merge all layers using the command Layer → Flatten Image (Layer → Run Flatten) and blur the entire image Gaussian by applying the filter Filter → Blur → Gaussian Blur (Filter → Blur → Gaussian Blur) with a blur factor of about 5 pixels (Fig. . fourteen).

Rice. 13. Original image
Rice. 14. Image after Gaussian blur
Now you need to form a kind of border for this, load the selection with the command Select → Load Selection (Select → Load selection) and fill the selected area with black. Then invert the selection, reduce it with the command Select → Modify → Contract (Selection → Modify → Compress) by 4 pixels and fill it with white (Fig. 15).
Rice. 15. Picture with a border
At the next stage, you need to slightly highlight the object from different sides to form glare by applying the filter Filter → Render → Lighting Effects (Filter → Render → Light Effect) with approximately the same parameters as in Fig. 16. In this case, you should pay attention to the fact that the settings need to be changed for all three light sources. The result will look like in Fig. 17.
Rice. 16. Lighting Effects Filter Options

Rice. 17. Image after the introduction of three light sources
In order to give the material a metal look, use the Image→Adjust→Curves command and build a curve on (Fig. 18); As a result, the picture should resemble the image in Fig. 19.
Finally, an indefinite metal must be turned into gold by adjusting the levels with the Image → Adjustments → Levels command (Image → Adjustments → Levels) with the Input Levels input parameters equal to 100; 1.0 and 255, and picking up the color and saturation using the command Image → Adjustments → Hue / Saturation (Image → Adjustments → Color / Saturation) with the Colorize parameter turned on and the values: Hue (Hue) - 35, Saturation (Saturation ) - 35. The result should resemble the image in fig. twenty.
Rice. 18. Curves settings window

Rice. 19. Appearance images after adjusting Curves

Rice. 20. The final version of imitation gold
Chromium
The most original way to create chrome objects can be found at http://www.eyesondesign.net/. To implement it, create a dark gray object (Fig. 21). Rename the active layer in Chrome.

Rice. 21. Original image
Select the object, save the selection with the Select → Save Selection command (Select → Save Selection) and reduce it by about 3 pixels using the Select → Modify → Contract command (Selection → Modify → Compress). In this case, you need to be guided by the principle: the larger the image size, the larger the value you need to enter.
Create a new Layer 1 above the Chrome layer. Set the foreground color to white and the background color to black, select Reflected Gradient and create a gradient fill from top to bottom within the selection (Figure 22). Refuse to highlight.

Rice. 22. Image after applying the gradient
Go to the Alpha1 channel and blur the Gaussian selection: Filter → Blur → Gaussian Blur (Filter → Blur → Gaussian Blur) three times in turn. The blur radius directly depends on the image size, but the principle of changing the radius when moving to the next blur is constant: the next value of the blur radius should be half the previous one. In this case, for the first time, a radius of 4 pixels was taken, for the second, 2, and for the third, 1 pixel (Fig. 23).
Rice. 23. Gaussian channel blur result
Return to the Layers palette, activate the Chrome layer and add lighting effects Filter → Render → Lighting Effects (Filter → Render → Light Effect) with parameters such as in fig. 24.

Rice. 24. Adjust Lighting Effects Filter Options
The next step is to give the image a metallic sheen. To do this, open the Curves dialog box: Image → Adjustments → Curves (Image → Adjustments → Curves) and form the curve shown in fig. 25. In this case, the coordinates of the first point of the curve are set in (60; 190), and the second in (190; 60) fig. 26.
Rice. 25. Curve settings window

Rice. 26. The appearance of a metallic luster
Finally, use the command Image → Adjustments → Brightness / Contrast (Image → Adjustments → Brightness / Contrast), setting the appropriate values \u200b\u200bfor the parameters Brightness (Brightness) and Contrast (Contrast). In this example, the Brightness value is 70, and Contrast 40 (Fig. 27).

Rice. 27. Finished chrome finish
Mercury
As for the imitation of mercury surfaces, on the Web on many sites you can find two fundamentally different options implementation of this effect. One, undoubtedly, first appeared on the site http://www.savvy.net/, and the authorship of the second one is already difficult to establish today. It is the second option that gives a more effective imitation of mercury, so we will dwell on it.
Create a new image in RGB mode, set the background to black and White color as the foreground color. Create a new Alpha 1 channel and draw the intended metal object (Figure 28) and then discard the selection.

Rice. 28. Original image on channel Alpha 1
Make a copy of the Alpha 1 channel By default, the new channel will be named Alpha 1 copy. Then blur the Alpha 1 copy Gaussian channel: Filter → Blur → Gaussian Blur (Filter → Blur → Gaussian Blur) with a blur radius of about 3 pixels (if the object is very large, then you can use a larger blur radius value; Fig. 29).

Rice. 29. Alpha 1 copy channel after Gaussian blur
Make a copy of the Alpha 1 copy channel - the new channel will be named Alpha 1 copy 2. Switch back to the Alpha 1 copy channel and apply the filter Filter → Other → Offset (Filter → Other → Shift) with parameters (-1; -1) and the Wrap option Around (Cycling). Return to channel Alpha 1 copy 2 and use the same filter, but with settings (1; 1).
After that, perform calculations for the channel using the Image → Calculations ... command (Image → Calculations ...), selecting the settings, as shown in fig. 30. As a result, a new Alpha 2 channel will be created, and the image will look like in fig. 31.

Rice. 30. Settings window of the Calculations command
Rice. 31. Image after calculations
On the Alpha 2 channel, successively apply the commands Image → Adjustments → Invert (Image → Adjustments → Negative) and Image → Adjustments → Auto Levels (Image → Adjustments → Auto Levels) - fig. 32.

Rice. 32. The result of the negative and tone correction
Now use the Airbrush tool to soften the edges of the image. Set the pressure to 6%, select a brush of about 45 pixels, set white as the foreground color and spray on.
At the next stage, you will need to enhance the reflection effect using the Image → Adjustments → Curves command (Image → Adjustments → Curves), having built approximately the same curve as in Fig. 33. The result should resemble the image in fig. 34.

Rice. 33. Curves setup window
Rice. 34. Image after enhanced reflection effect
Load the selection saved in the Alpha 1 copy channel using the Select → Load Selection command, invert it and fill the selection with black.
Reload the selection Alpha 1 copy and compress the selection by about 3 pixels using the command Select → Modify → Contract (Selection → Modify → Compress). Make an inversion and apply the command Image → Adjustments → Invert (Image → Adjustments → Negative). As a result, the image on the Alpha 2 channel will look something like in Fig. 35.
Rice. 35. Alpha 2 channel after all manipulations
Now select the entire image, copy the selection to the clipboard, switch to the RGB channel and paste the selection into it. Then give the metal the desired shade using the Image → Adjustments → Hue / Saturation command (Image → Adjustments → Color / Saturation) with the Colorize parameter turned on and the appropriate Hue (Hue) and Satuation (Saturation) values. The result should resemble the image in Fig. 36.
Rice. 36. Final view of the mercury surface
Metal simulation with plugins
A lot of plug-ins have already been created, in which the effect of metal imitation is implemented to one degree or another. For example, pseudo-3D metal objects can be obtained using the Lighting effect of the Ulead Type.Plugin plugin. The realistic texture of gold is easily simulated using the Gel filter from the KPT 6.0 group from Metacreation. Various options for shiny metallic surfaces (chrome, gold, silver, etc.) can be created very quickly using the Chrome filter from the Eye Candy 4.0 group from Alien Skin, while matte metal surfaces work well thanks to the PhotoGroove 3.0 effect from the Extensis PhotoTools 3.0 group.
Let's consider the possibilities of using plug-ins to simulate shiny liquid metal surfaces using the Chrome filter from the Eye Candy 4.0 group as an example, and to create matte using the PhotoGroove 3.0 filter from the PhotoTools 3.0 group as an example.
In the first case, select the object to which you want to apply the filter (Fig. 37), and use the command Filter→Eye Сandy 4000→Chrome (Filter→Eye Сandy 4000→Chrome) with approximately the same parameters as in fig. 38. As a result, we get the image shown in fig. 39.

Rice. 37. Original image

Rice. 38. Setting the Chrome filter parameters from the Eye Candy 4.0 group
![]()
Rice. 39. The result of the Chrome filter from the Eye Candy 4.0 group
To use the PhotoGroove 3.0 filter, also select the object and use the Filter → PhotoTools → PhotoGroove 3.0 command (Filter → PhotoTools → PhotoGroove 3.0), setting the appropriate parameter values, for example, as in fig. 40. As a result, we get the image shown in fig. 41.

Rice. 40. Setting the PhotoGroove 3.0 filter options from the Extensis PhotoTools 3.0 group
Rice. 41. The result of the effect of the PhotoGroove 3.0 filter from the Extensis PhotoTools 3.0 group
Today we will do metal in photoshop. Further, it can be used as a background or basis for letters, frames and all kinds of clipart.
We create a document. I mainly use A4 format, as the result is obtained in good quality. If necessary, the format can always be reduced, but it will be problematic to increase it without losing quality.
After the document is created, fill it with a gradient. Choosing a tool Gradient
and use colors:
1
#434037
2
#575447
3#8a8374

Now fill the background from bottom to top, or from top to bottom, as you like, and move on to the next part of the work.
Now we need to add a new layer: Layer / New / Layer…
Fill it with white.
Next, add noise to the new layer: Filter / Noise / Add Noise…
We set the value Amount - 200%
Choose Gaussian
and check the box Monochromatic

Add a motion blur filter. Filter / Blur / Motion Blur… Meaning Angle - 90%, Distance - 204px
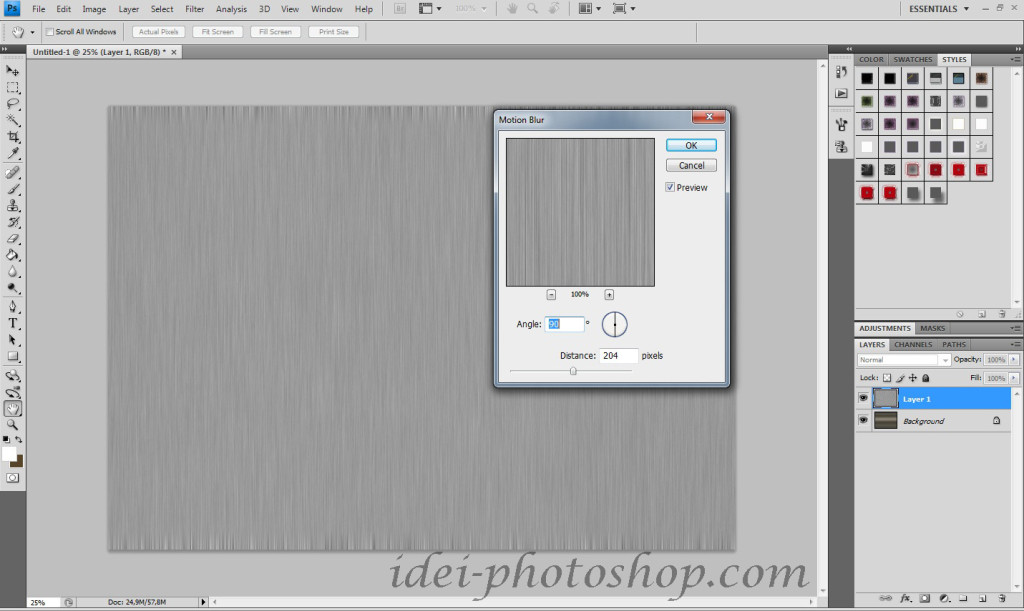
Please note that the stripes will be sharper at the edges than in the middle part, so we need to remove them. I just pull out this layer. In order for the deformation mesh to appear, check the box next to Show Transform Controls
, on the top bar.
![]()
It remains to change in this layer Blend Mode on Overlay and you're done. For convenience, you can merge layers by clicking Ctrl+Shift+E We got the effect metal. It can be used as a background or a blank for further work.
And, as I like to do, a short video to help beginners understand the whole process more clearly.
The basis of web design in Photoshop is the skillful use of layer styles. In this short tutorial by Collis, the founder of the psd.tuts.com project, we will show you how you can achieve a metallic effect with a layer. It’s not very clear, of course, why Colin needed to smear the background with a brush when there is a beautiful layer style Inner Glow, which does the same. But in general, the lesson is useful for mastering Styles. Translated for
In this tutorial, we'll create a subtle metallic effect using a layer style and a gradient that we'll apply to the object. But first, let's make a beautiful background, and create a style for the emblem. At the end of the lesson you can download PSD file. In the file, you can unwind all the style settings and see what was done and how.
Create a background
As usual, let's start with the background. I applied a Radial Gradient with two shadows of a nice green color. The exact color code is as follows: #93cc1a and #7eb704

Shadows
To give the background more gloss, I'll create a small shadow around the edges of the artboard. Take a large brush with soft edges and black color. Create a new layer and just go around the edges of the work area with a brush. Then change the layer's invisibility danger on the 30%

Applying Blur
Now duplicate the shadow layer Layer > Duplicate and apply the effect Filters > Blur > Gaussian Blur. In the settings, set from 20 pixels.
You might be thinking why not apply a green gradient with the right colors first. The thing is that Photoshop only offers a radial gradient, and my gradient is more square. So I decided to make this shadow by hand.

Fonts
To complicate the background a little more, I chose the font TW Cen MT (T1) and put a letter S. I chose a color #cecfd0. Transformed to giant size and set Multiply. The result is nice curves in the background.

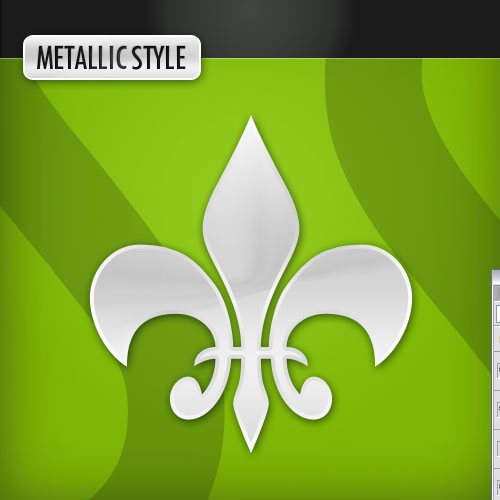
Shapes in Photoshop
In order to apply the metallic style, I need an appropriate shape. To do this, I'll select the Freeform Shape Tool and the shape Fleur De Lis. Color #cecfd0 will be a good base for our gray metallic effect.

metallic effect
First add a shadow Drop Shadow. Let her shade the figure a little. I used dark green color, instead of black. The skillful use of the shadow is that the shadow should not be much.
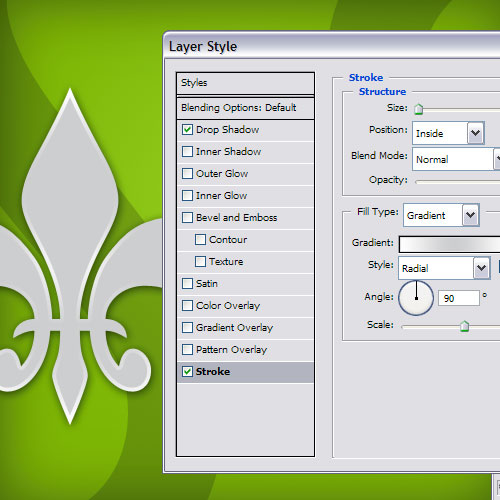
Next, apply a stroke Stroke. Parameter inside Inside and 4 pixel. The stroke type should be a gradient from gray to white. The meaning of this procedure is that real metal always shimmers. We want to achieve the same.
To achieve realism, gradients are needed. But just not in full force. Never do that. The gradient needs a very careful approach. The basis of good web design is subtle changes.
Applying a Gradient
The next step is to apply the full gradient gradient overlay. The gradient fills the body of the object, just what we need. The point of applying this style is to create contrast with the gradient applied to the stroke.

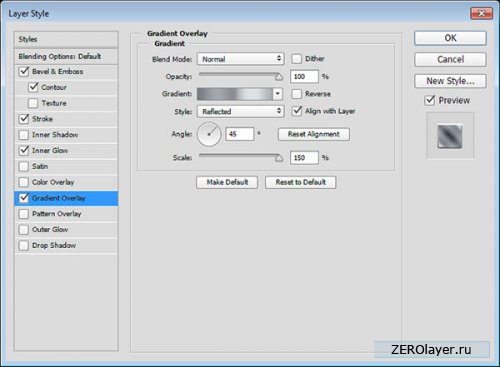
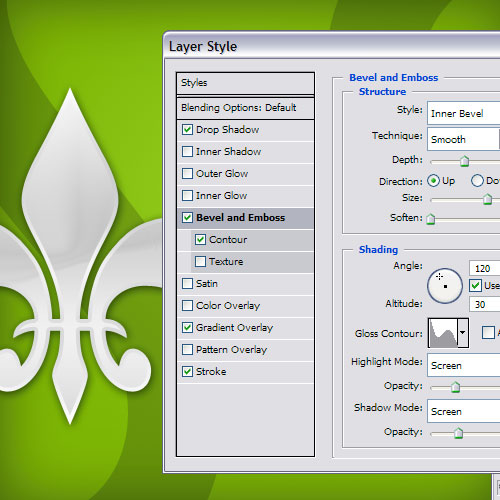
Apply Bevel and Emboss
After we have this chrome effect, I will use the style Bevel and Emboss. In modes choose Inner Bevel with huge size size and apply a style outline. For more information about style outlines in Photoshop, see Outlines in Photoshop.
I want to note that I applied these effects as an experiment. So you can apply any contour to your taste. Just move the dots until you get a nice reflection effect in the center of the shape.
Our metal style is ready! You can now copy the style and Paste it to other objects. To do this, right-click on the layer and select Copy Layer Style.
metal plate
To complete the shape, I added a black cap and drew with the tool Rounded Rectangle Tool a small plate. I just copied the metal style onto the plate. To do this, right-click on the layer and select from the menu Paste Style.
I added text on top of the plate. For the text, I created a new layer style. inner shadow Inner Shadow, since I want the letters to seem to be squeezed out of the plate. Gradient gradient overlay because the gradient makes objects look more natural.
And of course edging Stroke, I used a gradient border. Mode Outer Stroke. Gradient from dark on top to light on bottom. This effect creates the illusion of real edges on the lettering. But in general, it only enhances the overall metallic effect.

final version
That's all. Nice metallic style for Photoshop.
The last notes

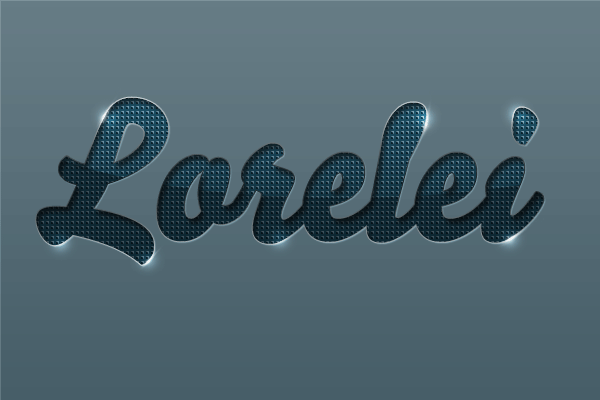
To give text a metallic embossing effect. First, let's write the word in a beautiful font, then apply different layer styles to it, simulating the effect of embossing. Along the way, we will create a new pattern ourselves, then slightly decorate the background with a gradient. Let's give the text a glamorous gloss and decorate it with spectacular luminous dots.
Step 1.
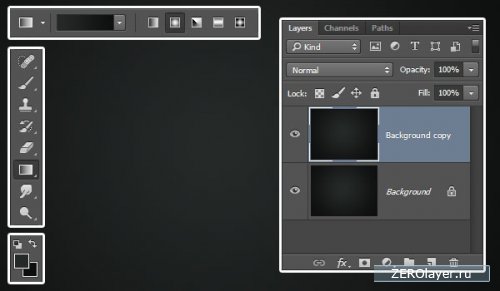
Create a new document 600x400 pixels in size. Fill with color #535559.
Step 2
We write a word in any suitable font (the font should not be too thin). This tutorial uses the Bello font. Size 188pt. 
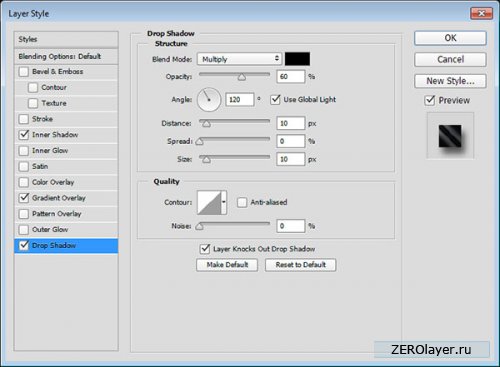
Step 3
By double-clicking on the layer, we will open the layer style and we will sequentially set different styles. Let's start with the Drop Shadow tab. Set the values as shown in the figure below. Blending mode "Overlap" (Overlay). 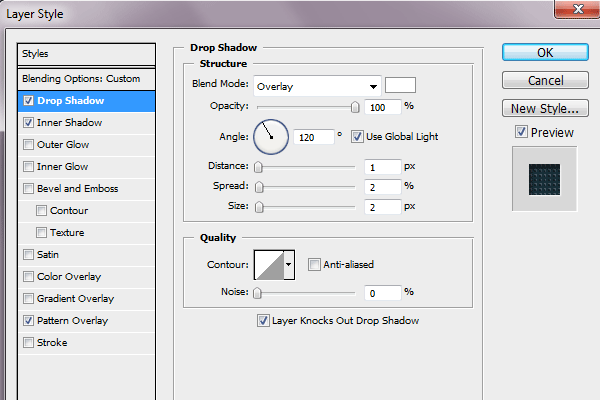
Step 4
Bookmark “Inner Shadow” (Inner Shadow). Blending mode “Multiplication” (Multiply). 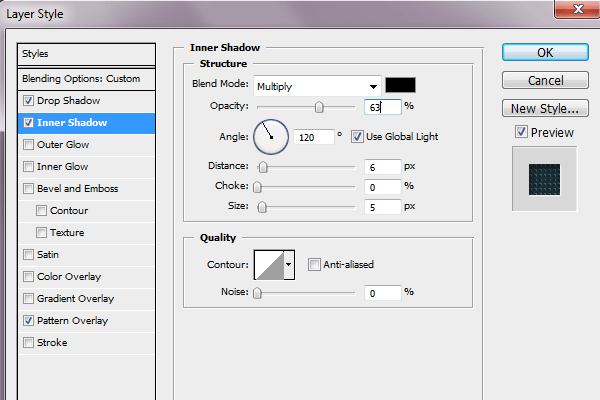
Step 5
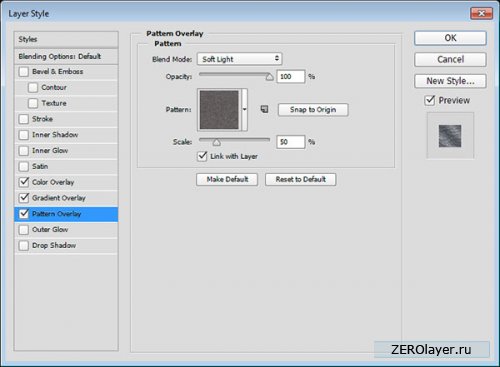
The Pattern Overlay tab. But first, let's make a new pattern. Create a new 5x5 px document and fill it with #07212c. Maximize the image and use the Pencil tool to paint over the pixels, as in the figure below. 3 dark pixels #000b10 color, 3 light pixels #3b4e58 color and 2 corner #283942 colors. Then go to Edit > Define Pattern. Now select this pattern in the layer style. 
Step 6
Stroke tab. Make a one-pixel gradient stroke outside. 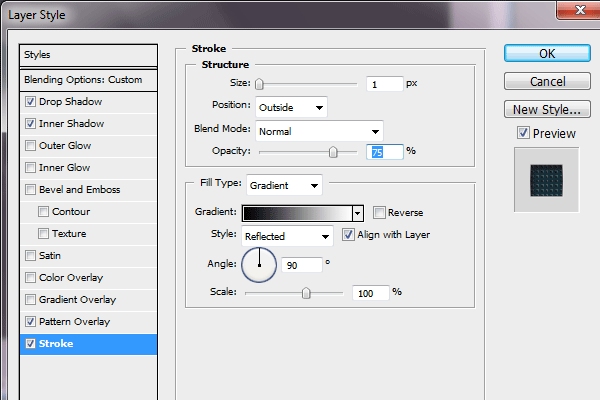
Step 7
This is the intermediate result. 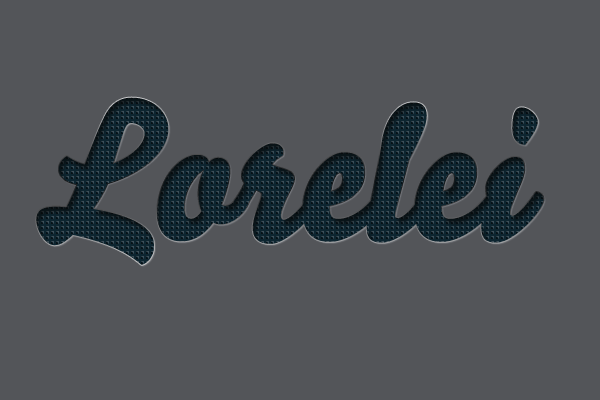
Step 8
Now we will slightly decorate the background of the document. Go to the background layer, open the layer style and set following parameters for the Inner Shadow tab. Blending mode “Soft light” (Soft Light). 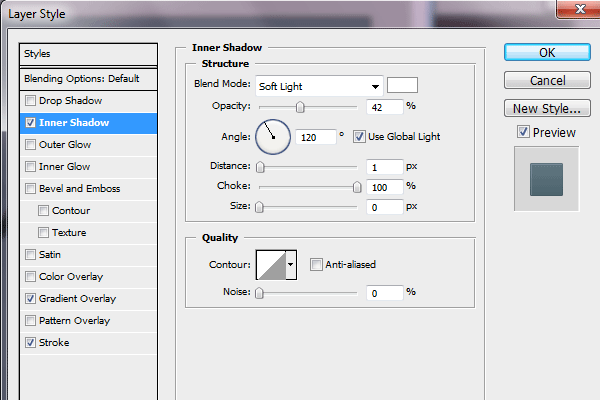
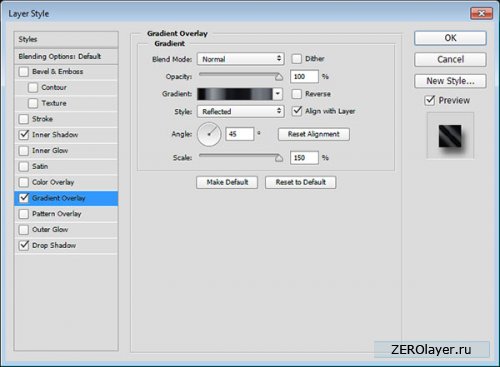
Step 9
In the Gradient Overlay tab, set the following colors for the gradient: from dark #475e68 color to light #667c85 color. 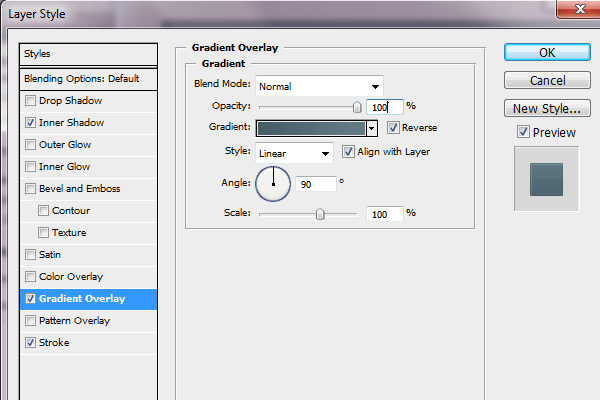
Step 10
The picture will look like this. 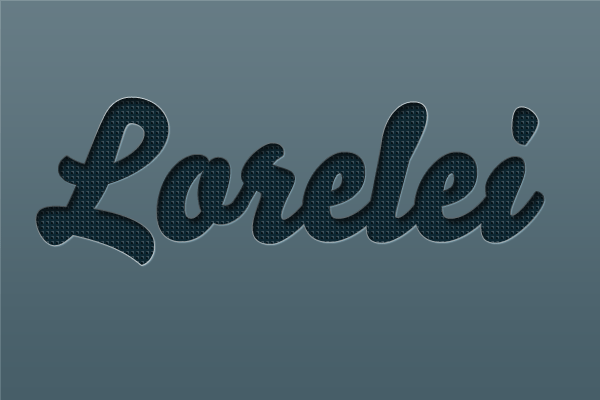
Step 11
Let's add a gloss effect to the text. Create a new layer on top of all layers. Hold down Ctrl and click on the text layer to select it. 
Step 12
Now take the gradient from white to transparent and drag the mouse from top to bottom of the text. Then take the tool “Oval area” (Elliptical lasso tool) and select the area, as in the figure below. 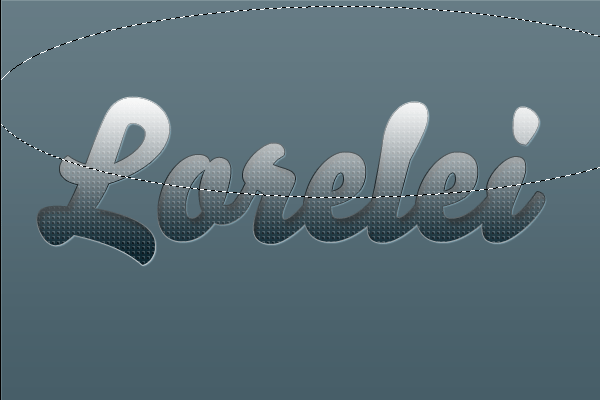
Step 13
Now invert the selection Shift + Ctrl + I and press Del, deleting the excess. 
Step 14
Change the blending mode to “Overlap” (Overlay). 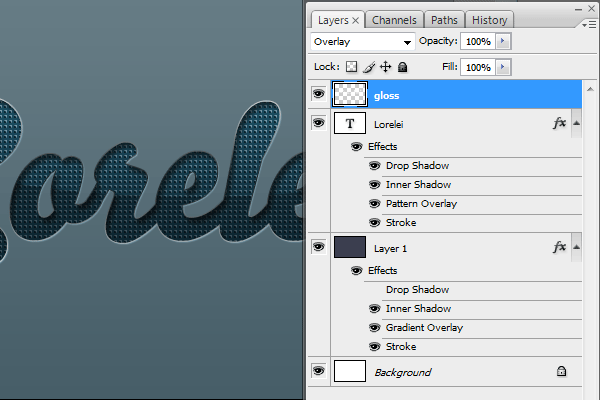
Step 15
Now let's add a dot glow for the text. We take a soft brush, size 27 pixels, white color and on a new layer we randomly put white luminous dots along the edges of the text. Then change the “Transparency” (Opacity) to 70% and change the blending mode to “Overlap” (Overlay). 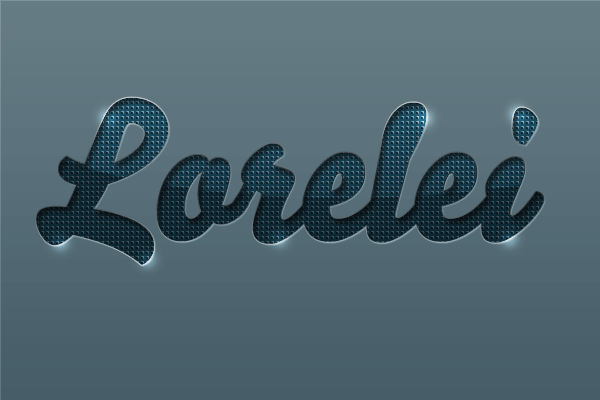
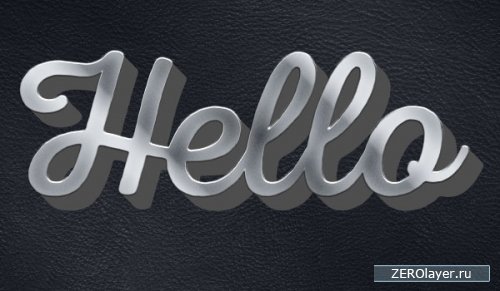
The final
As a result, we got such an original metallic embossing effect for text.