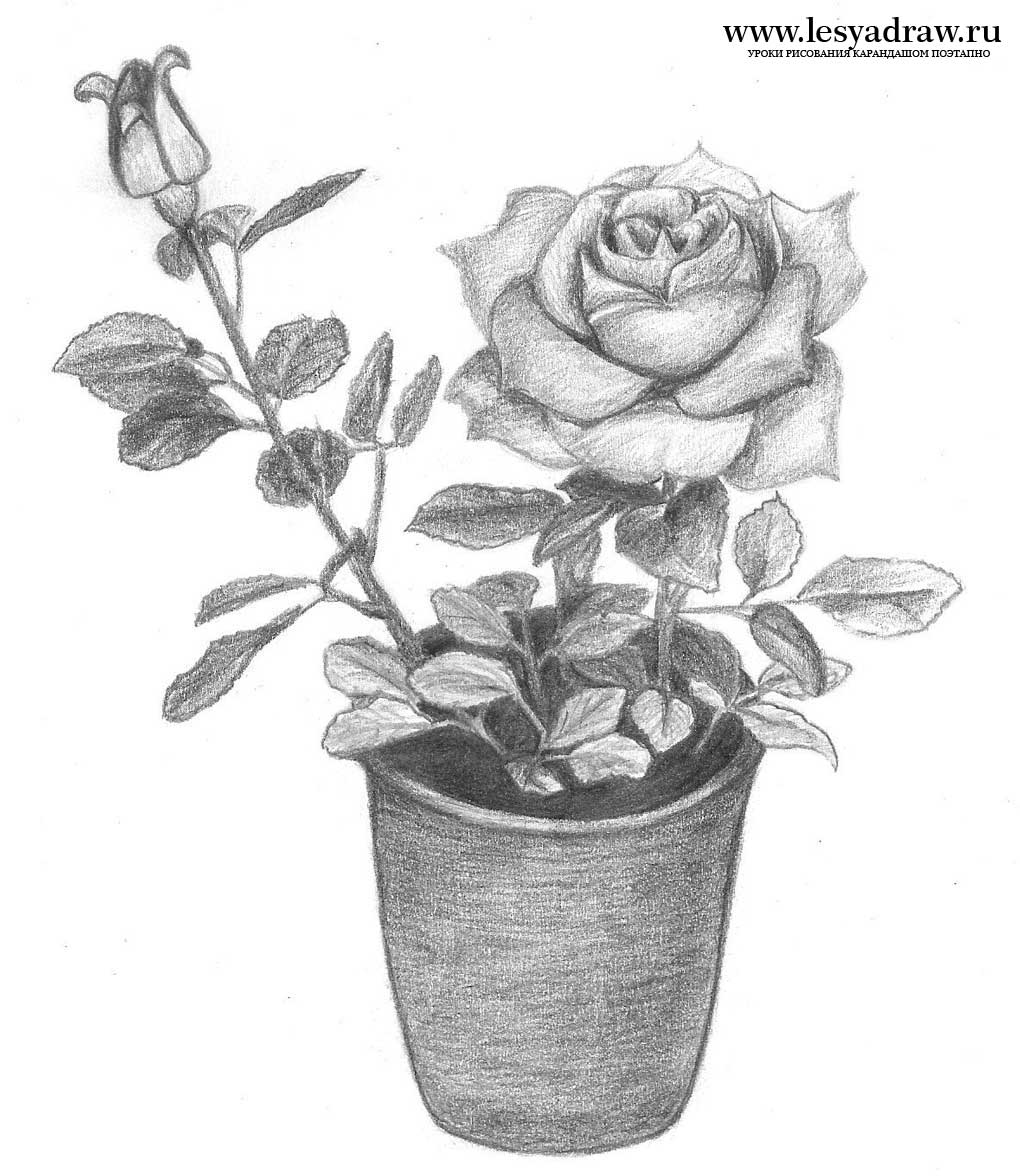
This lesson on drawing a rose in a pot with a pencil step by step. I was looking for a picture for a long time, I found a more or less simple one.
I must say right away that my goal was not an exact copy of this picture, so I did not even pay attention to inconsistencies. Whoever wants can exactly copy this rose in a pot, so I put the original.
So, I started painting with an open rose. Click on the image, it has a high resolution, where you can see everything in detail. Then, at a certain distance, I drew a rosebud and a stem. Then I drew a pot. The bottom of the pot is not flat, but rounded.
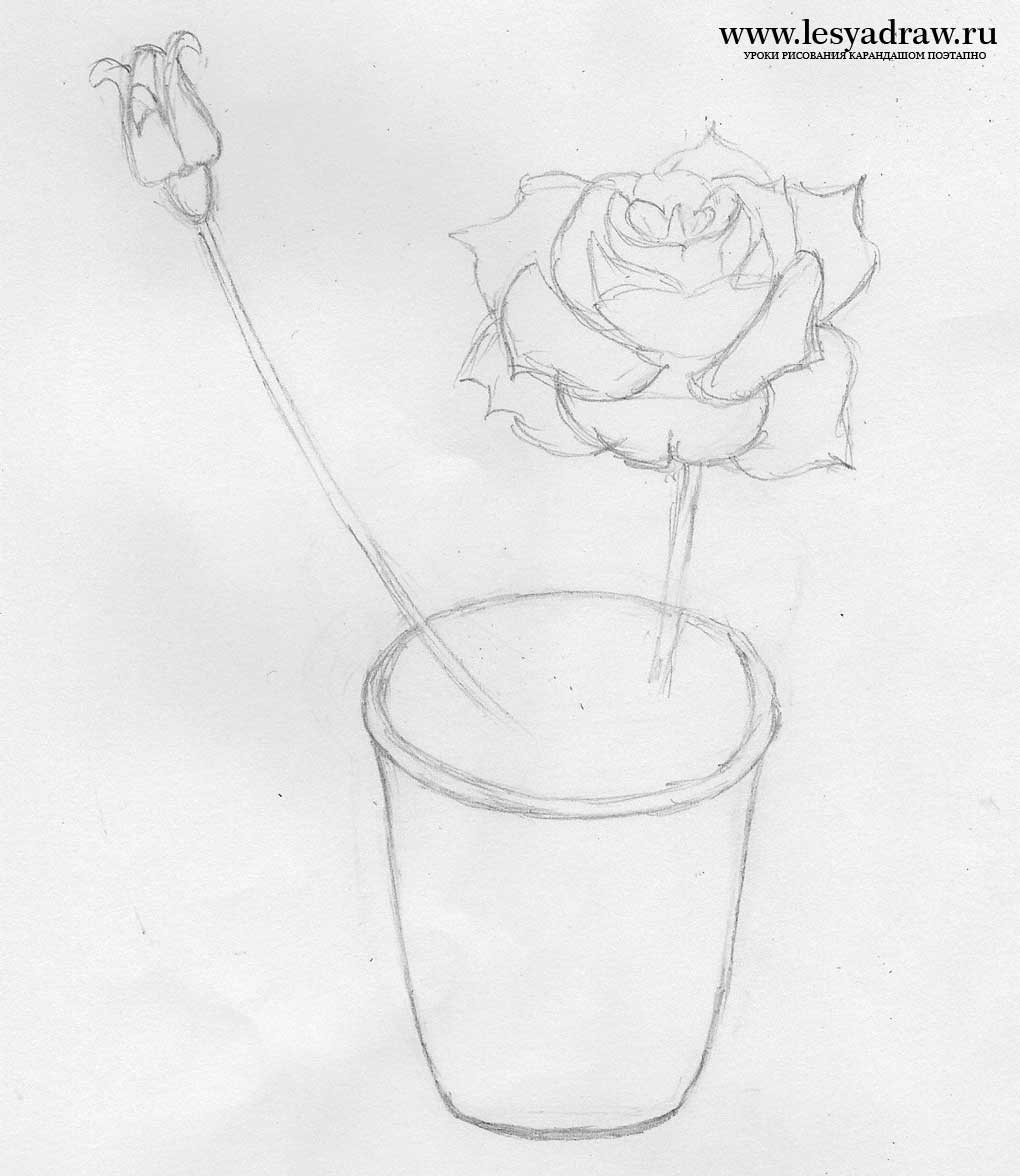
Now we need to draw the leaves. If this is too hard for you and you feel that you will get bored and you will freak out from drawing so many small details, then draw as many leaves as you think you can handle, for example, 2 or 3 times less, in places where Do you like it. If my sketches of leaves are incomprehensible in my drawing, refer to the original and copy from there.
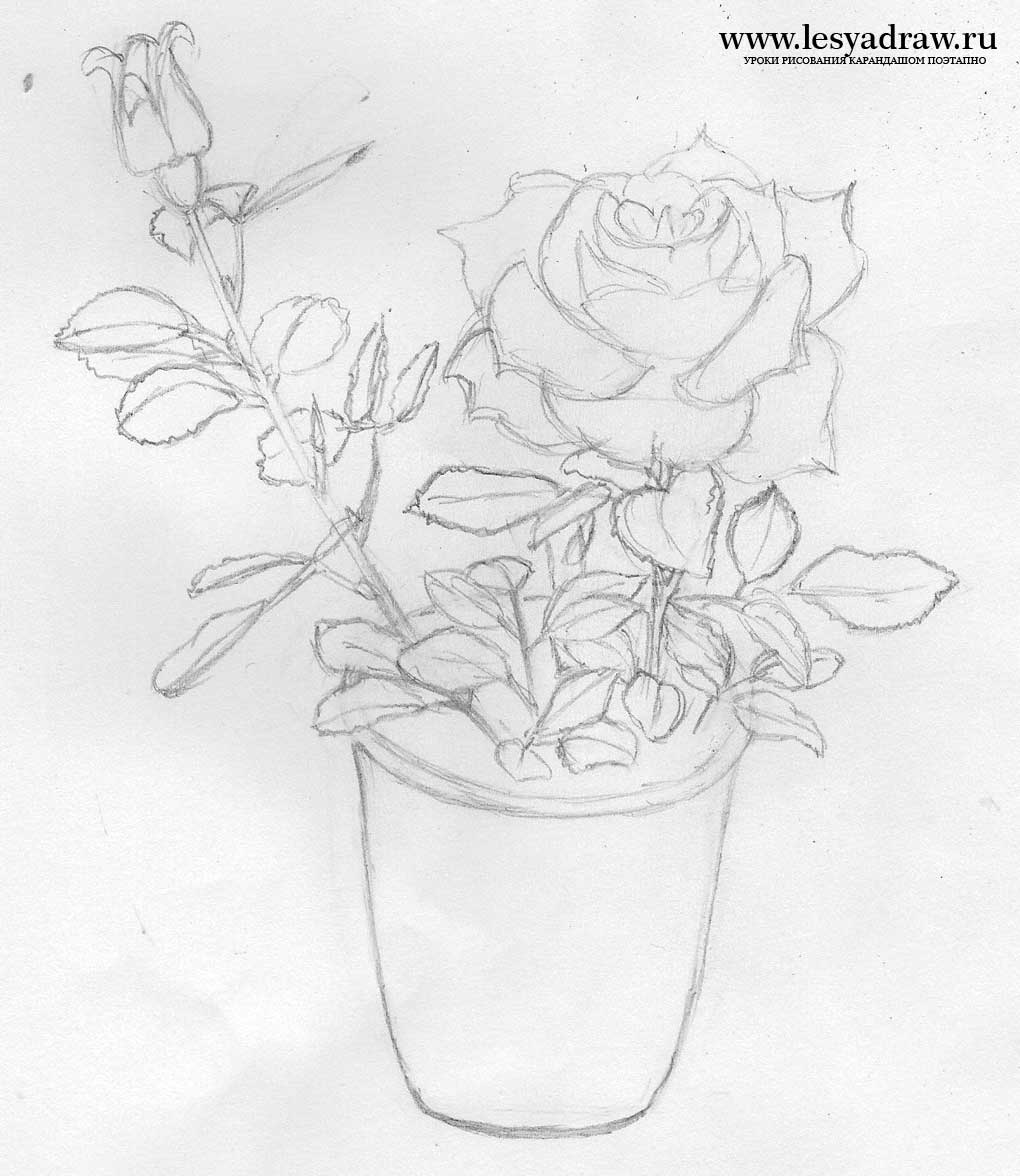
Now let's start shading the rose. In fact, I have a rose measuring 6 by 5 cm, so hatching is easy. Take the softest pencil you have. I use a 6B pencil. Using different levels of pressure on the pencil and drawing lines a little closer and a little further from each other, create shadow transitions. Who is not familiar with shading at all, look first, then.

We paint over all the rose petals. Do not be afraid to apply very dark shadows, they give the drawing a realistic look.

Now let's move on to the pot. Paint over the visible part of the ground, leaving the stems and leaves untouched. We begin to apply hatching to the pot. In the original, the pot has a non-uniform color, clay (?) comes with some impurities and repeats the shape of the pot, so the lines will also repeat the shape of the pot.
From the sides of the pot, I first simply shaded, then applied a smaller hatch on top of it (you can see it on the left side), then I applied additional hatching with curved curves of different lengths (the result on the right side).

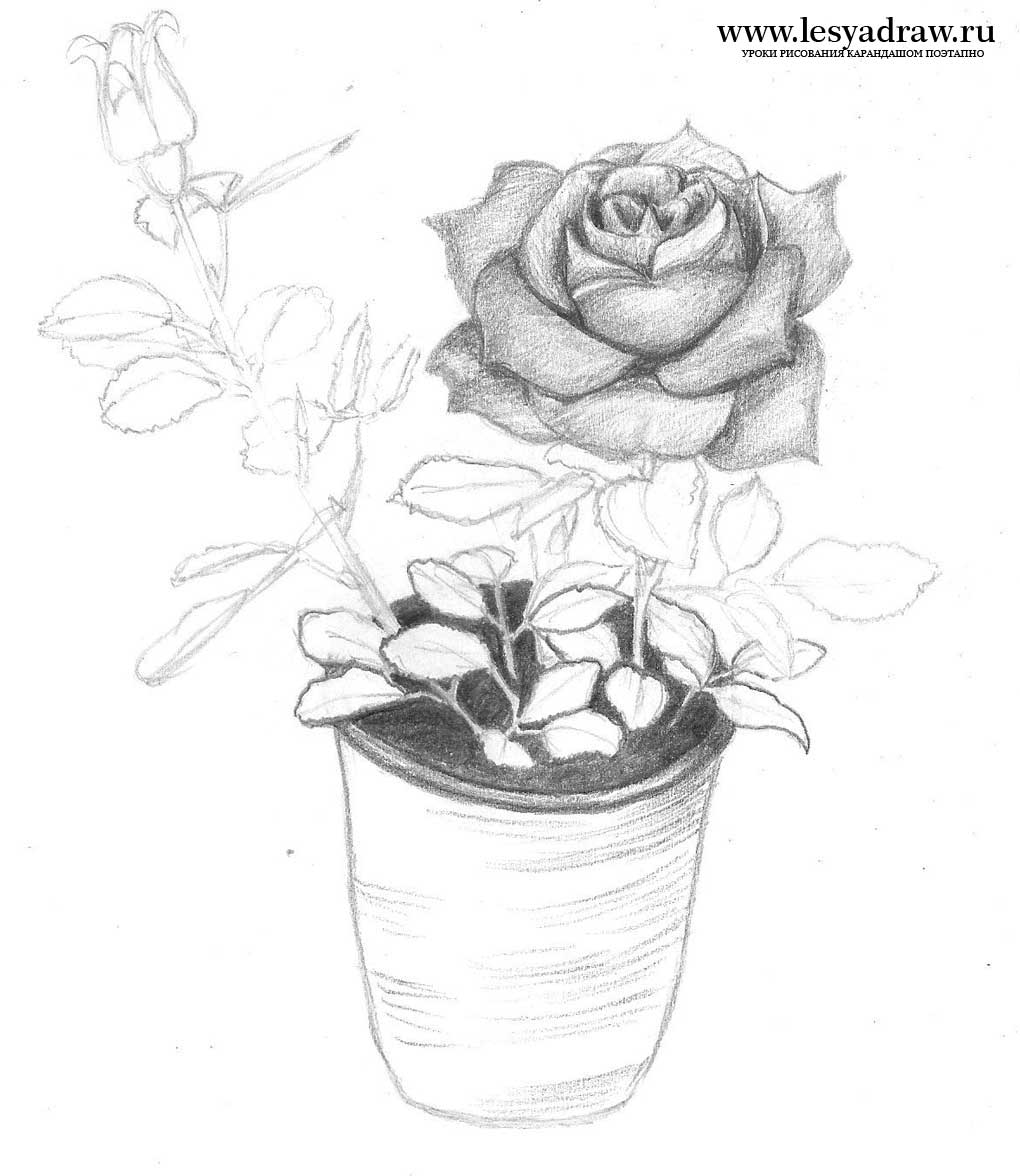
Now I shaded the remaining area and applied curves to the shape of the pot.
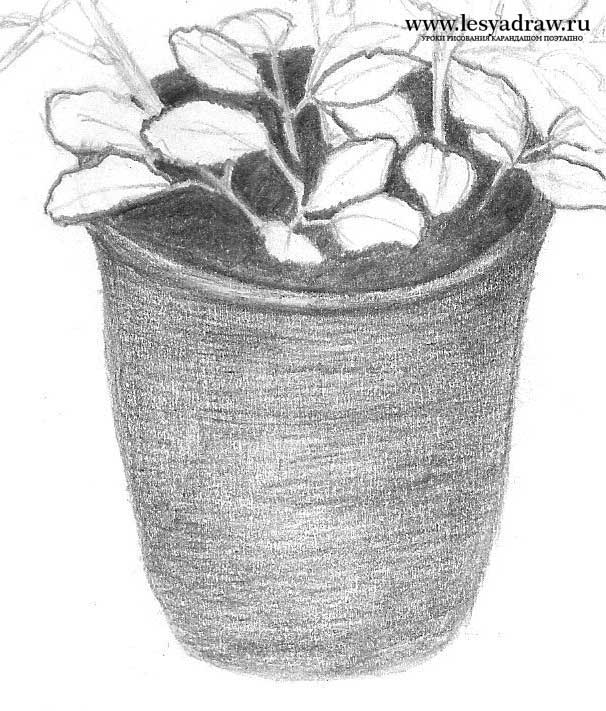
I darkened the areas on the sides and bottom of the pot. At the same time, the pot became crooked, nothing terrible, you can then fix everything with an eraser. Shaded rosebud. Now let's move on to hatching the leaves. The leaves that grow from the ground are light green in color, they are lighter than the rest, I hatched them with a 2B pencil.

The ground was not dark enough for me, so I made it darker. I applied hatching to the remaining leaves with a 6B pencil. Our flower is ready.
In this lesson, we will look at how to draw indoor flower in a pot using Photoshop.
ATTENTION: The lesson is intended for already advanced users of Photoshop.
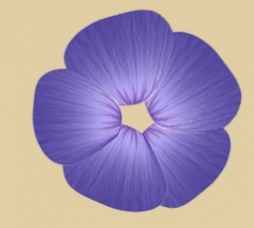
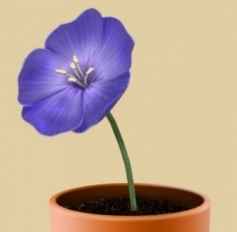
Final result
Let's start the Photoshop tutorial
Step 1.
Create a new document of size 450 px x 600 px( File > New(File > New / Keyboard Shortcut "Ctrl+N")) and fill it with the following gradient ( Gradient Tool(Gradient Tool / "G" Key): ↓

Step 2
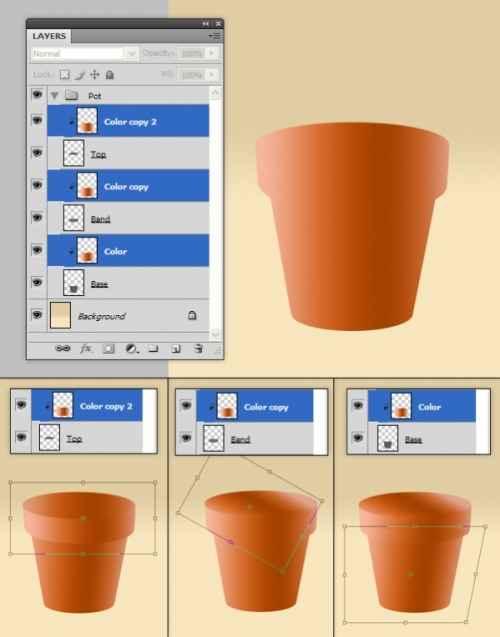
Create a new group in the layers panel and name it " Pot". Create a new layer in the group and name it " Top". With a tool Ellipse Tool(Oval Shape Tool / "U" Key) create an ellipse as shown and fill it with color #5b5b5b- this will be the top of the pot: ↓

Step 3
Create a new layer " Band” and place it under the layer " Pot". With a combination of tools Elliptical Marquee Tools Rectangular Marquee Tool(Rectangular selection area / "M" key) create the shape shown in the image. Use the shape shown in the image Fill it with a lighter shade of gray: ↓

Step 4
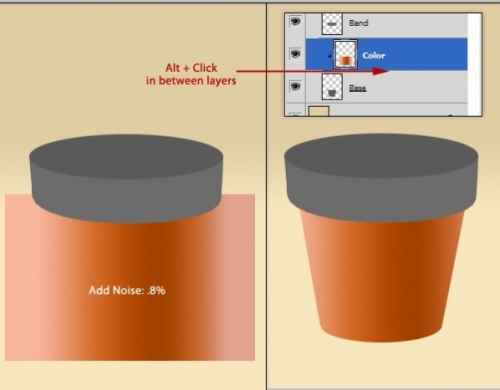
Create a new layer " Base” (new layer(New Layer / Keyboard Shortcut "Ctrl+Shift+N")) and place it below the layer " Band". Also with tools tools Elliptical Marquee Tools(Oval Selection Tool / M Key) and Rectangular Marquee Tool(Rectangular selection area / "M" key) create the shape shown in the image (you can use pen tool(Pen Tool / "P" key for creating shapes). Fill the base of the pot with the color shown in the image: ↓

Step 5
Create a new layer ( new layer color” and place it above the layer " Base". With help Rectangular Marquee Tool(Rectangular Selection / M Key) create a selection that will overlap the base of the pot and fill it with the gradient shown in the image: ↓

Add noise to the gradient, for this select Filter > Noise > Add noise(Filters > Noise > Add Noise), Amount(Degree) = 8% , distribution(Distribution) = Uniform(Uniform) (you can take the value Amount(degree) less). Then click alt+ click between layers " color" and " Base” to translate the layer " color” to the mode clipping mask(Clipping mask).
Step 6
Duplicate layer " color” 2 fold (ctrl+J) and place each copy above the layers with the parts of the pot, as shown in the image. Don't forget to translate all layers" color” to the mode clipping mask(Clipping mask).
You can adjust the size of the layer " color” to the size of each part of the pot using transform (Ctrl + T).
Step 7
With a tool BurnTool(Dimmer Tool / "O" Key) darken the area on the layer " color” under the rim of the pot, as shown in the image: ↓

Step 8
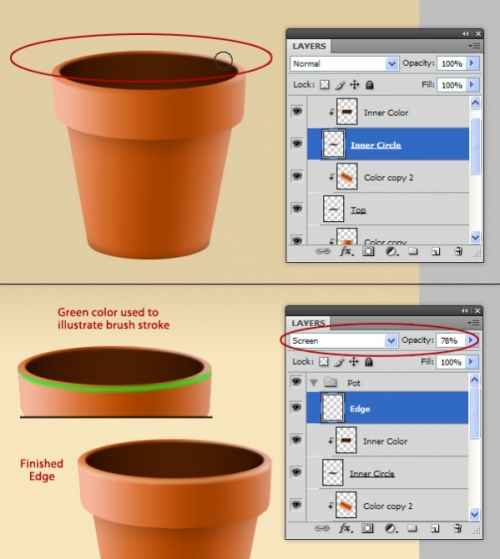
Create a new layer, name it " Inner Circle” and place it on top of all layers in the group " Pot". Create an ellipse shape on it and paint it gray. Create another layer, name it " Inner color”, place it above the layer " Inner Circle” and set to clipping mask mode. Fill layer " Inner color” with the gradient shown in the second image: ↓

Step 9
Go to layer " Inner Circle”, select a tool Blur Tool(Blur Tool / R Key) and drag it along the edges of the pot in the area marked in the top picture to blur the edges a little. Now create another new layer, name it " edge” and place it on top of all layers in the group. Go to layer " edge”, select a tool brush tool(Brush Tool / "B" Key) ( color - #E2B398, hardness(Hardness) = 0% ) and brush over the area marked in green. Change Blend Mode(Blending Mode) layer" edge" on the Screen(Lightening) and reduce Opacity(Opacity) to 78% .
Step 10
Now we need to create the earth in a pot - for this we will create another new layer in clipping mask mode. Select layer " Inner color" and press Ctrl+Shift+N. Make sure you have a checkmark in the box that appears. Use Previous Layer to Create Clipping Mask(Use previous layer to create clipping mask), name the layer " Dirt" and press OK.

Step 11
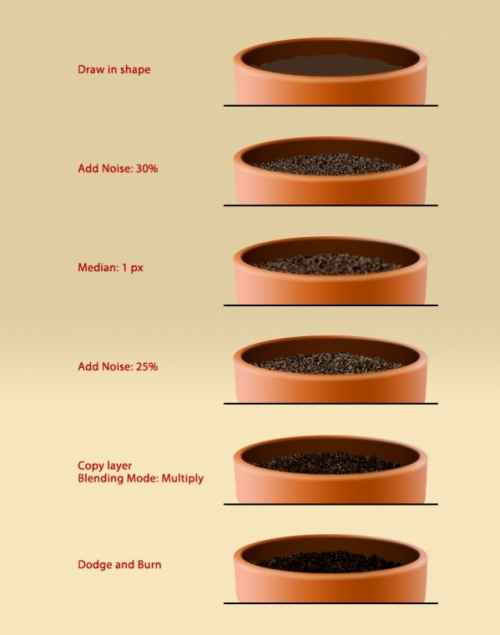
Let's continue to create the earth. Go to layer " Dirt” and create a brown ellipse. Select Filter > Noise > Add noise(Filters > Noise > Add Noise), Amount(Degree) = 30% , check the box Monochromatic(Monochrome). Then select Filter > Noise > Median(Filter > Noise > Median), radius - 1 rx. Then select again Filter > Noise > Add noise(Filters > Noise > Add Noise), Amount(Degree) = 25% , check the box Monochromatic(Monochrome). Now duplicate the layer " Dirt” (Ctrl+J) and make sure both layers are " Dirt” are in clipping mask mode. Change Blend Mode(Blending Mode) of the duplicated layer on Multiply(Multiplication) (I would also recommend reducing the Opacity(Opacity) of this layer). Go to the original layer " Dirt” and using the tools DodgeTool BurnTool(Dimmer Tool / "O" Key), draw shadows and highlights.
Step 12
Go back to layer" Inner color” and with the help BurnTool(Dimmer Tool / "O" Key) add a shadow from the ground on the inside of the pot: ↓

Step 13
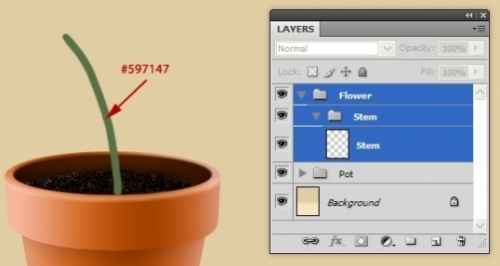
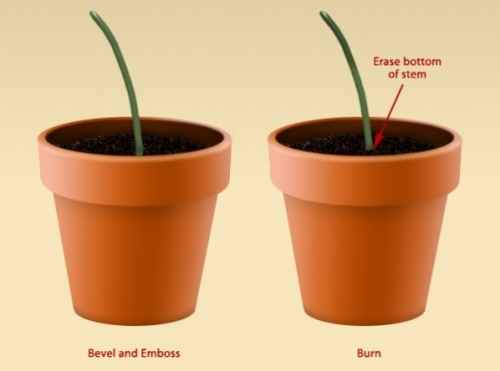
Now we will draw the stem. So, create a new group in the layers panel (Ctrl+G) on top of the group " Pot” and call her " Flower". In a group " Flower” create another group and name it " Stem". Create a new layer ( new layer(New Layer / Keyboard Shortcut "Ctrl+Shift+N")), name it " Stem” and with the help brush tool(Brush Tool / "B" Key) draw the stem as shown in the image: ↓
Double click on the layer Stem” on the layers palette (call Blending Options(Overlay options)) and in the menu that opens, set the following settings Bevel and Emboss(embossing and relief):
Bevel and Emboss(embossing and embossing): ↓

With a tool Eraser Tool(Eraser Tool / "E" Key) Erase the bottom of the stem and using BurnTool(Dimmer Tool / O Key) darken the top and bottom of the stem: ↓
Step 14
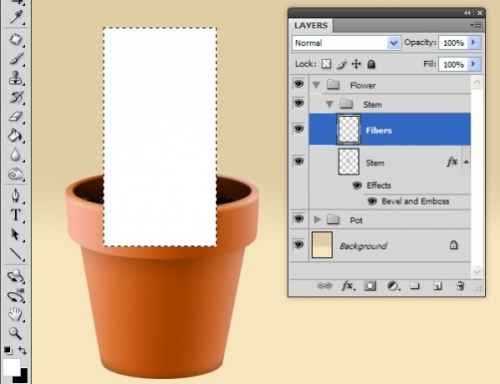
Make sure the foreground and background colors are black and white (as in the picture). Create a new layer above the " Stem"", call it " fibers”, create a rectangular selection using Rectangular Marquee Tool(Rectangular selection area / "M" key) and fill it with white ( Paint Bucket Tool(Fill Fill Tool / "G" Key): ↓
Step 15
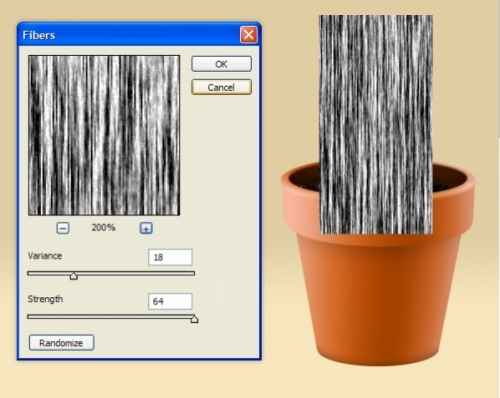
Being on the layer " fibers”, press ctrl+t, then right click on the image > Warp(Deformation). Give the layer the shape shown in the figure and translate the layer " fibers” to clipping mask mode. Change Blend Mode(Blending Mode) layer on overlay(Overlap) and reduce Opacity(Opacity) to 28% .

Step 16
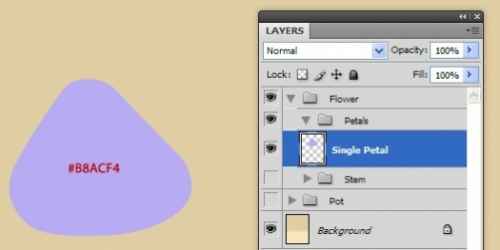
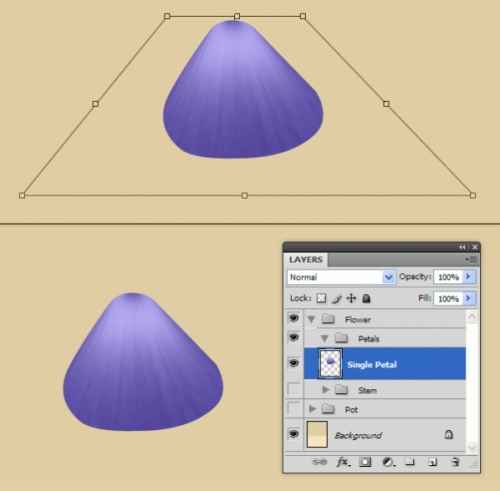
Now we will create the flower itself, but first we will create the petals. Create a new group " Petals”inside the group" Flower". In a group " Petals”Create a new layer and name it " Single Petal". On this layer create the petal shape shown in the picture and fill it with color. #B8ACF4(to create a petal you can use the tool pen tool(Pen Tool / "P" Key).
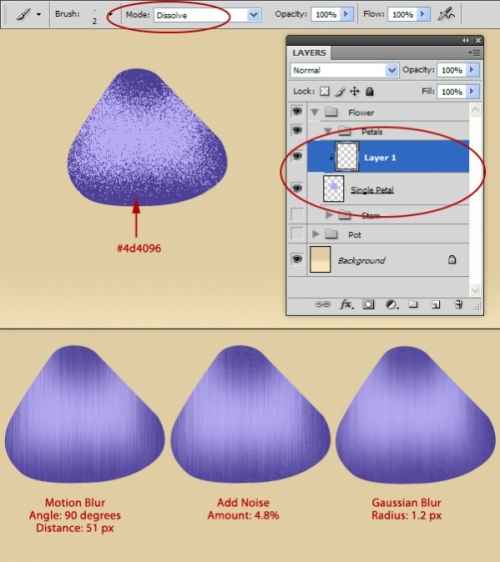
Step 17
Create new layer(Layer 1 / Layer 1) and put it in clipping mask mode. Take a soft brush in mode Dissolve(dissolve) (color #4d4096) and draw " noise» as shown in the image. Then select Filter > Blur > motion blur(Filter > Blur > Motion Blur) with settings:
Angle(Angle) = 90 °;
Distance(Offset) = 51 px;
Then select Filter > Noise > Add noise(Filters > Noise > Add Noise), parameter value = 4.8% and finally select Filter > Blur > Gaussian Blur(Filter > Blur > Gaussian Blur), radius = 1.2 px.
Step 18
Being on the layer Layer 1» (Layer 1), press ctrl+t and transform the layer so that the direction of the texture matches the shape of the petal. When you are happy with the result, merge these 2 layer into one (Ctrl + E). Make sure the layer name remains the same - " Single Petal”.
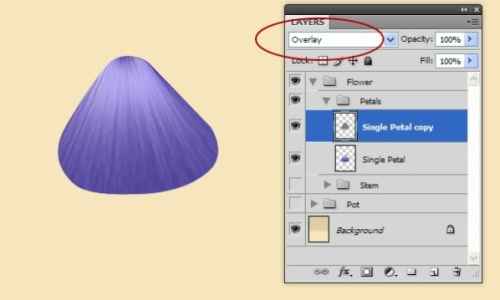
Step 19
Now the petal looks flat. In order to add volume to it, duplicate the layer " Single Petal”, go to the layer copy and select Image > Adjustments > Desaturate(Image > Preferences > Desaturate / Keyboard Shortcut "Shift+Ctrl+U"). Next select Filter > Style > Emboss(Filter > Styling > Emboss) and set the following settings: ↓

Change Blend Mode(Blending Mode) of this layer on overlay(Overlap).
Step 20
Go to layer " Single Petal”, choose a purple color and draw lines at the top of the petal as shown in the image: ↓
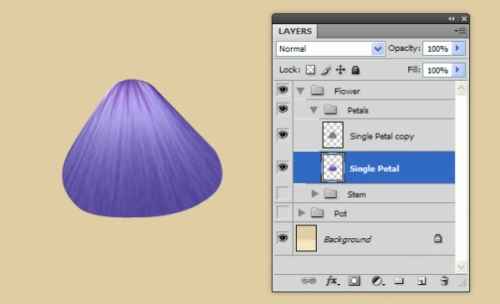
Then merge into one original layer and its black and white copy.
Step 21
Now duplicate the layer " Single Petal” 4 fold and place the petals as follows: ↓
Step 22
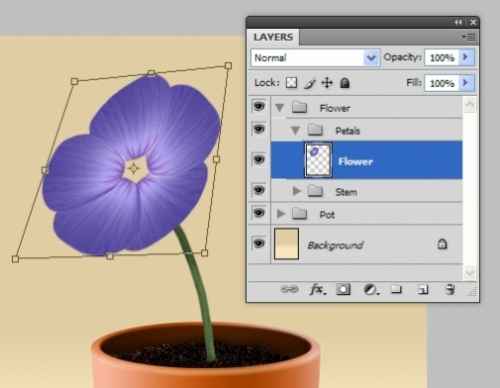
Merge all petal layers into one layer and rename it " Flower". With the help of transformation (Ctrl + T) give the flower this shape (mode Perspective(Perspective)): ↓
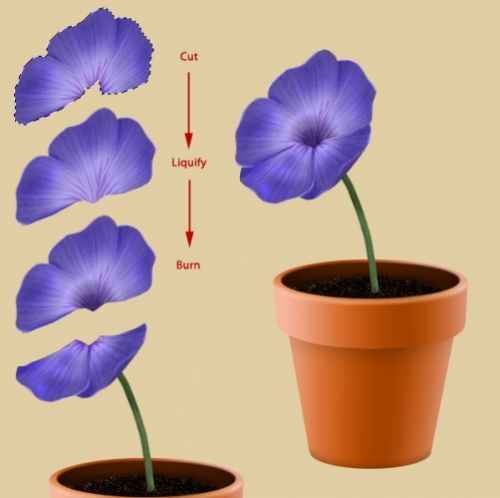
Step 23
Now let's slightly distort the shape of the petals. To do this, select Filter > Liquify(Filter > Plastic / Keyboard Shortcut "Shift + Ctrl + X"), set the settings shown in the figure and give the petals this shape: ↓

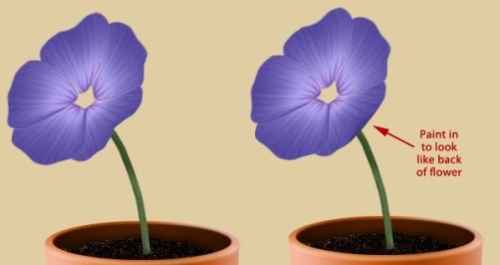
Now paint the back side of the flower with a brush (color - dark purple): ↓
Step 24
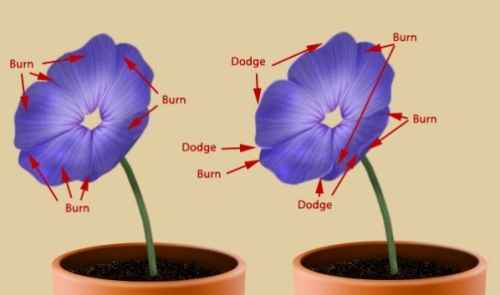
Using Tools DodgeTool(Illuminator Tool / "O" Key) and BurnTool(Dimmer Tool / "O" Key), draw shadows and highlights on the flower: ↓
Step 25
Now we need to finish the core of the flower. For this, using Polygonal Lasso Tool(Polygonal Lasso Tool / "L" Key) make a selection of the top of the flower, cut and paste the top on a new layer. Thus we divided the flower into 2 layers - top and bottom. Go to the top layer and select Filter > Liquify(Filter > Liquify / Keyboard Shortcut "Shift+Ctrl+X"). With this filter, grease» down the middle of the layer as shown. With a tool BurnTool(Dimmer Tool / "O" Key) darken the middle and merge the layer with the top and bottom into one: ↓
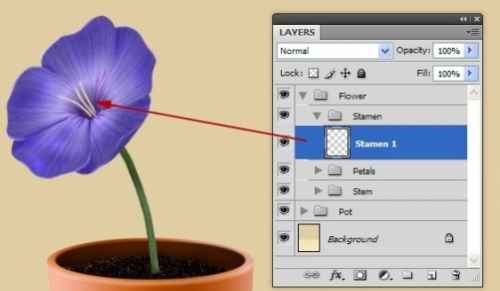
Step 26
Now we will create stamens. To do this, create a new group " Stamen”inside the group" Flower". In the group you just created, create a new layer and name it " Stamen 1". With a small brush (color - light yellow), paint the stamens as shown in the image: ↓
Using BurnTool(Dimmer Tool / O Key), darken the stamens at their base. Click 2 times on the layer " Stamen 1” and set the following settings: ↓
Bevel and Emboss(embossing and embossing): ↓

Step 27
Create a new layer - " Stamen 2” and draw more stamens. Darken the stamens at the base with BurnTool(Dimmer Tool / O Key) and erase them from the bottom so that they appear to be sticking out of the flower. Don't forget to apply the blend settings we used in the previous step to them: ↓

Step 28
To create the anthers at the ends of the stamens, create a new layer " anther"above layer" Stamen 2". Take a small brush (color - light yellow) and paint anthers as shown in the image: ↓

Step 29
Apply the following styles ( Blending Options(Blending Options)) for layer " anther” with the parameters as in the image below: ↓
Inner Shadow(Inner shadow) Bevel and Emboss(embossing and embossing): ↓ 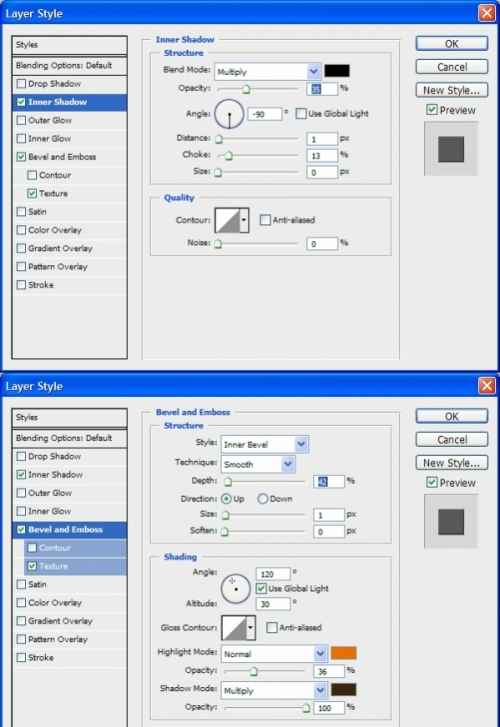
Here's what happened: ↓
Step 30
Let's start creating a leaflet. First, duplicate the whole group " Stem” (right click on the group - duplicate group/ Duplicate group), go to copy group > right click > merge group(Merge Group) - we will get one layer that needs to be placed under the group " Stem". Go to layer " Stem copy” and select Edit > Transform > Flip Horizontal(Edit > Transform > Flip Horizontally). With the help of transformation, reduce the size of the layer and change its shape with the option Warp(Deformation): ↓
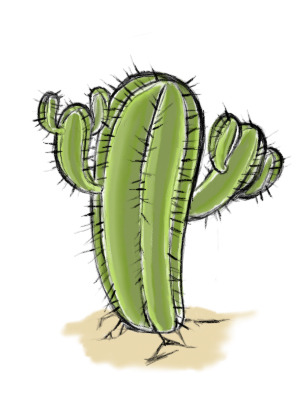
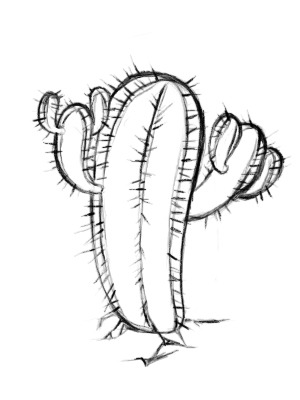
This article will show and tell you how to draw a cactus. Any person can depict a flower, for this it is enough to break the picture into simple figures: circle, straight line, curve, cylinder, ellipse, etc. Using this approach, it will be quite easy to depict this exotic plant.
For kids
How can a child draw a cactus? Very simple! Let's take a look at this example.
On a sheet of paper with a black marker, draw an elongated vertical oval with a cut off lower end - this will be the main figure. On its left edge, draw another such, already reduced figure, extending from the lower third at a slight angle. Draw the same design at the right contour, slightly higher than the left one. Color the flower green.


Draw two horizontal lines inside the stem of the plant and two each inside the shoots. The lines should run at equal distances from each other and from the contours of the plant. With small strokes, about two centimeters each, designate the spines.


Draw three small flowers - one on the trunk and two on the processes. Color them in with a red marker. The flowers are depicted as several drop-shaped figures, converging with thin edges to each other.
cactus in a pot
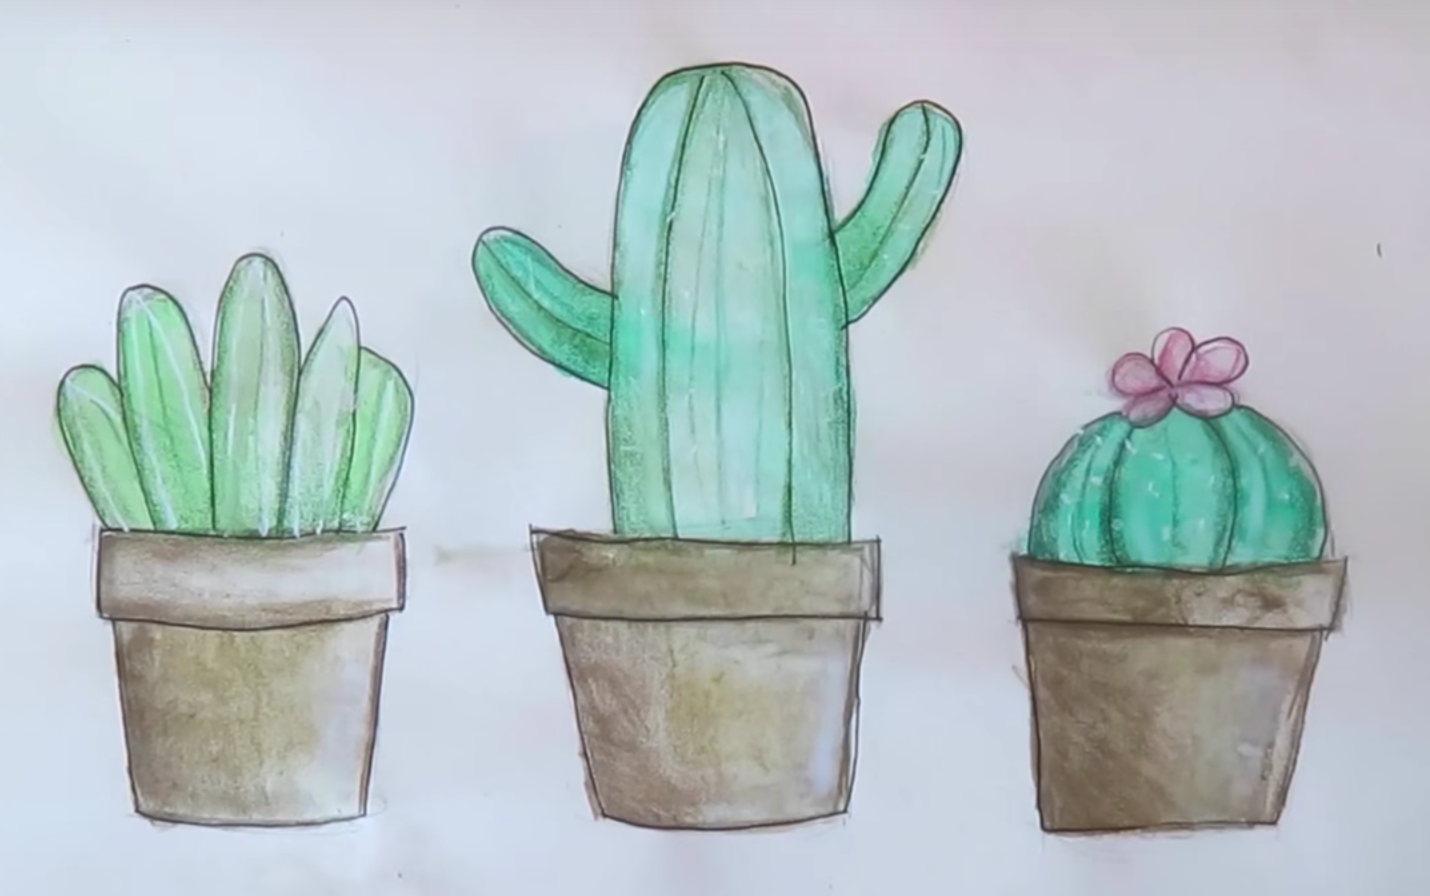
Very often people plant these plants in pots and put them on the windowsill, so let's take a pencil and draw a cactus in a pot.
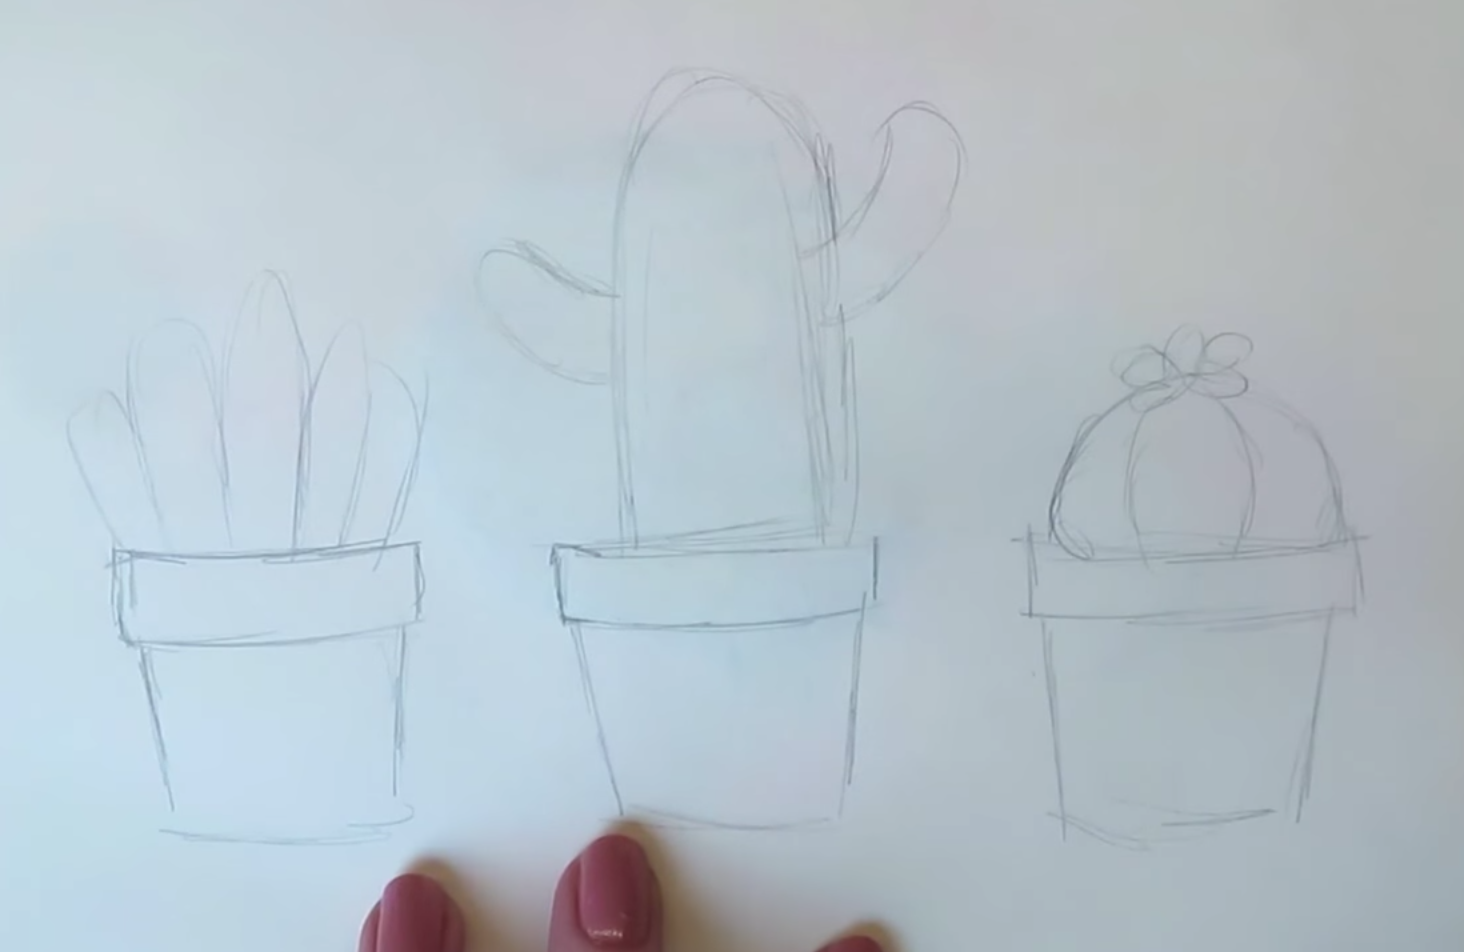
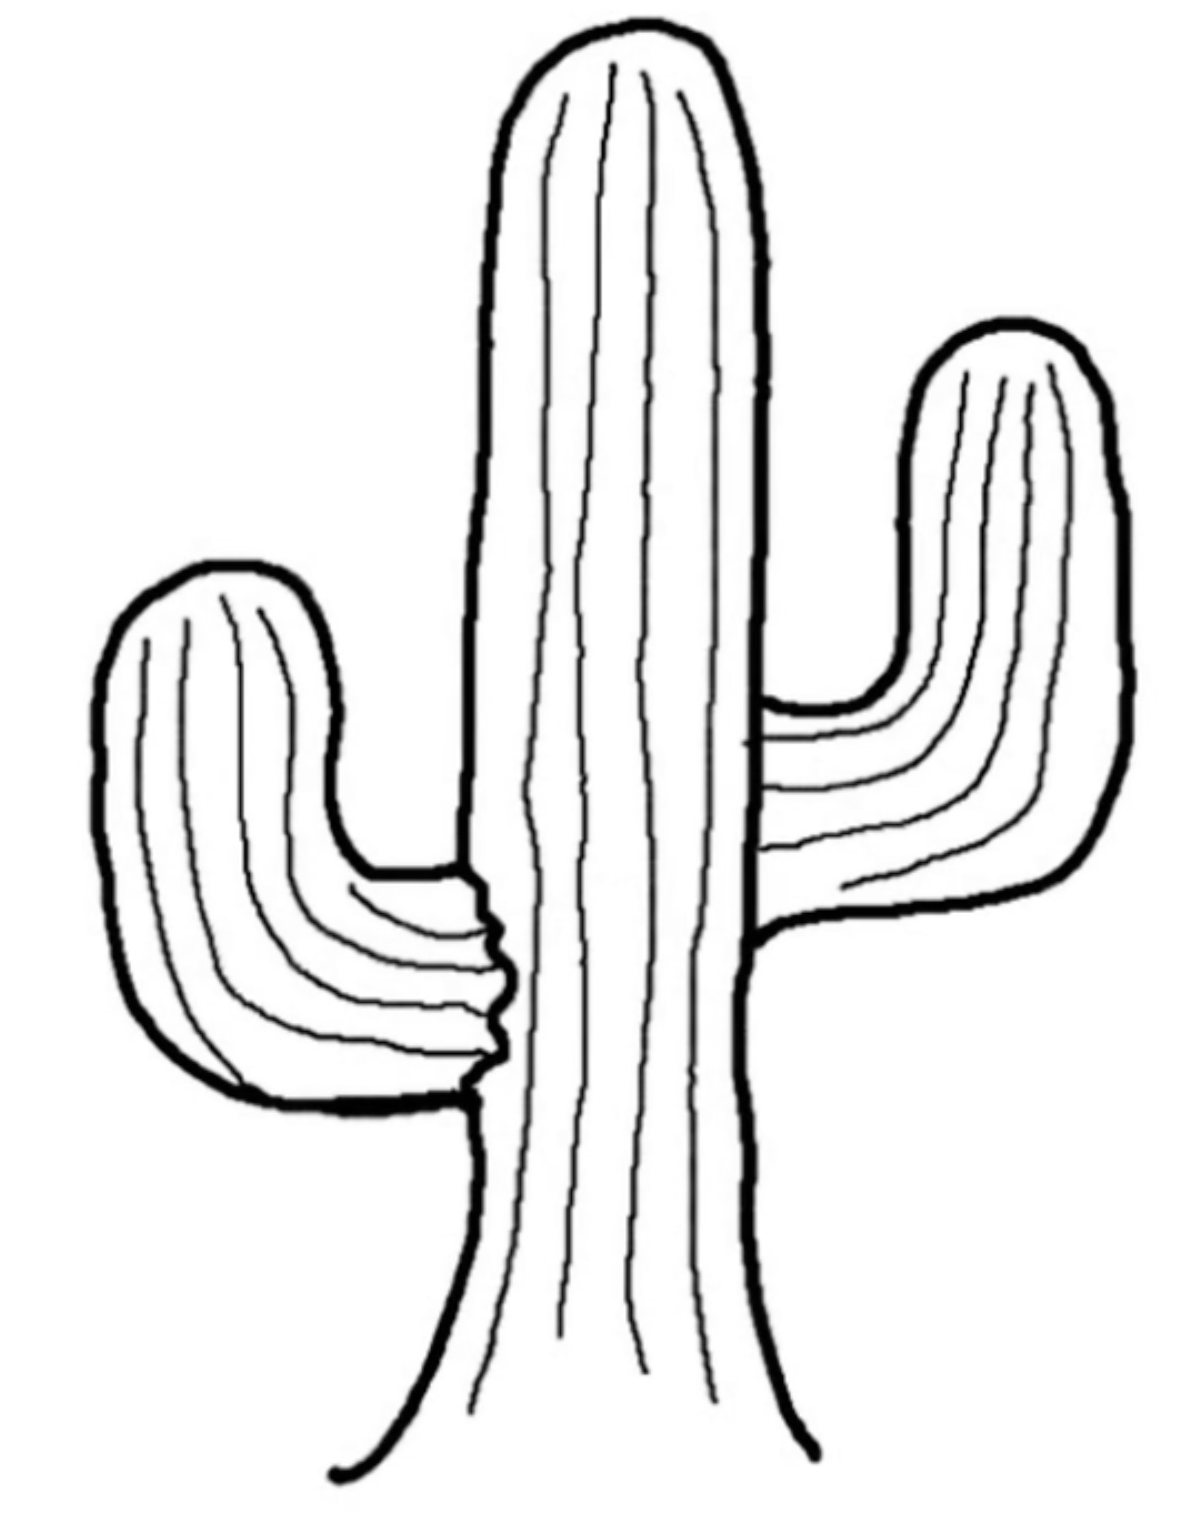
So, let's draw three cacti in pots with a pencil. Each of them is an inverted pyramid with almost vertical edges. The upper part of the pot must be depicted as an elongated rectangle. Then draw three cacti. The first is in the form of a set of strongly elongated oval-shaped objects standing side by side. The second is in the form of a zucchini, adding processes to it that look like ovals, bent up. The third is in the form of a semicircle, inside which there are vertical grooves. At its top, simple oval lines indicate the contours of the flower.
Color the entire drawing. This can be done using watercolors or colored pencils. When working with watercolor, you need to be careful when painting the edges, as this paint can spread.

With a little imagination and using the method described above, you can get these drawings.

Draw with a pencil
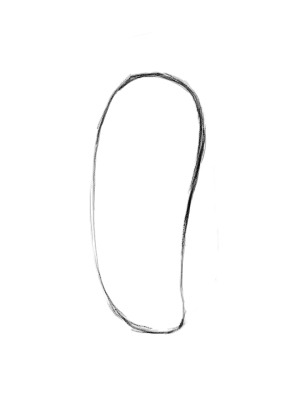
We continue to learn how to draw a cactus with a pencil.
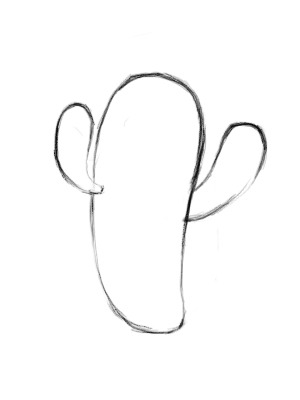
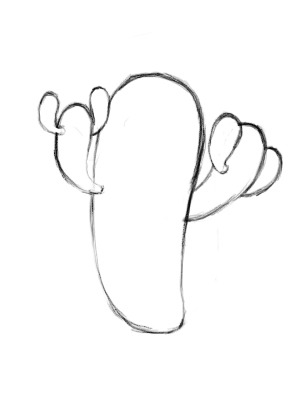
In the center of the sheet, draw with a pencil something between a rectangle and an oval. On the sides of it are drop-shaped processes, each of which has a couple of small processes.
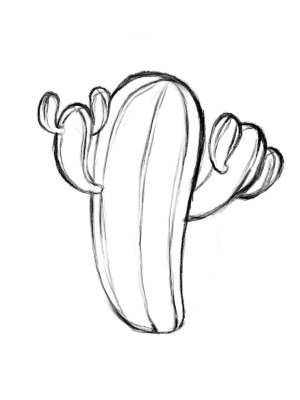
Draw vertical lines throughout the flower. With small frequent strokes, mark the spines on the trunk and processes.
Color the drawing. Give the plant volume with dark green and light green, and barely mark the soil at the base with light brown shades.
Draw step by step
Let's see how to draw a cactus step by step. This instruction will help you see the simplicity of painting when the process is divided into simple step-by-step actions.
Stage 1
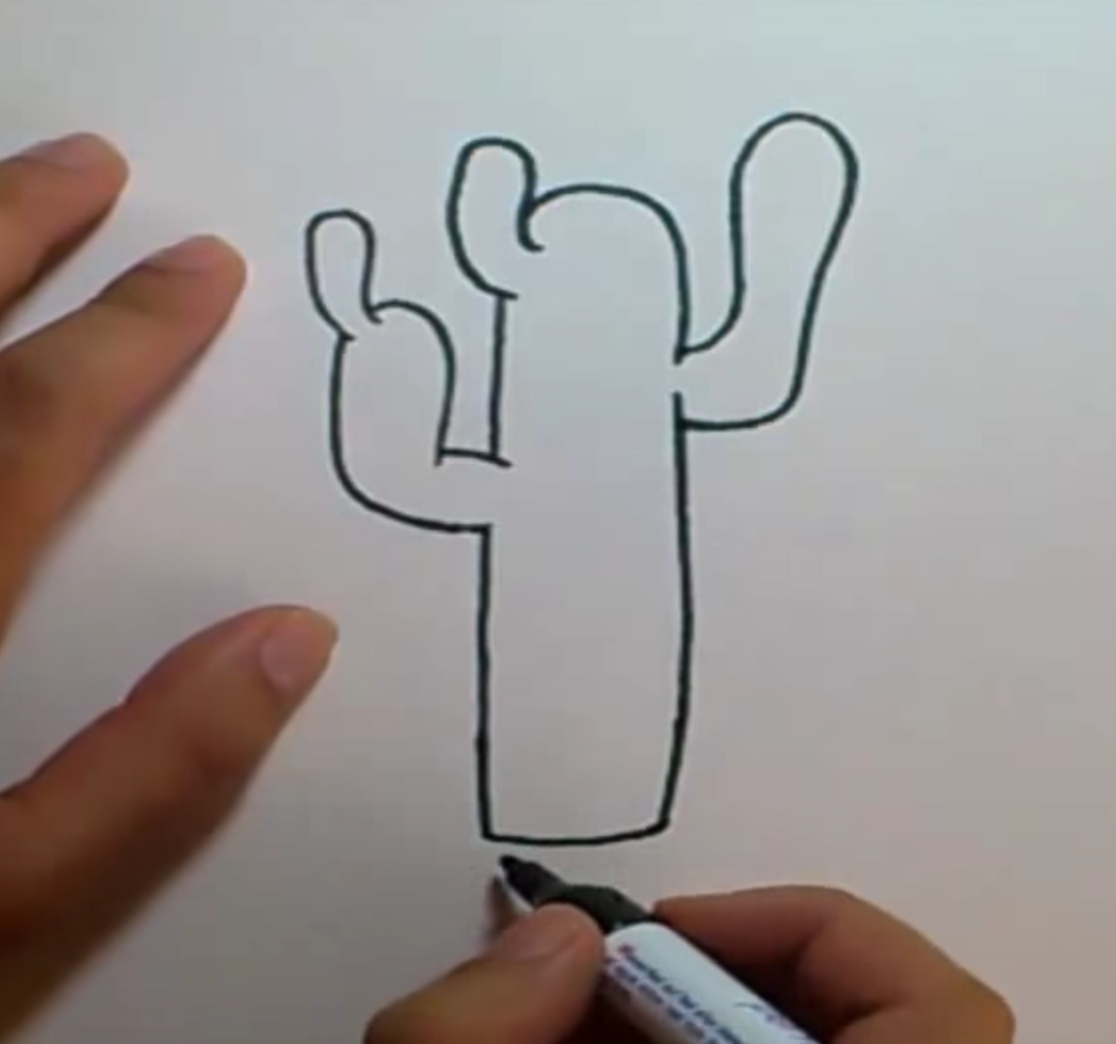
We draw a trunk. Draw lines from the bottom edge of the sheet vertically upwards, expand it in a semicircle at the top and continue it down - you get something cigar-shaped. With the same lines we depict L-shaped processes.

Stage 2
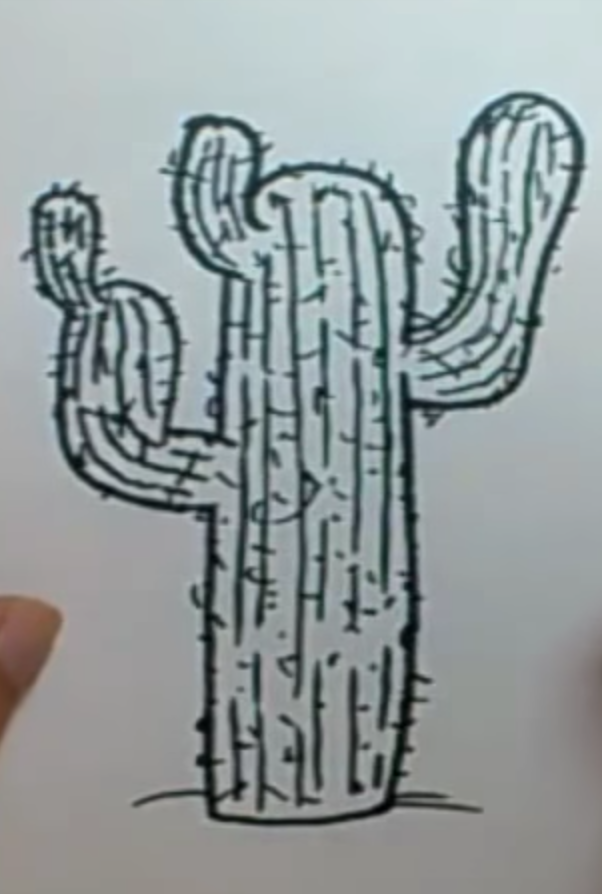
We make the image three-dimensional, for this we draw horizontal grooves in the body.
Stage 3
And finally, thorns. We draw them with frequent short strokes along the contour of the flower and in the form of small dots inside the image.

blooming cactus
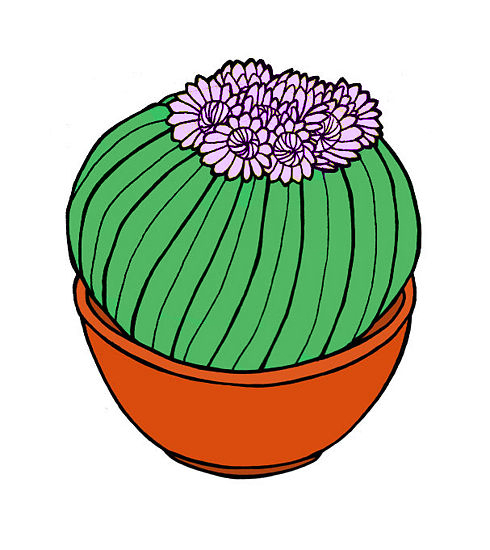
How to draw a blooming cactus? In the same way as usual, only you need to remember to paint on a flower.
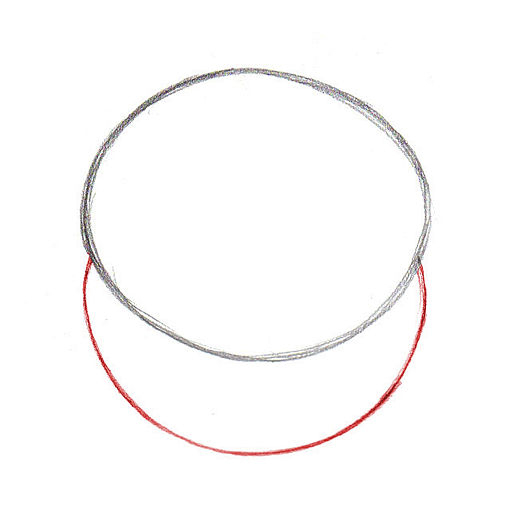
Draw a circle in the middle of the sheet, and a semicircle below it. After that, additional lines in a semicircle - this will give it volume, and as a result you will get a pot.
![]()
Flowers are depicted at the top of the circle. They consist of circles, inside of which lines stretch to the center, and sheets in the form of arbitrary rectangles with rounded edges. Please note that some of the flowers are not fully depicted, as they are covered by flowers in the foreground.

Color the pot brown, the cactus green, and the flowers purple.

giant cactus
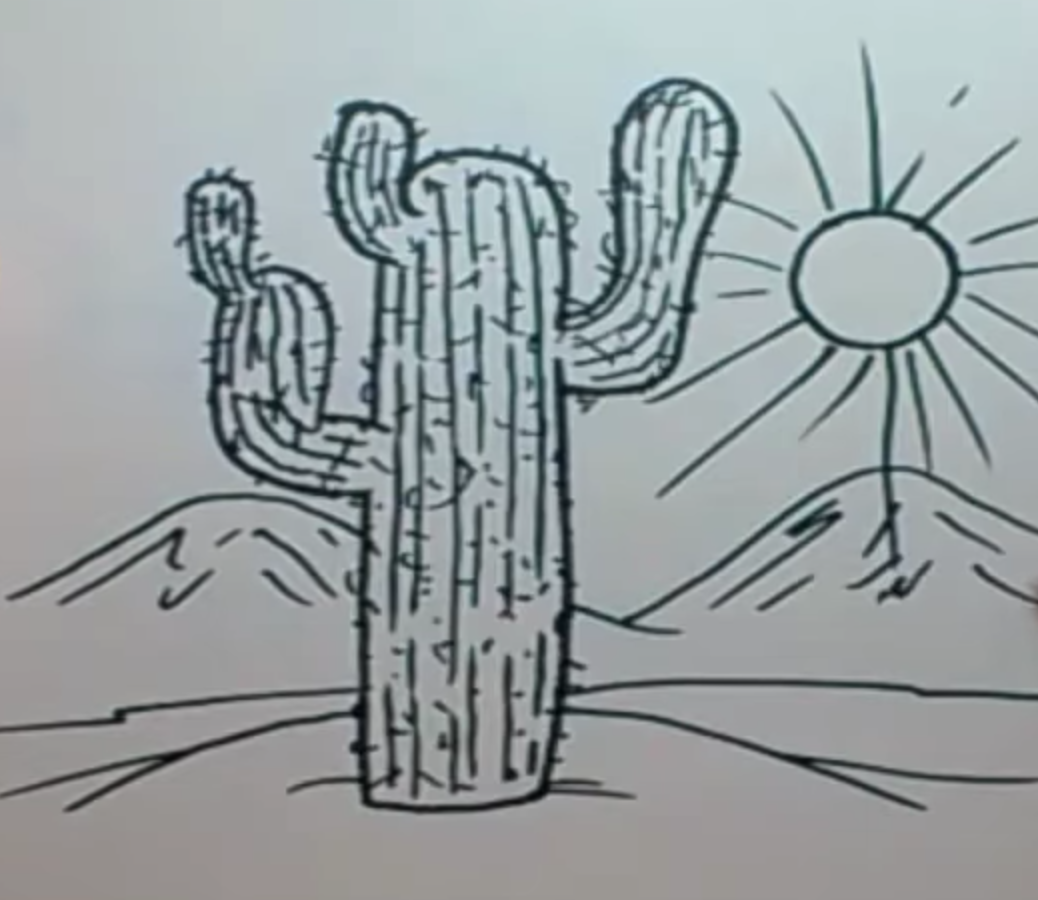
Also, we suggest you draw a giant cactus in the desert.
An unusual example
Well, at the end of our article, we suggest you take a look at a very unusual example. Instead of the usual green shades, the plant received a cosmic color.
We advise you to read
 Healthy eating scenario "Vitamins visiting children
 How to quickly and easily wake up in the morning - easy and effective tips
 Psychological characteristics of children in adolescence
 Transferring a child to another school - the procedure and necessary documents Whether to transfer a child to another school