It's no secret that the so-called water meters allow not only to control the flow of water, but also to pay exclusively for the consumed natural resources. The actual savings of the family budget are noticeable already after a month of operation of the water meter - as a rule, the payment for tap water is reduced by two or even three times. The profitability of these devices is obvious, so installing them in your apartment is only a matter of time.
Do you want to bring this hour closer and save today? Then read further this article and study the question of how to install water meters with your own hands.
Vodokanal requirements for the installation of water meters
Oddly enough, but the water utility puts forward only three basic requirements for the installation of water meters.
Firstly, it is the presence of protection of meters from mechanical damage by large and small debris, which is in abundance in tap water. In order to prevent foreign particles from getting inside the meter and, thereby, to protect it from premature failure, a coarse filter must be installed in front of the water meter. You need to put it in your own interests - most modern plumbing fixtures also need such protection.
Secondly, the installation of water meters in an apartment, in order to avoid unwinding them by some irresponsible individuals, must be accompanied by the installation of a so-called check valve. It is installed immediately after the counter and does not allow some craftsmen to let the air flow against the movement of water through the counter and release it through the filter. At one time there were many such precedents.
Thirdly, this is the sealing of counters. Immediately after their installation, an application is submitted to the local water utility, whose specialists perform sealing. Along the way, they also check how correctly the water meter installation scheme was followed in your case.
How to install a water meter with your own hands
Self-installation of water meters, as a rule, is combined with full or partial - it is almost impossible to embed water meters into an existing water supply system made of metal pipes without special tools.
First you need to correctly determine the installation location of the water meter. Usually it is located on the pipes that drain water from the riser. But this is not important - by and large, the counters can be moved to any place in the apartment. Another thing, is it necessary? Yes, and it’s easier to install them directly on the pipes immediately after the shut-off taps - in this case, you don’t even have to turn off and deprive all residents of the water supply entrance.
But if the faucet is old and needs to be replaced, then shutdown is indispensable. To do this, call a plumber and turn off the water supply. After that, we boldly dismantle the entire water supply system or part of it, unscrew the old valve and install a brand new ball valve in its place, which has an internal thread on one side and an external thread on the other. Please note that a tap marked DN15 is used for cold water, and DN25 for hot water. At first glance, there is no difference between them, but if you look, it will be found in the materials used in their manufacture - on hot water, a tap marked DN15 will not last very long.
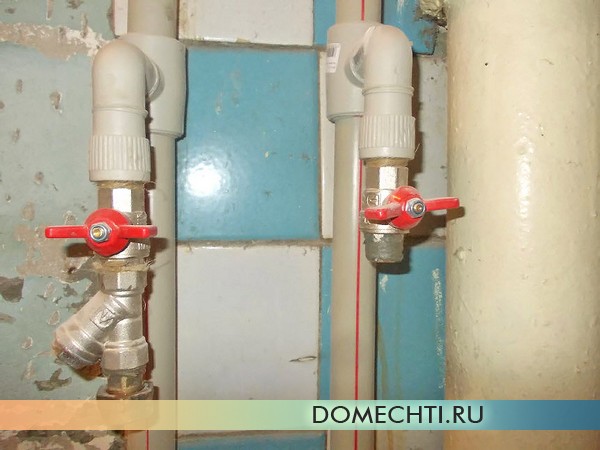
We go further and screw a coarse filter onto the external thread of the tap. Pay attention to the arrow on this product - it indicates the direction of water flow. The filter must be installed in accordance with this arrow - the tip from the tap. This is exactly what the correct installation of water meters requires. To seal threaded connections, either tow, or FUM tape, or a special thread is used. The seal is wound in a clockwise direction.
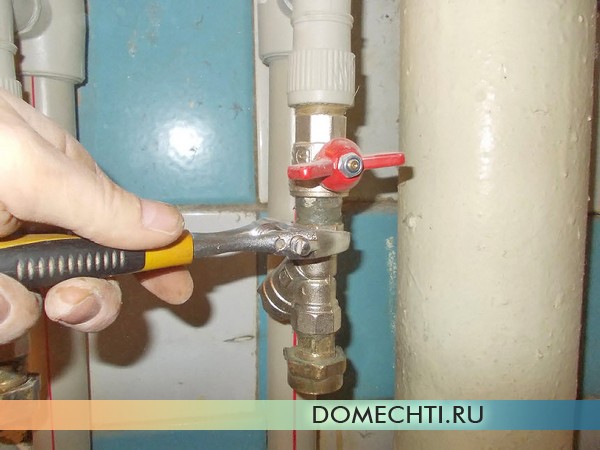
Self-installation of water meters
Following the filter, a pipe with a union nut is installed - as a rule, two of these products come with the meter. Like the filter, the spigot with union nut is installed using tow.
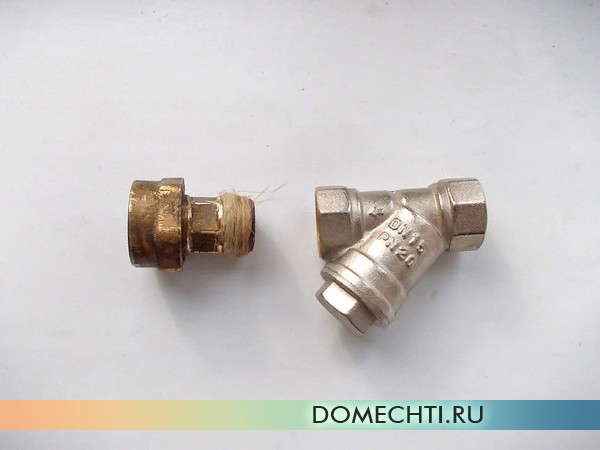
Water meter installation technology
Further, by means of a union nut and a rubber or paranitic gasket, a counter is attached to the already assembled fitting design. As in the case of the filter, it has an arrow indicating the direction of water movement.
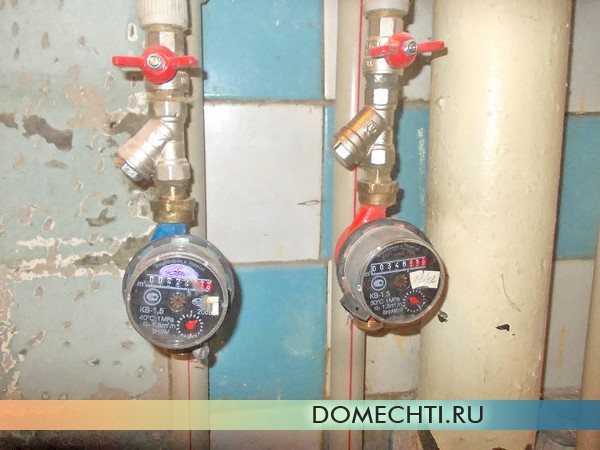
Now we pick up the second pipe with a union nut and connect it to the check valve. The valve also has a certain direction of installation - when screwing it with the union nut, pay attention to the fact that the arrow points away from the nut.
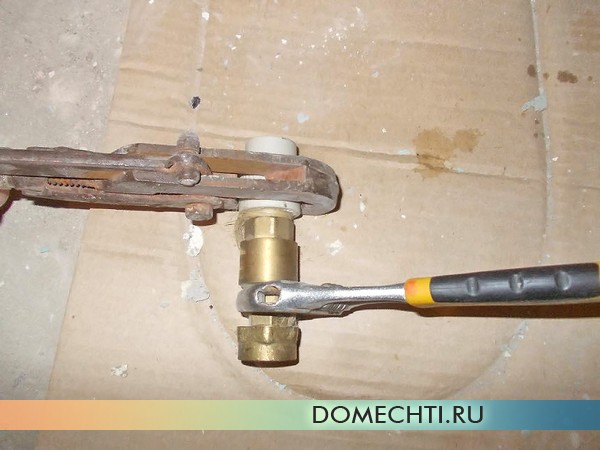
In order to save money on paying utilities, and in accordance with the law, many hurried to install water meters on the territory of their living space. At the same time, many used the services of employees of the housing office or specialized companies. And more than half of the consumers of cold and hot water prepared to install the devices themselves. Therefore, the water meter installation scheme is so interesting to our readers.
Important: if there are doubts about the legality of self-installation of a water meter, then you should know that the law clearly states that the purchase and connection of a water meter is made at the expense of the consumer and his forces. That is, there is no specific regulated ban on independent work. And, as you know, what is not forbidden is allowed.
Types of meters for an apartment
If you decide on your own to equip an apartment with water meters, then, for sure, at first you asked yourself which type of equipment to purchase. On the modern market a large variety of water meters from electromagnetic to the simplest vane meters are presented.
Electronic counter - a problem with constant values. Since electronics tend to fail quickly, and at the same time, electronic water meters are practically not subject to repair. The same applies to expensive ultrasonic devices.
To connect a water meter in an apartment, it is better to purchase the simplest vane mechanism. Such a device has been tested in operation for years, undergoes mandatory certification and requires verification every six years (for cold water) and every four years (for hot water).
Important: for each water supply system, you need to purchase a “own” meter, enclosed in a case of a certain color or having a belt of a certain color. So, for cold water - Blue colour, for hot - red, respectively.
It is important to check the device for completeness when buying. As a rule, a complete kit should contain the water meter itself, a check valve, a coarse strainer and gaskets for it. It's just that sometimes unscrupulous sellers try to sell goods in a fragmented form. A shut-off valve may or may not be included. If there is one, then you should pay attention to the material of its manufacture. The silumin crane does not fit at all. Such an element will completely fail in the near future. It is better if the stopcock is brass or metal-plastic. In this case, it is advisable to buy a lever mechanism or a butterfly crane. Valve has long been out of use due to its "aging".
Important: so that there are no disputes at the time of installation of the equipment or its poor quality, it is better to buy a water meter at specialized points of sale and only with a receipt. At the same time, it is important to check the serial numbers of the water meter itself on the body and the indicated numerical values in the passport for the device.
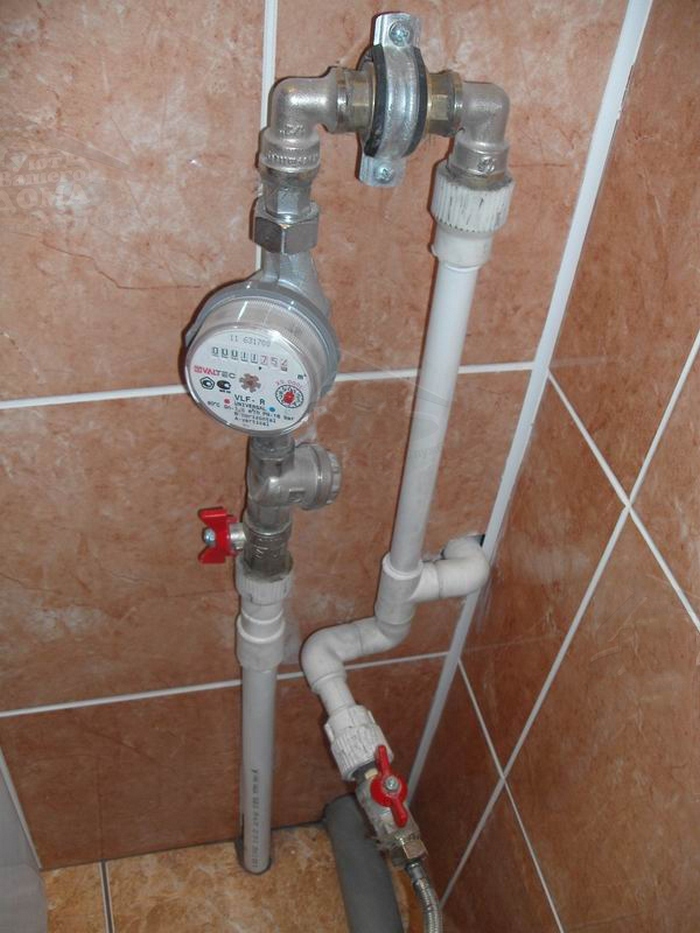
The installation and connection of the water meter must be carried out in accordance with the rules regulated by the water utility. That is, the place for mounting the accounting device in the bathroom should be chosen thoughtfully, and not according to the principle “I mount it where it is convenient”.
- So, the rules state that the connection of the metering device should be carried out as close as possible to the branch pipe of the pipe entering the apartment. In this case, a specific place in the rules is not indicated. But the installation and connection of the water metering device must be carried out in a place in the pipeline where unauthorized entry will be technically impossible. That is, the inspector should not have doubts about your decency as a consumer.
- The situation is a little more complicated with connecting a water meter in a private house. Here, the water meter should be installed exclusively no further than 20 cm from the beginning of the incoming pipe to the house from the central water supply.
- It happens that in the apartment in which the installation of the water meter will be carried out, there is a fire drain. In this case, it is necessary to invite fire service employees to install a special valve on the bypass pipe. Subsequently, the valve will be sealed together with the meter. But often firefighters are in no hurry on call, so you can install such a valve yourself.
- If the apartment has a two-pipe hot water supply system, then the owners of such communication will have to purchase a bypass valve to connect the meter. If it is not installed, then the water will circulate through the pipe constantly, which means that the meter will constantly wind, even if the water is not consumed.
Important: you do not need to take permission from the fire service to install such an element.
- It is also worth remembering that when installing a water meter in an apartment, the temperature in the room should be at least +5 degrees Celsius.
Meter mounting scheme
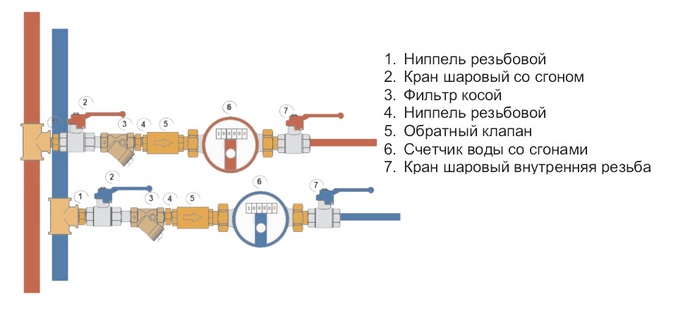
In order to install a water meter for cold water and hot water in an apartment, you will first have to understand the principle of operation of the entire counting system. And the components of communication will be:
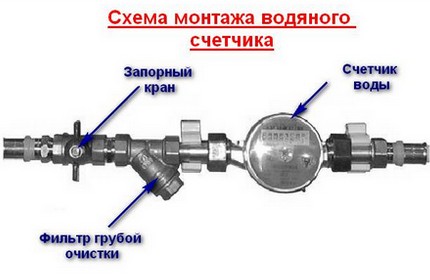
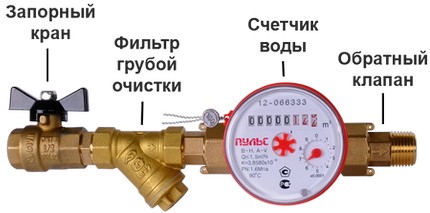
- Shut-off valve. Such an element is installed in front of the meter and allows you to shut off the water supply to the apartment in case of need for repair work. It is best to purchase a simple lever faucet or butterfly faucet. But it is always worth remembering that this type of faucet cannot be kept in a half-closed or half-open state. From such treatment, the crane will quickly fail. If there is a goal to supply water to the apartment in an economical mode, then it is better to install a valve shut-off valve.
- Coarse filter (oblique). This element additionally protects the water meter from getting into it small debris, possibly sand or rust. These inclusions are collected in the filter nozzle. Install the filter element only with the nozzle down. This will make it easier to collect small debris in the compartment.
- Water meter. It is mounted behind the filter with the dial up. Moreover, on both horizontal and vertical water pipes, the dial should be clearly visible.
- Check valve. Prevents the reverse flow of water and its corresponding flow through the meter. If you do not install such an element, then the water, after closing the water tap in the bathtub or sink, will drain back through the pipe, thereby forcing the meter to wind up extra liters and cubes of water consumed.
Important: in the event that the incoming pipe in the apartment is vertical and the water is supplied in height from the bottom up, then the check valve is mounted with a deviation from standard scheme. In this case, it is installed behind the stopcock, but in front of the metering device.
Thus, water enters the water intake pipe and continues its movement in a given direction. Debris particles settle in the filter element, and water passes through the water meter and then into the faucet or toilet bowl. After the tap is closed, the water stops its movement completely thanks to the check valve.
We connect the counter with our own hands
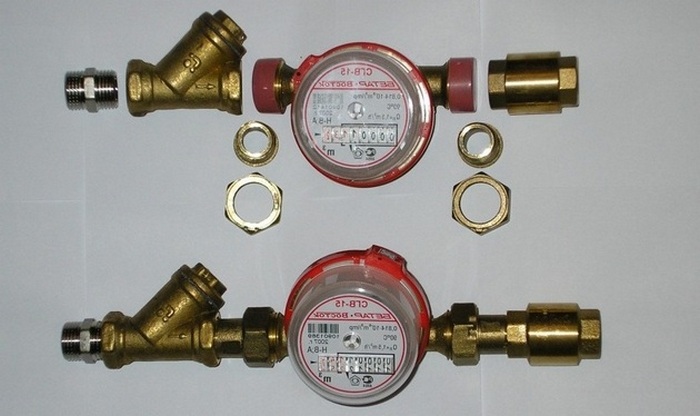
Before you mount the meter, you first need to assemble all the elements into a single design. This will allow you to measure the length of the entire structure in order to cut a piece of pipeline of the desired length.
So, first of all, it is necessary to lay out on the floor all the elements of the future system. And here it is important to track the direction of all the arrows on each of the elements. The order of the elements is as follows:
- Stopcock;
- Purification filter;
- Water meter;
- Check valve.
They need to be placed along the flow of water in your plumbing system, that is, horizontally from left to right or right to left, or vertically from top to bottom or bottom to top. They should all point towards the flow of water in your system.
Important: if this is neglected, then the counter will incorrectly calculate.
To connect all the threaded sections of the structure, you need to prepare tow, union nuts with gaskets and a special plumbing paste. It is worth remembering that the sealant in this case is not suitable. It tends to coarsen and crack under loads, which in turn will lead to a violation of the sealing of the entire system.
- First we connect the stopcock to the filter. It is necessary to wind it on tow and sanitary paste so that the garbage pipe looks down. In this case, do not strongly clamp the thread, otherwise it will burst under load.
- Now you need to take the prepared union nut and, together with the gasket, mount it on the filter nozzle.
- Next, we fasten the counter to the union nut so that the dial looks up.
- After that, a check valve must be connected to the second union nut, also using tow and plumbing paste.
- It remains to connect the second branch pipe of the meter to the union nut with a check valve. Let's not forget the lining.
Important: rubber gaskets are suitable for cold water, but for hot water you need to buy special paronite gaskets.
When the whole structure is assembled and has right kind, you need to change its length. We set aside the same length on the pipeline and cut off a piece of pipe, starting from the previous shut-off valve, not forgetting to substitute a basin.
Important: before starting work, coordinate with the housing office to turn off the water in the riser for a certain period. Otherwise, you will simply flood the neighbors.
Now it remains to connect the entire system to the pipe. If the pipe is plastic, then we simply use fittings to switch from plastic to metal. If the pipe is metal and you do not plan to replace it in the near future, then it is necessary to cut the thread with the help of a lehr, and then connect the entire structure to the pipeline.
At the end of the work, do not rush to abruptly open the taps in the bathroom. It is necessary to unscrew the taps in the sink little by little to avoid water hammer or disruption of the water metering equipment. Only after the water passes through the meter and it starts to wind, you can open the taps to the full.
Sealing the meter
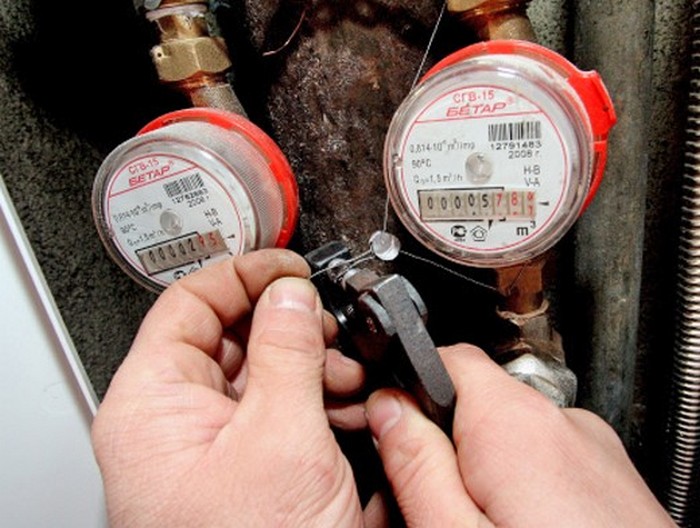
After independently connecting the water meter, you need to declare this to the representatives of the housing office or the DEZ as soon as possible and invite them for sealing. Only a sealed water meter with an act of putting it into operation is suitable for taking readings and submitting them to the water utility.
At the same time, it is worth knowing that if a representative of the organization did not appear within 15 days of your application, it is worth submitting another one. If in this case, too, the employee did not come within 15 days, the meter can be considered put into operation from the moment the first application was submitted. But for this, you must have a copy of the application with the incoming registration number affixed to it.
The cost of goods and services is constantly increasing. Installing water meters will allow you to assess the correctness of billing for payment and reduce financial costs arising from water consumption.
When it is not possible to meet a repairman, it makes sense to install water meters with your own hands. There is nothing difficult in this. It will be harder to get Required documents for the operation of the devices.
Choosing a water meter
Water meters are presented in a wide range. The problem arises in determining the best value for money. There are two groups of flowmeters:
- industrial;
- household.
The former are used where there is a high water consumption, and with large pipe diameters.
From design features water flow control devices depends on their cost. There are the following types of devices:
- Vortex. Counts the swirls of flow that occur around a specially shaped object as water passes.
- Electromagnetic. Registers the magnitude of the magnetic field.
- Ultrasonic. Captures the passage of ultrasound vibrations.
- Tachometric. It is also called mechanical, it counts the number of revolutions of a special turbine.
Mechanical water meters are the most suitable for an apartment or a private house. They have proven themselves due to their high reliability, accuracy and low cost. You can install them yourself.
It is worth considering the difference between devices temperature regime. To measure the consumption of cold water, devices with a maximum operating temperature of 40 ° C are suitable, hot - 150 ° C. The latter can be installed in a cold water supply system, but devices designed to measure cold water consumption cannot be used to measure hot water.
It is advisable to purchase devices at specialized outlets, paying attention to the passport, which should be made only by printing. The passport must be stamped by the manufacturer, the device number must match the one indicated in the passport.
Possibility of self-installation
At independent work following the installation rules will help to avoid many pitfalls. In some regions, self-installation of water meters is not allowed. Before starting the installation of the meter, it is necessary to submit an application, in response to which specifications, where the installation order, characteristics of the elements are indicated. These issues are dealt with by the management company. Sometimes the company's requirements include a list of meter models that can be installed in an apartment with your own hands.
How to install water meters? First of all, you need to master the rules for installing water meters:
- The temperature at the place where the flowmeter is to be installed must not fall below 5°C.
- It is necessary to install the meter at a minimum distance from the common pipeline on a horizontal section, while vertical installation is also allowed.
- In cottages, installation is carried out at outer wall, at a distance of 200 mm from the point where the pipeline exits. The room should have artificial and natural light.
- In some cases, installing a water meter with your own hands requires a check valve.
- After installing water meters in an apartment or a private house, they must be sealed by employees of the management company.
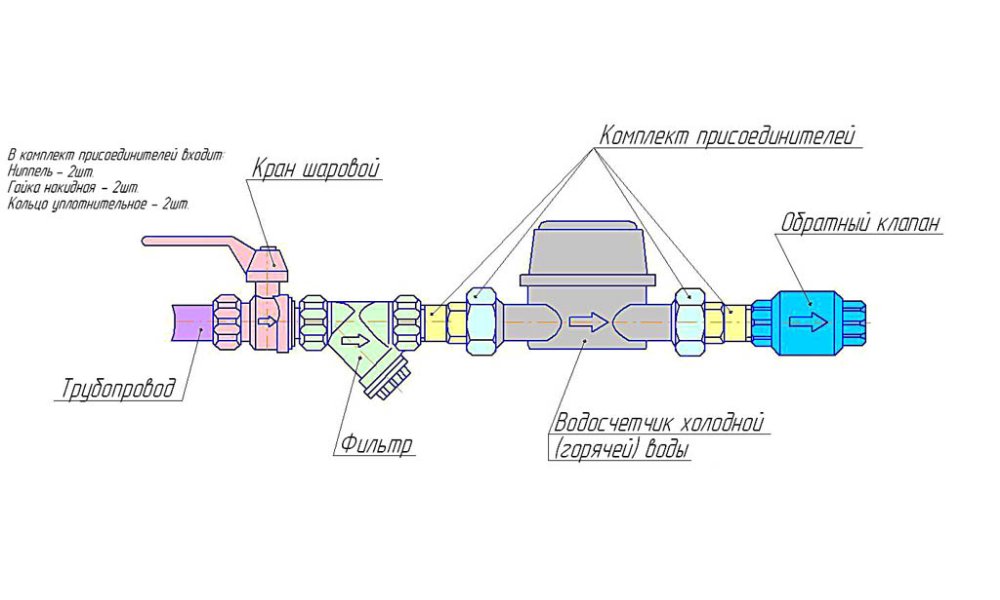
Figure 1. A typical scheme for installing a water meter.
Structural elements
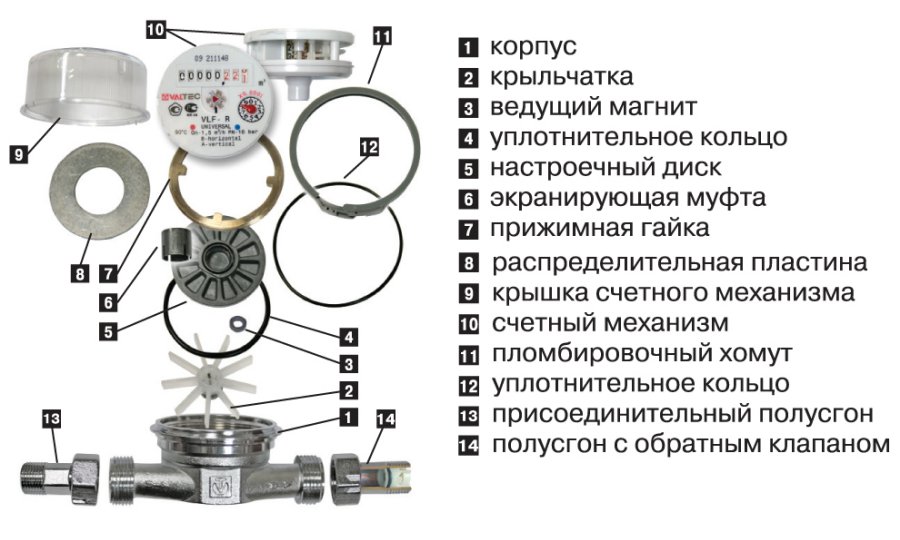
Before installing such a meter, it is necessary to mount a single unit that will crash into the water supply system. Water meter installation regulations require the use of typical scheme installation. It will help to avoid problems with the water supply system, allow the product to work for a long time, accurately account for the water spent in the apartment (Fig. 1).
The ball valve ensures that the water in the system is shut off. There should not be any outlets before it, from where water could be taken, otherwise the structure will not be allowed for operation. If partial blocking of the water flow is required, a valve type valve is needed, since the ball valve quickly fails when working in intermediate positions.
If there is poor-quality water in the pipeline, it is necessary to install a filter that will protect the meter from pollution, and it will be required for both cold and hot water meters.
Most often, an oblique filter is installed. With it, the structure can be positioned in a horizontal and vertical position. In the first case, the sump should be directed downwards, in the second - to the side, so that when cleaning the system, water does not get on the meter.
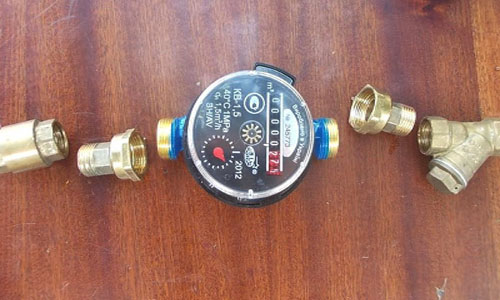
Figure 2. Assembly of the counter according to the scheme.
The presence of a check valve is one of the requirements of the water utility. Such a valve does not allow the meter to unwind cubic meters of water when the water supply is turned off, as well as when intentionally rewinding the meter readings.
Connection of parts
Before installing the meters, it is necessary to prepare a place for installation, a pipeline section in accordance with the device passport, which indicates the distance before and after the flow meter in a straight line. This is necessary for the correct functioning of the counter.
The installation diagram shows the location of the elements. It is necessary to arrange them on the surface in the same order (Fig. 2).
It is important to observe the direction of each of the elements based on the direction of the water flow. On those details where this factor is important, arrows are applied. Most often it is the meter itself and the check valve.
If the structure is assembled incorrectly, it will not work.
The installation of the counter is carried out in 2 stages. At the first, a preliminary assembly is done for each of the elements, during which the number of revolutions is calculated. This is to avoid overtightening the threads when using seals against leakage. Tow is used as a sealant. It is twisted into a thin thread and wound around a threaded connection, sometimes a special composition of sealant or plumbing paste is applied on top.
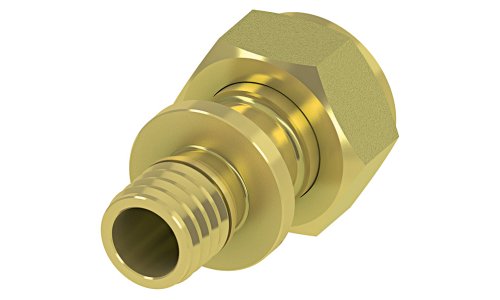
Figure 3. Union nut.
The delivery set of the meter always includes union nuts, they are also called Americans. If necessary, they can be used to disconnect the meter from the pipe (Fig. 3).
On the nut side, the seal is made with O-rings. The material for cold plumbing does not really matter, for hot it is better to use paronite. In order not to be mistaken, paronite gaskets can be used on all systems.
Pipe connection
After pre-assembly, it is necessary to install a water meter, taking into account the material of the communication system. The most difficult thing is the installation of a do-it-yourself water meter in communications, which are made of metal. In such cases, in addition to a hacksaw, you will need a lerk. This tool cuts the thread. The best place to install meters is on existing valves. If they are old, then it is advisable to change them to ball valves.
If the apartment has a water supply system made of polypropylene, then the main problem is the connection of pipes with special adapters. For this purpose, a device for soldering polypropylene is required, since this type of connection provides the highest reliability.
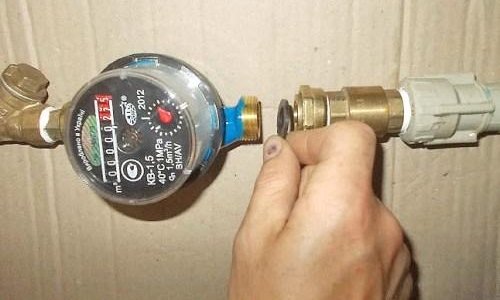
Figure 4. The process of connecting the meter to other elements of the system.
How to install counter:
- The assembled block of the counter is measured.
- The required section of pipe is cut.
- We put adapters (in the case of polypropylene), or cut the thread.
- The block is disassembled.
- The tap is fixed on one side, the filter on the other. Linen tow is used as a sealant.
- Americans connect the counter with elements screwed to the pipe (Fig. 4).
To check the quality of the installation, you need to supply water to the system. At the first start-up, it is better to increase the pressure gradually so that the sharply increased pressure does not disable the measuring device. If visual leakage is not observed, you can wrap the joints with a paper towel. If the cloth remains dry, then the water meter has been installed correctly.
For input measuring instruments In operation, it is necessary to invite an employee of the water utility to seal the flow meter and put a sign in the device passport. He must also draw up an act on the commissioning of each meter in two copies, one of which he takes for himself. From the moment of receipt of the relevant documents, it is possible to take into account the water consumption according to the readings of metering devices. At least once every 4 years, it is necessary to check the hot water meter, the cold meter - once every 6 years. A master is invited to check the meters for both hot and cold water.
Solving the problem of self-installing a water meter does not cause any particular difficulties if the approach to the issue is competent and the installation scheme is followed.
No one doubts the need to install a water meter against the background of a regular increase in tariffs. After all, with its help you can not only determine the flow natural resource but also significantly reduce the cost of paying for its use. Let's consider in the article how to independently install water meters and what rules should be observed when putting it into operation.
Installing a water meter is the first step towards rational consumption of utility resources and proper management of the family budget. Indeed, the amount indicated in the receipt will directly depend on the volume of saved cubic meters.
The widespread installation of metering devices also disciplines the workers of the water utility, not allowing them to uncontrollably write off the losses resulting from the operation of worn-out networks on the residents.
The installation of a flow meter allows not only to significantly reduce the cost item, but also to act as a disciplining moment for the reasonable use of a natural resource
As the experience of people who have already installed water meters with their own hands shows, connecting a water meter makes it possible to save up to 30% on payment costs, provided that the number of residents corresponds to the number of residents registered in the house. The accepted norms of water consumption do not correspond to the volumes of liquid consumed in real life.
The installation of a metering device will also help to significantly reduce water costs in the case when the number of residents in the apartment does not correspond to the number registered in this living space. For example, if two households live in it, and five people are registered, then the fee will be calculated from the “average” monthly consumption for each registered family member.

Unprofitable installation individual device accounting only if the apartment is actually home to more people than prescribed
Some owners in apartment buildings with centralized water supply do not want to install metering devices specifically for hot water. And the reason for this is that many are close to the situation when, in the early morning or late evening, by opening a tap with hot water, you have to grind off the cooled liquid for several minutes in anticipation of a hot stream.
In this case, if you install a flow meter for hot water, in addition to the time spent waiting for hot water, you will also have to overpay for cold water flowing from the tap at hot rates.
Therefore, if you are systematically faced with the need to grind off water for a long time, think about whether it is worth putting a water meter on it. Maybe it’s enough to limit ourselves to a metering device for a pipe with cold water.
Self-installation: legal aspect
The legislation does not provide for categorical prohibitions on the manifestation of such independence. The main thing is to be guided by common sense and comply with regulatory requirements during installation.
But in most cases, they are connected by specialized organizations that have the appropriate permit to perform this type of work.
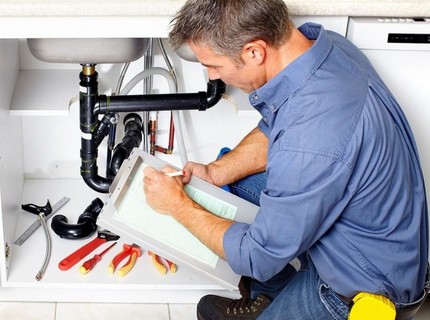
Licensed organizations carry out the installation of metering devices, strictly observing the requirements and order of input installed appliances accounting in operation
If the services of specialized companies are imposed on you, know that this is illegal. You can do the insertion procedure into an equipped plumbing system on your own.
When installing equipment, it is worth considering a number of points:
- Purchase devices only from licensed companies. The device must be accompanied by a technical data sheet.
- Installation of equipment involves shutting off the water supply along the riser, which is quite problematic to do on your own.
- When installing and connecting the device, it is important to follow the water meter connection diagram and strictly follow the technology. Otherwise, if the pipeline breaks, all losses will have to be reimbursed from your wallet.
In order for the readings of a self-installed water meter to be accepted when calculating utility bills, it is necessary that they be sealed and put on the balance sheet of the local branch of Vodokanal.
Registration and registration
Before you put water meters in your bathroom, you need to contact the local water utility in order to get your hands on the technical requirements for the water meter. This is done by the department for coordinating projects on water metering.
Having received permission, you can safely buy a meter. When purchasing a product, make sure of two parameters:
- The serial number on the water meter must match what is indicated in the passport.
- On the seal, the device must have an imprint of the State Standard.
- The date of the factory check must be recorded in the passport for the device.
At the time of purchase of the goods, the seller must stamp the store and indicate the date of sale.
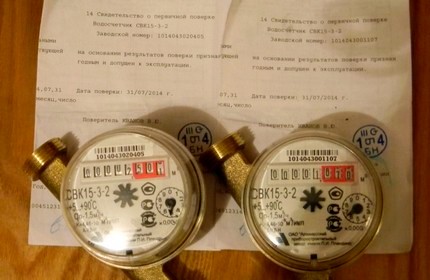
Most the best option- if the interval between the date of the factory check of the meter and its sale is not too long
The purchased device must be checked by contacting one of the organizations listed below:
- department of the ZhEK;
- water utility management;
- private licensed firm.
To carry out the test, the device is handed over together with technical passport. Upon completion of the procedure, the stamp of the inspection organization will be entered in the passport and all relevant fields will be filled in. In parallel with this, a date for the sealing will be set.
Keep in mind that it is forbidden to damage the KIP seal, otherwise it will simply not be accepted in the water utility. If you accidentally damaged the factory seal, then the department can still accept the device. But, if there is no KIP seal, then the meter data is considered invalid.
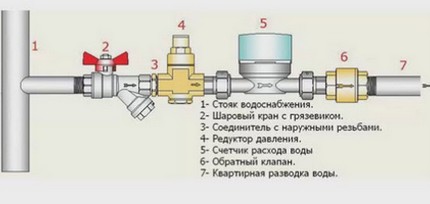
For self-insertion of the water meter, the housing office will provide a drawing and the necessary technical conditions, which will certainly be required during installation
In the equipment connection plan, the sequence of installation of parts will be clearly described. There is nothing difficult in this. Traditionally, the “garland” looks like this: the shut-off valve comes first, after it is a collapsible filter, followed by the water meter itself and the check valve completes the “chain”.
Installing a water meter yourself
In advance, on the day when the water meter is supposed to be inserted, it is necessary to write a statement to the organization serving your home in order to call a plumber to temporarily shut off the water supply in the riser.
Choosing a place for accommodation
When choosing a place for installation, it is necessary to assess the current condition of the pipelines and determine whether there is wiring from the risers. Metering devices can be placed both in a horizontal and vertical position. The task of the master is to provide free access to inspect the device.
The counter is placed as close as possible to the place where the line enters the bathroom. For private houses, this parameter is 20 cm from the exit point of the pipeline.
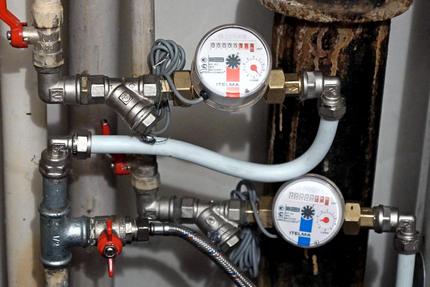
In most cases, meters are mounted on pipes that drain water from a common riser, trying to place them immediately after the shut-off valves
Most often, the device is placed near the toilet or under the sink. The distance of the straight section, which must be set aside before inserting the device, is written in the meter's data sheet.
According to the requirements for the installation of metering devices, if the valves are old, they must be replaced with more reliable ball valves. For hot water pipelines, ball valves marking DN25 are used, and for cold water - DN15.
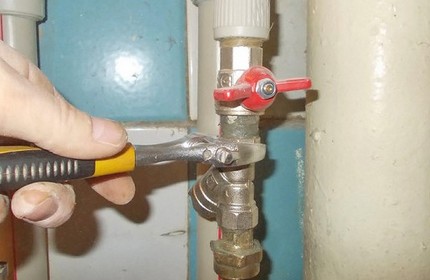
The ball valve is equipped with an internal thread on one side and an external thread on the other; it is used for screwing on a coarse filter
For installation, it is better to use high-quality valves from trusted manufacturers that are able to withstand operating temperatures reaching 100 ° C and above and high operating pressures.
Acquisition of necessary accessories
The number of water meters is calculated based on the number of risers located in the apartment.
To simplify the task of inserting a meter according to the scheme, you should clearly understand the purpose of each node of the system:
- The shut-off valve is the "advanced" intra-apartment pipeline. For overlapping polypropylene pipes embed plastic taps, for metal and metal-plastic - brass models.
- Cleaning filter - protects the equipment from large suspensions and therefore needs periodic washing. Available in two versions: straight and oblique.
- Non-return valve - prevents the device from rewinding back in the event of a sudden stop in the water supply.
The ball valve can only be in two positions: open / closed.
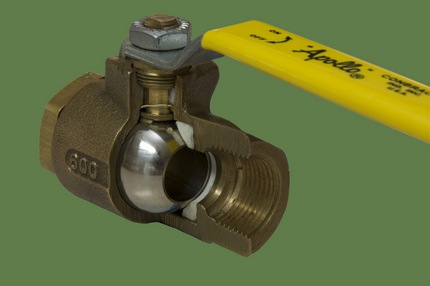
The half-open position of the ball valve, regardless of the type of its execution, is the right way to a quick failure of the locking mechanism
The presence of a check valve immediately after the meter is a prerequisite for connecting a water meter. The placement of this device immediately after the counter prevents the possibility of starting an air flow against the movement of water, which is often used by some unscrupulous "craftsmen" when unwinding the device.
Water utility inspectors always check the presence of this valve and without it they never allow the device to be put into operation.
From the tools for the work you will need:
- Bulgarian;
- soldering iron;
- scissors or hacksaw;
- gas and adjustable wrench;
- FUM tape or tow;
- corners and sgons;
- couplings (for changing to another size).
Spurs and corners will be needed to connect the device to the water pipe. If desired, they can be replaced with flexible hoses made of rubber or rubber, the outer walls of which are covered with an aluminum or nylon braid.
Complete with a flow meter should be "American" and sealing rings.
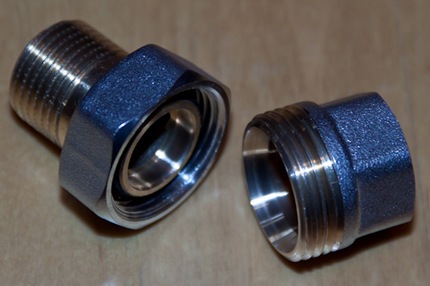
"American" is a connecting fitting equipped with a union nut, the main purpose of which is to remove the device without harm to the elements of the plumbing system
When planning to embed a hot water meter, you will additionally need to purchase paranitic gaskets, and if the water meter is for cold water, rubber seals. Tow and FUM tape will help to ensure the tightness of the American connections with the check valve.
Installation and connection of the water meter
The easiest way is to install a water meter on a water supply system made of metal-plastic or polypropylene pipes. The polymer is easily cut with special scissors, the upper part of which is equipped with a sharp knife, and the lower part is equipped with a pipe holder.
The connection of the elements of the pipeline, made of polymeric material, is carried out by means of a soldering iron, the technology of which is quite simple.
When dealing with a water supply system made of metal pipes, it is rather problematic to embed water meters without using special tools. Therefore, independent connection of metering devices to metal pipes in most cases, it is combined with the complete or partial replacement of the intra-apartment pipeline.
All parts of the plumbing structure are connected in accordance with the diagram attached to the product and the drawing received from the Housing Office
To simplify the assembly process, first lay out the elements of the "garland" on a flat surface in the sequence in which you will connect them. And in order to correctly calculate the number of turns, perform a “dry” connection. To do this, screw the filter onto the tap, counting the turns in parallel. Traditionally, there are no more than five.
When performing a “dry” connection, pay attention to which of the turns the sump is in the bottom position. After that, unscrew the connection, and wrap the sealant on the grooves of the stopcock filter filter.
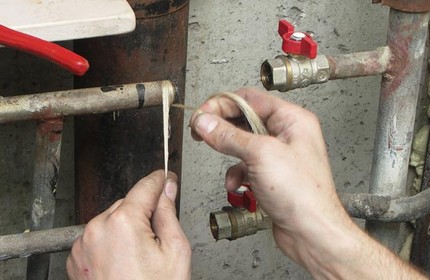
The threaded grooves are wrapped with a sealant, trying to drown it into the coils as much as possible, then covered with a thin layer of plumbing paste, and a stopcock is screwed on top
When tightening the stopcock, the main thing is not to overdo it, otherwise the connection may simply burst.
When assembled, the design will look like this: the stopcock switch, the filter sump and the meter dial “look” up, and the impeller down. Having measured the length of the resulting "garland", they measure the same distance to the worker at the tie-in section into the pipeline.
Covering the plumbing apartment building should be agreed in advance with the workers of the water utility.
Installation sequence:
- The pipe, previously disconnected from the water pressure, is cut. When cutting off a section, it is better to substitute a basin, since it is likely that the water remaining in the pipe will drain a little.
- A valve or ball shut-off valve with a strainer installed on it is connected to the pipeline.
- A pre-assembled water meter block is connected to the shut-off valve with a filter, not forgetting to lay a rubber or paranitic gasket of the appropriate diameter.
- The arrow on the device is oriented in the direction from the shut-off valve embedded in the pipeline. From the side of the sharp end of the arrow imprint, an “American” is screwed to the filter, and from the side of the tail, a check valve.
- By attaching the meter to the tap, measure the exact location of the mating thread.
- Cut off excess pipe. At the end of the pipe, a thread is made and a fitting is mounted.
- A non-return valve is unscrewed from the assembled water meter and fixed to the prepared counter thread.
- After the installation is completed, the connection of the "American" with the flowmeter body is restored.
When assembling the water metering unit, carefully follow the direction of the arrows installed on each of the components. The marks of the marks in the form of arrows act as a guide, indicating the direction in which water should flow through the meter.
It is not possible to ignore the marks indicating the direction, since in this case it is impossible to guarantee the correct operation of the equipment.
If, when assembling the system, you confuse the direction of the arrows on the device case, check valve and the filter, then when checking, the worker of the water utility will not allow sealing the metering device. After all, you can only put into operation a system in which each element of the block is correctly installed.
System health check
To check the correct installation, the assembled structure is connected to the water supply. To do this, slowly open the ball valve, which cuts off the internal water supply system from the common riser. After starting the system, all threaded connections are checked for tightness and whether there is a leak.
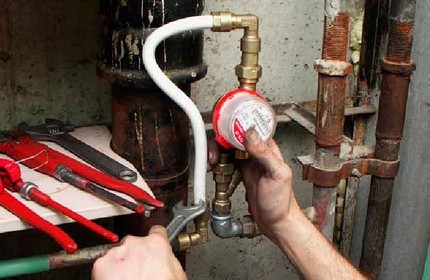
The absence of leaks at the tie-in points into the water supply system indicates that the tie-in and connection of the device were carried out successfully
If everything is in order, you just have to write an application and wait for the visit of the water utility inspector. The controller will check the correct connection, conduct a test run and see if the device works. After that, he will seal the meter with a seal and draw up an act of commissioning.
Payment according to the readings of the water meter will be charged from the month following the date the connected meter is put into operation. To do this, the owner of the apartment only needs to timely transfer the document to the DEZ.
Video: the subtleties of competent installation
Video tips of the wizard to install the device:
Video: water meter installation option:
Self-installation of the counter is a simple procedure. Its main problem is only bureaucratic ups and downs: filing applications, obtaining and approving permits. But in the future, it is only necessary to hand over the meter for verification every four years and enjoy the benefits of civilization without overpaying significant amounts.


