In some cases, the car owner has to find out why the starter turns as if the battery had run out. This unpleasant phenomenon is associated with the starting system, and it does not matter which car is gasoline or diesel. This happens on any car.
The unpleasantness is expressed in the fact that it turns out to be impossible to continue the path. Well, let's say you stopped on the road to go to the store for juice, but the car does not want to start. What are you going to do here?
ATTENTION! Found a completely simple way to reduce fuel consumption! Don't believe? An auto mechanic with 15 years of experience also did not believe until he tried it. And now he saves 35,000 rubles a year on gasoline!
Still, the modification of the car is important. For example, if the car has a manual transmission, then it can be started from the pusher. With cars with automatic transmission, this will no longer work. Be that as it may, trouble is putting it mildly.
If the battery is dead, then the starter does not turn because there is not enough current. This is clear to everyone. However, the reason for the poor performance of the starter may lie elsewhere.
starting device called starter
So, the starter performs the main task of the starting system - it ensures the start of the car engine. Today, with the help of a starter, it is possible to remotely start a car from a key fob, for example, in winter, standing on the balcony of your apartment. By the time you get down to the car, the cabin is already warming up. Thus, a modern starting device easily saves the driver from many difficult things, significantly increases the comfort of control.
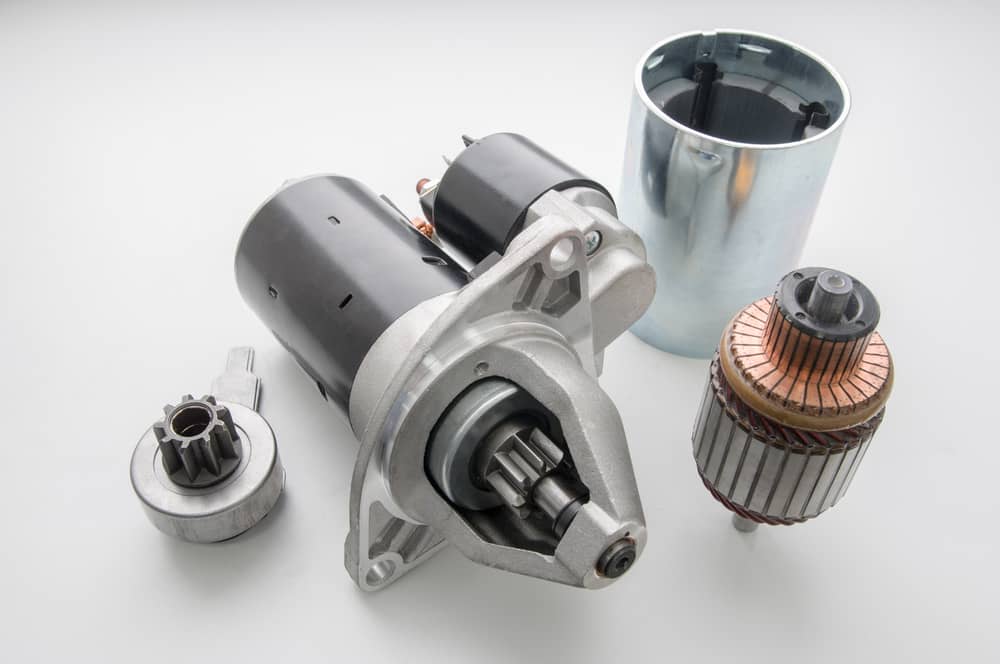
In structural terms, the starter is an electric motor that consumes energy from the battery. The starter then drives the machine's crankshaft when the device's bendix engages the flywheel.
In addition to the bendix, the starting device also includes other elements, such as a traction relay, anchor, etc. Thus, the starter will not be a full-fledged electric motor if the full and interconnected work of all elements is not established.
Starter faults
Despite the overall reliability of the starter device, in some cases, defects and malfunctions are possible due to various reasons. They may even not relate to the starter itself at all, but be caused, for example, by wiring problems, the same battery, etc.
As a rule, the following points indicate problems in the operation of the starting device:
- the armature rotates, but the crankshaft does not rotate;
- it is impossible to turn on the starter;
- the crankshaft rotates slowly;
- extraneous sounds are heard during the start of the motor.
Causes of Slow Rotation
We are interested in the moment when the starter rotates at low speed. This makes starting the internal combustion engine problematic. A priori, the reason for this behavior of the starter is related to the battery, the condition of which leaves much to be desired, but this is not about that. Assume that the battery is reliable, the acid has been replaced and the charge is present.
The cause of the slow rotation of the starter can be due to things such as oxidation of the terminals or their loose fixation. In this case, it is recommended to clean the oxides, tighten the clamps and treat the elements with a suitable lubricant. If the start does not improve, continue troubleshooting.
On many vehicles, there is easy access to the starter device and its traction relay. In this case, it will be much easier to check if the starter is working if you start it directly. In other words, the closing of the power terminals of the relay is carried out forcibly, which will make it possible to confirm the malfunction of the solenoid relay (VRS) by confident operation of the starter. Conversely, if the start fails, the starter will have to be removed and repaired.
How to dismantle, disassemble and test the starter
It is not so difficult to dismantle the starter device, but on some car models it is extremely inconvenient to remove it.
Before direct dismantling, it is recommended to test the quality of the connection of the armored wiring to the bolts of the traction relay. The heating of the connections and their subsequent deterioration can be caused by a large amount of consumed currents. Obviously, broken contacts are the reason for the slow rotation of the armature.
 If everything is in order with the power wires, you need to start dismantling.
- Disconnect the terminals from the battery.
- Loosen the nuts on the BPC terminals.
- Disconnect the wires, then take them aside.
- Remove the engine protection, if any.
- Remove the two main nuts securing the starter to the engine.
- Pull out the starter.
Disassembly of the starting device is carried out partially or completely. It depends on what kind of error is found. For example, if bearings were damaged, then dismantling is carried out until they are removed.
Here's how the disassembly is done.
- Loosen and unscrew the nut located on the lower bolt.
- The screws connecting the solenoid relay to the starter cover are unscrewed.
- With one hand you need to hold the anchor, with the other - remove the relay.
- Remove spring.
- Disengage the anchor from the lever, then remove it.
- Now you can unscrew the latches that hold the protective cover.
- Under the protection there is a retaining ring, which must be removed by prying it from below with a screwdriver.
- Unscrew the fasteners of the back cover and remove it.
- Access to the brush assembly will open, which will now be possible to remove and replace.
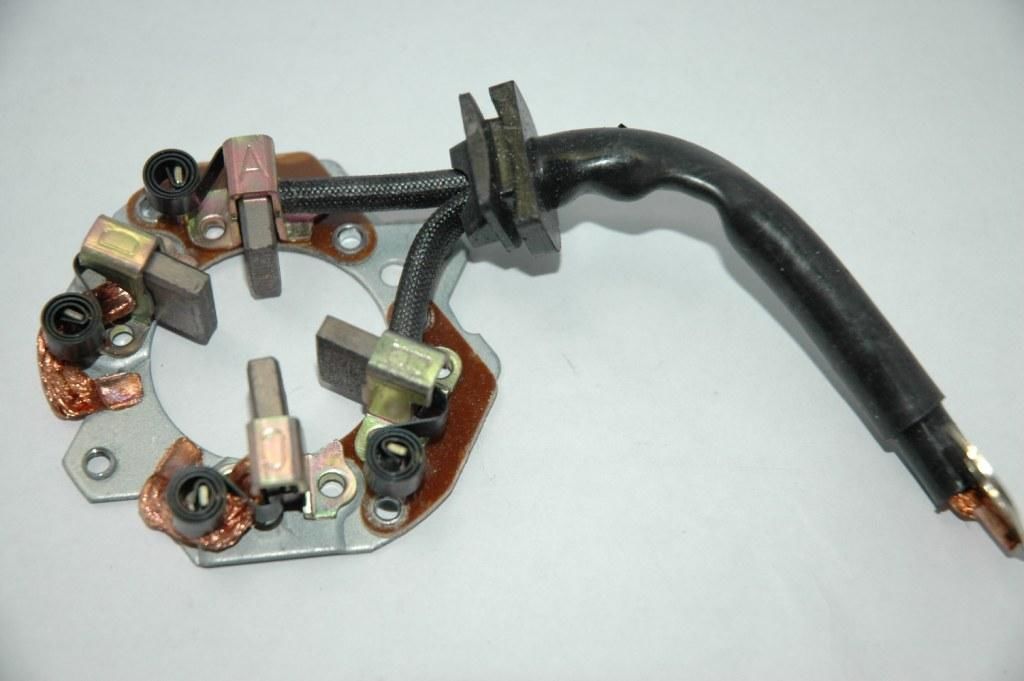
Starter brushes must be replaced in a timely manner. They are located at the back of the starter, and their connection scheme is designed in such a way that the failure of one of the components of the assembly leads to the failure of the entire device. For this reason, all brushes are replaced. To do this, unscrew their terminals, release them from the springs pressing on top, and remove them. This will allow you to easily pull out the carbon elements.
If the cause of the failure is related to other starter failures, dismantling should continue.
- Remove the washer from the starter armature.
- Disconnect the starter housing from the armature shaft (in other words, split the starter in half).
- Take off insulating tubes from tie rods.
- Unscrew the axis of the starter drive lever with a screwdriver, holding the nut with the other hand with a wrench.
- Pull the lever out of the cover.
- Then remove the anchor with the bendix.
The armature is also called the rotor. It should be carefully examined. As a rule, this assembly and the retractor relay, along with the brushes, are starter parts that fail more often than others.
Particular attention should be paid to the rotor windings. They should not have traces of burning or soot. Otherwise, the anchor must be replaced. You can, of course, rewind, but not everyone can do it with their own hands.
It is recommended to check if the armature shorts to ground. For this, a megger is used. It will also be useful to check the element for breaks where the outputs of the winding sections are connected to the collector plates.

It is also necessary to focus on the collector, on which plaque is not welcome. Yes, in small quantities it does not interfere, but if the plaque is excessive, then the engine will just be difficult to start due to the slow scrolling of the flywheel. The solution suggests itself automatically - you need to clean, sand the collector using a piece of sandpaper.
There should be no cracks or signs of wear on the drive lever.
- You need to press the bearing out using a mandrel.
- The bushing is pressed out of the front cover.
Faulty, poorly rotating bearings are replaced with new ones.
The assembly of the starting device is carried out in the reverse order. Do not forget to lubricate the working and rubbing parts of the starter with oil.
| If when you turn the ignition key, the starter does not rotate at all. | Make sure the shift lever is in the "N" or "P" position (automatic transmission) or, if equipped, the clutch pedal is depressed (manual transmission). |
| Make sure. that the battery is charged and that all wires, both on the battery terminals and on the traction relay terminals, are clean and securely fastened. | |
| If the starter turns but the engine does not turn over. | The starter freewheel is slipping and the starter needs to be replaced. |
| If, when the ignition key is turned, the starter does not rotate, and the traction relay makes a click. | The problem lies either in the battery, or in the contacts of the traction relay, or in the starter itself (or the engine has jammed). |
| If the action of the traction relay plunger is not heard when the ignition key is turned. | The battery is faulty, the ignition switch is defective, the safety wire is burned out (open circuit) or the traction relay itself is faulty. |
| If the starter is working now. | To test the traction relay, connect a jumper between the battery (+) and the traction relay enable terminal (small terminal). The traction relay is OK and the problem is in the ignition switch, starter inhibitor switch (automatic transmission models), clutch switch (some manual transmission models) and wiring. |
| If the starter still does not work. | Remove for disassembly, inspection and repair of the traction relay / starter assembly. |
| If the starter cranks the engine at an abnormally slow speed. | First of all, make sure the battery is charged and all terminals are tight. If the engine seizes or the wrong viscosity oil is used, the engine will crank slowly. |
| Warm up the engine to normal operating temperature, then disconnect the ignition coil high voltage wire from the ignition distributor cap and connect it to the housing. | |
| Connect the positive lead of the voltmeter to the positive battery terminal and the negative lead to the negative lead. | |
| Turn the engine over and take a steady reading on the voltmeter. Do not allow the starter to rotate for more than 10 seconds without interruption. A voltage of 9 V or more is normal when the starter is cranking the engine at normal speed. If the reading is 9 V or more, but the rotation speed is low, then the starter is defective or there is a problem with the battery (faulty or discharged). | |
The starter does not turn (or turns slowly, jerkily). The situation is, unfortunately, not uncommon. Where to start troubleshooting?
Of course, we check the battery first. Have you made sure that its charge is normal, but does the starter turn as if the battery is dead? There is no need to be afraid of such a malfunction, and immediately send the car to the service on a tow truck. The engine start system is not the most difficult part of the car.
Battery Starter Test
Checking a starter installed in a regular place is almost impossible. You will not be sure of the true cause of the malfunction. Therefore, it would be better to remove it. Moreover, it is not difficult to do this on any car.
Before dismantling, we check the integrity of the wiring and the cleanliness of the contacts. In some cases, banal cleaning and tightening of the terminals helps. For completeness of the experiment, check the supply wiring. The voltage at the terminals of the connecting cables must be the same as at the battery terminals.
Before you remove the entire assembly, check: Can the starter drain the battery? To do this, it is not necessary to connect an ammeter and record the leakage current.
- Disconnect power cables from starter
- Connect the multimeter to the battery, fix the voltage value (if possible, do not turn on any load: external lighting, multimedia, interior light)
- Connect the power cables to the starter. If there are no leaks, the battery voltage will not change. If the value has decreased, there is a problem in the starter circuit.
Important! Before disconnecting the cables from the starter, disconnect the battery contacts. This can only be done with the ignition off, otherwise there will be problems with the immobilizer.
The starter motor is very powerful, and the rotor has a large mass. When starting the engine, a loose housing can be pulled out of your hands. Therefore, to check, secure the knot in a vice.
If you are not familiar with the starter device, carefully study the illustration. Then it will be easier to understand the principle of operation of the node. 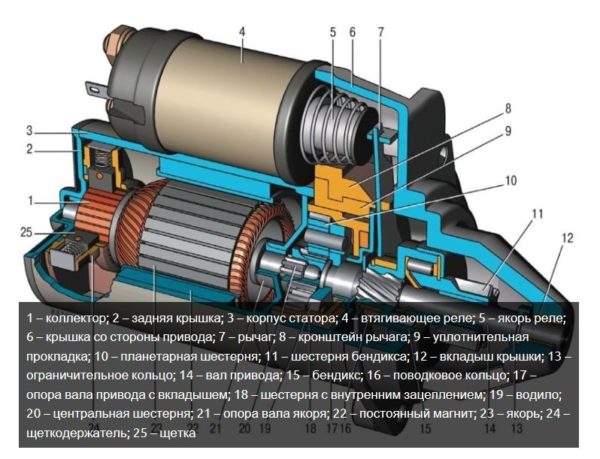
Possible causes of battery failure. Details in this video.
How to properly check the starter on the battery
As you can see in the illustration, the node consists of two separate components:
- Solenoid relay- works on the principle of clutching a manual gearbox - connects the Bendix gear to the engine flywheel to crank the crankshaft.
After a successful start, the bendix returns to the "parking" place so that the motor shaft does not rotate idly. A broken relay leads to the fact that a serviceable starter motor cannot crank the crankshaft, and the internal combustion engine does not start.
- Starter motor. Breakdowns are classic - the armature winding burned out, the collector was worn out, the brushes were worn out. The stator does not break because it is without a winding.
There are also purely mechanical failures - for example, if the starter does not turn well with a charged battery, and normal condition the electrical part, it may be due to bearings or worn gears.
And if you removed the block from the engine, carry out preventive cleaning. The presence of dirt can lead to difficulty in rotating the anchor.
Consider checking electrical components. To do this, you must directly connect the starter to the battery.
Checking the electric motor
Having securely fixed the case, we connect the negative terminal of the battery with the starter mounting eye (that is, we connect the minus with the case, ground). The cable must have a cross section of at least 6 squares.
We connect the positive terminal to the engine power cable (a short piece of wire with a terminal that is attached to the contact of the solenoid relay). 
The shaft must rotate rapidly. If the starter barely turns, we deal with the motor. Check the condition of the brushes and commutator.
The brush assembly is easily dismantled. Flexible wires should be without traces of melting, and the brushes themselves should have a margin in length. In case of visible damage, the elements must be replaced. 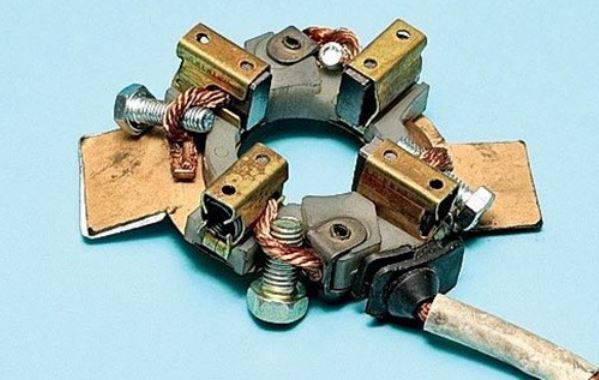
Inspection of the rotor manifold(after removing the brush assembly, it is accessible from all sides). The rotor itself must rotate freely, the copper lamellas must have uniform wear. A short circuit between the contact plates is unacceptable (checked visually and with a multimeter). 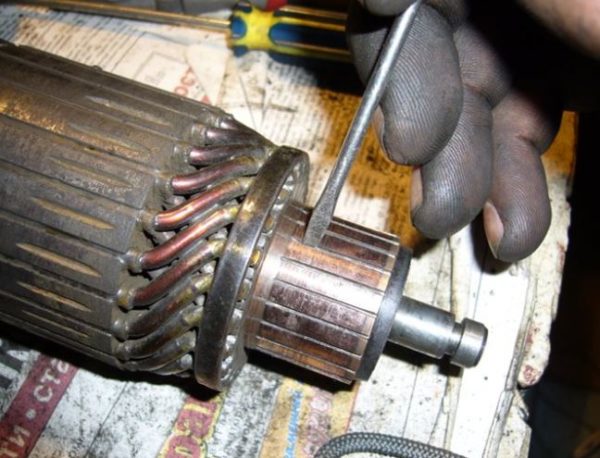
There is another test– let the engine spin for 20-30 seconds. Then evaluate the temperature of the case and check for the smell of burnt windings. The temperature should not be higher than 40-50°C.
Checking the solenoid relay
This element simultaneously closes the starter shaft with the ICE flywheel (by means of a bendix) and supplies power to the starter motor winding.
To check the solenoid relay starter from the battery, it is enough to apply a positive wire to the control terminal of the relay. It is easy to find - there is no threaded connection on the terminal, unlike power contacts. 
When 12 volts is applied, a characteristic click should sound, and the bendix gear will take up its working position.
Attention! Do not check the bendix with your fingers when applying voltage to the relay. You can get injured.
You can check the closure of the power contacts of the relay supplying voltage to the starter motor. At the time of operation, the resistance between them should be zero. If not, just clean the contacts (pyataki).
If the relay does not work- it should be replaced. This assembly is purchased separately from the starter, is inexpensive, and easy to change. Restoring a burned-out relay winding is impractical, although it is possible.
Having gained access to the “insides” of the starter, check the mechanical condition of the bendix fork and gears. Wear may be present, but no tooth distortion. The play on the fork should not interfere with the reliable engagement of the bendix gear.
After checking, the assembly is blown with compressed air, the bearings are lubricated. Contact joints are treated with a special grease for contact groups.
Important! The connection of the terminals with the battery is made only after secure fastening power cables on the starter.
How to check a starter on a battery video recommendations on the example of a VAZ 2110 car
During the operation of any vehicle various cases arise. For example, drivers are well aware of the situation when the starter is heated and turns the starter poorly with a charged battery. This makes it impossible to start the power unit normally, so it is worth analyzing possible reasons occurrence of this malfunction.
Purpose and features of the starter
This element in the starting system of the power unit is necessary for spinning the crankshaft, because without this procedure, any vehicle simply cannot start. If, for some reason, the starter stops spinning the crankshaft until it reaches the required speed, problems arise with starting the engine.
Do not confuse a non-working starter with a mechanism that turns the engine poorly, since these are two opposite states of the element. Therefore, every car owner needs to learn to distinguish between these conditions and diagnose their causes.
Before performing a device test, it is necessary to check the charge of the power source, since the correct start of the engine depends on it. If the battery is not sufficiently charged, the starter will no longer be able to spin the crankshaft.
Advice! You can check the battery different ways, the simplest of which is to measure its voltage with a voltmeter. In addition, it is also worth checking the condition of the wires that supply voltage to the terminals of the starting system, since they can also cause the element to work poorly. It is very important to determine how often this condition occurs. In case of its single occurrence, there is no cause for concern, otherwise it is recommended to install a new battery on the car.
Reasons why the starter turns slowly
Before carrying out a complete diagnosis of the starter, it is necessary to test its performance on a cold power unit and after it has warmed up. To do this, it is enough to try to start an unheated engine, then start it again, warm it up to operating temperature and turn it off, then re-test it. A properly functioning starter should start the vehicle's engine in any of these modes.
Common problems that interfere with the normal start of the motor include:
- Thick grease in the motor.
- Low power supply.
- Development of bushings or starter brushes.
- No negative contact (ground).
- Bendix failure.
- Incorrect operation of the retractor relay.
- No contact between commutator and brushes.
- The closure of the turns or their breakage.
The operation of the starter is completely dependent on the temperature of the system, so auto mechanics always recommend testing its performance, both on a warm engine and on a cold one. Let's describe this in detail.
Why does the starter turn badly when hot?
In this state of the system, the reasons for the inability to start the engine are as follows:
- development or jamming of bushings;
- problems with the crankshaft (imbalance, wear of liners, etc.).
Such problems are the result of the development of elements of the starting system of the motor unit. In addition, the situation is greatly exacerbated by high temperatures. If this is observed constantly, urgently go to the nearest car service to diagnose the system, otherwise the engine crankshaft or the unit itself may fail. The cost of repairs in this case will be high.
Why does the starter turn badly on a cold one?
In this state of the system, the malfunctions are not so significant, and are mainly associated with the effect of low temperature on the working fluids. The starter does not work well for the following reasons:
- low efficiency of the battery due to the loss of its capacity due to a decrease in temperature;
- thickening of the oil inside the engine as it starts cold.
Note that if the starter works equally poorly in both modes, the reasons for this must be sought among the most common. Often they are associated with the presence of malfunctions in the start device, or the lack of contact in the car's electrical network. It is possible to identify the causes of problems only during the diagnostics of the device.
Preventive measures that will help to significantly extend the operating period of the starting device
 Not every vehicle owner has the opportunity to constantly monitor the performance of the starter, therefore, in order to ensure the normal start-up of the power unit, it is necessary to periodically perform a small preventive maintenance of this device. Note that this will not save the part from serious damage, but it will significantly extend its operational period.
It is known that any vehicle is constantly in contact with various aggressive environments, due to which corrosion forms on its metal parts, parts and assemblies. This negatively affects the engine starter and other elements.
In order to prevent the occurrence of malfunctions caused by metal oxidation and the appearance of corrosion centers on its surface, it is necessary to periodically monitor the condition of the power wires and contacts. It is also necessary to perform the following activities:
- de-energize the car's electrical network by disconnecting the terminals from the battery;
- using sandpaper, clean the surfaces of all contacts in order to remove sources of oxidation and corrosion from them;
- treat the contacts with a special anti-corrosion compound or a common solvent after cleaning them;
- assemble the circuit, securely fixing all the contacts.
It is necessary to measure the voltage and current of the battery in the car with a multimeter and compare them with the nominal ones. Insufficient battery capacity negatively affects the performance of most vehicle systems. Do not ignore the procedure for diagnosing the condition of the wiring, engine crankshaft, and others important systems and units of the machine, since minor defects and malfunctions detected and eliminated in time will prevent repair measures that require large material and time costs.
The implementation of this small set of measures will reduce the likelihood of malfunctions in the engine starting system. It must be understood that incorrect operation and the occurrence of malfunctions of this system may be the result of problems with other units of the car.
We advise you to read
 Psychological characteristics of children in adolescence
 Transferring a child to another school - procedure and required documents Whether to transfer a child to another school
, diagnosis, treatment Treatment of urogenital chlamydia") Urogenital chlamydia - description, causes, symptoms (signs), diagnosis, treatment Treatment of urogenital chlamydia
Urogenital chlamydia - description, causes, symptoms (signs), diagnosis, treatment Treatment of urogenital chlamydia The benefits and significance of hydroamino acid threonine for the human body L threonine what

