For many, wall shelves are a favorite decor. interior decoration Houses. The original form, books with colorful covers, beautiful dishes, souvenirs - almost everything that your imagination tells you can become a stylish accent in the interior design of the room. In addition, it is not at all necessary to buy them, because it is not very difficult to make a creative shelf on the wall with your own hands, even for those who are not very strong in carpentry.
Do-it-yourself shelf in the form of honeycombs
A nice shelf made in the form of honeycombs can be a cool addition to a non-standard interior. A fashionable design is formed from hexagonal modules creating original geometric compositions. Everyone can arrange the blocks in the best way for themselves.

how to make a shelf with your own hands. Photo
Despite the non-standard appearance, hexagonal blocks are quite convenient and functional, and besides, they are the most durable and stable.
To make such a shelf with your own hands, you will need a standard set of tools and simple blanks from rectangular boards. You can assemble a structure from ready-made honeycombs in different ways:

shelf on the wall with your own hands. Photo
The second option is undoubtedly more practical, since dust will not accumulate between the individual elements.
Let's see how to make a shelf in the form of honeycombs in practice
To get the right hexagon, boards for future construction pruned at an angle of 30°.

Check again if they are the same size, proceed to assembly hexagons. Better to do it on the floor.
The block elements perfectly match one another and begin stick together boards using wood glue.

Attachment points for reliability amplify using L-shaped holders or screws. The brackets can be hidden by painting them the same color as the shelf.
Do the rest of the cells in the same way.

Finished modules carefully polished, then covered with stain and special varnish or painted. The shelf will look unusual if the honeycombs are painted in different colors.
It remains to fold the finished blocks side by side and drill one or two holes at the joints and twist them together.
Do-it-yourself shelf. Video instruction
DIY round shelf
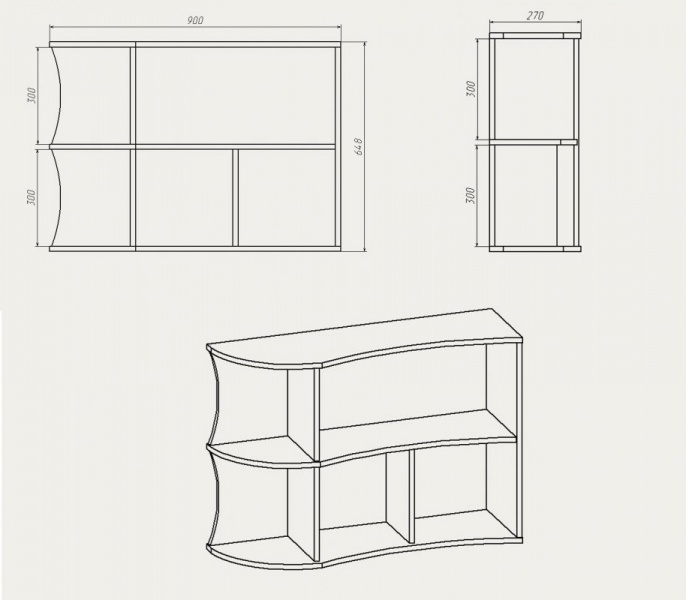
The round shape of the shelf is an unusual and stylish solution for those who are not particularly concerned about how to place more things on it and save space in this way. It is easy to make such a shelf with your own hands. Success will be predetermined if you choose the right source material for the shelf and correctly calculate the dimensions of the parts.

The most affordable material, which is both strong enough and bends easily, is fiberboard sheet. Two strips of estimated length (l) are cut out of it. At the same time, a board of the desired length is also prepared as a central shelf. Obviously, all these parts should have the same width. Now about the length of the strips.

DIY bookcase. Photo
From the point of view of geometry, the central shelf is the diameter (d) of the outer contour of the future circle, and the stripes, respectively, are half the length of the contour, so they depend on each other and are interconnected by the formula - l=3.14 x d/2.
Let's say the dimensions of the board are 150 by 700 mm, then the length of the semicircle will be 3.14x700 / 2, that is, 1100 mm. Now let's calculate the length of the fiberboard strips, taking into account their overlap, say, 70 mm: 1100 + 2x70 = 1240 mm.

Now let's figure out how to make a shelf with your own hands using a fiberboard sheet.
Stepping back from the end sides by the amount of overlap, apply to the strips markup. Then proceed to form a circle.
The edges of the strips are pointed at each other according to the markings and fixed with clamps. Carefully, so that the material does not burst, the strips are slowly bent, overlapping the free edges on each other.

Before finally fixing all the parts with screws, you need to make sure that they are correctly fitted:

The do-it-yourself shelf is almost ready. It remains to finish it: cover by paint, varnish or other decorative composition. They hang it through the furniture eyes on screws screwed into the wall.


DIY hanging shelves
When choosing an interior for a small apartment, many are wondering if it is possible to make a compact bookshelf with your own hands so that it does not take up much space. One of the possible options is a suspended structure.

To get started you need

The work is carried out in two stages: shelves and fastenings.
Prepare shelves, sawn to size.
Along their edges, holes of the same size must be provided.

hanging shelves with their own hands. Photo instruction


The template is pressed against the board from the edge, say, with the help of clamps, and make two holes, but not to the end - approximately to the middle of the thickness of the shelf.


Shelves handle sandpaper and separate. For example, you can paint in a suitable design color.
The shelves are completely ready, it remains to hang them. Reliability in this case, given the impressive weight of the books, is no less important than aesthetics, so it is best to hang the structure cable.
It is cut into pieces in size and, using clamping clips, a loop is made at one end.
They are suspended and fixed along the entire length with the desired step. kegs.


Hooks with screws are attached strictly perpendicular to the wall, on which cables are hung, and already suspended shelves are attached to them.


Do-it-yourself hanging shelf-shelf

A charming hanging shelf in the kitchen with your own hands will allow you to rationally use the space. It will look great in a colonial living room, in a nautical-style children's room or in a Mediterranean-style bathroom. Anyone can cope with such work, since you can make a shelf with your own hands in just a few simple steps.

how to make a shelf with your own hands. Master Class
Blanks from a tree align both in shape and in size.
Mark places under holes and make them with a drill pen drill. In order to avoid problems in the future, the diameter of the drill is chosen larger than the diameter of the rope for which the whatnot will be hung.


Markup is easier to do pattern in the form of a 4x4 square cut out of paper. The template must be applied to the corner of the board and markup is made at the point of intersection of the diagonals of the square.
coloring boards.

There are many ways to make a shelf more interesting. You just need to show a little imagination, for example, paint it only from the ends.
Now the design can gather. The rope is folded in half and, stepping back about 30 cm, a knot is tied on each half. The ends are pulled through the holes on one side of the board and secured with another knot. The plank is thus fixed motionless between the two nodes. The process is repeated with each shelf, arranged with the desired step.


Do the same with the other side. The main thing that nodes on both sides are located at the same distance from each other.

The remaining free ends of the ropes are cut and unraveled to form brushes.

It remains to hang the finished bookcase on the wall.

Such a do-it-yourself shelf has several advantages:

DIY hanging shelves for photos
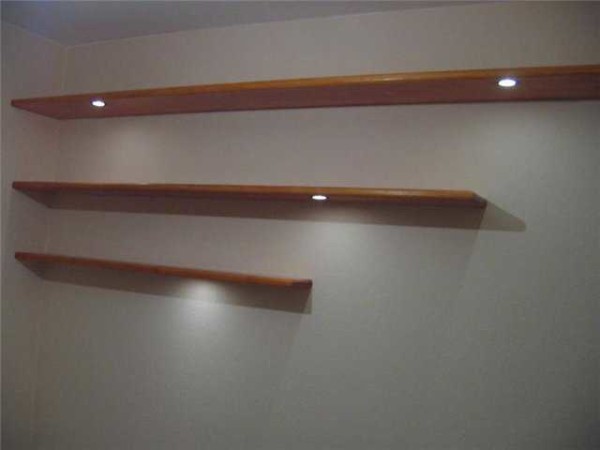
Is it possible and, most importantly, how to make a shelf on the wall so that it takes up very little space, and you can store a sufficient number of photos, albums, record collections and more there? Well, let's figure out how to make a shelf with your own hands so that it has a minimum depth.

This shelf actually represents several lath tied together with a rope. A bar is attached to them, which prevents photos, books, etc. from slipping off the shelf. In principle, there can be as many rails as you need, so first you need to decide on their location and number. So it will be much easier to calculate the width of the shelves and file blanks.

After the blanks skinned, planks are attached to the rails: they can be nailed or glued. The nail heads are carefully hidden under a layer of special putty, and the bar is sanded again.

Stepping back from the edges by 2 cm, two holes are drilled in the shelf with a diameter slightly larger than that of the rope.

From each end of the first shelf stretch rope, tightening the knot at the ends.

It will be much easier to do this if you wrap the threaded edge of the rope with tape or, say, electrical tape.


Put on a second shelf.
The process is repeated until all are installed.

The free ends of the ropes are tied to screws with hooks screwed in at the correct height. This is perhaps the most crucial moment, since the bottom shelf should be located strictly horizontally, and all the rest will be aligned along it.
Horizontalness is checked by level, nevertheless it is useful
 and there will be someone's help., because even knowing exactly how to make a shelf, it will be difficult for one to complete the last stage.

Christmas tree book shelf
A creative do-it-yourself bookshelf will help to delay the incomparable New Year's mood for a longer time. Instead of garlands and toys, it is decorated with books and various cute little things. Such Christmas tree shelves are especially to the liking of the kids.

This shelf can be made from ordinary plywood sheet.

First you need to prepare a small layout plan all details on a sheet of paper on a scale corresponding to the size of plywood with an indication of their dimensions.

Then you need to transfer everything to plywood in the original size and after carefully checking the location and dimensions of the parts cut them with a saw or jigsaw.


The Christmas tree is assembled on carpentry glue and fixed with nails.


When the workpiece dries, it is covered paint and give it time to dry completely.


The tree shelf is ready to use. Under New Year you can decorate it to your liking and even put gifts on the branches-shelves.

Here's how a DIY shelf can help bring joy to loved ones.
Do-it-yourself shelf-rack
The functional and minimalistic industrial style is very popular today. A do-it-yourself shelf assembled on pipes will bring to your home the very industrial chic that you may be striving for.

Since the number of shelves, as well as the total length of the pipes, is easily adjustable, let's focus on general scheme production of this designer furniture.


Work begins with the preparation of shelves from wood. They are applied with a special oil or wax to get a smooth textured surface.

It would be nice if the shelves initially had an interesting texture.
If you cover the shelves more and polyurethane varnish on a water basis, they will acquire even more magnificent radiance.
After allowing the structure to dry, in each corner of the lower shelf, round flanges about 2 cm from the edge.

The location of the connecting parts is marked with a pencil.

The shelves are stacked and clamped with clamps.

A pilot hole is drilled through the center of the flange through the first and second flanges. For the next boards in order, the size of the drill needs to be changed to a larger one, since pipes will pass through them in the future.

Start assembling.
Each flange is placed on the bottom shelf above the pilot hole and fixed to the surface.

Insert into holes galvanized pipes of the desired length, threaded at both ends and tightened in the flange with a wrench. A coupling is installed in the upper part.

When all the parts are mounted, flanges are screwed to the tops of the pipes and fixed to the top shelf.


The finished shelf can be made mobile if you install wheels on the bottom board.

The headset will be more stable if you attach it to the wall with special studs or install an L-shaped bracket.

Do-it-yourself kitchen shelf

Men will probably never understand why the housewives do not have enough shelves in the kitchen, but few will deny themselves the pleasure of surprising her with a simple but functional shelf in the kitchen with their own hands.

It is quite easy to make it. Need to make two boards, preferably from hard rocks of the same length. One of them will be installed horizontally for various utensils, and the other vertically. It will be fitted with wooden pegs on which you can hang cups, potholders and more. Board widths may vary slightly.

On a plate for cups mark out places for perches. It is better to apply the markings symmetrically, then the extreme ones will be at an equal distance from the edges of the plank.
Following the markup, drill holes corresponding to the diameter of the pole.

Using a jig, this is a special drilling tool, you can make several holes to connect both planks. In extreme cases, you can also use a countersink, then the recesses under the screw heads will need to be hidden with plugs.

wooden pole polished sandpaper and sawn into equal parts.

The holes for the perches are lubricated from the inside with carpentry glue and inserted pegs. They should perform the same. Excess adhesive mass is wiped off with a napkin.

If the pegs are very tight, you can use hammer.
Glued to their end circles either plywood or wood. Do the same with excess glue.

The shelf is generally ready, it remains polish fine emery and take care of the appearance: process wood stain and varnish or paint.
Two holes are drilled in the vertical board of the shelves, through which the shelf will be fixed to the wall with screws. The places for the heads of the screws are countersinked, and they themselves are closed with decorative plugs.

When installing shelves use a level.


Do-it-yourself plexiglass shelf
Such a shelf looks very light, without loading the interior with anything. Do-it-yourself transparent shelf is made from a strip plexiglass of a given size, which is installed on the original support of beads.


It is more convenient to cut it out of a sheet when buying immediately in a store.
Screws are selected on the basis that the diameter of its head must exceed the hole of the bead. If this is a problem, a washer can be used.

Beads before installation you need paint gold spray paint.
Paint the wooden beads with gold spray paint.
In the wall drilled pilot holes.
Six beads are put on the screw, screwed into the wall and leveled. The same is repeated with the second. For a concrete wall, dowels are used, in the case of a frame wall, the screws must enter the wooden racks.


A plexiglass plate is placed on the resulting supports.

The shelf thickness of 1.2 cm provides sufficient rigidity, but not so much as to lay out heavy objects on it.


Do-it-yourself hanging shelf on belts

To make such a design is extremely simple.


Need to prepare board a convenient size and sand the surfaces of all edges with sandpaper.


If the texture of the wood is not expressive enough and you would like to hide it, you can paint.

From two identical belts buckles are removed from leather (textile), as well as all other metal parts.

At the ends of each of them drill holes small diameter.

The belts are folded in half so that a a loop. They are fixed on the wall, positioned from each other at a distance slightly less than the length of the plank.
The board is inserted into the hinges and leveled so that it is parallel to the floor.

If you want to fix the board more securely, you can additionally fix the belt with a few screws from the bottom side.

Shelf of construction pallets
Times change, tastes change. Today, many are trying to use industrial decor in their homes, replacing elegant pieces of furniture with deliberately rough ones. Individual elements can be made independently, for example, a do-it-yourself shelf from wooden construction pallets.


For one bookcase, you need to disassemble two pallets. The result is:

The following parts are sawn from this material and polished either with sandpaper or with a special nozzle on a drill:
Boards: Quantity - Dimensions (mm)
- 4 - 640x145
- 2 - 680x145
- 2 - 840x145
- 2 - 290x145
- 2 - 640x100
- 2 - 840x100
- 2 - 290x50
Checkers: quantity - dimensions (mm)

The shelf is assembled in the following order:
For the base take two narrow boards 640x100 each and fasten along the edges of the checker. Wide 290x145 are attached to the checkers perpendicular to the narrow boards, aligning them on equal sides.

To the end grounds two boards are fixed vertically with self-tapping screws: narrow (840x100) and wide (840x145). Repeat the same operation with the opposite end of the base.

Finishing up box future whatnot, fixing two wide boards (680x145) on top. To avoid cracking the wood, you can pre-drill holes in them with a thin drill.

Then two wide boards (640x145) are attached to the base. The bottom shelf is ready.

For the rest of the shelves you will need support bars. To do this, the narrowest boards (290x50) are attached at the desired height.

The remaining boards measuring 640x145 are attached to the installed planks. It is advisable to fix them with screws and from the ends. This will give the structure durability and greater reliability.

The resulting bookcase can be used as a rack for your favorite things, and as a shelf for shoes with your own hands.


DIY painting shelf
You won’t believe it, but you can make an unusual original shelf on the wall for your favorite picture yourself, and from a simple set that you can buy at any supermarket.

Creating this masterpiece will greatly simplify Dremel 300 - multi tool with a large number of high-quality nozzles and milling machine Dremel 231. The point is this: in order for the picture to slide off the shelf, a groove must be made on its surface.
The boards are placed on the milling table and turned upside down, mark the cut line for groove and with the help of guides on milling table set the desired depth for it.

Perform a groove.

Wooden wall shelf paint desired color and allowed to dry.

Attached to her holders and strictly horizontally attached to the wall. The direction is regulated using the building level.

Do-it-yourself children's shelf in the form of a horse
From several wooden boards, you can create a fun bookshelf where your little one will happily store their books.


Required for work sample pony horses. You can draw it yourself or with the help of special computer programs. The template is printed out and a stencil of the main details of the future pony shelf is cut out: legs, head and tail.

Do-it-yourself children's shelf. Photo
Stencils are placed on separate boards, outlined along the contour and cut out parts with the appropriate tool.


clean up surfaces of parts and edges with sandpaper.

The “legs” are attached to the “body” with furniture screws, then the head and tail are glued.

You can go over the product with sandpaper again.

"Horse" coloring.

In a few hours, the miracle shelf will be ready for use.

Shelf-shelf
Here are two bookcase ideas that you can easily make yourself.

First of edged board 40 mm is extremely simple. Bookcase assembled:

The height and width of the structure are arbitrary and are selected locally. If desired, the bookcase can be fixed in the upper part, and rubber heels can be stuffed along the bottom of the boards.

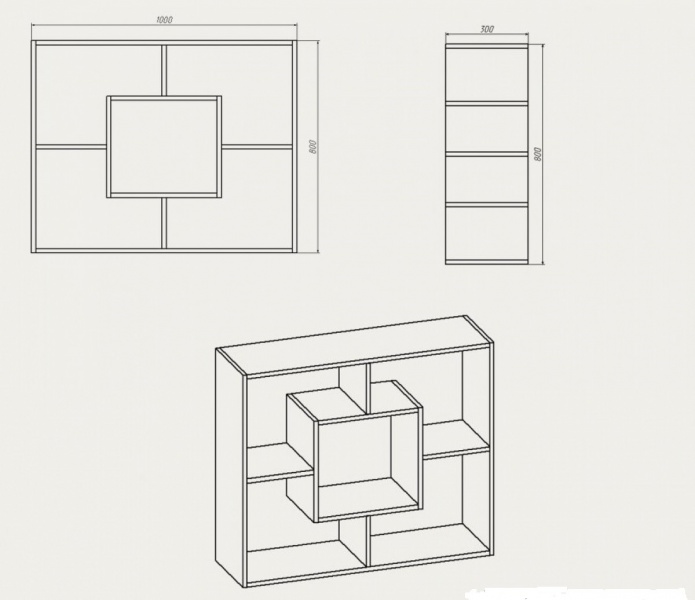
Second - S - figurative. For manufacturing, you can use trimming boards, plywood or chipboard. For one section of the structure, 16 rectangular blanks are needed, for example, 300x150 mm.

Blanks set in a certain order, at each stage three.


The first workpiece is placed on the floor. A second one is attached to it at a right angle, joining them in width on the left. The third in width is joined with the first along its length, starting from the far right corner.

The fourth, fifth, sixth - are assembled symmetrically, exactly the opposite.

It is very simple to check how correctly the figure has developed: the second, third and fourth boards should form the letter S.
Experienced craftsmen advise first to assemble the design in rough on wooden pins and fit the blanks, and when disassembling, number the parts from the end.
Every detail then sanded sandpaper and begin to collect them, according to the numbering. PVA glue is applied to the joint lines and grooves and tightly clamped, holding in this state for some time.
The assembled bookcase is varnished or painted.
DIY shoe rack
The main problem for the hallway at all times is shoes. How to deal with the perpetrators of the riots, and do it as economically as possible? The best solution is to make a shoe rack with your own hands.

Let's share some interesting ideas.
From plywood. More often they make a modular whatnot, which is attached to the wall and saves space. Using a jigsaw, plywood is cut into identical rectangular planks, then gently sanded. U-shaped structures are assembled from parts and “invested” one into the other, forming a structure resembling a labyrinth.

From tree. From a wooden board cut blanks with a width of 250-350 mm and a thickness of about 20 mm. The next steps are:

Saw the side walls about 800-900 mm long.
Cut out four shelves of 600-700 mm.
All additional details are being prepared: crossbeams and support rails.
All blanks are polished.
The support bars are fixed to the side walls with self-tapping screws.
Shelves are laid on them.
Metal corners are attached to the rear end part.
The finished product can be varnished or painted.
From profile. Galvanized or regular profile plus strained glass- everything you need to build a do-it-yourself shoe rack in a modern high-tech style.
A section of the profile of the desired length is applied to the wall and fixed for the time being with one self-tapping screw.
Check the horizontal level of the profile line.
Screw in the rest of the screws.
Assemble the frame.
Install glass shelves.

From boxes. This is the most economical option for a do-it-yourself shoe rack, both in terms of cost and dimensions.
The contours of the parts are drawn on the cardboard of the box.
They are cut out using a special cardboard knife.

Then boxes are folded from rectangles, which are superimposed on each other. This is how the recesses for the shoes are formed.
Fasteners are made with staples.
The shelf is assembled on the wall, then glued with a decorative film.
Photo of unusual shelves on the wall
An interesting composition on the wall of the living room, which combines several unusual shelving, made in the same style and color scheme, but different in configuration and size.

On the wall shelves you can store not only books, there is also a place for albums, glass and porcelain figurines, cute knick-knacks, flower pots.

Bright and eye-catching, the whimsical branches of the Flex Shelf give you extra space to compactly house books and magazines.

These shelves are a real art object on the wall, far from the traditional way of decorating the interior. Combination of classic and modern forms shelves scattered on the wall, instantly attracts attention.

The TV in this composition looks like a “modern picture” in a frame, inside which open shelves are asymmetrically located. They can be placed decorative elements, photographs and more.

A bright and creative shelf in the shape of a bat looks incredibly original. It will equally stylishly decorate the living room, bedroom or nursery of a lover of original solutions. 
Bulky, cabinet furniture is gradually losing its popularity. She is being replaced by light and elegant shelves on the wall, made by hand from improvised materials or ready-made blocks. An interesting and original design of wall shelves allows them to successfully compete with many interior and decor items made in country, hi-tech or modern style.
A wide choice of materials and ideas for the manufacture of such products makes it possible to use them in almost any utility, utility and residential premises.
We suggest that you take into service the most interesting sketches in order to free up space from things scattered everywhere and old furniture and make your home more cozy and comfortable.
Features of wall shelves
 A do-it-yourself wall shelf will be appropriate in absolutely any interior:

The main types of wall shelves
 The method of fastening, the material for manufacture and the items that will be stored on the shelf determine the working load on the entire structure and on the wall on which it is fastened. It is quite natural that the method for attaching it to a vertical surface largely depends on the type of product.
A variety of shelves on the wall of the photo, which are presented below, can be used to place pots, flowerpots and planters with.  In this case, you should take care of the safety of family members, because due to the land that is filled, the structure is subjected to increased loads.
  For this reason, a reliable fastening should be used to place such shelves.

Taking into account design features wall shelves conditionally they can be divided into the following groups:
- closed and open (with or without doors);
- straight and angular;
- console type;
- with and without side restraints;
- through or closed back wall;
- in the form of one plane or rectangular;
- single-tier and multi-tier;
- fantasy shape - diamond-shaped, inclined.
 Among the most popular types of wall shelves are:

In order to make transparent shelves on the wall with your own hands, you need to order a set of glasses of the same shape in a special workshop. For safe use, the ends of the glass are plastered, after which the blanks are fixed in a free corner using brackets.
Glass shelves are suitable for storing books, souvenirs, cosmetics, shampoos and personal hygiene items.
Materials for wall shelves
Everyone who thinks about how to make a shelf on the wall with their own hands knows that a variety of materials can be used to make this piece of furniture. Of course, the simplest and most affordable option is the usual wooden plank nailed to the wall. That's just to create a modern and original design of the room, this will not be enough. The choice of materials even for such simple products is very wide.
Wood
 Do-it-yourself wooden shelves are a good old classic. You can diversify a wooden structure with the help of complex shapes and non-standard fastenings. For interiors in the loft style and minimalism, a beautiful and unusual wooden shelf will be an appropriate solution. For classic design projects, the product can be decorated with carvings, while all structural elements must be carefully processed.
 For those who want to save on the source material, we recommend using chipboard, MDF or plywood, which can be purchased at any hardware store for quite affordable money.
Metal
 Do-it-yourself metal shelves, the photo options that you will find below, can perfectly complement the interiors of rooms in the style of minimalism, hi-tech and fusion. Installation of such products is impossible without special skills and tools. Among the advantages of metal structures are their strength, reliability and durability. Special surface treatment will protect the finished shelf from corrosion and give it additional appeal.
Plastic
 Currently, plastic is considered an ideal material for the production of various interior and decor items. Practical, light, cheap, it can look simple and luxurious, imitating appearance natural materials and at the same time, excluding their shortcomings. For rooms with high humidity, a plastic shelf can be an ideal option.
Glass or mirror
 A glass or mirror shelf is a real decoration of any room. Elegant and glamorous designs made of glass and mirrors can give the room elegance and lightness. However, such products have one serious disadvantage - increased fragility. An accidentally dropped object or a sharp blow can lead to very sad consequences.
Shelf fixing types
When choosing one or another method of fastening for a future wall shelf, you should remember that the mobility and reliability of the entire structure largely depends on your decision. Experts distinguish the following methods of fastening for shelves and shelves:

 Hanging shelves that are hung from the walls or ceiling look interesting and unusual. As a flexible basis can be used:
- braided harnesses;
- belts made of natural or artificial leather;
- twisted weaving from macrame;
- decorative ropes, etc.
With the right approach, the mount can perform not only a utilitarian function, but also become an interesting and unusual decoration. So, for example, forged sidewalls can be used as reinforced fasteners for wooden or metal structures and at the same time will become a harmonious addition to a room in Provence or country style.
Wall Shelf Design Ideas - Video
 When choosing a shelf on the wall, the following nuances should be considered:

Having trouble choosing a shelf? If possible, we recommend that you contact professional designers with this question, who will help you choose the perfect piece of furniture in every respect.
How to make shelves on the wall with your own hands?
 The algorithm for building a wall shelf with your own hands is extremely simple and straightforward.
- decide on the idea of \u200b\u200ba future wall shelf;
- make a pencil sketch and decide on the size and dimensions of the future product;
- make a design sketch with reference to a specific place in the room;
- depending on the idea being embodied, choose the material and type of fastening.
- to assess the working load on the wall and structure., depending on the load, decide on the use of reinforced or conventional fastening;
- on the wall, at the installation site of the structure, make markings;
- to cut blanks;
- assemble individual elements into a finished structure;
- tint brackets or hinged hinges;
- in order for the shelf to look beautiful and neat, its surface can be covered with a special coating, the ends and joints can be processed by grinding or trimming;
- hang the shelf on the prepared fasteners, check their reliability and safety;
- adjust the horizontal of the product;
- arrange decor items, books and other things that will be stored on the shelf.
If you like everything interesting and unusual and at the same time design your own home interior, we recommend that you pay attention to any materials at hand. Sometimes even the most unexpected things can be used for these purposes.
Went for a walk in the park? Pay attention to unusual branches, rhizomes and stumps - with the right approach, in skillful hands, they can serve as the basis for an exclusive shelf structure design.
Talk about the benefits of using wall shelves in modern interiors apartments and country houses are endless. However, we recommend that you do not waste time and pick up some interesting items for yourself that will allow you to transform the interior of your home and at the same time add practicality and functionality to the room. With this simple technique, you can effectively expand the internal area. Use corner options, asymmetric, single-tiered and multi-tiered shelves of various sizes, thereby hiding the flaws of the interior, and emphasizing its advantages.
We make a shelf with our own hands - video
Shelf for the kitchen - video
In order for the interior to “heal”, it is necessary to fill it not only with furniture and textiles, but also with all kinds of accessories.
Books, souvenirs brought from travels, flowers, favorite photos in frames, various objects dear to the heart should take their places in the interior.
Various shelves, niches, racks come to the rescue, which are just designed to store such items.
Today we'll talk about various options placement of shelves that you can do yourself, or purchase in a distribution network.
Types of shelves
A shelf is a piece of furniture made from different types materials, without a front wall, designed to store various interior items.
According to the location in the interior, the shelves can be wall-mounted, hanging and corner.
- The wall shelf is attached to the wall, often located above any piece of furniture (above a table, sofa, bed).
- The hanging shelf is attached to the ceiling with cables, belts, chains and other devices.
- The corner shelf is located between two adjacent walls, attached to both the walls and the ceiling.
According to the materials from which the shelves are made, they can be divided into:
- wooden;
- metal;
- glass;
- shelves made of MDF, chipboard;
- shelves from GVL sheets;
- combined (combining two or more materials).
By design, the shelves can be cantilevered, with and without side walls, with a back wall, vertical, horizontal, with a shift, multi-tiered, with right angles, inclined, rounded.
The options can be listed for a long time, because for each interior with its own design, its own type of shelves is selected, which becomes not only a place of storage, but also a kind of accent that stands out against the background of the walls in color, texture, complemented by various lighting.
Wall shelves in the premises of a house or apartment
In almost every children's room you can find a wall shelf, especially if the child living in this room is of school age. On the shelf, as a rule, textbooks, notebooks, various school supplies and toys are placed. Often the shelves are made of the same material as the furniture.

You can fix the shelf on the corners, brackets (open and hidden), hinges. The mounting option for wall shelves depends on the chosen interior style.

Mounting on a bracket with a pin. The shelf fits tightly on the pin. The thickness of such a shelf exceeds 25 mm. The design looks concise, no frills, often used in the interior in the style of minimalism.

Wall shelves on brackets attached to the wall. The shelf itself is mounted on top of the brackets.

Often the brackets carry not only a structural load, but are also decorative elements. Such shelves look good in a country-style interior.

An excellent solution for wall shelves for a nursery. Designs are made in the form of letters. Bright color accents not only create a mood, but also contribute to the development of the child.

I want to make a children's room for kids brighter than other rooms. Fill it with unusual details, characteristic childhood, create a cozy fairy-tale atmosphere for your kids. Shelves of an unusual shape in the form of a cloud, a tree or a flower are a godsend for loving parents.

You can make them from plywood by cutting blanks with a jigsaw according to a pre-made pattern, assemble the structure and paint it in the desired color.

Recently, it is no longer fashionable to clutter up the living room with an abundance of cabinet furniture. "Walls", which could be found in almost any apartment Soviet period gone to the past. Modern living rooms, in addition to upholstered furniture, are filled with various racks and shelves, adding spectacular lighting.

Wall shelves are made of various materials. Drywall designs are popular, which are not difficult to do with your own hands. The future design is marked on the wall, to which metal or wooden rails are then mounted and sheathed with GVL sheets. The surface of the shelves is puttied and painted.

A plasterboard shelf in the form of a console in the color of the wall to which it is attached looks very light, does not clutter up the room.

You can beat the corners of the premises with corner shelves. The construction will perfectly fit both into the inner corner of two adjacent walls, and at the junction of the walls from the outside. An openwork metal corner shelf is an interior decoration.

Interior and furniture designers offer a large number of original wall shelves that can become a bright accent in the living room interior. We hope that the presented photo gallery will inspire you to make a wall shelf with your own hands. You can draw ready-made ideas or create your own design to your taste.
An unusual decorative shelf in the form of a tree branch against a monochrome wall.

Shelves-frames carry not so much a functional load as they are a decoration of the wall. However, this design can accommodate several interior items.


A shelf of curved wooden blocks, as if bent under the weight of books.

And this shelf, like a bright sun, will always warm you with its warmth, even in dull rainy weather.

Original round shelves can be made from plastic pipes different diameter.

Shelf of metal pipes appropriate in the interior in the loft style.

The budget version of the suspended structure combines wooden shelves strung on ropes. The shelf can be mounted both to the ceiling and to the wall on the bracket.

On a glass shelf you can place a collection of souvenirs brought from travels around different countries. Such a design will not focus on itself, the objects placed on it will be presented to the eye.

The original combined wall shelf made of metal and wood for flowers in the form of a ladder will decorate any room.

Wall shelves find their place not only in living rooms. In the kitchen, the design can become a storage place kitchen utensils, books with cooking recipes, or just a wall decoration.

A wooden wall shelf from a drawer is appropriate in the interior of a country-style kitchen.


Metal wall shelves are often used in bathrooms. They are made of stainless steel, so they are not subject to corrosion. On sale you can find a wide variety of them. In many models, metal is combined with glass.

The corner glass shelf for the bathroom is attached using a special bracket, which consists of two parts: a base and a movable console. The glass is clamped between the parts of the bracket by tightening the screw located at the bottom of the mount. The bracket is pre-attached to the wall, and only then the glass shelf is strung.

Arrangement of a wardrobe design of shelves on brackets and metal racks. Racks are fixed to the walls, floor and ceiling.

The shelves, hung with brackets on perforated rails, can be easily removed and set to the desired height.

It is perhaps difficult to find a house where there would not be at least one wall shelf. Today, this piece of furniture combines convenience, beauty, and functionality. Look for your solution, equip the interior, enjoy the work done.
Wall shelves are able to harmoniously complement the design of the room. The range of their purpose is very wide. Depending on the location and application options, they choose the material for their manufacture and think over the design. What features should be taken into account before you start creating a wall shelf with your own hands, and what are the main stages of the process, let's get acquainted in detail.
Variety of wall structures
The main purpose of the wall shelf is to place a lot of small items, while organically combining the functions of storage and interior decoration. Depending on this, the option of installing a furniture structure is determined. There may be several of them:
- The most common way of placement is to make a wall form, when the product is attached to the wall, at the bottom of which other pieces of furniture (sofa, bed or table) are often located.
- A kind of highlight among wall structures can be a do-it-yourself hinged shelf. The key difference lies in the method of fastening: instead of traditional brackets and loops, ropes, chains and straps are used.
- Depending on the organization of the living space, from time to time there is a need to make a corner shelf. Moreover, in addition to the common way of using internal areas, sometimes they harmoniously use the outer corner of the room.


A little imagination, and you can make a wall shelf design with your own hands in various variations. The following models are widely used:
- The ease of manufacture with your own hands is distinguished by the console - a shelf fixed perpendicular to the wall.
- If desired, the design is supplemented with side walls and the back is closed.
- To create a kind of rack with your own hands, it is enough to combine several single consoles together.
- Recently, combined specimens with an extraordinary arrangement of horizontal and vertical walls have gained wide popularity.
- Numerous decorative models of wall shelves are original. Their main function is to create an exclusive design element in accordance with the chosen style.

Occasionally, the facade of a do-it-yourself structure is supplemented with glass. This is practical when storing items that do not have a decorative function. A small part of the designs of wall shelves that you can decorate with your own hands is shown in the drawings below:


The nuances of the choice of material in the design
No construction work is complete without a preliminary plan.
Remark ! Before you start designing a shelf with your own hands, you need to decide on the material for the base.
When choosing it, take into account the place where the furniture structure and its main functions will be installed. The scope of wall shelves is as follows:
- Book lovers and students will definitely need bookshelves based on wood and its derivatives.
- To store jars of spices or decorative items in the kitchen (which are original plates or exclusive mugs), narrow shelves equipped with low sides are used. In this case, it is most appropriate to use wood for manufacturing, although, depending on the chosen design, glass specimens can also look harmonious.
- The arrangement of the bathroom is not complete without the installation of glass shelves, complemented by chrome elements. This is due to the basic requirement for the material - it must have high level moisture resistance.
- Universal shelves allow you to show your imagination with the choice of material during self-production. They are intended for setting flowers or various souvenirs, and the base is selected taking into account the overall design of the room. It can be classic wood, durable metal, complemented by forged elements or glass, which creates the effect of lightness.

Mounting options
The type of fastening plays an important role in the design of the shelf wall structure. Having studied the options for fixing, it will be easier for you to determine the most suitable method.
Classic loops
The traditional fastening of wall shelves is the use of hinges. They are optimally suited for products made of wood and its derivatives. An important condition is that the material must have sufficient thickness. The whole process takes place in several stages:
- The hinges are fixed on the side of the furniture structure with self-tapping screws.
- After measuring the distance between the holes, the required segment is marked on the wall.
Attention ! Compliance with the horizontal line is important point when fixing the wall shelf.
- At the indicated point, holes of the required diameter are drilled, designed to insert the dowel.
- A self-tapping screw with a neat hat is screwed into the clogged dowel, on which a shelf is hung.

Fixing glass shelves
The use of loops is not suitable for all materials. Installation of wall-mounted glass shelves is carried out using special fasteners for fragile products. Fasteners are made of two parts and are often supplemented with elastic gaskets, a glass shelf is inserted between them. The lower part of the device for reliable fixation of the wall structure is equipped with a clamping screw.
A common model for mounting a glass shelf is an instance called a pelican, capable of holding a wall structure with a thickness of 8 to 34 mm. In addition to glass, it can be used to fasten other materials with similar dimensions.

Concealed mounting and decorative brackets
The hidden installation of the wall shelf is distinguished by simplicity and originality. In this case, the fastener is completely masked. essence this method is as follows:
- at the end of the wooden structure, a recess is prepared for the pin and the body of the fastener;
- the mensol holder is fixed to the wall, after which a shelf is put on it.


Wall shelves with decorative brackets allow you to create an individual design of the room. They can be fulfilled in a production way or treat exclusive copies. Photos of wall shelves decorated with hand-made brackets are presented below:


Manufacturing process
Depending on the chosen design and material, the process self-manufacturing wall shelf has its own characteristics.
Tree
If you want to make an original wooden wall shelf with your own hands, you will need:
- Base material. In addition to natural wood, you can take MDF, chipboard or GVL, this will greatly facilitate the surface treatment process.
- An electric jigsaw that can replace a hacksaw.
- Drill and grinder.
- Line with a pencil.
- Building level.
- Wood glue or liquid nails.
- Lacquer or stain.
- Brackets, dowels and screws.
The whole process of DIY wall shelf production is simple. After drawing up a plan or taking a finished project as a basis, the dimensions of the structure are transferred to the material. It is better to cut the wooden base with a jigsaw, which provides a perfectly even cut.

All elements of the wooden shelf are carefully polished, in the presence of significant defects I use putty for wood. At the initial stage, you will need sandpaper No. 40, sanding paper No. 80 and 120 will allow you to get a perfectly smooth surface.

Connect the parts of the wall structure with liquid nails or wood glue.

Mounting marks are made on the shelf and wall. The brackets are connected to the shelf, and a recess is made in the wall with a drill, after which the dowels are inserted.

At the final stage, self-tapping screws are screwed in and the wall shelf is suspended.


Glass
Rooms with a small area are best equipped with glass wall shelves that create an atmosphere of lightness and visually increase the space. If the experience of working with glass is not enough, it is better to turn to specialists who, at the same time as cutting fragile material, will perform high-quality processing of sections. The following steps for mounting a wall shelf are within the power of anyone who can hold a tool in their hands and are similar to the procedure for attaching a wooden structure:
- Using the level, mark the attachment points on the wall.
- The Pelican design needs two dowels.
- After removing the decorative trim, you will find holes where you need to screw the fasteners.
- The decorative overlay is put in place and the glass is inserted.
- At the final stage, the screw is tightened.
This completes the installation of the glass wall structure.


Conclusion
A competent combination of a wall shelf with other details of the situation will create a harmonious design of the room, which is distinguished by individuality.
In a new review, the author has collected examples of shelving and shelves that you can concoct with your own hands. They must be used, of course, for their intended purpose. Having looked at the photographs collected here, you can easily make sure that there is nothing fundamentally complicated in the proposed version.
1. In the shape of a circle

The original round shelf, the edging of which is made of thin fiberboard, and the shelves themselves are made of an ordinary board, painted in White color. Of course, this design is not suitable for storing the entire home library, but it can accommodate several educational books, a small indoor plant and a couple of framed pictures.
2. Hanging shelf

An adorable hanging shelf that can be made from a few used books or notebooks of the same size. Such a shelf is not only suitable for storing cosmetics and small decor items, but in itself will be a wonderful decoration for any wall.
3. Arrow

Stylish bookshelf in the form of an illuminated arrow, made from the remnants of metal water pipes, will perfectly fit into the interior of a teenage boy's room or a bachelor's apartment.
4. Practical and unusual

An original and practical shelf that can be made from a small tray from an old cart and a few wooden bars. Such a shelf is reliable and spacious and is suitable for storing a variety of things.
5. Charming shelving

Stylish and original rack, made from a slightly modified and white-painted door. Filled with favorite books, candles, family photos and small decor items, this shelving unit will be a real highlight of any space.
6. Narrow slats

Old skis that have been gathering dust in the pantry for many years can be used to create unusual shelves. Such shelves will perfectly fit into the interior of the nursery and are suitable for storing toys and books.
7. Stylish copper

Massive shelves made of wood, pasted over with a stylish copper-colored film, are perfect for placing house plants.
8. Old pallet

An old wooden pallet is easy enough to turn into an original shelf for storing magazines and family pictures.
9. Industrial style

Stylish storage system in the current industrial style, which can be made of wood or MDF boards, painted gray and interconnected by a structure of metal water pipes.
10. Bright honeycombs

Original shelves made of bright gift hexagonal boxes attached to mirrors of the same shape. Of course, this design is not suitable for storing large heavy items, but it is suitable for storing small things dear to the heart and decor items, and will also become a unique wall decoration.
11. Stylish transformation

The drawers of an old discarded table can be used to create original shelves. Neatly painted and customized, the boxes can be mounted to the wall, both vertically and horizontally, and used to store a variety of things.
12. Rough design

Rough shelves made of untreated wood, opened with varnish or paint, will perfectly fit into the interior of a room decorated in a rustic or country style.
13. Abundance of cells

A huge wall-to-wall shelving unit made from many brightly colored wooden crates can be a stylish and budget-friendly alternative to a massive store-bought wardrobe.
14. Wicker basket
MDF shelves.
Compact MDF shelves with fruit slices painted under them will become a bright and functional decoration of the kitchen wall.
17. Rustic style

A solid piece of bark or unfinished wood can be turned into a fantastic hanging shelf that is an ingenious alternative to a standard bedside table.


