The quality of a laminate coating depends on many factors, one of which is the correct processing of the boards during installation. Despite the outward simplicity of the technology, it is almost impossible to assemble the floor covering with bare hands, so you will need a simple and convenient tool for laying laminate flooring, only in this case you can get even, almost invisible seams and a flat surface like a table.
How to choose the right set of standard tools for laying laminate flooring
In the process of installing a floor covering, you have to perform several basic operations:
- Measuring and marking the length of laminate boards. In addition, it will be necessary to correctly mark the cut lines, strictly maintaining their perpendicularity to the side faces;
- Cutting material into precisely measured pieces. In addition to linear cuts, it is necessary to cut fillets or internal arcs, for example, to bypass heating pipes;
- Fixing a cut-out slab or lamella in a precisely defined position, if necessary, knocking out and sealing the joints in the laminate locks.
All of these operations are almost impossible to perform with one tool. Even if you try to mark, cut and lay the laminate flooring using some universal Chinese hand saw, with a ruler and a square applied to the canvas, there is not much point in such an organization of labor, since each operation must be performed with its own specialized tool or device. This is the only way to achieve good accuracy and quality.
Advice! In addition, when laying laminate tiles, you have to perform a large number of typical operations, so it is best to use a set for laying laminate, otherwise, after a couple of hours of work, your hands will simply “fall off” due to an uncomfortable tool.
You can choose a standard set for laying laminate flooring, which are offered in sufficient quantities by building supermarkets and firms, but it is more important to understand what tools are needed for laying laminate flooring in order to choose the most optimal and convenient option.
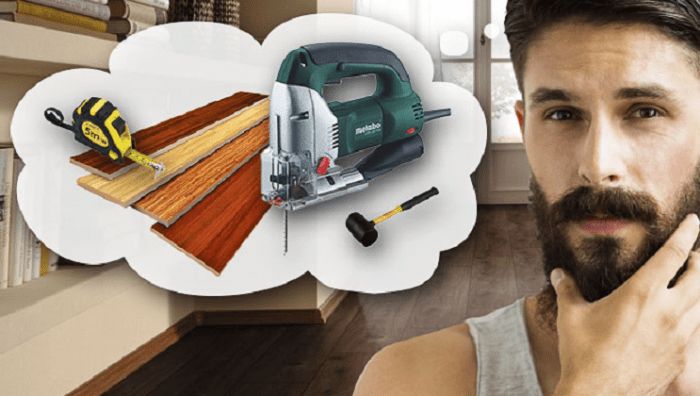
Simple tool kit
The minimum list of tools required for laminate installation depends on how complex the laying pattern is planned to be chosen. For the simplest laying option, without corner and parquet dressings, a set for laying laminate from eight tools is suitable:
- Linear and curly cutting laminate;
- Measurer and marking tools - a tape measure with a tape length of at least three meters, a carpenter's corner and a steel locksmith's ruler of a meter length;
- Carpenter's wooden mallet with a rectangular block of soft wood;
- Set of wedges and mounting clamp;
- Building level.
Note! If the laying of the laminate flooring is being done for the first time, or if there are walls with a large number of transitions and niches in the repaired room, there are outlets for water heating pipes, it makes sense to purchase a laminate repair kit.
It includes wax crayons different colors and heating device. If it is necessary to restore a damaged laminated surface of the coating, it is enough to heat up the wax and fill it with a chip or scratch.
Fixtures and tools for measuring laminate
At the first stages of laying the floor covering, the laminate slab and the place of laying have to be measured many times before a certain skill and eye is developed. Pre-measurement of long laminates is done with a tape measure. More accurate marking in size for cutting must be done using a steel ruler and a joiner's corner.

The same tools are used to mark the cutting line. Initially, the exact distance is measured with a steel ruler applied to the edge of the lamella. Further, without tearing off the tool, a corner is applied to the steel ruler, and a cutting line is drawn, taking into account the width of the cut.
Tools for cutting laminate
Most often, the cutting of the laminate coating is performed with an electric jigsaw or a cutting nozzle for an electric drill. Blades for cutting wood are chosen for cutting the fiber material of the laminate, but some craftsmen recommend using fine-toothed titanium tools designed for cutting metal. In this case, the cut is smaller, and the quality of the end face of the cut laminate is much higher. The cutting of the laminate is performed at the maximum rotational speed of the power tool. So it turns out faster, and the quality of the cut is higher.

For some models of electric jigsaws, a device is attached in the form of a guide of two aluminum strips. A simple device allows you to cut along the line as evenly as possible. But even in this case, the edge has to be sharpened with a bar stuffed with emery cloth in order to remove traces from the blade and make the butt as smooth as possible.
Before cutting the laminate with a tool, the cut line is sealed with transparent tape. This avoids the lifting of the fibers and the edge of the laminated layer.
The best option for a cutter for laminated boards is considered to be a swing cutter, as in the photo. In addition to the high quality and accuracy of the cut, when the cutting edge of the tool moves, the edge of the plate is pressed in a specific way, which significantly improves the resistance of the laminate joints to scuffing.
You can use a hand saw with a fine tooth and a blade length of at least 50 cm, but only if you have the skills to work with a tool in cutting fiber plates. Considering the fact that when laying you have to cut the laminate dozens of times, it is still better to use an electric tool that significantly reduces physical stress.

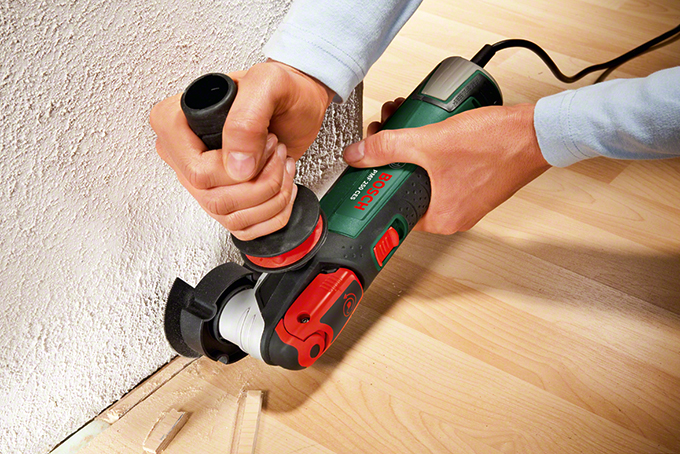
Laminate leveling tool
In addition to marking and cutting laminate sheets, when laying the material, tools are used to align the joints and control the horizontal coverage. Often, masters neglect the use of the building level, motivating their decision by the fact that the horizon was made when preparing the base for laying the laminate. In practice, the joints and locks between individual slabs may not fully snap into place, and after a while the junction of the two pieces may rise slightly. Visually, such a defect can not always be seen, and the building level will immediately show a violation.

In this case, you need to lay a wooden block on the joint and gently tap the entire length of the seam with a carpenter's hammer - a mallet. In a similar way, the joint is knocked out in the horizontal direction. Usually laying kits for laying laminate include rubber mounting hammers, but many experts find that the wooden version is more convenient to work with and at the same time allows you to more accurately dose the impact on the surface of the bar.
Of course, it is impossible to hit the joint directly with a mallet or rubber mallet, without using a bar, this method leads to local destruction of the edge of the laminate. Often the working surface of a wooden block is stuffed with leather tape or a piece of linoleum to soften the transmitted force.

For installation, a bar 20-25 cm long is used; the use of long planks for tamping does not make sense, since they are ineffective. In some cases, for example, when laying a laminate, when the distance to the opposite wall becomes so small that it is simply not possible to hit with a mallet, a T-shaped tool is used from two bars connected by a transverse bar.

Before laying the laminate flooring, plastic wedges or beveled wooden blocks are laid out around the perimeter. This is done in order to fix the gap between the wall and the laminate when laying. The presence of such a gap allows the coating to expand with changes in temperature and humidity in the room.
In the eighties of the last century, artificial, environmentally friendly materials for the production of floors began to appear on the market.
Laminated coatings are especially popular with consumers.
- The basis of such flooring is a high-density fibreboard, protected from above by a transparent wear-resistant coating - “laminate”.
- Laminate flooring goes on sale in the form of panels, various colors, sizes, moisture and wear resistance.
- Laying such a floor is not a problem. This work can be done by anyone with their own hands, even without the skills of a professional in construction and repair work.
- If you have instructions, free time and tools for laying laminate, then in a couple of hours you will admire the result of your work.
- Before starting work, packages with plates, for two days, must be aged where work will be carried out. During this time, the material is fully adapted to the conditions of the room.

- The floor production process is quite simple, especially if the elements are connected to each other in a “lock” type. But using a special tool for laminate, you will get the job done faster and better. Some of the necessary tools are in every home, because. it is used in everyday life.
Basic Toolkit
What tools for laminate flooring will you need first?
- This is, first of all, a roulette wheel. And where without her? Regular simple pencil. The softer the pencil lead, the better.
- Don't forget the corner. It is never superfluous, and in our case, it will help to quickly and accurately markup.
- You will not be able to use only solid elements. That is why, the most important assistant is electric jigsaw.
- You don’t need to buy an expensive and powerful electric jigsaw. Cheap and breaks down quickly. The "golden mean" will be a device from a well-known manufacturer, with a power of approximately 500 watts.
- A hammer should also be prepared.
So, the minimum set you will need is as follows:
- tape measure (5 meters is enough);
- simple pencil;
- metal square (25-35 cm);
- electric jigsaw with a set of files;
- hammer (maybe a mallet).
But, in the process of work, this gentleman's set will not be enough.
So what tool is needed for laying laminate flooring yet?
Additional tools
For high-quality installation of flooring slabs, you will need the following special devices (parts), which are available in any hardware store:
- clamp for laying laminate (metal bracket);
- tamping bar;
- a set of flat-milling (feather) drills.
We calculated that the estimated price of all of the above tools will be 3000-3500 rubles.
Let's look at what this or that tool of labor is needed for:
- Roulette - needed at the stage of preparation, to measure the area of \u200b\u200bthe floor.
- A simple pencil and a square - for marking work.
- Jigsaw electric - for precise, high-quality and fast cuts.
- And finally, a hammer - for padding panels and eliminating gaps between them.
Now let's talk about special devices, or as they are also called - mounting kits.
Special toolkit
Clamp
A clamp (metal bracket) is a curved plate, 4-6 mm thick. Bends at the ends of different directions.
They are made at right angles. One end is wider. The design of the bracket is quite simple, so you can make it yourself.
brace
There is only one use for the bracket - tamping the last board lying against the wall to the rest. This is not done directly with a hammer, but through a bracket, to preserve the edges of the material to be laid.
Secondly, it will be problematic to knock out a board lying close to the wall with a hammer. Thirdly, the use of a brace creates an even distribution of the applied efforts, and this makes the movement of the board clear and straightforward.
The wide end of the staple is applied to the end of the plate, and the narrow end is hit with a hammer. Thus, the extreme board is pushed to the neighboring ones.
Wedges
Wedges for laying laminate - help to provide a gap between the wall and the edge board (8-12 mm.). The gap is needed to expand and contract the hygroscopic laminate. In the future, it is closed with a plinth, and the gaps around the pipes are decorated with rosettes.
Tamping block
Stamping block - used for tamping floorboards. It reduces the impact force per unit area, and this, in turn, prevents chipped boards and breakage of locks.
It is made of plastic materials, which well reduce the hardness of impacts.
Note!
It is forbidden to pound the boards to be laid with only one hammer, as this can ruin the edges, and as a result, a defective joint.
Fountain drills
Fountain drills for wood are used for drilling large holes in boards for pipelines. Their diameter should be slightly larger than the diameter of the pipes, on average by 4 ... 6 mm.
Recently, quite interesting devices from the German company Wolfcraft have appeared on our market.
According to the engineers and developers of this enterprise, here are the tools needed for laying laminate (see photo and description):


Thinking about what tool you need for laying laminate with your own hands? Laying laminate on the floor is not such a difficult thing, and if it is joined with a locking type of connection, then spit in general! This work can be done by anyone without having any skills of a builder. It will be enough for you to have instructions, some free time and a special tool.
A professional tool will certainly not be cheap, but do not be afraid! And most of the necessary tools you probably already have in your closet, and the other part can be replaced with something more budgetary or taken from someone you know who has already made repairs in his apartment. Another type of tool is specific and is simply necessary for laying laminate flooring. After all, do not forget about the docking grooves, which, for the reliability of your future foundation, must be intact and perfectly docked.
Laminate laying tool
We will now consider all this in more detail. And I will also tell you what do-it-yourself laminate laying technique is used by craftsmen who take a lot of money for their knowledge.
Expendable materials
Before you start laying laminate flooring, you will need not only tools, but also the necessary consumables. These include:
- Masking tape to limit the jigsaw
- Ordinary adhesive tape (color is not important) to glue the joints of the substrate
- waterproofing film
- Naturally, the substrate for the laminate itself, which will not only play the role of a heater, but also eliminate screed errors, if any.
- Silicone sealant to fill gaps and cracks
If you have already stocked up on all this, you can safely proceed to the preparation of tools for laying laminate.
Required Tools
As I mentioned above, most of the tools that you will need for self-laying laminate flooring are used by you in everyday life. And there is in the house of every owner.
Looking ahead, I will say that the main tool will be an electric jigsaw. If you don’t have one yet, it’s not necessary to buy an expensive and professional electric jigsaw. But at the same time, it is worth remembering that cheap analogues, like low power, can quickly disable the tool during long-term processing.
The "golden mean" here is to choose a device with a power of at least 500 W under famous brand and in the middle price category. I also advise you to stock up in advance with interchangeable saw blades specifically for your electric jigsaw model.
Basic
In this table, we tried to briefly tell you which tool is better to choose and what it will be needed for.
| Tool | Description | |
|---|---|---|
 | Roulette (5 m) | It is desirable that its soldered iron tip is held firmly and does not crawl on the canvas itself. |
 | Stationery knife | Opening the packaging with the material. Underlay cutting. In most cases, they do without it - the current substrate simply breaks along the tear lines. |
| regular pencil | Mark "B" is ideal for marking laminated flooring. Even if the markup is not done correctly, you can easily wipe off a thin strip. | |
 | Square (25-30cm) | At all times, this tool has been the most important for marking something. |
| Electric jigsaw or Hacksaw with a fine tooth | Pattern and sawing of material | |
 | Hammer or mallet | For fitting and precise joining of laminate dies |
Unfortunately, this set of tools will not be enough for comfortable and quick laying of laminate, let's also consider what additional tool you need.
Another necessary tool may be a protractor or goniometer. It may come in handy if you decide not to follow the rules, but to lay the laminate diagonally - by setting it to an angle of 90? it is very easy to mark lines for trimming dies.

You probably have a question: why a hacksaw with a fine tooth? It depends on whether there is a gap between the base of the floor and the bottom of the door frame after installation. interior doors. If there is no gap, then you can not do without a hacksaw. Of course, you can try to make this LNA (Bulgarian), but I don’t think that without special skills you will be able to make an even cut.
Auxiliary
The fact that it is auxiliary does not mean that it is an expensive tool or difficult to get. This tool for laying laminate flooring is sold in almost any hardware store, unless of course you live on an uninhabited island. The estimated cost of these devices ranges from 2800-3000 rubles. Having spent this insignificant amount, you yourself will be able to quickly and efficiently cover your floors with laminate.
| Tool | Description | |
|---|---|---|
 | Clamp (metal clamp) | Taping the last sheet of laminate |
 | Restrictive Styling Wedges | Providing a gap between the wall and the edge board |
 | tamping block | Provides sheet edge protection |
| Fountain drill set | Required for communication | |
To make it clearer for you, we will consider in detail what is needed for laying a laminate with your own hands from an auxiliary tool.
- Metal brace or clamp. It is a curved plate, the thickness of which should not be less than 5 mm, for efficiency. At the ends of the plate, bends are made in different directions, but clearly at an angle of 90 degrees. One end should be wider than the other. It is needed for tamping the last laminated boards that are laid along the walls. Its use is necessary for uniform distribution of force along the entire length of the Laminate. Since for tamping it is necessary to make a certain effort, one cannot do without a hammer. This brace helps keep the laminate edge intact.
- Stop Wedges for Laminate Laying . Needed for laying boards to the wall, they will help you set a gap of 8-12 mm. This gap will serve for the thermal expansion of the laminate tiles in the off-season. I can immediately reassure you, they will not be seen on the finished, laid floor, after the work is completed, everything will be safely closed with skirting boards.
- The bar is padded. As you probably already guessed, it serves to pad each board and to clearly join the tiles to each other. Using a bar, all lock connections will remain safe and sound. It can be made of both wood and plastic, so that it would be enough for more than one room, pay attention to its price and quality.
- Fountain drills. As in processing technology ceramic tiles are used for precise and accurate drilling. In this case, they are used for making holes in the laminate for heating risers or for laying other water pipes. Do not forget that the holes should be made 4-6 mm. wider than the diameter of pipes passing in an unnecessary place.
Remember!
Sometimes a situation may arise that there is no tamping bar at hand. In this case, it is FORBIDDEN to hit the laminate locks with a hammer. In extreme cases, take an unnecessary segment from one of the sheets, join the locks and carefully tamp the sheet. The effect will be the same as from the bar.
Innovations
Above, we examined a common and common tool, and professionals believe that high-quality laying of a laminate with their own hands will require a more advanced tool.
1- in simple terms, noiseless and dust-free cutting of panels without the use of a hacksaw or electric jigsaw. The cut is made at a right angle. Design feature is the cutting of laminate or similar boards - one left, since great effort no need to apply. This result allows you to get a special structure of the blade.

Makes it possible to quickly and effortlessly measure the angle of the walls and easily place it on the laminate sheet. The working surface of such a square starts from 30 degrees.

Easily helps you instantly mark the line for cutting the final row of your base. This tool does not even have to be bought in a store. If you think a little, you can find a similar design in your everyday life.

4 — it will be useful for you to quickly mark the cutting line of the row extreme to the wall, it will easily cope with the display of the form with subsequent application to the laminate sheet for subsequent cutting, for example, a semicircle for pipes or decorative elements. You can also combine the design of one template with another.

Video instruction
And now we bring to your attention a video instruction on necessary tools and of course about laying, the laminate itself.
Summing up:
We, in principle, presented you with all the tools that are needed for laying laminate with your own hands and for what specific work. As you yourself have seen, most of the tools are already in your house. There is no difference, you will have at least a part basic tool, even though the whole set, the quality of the finished flooring in your home will not change. Any tool can be replaced with something from improvised means, the main thing is to approach the matter with high accuracy.
Think for yourself: will the quality of the saw change if you use an ordinary saw instead of a jigsaw? I think your answer is no. It will only affect the time spent.
The video in this article will help you get Additional information on this topic.
Laying laminate flooring is easy. Manufacturers have taken care of this. They thoroughly thought over the design of the lamellas and how they are connected to each other, so the installation of the flooring is quite affordable.
Quantity Calculator
Without the involvement of specialists, with their own hands. However, a tool is required for the production of work. That's what this article will be about.

A little about the material itself
As mentioned above, the device of the laminated board is thought out in such a way that it does not require fixing to the base or gluing the seams. Laminate parquet floors are laid floating. This means that the individual elements of the coating are firmly fastened together with special locks cut out along the perimeter of the board. The connection takes place according to the “thorn-groove” principle, only the thorn and groove have a complex profile that increases the reliability of the connection.

The entire floor plane assembled from individual elements slides freely on the substrate on the base. "Freely glides" is, of course, loudly said. Who will give him such an opportunity: heavy furniture will be placed on top of the floor. But nevertheless, some backlash is still present. Therefore, it is necessary to leave a damper joint of 10-15 mm along the perimeter of the floor covering. This gap will subsequently be covered with a plinth.
The usual way of laying laminate - the most common - "deck". They start with a whole board, the next one is joined to the end, and so on to the wall. The last board, if necessary, is cut to the required size. The remaining trim, if it is more than 200 mm, is used as the start of the next row. If a whole number of boards fit into the length of the room, without trimming, or if the cut is too short, before starting the next row, cut the whole board and start with a half. With this method, the transverse seams are shifted - they are obtained “in a run”.

What will be required
From the described laying technology, it can be seen that the set of tools for working on the installation of laminate flooring is not large. When installing a laminate with your own hands, the following set will be enough:
- marking pencil;
- measuring tools - tape measure and square;
- a hacksaw with a small tooth or an electric jigsaw;
- knife or scissors for cutting the substrate;
- a hammer, preferably with a rubber head, but if the laminate has a Click-type lock, then you don’t need to hammer the boards with a hammer; they snap into one another;
But what about special kits for laying laminate? Let's see what the manufacturer put in this set. There are kits from different manufacturers on sale: FIT, Quick-Step, FLINST-001, and others. Their composition is the same. The set includes:
- mounting wedges;
- driving block;
- metal bracket;
As the manufacturer intended, wedges are used to create a damper joint between the coating and the wall. With the help of a driving block, boards are knocked out. It is necessary so as not to damage the spike of the lock on the board when hit with a hammer. The driving block has the same groove as on the lamella. The block is put on the protruding part of the lock, the blow is made on the block.

Well, a metal bracket for laying a laminate will need (attention!) Only once: to install the last, finishing board. After all, there will be a wall that will interfere with the installation of the last board. The photo shows what this thing looks like.
No words: the devices are very necessary and convenient. But are they really needed in order to purchase them for almost fifty rubles, and even more so, to find out how to make a bracket for a laminate with your own hands, and what’s the funniest thing: having learned the dimensions of this fixture, try, nevertheless, to make it with your own hands.

Why such skepticism, you ask?
Why then sell mounting kits and a separate metal bracket? Firstly, there is a terrible bourgeois secret: most things are sold not so that the consumer is comfortable, but so that the consumer buys, and therefore brings profit to the manufacturer and seller. Second: for the professional floor installer who installs hundreds of square meters floor coverings, lightening and speeding up production process necessary.
Some of them do use a mounting bracket. Only this tool is not quite the metal squiggle that is sold in sets. By the way, many professionals do without wedges, pads and metal brackets. Now I'll tell you how.

How to do without a metal brace
If you plan to do the flooring work of laminated panels with your own hands, then for the bracket for laying the laminate, as well as wedges and a block for hammering, it may well be replaced with improvised means. Consider the stages of work:
- Damper seam. The required technological gap is made within 10-15 mm. And surgical precision is not needed in this process. Tolerances "by eye" are quite acceptable, the main thing is that the gap is not larger than the plinth can cover. If you are neat in life, and the measure “by eye” is not suitable for you, use laminate trimmings as wedges - its thickness is quite enough to create the necessary distance between the coating and the wall.
- Board knocking. Recall that the Click type lock does not require the use of force: the board is tilted with a spike into the groove, and then lowered into a horizontal plane. The lock snaps into place by itself, without much effort. If the lamellas have a different type of lock, or it seems to you that it still doesn’t hurt to knock out the board a little, use trimming of the same laminate to protect it from breaking the spike or groove. Put a piece on the spike, and knock on health - the castle will remain intact.
- Finish board. To install the last board, use a wooden wedge: cut any piece of wood in the form of a right triangle. Install it so that one of the legs looks up, the second rests on the wall, and the hypotenuse rests on the edge of the board. Carefully drive the wedge - it will push the board into the groove. Just remember to protect the wall. For example, a metal ruler, or other similar object. By the way, you will have to protect the wall even if you use a bracket. In this case, the lining will need to be made under the bracket so that it does not damage the floor.
- About making a staple yourself. If a do-it-yourself laminate laying bracket haunts you, and you are determined to make it yourself, you will need a metal strip. It must be steel. Thickness - such that it can be bent, but sufficient so as not to straighten out from the effort applied during work. Its dimensions are not important. The strip must be bent in the form of the letter Z. The tool looks like a montage. If necessary, it is the mounting bracket that can replace the metal bracket for mounting.
Watch the video of the laminate installation process and see if you can do without the installation kit.
Laying laminate is not difficult, especially if it has castle type element connections. However, the use of a special tool will help to perform the work efficiently and quickly. Some of them are in the house of each owner, as they are used in construction work and at home, but a specific tool will also be required to comply with the laminate laying technology. It allows you to maintain the integrity of the grooves during the knocking of the lamellas, as well as to evenly cut off part of the board for the row that is farthest from the wall.
Laminate tools
 Laying a laminate cannot be done with only whole elements. That is why the main tool is a jigsaw. What characteristics should it have if the floor is laid in an apartment? It is not necessary to purchase a powerful and expensive professional electric jigsaw. At the same time, a cheap tool breaks down quickly, and low power can lead to its breakdown due to prolonged operation.
It is enough to choose the "golden mean", that is, a 500 W device from a well-known manufacturer will fully justify its  acquisition. You should buy in advance spare files suitable for the selected model of the jigsaw.
The perforator is selected according to the same principle, therefore good choice becomes a semi-professional instrument. The purchase of spare drills will allow you not to stop work in case of breakage. Hammer, tape measure, square, hacksaw, pencil - these items should be prepared in advance, the pencil must be sharpened sharply, it is more convenient to use a metal square.
Specific tool for laminate
Installation kits are sold specifically for laying laminate flooring, containing the following parts:
- metal staples,
- limit wedges,
- padding bar.
 With metal brackets, the elements of the laminate are protected from punching when it is necessary to knock out the row extreme from the wall. They serve as stops, have a convenient shape, and are made of durable steel. Boundary wedges are metal rectangles inserted between the outermost row of laminate and the wall. Thus, they fix a small gap, which allows the expansion of the material in case of change. temperature regime air.
The tamping bar is important detail, without which it is impossible to carry out padding of each board. It is made of wood or plastic, high demands are placed on its quality.
It is forbidden to knock out the elements of the laminate only with a hammer, as it can damage the edges, resulting in a poor-quality butt joint.
 Builders advise using a plastic bar. Wooden, like a hammer, can lead to chipping. The optimal hammer weight is 1-1.5 kg, tamping blows are applied only on one side of the bar, since the second must remain perfectly smooth.
Cutting the lamellas at the required angle is carried out using a special angle cutter. In total, in order to perform the installation, the following tools are required:
- jigsaw;
- perforator;
- hacksaw;
- square, goniometer;
- pencils, tape measure;
- mounting kit.
It should be noted that the violation of technology leads to poor-quality installation even with the help of good tool. Before starting work, level the floor concrete screed if it is not equal. Next, a substrate is laid on it, it is made specifically for this purpose, and is sold together with the laminate. The substrate provides the floor with sound and heat insulation, noise absorption.
The substrate is laid in one layer, glued together with masking tape. Work starts from the corner near the window. The boards are joined depending on their variety: in grooves or with the help of a locking mechanism. The evenness of the first row is a guarantee of the correct laying of the entire floor. The offset of the seams will provide a beautiful pattern of the finished surface. At the end of each row, as a rule, it is required to cut the lamella. It is important to accurately measure between the wall and the board - it is into these gaps that the restrictive wedges are inserted.
We advise you to read
, diagnosis, treatment Treatment of urogenital chlamydia") Chlamydia urogenital - description, causes, symptoms (signs), diagnosis, treatment Treatment of urogenital chlamydia
Chlamydia urogenital - description, causes, symptoms (signs), diagnosis, treatment Treatment of urogenital chlamydia The benefits and significance of hydroamino acid threonine for the human body L threonine that
 To wait or not to wait for a guy from the army For what reason can they be commissioned from the army
 Baked apples with cottage cheese Baked apples with cottage cheese

