Such parts are always made from high-strength and high-quality raw materials. But due to transverse and longitudinal loads, the action of chemicals from the road and water, the product gradually wears out. Most often, the bushings of jet rods break, which need to be changed from time to time.
When VAZ-2107 needs to replace jet rods
As mentioned earlier, the rods are made of high-quality metal (mainly steel). This raw material can withstand heavy loads over many years of operation.
The weak point of the rods is the lugs. These parts are welded to the rods and are not their continuation, and welding has a certain service life. Over time, gradually solder spots can be damaged or destroyed.
In order to avoid problems when driving and prevent malfunction of the rods, you need to periodically check the condition of the spare parts. In the event of deformation, cracks, traces of destruction, it is necessary to replace the jet rods.
It is especially necessary to monitor the suitability of silent blocks, which are often torn,
unable to withstand stress. As a result of this, the fastening of the rods weakens, they begin to move relative to the base, ceasing to perform their direct functions.
In this case, you do not need to wait for the rubber bands to fail. If knocking occurs at the time of vehicle movement, inspection and detection of damage to the rods, change them immediately. To do this, it is not necessary to go to a service station, you can do everything yourself.
Step by step replacement of jet rods
Work is carried out on a flyover or pit. If this is not possible, then there is a flat area, the necessary part of the machine rises and is fixed.
For work you will need:
- a set of keys;
- WD-40;
- metal brush.
Replacement of jet rods is carried out as follows:
- The joints of the rods are cleaned with a special brush. After this procedure, the WD-40 bolted connection is necessarily processed and time is given to soak.
- It happens that it is not possible to unscrew the first time, then re-processing is carried out and some more time is expected.
For the greatest efficiency, a key with a large “shoulder” is taken and the nut is unscrewed, but this option is not suitable if you are working without a pit, but lying under the car.
- When the nut reaches the edge of the bolt, several blows are applied with a hammer to dislodge it from the “hatched” area, since this element usually sticks strongly in the sleeve.
- The nut is completely unscrewed with a key and the bolt is taken out, if it does not come out, a drift is used.
- If the thrust is torn out alive, then the remaining parts of the mechanism are taken. This can be done using a mounting spatula.
- Next, move on to the second mount. At this point, the bottom of the shock absorber is unscrewed, the spacer is pulled out and it is moved to the side so that you have access to the bolt.
- Nuts can be very tight, but this is normal. The difficulty of the process is explained by the fact that locknuts are used for fixing. Its distinguishing characteristic is the equipment with a nylon border around the edge, which makes the connection very tight.
- Further it will be more difficult. The construction of the structure is such that the bolt is mounted on the side of the gearbox. To get to it, you need to remove unnecessary parts on the left side (get the axle shaft, dismantle the brake disc, etc.). It will take a lot of time and effort to carry out these activities. Therefore, it is advised to clean the connection with a brush, treat it with WD-40, and then try to unscrew
- If all else fails, then the grinder is used. The head of the bolt is cut off in the area between the bracket and the silent block. The same procedure is done on the other side.
- The mounting blade gets the rod from the bracket.
Installation 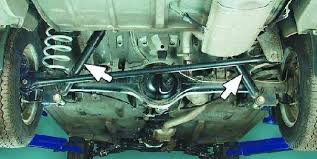 traction is done as follows:
- First, the thrust is mounted in the front bracket. Before inserting the bolt into the desired hole, it is processed with nigrol;
- jet thrust is placed in the rear bracket. Don't be surprised if the mounting holes don't line up.
If the jet thrust was broken, then under load the bridge moved all the time. This led to the shift.
To adjust the holes, you need a mounting blade, resting it on the bracket, unscrew the bridge until the fasteners are aligned. When they match, you need to insert the bolt and fix it with a nut.
With the help of such manipulations, you will be able to replace jet rods with your own hands and save money on visiting service stations.
We change the bushings of the rear jet rods (rods) VAZ 2101-2107
Quite often, the cause of knocking in the area of \u200b\u200bthe rear wheels of the VAZ is the wear of the bushings of jet rods. Many change rods entirely, as this is much easier than replacing bushings. But practice shows that the jet thrust resource is many times greater than the resource of the bushings, so it makes sense to change only the bushings. It is not difficult to do it yourself, the main thing is to know the technology.
It is more convenient to carry out all work on replacing the rear jet rods on the VAZ 2101-2107 on a viewing hole or overpass. First of all, you need to remove the old jet thrust. On the one hand, it is attached to the body, and on the other - to the bridge.
We unscrew the nuts on the bolts, remove or knock out the bolts with a metal spacer and release the jet thrust. Then you need to press out the old metal sleeve. To do this, you need to clamp the eye of the jet thrust in a vice and knock out the metal sleeve using a spacer.
After it is knocked out, it will not be difficult to remove the rubber bushing - just pry it off with a screwdriver. The inside of the eyelet is best cleaned with a file.
In order to install new bushings on the VAZ, you need to use a vice. First, we install the rubber bushing - we lubricate the inside of the traction eye and the bushing with soapy water, and then with the help of a vice we press the bushing into the eye. Do the same with the metal sleeve. We repeat the procedure for the second eyelet.
When installing jet thrust, it is best to use new bolts and nuts. Before inserting the bolt into the jet thrust bushing, it is best to lubricate it with grease - lithol or. Since the jet thrust changes its angle of position during operation, the lubricant will protect the bolt from thread abrasion. Subsequently, this bolt will be much easier to remove.
I am glad to welcome you, friends, on the blog ""
A knock in the rear wheels of a penny, a deuce and the next row of classic models of the domestic automobile industry appears from the wear of the bushings of the jet rods or, as they are also called, the rods. Almost all classic VAZs in their layout contain these elements necessary for the rear axle.
Some car owners change the rods entirely, but to eliminate knocking or other malfunctions, it is enough to change only the bushings, which wear out very quickly, unless, of course, the rod itself is bent or deformed. Naturally, completely changing the thrust is much easier than knocking out a worn out rubber band and then pressing a new one back in, but this process is more economical and not so complicated.
On the market today you can find many different repair kits, both complete rods and bushings separately. When buying, you should pay attention to the package, and more specifically to the number of large and small rubber parts. Most provide kits with 4 large and 6 small bushings. It is better to take a repair kit for the VAZ-2121 in which all the elements are of the same large size. Of course, you will have to tinker with them, but the result will meet all expectations. In addition to rubber bushings, it will be necessary to purchase metal bushings, which in any case will also need to be replaced.
The procedure for replacing the bushings of the rear jet thrust must be carried out in a viewing hole. First of all, you need to unscrew the nuts on the bolts that connect the bar to the car body and the bridge. Then remove the bolts and release the thrust itself.
With a long operation of the machine, for this operation, you may need special tools, for example, a metal spacer, with which you can knock out a rusted bolt. After removing the jet thrust, you can start knocking out worn bushings. To do this, it is better to clamp the eye of the rod in a vise, and using the same spacer and hammer, knock out the gum. After the bushing has come out of its place, it can be easily removed by prying it with a screwdriver. In extreme cases, if it has already become attached to the metal, the sleeve can be pulled out with pliers. After releasing the eye of the rod from the rubber bushing, its inner surface must be cleaned with sandpaper and wiped with a dry cloth.
When installing a new bushing, make sure that the inner surface of the lug is smooth and without roughness. Next, the bar and the new gum are treated with soapy water in order to avoid much friction. The bushing to be replaced is put into the traction eye and, with the help of a vice, is carefully and slowly pressed in. After that, the installation of the metal part is carried out in the same way. The same actions are necessary 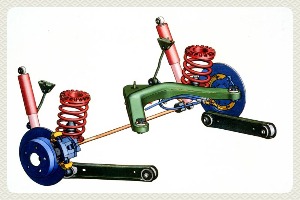 produce with the second part of the jet thrust.
In addition to replacing the bushings, you also need to take care of the bolts and nuts. It is advisable to change them too, because jet thrust is a moving element of the car. The seats of the body and the bridge of the machine are pre-cleaned and lubricated with special oil. After that, the thrust with replaced bushings is screwed to the body. You can also lubricate the bolts themselves, thus protecting them from corrosion.
Knocks and shaking in VAZ cars mainly depend on the rear jet rods, so you should pay attention to them, especially since solving the problem does not involve large financial injections and does not require more skill and experience. There were even cases when the rear bar simply burst in the eye area and the rear axle "led" along the road, but the domestic car still kept moving.
Another interesting way to replace the bushing ⇓
We advise you to read
 Psychological characteristics of children in adolescence
 Transferring a child to another school - the procedure and necessary documents Whether to transfer a child to another school
, diagnosis, treatment Treatment of urogenital chlamydia") Chlamydia urogenital - description, causes, symptoms (signs), diagnosis, treatment Treatment of urogenital chlamydia
Chlamydia urogenital - description, causes, symptoms (signs), diagnosis, treatment Treatment of urogenital chlamydia The benefits and significance of hydroamino acid threonine for the human body L threonine what

