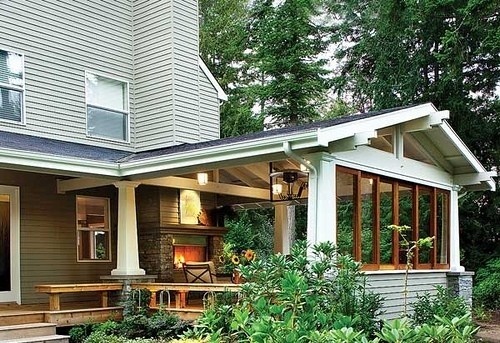
The veranda is attached to the house and serves as a kind of resting place in the summer. Distinctive features of such a building are the lack of heating and good ventilation. There are options for verandas, both open and glazed. Regardless of the type chosen, the veranda must have a roof to protect it from rain. The owner will need to decide on the shape of the roof and its material. Most often, verandas are made with a shed roof with a slight slope.
So, how to attach the roof of the veranda to the house?
Roof structure and features
The veranda can be built-in, that is, be under the same roof with the house. But it happens that it is attached to an already built house, then it will have an individual roof, simply adjacent to the main building.
Shed roofs are found on verandas that are attached to the side of the house - this is most often. But sometimes such a summer gazebo is built from the back or front side, in which case you can make a gable roof.
To make the roof of the veranda look harmonious and beautiful with your own hands, it is made from the same materials as the roof of the house. However, there may be exceptions.
When choosing how to make a roof on the veranda with your own hands, from what materials, you should take into account the amount of precipitation in the form of snow. The roof must be strong enough to withstand the snow layer.
Thermal insulation material must be laid under the roof, but this is not necessary, since the veranda is designed specifically for use in the summer, and additional heat may even be superfluous. But you need to leave space for the free passage of air flows, otherwise in the summer heat the roof will overheat greatly, moisture will accumulate inside. This will adversely affect the life of the roofing.
It is not very difficult to make a roof on the veranda, since the building is small in size and can be used mainly in the warm season. Let's figure out how to build a veranda roof.

First of all, before you attach the roof of the veranda to the sloping roof or build a separate one, you need to decide on the angle of the roof and its materials.
If the slope is strong, then the wind resistance will also be strong and precipitation from such a roof falls off easily. If the angle is higher than 25 degrees, then in the scorching sun the material can move out if it is on rolls. If the slope is up to 60 degrees, then the consumption of materials will be doubled.
When choosing materials, it is worth considering the average rainfall in the region; the weight of the people who will cover the roof; wind strength and other atmospheric features.

The roof of a do-it-yourself veranda can be made from many materials. Let's consider the main ones:
- Tiling. One of the most common options. Such a roof looks aesthetically pleasing, will last a long time, can withstand heavy rainfall, without being combustible. At high temperatures, it does not lose its properties, heat transfer is slow, so even at night the roof will heat. This material is breathable, so natural ventilation is provided. There is a ceramic tile, it is used most often, another option is cement-sand - it costs less and is less in weight, although it is indistinguishable from ceramic in appearance. Also choose soft tiles, this material is also very stable and elastic.
- Metal tile. This type of tiles should be taken out separately. It is either made of steel or aluminium. Very convenient to use. Can be laid directly on top of old flooring. It does not fade in the sun, is resistant to temperature extremes, precipitation. It is additionally treated against the occurrence of rust. But there is also a drawback - it makes a lot of noise in the rain or wind.
- Materials in rolls. Usually these are inexpensive materials in the form of roofing material, roofing felts, etc. They are placed on the crate, attached with nails and battens.
- Polymer. They are inexpensive, but very wear-resistant, durable and well pass the rays of the sun. Also, such a roof absorbs sound well, weighs little, retains heat, and transmits light by almost 100%. If you want to make a transparent roof on the veranda, then choose transparent polycarbonate. Such a roof does not fog up, drops of precipitation roll down, consists of sheets that are fastened with metal profiles. A do-it-yourself polycarbonate roof for a veranda is a great solution for any type of extension.
- Ondulin and slate containing asbestos and cement. These types of materials are very similar in their characteristics and appearance. How to cover the roof of the veranda with ondulin? Simple enough. The material is a plate of a wavy shape, asbestos-cement slate is produced in the same shape. They are usually fastened with screws or nails to the crate. The advantages include durability, ease of installation and replacement of one sheet, low cost, fire resistance, does not electrify, is resistant to moisture, and has good soundproofing properties.
- There is another option to make an awning roof with a telescopic system, that is, if necessary, such a roof can be moved away and then there will be an open sky above you. Such a roof will completely protect from the sun, precipitation, dust, but if you want more space and fresh air, then you can easily move it away. If you make a veranda with such a roof, then this will not be considered an extension to the house, that is, legalization of construction is not required.
According to experts, if the slope is above 22 degrees, then we build the roof of the veranda with our own hands using slate or tiles.

If the veranda is attached to the side of the house, then the roof is made shed. It is most convenient if the roof of the house and the veranda are one. So leaks are practically excluded, plus savings on installation and building materials.
Step-by-step guide on how to make the roof of the house and the veranda:
- First of all, you need to decide what the angle of inclination will be. If there is a lot of precipitation in the form of snow, then the roof should be more sloping so that it does not fail under the weight of snow blockages. The same applies to areas with strong winds. The sharper the angle of the roof, the more wind resistant it is.
- Then there is work on erecting a wooden frame. This is done in the same way as for the construction of the roof of the house.
- The rafter system is equipped.
- Roofing is being done. To do this, the frame beams are attached on one side to the wall, and on the other to the ridge. Between themselves, the beams are fastened with pins and wire. The roof is laid in accordance with the recommendations and instructions of the selected material.
How to connect the roof of the veranda to the roof of the house? There are some specifics on how to cut into a roof when building a veranda.
- The step of laying roofing boards should be equal to the step that goes on the main roof of the house. If a soft roof is chosen as the material, for example, roofing material, then you can simply make a solid flooring from boards.
- With the help of nails, the boards are attached to the truss system under the visor of the already existing roof of the house.
- The roof of the house should be at least 5 centimeters on the roof of the veranda, this will ensure that the drops slope down, and not seep between the two roofs.
Do-it-yourself roof on the second floor of the veranda is built in the same way. To prevent water from getting inside, at the junction of the junction of the extension to the house, a junction bar should be laid and do not forget that the roofs should overlap.
The roof of the veranda for the change house is built with your own hands, following the step-by-step instructions above.
If you are building a veranda not for an ordinary country house, but for a cottage, then you should use the roofing materials that cover the roof of the house itself. But if this is not possible, then you can make the roof of the veranda out of polycarbonate. This is also a very noble material.
Now you know how to do the roofing of the veranda with your own hands.
How to properly attach the roof of the veranda to the house with your own hands: video
If you are a happy owner of your own plot near the house, then you know that even half of all the desired landscape design ideas cannot be realized - there is simply not enough space. And you have to prioritize: first of all - green spaces, then - a gazebo with a barbecue, a place for a car, a mini-garden, a swimming pool ... But for a terrace open to the sun, sometimes there is not enough secluded and comfortable corner.
That's when the inhabitants involuntarily stare at the bold projects of modern architects, when such recreation areas are equipped right in the open air, at a height. Do you like such solutions? Believe me, in practice everything is much easier than in theory! And our step-by-step master classes, video tutorials and valuable tips from experienced architects will help you figure out how to make a terrace on the roof of your own house.
How to draw up a competent project of a terrace on a house?
When designing and thinking over the terrace on the roof of your house, consider all the seasonal and climatic features of your latitude. The possibility of implementing such a project and its details will depend, first of all, on the specifics of your climate:
Over the past decades, some experience has already appeared in arranging a terrace directly on the roofs of residential buildings. And you will certainly be interested in learning it! So, for example, not always such terraces are open from all four cardinal directions.
First, such openness often causes discomfort and a sense of insecurity. For example, there is a big ugly factory or a highway on your right, and at least from this side you want to take cover.
But I would like to leave the sun and the forest on the left, right? Well, if on the right side from an unsightly view it covers part of the roof, and this was even designed from the beginning of construction:

The construction of a terrace as part of the roof is quite possible to implement in ordinary residential housing construction:

Another good option is when the terrace serves as a natural extension of the attic. Such projects are now in vogue, and have a huge number of advantages:

If the terrace is located on the flat roof of the house, and is open from all sides at once, then the so-called privacy screen is equipped. They can serve as a specially built wall for a barbecue oven, as well as a pergola, solid landscaping, or a carefully selected lighting design:

The subtleties of arranging an inversion roof
Now let's move on to the technical details. And let's start with the most difficult moment: fixing the terrace to the roof itself, namely, its foundations with the outer layer of the roof. More often for arranging the floor on the roof, tiles, artificial stone and terrace decking are used:

Decking: how to properly install and secure
The simplest and most reliable solution is to make the floor of the roof deck out of composite decking. It does not rot, does not get wet, does not fade and does not weigh much. And the choice of textures and colors is huge.
There are some points: a flat roof is always protected by waterproofing, and its role is invaluable for the roof. And therefore, when installing decking over insulation, your main task is not to damage the insulation.
For this, elements in the form of fungi with a plastic cap were developed. In addition, it is recommended that before installing the insulation, lay another layer of waterproofing or reinforce it with several existing layers:

Second moment. Often a flat roof is protected with euroroofing material, and it is important that the material that comes into contact with it is not subject to decay. Modern adjustable legs are perfect for this idea. And they already put wooden logs.
Moreover, the tree will not rot, because. it is well protected from rain from above and puddles below. They are especially indispensable if the base is not even:

And, finally, if you are going to equip a terrace on the roof of an extension to the house, for example, on a garage, then know that this is only covered with roofing material. And this is not the best option as a base for the floor.
The fact is that over time, all rolled materials lose their elasticity and become brittle, which is why they begin to let water through. In addition, the roof on which the terrace will be installed must be vapor-permeable.
Therefore, it is ideal if the waterproofing of such a roof is still made of another material. In any case, you will need to lay its additional layer, crate, lag mount and the board itself:

When choosing a board for the floor of such a terrace, pay attention to a matte, with a rough surface so that it does not slip after rain:

As a last resort, if terrace decking seems expensive to you, opt for larch decking. As you guessed, such a deck board is not simply called. It steadfastly withstands the atmospheric phenomenon, remarkably tolerates strong temperature changes and constant moisture. And, finally, the most budget option is a pine floor, which, unfortunately, will not last long, but as a temporary one it will do.
Today in stores you will find many options for modern terrace decking, which immediately comes with component logs. Both the terrace board and the logs are also made of composite material, and therefore do not deteriorate even with constant rain.
Keep in mind that usually a roof terrace does not have its own roof, which is quite difficult to perform in such conditions, and illogical in such a place. Therefore, it is always open, like a palm, to the sky with its rains, hail, snow and winds. In a word, it is in harsh climatic conditions 365 days a year.
Adjustable supports adjust the slope and height of the terrace floor, thanks to which they perfectly distribute the load on the entire supporting structure. In addition, you can make the floor of the terrace slightly sloped so that rainwater easily descends from it. The main advantage of such supports is that they do not need to be fixed inside the roof, and therefore you will not damage the waterproofing.
When the logs are laid on the supports, the entire structure of the terrace will become a single whole, because. support does not require additional fastening. There is still a plus here that under such a floor a natural water flow will descend, for example, from rain or melting snow. Those. the roof will directly perform its functions, and on it there will be a frame with a terrace floor, which does not interfere with anything.
Here is a useful practical advice of what we just talked about:
By the way, terrace decking does not always have to be only the natural color of wood, even here you can find interesting solutions:

Tiles, artificial stone or pebbles: which is better?
Both ceramic tile and stone look great in any project, not just as unusual as those implemented on the roof. But keep in mind at the same time that such a coating has a considerable weight. Of course, you can arrange the floor from natural stone, but only immediately with the calculation of its load on the foundation of the house. And even if the latter was built with a certain margin, it is still better not to reach the boundary values.
If you decide to give preference to this material, then know that it is allowed to install a warm floor on the roof. It will slightly warm the terrace in winter so that the snow and ice melt, and a slight slope and organization of a drain will help to get rid of precipitation immediately. To do this, the slope is arranged even during the construction of the roof, and the drain is often located in the very center of such a terrace.
The next thing to take care of is waterproofing. The main requirement for it is elasticity at sub-zero temperatures, crack resistance and the ability to lay facing materials on it (mainly this is a two-component waterproofing).
Next, now choose a porcelain tile adhesive, and not everyone is suitable here. The adhesive must have high adhesion and deformability. According to the norms, for construction on the roof, it must have the characteristics C2 and S1.
And, finally, the following requirements are imposed on grouting: strength, water-repellent properties and frost resistance. Those. here you need your own special grout, because the street terrace is different in that dust, branches, dirt and snow fly on it. And therefore, for a terrace on your roof, take cement-grade grout, or even better - epoxy, which tolerates strong Russian frosts well.
The main thing is that the grout in the end does not absorb water and allows the seams to look like new. After all, this is not a bathroom, this is the place that is shown to guests first of all, and such trifles can spoil the whole impression. The same applies to sealants. If you get a low-quality one, then it will eventually turn yellow, darken and even become covered with a fungus.
In a word, you need to choose those materials that will meet the operating conditions of the open-air place, especially since the terrace is at a height.
As a floor covering on the terrace, you can also lay pebbles, crushed stone or even a green lawn. But immediately think about a good fence so that from such a height a pebble does not fly directly into the forehead of someone. Indeed, in addition to the mischievous children of your guests, there are still strong winds, storms and just accidents.
Issues of landscaping, selection of furniture and fencing
So, if you have already built a roof, then this is 50% success! It remains only to successfully select furniture, decor and ensure all this protection and safety.
The choice of furniture: from chic to convenience
For garden furniture and landscape design elements of such a terrace, special composite exterior items are increasingly being used, where wood is combined with polymers. As a more budget option - light garden chairs, tables, benches and the like:

Fortunately, today garden furniture is specially produced, which easily tolerates constant scorching sun, snow, and temperature changes. And whole sets!
Landscaping: artificial or real grass?
If your terrace on the roof of the house will look at the city, then it makes sense to create a real corner of wildlife in it, such a spectacular contrast of comfort and urban technogenicity.
In the West, it is customary to raise mobile greenery on such a terrace. It is clear that growing real grass on an inverted roof is not easy, and it is not always necessary. In total, there are two solutions to such a problem: either for this purpose, make the inversion roof complex and heavy, if the foundation allows it, or lay artificial grass.
The first option is bad because, due to the weight, such a roof must first be included in the project of the house, taking into account the load on the foundation. In addition, keep in mind that living earth for living grass is always dirt.
You need to think carefully about the sides for such landscaping, so that in the rain all this dirt does not then pour on the walls of the house. And, finally, you still won’t lay a sufficient layer of earth directly on the roof, and therefore plants can periodically get sick, such an ecosystem turns out to be too closed.
Another option is artificial grass. It is light, it does not need living earth, and it looks good. If it weren’t for one thing: dust, dirt after melting snow and fallen leaves quickly accumulate on such grass. Those. over time, artificial grass becomes dirty and even covered with moss. Therefore, it will need to be looked after no less than the pool.
And finally, such an important moment as the sliding of wet artificial and natural grass. That is why we recommend that you abandon both ideas and still make a typical decking for a decking deck. And raise greenery that is pleasant to the eye in the form of plants in pots, especially since landscape designers love this technique so much:

Perimeter glass railing: stylish protection
Think carefully about security as well. If you are going to walk animals on the terrace, without a coherent perimeter, this is not the best idea. Unfortunately, there are many cases when animals fall from a height, jumping up after some butterfly, and this is quite difficult to keep track of.
Yes, and slightly tipsy friends who have gathered for a picnic are able to lose a sense of danger, and with it a sense of caution. In any case, if there are no barriers around the perimeter, then everyone, even domestic ones, is at risk, because any person can feel dizzy or suddenly slip.
That is why, even if only you will rest on the terrace, at least a small fence still needs to be made. And at the same time, keep in mind that it will be visible from the side of the street, and how exactly it will merge into the overall design of the house is an equally important issue. Therefore, we advise you to install the popular glass railing. Today it is more popular than ever, and in terms of its strength it is not inferior to a fence made of any other material:

Glass railings are often placed on outdoor outdoor pools or sports fields. This is ideal for places that need sunlight (flowers, sunbathing areas). Naturally, there is no need to put a blank fence around the perimeter of the terrace at a height - what's the point of blocking the entire view?
Although it happens when it’s better to hide from such beauty in the form of dilapidated houses or not particularly beloved neighbors. Then, along such a fence, landscaping is arranged to hide its unattractiveness.
In all other cases, you need to put glass, and believe me, it will not be fragile. Even if you wish, it is difficult to fall out of such a terrace, and at the same time, the lightness, airiness and transparency of such a building will remain in force. In addition, the glass one does not require periodic painting, which is also good, because it is quite inconvenient to carry out any paint and painting work at the height of the second floor.
As the glass itself for fencing, tempered glass is excellent. It is made at high temperatures. But, unfortunately, such glass is poorly protected from damage, so the frame method is not recommended for it. In other words, editing has its own challenges.
Triplex is also suitable - laminated glass, in which the topmost is covered with a reinforcing polymer film. Triplex is made of any thickness, which is its main advantage. And such a fence can withstand heavy loads, especially during impacts.
Finally, an expensive type of solid glass is curved glass. It is more used for decoration, but is also suitable for fencing terraces at a height. This is fire-resistant glass with noise insulation, frost resistance and even bullet resistance, which is quite valuable for the realities of modern cities.
Here is a comparison of all three types:

Such glasses are usually fixed through a hole in the glass using brackets with a coin-shaped plug. It just needs to be screwed into the base of the glass holder. It turns out that the glass is inserted as if into a frame and screwed. During the installation of such a fence, you will need special glass sheets, stainless steel or wood posts, brackets and even lamps for lighting, especially colored ones. Believe me, with the help of these you can create a unique lighting design for your terrace.
In a word, if you approach the matter wisely, you can independently realize even the most incredible project!
Roof installation is the final and most difficult stage in the construction of a building or extension to a house. Therefore, the installation of a transparent roof for a terrace requires from the home master not only the ability to freely handle the tool, but also an extremely responsible attitude to the performance of the required calculations and the preparation of materials.
What material to choose for the terrace roof
Terraces and gazebos are modern outbuildings designed to organize comfortable rest and relaxation of the household in a private home. To increase comfort and give the terrace a more sophisticated appearance, its roof is often made of transparent materials.
Advantages of translucent roofing:
- ease of installation of the structure and, if necessary, dismantling;
- lightness and strength of the coating;
- maximum illumination of the premises of the summer building with natural light;
- simple and uncomplicated work on cleaning the flooring from dirt and moisture;
- nice appearance.
In modern construction, one of the following types of transparent roofing materials is used:
- Polycarbonate plastic (polycarbonate) - due to its chemical structure, it has a high light transmission, reaching 92%, it is impact resistant in combination with low weight.
- Glass or ready-made double-glazed windows are a rather rare solution due to the complexity of the installation and the high cost of the material and components. It has the highest possible light transmission.
Types of polycarbonate material
This type of building canvas is available in several versions:
- Cellular. It has an internal cellular structure, so the roof for the terrace will be light in weight, but superior in thermal insulation properties to other types of plastic.
- With profiled surface. It is distinguished by a wavy surface structure, made in the form of a semicircular or trapezoidal profile. In conditions of a small slope, it increases the outflow of water.
- Monolithic execution. Smooth and transparent sheets have an increased density, and hence strength, therefore they are used as flooring in regions with heavy precipitation.
Preparing for the arrangement of the terrace roof
Reliable and high-quality installation of the structure can be ensured using special fasteners designed to connect polycarbonate material with various types of supporting structures. The selection of professional tools and components guarantees durability and attractive appearance of the structure.
For the production of work you will need:
- connecting profiles - end, U-shaped, H-shaped (one-piece);
- corner profiles;
- a set of ridge profiles;
- guide profiles for fastening material to wall surfaces.
Features of fastening polymer sheets
Fasteners are made with self-tapping screws, equipped with special thermal washers or rubber seals that prevent the penetration of moisture into the holes. With a polycarbonate thickness of 6-10 mm, self-tapping screws 4-5 cm long are used.
A practical solution would be to use a special thermal washer with a foot for attaching thick polymer plates. In this case, pre-drilling of pinholes is performed with a step of 40-50 cm and a diameter exceeding the diameter of the self-tapping screws by 2-3 mm.
The design of the thermal washer with a leg provides a closer fit to the work sheet. In addition, such thermal washers are equipped with original latches that reliably protect the fixing screw from water.
If a wooden truss frame is erected on the terrace, then the transparent material is attached using steel or aluminum profiles. However, the use of galvanized self-tapping screws is most preferable here.
Do-it-yourself installation of a transparent roof on the terrace
When mounting polypropylene sheets, it is forbidden to use rigid fastening, as well as to exclude the use of nails, rivets and staples. Screwing in screws should be done without additional effort and pressure.
Monolithic smooth polycarbonate has a perfectly flat surface and different thicknesses. As an option, there is also a monolithic corrugated type with its inherent wave-like or tiled structure. The fastening of such sheets does not cause difficulties, and the general technology for arranging a transparent roof for a veranda is performed in the following way:
- Fabrication and preparation of elements of the truss frame. The profiles are cut in accordance with the calculations made, their surfaces are treated with antiseptic agents or paint.
- Rafters are attached to the finished upper trim of the structure, maintaining a given angle (5-10 °). The most suitable tools are a screwdriver and self-tapping screws.
- Next, they proceed to cutting polycarbonate sheets, the dimensions of which are calculated based on the step width of the truss elements. Make sure that the joints of the sheets are located in the middle of the support beams with an overlap of 1-1.5 cm, and when laying the plastic stiffeners, they rush in the direction of the roof slope. At the attachment points, holes are prepared at a distance of 30-40 cm from each other, the dimensions of which should exceed the diameter of the self-tapping screws by 2-3 mm.
- The extreme rafter leg acts as a guide element, to which the end profile is attached and the installation of the first sheet of plastic begins.
- For mounting polycarbonate to the frame, only galvanized self-tapping screws are used, which are not susceptible to corrosion and salts. Each self-tapping screw is equipped with a thermal washer or a rubber seal to protect the holes from moisture.
- Sealing and fastening of sheets at the joints on the rafter leg is carried out by means of an end profile.
- After installation is completed, all polycarbonate overlaps are filled with sealant.
Features of mounting cellular polycarbonate
The fastening of the material with a honeycomb structure is carried out with more care and additional operations:
- the factory film is removed only after completion of work;
- sheets with ultraviolet protection are turned to the sun with the corresponding side;
- polymer sheets are placed in honeycombs downwards;
- polycarbonate sheets are connected to each other using detachable or one-piece H-shaped profiles;
- open edges of the canvases are completed with U-shaped plastic profiles;
- it is recommended to use finely porous flexible tapes for sealing the ends of the elements.
Design solutions
Polymer plastic structures can be given a different look, sometimes even quite unusual and exclusive. In this case, the shape of the roof is determined by the complexity of the construction of the truss frame:
- Flat roof. The slope level does not exceed 1-2°. It is carried out in places where there is heavy snowfall. The thickness of the plastic is chosen at least 10 mm. Ideal for small terraces and verandas.
- Pitched. Single or gable roofing is carried out at an angle of up to 40 °. The low weight of the polymer allows you to experiment with any slope settings.
- Arched. For the original curved design, honeycomb carbonate is suitable, which is easily deformable. Flexible sheets are malleable in the hands of a craftsman who can bring any original idea to life. In this case, only metal profiles are used.
- Dome. During its construction, honeycomb material is also used, which has increased flexibility. The creation of a dome is hampered by the complexity of careful calculation and fitting of the supporting elements of the roof.
Adhering to the technology described above, you can make a transparent roof for the terrace with your own hands correctly and at minimal cost. The low cost of polycarbonate allows you to use it for all adjoining buildings - verandas, gazebos, makeshift garages and playgrounds.
The construction of a roof from double-glazed windows is a rather complicated work and requires a separate description.
Transparent roof for the terrace (video)
The veranda allows you to profitably expand the usable space of a residential building. In a properly erected and well-equipped extension, you can comfortably spend time both in the warm and in the cold season.

An extension is best built so that it closes the front door to the main house. Therefore, you will not be able to build a veranda from any desired side of the already finished main building. Otherwise, the veranda will be torn off from the main building and you will have to enter it through the street.

Extension dimensions are selected individually. For a family of 3-6 people, a 3x4 m veranda is enough. It is also important to take into account the general view from the street. For example, if you live in a large two- or even three-story house, and the veranda is very small, the overall architectural ensemble will turn out to be inharmonious. For compact houses, you can safely attach verandas the width of the entire wall of the main building - it looks great.

Important note! Regardless of the chosen size and, in general, the features of the extension, its construction must first be legalized. To do this, you must have a project in hand. You can find it in open sources or order it from a specialized company.
With the finished project, go to the local architectural department. Employees of the department will study your project, make the necessary changes and issue a permit. Keep in mind that it takes about 2-3 months on average to review and approve a project, so it is best to deal with this issue in the winter, before the start of the construction season.


Construction site marking
We are starting to prepare our construction site.
First step. We remove about 150 mm of the top layer of soil around the perimeter of the future building and take it to flower beds, a garden or another place.
Second step. Align the resulting recess.
Third step. We do markup. First, focusing on the project, we drive in metal or wooden pins at the corners of the site, then in the same way we drive in intermediate pegs every 1-1.5 m, and then we pull the rope between the pins. We will be guided by it in the process of arranging the foundation.
We make the foundation
Most often, verandas are built on the bases of a columnar or tape type. The depth of the support is taken equal to the depth of the foundation of the main house. It is strongly not recommended to connect the main support with the foundation of the extension, because. these designs will have widely varying weights. Therefore, the degree of their shrinkage will also differ. To prevent a heavy house from pulling a relatively light extension, the latter must be erected on a separate foundation. To do this, leave between the foundations of approximately 3-4 cm gap.
Important point! When choosing the type of foundation, consider, first of all, the characteristics of the soil in your area and the total mass of the veranda. For the construction of heavy structures on heaving soils, monolithic ones are best suited. Lightweight structures, for example, made of wood, can be built on columnar supports.
Tape base
The tape type foundation is optimally suited for the further construction of a veranda on it from building blocks or bricks. The thickness of the base, as already noted, is maintained equal to the thickness of the foundation of the house. If this is a new building, we keep the thickness at the level of 70-80 cm.
First step. We dig a trench along the perimeter of the walls of the extension.

Second step. We level the bottom and walls of the trench, from wooden boards or shields, according to the height of the future concrete support.
Third step. We successively fill the bottom of the trench with a 10-cm layer of sand and the same layer of gravel with the obligatory tamping of each ball of backfill.
Fourth step. We lay the reinforcing mesh of 10-12 mm bars. The recommended mesh size is 10x10 cm. So the base will be as strong as possible.
Fifth step. We pour concrete prepared from a portion of cement, three portions of sand, 4-5 portions of gravel and water.
Carefully level the fill and leave it to dry and gain strength for 3-4 weeks. In the heat, we pour concrete every day to prevent it from cracking.

columnar base
Perfect for a veranda made of timber or polycarbonate. Pits for poles are recommended to be made with a depth of 80-110 cm. If the veranda is small (up to about 3x4 m), it will be enough to install supports in the corners. However, professional builders recommend installing intermediate racks for any size of the veranda. We maintain the distance between the supports within 0.8-1 m.

First step. We dig holes in the places of future pouring of the pillars. The best way to do this is with a drill.
Second step. We fill the bottom of each recess with a 15-20 cm layer of sand. Additionally, it is recommended to pour about 10 cm of gravel. We compact each layer.
Third step. Pour the concrete to the ground level and let it harden.
Fourth step. Finished concrete supports are coated with bitumen.
Fifth step. We fill the cracks between the ground and the supports with sand.

Sixth step. We erect the above-ground part of the brick pillars. We make the height equal to the height of the foundation of the main house.


Making a subfloor
The floor can be wood or concrete. For example, in a framed veranda made of wooden beams, a wooden floor would be more appropriate. Concrete pouring will best fit into an extension made of bricks.

We do the wooden draft floor like this:
- we fix the beam of the lower trim on the foundation. We use suitable fasteners, for example, anchors. To connect the beams directly, we first make samples at their joints and additionally fasten them with galvanized nails;
- we attach wooden logs to the bottom trim. We maintain the step at the level of 50 cm - so the floor will definitely not fail. We use the connection option described above;
- we fill the space between the lags with expanded clay;
- we make flooring from unedged boards or plywood with a thickness of about 50 mm. We fasten the flooring elements to the logs with galvanized nails or self-tapping screws.
We do the concrete screed like this:
- we fill the base with a 10-centimeter layer of sand;
- pour a layer on top;
- laying reinforcing mesh. For the floor of the veranda, a grid of bars with a diameter of 6-8 mm with cells of 25x25 cm is enough;
- pour concrete.
Important! The screed should be as even as possible. We carry out the work with the obligatory use of the level.
We build a wooden veranda
Basic material properties
Wood is one of the most popular and ancient building materials. Even after the appearance on the market of all kinds of blocks and other budget and easy-to-arrange elements, wood practically did not lose ground.
With the construction of a simple frame wooden veranda, almost everyone can handle it. It is only necessary to properly mount the frame racks and sew them up with shields, clapboard or other suitable material.
The indisputable advantage of wood is its environmental friendliness, beautiful appearance and relatively low weight. The latter property allows you to abandon the arrangement of expensive and difficult to build foundations.
The main disadvantage of a wooden veranda is its fire hazard - installing a brazier in such an extension or in its immediate vicinity is a very important undertaking that requires taking into account many nuances and trifles. Therefore, it is better to take the source of fire somewhere far away from the wooden veranda.
Another significant drawback of wood is its poor tolerance to high humidity, which is why the material needs serious pre-treatment with special ones. Without such preparation, the wood will rot very quickly.
Construction order

For the construction of the frame, we use a high quality wooden beam with a section of 100x100 mm. We already have the lower trim and the subfloor, so we continue to work following the instructions below.


First step. We cut grooves in the beam of the lower strapping for the installation of vertical supports. We maintain a half-meter step.
Second step. We install vertical racks. To fasten the frame elements, we use staples and screws or nails.

Important! The roof of our veranda, as noted, will be sloping. Therefore, the vertical beam, installed at the bottom of the slope, is made 50 cm below the opposite racks.


Third step. We mount the beam of the upper trim. On higher racks, no questions will arise - we perform the connections in the same way as in the previous stages.
When installing the strapping of lower supports, we do the following: first we connect the posts longitudinally with a strapping beam, and then we fix the transverse crossbars connecting the high and low racks at the height of the low racks. We fasten the crossbars with high racks using pre-created samples and nails.
Fourth step. The top harness is ready. The resulting slope will allow us to lay the rafters for the roof. Additionally, we nail a girder near the roof slope. To fasten the beam with all supports, we use anchor bolts. For greater reliability, it is recommended to fasten the strapping beam with transverse boards or beams, if possible and necessary (we focus on the weight of the future roofing material). We will attach racks and struts to them for greater strength of the truss system.
Fifth step. We mount in increments of 50 cm. To do this, we use a wooden bar with a section of 100x200 mm. We perform the connection of structural elements by any of the previously discussed methods.


Sixth step. We sew the frame. Lining is perfect for interior cladding, siding or other material is perfect for exterior. Between the materials of the outer and inner skin we lay layers of hydro- and thermal insulation. We attach the film to the frame. The position of the insulation is fixed by transverse rails. The finishing material is also attached to them. When sheathing, do not forget to leave openings for windows and doors.


Prices for various types of timber
brick verandas
Basic information about building material
Brick is great for building capital verandas. In a building made of this material, it will be cool in summer and, if properly insulated, warm in winter. Brickwork is durable, fireproof and unpretentious in maintenance.
The main disadvantage of a brick building is a lot of weight. Such structures are built exclusively on, which does not have the best effect on the total cost of construction.
The order of the construction of the veranda
The foundation is ready and waterproofed, the screed is poured, the base is even and does not require any additional preparatory measures. Let's start laying out the walls.

We first select the appropriate type of masonry. The simplest options that are perfect for self-construction of a veranda are as follows:
- spoon masonry. The final wall thickness will be 120 mm;
- poke masonry. Wall thickness - 250 mm;
- chain laying. Allows you to get walls with a thickness of 380 mm.
First step. We attach a mooring cord at two opposite ends of the foundation with a coupler. It should run along the edge of the base.
Second step. We expose the corner bricks along the cord, and then fill the space between them in accordance with the chosen masonry method. To fasten building elements, we use a standard cement mortar.

Third step. We check the evenness of the first row and similarly lay out the walls to the desired height, not forgetting to leave openings for doors and windows.
Important! will be inclined, therefore, the wall falling on the bottom of the slope, as well as the side walls adjacent to it, are made a row lower compared to the wall supporting the top of the roof.
Having laid out the last row of walls, we equip the armored belt. To do this, we fix a formwork about 70 mm high on each wall on the upper surface of the walls, put anchor bolts in the corners, lay reinforcing bars and pour concrete.
We let the concrete harden, and then we attach a strapping of a wooden beam with a section of 10x10 cm to the anchor bolts. The further procedure for arranging the truss system remains similar to the situation with
If the veranda is planned to be used throughout the year, the walls can be laid in two rows, filling the gap between the rows with heat-insulating material. With single masonry, we carry out insulation, moisture insulation and interior decoration by analogy with a wooden veranda. The exterior finish is up to you. You can simply gently embroider the seams and finish it.


| Masonry size | Length, L | Width, V | Height, H | Number of bricks thickness not included mortar joint, PC. | Number of bricks taking into account the thickness mortar joint 10 mm, PC. |
|---|---|---|---|---|---|
| 1 m3 single brick laying | 250 | 120 | 65 | 512 | 394 |
| 1 m3 thickened brickwork | 250 | 120 | 88 | 378 | 302 |
| 250 | 120 | 65 | 61 | 51 | |
| 1 sq. m of masonry in half a brick (masonry thickness 120 mm) | 250 | 120 | 88 | 45 | 39 |
| 1 sq. m of masonry in one brick (masonry thickness 250 mm) | 250 | 120 | 65 | 128 | 102 |
| 250 | 120 | 65 | 189 | 153 | |
| 1 sq. m of masonry in one and a half bricks (masonry thickness 380 mm) | 250 | 120 | 88 | 140 | 117 |
| 250 | 120 | 65 | 256 | 204 | |
| 1 sq. m of laying in two bricks (masonry thickness 510 mm) | 250 | 120 | 88 | 190 | 156 |
| | 250 | 250 | 65 | 317 | 255 |
| 1 sq. m of masonry in two and a half bricks (masonry thickness 640 mm) | 250 | 250 | 88 | 235 | 195 |
Prices for building and facing bricks
Building and facing bricks
We make the roof of the veranda
And the rafters have been installed. It remains to make the crate, mount the insulating layers and lay the finishing roofing material.
The lathing can be continuous (for rolled materials) and sparse (for sheet roofing). We make a continuous crate from OSB boards. To do this, we attach them to the rafters with a 1-centimeter gap. We fasten the bars of the sparse lathing with a step recommended by the manufacturer of the selected roofing material. On average, it is 30-35 cm. To attach the battens to the rafters, we use galvanized nails or self-tapping screws.
The cells between the bars of the crate are filled with mineral wool for thermal insulation. We lay a waterproofing film on top and attach it to the crate using a stapler with staples. In the case of arranging a continuous crate, we fix the thermal insulation from the inside of the room. We fix the insulation plates with the help of transverse rails, nailing them to the crate.
In conclusion, it remains to mount. It is better that it matches the roof covering of the main house. Otherwise, we focus on our preferences and available budget.


Finishing the floor
If the draft floor is wooden, we put insulation in the space between them and fill the flooring from edged boards to the logs. Boards are painted and varnished.
On top of the concrete screed, you can also equip a boardwalk, similar to the previous method, or lay another material of your choice, such as linoleum.


At the end, the doors remain, furnish at your discretion and connect lighting if necessary. We will not pull the wire. It is enough to take the extension cord out of the house and turn on the necessary lighting fixtures.

Successful work!
Video - Do-it-yourself veranda
A roof for any building, as well as for an extension, reliably protects it from snow, rain, heat or cold. At the same time, the roof carries an aesthetic component, which allows you to give the extension beauty and individuality.
Before proceeding with the choice of the type of roofs for an extension, it is necessary to determine exactly what its main functional purpose will be. In the event that the extension is planned to be "cold", it is best to opt for a shed roof. But when you need an insulated attic with full free space above your head, then the best thing would be a corner-type roof.
Important! View on our website.
How to make a roof for an extension of a house with a pitched roof

A shed roof for an extension will consist of a roof and a truss system, which is quite simply erected.
1. First of all, we determine a sufficient level of slope for our future roof. This will allow us to calculate the level difference between the back and front walls of the extension;
3. We install the truss system with a board installation step of 0.6-0.7 m.
4. We mount the roof directly.
Step-by-step instructions on how to properly make an extension roof
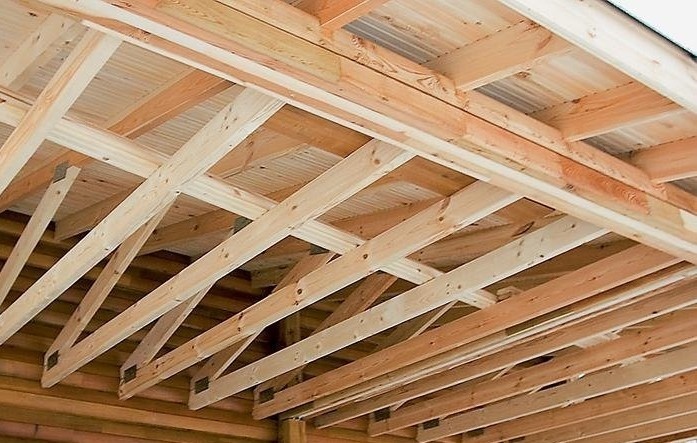
First of all, we make rafters for the roof. As a rule, during the construction of the veranda, they try to make a roof with one slope. Combining at the same time two truss trusses connected in series at once:
1. On the top of the short side of the extension, we lay the roll beams, the thickness of which should not be more than 100 mm, and the width is 50 mm. The installation step of the beams is approximately 0.6-0.7 m.
2. The beams should rest at one end directly on the top trim. To attach the beams to the extension wall, use nails.
3. On the walls of the house we start the second ends of the beams.
4. Proceeds to install the truss system. It is best to use beams with a size of 150x150 mm. We make the laying step 0.6-0.7 m, the same as for the beams of the upper floor. In this case, the floor beams are obtained under the rafter beams, that is, acting as a projection of the latter.
5. We fix the rafter beams together with the floor beams.
6. With the second end, we completely attach all the truss beams of the roof of the extension to the truss beams of the house itself. This process is carried out as follows. We make the same holes in the rafters of the house and in the rafters of the veranda, then we drive thin pins into these holes. After that, we connect them together with a metal wire. It is best to wrap at least two times around the built and rafter beams. We do the same procedure on the second edge of the rafter.
Stability and reliability

In order to give stability and reliability to the structure of the future roof, it is necessary between the beams, the ceiling and the rafter veranda, at a distance of about 30-50 cm, we place a part of the round log, starting from the top trim.
After that, with the help of reinforcement from above, we pierce through our rafter beam, and then we drive the reinforcement into a round log. In order for the log not to go to the side, we fix it with the help of two supports, which we place on both sides of it. It is best to choose pieces of timber nailed as a support. After that, we nail them to the floor beams.
Methods for installing a roof to any extension
The roof of the extension, depending on the architecture of the house itself, can be installed in different ways. For example, when building an extension, from the gable side, it is best to arrange the roofs of the veranda so that both roofs, extensions and houses have one common slope. Thus, the roof trusses have the same slope, and, accordingly, there is no need to install additional valleys or split blocks. As practice has shown, they increase the risk of leaks at the interfaces.
Installation of a roof (roof) for a house veranda

As a rule, it is best to use the same roofing material for the extension that is used for the entire house. This approach will create a single aesthetic appearance of the building and emphasize the taste of the owner.
1. First of all, it is necessary to complete the roof lathing. To do this, we lay boards horizontally, the pitch of which will vary from the selected roofing material. For roofing material and all types of soft roofing, solid plank flooring is best suited. We fix the boards directly to the rafters with nails, and we “recess” the nail heads themselves into the boards themselves.
2. As a rule, the roof of the extension has a small angle of inclination, which is why the roofing sheet material must be laid on the finished flooring from boards with a large overlap.
3. All roofing material that is laid on the slope of the extension must necessarily go under the lower edge of the material for the slope of the roof of the house by at least 5 cm. Otherwise, during heavy rains, water will begin to seep through all the joints between these slopes.
What is the best roofing material?
Given that our extension is not intended for housing, then it makes no sense to buy expensive material. Of course, if you have extra finances, then you can cover the pitched roof with metal tiles. Today it is possible to choose any roofing material according to your design preferences and financial capabilities.
Previously, a simple slate was used for this, which is now presented in various modifications. This material remains the most accessible and practical. But if you settled on a metal tile, then you should take into account that the slope at the roof of the extension is short, and therefore the metal tile can be laid in one sheet, without joints along the length.


")

