How to set up loading of bank statements in 1C, as well as uploading, and how to make a statement in 1C 8.3?
Let's start by creating a payment order:
- Based on the document of receipt of goods and services, invoices, etc.;
- Through the creation of a new payment order/PP.
In the “Bank and cash desk – PP” block.
Fig.1
A journal with payments will appear in the window that opens, where you can, by setting up the appropriate selection, filter the necessary documents, for example, display a list by a specific organization, bank account, date or counterparty.

Fig.2
Filling out the main fields here begins with the “Type of operation”. Depending on what is selected, the structure of the document will change, as well as the required analytical fields.
Having filled out the basics, we open and close the document with the “Post and Close” button.

Fig.3
The payment system does not make any transactions in 1C 8.3; they are generated by “Write-off from account”, which can also be created based on the payment slip we generated, or manually, by creating a new write-off.
Creating a receipt/debit from a current account
The first option is to create it manually through the “Bank and cash desk – Bank statements” block.

Fig.4
The journal that appears shows all receipts and debits from the account. To make it more convenient to work with it, you can set filters:

Fig.5
To make the document we need, click on “Receipt” or “Write-off”, depending on what we need.
Fig.6
Here we fill out the main fields in the same way as filling out a payment order:

Fig.7
After filling out all the fields, check the correctness of the filled in details and click “Record-Post”.
In the documents “Receipt to the current account” and “Write off from the current account” we look at the transactions and check the correctness of their display through the “DtKt” button. The transactions will be displayed in the “Document Movements” window that opens.

Fig.8
After checking the correctness of the transactions, click “Post and close”.

Fig.9
The second way to create “Receipt to current account” and “Write off from current account” by uploading a bank statement
Let's move on to sending documents to the bank. While in the “Bank Statements” journal, click “MORE—Exchange with the bank.”

Fig.10
In the “Exchange with Bank” window that opens, to upload documents to the client bank, select the “Send to Bank” tab:
- We select the company from which we will upload documents;
- We indicate the bank account;
- We select the period for which we need to download the bank statement;
- Select the location to upload the file.

Fig.11
The tabular part here will be filled with bills that need to be paid.
Next to each payment card that we want to pay, we put a “Flag” and click on the “Upload” button. This will open the “Check for virus attacks” window, where we click “Check”.

Fig.12
A file will be generated in the “1c_to_kl.txt” format, which must be uploaded to the client bank.
In the “Exchange with Bank” window, you can view a report on uploaded payment documents, for which click “Upload Report”. The resulting report will display the payments that were uploaded to a file for downloading to the “client bank”. It can be saved in any format or printed.
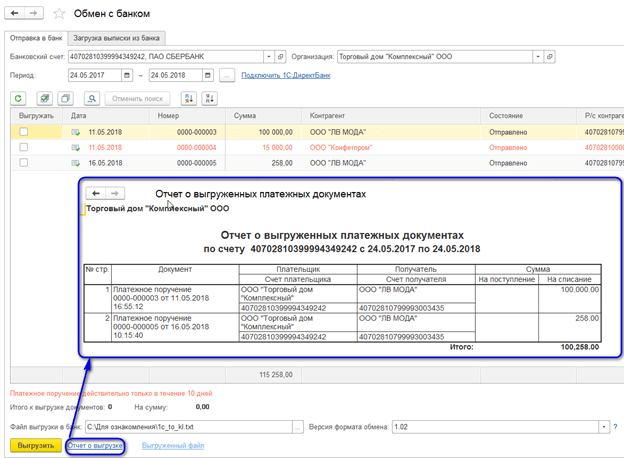
Fig.13
Loading an extract in 1C 8.3
The first option is from the “Download bank statement” tab.

Fig.14
We indicate:
- Organization
- Bank account
- Download file
Click on the “Update from statement” button.
The tabular part will be filled with data from the file, while the lines highlighted in red mean that the program did not find in the directories the data (registration account, counterparty by matching TIN and checkpoint) to which receipts or write-offs from the account should be distributed. Correctly distributed documents are highlighted in black.
Next to each document that we want to upload, we put a “Flag”. At the bottom of the window, information will be given on the number of documents to be loaded, as well as “Total Receipts/Debits for the amount”. Click “Download”.

Fig.15
If the bank statement in 1C 8.3 was partially downloaded, the system will display this information in the tabular part of the “Exchange with Bank” window. Documents that have not been downloaded will be displayed with the value “Not downloaded” in the “Document” column; for downloaded documents, the information “Debit from the current account or Receipt to the current account”, the number and date assigned to it will be displayed.

Fig.16
You can view a report on downloaded documents. To do this, click on the “Download Report” button.

Fig.17
Let's consider the second option, how to load statements into 1C 8.3.
In the “Bank Statements” journal, click “Download”.

Fig.18
Here we look for the extract download file and click “Open”.

Fig.19
The program will automatically download and post documents from the statement and display the number of downloaded documents, as well as the total receipt amount and the total write-off amount.

Fig.20
Documents in the Bank Statement journal, marked with a green flag, are posted and posted.

Fig.21
You will need to post and post the statement yourself if it is not marked with a green checkmark: open the document that has not been posted, fill in the basic required fields for posting the document, check the correctness of the filled in details, click on the “Post” button, then “Post and close”.

Fig.22
The document was processed and distributed.
If in the bank statement journal you need to display the initial balances at the beginning and end of the day, as well as the total receipts and write-offs for a given date, click “MORE – Show/Hide totals”.

Fig.23
At the bottom of the journal, the initial balances at the beginning and end of the day will be displayed, as well as the total receipts and write-offs as of the date.
Entering bank statements in the 1C 8.3 Accounting 3.0 program is carried out:
- Manual entry of bank statements;
Data on receipts and debits of funds in 1C 8.3 is entered in the Bank Statements journal. The magazine is located in the Bank and Cash Department section:
To manually enter an extract into the program, you need to click on the button in the journal form. Admission or book. Write-off.
There is another way to enter bank statements manually: based on other documents. Then the receipt and write-off data are filled in automatically according to the documents - grounds.
- : drawn up on the basis of an Invoice to the buyer, Payment request, Cash issuance, Sales (act, invoice) and other documents.
- WITHDene scripturehard means: drawn up on the basis of the documents Invoice from the supplier, Receipt (act, invoice), etc.
According to the received bank statements on cash flows, the accountant enters information into the 1C program:

Receipt to the current account in 1C 8.3
To enter data on cash receipts into the 1C 8.3 program, click book Admission and select the correct Operation Type in the document. The set of available form details depends on this.
To arrange for the buyer to pay for the order on account of the future delivery of goods, select the type of operation - Payment by buyer. We indicate the organization – Trading House “Complex”. If there is only one organization in the database, then the organization field is not shown in the form. This field becomes visible only if there are several organizations in the database.
The field Bank account of the organization, Amount, Payer, Accounts for accounting of settlements and advances – 62.01 and 62.02 is required to be filled in:

Since payment is made before the goods are sold to the buyer, the 1C 8.3 transactions will reflect the prepayment on advance payment account 62.02:

Debiting from a current account in 1C 8.3
Debiting from a current account in 1C 8.3 Accounting 3.0 is executed according to the book. Write-off from the Bank Statements journal. A document form opens, in which the type of operation and organization are indicated.
Let's select the transaction type: Payment to supplier. Let's fill in the data on the counterparty, amount, and bank account of the organization.
We also fill out the tabular part of the document: agreement, VAT rate, purpose of payment:

In this case, the following transactions are generated in 1C 8.3:

Uploading statements from Client Bank in 1C 8.3
The work of the accounting department is structured in such a way that during the day the accountant must prepare payment orders to the bank for current transactions and post the received bank statements for transactions already performed by the bank. Work in 1C 8.3 on interaction with the bank comes down to processing payment orders outgoing to the bank in the program and then entering data on transactions performed by the bank.
Automation of this process involves loading bank statements from the Client Bank into the 1C program and uploading payment orders from the 1C program to the Client Bank.
Currently, most banks support the data exchange format with 1C programs. Loading of bank statements after setting up an exchange with the bank is done from the Journal of Bank Statements according to the book. Download. You can open the Exchange with Bank setup form directly from the Bank Statements journal - book. MORE – Exchange with the bank:

Setting up an exchange with a bank and downloading bank statements is discussed in detail in our other article: “.
According to the book Download Bank Client data is read by the 1C program and loaded into the Bank Statements journal:

When loading data, the 1C 8.3 program matches database objects with data from the loading file. The message that the object “not found” is issued:
- By counterparty, if neither the bank account specified in the download file nor the TIN is found;
- For the counterparty's account, if the account number is not found in the download file;
- According to the contract, if the owner of the contract and the required type of contract are not found in the 1C database;
- If there are several identical objects in the database, the first one from the list will be selected and a warning will be issued regarding the situation;
- When re-uploading documents, the program analyzes only the Amount and Payment Type data. If they change, the data is overwritten.
How to upload a payment card from 1C 8.3 to the Bank Client
You can upload payments from the 1C 8.3 program to the Client Bank:
- From the Exchange with Bank processing form. If you place the processing in "The Chosen Ones"", it will be accessible from any place where the user works;
- From the list of Payment orders according to the book. Unload. When you press the button. Unload The Exchange with bank form opens.
We discussed in detail setting up an exchange with a bank for uploading payment orders from 1C to Client Bank in our other article: “”.
According to the book Unload from the Payment Order Journal, the data is downloaded into a text file and then transferred to the Client Bank:

Exchange form with the bank – Upload to bank tab:

You can study the features of processing banking transactions in 1C 8.3: accounting accounts, documents, transactions, bank-client, and correctly configure Direct Bank settings on our. For more information about the course, watch our video:
On the website you can see our other free articles and materials on configurations:
How to download statements from a client bank into 1C Accounting 8.3 (revision 3.0)
2016-12-07T18:26:50+00:00It’s the 21st century and I’m surprised to learn that some accountants still enter bank statements into 1C: Accounting manually, although in all programs of the 1C family (starting with 7) this process is automated.
And if in 1C 7.7 there were still complaints about it, then the mechanism for loading bank statements for 1C: Accounting 8.3 (revision 3.0) truly deserves all praise.
I’ll tell you step by step how to download statements from your client bank (using the example of the iBank system as the most common now) into 1C: Accounting 8.3.
1. Launch the client bank. From the main menu, select "Settings" - "General".
2. In the settings that open, go to the "Export" tab. Check the box in section 1C and uncheck all other sections. As an exchange file in section 1C, enter any path to a file with the extension ".txt". Click the "Save" button.

3. Now get statements for the required date, select them all (key combination Ctrl+A) and select the down arrow next to the button in the panel Out. From the list of commands that opens, select "Export to 1C...".

4. Half the battle is done! The statements were uploaded to the same file that we specified in the client bank settings.
Making a backup copy of the database
Loading from a file into the database
5. Now launch 1C and go to the “Bank and Cash Desk” section. And then select "Bank Statements" in the panel on the left.

6. In the statement log that opens, click the “More” button and select “Exchange with bank” from the drop-down list:

7. An exchange window with the bank has opened. Select the "Load from Bank" tab.
Specify the bank account and the file into which statements from the client bank were downloaded:

8. In the bottom panel, click the "Download" button. And all extracts from the file will be uploaded to 1C.

9. Done! All that remains is to view the “Load Report”.

Sincerely, Vladimir Milkin(teacher and developer).
A bank statement in 1C 8.3 Accounting is necessary to reflect the write-off and receipt of funds by bank transfer. It reflects information about the status of bank accounts at the current moment. Based on accounting statements, transactions on personal accounts are carried out.
Typically statements are generated daily. First, all cash receipts and debit confirmations are downloaded from the bank. Next, current payment orders are generated, which are transferred to the bank at the end of the working day.
A payment order is a document that instructs its bank to transfer a certain amount of its funds to the account of some recipient. This document does not have accounting entries.
In 1C: Accounting 3.0, payment orders are usually created on the basis of other documents, but they can also be created separately. Creation can be done from the list form of this document. To do this, in the “Bank and cash desk” section, select “Payment orders”.
In this example, we will consider creating a payment order based on the “Receipt of goods and services” document. To do this, open the already generated document you need and select the appropriate item in the “Create based on” menu.

The created document will be filled in automatically. If this does not happen, enter the missing data manually. Be sure to indicate the details of the recipient, the payer, the amount of the payment, its purpose and the VAT rate.

Uploading payment slips from 1C to the client bank
Most often, organizations upload payment orders to the bank at the end of the working day. This happens in order not to upload every document, but to upload all those accumulated during the day at once.
Let's look at how this is done in 1C: Accounting 3.0. Go to the form for the list of payment orders (“Bank and cash desk” - “Payment orders”). Click on the “Send to Bank” button.

A processing form will open in front of you, in the header of which you need to indicate the organization or account and the unloading period. At the bottom of the form, select the file into which the data will be uploaded. It will be created and filled in automatically. Check the boxes for the required payment orders and click on the “Upload” button.

To ensure the security of data exchange with the bank, a corresponding window will be displayed. Which will inform you that the file will be deleted after it is closed.

1C will most likely offer you to connect to the DirectBank service. Let us explain a little what this is. 1C:DirectBank allows you to transmit and receive data from the bank directly through 1C. This method allows you to avoid uploading documents to intermediate files, installing and launching additional programs.
To learn how to issue a payment order and debit a current account manually, watch the video:
How to unload a bank in 1C 8.3 and distribute it
Loading a bank statement into 1C is carried out using the same processing as uploading payment orders. Open the “Download Bank Statement” tab. Next, select the desired organization and the data file (which you downloaded from the client bank). After that, click on the “Download” button. All data will go from the file to 1C.

You can see how to manually reflect receipts from a buyer in 1C in this video:
Before setting up the exchange, let's answer the question: “Where is the exchange service with the bank in 1C?”
And, as it turns out, everything is not so simple here.
As a rule, they point us to the Bank Statements magazine, where the developers placed a magic button Download and they stop there. But we will go further and explore all possible ways to access this wonderful service.
Uploading from Client Bank to 1C 8.3 from the journal of bank statements
So, we have already named the first option - downloading bank statements is possible using the button Download from the magazine of the same name in 1C. This is a typical download option that developers offer for use. It will do the following:
But that is not all!
Uploading statements from Client Bank in 1C 8.3 from Exchange with bank processing in the Service group (Bank and cash desk section)
We can upload and download information on banking transactions from the processing itself Exchange with bankom. We can launch it traditionally through the Main Menu - All Functions, or by adding this processing to the active commands of the section Bank and Cashier.
This can be done from the action bar settings by adding the available command Exchange with bank to selected section commands:
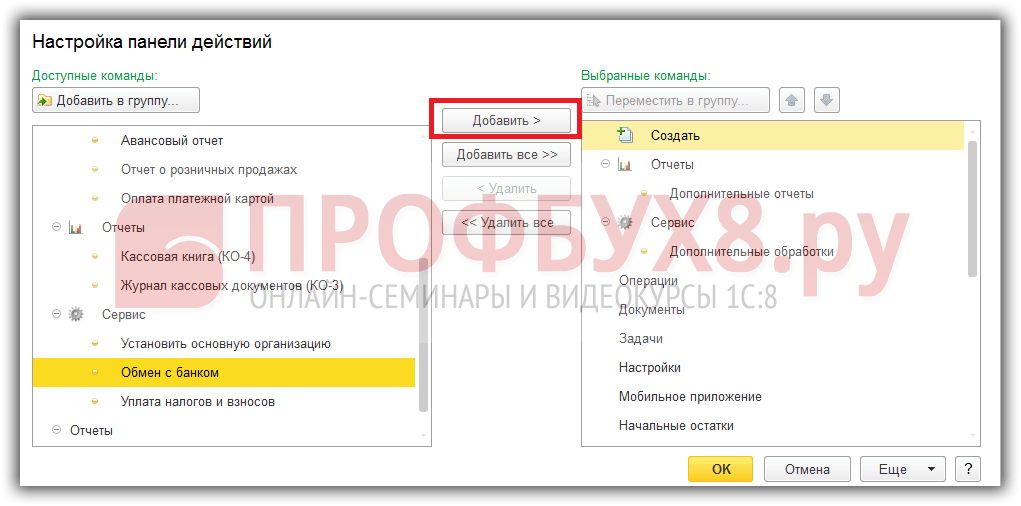
Team Exchange with bank will appear in the Service group (Bank and cash department section):

But that's not all!
Uploading statements from Client Bank in 1C 8.3 from the Exchange with bank form in the bank statement journal
In the Bank Statements journal itself, it is possible to open a form Exchange with bankom by the action menu command MORE – Exchange with the bank.
This same command can be placed on the Bank Statements command panel. Since we, of course, want to be somewhat different from the monotonous coverage of this issue on the Internet, we will now consider this option.
We are sure that this will be useful to you in your future work.
Changing command properties Exchange with bank. From the action menu “More – Change form” of the Bank Statements journal, we will include the Exchange with Bank service in the journal command panel:

Processing Exchange with bank is available in the list of bank statements:

All options for calling the Exchange service with a bank:
- Directly from the Exchange with bank form (section Bank and cash desk);
- From Bank statements according to the book. Download;
- From Bank statements using the action menu command More – Exchange with bank;
- From the Main menu – All functions – Processing – Exchange with the bank.
Let's move on to the second part of the question - settings for Exchange with the bank.
How to set up downloading from the Client Bank in 1C 8.3 Accounting 3.0
Before you start setting up an exchange with a bank, enter the banking program and find the item in it Uploading to 1C. Copy the file name onto a piece of paper - this will be needed when setting up data exchange loading in 1C.
Now open the processing form Exchange with the Bank in 1C 8.3:

Displayed in form Exchange Bank organization and bank account through which we will perform operations for downloading statements and open the Settings form.
Exchange parameter settings are stored in a special information register Data exchange settings with the Bank Client: Ch. menu – All functions – Information registers:

After specifying the organization and bank account for which we will create an exchange setup, according to the book. Setting up, go to the form for setting up an exchange with the bank.
Settings for program name and download/upload files:

Serviced Banking check– is on by default.
The name of the program– the name of your banking program you are working with. You select the name of the program from the drop-down list provided by the developers.
For example, for SBERBANK this is a program AWS “Client” AS “Client-Sber”Bank" of Sberbank of Russia:

File download fromjar– this is the name and location of the file into which data will be downloaded from the Bank Client. Typically, the text file kl_to_1c.txt is used. But you can use other options.
The only condition: the name of the download file in 1C must match the name of the download file on the bank’s side. This is where the data recorded on a piece of paper from your banking program using the upload file in 1C will help. Please pay serious attention to this. This is the most common exchange setup mistake. If the path is specified incorrectly, the exchange will not work.
Another very important note: enter the file name without spaces, spaces, or unnecessary extensions. After entering, check that the file in the 1C window “Download file from Bank Client” and “Upload file in 1C” of your banking program completely match!
Check with your bank's technical support service about encoding of upload data. This can be either DOS or Windows. 1C supports working with both encodings.
Default substitution details
These settings are optional:

You can set the Cash Flow Item for substitution in the new documents Debiting from the current account and Receipt to the current account. But in fact, it rarely happens that the DDS article is the same for all occasions. Therefore, in order to avoid confusion and make mistakes, these fields are left blank. The data on them is filled in after the exchange is completed.
Groups for new contractors
Also with filling in the Group settings parameter for new counterparties. The accountant has the right to decide how he will control the counterparties in the database created by downloading bank statements in the event that 1C 8.3 did not find the necessary payers and recipients in.
Load/Unload Block
This block already works with the data received from the bank and, before generating new documents in 1C, asks you to decide on the loading and unloading actions:

We are now considering downloading statements from the Bank Client and here the user chooses whether it is necessary to automatically create new objects in the database and post new documents. But, probably, the checkboxes for posting documents of receipts to the current account and debits from the current account will be convenient.
Uploading from the Client's Bank to 1C 8.3 Accounting 3.0
Once you save the settings, you can start uploading documents.
After the cash flow data from the banking program has been uploaded to a file and received by the accountant, you can load it into 1C. During the loading process, the documents Receipts to the current account and Write-offs from the current account are created.
The sequence of actions of the accountant when downloading statements is as follows:
- We indicate the bank account of the organization;
- Choosing an organization;
- Check the path to the download file;
- We control the information in the data loading file;
- Download bank statements;
- We generate a report on downloaded statements:

If no mistakes were made in setting up the exchange with the bank, then the program will handle the download without any problems. Your task is to check the data before downloading:

What you need to pay attention to first:
- When checking data before uploading, pay attention to the icon in the column next to the date:
- An icon with a check mark means that the document is in the database and has been posted;
- An icon without a checkmark indicates that the document is in the database, but has not been posted;
- The icon with a “sun” signals that a new document will be created.
- When loading data, a “not found” message appears:
- By counterparty, if neither the bank account specified in the download file nor the TIN is found;
- For the counterparty's account, if the account number is not found in the download file;
- According to the contract, if the owner of the contract and the required type of contract are not found in the 1C database;
- If there are several identical objects in the database, the first one from the list will be selected and a warning will be issued regarding the situation;
- When re-uploading documents, the program analyzes the Amount and Payment Type data. If they change, the data is overwritten.
After downloading bank statements, you can print a report on the downloaded documents in 1C:


How to automatically monitor invoice payment, how this is affected by the status of invoice payment, that is, quickly report to the manager on paid and unpaid invoices, you can study the features of processing banking transactions in 1C 8.3 on our


