Good afternoon, today I decided to collect in one article all ways make paper crafts that kids can do. For the DIY season of 2017 - it turned out to be a decent photo piggy bank of ideas that a child can make out of paper with their own hands. These paper crafts can be used for kindergarten or school (grades 1-5). There will be easy crafts for preschool children(from 3 to 7 years) - for the younger, middle and older groups. And there will also be crafts and more complicated ones that require more long school hours(for 45 minutes) - suitable for labor lessons for children in grades 1, 2, 3, 4. As well as heads of creative circles "Skillful hands" kindergarten or school will find many useful paper craft ideas for themselves.
- We will do flat crafts-applications.
- Volumetric crafts from colored paper and corrugated cardboard.
- craft toys from cardboard or thick paper.
- crafts using various techniques(half disks, fan, symmetrical fold, postcard).
At the moment, we already have thematic articles on the site with paper crafts,
And also a lot of ideas for paper NEW YEAR crafts in the article:
And in this article - we will look at different techniques that can be used for paper crafts for children of different ages.
So let's see what paper crafts I have collected in this piggy bank.
Origami
In the technique of HALF DISK.
Colored paper crafts that we meet in kindergarten and at school most often look like applications. I myself really like effect applications 3D. There are quite a few ways to create bulges on the application.
In this article, I want to highlight a technology that is interesting in its graphics - these are crafts from round paper discs. When all the work is laid out in the form of whole or folded in half paper rounds.
Such a mosaic applique of round pieces is suitable for children 3-4 years old. It is just right for them in terms of pedagogical tasks of this age, when children still do not know how to work with scissors, but are already happy to glue ready-made template modules from colored paper.
Such crafts-appliqués look bright and unusual due to PARTIAL GLUE of modules - we put only half of the disk on the glue, and its second part sticks out in a fold.

And from circles or ovals bent in half, you can make not only flat applications, but also paper crafts-toys. Here's one for inspiration caterpillar of ovals bent in half- children from 3 years old cope with this task, if you help them fold the ovals in half. Children 4 years old will fold the ovals themselves, and even cut out a few of them. And for children 5 years old, you need to distribute colored rectangles, they themselves will cut the corners of the rectangles, thereby turning them into ovals, they themselves will bend them in half and fold them into a caterpillar.

Be smart and think WHAT ELSE can be constructed from paper semi-circles or semi-ovals. Surely you can make a frog, a panda, a giraffe, a hippopotamus, a penguin from such half-discs of a round or oval shape.
VOLUME application
From paper blades.
And here is another technology for convex paper applications. When the parts are glued in advance into the BLADES, and then such a bladed paper craft is glued with its blades onto the application cardboard.
Blades are obtained if Bend 3-4 identical parts in half, and then the bent walls of adjacent parts are glued to each other.
For example, the ladybug in the photo below consists from three paper circles. Cut out three circles, bent them in half. First, glue the halves bent in half on the left and right. And then the third kruglyash lays down like a book on the protruding halves of the glued kruglyash.
Craft "Ladybug" is suitable for children 3 years old. And the craft "Balloon" with a large number of blades is suitable for children 4-5 years old.

Any form of paper can be turned into a paddle part, the number of blades and the splendor of the part depends on how many parts you use in your bulk gluing.
In the same way, you can do paper crafts in three-dimensional form (in the form of objects) with your own hands - like these paper fruits in the photo below. Watermelon is suitable for crafts in the older group of kindergarten.


Origami
ON SPRINGS.
And here's another paper craft with a bulging effect. Here, the volume of the application is transmitted by embossing a strip of colored paper bent into three folds. This autumn application is easy to do with your own hands - suitable for children of the middle and older groups (5, 6 years old).
In the center of the upper fold, we cut a hollow and place the silhouette of an owl inside. To make the owl hover at a distance from the back wall of the hollow, you need to stick a paper spring on the back of the owl. How to make a spring you will now understand, using the example of the following paper craft with a three-dimensional effect.

Here below we see a BEAR paper craft. The bear's paws are also glued at a distance from the body. And this distance between the paws and the body is achieved by sticking paper springs. Everyone in childhood made such spring worms. Below we see a master class that shows the process of creating such a paper spring and the whole craft as a whole.

The BEAR craft is suitable for children 3-4 years old (if all the details are already cut out and the springs are folded). Children 4 - 5 years old you can slowly cut out the silhouettes yourself. Children 5-6 years old already able to fold the springs themselves (and the lesson can be divided into 2 parts- in the first lesson we make springs and cut out part of the silhouettes - in the second lesson we cut and assemble everything together.
In the same way, you can do any craft. Below we see that the crown of the tree is made according to this principle. But with the same success, you can do bunch of balloons on a greeting card. Or bouquet of flowers from paper, where each flower will be at its convex level.
You can highlight with a bulk spring any details of paper crafts - bird wings, tiers of thorns on a hedgehog (photo below).

Or hares in thick grass (spring crafts in the photo below).

You can also make this paper craft using springs inside. It turns out a beautiful effect. And also legs-stands for multi-layer applications can be made not from paper springs, but from purchased thick double-sided tape. Such a plump adhesive tape is for sale - it has a thick, as it were, foam tape and it is sticky on both sides. It can be cut into stumps and glued between layers of crafts.

From such springs, you can make not only applications, but also independent paper crafts. Make a spring and beat it with other paper parts. For example, attach an oval muzzle, round ears, paws at the bottom and a long stripe-tail - and now it all starts to look like a paper mouse.

But paper penguins crafts based on the same spring. Or crafts-bugs. There is always unused black paper in the kindergarten in a set of colored paper - you always don’t know what to make of it - but here you are, black bugs, penguins and little crows.


Origami
WITH FAN.
A paper fan is often used in children's crafts as a way to quickly create the desired shape of a part. Most often, a gluing fan is used as a tail for paper birds (or as wings).


The spreading fan blades may remind you of bat wings. Children's crafts for middle age (4-5 years).

The fan is similar to the lampshade of a table lamp - which means it will make an excellent do-it-yourself lamp craft (craft for children from 3 years old)
The fan can become the basis for children's crafts in the form of fairy-tale characters - friends of penguins or northern bears (crafts for children 5-7 years old).

If we fold the fan in half - and unbend its blades into 2 semicircles - and glue the semicircles that meet with glue, then we will get a ROUND FAN.
From such a blank, you can make a lot of paper children's crafts. The simplest and fastest are apples (add a stalk and a leaf) or birds (add a wing, an eye and a beak).

Ready-made blanks of round fans are used in classes with children 3-4 years. And aged 5 years the child is already given the task of creating such a round fan out of colored paper.
By adding various details to the paper fan, we can get the image of any paper animal (a black cat, or a red, white bunny (as in the photo with children's crafts below).

You just have to teach children how to make a fan with their own hands, practice several times. Then teach them to bend the fan in half and unfold both halves into two semicircles - and glue these semicircles with a glue stick. And then the children themselves will surprise you, they will throw up more and more ideas for crafts, turn a round paper fan into a snowman, then into a mermaid bra, into a round red nose of a clown.
And if you make several round fans of slightly different diameters at once and string them on a wire, then we can get a voluminous spherical paper craft. The fan ball can become an apple, a pumpkin, a snowman, a sheep, a white rabbit and any other children's character.

Children's crafts
on an accordion stand.
There is another original way to make paper crafts for children. Below we see the principle of creating such crafts. From cardboard, we fold an ordinary accordion. And we use it as TIERS for sticking paper parts.
In the photo of the children's crafts below, we see how the accordion turned into a cake craft. Each row of an accordion is a tier of a cake with candles.
Note, the side high part of the craft in the photo below (where the balloons are) is not necessary.

In the same way, according to this principle, we can use the rows of an accordion like rows of Christmas trees in a forest. And between them put a deer or a snowman, or hide a bunny.
Rows of pots can be used as streets on which to place houses.
Or the rows of such a stand can be folded from blue paper and designed as SEA WAVES, and then it remains to stick dolphins or rows of boats on them. Or peeping sharks.

Origami
on a flat cardboard template.
And now we will see crafts for children, where all the elements are pasted on a silhouette cut out of thick cardboard.
For example, we take cardboard and draw a silhouette of a shark on it. Any child from 4 years old is already learning to cut with scissors - he cuts out the silhouette himself with his own hands, slowly crooked, but he should already myself cut along the line holding the scissors in a stationary hand, and rotate the sheet of cardboard as the cut line rotates along the silhouette ..
When the silhouette of a shark is cut out of blue cardboard, we give the child a round blank of white paper - the task of the child is to cut it into teeth (just stuff the triangles obliquely with scissors, and then bend every tooth so that it protrudes inside the general circle. And this paper mouth remains to be glued onto the silhouette of a shark. And we'll get awesome crafts for children 4-7 years old. Sharks are great crafts for boys. Little brave men will be happy to tame a dangerous sea predator.

Application details do not have to be from colored paper. For example, a scarf on a polar bear below is cut out of a cover from colored paper (the cover was in a box). And the carrot on the craft with the hare is white cardboard, which was previously painted with gouache (they painted yellow-orange-red stripes).

You can peep ideas for the same applications on a cardboard silhouette in children's cartoons, or see them on a children's coloring book.
Such paper crafts for children 5 years old can become the basis for a children's theater. If you stick on the back of each craft long handle made of thin wooden lath(you can buy it in the building department of the store) - or the pen can be rolled up from a sheet of paper and wrapped tightly with tape for tightness.
Children, hiding behind a screen and holding their characters on sticks, can put on performances entertaining parents, grandparents with homemade reprises of famous fairy tales.

And you can also cut round holes for children's fingers in such a craft - then you can already play the scenes of the TABLE THEATER. Here in the photo below we see a sheep and a hare made of paper with such slots for fingers.


Also, your paper characters can have a special PAW GRIP, and you can insert a candy or a pencil and a small gift for someone into this grip.
By the way, here's a good idea - such a character can be pasted on a postcard and give him a paw rolled up 100 dollar bill- you get a gift card with money for a friend's birthday.

Such flat cardboard crafts can be supplemented with FOLD elements (as in the bunny in the photo below), or TWIST elements (as in the snail below). Or additional ENTOURAGE elements (as with the cat below).

Children's crafts
with paper stripes.
Also, the application can be made voluminous if you use LOOP FROM PAPER STRIPS. Colored paper is cut into strips, and each strip is smoothly folded and glued at its ends. Such curved stripes can be the petals of a lush aster or a modest chamomile.
Or such paper loops can serve feathered swan- left photo below. This craft is suitable for children ages 4 and up. They themselves glue the already cut strips into loops and stick them in rows on the tail of the swan.

But the peacock (in the right photo above) is already craft for older kids. For grades 1-2 - because in a lesson in kindergarten, children in 25 minutes will not have time to make a peacock from start to finish. But in 45 minutes of a school lesson, children will just cope with this task.
Please note that the peacock is made of paper from strips of different lengths. The yellow strip is the shortest - it is the first to bend into a loop. Then the green strip is glued to the loop with one edge and also bent to the place where the yellow loop-strip is glued. Then we do the same with a slightly longer blue stripe.
Thus we get EIGHT THREE-COLOR LOOP for the peacock tail. They all stick together ribs to each other- in one bunch-bouquet. And at the junctions of their gluing, we attach peacock spots. Then we attach to the back cardboard silhouette of a peacock. Great creative piece.
Below we see how flower crafts are created according to the same principle. In the same way, we make a tail for our peacock from the photo above.

Or a paper craft for girls - SHOES-SANDALS - here the strips serve as straps to create a woven toe of paper flip flops.

And if you cut strips of the SAME LENGTH, then it is convenient to make a spherical braid out of them. Such a braid in the form of stripes crossed in a circle can serve as a shell for a turtle, a balloon, or the middle of a lush flower or a snowball from a snowman.

Or it can be a delicious apple bitten off the side (left photo below). And inside such an apple, you can put a worm from a paper spring (see above for the method with a spring).

If you glue the strips crosswise in the center ... and pierce holes from the ends with a hole punch ... and lift these ends with holes up ... and collect them on a thread, then we will get a paper pear craft (look at the right photo above).
And if take NOT SEPARATE strips - but cut a sheet of paper into strips NOT CUT TO THE EDGE - like a long fringe. And then arrange this long striped fringe in the form of a paper craft-hat.

By a similar principle, beautiful paper crafts are made in the form bird cages. Such a craft only at first glance seems complicated. But in fact, everything is available for children from 4 years old. And even a child of 3 years old can cope with the help of an adult who will show, then smear with glue and where to stick it.

Below we see this cage in the blank (photo-master class). First, these are paper strips on a wide strip of the base. Then we wrap the base in a ring. And we bend the strips sticking up into an arch, each relative to each other. Quick and easy craft. It remains only to make a paper bird and hang it on a string under this paper roof.
That is, such a craft is easy to do with your own hands for children even 3-4 years old.

And you can also make paper children's crafts based on a BALL from strips. A ball of stripes is collected on a needle and thread. Since you can’t give a needle to children, you can go the other way and make holes in three places of each strip in advance with a hole punch - along the center and along two edges.
The strips are folded crosswise onto the central hole - a thread is threaded into it from a suspended bead from below. A large bead at the bottom prevents the strips from slipping off the thread. Next, a few more beads are strung on the thread (see carefully inside the lamb, they are visible in the photo). And then the same thread is threaded into all the holes at the ends of all the strips - THIS IS THE BALL. If anyone does not understand, there is a photo-master class in

You can attach any details to such paper balls, turning them either into frogs or hares (as in the photo of children's crafts below). With your hands and your imagination, you can make a variety of animals.

These are the chickens and the hen made by craftswoman Tatyana. What characters will you invent? Such crafts from stripes can be done in the 1st, 2nd, 4th grade of the school. And it is also suitable for diligent children of 5-6 years old.

Origami
in the quilling technique.
And paper strips can be wrapped in a tight roll-twist. Then give this twist the shape of a petal or a leaf and make paper applications of flowers with such twists. The technique is quite well-known, called quilling. The technique is suitable for children from 5 years old, when the fingers are already dexterous enough to hold the twist on the holder rod.
Below we see how the usual round twist is given different shapes (they pinch it with a finger from the right sides) and the twist becomes tear-shaped or cup-shaped, or triangular. And from such twisted modules we add a quilling application.
Below we see children's crafts made of colored paper using this technique. You see, paper consumption does not have to be large - the craft itself looks miniature and can decorate a handmade postcard. The child will be pleased to give his mother a handmade card.

Within the framework of a school or kindergarten, the time for doing such crafts is limited - and we can only make a few of these modules. The process is laborious for children's fingers and takes time. You can break the craft into 2 classes - on the first we make modules, on the second we form crafts.

Children's crafts in the form of a cupcake are very popular with girls.
A cupcake and a bird is a very quick craft because it does not require many twists. Such crafts can be done by children in grades 1 and 2 - slowly, gently twisting and gluing the twist tails.

But a bear or a bunny is already a paper craft for children who have gotten their hands on simple quilling tasks. For grades 3, 4, 5 - this level of complexity of do-it-yourself crafts is just right.

By the same principle, you can make larger twisted crafts - if you take not a thin cut strip, but a folded sheet of paper. The thick folding of the sheet will allow you to get large twisted parts and you can make a large appliqué out of them - for example, such a penguin or an owl made of paper.

And also large twisting crafts are obtained from corrugated cardboard. Due to the ribbed relief, such a corton forms wide volumetric parts and can be used to make 3D paper toys. Craft for the older group of kindergarten or for school (grade 1,2,3,4).

Origami
based on the CONUS.
A paper cone is also a good base for children's craft ideas. We all made a Christmas tree from a cone in kindergarten with our own hands. And now we can already make any character out of paper in the form of a cone craft.

So that the cone is not too wide and not too narrow - its razmerka (flat pattern) should be an angle of more than 90 degrees - usually 120 degrees (as in the photo below) - that is, a third of a full circle.


For a giraffe, you can make the cone thinner and sharper. Then we need a quarter of a circle (that is, not 120 degrees, but 90 degrees is enough).

Origami
folded in half.
But children's crafts that are made from a sheet of paper that was bent in half and cut out the silhouette - as a result, we got a double-sided craft with the same symmetrical sides.


And paper birds can also be made using the same technique. In the bird (pictured below), we see that the wings are a fan made of paper or napkins. And in the fold of the upper part of the bird, we make a slot and insert the fan there.

For animal crafts, elephant ears can be inserted into such a slot. And also, for example, a lion's mane made of cardboard or thick paper.

To such BENDING CRAFTS, you can attach not only wings, but also a head - which will be perpendicular to the body. See the photo below with an example of a children's craft "Black Cat" made of paper.

The head of this cat is attached according to the same principle as the wings-fan of the bird above - ALSO IN THE SLOT. If you look closely, you will see that the head has fold too, which divides the head into 2 planes (posterior and anterior).
THE BACK PLANE OF THE HEAD continues with the ears, AND THE FRONT PLANE OF THE HEAD contains the glued eyes and whiskers of the cat.
A slot is made in the back of the cat (as in the bird above for wings) - and the BACK PLANE OF THE HEAD is inserted into this slot. And the front plane simply hangs in front and is not inserted into the slot.
A very simple paper craft for older children (age 5-6 years). And for children in grades 1-2, it’s also great do-it-yourself work.
It is possible to provide for such a craft scheme addition in the form of a tummy- like these hares below. To do this, you just need to draw additional processes of paper in the abdomen area, which then, after the silhouette is folded, WRAPPED WITH A ROLL and fastened with a stapler or glue.

You can slightly modify this principle of crafts - leaving between the two halves-bochins the UPPER BACK PLATFORM. That is, at the top of the part, make not one fold, but two folds at a distance of 1-2 cm from each other - this is how we get the back.
These bears made of cardboard (or thick paper) have just such a back.

And these paper birds (pictured below) also have a back. And thanks to this site, we were able to provide for the tail part (it became a natural continuation of the dorsal part of the bird).

Both birds and bears according to this scheme can be drawn in advance on a template made of paper, then circle this template on a sheet of cardboard by drawing in advance the internal fold lines (those that go along the back). And the task of the child is to cut the silhouette of the template and bend it along the internal lines. That is, the craft is available to children from 5 years old, and is suitable for middle and older groups of kindergarten and for school lessons of creativity and labor.
Origami
SIMPLE ORIGAMI.
For young children, it is difficult to make multi-step origami crafts. Therefore, it is better to start with simple schemes, which are then supplemented with cut out elements, giving them a resemblance to the intended character. So we get easy crafts.
You yourself, with your own hands, you can experiment with a sheet of paper - fold it this way and that, and then think about what this folding sheet might look like ... but what if ears are here, eyes are here, and nose is here .... wow, this looks like a great MOUSE.

Here's another simple folding of paper along diagonal lines that makes it possible to get a fold for the Ladybug craft. Spots and a muzzle can be drawn with a marker or cut out of colored paper.

The simplest thing a small child can do is fold a sheet of paper into two folds and get base-blank for a character made of paper, whose mouth opens, and therefore you can make him not only a muzzle, but also a mouth with teeth and tongue.


This children's craft is suitable for classes in paper design in kindergarten. She needs double-sided colored cardboard or the same thick paper. It is good to buy office colored paper for such crafts - it has a higher density than standard children's colored paper.
Or children can make their own hands like these easy folding bed crafts. To do this, a sheet of paper (A4 format) is cut along a beveled diagonal. And then it folds into 2 folds (to get 3 parts). The wide side of the folded paper is not glued onto a sheet of colored cardboard and then decorated according to the design of the sketch.

Children's paper crafts.
DROP template.
If we roll a wide strip of paper with the ends together, then we get teardrop-shaped twist.
On the basis of such a simple blank, you can also make a variety of craft designs - a blue paper whale, a ladybug (glue wings to a drop).

It is convenient to make mice or a hedgehog from a paper template in the form of a drop.

Can i to such drop-shaped details add on top round paper roll- to make a head. So even more options for simple and easy crafts - bunny, duckling, swallow.

Turn on your imagination and multiply ideas.
And if you connect a whole series of strips together like CHAIN LINKS, then you can get such a green crocodile from paper loops.

And here are some more simple crafts based on a wide strip, bent into a ring or into navicular shape.
In the craft with the boat - we first do holder at the bottom of the boat- it's just a small rectangle of paper, which has small sides bent on both sides. And then we glue the REAL BOARDS OF THE BOAT FROM BLUE PAPER to these bent sides. Rectangle with edges in the center will not let the sides of our boat collapse towards each other.

The craft is suitable for children from 5 years old.
And here is a children's paper craft, where white paper strips also imitate the body of a swan. Here the form holder is a roll of white paper twisted into a long tube. Craft for children 5-6 years old.

Crafts-postcards
from paper.
And of course, if you like to make children's crafts from paper and cardboard, then opener cards are a suitable topic for children from 3 years old. Ideas for opening crafts can be very different. For example, an aquarium with a fish. Or craft-valentine with spring birds.

You can make a simple children's craft in the form of a castle - the gates of which will be opened for boys by knights and soldiers, and for girls by beautiful princesses hidden inside a paper bastion.

Crafts-postcards can be a great gift for March 8, made by hand. For example, here is a cup with tulips. The handle for the cup can be cut out as a separate piece and glued to the side of the mug.

Or you can make an apron craft with carved paper lace (lace can be obtained from ready-made paper napkins, or cut a snowflake out of paper, cut off its lace edge and we will get a border for the apron.
You can cut out the silhouette of the can on the craft - seal it with a thin layer of the file (on double-sided tape). And also stick a paper pocket (the back wall of the craft) and put hearts in this transparent front pocket.
Here is another technique VOLUME POSTCARDS. She is simple. Fold a piece of paper in a fold. And on the edge of the bend we do 2 notches scissors (any length and width). And then we simply push the place between these incisions with a FINGER into the postcard - and it BUGS out in the form of such a rectangular stand.
And now we stick any element on this stand. For example a cupcake.
If you make three pairs of such cuts - push them with your finger inside the postcard, then you can stick a cupcake on each of them. And checkboxes on top. Here is a simple children's craft and ready. Interesting and non-standard.

To get started, practice on a piece of a regular sheet - bend in half, cut it twice and push the incised part inward. You will see that it is simple.
And you can show your kids the same way. And then on such a stand (already pushed inside the postcard) you will stick any craft (butterfly, dinosaur, rocket).

Any original ideas can be realized in this technique of voluminous postcards. That is, this is another field for children's fantasy paper crafts.
The longer you make paired cuts, the further the strip-stand will be curved inside your postcard. You can see this in the example with the postcard craft in the photo below.

Crafts openers can have a surprise in the form of a folding fan. Under such a folding bed, you can arrange a peacock with a magnificent tail.
Of course, such a complex carving (as in the photo below) is difficult for a child. But for children, you can simplify any idea - let the fan be not carved, but simply cut out the peacock spots separately and stick them on the fan blades.

Or a cot inside the postcard can be in the form folding chain of symmetrical elements- butterflies, flowers (that is, the main thing is that there is a symmetry of the folds).
We cut out any identical details - butterflies, flowers, hearts. The main thing is that the left half and the right one should be like a mirror image of each other. And then these parts can be glued in halves to each other (not all the halves should be smeared with glue, but only the outer edges). And then we get a multi-colored accordion of parts. And paste this accordion into a postcard. Also a beautiful craft - night butterflies, bright but against the background of a dark sky.

These are the ideas I collected and systematized - for your future paper crafts. I am sure that now you will not only be able to repeat the crafts presented here with the children, but also CREATE YOUR OWN AUTHOR'S WORKS for each of the proposed METHODS.
After all, when you understand the method, and when you see that it allows itself to be widely interpreted - multiplying the same technical idea in the form of a variety of crafts - then you just have to CONTINUE THE CHAIN OF IDEAS.
And I wish you the most original creative finds. And the children will be very happy to implement them in the most diligent and inspired way.
Good luck with your children's crafts.
Olga Klishevskaya, specially for the site
If did you like this article
And you want to thank our author for this painstaking work,
then you can send any amount convenient for you
So that you have a great mood in any weather, make new things from improvised means. Quick crafts that take less than an hour to make.
The content of the article:
Sometimes you want to pamper your child with a new toy, but there are no financial opportunities and time to make it. Therefore, we decided to pick up for you the fastest simple crafts that you will spend no more than an hour on. The family budget will not suffer, since they are mostly made from waste material and all sorts of leftovers.
How to make a doll from threads and a dandelion with your own hands?

You will create it while relaxing in a comfortable chair. The main thing is to arrange everything you need nearby so that you do not have to get up again. This:
- threads;
- half a sheet of cardboard;
- scissors;
- a strip of flesh-colored fabric;
- markers.
- Wind the threads around the postcard with an impressive layer.
- Tie the finished winding with thread. Decide where the doll's head will be. Designate it by also rewinding the thread.
- Do the same for the right and left hands. To make doll brushes from thread, rewind your hands at wrist level, cut the yarn around the fingers of the toy.
- Also, separate the torso from the legs with threads, and perform them in the same technique as the arms, just make them longer.
- Measure a strip of flesh-colored fabric over the volume of the head, glue its sides.
- Wind the hair threads around your hand, cut the resulting roll on one side. Glue to the head, trim the bangs if desired.
- Use markers of different colors to draw facial features.
- Sew a sweatshirt for the toy or tie it up with a piece of fabric to make an apron. You can tie a handkerchief to become a cloak. Such clothes are made with pleasure by children, who will surely appreciate the new doll made of threads.
If you are making a girl doll, then you do not need to indicate her legs. Let the threads evenly cut at the bottom become a skirt.
Such simple crafts will surely please the kids. You can also create a fluffy dandelion from the leftover threads.

For this charm you will need:
- yellow and green yarn;
- wire;
- PVA glue;
- knitting fork or metal staple;
- scissors;
- gypsy and thin needle.
- Wind yellow yarn around a knitting fork. Thread the gypsy needle with a thread of the same color. Sew it in the middle.
- Lubricate the resulting line well with glue. Remove the created web of yarn from the fork, twist it with a roller.
- A thread is wound in the middle to give the workpiece the shape of a dumbbell. From above, coat the middle of this part with glue, wait until it dries.
- Such simple crafts are interesting for both adults and children. They are made quickly, but part of the time is spent waiting for the glue to dry. Therefore, it is better to craft in the evening, and the next day to continue entertaining needlework. What are we going to do now.
- Cut the resulting dumbbell in the middle. On the first and second flowers, you need to cut the loops with scissors, carefully comb them to get fluffy hats of two dandelions.
- The green yarn from which we will make the sepals must be cut into segments 4 cm long. We thread the same thread into the gypsy needle, sew the segments across, but not in the middle, but stepping back from the edge 2/3.
- Trim the top with scissors, trim it, make another line parallel to the first.
- Lubricate the back of the flower with glue, attach the sepals here. Wrap it with the same thread that was stitched. Glue both ends and leave the workpiece to dry.
- In the meantime, you will wind the green thread around the glued wire. Get a stem.
- Insert a thick needle from below into the sepal, twist to make a hole for the stem. Install it there, after lubricating this part with glue.
- The leaves can be crocheted, but since we make simple crafts, cut them out of green paper or cardboard, glue them on the stem.
How to quickly make crafts from animal tissue?
If you want to spend less than 30 minutes making a new toy, then make these funny mice. They don't even need to be sewn. By making cuts in a certain way, you will make these rodents.

See if you have:
- pieces of felt;
- juice straws;
- beads or small buttons.
- For each mouse, you need to cut two pieces from one fabric. The first will become a body, pointed from the muzzle, rounded on the other side. Cut out the ears in the shape of a figure eight.
- From a fabric of a different color, you need to cut a small circle for the nose and two larger ones for the ears, glue them in place.
- Use scissors or a clerical knife to make 4 cuts on the body of the mouse. Two will be vertical, at the back of the head, and the other two you will make in the area of \u200b\u200bthe rump to put the straw here. Position the ears on top of the head by threading them through the incisions.
- It remains to glue beads or buttons instead of eyes and marvel at how quickly crafts are made from simple materials.

If the child is bored, you can make a fabric appliqué with him. Such funny bunnies are also sewn on the worn knees of children's trousers to update this thing.

Transfer the applique to the fabric, cut it out. They decorate the bunny by sewing a bow to its ears, and a carrot on the body. Attach eyes and other facial features. If this is an applique, then you need to glue the hare on cardboard.
And here are some more simple crafts - in the form of birds. You can cut these out of the remnants of felt, glue the nose, eyes, wings and play a home performance.

Crafts from cones with their own hands for children

They are also made simply and quickly.
To make gnomes, take:
- Pine cones;
- light plasticine;
- pieces of felt or fleece;
- glue;
- brush.
- Let the child roll a ball out of plasticine, with the back of the brush make indentations in it for the eyes, mouth, nose. They will be filled with pieces of plasticine of the corresponding color. So, the eyes can be brown or blue, the mouth is red.
- Attach the head to the top of the cone. Cut out a triangle from felt, glue its sides to make a cone. Put this cap on your character's head.
- Cut out mittens from the remnants of the fabric, attach them to the bump with plasticine.

For such crafts from cones, like an owl, we also need:
- 2 caps from acorns;
- yellow paint with a brush;
- plasticine;
- accessories in the form of feathers, ribbons.
- First, the cone and the acorn cap need to be painted, continue subsequent work when they dry.
- Let the child roll small balls from black plasticine, stick them to the inverted acorn caps - these are the pupils.
- Make a nose out of orange plasticine, attach it in its place.
- Such an owl made of cones craft is decorated with feathers or ribbon.
- pine cone;
- pieces of dense fabric;
- two toothpicks;
- cotton wool;
- 2 ice cream sticks;
- white paint.
- Let the child paint the bump, remove it until it dries completely.
- Mom will cut a scarf out of checkered fabric and tie it around the snowman's neck. He will make headphones from felt, glue them to the character's head.
- The child will make the nose and mouth of a snowman out of plasticine, attach it to his face.
- Make hands from wire wrapped with a strip of cloth or tape. The wire needs to be wrapped around the bump.
- Put toothpicks in the hands of the snowman, with pieces of cotton wool glued to the bottom of these sticks.
- Paint the ice cream sticks, when they dry, install the snowman on these skis.
Quickly and simply done and these are the piglets. Glue the scales from the cones in the form of ears to the spruce cones. Attach the patches, which will become acorn caps. You can use not glue for this, but plasticine.

Paint the piglets pink, you can use spray paint for this. When it dries, only after that you attach small black beads that will become eyes.
For this craft, you need an unopened cone. But over time, the scales open up. To avoid this, dip the cones in wood glue diluted with water for half an hour.
Take them out of the solution, shake them off. After 3 days, the bump will dry completely, fixing the scales, which now will not open. After that, you can cover this natural material with paint and make new items.
The next simple craft is a forest corner. For her, take:
- CD disk;
- plasticine;
- spruce and pine cone;
- an acorn cap;
- glue;
- paints;
- eyes for toys
- Paint the disk green, draw flowers on its surface.
- Let the child roll up the hats and legs of the mushrooms, connect them.
- The base for the hedgehog can be molded from plasticine or polymer clay. Then cover it with brown paint.
- When it dries, stick scales from a spruce cone into the back of the hedgehog. Put a hat on his head.
- Glue the eyes, nose, mouth, put a cane stick in your hand. The other will contain a basket with mushrooms, which are molded from plasticine.
- Attach the hedgehog to the stand, after which another wonderful craft is ready.
Tie floristic wire to the cones, put picturesque flowers in a jar, previously wrapped with twine.

From the cones for the garden, you can make another craft, such a wonderful decorative basket.

If you need to quickly make a hedgehog to bring to kindergarten, mold his body and head from beige plasticine, and roll up his eyes and nose from black. Stick seeds that will become thorns.

Simple crafts for a great mood
Now the sun peeps rarely, more and more cloudy weather. In order not to succumb to despondency at this time of the year, make mischievous tricks that will certainly improve your mood.

Settle at home in a vase with these cheerful flowers that are made from almost nothing. For them, you just need to take:
- colored paper;
- cardboard from a white box;
- marker;
- stationery knife;
- tape;
- scissors.

Paint the eyes with a black marker, bend the petals forward.

Cut out a stem from cardboard. At the top, on one side, glue the finished part, on the other, a pre-cut flower with petals.

Bend a green sheet of paper in half, draw an oval line on it, cut it out. If available, use zigzag scissors. Make the cuts simple.

Tie paper flowers with ribbon, and if there is taffeta, then use this fabric for decoration. You have got a bouquet that will never wither, will amuse you.

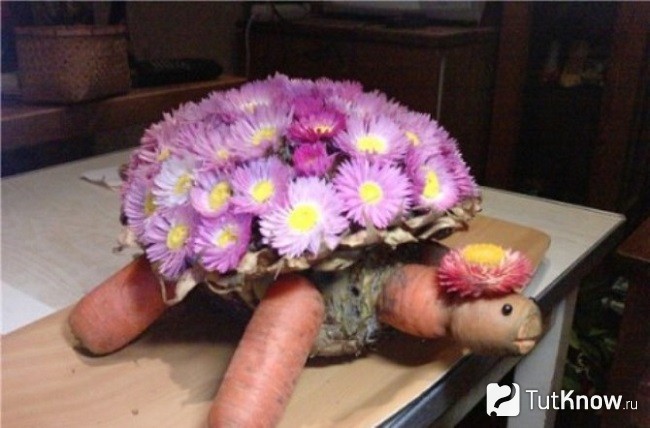
You can attach flowers with a toothpick to washed beets or pineapple. You will get a beautiful tortoise shell. You will make her arms, legs and head with a neck from carrots. Attach these parts to the body with toothpicks too.
If you want the New Year to come soon, decorate the white objects in the apartment by turning them into snowmen.

Attach black magnets to the refrigerator, and now the holiday character has settled in your kitchen. If you draw on a white vase or stick round eyes and an orange nose in the form of a carrot, then another snowman will amuse everyone at the table.
See what other quick and easy crafts you can make.
Do-it-yourself pleasant little things most often become the main factors in creating home comfort. Many of them are quite easy to make - just sleight of hand, a little imagination and creative inspiration.
Interesting things collected in our photo selection are not only pleasing to the eye, but also make life even more pleasant. Rather, let's start reviewing fascinating things with our own hands.
Rug of stones
Let your interior be one step closer to nature. This cute, handmade rug made of large pebbles makes for a vibrant natural decor - a great alternative to the traditional rug at the entrance.

Mug with golden accent
Have you been dreaming of transforming your favorite mug for a long time? Stop putting things off until later. Get a special aerosol with golden paint and start creating as soon as possible. There can be many design options - create to your health or follow the original example in the photo.
Lace lampshade
You will hardly find the similarity of this lace lampshade in any store, because such a masterpiece is the result of manual creativity and craftsmanship. The essence of the work is shown in the photo.

Paper cutting: evening city on a shelf
Real magic in your home is not difficult to do at all. This spectacular lantern in the shape of a fairy-tale castle is cut out of paper. Even your child can do this technique.

For crafts, prepare the following materials:
- thick paper;
- scissors, pencil, ruler, eraser, breadboard knife, glue stick;
- New Year's garland (preferably on batteries).
- a shelf for a picture (necessarily with a side that will hold the picture).


We bend the edge of the layout to install it on the shelf. We lay a garland along the bottom and light the lights. Fairy tale castle with lights is ready!

kitchen organizer
Kitchen accessories, made with love by you, look much more interesting than store-bought counterparts. With them, the surroundings are filled with a special warm atmosphere and comfort. Even such a simple cutlery organizer made of tin cans will give the interior a certain personality and charm.

Cardboard mirror frame
Get creative with your dressing table. Instead of a boring classic mirror, you can hang something more original above it, for example, a mirror with an openwork cardboard frame. Believe me, such a masterpiece with your own hands looks much more elegant than the store counterpart.

City plot from cable
Add a touch of unpredictability to your own interior. A long black cable, randomly lying around a white wall, can turn into an original minimalist urban plot against its background.

Vintage photo frame
An antique picture frame and simple wooden clothespins are great materials for creating a unique vintage-style photo frame with a creative touch.

Charging point in the box
If you are one of those who have accumulated a lot of chargers, we have a great solution for you in an aesthetic and at the same time functional box for storing them. It not only visually decorates the room and keeps all the devices in order, but also charges them on the spot!

book of kisses
A creative surprise for a loved one - a mini-book with kisses. Flipping through the pages, the hearts are becoming more and more.

Accessory for toast lovers
Here's a cute toast you can sew yourself. Nice gift for the occasion.

Shoes with cats
Add a little more color to your everyday life. Old ballet flats can be transformed in an original way by embellishing the socks with charming cat faces.

And you will need just a little: plain ballet flats, a brush, black and white paint, a white marker, masking tape. Then everything is according to the instructions in the photo.


Soul winter accessory
Homemade decorative skates will once again remind you of a winter fairy tale and relaxation on the ice rink.

If you want to make the same, then prepare large pins, felt, cardboard, woolen thread for laces, hot glue, a marker and a tapestry needle.


A little humor on a rainy day
Comic covers on rubber galoshes will certainly not allow you to be sad in rainy cloudy weather.

Adorable spiny hedgehog
A sewn hedgehog made of yarn can also have needles, but not their own, but sewing ones.
 funny abstraction
Feel like an abstract artist by building bright emoticons from different miniature figures.

Cute kittens made of cardboard for holding thread

Collection of handmade stamps


Bunny bag for children
Why buy accessories for a child when you can make them yourself. A bag for a girl with a hare muzzle looks very original.

Ice cream garland
Create a summer mood by tying a garland of the most popular treat of this season - ice cream cone.

Notebook in homemade leather cover

Stylish hanger
Eyelets made of leather ribbons nailed to the wall - an extraordinary minimalist hanger or shelf for books, magazines and other small items.


magic vase
You can create a magical atmosphere in your home with simple beautiful things, such as this vase.


Rhinestone bracelet


Decorative letters for a refrigerator or children's board
Letters from the learning alphabet are a great idea for home decor. All you need is a little bit of golden paint.


Convenient headphone clip

Spectacular shimmer
A little palatial interior will give candles with golden and silver flicker. Such beauty can be made at home using old candles and aluminum tape.

Donut bracelet
Young fans of Homer Simpson will love this cute donut bracelet. Here you only need bright nail polish and a plastic children's bracelet, then all that remains is to dream up with icing.


Boring clothes
A simple beanie will make a big difference in your everyday style. It is enough to sew a few bright flowers along its edge.


T-shirt with a figured neckline

Sweatshirt with watercolor pattern

Pareo beach dress

Headband

Woven scarf

A simple white T-shirt will become more stylish if you sew a neat pocket with an interesting print to it.

More ideas for DIY crafts are presented in the following selection of photos.


As you can see, to please yourself and your loved ones, you do not need to spend a lot of effort and money. Your desire, creativity and inspiration can work wonders. And the result of work done by one's own hands cannot be compared with purchased accessories and other store items.
Do you like needlework? Tell us about your favorite creative masterpieces.
Quick article navigation
Making paper crafts with your own hands is a simple, inexpensive and very interesting activity for both children and parents. All you need is paper, scissors, glue, and a few fun ideas. In this material you will find 7 step-by-step needlework workshops from different types of paper and 50 photo ideas for your inspiration.
Idea 1. Volumetric crafts
We offer the smallest needleworkers to make a simple voluminous paper craft in the form of such a cat.

Materials:
- Sheet of A4 paper;
- Scissors;
- Glue.
Instruction:
- Download and print the template (see cat template below) on white or colored paper;
- Cut out the template with scissors, and then make 4 cuts in it along the outlined solid lines;
- Bend your neck according to the markup with an accordion and twist the tail;
- Bend the fold lines marked with a dotted line on the paws and glue them to the cardboard.
For older children, there is a more difficult task, namely a master class on making voluminous paper crafts in the form of a bird.

Instruction:
Step 1. Download and print the layout diagram (see below). Please note that the file contains a colorless template so that you can print it on colored paper.
Step 2. Cut out all the details exactly along the solid lines with a breadboard knife.
Step 3. Fold all the fold lines according to the principle: bold dotted line = fold inward, thin dotted line = fold outward.
Step 4. Glue the parts to each other, treating their corners with glue (with Glue inscriptions). Stick to the following order:
- First glue the beak to one side of the bird, then to the second.

- Glue the back of the bird starting from the beak, as shown in the photo.

- Glue on the wings.

- Now take the part, which is the bird's breast, and at one end of it, fold and fix the triangle with glue as shown in the photo.


- Assemble the legs, make sure the knees are at a 90 degree angle, then glue the legs to them.

- Well, that's all, it remains only to glue the legs to the body and your voluminous paper craft is ready. If you wish, you can make a whole flock of such birds in different colors with your own hands.


Idea 2. Wall panels, paintings and applications
It is known that you can draw not only with paints on paper, but also ... with paper on paper. Such activities are no less exciting and useful for developing hand-eye coordination, fine motor skills, perseverance, the ability to plan your work, combine colors, shapes and materials.
The following selection of photos presents ideas for paintings, panels and paper applications for children of different levels of complexity.


By the way, the application can be made up of parts of the same shape, but different sizes and colors. It can be circles or hearts. The following slider provides examples of such paper crafts and schemes for their manufacture.


And here are some more examples of interesting paper crafts of various types.

Now we offer you to get acquainted with a master class on making an original, but very easy paper craft. We have no doubt that such cute figurines will help instill in your child an interest in reading books.


Materials:
- 1 sheet of A4 colored paper;
- 1 sheet of A4 white paper;
- Scissors;
- Glue stick;
- Markers, pencils and paints.
Instruction:
Step 1. Bend one half of a white A4 sheet in half and let the child independently draw the cover of their favorite book on it, also signing the title and name of the author.
Step 2. Cut three long strips from a colored sheet about 2.5 cm wide. You will have 4 parts: 2 strips for the legs, 1 strip for two arms and one rectangle to create the torso of the figure.

Step 3. Take two strips (for the legs), fold them like an accordion, and then glue them to the rectangle torso.
Step 4. Divide the remaining long strip into two equal parts, draw fingers at the ends and glue to the body.
Step 5 Bend the top of the figure to the front side and make her bangs with scissors as shown in the photo.

Step 6. From the remaining half of the white sheet, cut out circles and glue on the figure as if it were glasses.
Step 7. Draw the details: eyes, mouth, nose and temples of glasses with a black marker.
Step 8. Now glue the book to the hands of the figurine and finally put it on the table or hang it on the wall, for example, near the bookshelf.

Idea 3. Hats
All children love games with reincarnations and for this they use everything that comes to hand. To provide a child with props, you can make fantasy hats with him. By the way, such colored paper crafts can be made for one or more children for a performance, a masquerade, a themed birthday or any costume party. In the next selection of photos you can see examples of a variety of paper "hats" - from pirate cocked hats to wigs.


Today we invite you and your kid to make a hat in the shape of a dinosaur head. This workshop is so easy that a child as young as 3 years old will need very little help from you.

Materials:
- 3 sheets of colored paper;
- Glue stick or PVA;
- Scotch;
- Scissors.
Instruction:
Step 1 Cut 4 strips about 3 cm wide along the long side of the paper. Two of these strips will turn into a headband, and the other two into the crossbars of the “cap”, on which dinosaur spikes will be glued.

Step 2 Take two other sheets of paper and cut them into strips about 5 cm wide along the short side of the paper. You can measure and cut the strips by eye, but in the end you should get 5 strips from each sheet. We need these blanks for the manufacture of spikes.

Step 3. Fold each spike blank in half and, stepping back from the fold by about 1.5 cm, draw a markup in the form of a triangle up to the very edge (see photo). Next, just cut out future spikes.

Step 4. Glue the two crossbars, and then glue the spikes on them in a row as shown in the photo below.

Step 5. While the glue dries, fit the two pieces of the headband to fit the circumference of your child's head, and then connect them in a circle with tape.
STEP 6 Now let's get back to the spikes. Turn the crossbar over so that the spikes are on the table and carefully bend each of them (see photo). Form the first spike: cover one side of it with glue and connect it to the other. Use paper clips to secure the spike until the glue dries. Repeat these steps with the rest of the spikes.

Step 7 After the glue has dried, remove the staples from the spikes and simply glue the crosspiece to the headband at the front and back.

Idea 4. Toy figures from a toilet paper sleeve
Toilet paper rolls are great crafts for kids that just need a little embellishment. For example, you can make such wonderful toys out of them.


