And he loves to furnish the house at his own discretion; he must have a carpentry workshop at his disposal. Woodworking is a fun and creative activity. It’s a pleasure to work with him, and the workshop smells like a forest. Many interior items and furniture are made from wood. So there will always be an object to make. How and where to equip carpentry with your own hands?
Workshop space
Before choosing a location, you need to know the requirements for a carpentry workshop. Since tools and machines make a lot of noise, the room should be away from housing, especially grumpy neighbors. The future workshop must have electricity, at least 220 V. Lighting is required above each machine and general. The workbench should receive natural sunlight.
It is also necessary to immediately think through the question of how the area will be heated. To work with wood, the room must be dry and preferably with the same air temperature. Due to dampness, the products will dry out in the room and cracks will appear. The glue will not set in the cold. We need a golden mean. When buying a stove, think about where it is safe to put it and how you will have to heat it.
Having a private house, it is much easier to allocate space for carpentry and joinery work. This could be a stone garage, a barn, a summer kitchen, or just a separate building. In the city it is more difficult to think about a place. It will not be possible to equip a good workshop in an apartment, unless you put a small workbench and a cabinet with tools on the balcony. In this case, there is no question of any complex work. What remains, again, is the stone cooperative. Nothing will work out in metal because of the heat in summer and cold in winter. At best, you can do all sorts of little things there.
Carpentry tool
To create full-fledged carpentry with your own hands, you need machines and hand tools. Many people believe that the most convenient option is a universal machine, but this is not entirely true. When you turn on one process, the others are automatically turned on. This wears out the equipment and is dangerous when working. Strict, you can crawl under a moving circular saw, etc. It is better and more professional to have several separate machines. When organizing carpentry with your own hands, you first need to have a circular saw, a planer, and a lathe.

Other operations can be performed with electric hand tools: milling cutter, drill, grinder, screwdriver. They also use planes, jointers, chisels, clamps, miter boxes, measuring tools, metal squares, saws and others. Brushes will be needed for painting and varnishing. The most important place for any carpenter is a comfortable workbench, which in its structure has several additional functions.
Room lighting
When working with sharp tools that rotate at high speed, you must follow safety regulations. First you need to clearly see everything you do. Proper lighting will create comfortable working conditions for the carpenter. If there is insufficient natural light, additional light is provided above the workbench. If a do-it-yourself carpentry will be located in a garage without windows, then the lighting should be combined. Fluorescent lamps are added to conventional incandescent lamps.

The light should be even and not flickering. Lighting should not create shadows on the product; they can visually distort the proportions and sizes of parts. Since there is a lot of electrical equipment and lamps in the workshop, think in advance about the number of sockets and automatic shutdown in case of overload. This is not always good, especially when work is done on machines. Adjusting the loads on electrical and lighting devices falls on the shoulders of the master. The best option to ensure safe operation of the workshop is to consult an electrician. This will save you from problems in future work.
Workshop heating
The ideal premises would be a building with central heating. But this is very rare in workshops. Therefore, each owner comes up with his own ways to keep warm. They use fireplaces and oil radiators, heat blowers (a fireplace with a fan), an air convector, and an infrared heater. These devices heat a hermetically sealed room well, but consume a huge amount of electricity. And this is expensive and unprofitable.

Carpentry workshops collect a lot of sawdust, wood scraps, wane and other waste. All this needs to be taken somewhere. The best option is to use such waste for heating the room. The stove can be welded from a simple metal barrel or ordered from a welder. They install it away from the machines; for the pipe you need to punch a hole in the wall. It is imperative to place a stove or barrel on a metal sheet for fire safety purposes.
Posting rules
1. Each machine in the workshop should be located at a distance from one another and have free access from all sides.
2. Machines should be located away from the work table. A large unoccupied space should be left in the middle of the workshop for the assembly of large pieces of furniture, cabinets, tables and chairs made of wood.
3. The floor must be cement, with a smooth screed surface. The machines are installed permanently, tightly adjacent to the floor surface. And be sure to ground them.
4. There is a lot of wood and shavings in the carpentry shop. All of these are highly flammable items. You need to equip a box with sand somewhere in the corner and have a fire extinguisher. Don't skimp and buy it. For your own safety.
Furniture making
Wooden furniture is always appreciated. This is an environmentally friendly material, and people who care about their health try to use natural materials. The production of any furniture begins with ideas, planning and measurements. Next, a drawing is drawn and materials are selected. Oak, larch, linden, and beech are prized; walnut looks very beautiful. The wood available to everyone is pine.

The next step is to prepare the purchased boards for work. They need to be leveled on a planer and beautifully processed using a thicknesser. Then the parts are cut to size using a circular saw. Then comes assembly and painting. Thus, according to the drawings you can make cabinets, shelves, beds, tables and
By making furniture with his own hands, a carpenter gets pleasure from realizing his ideas, puts his soul and skill into making a beautiful product. Wooden furniture lasts for many years, it is strong, and therefore is in demand among buyers. Having your own carpentry, you can update your interior and also earn money.
The demand for high-quality furniture and other products made of natural wood is constantly increasing, so opening a carpentry workshop is a promising business with small investments.
How to open a carpentry workshop
The Russian furniture market is overflowing with low-quality products made from chipboard and fiberboard, the main advantage of which is their low price. However, more and more buyers are paying attention to high-quality products made from natural wood - not only furniture, but also doors, windows, souvenirs, and kitchen utensils. Therefore, opening such a workshop can turn into a profitable business.
It is profitable to open a carpentry workshop even in a small town
Advantages of a carpentry workshop as a business
Business benefits include:
- growing demand for high-quality wooden products;
- the ability to produce products with individual designs that have a high price;
- small initial investments (from 100 thousand rubles);
- quick payback;
- low competition compared to other types of business with low turnover.
Video: how to turn a hobby into a carpentry business
Woodworking company business plan
Before purchasing equipment and hiring personnel, it is necessary to draw up a business plan that will reflect market analysis, product sales prospects, planned expenses and income.
Business registration
You can register a company in any form convenient for you - for a small carpentry business, individual entrepreneurship is quite suitable. Registration of an individual entrepreneur takes only 3 days and costs 800 rubles. (state duty). You can open an LLC, but in this case you will not be able to quickly withdraw money (only once every three months and after paying tax). However, if you are starting a business with partners, an LLC is a suitable option.
When registering, you must enter the OKVED code 16.23.
A license is not required to manufacture carpentry products. Certification will be needed if you produce children's toys.
Choosing a workshop space
Almost any room is suitable for a carpentry workshop - even a garage or basement. The main thing is that the future workshop was dry, since wood is afraid of moisture. The workshop area for comfortable work should be from 50 square meters, ideally 300. For large-scale production, it is necessary to rent 700 “squares”. If you will produce large products - windows and doors, then the length and height of the room must be at least 4 meters.
Other requirements: good ventilation, natural light, low humidity, temperature not less than 16–18 degrees, electricity (220V, ideally 380), fire safety.
 It is advisable that the windows of the carpentry workshop occupy at least 20% of the floor area
 If you, for example, plan to produce doors, then you need to divide the workshop into separate production areas:
- drying boards;
- production of solid woodwork;
- production of individual elements;
- assembly of elements into one product;
- sanding and painting.
Market and competitor analysis
If funds allow, you can order market research from a specialized company. However, most of the information can be collected independently. If you already work in a similar industry, then you probably already know the local conditions. Otherwise, visit specialized companies and stores, see what they offer on the market and in construction supermarkets. This way you can analyze prices, understand the products offered, find out which models are popular, and ask about the origin of the wood.
 Meet interior designers who will supply you with custom orders
 Assortment compilation
The list of products offered by carpentry workshops is very wide. These are entrance and interior doors, windows, furniture, various small items for the kitchen, souvenirs, and children's toys. It is better to first choose one direction, and then you can diversify your activities.
Doors and windows are products of constant demand. Although wooden window frames are constantly being replaced by plastic, wood is still valued for doors, especially interior doors.
 Solid wood doors will last much longer than chipboard doors
 The manufacture of kitchen utensils benefits from mass demand and great variety. You can make wooden coasters for hot dishes, cutting boards, rolling pins, napkin holders, bread bins, containers for spices, cutlery stands, spatulas, etc. They are inexpensive, but with a large production volume the profit will be serious. And if you decorate them with decorative elements, you can sell them as souvenirs.
 Wooden utensils have to be renewed quite often
 One of the interesting trends in this area is gingerbread rolling pins and boards with indentations and bulges in the form of patterns, fruits, and animals.
 Gingerbread rolling pins are made of beech and impregnated with linseed oil
 Wooden souvenirs are very diverse - from magnets to carved boxes. You can produce a “knock on wood” souvenir. This amulet is made from a birch log or board, decorated with pieces of birch bark.
 This is what the “Knock on Wood” amulet looks like in its simplest form
 As for furniture, no special explanation is required. Chairs, benches, tables, cabinets, chests of drawers and much more are made from wood.
 Carved furniture looks rich and elegant
 Board and logic games made of wood are valued by parents for their environmental friendliness and durability. If you coat the products with paint, the products will cost less. Children's toys without the use of varnishes and paints usually cost more, since the surface must be perfectly smooth. Please note that to produce children's toys you need to obtain the appropriate certificate.
 Jenga (aka Tower) is a popular board game for almost any age.
 Finding ways to sell finished products
The easiest way to sell products is to negotiate with existing outlets in stores and on the market. Of course, getting into large retail chains is very difficult, so it’s worth trying to negotiate with small stores with a narrow focus. You can open your own kiosk or sell products directly from the workshop. A good option is to make an online store where you can post attractive photos of your products. This way you can sell products not only in your locality, but also in other cities and regions. You can advertise in free newspapers and post information on social networks. If you produce high-quality products at prices lower than those of your competitors, then word of mouth will help you.
 Unusual wooden furniture will attract customers with high paying ability
 Purchasing the necessary equipment
Equipping a carpentry workshop is the biggest expense for this business. It's good if you already have part of the tool. You can purchase used equipment (but always in good condition).
Table: necessary equipment for a carpentry shop
Some equipment can be made independently according to drawings: lathe, vice, workbenches.
A good solution would be a woodworking center that combines various equipment, which saves space. It can be bought for 100–200 thousand rubles.
 If you want to save money, choose a domestic woodworking center
 Don’t forget about the carpenter’s hand tools: knives, mallets, jigsaws, chisels, calipers, tape measures.
 The exact list of equipment depends on what products you will produce
 Materials
A variety of materials are used in carpentry, the choice of which depends on what products you will produce and what level of income you are targeting. For example, the most durable furniture is made from oak, while alder is better suited for the production of elegant furniture. Expensive models are made from walnut. Ash is suitable for carving, and beech is used for bent furniture.
 Example of bent furniture
 Furniture made from exotic species - mahogany and ebony - is very expensive; it is usually made only to order. Coniferous trees (pine, spruce) are suitable for creating interior doors.
It is also necessary to purchase consumables: wood glue, oil, sanding belts, brushes, paint and varnish products, nails, screws.
A separate expense item is accessories: various corners, wheels, closers, handles, etc.
Personnel search
To produce carpentry products, you will need at least two assistants. This is provided that you organize the work of the workshop yourself. If this is not possible, you will have to hire a production manager (technologist) or a workshop foreman. You may also need a handyman, a sales manager, a customer service specialist, or an accountant.
If you want to make unusual products, you will need a creative employee - a designer.
Keep in mind that woodworking involves risk, so it is necessary to organize training for employees. It would also help to have a job description that describes the duties and functions of employees.
 Look for carpenters with experience and creativity
 Is carpentry business profitable: calculation of profitability
Let's say you open a carpentry shop producing windows and doors with two employees in a rented premises, the workload is about 40%.
Table: one-time and monthly expenses
| Business expense item | Monthly expenses, thousand rubles. | One-time expenses, thousand rubles. |
| Business registration | - | 41 |
| Renting premises | 15 | - |
| Payment for electricity | 7 | - |
| Equipment purchase | - | 400 |
| Workshop setup | - | 85 |
| Purchase of raw materials | 436 | - |
| Purchase of additional materials | 7 | - |
| Salary | 215 | - |
| Social Security contributions | 11 | - |
| Administrative expenses | 10 | - |
Thus, the total costs will be about 1 million rubles.
Table: production diagram
Profitability
- revenue from wholesale sales - 752.4 thousand rubles;
- production and non-production costs - 701 thousand rubles;
- net profit - from 116.78 thousand rubles;
- profitability - from 21%.
The remaining time of workers can be spent on individual orders, which can bring in another 100–200 thousand rubles per month.
The investment will pay off in an average of 7–10 months.
If you open a small carpentry workshop, you can get by with a modest amount of 100 thousand rubles:
- equipment - 75 thousand rubles;
- raw materials - 10 thousand rubles;
- rent of space - 6–7 thousand rubles.
With a profitability of 23%, the profit will be about 30 thousand rubles. per month, and the initial costs will pay off in a period of 4 months to six months.
Video: carpentry workshop as a business idea
Opening a workshop for the production of doors, windows, and furniture is a successful model for a small business with a small amount of initial investment, which can be organized even in your own garage.
Regardless of where you want to allocate a corner for yourself for a workshop, first of all, you need to make sure that it is located as far as possible from a residential building, for example, in a garage. It is not difficult to choose a place on the site; it will be much more difficult for those who, living in a city apartment, do not have a country plot or at least a garage, since they will have to put a workbench in one of the rooms. Ideally, you can allocate a storage room for a workshop; you can also hide the workbench in the hallway, in the built-in closet, or take it out onto the loggia.
Further, everything is limited by the available area. If you only have a small booth at your disposal (a newsstand purchased for the occasion, or just a small utility unit), carefully work out the plan for the carpentry workshop. The less space available, the more limited you will be in terms of equipment. In an area of 4 square meters you can only fit a workbench, a small grinder and perhaps an anvil. But you still need to leave room for movement and, of course, do not forget the arrangement of cabinets with tools.

You will be most comfortable working with your own hands in a separate shed with an area of at least 6 square meters or in a garage. After all, a carpenter needs not only a workbench, but also various machines, in particular a lathe and, if possible, a drill. Also, for fire safety, it is advisable to allocate space for a box of sand, a barrel of water and a box for sawdust. It would be a good idea to put a rack for lumber near one of the walls or locate a workshop not far from it. To ensure that your country carpentry workshop, which you set up yourself at home or in the garage, has a competent layout, it is worth watching a training video on this topic once.
So, separate metal or built, but for now it's just a box. The most important thing at the next stage is high-quality sound insulation. It’s unlikely that your household will enjoy listening to the screeching sound of an electric plane or the whine of a drill all day. Therefore, it is advisable to cover even the door with sound-absorbing material. The window, of course, will let sounds through freely, but it can be made on the opposite side of the residential building. At the same time, it is better to make the internal lining of the walls and floors with your own hands from non-combustible materials or impregnate the so popular fiberboard slabs with a special fire-retardant primer. Video instructions will show you how best to do this.

The second thing to do is to conduct electricity. Moreover, the cable must be multi-core, designed for heavy loads, especially if you plan to operate several machines and power tools at once. If the building is wooden, the wiring is placed in special metal boxes or pipes to avoid fire due to a short circuit. Sockets must be grounded, just like the machines themselves.. And, of course, take care of good lighting; fluorescent fluorescent lamps are best suited.
And finally, try not to forget about ventilation. Imagine for a moment how much wood dust rises into the air when working with, say, an electric jigsaw. Some of it will settle on the workbench or floor, but you will definitely inhale some of it. Therefore, even the simplest exhaust system can make working conditions much more comfortable than the complete absence of ventilation. It is better to find out how such an installation functions and how to install it in the best way with your own hands using a video. At the same time, regardless of whether your workshop is in a shed, at home or in a garage, it is advisable to ensure not only the outflow of dusty air, but also the influx of fresh air.

When arranging equipment, it is important to maintain priority, for example, a drilling and lathe machine is closer to the workbench, and a grinding machine is further away, while tools should be stored directly near the workplace.
There is usually little space in the apartment for those who like to make something in their free time. There's a living room for watching videos together as a family, and there's definitely no corner for a workbench. Even more so in the bedroom and kitchen. Therefore, a workshop within the walls of a house is either on a loggia, or in a storage room, less often - in the hallway, as mentioned above, in a closet converted into a workbench. Let's look at the options for what a carpentry workshop plan could be.

If the balcony is spacious enough and insulated, it can be an ideal place for setting up your workshop, but if it is not glazed, work at the workbench will be seasonal. Therefore, first of all, it is advisable to take care of the frames and heater. Next, there is an outlet on the balcony, but here it is immediately worth remembering that the home electrical network is not designed for powerful machines, and the neighbors are unlikely to be delighted with the noise. Therefore, you will have to limit yourself to hand-held electric tools. But the loggia has ideal ventilation - just open the windows.
The worst inflow and outflow of air is in the pantry, but it is convenient due to its isolation from living and circulation spaces. True, in such a room there is almost no space for a workbench, not to mention equipment, so the best solution would be a cabinet with a folding table. The first will store tools, and the second will become a working surface, not particularly reliable, but easily removed when not needed. You can find a video master class on how to make a compact workbench with your own hands.

And finally, we got to the wardrobe in the hallway, an almost ideal place for a working corner, especially with the sufficient depth of the built-in closet. Here you can make 2 compartments: a narrow one with shelves and a wide one with a workbench. The first will serve as storage for tools that will always be at hand. The main thing is that the hinged doors hide both compartments behind them, otherwise you will have to constantly be distracted by looking behind the adjacent door in search of a hammer or chisel.
In the process of building a summer house or a country house with your own hands, a desire arises to make it so beautiful and individual that your friends and neighbors will be jealous. But even you have the ability and desire to carpenter, you need a tool and a room in which masterpieces of wooden art will be born. We invite you to consider building a carpentry workshop as the embodiment of your hobby. Although maybe later it can become your small business.
In this article we will look in detail at how to equip a carpentry workshop on your own using a ready-made example. The area of the workshop presented below is approximately 400 m² (but you can make it small). The entire workshop is divided into two rooms where the working processing machines are located.
Which is better: building a new one or using an old one?
The carpentry shop will look much more functional in a new free-standing building for a number of reasons:
- Noise. The operation of the machines can hardly be called silent production, plus the operation of ventilation systems.
- Smell. It is not easy to get rid of the smell of paint products even with a good ventilation system.
- Garbage. Even with thorough cleaning of the workshop, dust will involuntarily enter the living quarters.
- Safety. The presence of cutting tools on machines and the use of three-phase power supply is considered high-risk equipment, and access to it by unauthorized persons is prohibited.
- Production area. It is unlikely that there will be a room in the house of sufficient size to comfortably accommodate all the necessary equipment for a full-fledged carpentry workshop.
- Auxiliary area. It is necessary to choose a place for storing tools, as well as for storing blanks and finished products.
There is an opinion that a workshop for carpentry work at home should occupy up to 6-7 m2, but this is catastrophically not enough. In such an area it will not be possible to fit the maximum amount of equipment. Moreover, the recommended length of the room should be at least 4 m. Even if, by a lucky chance, you fit everything you need, you will not have any room left for normal work. There is nothing to say about storing material and finished products.
 DIY carpentry workshop
It won't work with a garage either. This is a specialized place for the machine and risking its integrity during operation is not a suitable option. In addition, the workshop requires normal temperature conditions, which are difficult to maintain in the garage. It is also necessary to allocate space for storing car parts and tools.
The barn is closer, but still unlikely to fit. Rather, such a solution will require radical redevelopment and reconstruction, commensurate with new construction.
Carpentry requires a reliable foundation made of slabs. If the equipment is installed unstable, it will vibrate, which will ultimately lead to its failure.
Having considered all the options, we decide to place the workshop in a newly built building.

Place for building a workshop
When determining a location for a future carpentry workshop, it is necessary to take into account some axioms of its placement:
- As far as possible from residential areas and buildings with domestic animals, if any. The noise produced by work equipment will have an adverse effect on the nervous system of your household.
- It is advisable to choose an open space. The absence of shadows will allow you to save a little on heating the workshop in winter and on lighting throughout the year. Solar radiation will heat and illuminate the room.
- To avoid flooding of the building during rains and snowmelt, there is no need to build it in places with a low general level. This can lead to problems with the building itself and even to emergency situations, such as electrical short circuits.
- It is advisable to ensure ease of access in all weather conditions in order to avoid constant snow clearing in winter, and to prevent flooding of the building during spring snowmelt.
- A plot of soil not suitable for farming will be an excellent place for a future builder
Workshop project: where to start
The first step in designing is to determine what specific workshop work you will be doing. It is advisable to think through and write down all planned work, both in the near future and in the future. Based on this list, it is necessary to compile a list of auxiliary equipment necessary to complete the assigned tasks.
Next, determine the availability of the necessary tools (from a chisel and hammer to a drill and jigsaw), nails and screws, blanks and finished products. Don't forget to complete your list with a powder fire extinguisher and a first aid kit. Then determine how to arrange all the above things, what cabinets, racks and shelves are needed for this. Let's move on to the list of main equipment. The list must be completed:
- workbench;
- machines, according to the list of works;
- advanced equipment;
- industrial vacuum cleaner;
- heating radiators;
- a box of sand;
- washbasin;
- container with water;
- locker for special clothing;
- a stool.
workshop equipment
After this, you need to add cabinets and racks with items from the first list to the second. Next, we determine the place for future blanks. The recommended minimum size of such a rack is 1 m × 6 m; it also needs to be added to the second list. Such a detailed list will allow you to calculate the dimensions of the future joinery.
Subtleties in drafting projects

When all preparations are completed, it is time to design. The result of your efforts should be a document that is a project for the future workshop. For construction, there is no need to draw up construction drawings according to all the rules; detailed sketches indicating the actual dimensions of the future premises and the dimensions of the main and auxiliary equipment specified in the second list are sufficient.
There should be several sketches. It is difficult to indicate all the elements of a structure on one projection. Therefore, your sketches should include all the details down to the smallest detail. External and internal dimensions of the room and its elements are indicated without observing scale, but must reflect the actual position of objects and building elements.
An approximate calculation of the required area for a workshop will be the product of the area of all equipment, shelving and cabinets and a coefficient equal to 1.5-2.
Still, if computer graphics looks like unplowed virgin soil to you, then the visual layout of the carpentry can be done using the old-fashioned method. Take a sheet of graph paper, draw on it the premises of the future carpentry on a scale of 1:20, agreeing with the approximate calculation and pre-made drawings.

From the same paper, cut out rectangles of equipment and auxiliary structures to scale, but according to real dimensions. This will make it possible to correctly place them in the workshop, taking into account workplaces and aisles. If necessary, you can move the rectangular layouts to determine the perfect workshop layout:
- On a sheet of graph paper, draw two lines perpendicularly, indicating the walls.
- We draw the door of the room. The size of the doorway should be slightly larger than the largest equipment. Then there will be no problems during its transportation. We arrange the equipment;
- We draw the remaining walls;
- We determine the location of the window openings and put them on the drawing. It is advisable to equip the eastern and southern walls with windows. This will allow you to get more sunlight and heat;
- Measure all dimensions and, taking into account the scale, apply them to the workshop layout.
This will be your guide to further actions.
Completion of the project: finishing touches

A few more necessary actions that must be completed in order to get a project that has the right to life.
It is advisable to provide several rooms in the workshop:
- The main area where carpentry work is directly carried out;
- Auxiliary, where additional work not related to woodworking is performed, for example painting and drying finished products;
- A utility room intended for household needs, such as changing clothes and rest, equipped with a locker for clothes, a table, a kettle for organizing a snack, and a couch for a short break.
These rooms will help divide areas of activity into zones and contribute to comfort during the work process.
The diagram of the utility room with the dimensions of its furnishings must be made on the same sheet with the main workshop.
The storage area for long timber or lumber should be located opposite the front door for ease of storage. A machine for sawing workpieces should be placed near the rack.
After receiving the layout of the carpentry, we move on to drawing up its sketch. We determine the material for the walls, their thickness and height. Select the type of roof and roofing material. Here it is recommended to rely on your wishes, budget and the ability to do it yourself.
An important issue in the design of a carpentry workshop is the development of a ventilation system. It must be forced, supply and exhaust. Such a system will ensure the removal of chips and harmful substances, complete air recirculation and microclimate regulation not only in the carpentry room, but also in the painting department. Draw on the sketch all the components of the ventilation, indicating the parameters and dimensions.
The final stage of design is the creation of a power supply circuit, lighting, both basic and individual for each workplace, and a grounding circuit. Each workplace must be equipped with a grounded socket, each machine must be grounded. Upon completion, a sketch of the connection to the communications workshop building is made.
Construction of a carpentry workshop with your own hands
The location has been chosen, the project has been prepared, and the construction of the carpentry workshop can begin. Construction should be divided into several stages:
Foundation
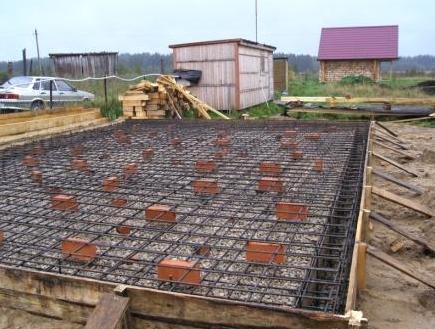
foundation
- At a pre-selected location, we mark the perimeter of the future workshop.
- We select soil to a depth of 70 cm for the future slab foundation.
- Along the edge of the pit we place formwork 20 cm protruding above ground level.
- We prepare the base from gravel and sand, carefully compacting it to a thickness of 20 cm.
- We carry out reinforcement. We take the reinforced mesh and lay it on the base. We screw the second layer of reinforced mesh to the bottom one using pieces of reinforcement 250 mm long with Ø1.5-2 mm knitting wire.
- We install anchor bolts in places where the machines are installed.
- Fill it with M200 grade concrete.
- Cover the concrete with a tarpaulin or film and leave until completely hardened for 3-4 weeks. In hot weather, it is advisable to periodically water the concrete.
Walls
 Wall installation primarily depends on the selected material. If the structure is wooden, then to fasten the lower crown when pouring the foundation along its perimeter it is necessary to lay threaded rods. Further construction of walls comes down to the construction of a wooden structure. The room can be made of brick or foam concrete blocks at your discretion. After making the box, install the window and door blocks. Make the roof according to a pre-prepared sketch with your own hands.
Floor


Floors in a carpentry shop play an important role. It is usually made from several layers. A base of 5 mm thick sand is made on the foundation, then it is covered with roofing felt and boards are laid on top or an armored mesh is laid and poured with concrete. The second option is more reliable and popular.
If the carpentry is made of wood, then it is necessary to impregnate the walls with fire retardant compounds.
Next, you need to bring all communication networks into the room and perform the wiring. All cable lines in cross-section must correspond to the current load imposed on them during further operation. In a workshop, wood is placed in metal pipes for fire safety purposes in case of a short circuit; in other buildings, corrugated pipes made of self-extinguishing polymers are used.
Heating in the workshop is provided using oil radiators or autonomous water heating. An electric boiler can be used as a source of heating the coolant, and if it is possible to equip the premises for a boiler room, gas or solid fuel boilers can be used. It is better not to use solid fuel boilers in a wooden workshop; there is a high probability of accidental fire.
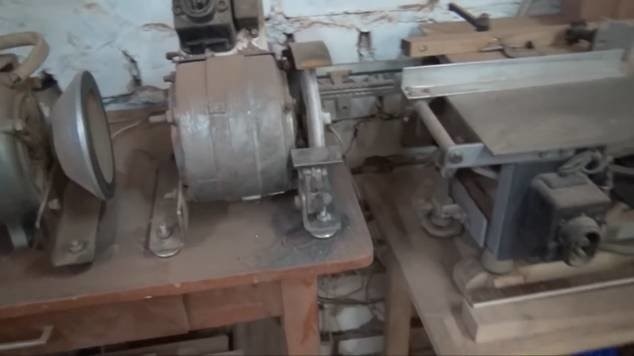
How to equip a carpentry workshop
Fig 1. General view of the workshop
In the center there is a sawing machine, near the wall there are blanking machines that allow you to end-process the board, make a cut, etc.
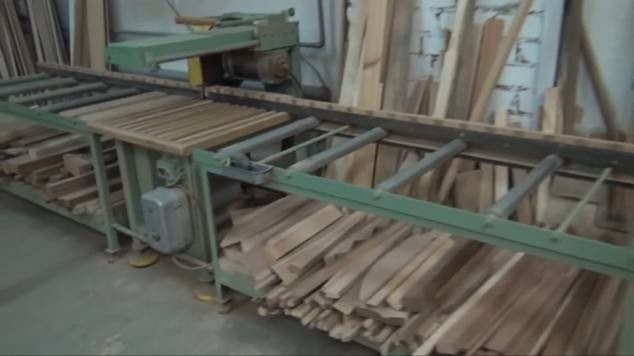
Figure 2. Procurement area
Prepared or processed wooden blanks, veneer, blanks for the façade of furniture, doors, etc. are stored here.
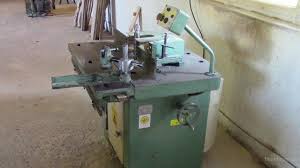
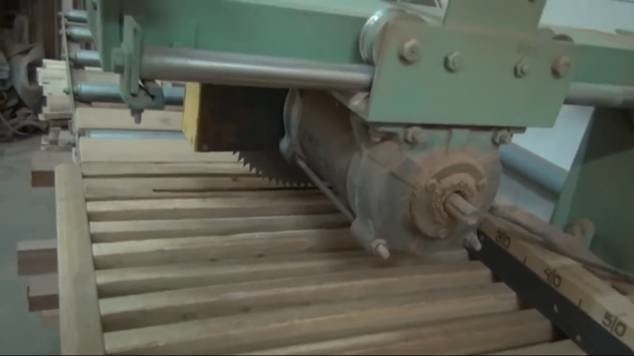
Fig 3. Cross-cutting machine
A cross-cutting machine is used to “cut” lumber. For example, 6 meter boards are shortened to 4 meters; the length is selected depending on the type of processing machine, the size of the room and the required dimensions of the finished product. Various waste after trimming lumber is stored at the bottom of the machine.
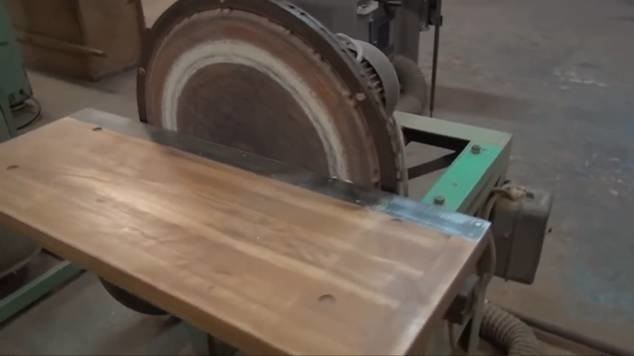
Fig 4. Drum grinding machine
Near the end machine there is a drum grinder, which is also made by hand.
Fig. 5. Hood - as an important factor in setting up a carpentry workshop
This drum sander hood is designed to collect all the wood dust after the sanding process.
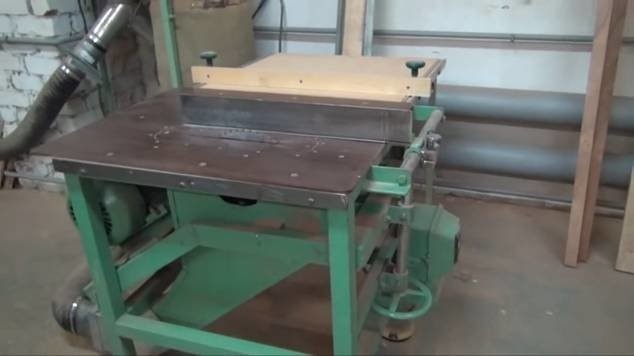
Fig 6. Circular machine
Next to the drum sanding machine there is a circular one, which is also used for “rough” cutting of lumber.
Fig 7. Jointer
In the center of the workshop there is a jointer, which was made in the USSR. The length of the table is 2800 cm and the width reaches 420 mm.
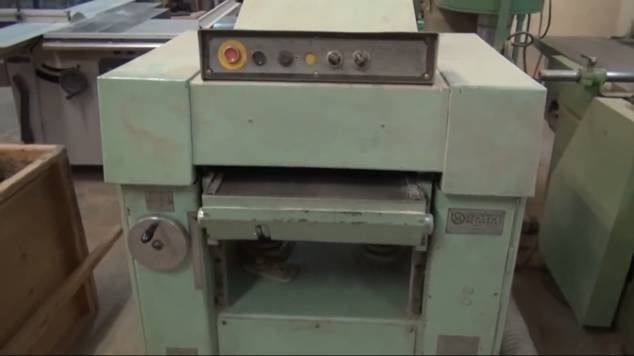
Fig 8. Thicknesser
The thicknesser is located next to the jointer with a workpiece size of 420 mm.
Figure 9. Aspiration
Between the thicknesser and the jointer there is a powerful aspiration unit, which during the processing process collects all the wood dust into a special reservoir, which can then be easily cleaned.
The milling mechanism was borrowed from the factory machine, and the work table, frame, aspiration and control system were made independently. Milled titanium was used as a tabletop. The factory shaft from the milling machine was removed and a new one was machined according to the dimensions of the working part of the machine. The shaft turned out without any cones for the old landing cutters, which is very convenient.
Fig 11. Milling machine shaft
Fig 12. Lathe
Figure 13. ShLDB machine
Figure 14. Cross-cutting machine
Do-it-yourself carpentry will require not only specific skills for fine-tuning and assembling machines, but also significant financial costs for purchasing the necessary materials.
Fig. 15. Factory-made Corvette 33 band saw
Figure 16. Angle cross-cutting machine
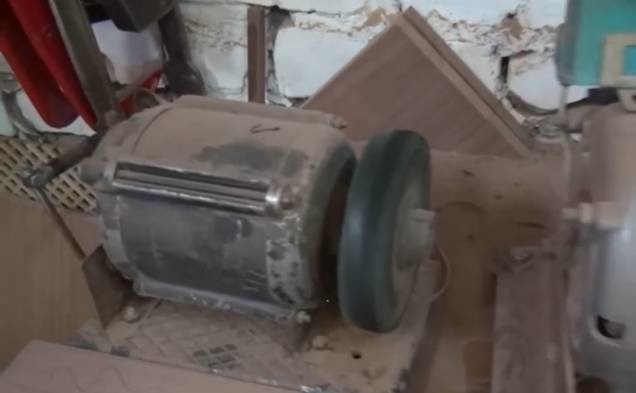
Figure 17. Sharpening machines: emery, diamond and felt
These machines are used for sharpening chisels, drills and other working tools.
Figure 18. Slotting machine
Some elements from the slotting machine were borrowed from the factory milling machine. The frame base, desktop, and controls were made independently. The motor is used at 380 volts with a bearing mounted at the rear. The bearing was installed in order to increase the power of the engine, which simply did not work under such a load without modification.
Fig 19. Sliding slipway on tripods
Figure 20. Homemade universal machine (plane, saw)
The countertops are made of high quality and durable titanium.
Fig. 20. Saw-milling factory machine with the ability to adjust the height and angle of processing lumber.
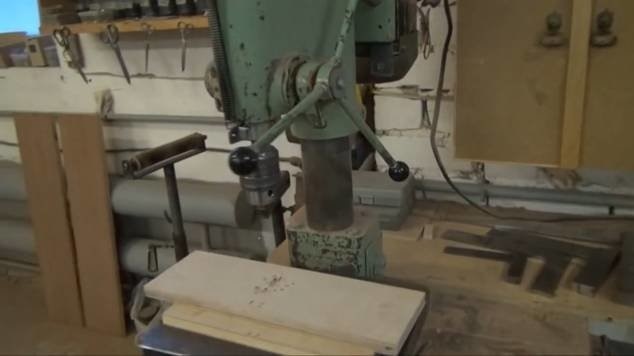
Figure 21. Drilling machine
The picture shows a factory-made drilling machine from the times of the USSR. The engine was modified and the pulleys were re-sharpened.
Fig 22. Workbench
Figure 23. Rack with hardware
Fig 24. Cabinet for chisels near the workbench
Figure 25. Cabinet for working cutters
Second room of the carpentry workshop
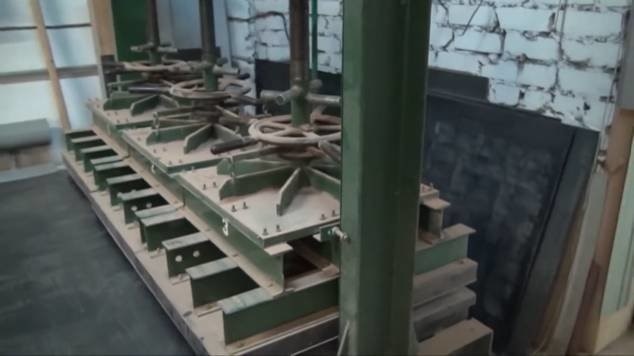
Fig 26. Homemade press
The dimensions of the press are 900 mm in length and 2700 mm in width. The workpiece is placed on plastic stops, which is then compressed by a press.
Figure 27. Universal sharpening machine
Here is a jointer and emery for sharpening cutters and knives.
Fig. 28. JET 16-32 drum grinding machine with a modified work table and feed roller.
Figure 29. JET drum grinding machine
Factory machine with modified support plates, internal aspiration casing installed.
Figure 30. Painting room
At this point, processed blanks are installed on tripods, which are subsequently painted and painted using a spray gun and brushes.
Figure 31. Compressor for painting
One of the mandatory conditions in a paint and varnish room is the creation of effective supply and exhaust ventilation. It should be noted that in winter, this room where painting work is taking place must be well heated. Otherwise, you will not be able to properly paint or apply varnish.
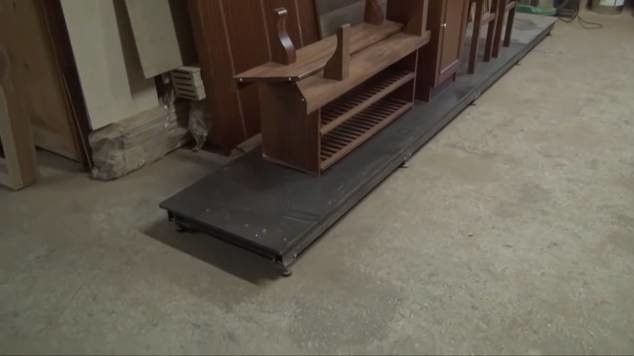
Figure 32. Slipway
The slipway is located in the assembly and grinding room, where the final stages of processing of wood products take place. The slipway is made of high-quality laminated plywood, which is mounted on a metal frame with the ability to be adjusted in height. This is done in order to create a perfectly flat surface in rooms with uneven floors.
Additional photos of the carpentry workshop
1. Shelving

Shelving
2. Trimmings
Trimming saws are used for cutting (dissolving) workpieces. Near the trim, you can immediately organize a place to store wooden scraps that can be used in the future.
In order to be able to produce any wooden product, it is better to equip the workshop with several trimming machines - with a six-meter longitudinal, with a transverse and with a rotating table.
Trimmings
Trimmings

Trimmings

Trimmings
3. Drum grinding machines

Drum grinding machines

Drum grinding machines

Drum grinding machines
4. Circular
Circular
5. Electric jointers

Electric jointers

Electric jointers
6. Reismus
7. Vertical milling machine

Vertical milling machine

Vertical milling machine
It is best to place a cabinet near the milling machine to store various cutters.

Cabinet for storing cutters
8. Lathe

Lathe
Grinding machines with reel and disc (ShlDB)

Grinding machines with reel and disc (ShlDB)
10. Band saws
This equipment is designed for cutting wood using a band saw. Unlike a circular saw and a cross-cut saw, this machine provides a lower roughness of the processed surface, which means that the surfaces (ends) obtained as a result of sawing do not require finishing.
It is better to equip your carpentry with two band saws - for sawing large and small parts.
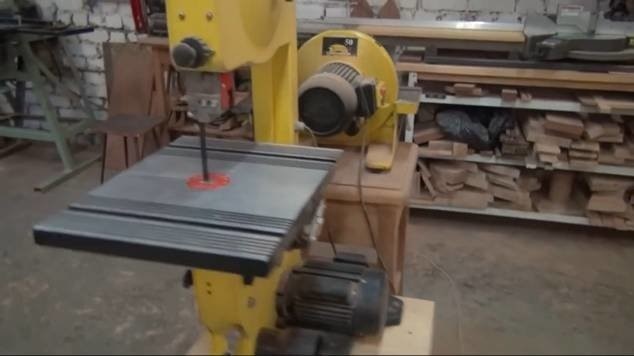
Band saw machines.

Band saw machines.
11. Sharpening machines
Sharpening machines

Sharpening machines
Sharpening machines

Sharpening machines
12. Slotting machine
In woodworking, a slotting machine is necessary to create rectangular and oval grooves in wooden workpieces.
The work table, with the workpiece attached, can move along and across the body, as well as tilt at a certain angle, which allows you to create grooves of various configurations.

Slotting machine
13. Sliding slipway

Sliding slipway
14. Drilling machine
A carpenter in the workshop cannot do without a drilling machine, which provides drilling of holes of various depths and diameters.
Drilling machine
Near the drilling machine it is rational to place a cabinet with interchangeable tools - drills of various sizes.
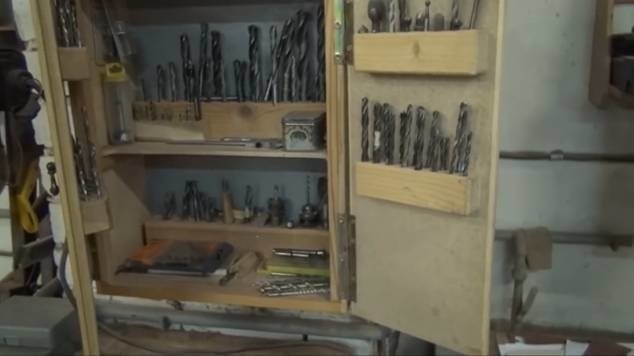
Tool cabinet with replaceable tools
15. Aspiration

Aspiration
17. Place for metal work
The area for processing metal workpieces should be equipped with related equipment and tools (vise, anvil, hammer, pliers, etc.), which are best placed on the table and surrounding racks and shelves.

Place for metal work
18. Joiner's table
The main equipment of a carpentry workshop is a reliable workbench for drawing, manual processing of wood products and other tabletop carpentry operations.

Carpenter's table
19. Area for painting and varnish work
The ideal option is to allocate not a zone, but an entire room for painting and varnishing wooden products. In any case, this place of work must be equipped with a good exhaust hood and have a window.

Paintwork area
20. Slipway for final assembly
Any flat and clean surface can be used as a building stock for assembling furniture. Ideally, if the area of the slipway is at least 10 m2.
Final assembly berth
21. Goats (weims)
Weights are used to facilitate the assembly and gluing of joinery products.

Shelves with tools (glue, tape, tape measure, screwdrivers, rulers, pencils, compasses, etc.) should be located close to the workbench.
Storage space for carpentry tools

Storage space for carpentry tools
To store chisels, it is better to select a cabinet where each tool will be in its designated place. Such orderliness will help improve work efficiency.

Storage space for carpentry tools
23. Space for storing hardware
It is better to package any metal fasteners (nuts, bolts, screws, nails, etc.) and accessories (handles, legs, guides, etc.) in separate jars and label each of them. Hardware distributed in containers is placed on shelves near the furniture assembly area.

Storage space for hardware
Before making carpentry or a carpentry workshop at your dacha with your own hands, you need to purchase a suitable room, and then purchase all the necessary equipment. All of the above-described machines necessary for working in a carpentry workshop can be purchased from companies that sell metal-cutting and woodworking equipment on their websites or trading platforms. You can also visit special exhibitions and get acquainted in detail with the examples of carpentry devices presented in order to choose the best option for your carpentry.
Video tour of the carpentry workshop
Most of the woodworking carpentry machines used in the video were made independently using some ready-made factory elements that were refined and improved. Another important aspect in a carpentry workshop is effective suction. This article answers the question in more detail - how to make a carpentry workshop or carpentry shop with your own hands. As can be seen from the material described above, this is a labor-intensive and costly process. However, if you have all the necessary woodworking machines and tools, you can easily make not only wooden windows, doors, furniture and interior items, but also restore especially valuable wood products from past centuries. Good luck.
We also recommend:
Preface
The workshop is an ideal place to realize your own creative potential and carry out work related to making, repairing something “for the soul,” as well as aimed at improving and improving living and recreational conditions. Only here can you develop yourself to the fullest and create exactly the working environment that suits you in all respects. With our recommendations, you can make a workshop with your own hands and equip it with all the necessary tools and equipment.
It is better to build the workshop anew, as a separate structure, and not as an extension to the existing buildings on the site. Of course, you can highlight a corner or room in the house. But in this case, you cannot count on the comfort of those living in it and the absence of reproaches on their part for the noise during work in the workshop and the garbage involuntarily carried into the living rooms. In addition, there is hardly enough space in the house to accommodate everything you need: tools, workbench, machines, etc. And you will have to work in very cramped conditions, when there can be no talk not only of comfort and convenience, but even of basic safety rules.
Although it is believed that the minimum sufficient area for a workshop is 5–6.5 m2, which can certainly be provided in the house, this is not enough. What is 6 m2? This is a closet or corner measuring 2x3 m. Such a space is only suitable for a darkroom or for a radio amateur.
When you plan to make a metalworking or carpentry workshop, then 6 m 2 is almost the same as nothing. Even if it is possible to squeeze some useful and serious equipment into the space remaining after placing the workbench and the most necessary things for any workshop, it will be almost impossible to work due to the cramped space, at least with large and long parts. Again, where to store finished products, blanks, lumber in a home workshop?
DIY carpentry workshop
A garage is also not an option. You will have to drive the car out every time so as not to damage it during work. In winter, because of this, it will be difficult and very energy-consuming to maintain a comfortable temperature in the garage workshop. In addition, you will have to sacrifice some of the space for car parts and tools.
Converting a suitable-sized barn into a workshop is an option, but a dubious one. A workshop needs normal windows and doors, insulation, heating, light, ventilation and preferably water. This is probably not in the barn and will have to be done. It itself may be placed in an unsuitable location for the workshop. The barn may require redevelopment or the creation of separate rooms if they do not exist. This is exactly the case that they talk about - it’s easier to break it down and rebuild it.
In addition, the workshop must have a solid foundation, namely a slab foundation. Especially if floor-standing machines are installed in it. And especially if they are for a locksmith workshop. They often purchase decommissioned or simply old equipment, including from Soviet times. It is heavy, bulky and creates a fair amount of vibration during operation. In any case, the workshop is a place where the load on the floor is very high. Falls of heavy objects are inevitable; work may be accompanied by impacts of something (for example, a hammer or sledgehammer) on something (a part or a workpiece), which hits the floor. With the latter, sometimes you have to drag something along. And even the smallest tabletop machine vibrates at least a little, thereby making its contribution to the process of destruction of the base of the room.
A slab foundation can still be found in a garage, but it is unlikely to be in a shed and unlikely to be in a house. If the workshop is placed on the second floor of a residential building, an attic or an attic, then not all buildings there have a sufficiently strong and durable floor.
It is advisable to choose a place on the site for the workshop in an open space so that shadows from trees or other buildings do not fall on it. Due to this, in winter it is possible to save a little on heating or it will simply be warmer to work, since on fine days the sun will help with heating. And all year round during daylight hours you won’t need to turn on the lighting fixtures or you can use them minimally, since there will be quite good natural lighting, which, by the way, is better for the eyes. In addition, this will save on electricity.
If possible, the workshop should be built away from the house and buildings with pets, since even if it is not intended to house too noisy equipment, almost any work will still be accompanied by sounds that are not the most pleasant for any ear. True, the farther from the house, the more extensive the supplied communications (electricity, heating and plumbing) are, as a rule, and these are additional costs.

Place for building a workshop
It is also recommended that the workshop is not in a low area. As a rule, rainwater and melted snow water accumulate there. Even if the workshop is not flooded, then excess humidity will become a serious test for the building itself, the tools of the machines and the supplied communications. All this will quickly become unusable. Even emergency situations, for example, short circuits in wiring or equipment, cannot be excluded. You can, of course, take protective measures against flooding and humidity. When building a workshop with your own hands, make the foundation higher and waterproofed, provide for drainage from it if possible, take care to strengthen the moisture insulation of the entire structure, and the like. However, all this will require additional financial costs, as well as effort and time for arrangement.
It is desirable that the chosen location has easy access to the workshop at any time of the year. So that in winter it is not too swept away, otherwise you will have to put a lot of effort into periodically clearing the path and the approach to the entrance doors, and in the spring you will have to push a much larger volume of snow away from the walls to prevent them from flooding. And finally, if there are places on the site that are not at all suitable or are of little use for growing any plants, then it is recommended to choose one of them for a workshop.
Before starting to develop a project, you must first decide what kind of work is supposed to be performed in the workshop: only carpentry or plumbing, or maybe both. It is best to make a complete list of all types of work. It is also recommended to think about possible additions to this list in the future. Maybe in a month or six months you will want to make a product with your own hands, the manufacture of which will require you to perform an operation that was not previously envisaged.
Based on the list of types of work, we are already compiling 2 other lists - for the required main and auxiliary equipment and workshop equipment. They must include everything that will be located inside the building. (from a screwdriver and sledgehammer to a drill and an angle grinder), hardware, fasteners, auxiliary equipment, small and small workpieces, finished products and the like, as well as a powder fire extinguisher and a first aid kit are grouped into the first list, which may be approximate and not very detailed. We decide how we will place and store all this stuff. Depending on the size and frequency of use, one or another equipment from this list can be placed: in cabinets, on racks and shelves, or hung on hooks mounted on the wall.
The second list should include:
- Crafting table. If the workshop is supposed to carry out both plumbing and carpentry work, then two workbenches. Metalworking and carpentry are different from each other.
- All necessary machines.
- Equipment that may need to be installed in the future.
- A vacuum cleaner, preferably a special construction one, for cleaning up garbage.
- Heating appliances. It is better that these are ordinary batteries connected to the central or heating system of the house, especially if you plan to build a wooden workshop. Electrical appliances will consume a lot of electricity, and some types of them are fire hazards (electric fireplaces, for example). Various types of stoves, including long-burning ones, are also recommended for use only in stone buildings (concrete, brick, blocks, panels).
- A box of sand (in case of fire in wiring or equipment).
- Wash basin.
- Container with water.
- Hanger for workwear.
- Chair.

Equipment in the workshop
We add to this list the resulting additional equipment for the workshop: cabinets and shelving. Shelves and hooks can be ignored - there is always a suitable place for them on the wall.
Now we need to decide whether large and long materials will be used for the work (for example, boards, beams or corners, rods, etc.), workpieces and whether it is worth allocating space in the workshop for them. It is recommended to provide a separate rack for them or, at least to begin with, a separate zone 0.5–1 m wide and at least 6 m long. Otherwise, they will then get in the way during work, or they will have to be left on the street if there is no place else to put them for a while (in a barn, for example). In the open air, the metal will rust, the wood will first become saturated with moisture, and then sooner or later it will begin to rot.
We also add a rack or place for storing materials and workpieces to the second list of equipment and equipment. This detailed list will allow you to accurately determine the size of the workshop.
Now you can move directly to the design itself. Its result does not necessarily have to be a set of drawings made according to all the rules; it is enough to make a few sketches with your own hands without observing scale. The main thing is that they be as detailed as possible. On the sketches you need to draw all the elements of the building, including small and small details. And, of course, they must indicate all the dimensions - external and internal of the workshop, as well as its elements. Several sketches are necessary for the reason that on one or even two it is impossible to display the structure of the building, and even its elements, in all projections and details.
We begin the design by calculating the area required to accommodate all the equipment and equipment of the workshop listed in the second list (drawing rules in the previous chapter).
A simple, fast, but at the same time very inaccurate method of calculation is to multiply the sum of the areas of all objects placed in the workshop by an approximate factor of 1.5–2. It is believed that this method should provide the necessary free space for work and movement between the equipment placed in the already built workshop. However, in reality, this approach can cause many difficulties, especially if there are many objects being placed and their dimensions are very different or large. Most likely, when arranging the equipment, you will have to rearrange everything again several times, while taking something back outside, and then dragging it back into the workshop. And it’s not a fact that as a result of such long ordeals everything will turn out perfect - it will be convenient to move and work everywhere.

Calculation of the area of the room for the workshop
In order to accurately determine not only the area, but also the internal dimensions of the workshop (length and width), you need to make your own diagram of the arrangement of all placed objects. Its preparation is best done using two sheets of graph paper. From one we cut out on a scale of 1:20 (or another, but so that it is a multiple of 10) rectangles and squares of the dimensions of the objects to be placed. We sign them in accordance with what equipment or equipment they relate to. On the second sheet of graph paper we lay it all out, trying to arrange it within the boundaries of a rectangular or square perimeter. We take into account the space and gaps between objects that are required for convenient and free performance of work, as well as our own and movement of tools, materials and other things.
Do not forget that this arrangement is carried out on the scale chosen for the equipment - it is necessary to periodically convert the distances on paper into real ones in order to prevent mistakes. The following order of design using this method is recommended. First, draw 2 perpendicular lines on paper. These will be 2 walls and a corner of the future workshop room. Mark the front door on one of the lines. We indicate its width. It must be no less than standard or equal to the width of the largest machine (equipment) or its largest part, if it has to be brought in parts disassembled. Now, relatively and starting from the existing corner and door, we arrange on paper all the equipment of the workshop. Each machine and workplace must be provided with unobstructed access from all sides, which are provided for by the operations performed on them. Finally, we finish painting the remaining 2 walls.
We indicate where the windows will be located. It is better to place them in the eastern and/or eastern walls. There is more light and it is warmer in winter. Then, if the arrangement diagram was drawn up on graph paper, we measure all dimensions on it (including the distances between equipment). We convert them according to the selected scale into real values, which we indicate in the appropriate places on the diagram. If the diagram was drawn up on plain paper, we indicate the desired dimensions during its development.
It is recommended to make 2 rooms in the workshop. One is the working one, where all the equipment and equipment will be located. The second is a small utility room that separates the first from the street. The presence of this room in winter will prevent the temperature from dropping when opening the front door when entering and exiting the workshop itself and will make it warmer. This will also allow you to save a little on heating.
In the utility room you should place a hanger for work clothes, a washbasin, one heating device and maybe even cabinets for workpieces, finished products, rarely used tools and something else like that. A small table with all the attributes for drinking tea and trestle beds would also be useful here, so as not to be distracted from work for a long time and not to carry dirt into the house while taking short snacks or smoke breaks.
The door from the street to the utility room should be located opposite the entrance to the workshop itself. Otherwise, it will be difficult or impossible to bring in long materials (boards, rods, etc.). The size of the utility room is determined by drawing up on paper a layout diagram of its furnishings. We make both diagrams - for the utility room and the workshop itself - on one sheet.

Schemes for the arrangement of furnishings in the workshop room
If it was decided to place a rack or a place for storing long workpieces and materials inside the workshop, then they should be located opposite its front door. Equipment intended for sawing and cutting should be located nearby. That is, next to the rack for materials, so that the workpieces do not have to be transferred to the other end of the workshop for initial processing.
After drawing up a diagram of the placement of equipment in the workshop and determining its area, we make a design (sketches) for the construction. To determine the external dimensions, we add the thickness of the proposed walls to the internal ones. We choose the height of the ceilings and the type of roof at our own discretion, so that it is affordable, convenient for work and can be done with your own hands.
The workshop must be equipped with ventilation. It is better if it is forced (rather than the usual supply and exhaust) and from each workplace, especially if work with wood is expected. You can make it the same as . We draw all the elements of this workshop equipment on sketches and indicate its dimensions and parameters.
In conclusion, we show on the project the placement of lighting devices (general and local for each workplace), electrical wiring and grounding. Each equipment must have a separate outlet. All machines and sockets must be grounded. Then we indicate on the sketches in what way and from which side all communications (electricity, heating and plumbing) are brought into the workshop.
In the chosen place we make markings along the perimeter of the future workshop. We dig a pit 60–80 cm deep for a slab foundation. We place formwork around its perimeter. We fill the bottom with a gravel-sand cushion. We compact it, after which the thickness of the bedding should be at least 15–20 cm. Then it is advisable to reinforce the future foundation. To do this, we use reinforcing mesh or rods, the first row of which we lay on the bottom, and the second row we attach 20–30 cm higher to the formwork. Then we pour the concrete. The foundation should protrude above the soil surface by at least 15–20 cm.
When it is intended to install bulky and/or heavy machines that require rigid fixation to the floor, then under them in the foundation immediately, before the concrete has yet hardened, install threaded studs or other steel fasteners in the appropriate places according to the equipment arrangement diagram. After the concrete has completely hardened, these machines can be installed and secured if there are concerns that it will be impossible or problematic to bring them into the constructed workshop. Then, until the end of construction, this equipment must be properly covered with a tarpaulin or plastic film.
If you decide to make a wooden workshop, then it is best for it to be framed from beams and boards. The building will be warm, and it will be quite simple to erect and carry out further equipment and finishing. But in this case, in the places where the frame posts are installed, it is necessary to insert threaded rods or reinforcing bars into the foundation concrete immediately after pouring it. After the concrete has completely hardened, we build a workshop according to the project in the same way as. If you decide to make a stone workshop with your own hands (from blocks or bricks), then we build it, just like.

Frame workshop made of beams and boards
Then we arrange the floor. It can be made multi-layered. We pour a layer of sand 3–5 cm thick on the foundation. Then we lay roofing felt, and on top - boardwalk. Another option is to use concrete instead of boards. Before pouring it, we lay the reinforcing mesh on the roofing felt, and then carefully level the floor surface. Such a foundation is not afraid of heavy objects falling on it and it will reliably protect the foundation from such destructive effects, especially in a metalworking workshop. True, in the latter it is still advisable to lay sheets of rubber or a conveyor belt on top of the floor. They will protect the base from oil and other active substances.
After this, if the workshop is wooden, it is advisable to carry out fire retardant treatment of all the wood inside it with special compounds. Then we bring communications into the workshop and do their internal wiring. We select all cables and wires with a cross-section corresponding to the current load on them. In a wooden workshop, we lay them in metal tubes or boxes to protect the structure from fire in the event of a short circuit. If necessary, we attach soundproofing materials to the ceiling and doors inside the building.
Then we bring it into the workshop and arrange and install all the equipment and equipment in their places. We connect what needs to be connected. Then we carry out the final events.


