The printer can be set to print from Tray 1 if that tray is loaded, or to print only from Tray 1 if a specially requested paper type is loaded.
|
Parameter |
Description |
|
TRAY 1 TYPE=ANY TRAY 1 SIZE=ANY |
Typically, the printer draws media from Tray 1 first, unless it is empty or closed. If you do not keep media in Tray 1 all the time, or if you only use Tray 1 to manually feed media, use the default settings TRAY 1 TYPE=ANY and TRAY 1 SIZE=ANY set in the paper handling menu. |
|
TRAY 1 TYPE= or TRAY 1 SIZE= type other than ANY |
The printer treats Tray 1 in the same way as other trays. Instead of searching for media first in Tray 1, the printer uses the media from the tray that is set to the appropriate paper type and size using the software. Using the printer driver, you can select media from any tray (including Tray 1) by type, size, or source. |
You can also specify whether the printer prompts you whether to take paper from Tray 1 if the requested paper type and size is not found in another tray. You can set the printer to always send a prompt before using paper from Tray 1 or when Tray 1 is empty. Set the REQUESTED TRAY option in the System Settings submenu of the Machine Configuration menu.
Printing by Media Type and Size (Tray Lock)
Printing by paper type and size ensures that jobs always print on the correct media. You can set trays to use the specific type (for example, plain paper or preprinted paper) and size (for example, Letter or A4) of media loaded in them.
If you set the trays this way and then select the same type and size in the printer driver, the printer will automatically select the tray loaded with that type and size of media. You do not have to select a specific tray (source selection). This printer setup is especially useful if the printer is shared and multiple people load and remove media frequently.
Printing by type and size from Tray 2 or 3 may require you to remove the paper from Tray 1 and close it, or set the TRAY 1 TYPE and TRAY 1 SIZE to a type other than ANY in the PAPER HANDLING menu on the printer's control panel. For more information, see Configuring Tray 1 Operation. Application or printer driver settings override printer control panel settings. (Program settings usually override printer driver settings.)
Printing a document depending on the type and size of paper
1. Check if the trays are loaded correctly.
2. Using the printer's control panel, open the PAPER HANDLING menu. Select the paper type for each tray. If you do not know the type of paper you are loading (for example, bond paper or recycled paper), check the label on the media packaging.
3. Select the paper size settings from the printer's control panel.
Tray 1: Set the paper size in the PAPER HANDLING menu when the setting for TRAY 1 TYPE= is set to a type other than ANY. If custom size paper is loaded, also set the custom paper size in the PAPER HANDLING menu.
Tray 2 and optional tray 3. Set the paper size in the PAPER HANDLING menu. These trays do not support custom media sizes.
4. In the program or printer driver, select a type other than Auto Select.
If you are using network printers, you can also set the type and size options in HP Web Jetadmin.
Manual paper feed from Tray 1
The manual feed feature is another way to print on special paper from Tray 1. Set MANUAL FEED to ON. in the printer driver or on the printer's control panel to stop the printer after each job is sent. This will give you the time it takes to load special paper or other print media in Tray 1. To continue printing, press the ^ key (Select key).
If there is already paper in Tray 1 when the print job is sent, and the default configuration for Tray 1 is set to TRAY 1 TYPE=ANY and TRAY 1 SIZE=ANY as the default configuration on the printer control panel, the printer will not stop and wait for media to be loaded. To set the printer standby, set the TRAY 1 TYPE and TRAY 1 SIZE to a type other than ANY in the PAPER HANDLING menu.
If SIZE and TYPE are set to ANY and MANUAL FEED REQUEST is set to LOAD FAILED, media will be fed from Tray 1 without being prompted. If REQUEST MANUAL FEED is set to ALWAYS, the printer will prompt you when paper is loaded if Tray 1 is set to TYPE=ANY and SIZE=ANY.
If MANUAL FEED=ON is selected from the printer's control panel, this setting will override the corresponding printer driver setting and all print jobs sent to the printer will use manual paper from Tray 1 unless specified in the printer driver. any specific tray. If you plan to use this feature infrequently, it is best to select MANUAL FEED=OFF. on the printer control panel and, if necessary, select the manual feed option from the printer driver for each specific job.
Selecting the correct fuser mode
The printer automatically adjusts the fuser mode according to the media type set for the tray. For example, heavy paper (such as card stock) requires a high fuser setting for better adhesion of the toner to the paper, but transparencies require a LOW fuser setting to prevent damage to the printer. The default setting provides the best performance for most types of print media.
The fuser mode can only be changed if the media type is set for the tray being used. After setting the media type for a tray, the fuser mode for that type can be changed in the CONFIGURATION menu. DEVICES in the PRINT QUALITY submenu on the printer control panel.
Using a high fuser setting (such as HIGH 1 or HIGH 2) improves the adhesion of the toner to the paper, but may cause other problems such as excessive paper curl. The printer may print slower when the fuser mode is set to HIGH 1 or HIGH 2.
To reset fuser modes to default modes, open the CONFIG. menu. DEVICES on the printer's control panel. In the PRINT QUALITY submenu, select FEL MODES and RESTORE MODES in sequence.
Tray loading
Envelopes, labels, transparencies, and other special media can only be loaded in Tray 1. Tray 2 or optional Tray 3 can only be loaded with paper.
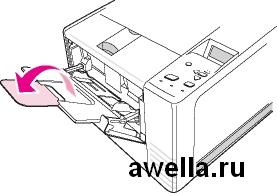
To load Tray 1
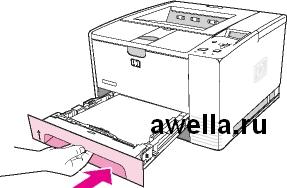
1. Open Tray 1 by lowering the front cover.
2. Pull out the plastic tray extension. If the media you are loading is longer than 229 mm (9 inches), you must also open the optional tray extension.
3. Slide the media width guides slightly wider than the media width.
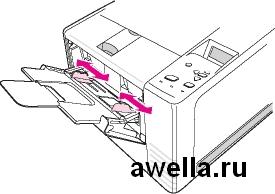
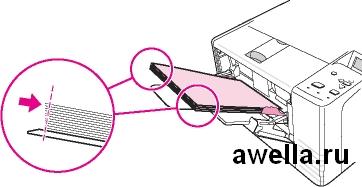
4. Place the media in the tray (short edge first, print side up). The media should be centered between the width guides and be loaded under their stops.

5. Slide the media width guides until they lightly touch the stack on both sides. Make sure the substrate is positioned under the tabs on the media-width guides.
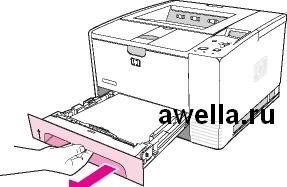
To load Tray 2
1. Remove the tray from the printer and remove all paper.
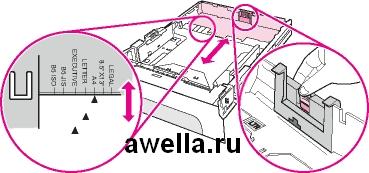
Adjust the media width guides so that the arrow matches the paper size you are loading.
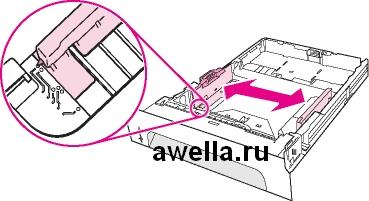
Press the blue tab on the rear paper length guide and adjust it so that the arrow matches the paper size you are loading.
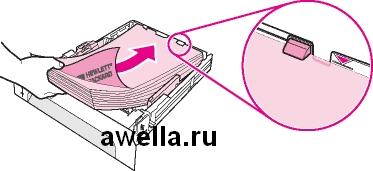
4. Place the paper in the tray and make sure it lies flat and snug against all four corners of the tray. Do not load paper above the height guides on the paper length guide located at the back of the tray.
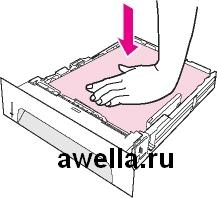
5. Push down on the paper to lock the metal paper pressure plate into place.
6. Slide the tray into the printer.
Whenever you remove Tray 2 from the printer, always press down on the paper before reinstalling Tray 2 to secure the metal paper pressure plate. When the tray is pushed into the printer, the metal paper pressure plate is pressed out and lifts the paper.
The tray, otherwise - a cuvette or dispenser, is designed in a washing machine for pouring powder and adding other detergents - bleaches, conditioner, etc. During the washing cycle, the machine sends water to the dispenser, wetting the detergent, and then “takes” it through a special channel directly into the tank. Unfortunately, modern detergents are not perfect: some of them remain in the dish, which ultimately leads to visible contamination. But the problem of cleanliness of the tray is far from being only aesthetic.
Why is a dirty tray in a washing machine dangerous?
Let's be honest, the external and tidy appearance of the washing machine, and even more so the cuvette, which is most often closed, is not the most compelling reason to take action. More significant are:
- Probability development of fungus and mold inside the tray. Both the first and the second “grow” very well on wet surfaces with detergent residues. As you understand, during the washing cycle, all this is carried throughout the washer and ends up, among other things, on your “clean” things.
- Reduced wash and/or rinse performance. Washing powder is capable of clumping into fairly strong deposits that can clog the detergent supply channel into the drum. As a result, washing will take place virtually without powder, and rinsing without air conditioning. At the same time, it’s definitely not necessary to talk about a quality streak.
The most correct solution is prevention: washing machine manufacturers recommend rinsing the cuvette after every 2-3 wash cycles.
How to pull out the washing machine tray?
You have decided that now your washer will always be clean. But how do you remove the tray? washing machine? In most models with horizontal loading, the cuvette is simply removed by pulling it all the way towards you.
How to clean the washing machine tray?
The first method is suitable for lightly contaminated pipettes: just rinse the cuvette under running warm water. Use a brush to clean all hard-to-reach places.
If the dirt is not washed off and you see “scale” on the walls of the tray, the part will need to be soaked. Immerse the cuvette in a container of hot (but not boiling!) water and add 1 sachet of citric acid. Remove after a couple of hours, rinse under running water.
"Limonka" failed (this happens with many years of deposits)? Household chemicals will come to the rescue. Apply an anti-limescale agent in the bathroom (for cleaning tiles and showers) on the tray for the time indicated in the instructions and then rinse thoroughly. Please note that most of these compositions are extremely aggressive! Use gloves and ventilate the room well!
If you see traces of mold (black spots) on the dispenser, be sure to treat it with an anti-mold agent after cleaning. Similar compositions for bathrooms are in any department of household chemicals.
If the dispenser is not removed, cleaning is rather difficult, but possible. To do this, take a kettle of warm water or, if possible, connect a hose to a faucet. Gently pour water into the cuvette, rub the dirt with a brush (a toothbrush works great). Rinse again. If the dispenser cannot be removed, and it was not possible to remove dirt with warm water, use citric acid or a specialized detergent for cleaning washing machines. Divide the product into 2 parts: pour one part into the cuvette, and the second into the drum. Start a wash cycle.
How to avoid contamination of the dispenser in the future?
Finally, here are some tips to help you keep your washing machine tray clean. If you are following the instructions and rinsing the dispenser after every 2-3 washes and you still find dirt and / or mold, then try:
- Vary the amount of detergent. You may be using too much powder and rinse aid.
- Change the detergent to a better one.
- Check the quality of the water in the tap. If it is too hard, the main filter will significantly extend the life of the washer, boiler, dishwasher and all plumbing.
- After each wash, leave the dispenser extended so that it dries and mold does not grow in it.
Probably any experienced housewife who uses an automatic machine knows how to pull a standard powder container out of it. As a rule, a standard powder tray has a special tab in the middle, near the rinse aid compartment, by pressing on which you can simultaneously pull the tray itself and pull it out without any problems. In 90% of brands of washing machines there is a container of just such a design, however, there are washing machines (Ariston, Indesit), in which the container is arranged differently and is pulled out in a special way. In this article, we will figure out how to remove the powder tray in the Indesit washing machine and what it is for.
Why remove the tray?
Any Appliances requires careful handling. With proper care and compliance with all the rules, equipment, including an automatic machine, will serve you for a long time. To do this, periodically it is necessary to carry out preventive cleaning.
Important! Of course, the powder tray in the machine is not the most important part of the device. However, if it is clogged, the device can break down, creating a lot of trouble for you. Having received the conclusion of a specialist that a clogged tray was the cause of the breakdown, any housewife will regret that she did not regularly clean this container.
Often, during the washing process, detergents are very poorly washed out of the tray. A number of reasons contribute to this:
- Not the last role in this is played by the quality of the detergent itself. The worse it is, the more powder will remain on the walls of the container.
- Liquid powders wash out much better due to their structure.
- If there is insufficient water pressure in the water supply, there is also a possibility that not all detergent will be completely washed out.
- The fabric softener in its composition contains surfactants that form a film not only on linen, but also on the walls of the tray. This is due to the fact that fabric softener is poured into a special cuvette before washing and is added to the laundry almost at the very end. It is because of this that with regular use, the walls of the air conditioner container become a little slippery and sticky over time.
- When washing some things, there are certain restrictions that must be strictly adhered to so as not to render the product unusable. For example, some fabrics should not be washed with detergents that contain bleach. And if you used such a product during the last wash, then its residues on the walls of the container can get on the things of the next load and spoil the ex.
Important! Remember that any mold or dirt from the tray ends up in the drum of the machine, and then on to your laundry.
We take out the tray from the Indesit machine
Removing the powder tray in the Indesit washing machine is quite difficult. How many housewives, trying to pull out the powder cuvette of this machine, “teared it out by the roots”. What is most surprising, many people read the instructions that came with the device, but in these instructions this process is described so incomprehensibly and sparingly that, as a result, you have to rely only on your skill and intuition.
Let's imagine a situation: you just bought an Indesit automatic machine, used it for a while and decided to wash the powder tray. Accordingly, this container has never been pulled out and its internal mechanism is completely intact. So what to do?
- Pull the compartment of the washing machine towards you until it stops, so that it shows outward as much as possible.
- Sit down and inspect the bottom of the container, there should be teeth on the left and right that prevent the tray from being pulled out - grease them with a small amount of vegetable oil.
- Next, grab the compartment body (not the handle) and, with some effort, lift it up and pull it towards you, while the container should move a couple of millimeters.
- Then, grasp the powder container body again and push it from above so that it moves down, making a click.
- Now the tray should come out at a slight angle - keep pressing on it from above while pulling the container towards you with some effort - it will pop out.
We take out the tray from the Ariston typewriter
As mentioned above, most washing machines have a regular, straight-out powder flask. By pressing the tab in the area of the rinse aid compartment, the tray pops out easily. But how to pull out a container that extends like a fan? A prime example is the Ariston machine.
Important! On the one hand, this type of tray is very convenient, as all compartments are more clearly separated. On the other hand, when it comes time to wash the tray, you have to solve the problem in order to pull it out.
In the case of the Indesit brand machine, you can simply pull the powder cuvette with force and it should pop out, and you may not even damage anything. But with the Ariston washing machine, such a trick will not work - if you pull it properly, you will break the front of the tray, which will entail pouring the air conditioner onto the floor in the future, and you will have to change the entire part.
To avoid breakdowns, let's look at how to remove the powder tray in the Ariston washing machine:
- Pull out the powder container until it stops.
- Grasp the edge of the container body on the right side and lift it up slightly.
- Pull the tray towards you and pull it out of the washing machine.
What can be done to make the tray easier to remove in the future?
When you manage to remove the powder cuvette from the washing machine and rinse it of detergent residue, do not rush to put it back in its place. It is possible that re-extracting the container again will create difficulties for you, and the same cloves will interfere. What can be done so that in the future the tray of the automatic machine can be removed more easily?
Thus, firstly, the tray will be removed much easier, and secondly, it will not spontaneously pop out if you pull it a little harder before pouring powder into it.
How to clean the detergent drawer?
After you have removed the powder tray in the washing machine, you need to clean it. First of all, you can use special products from the range of household chemicals to combat plaque and mold. If you did not achieve the desired result or you would like to apply folk remedies, then you can resort to using old proven recipes:
- Soda. Mix equal amounts of water and baking soda and fill the tray with the mixture. After that, clean it with the hard side of the sponge. So you can quickly get rid of mold and detergent residue.
- Vinegar and soda. Fill the container with soda and pour 9% table vinegar on top. These two substances will react, as a result of which the dirt will lag behind the walls and can be easily removed. If the effect is weak, the procedure can be repeated.
- Lemon acid. With the help of citric acid, you can not only clean the powder tray, but also rinse the entire system of pipes that supply detergents to the drum. To do this, it is necessary to pour acid into the powder cuvette and turn on the idle washing mode, after setting the temperature to 60 degrees. The heated citric acid will help remove scale, detergent residue and mold. The pleasant smell will be a bonus of this method.
- Table vinegar 9%. The previously removed powder cuvette is placed in a container of the desired size. Next, pour 1 glass of vinegar into it and add 1 liter hot water. The exposure time is at least 6 hours. After this procedure, the scale is eliminated quite easily.
How to prevent the formation of plaque or mold?
by the most the best remedy To keep the original appearance of the detergent tray is a regular care. To make this process easy and enjoyable, you should thoroughly wash the remaining powder after each wash and wipe the tray dry. In extreme cases, you can leave the container open so that all the moisture evaporates from it and there are no conditions for the appearance and reproduction of mold in it.
After every 2-3 washes, it is advisable to clean the tray more thoroughly. To do this, remove the powder tray in the washing machine and rinse it well using one of the methods described above. Do not forget to do this regularly, and your washing machine will serve you for many years!
We advise you to read
 Therapeutic effect What is vitamin e used for?
 - instructions for use Dexalgin how to take") Dexalgin (ampoules with dexketoprofen) - instructions for use Dexalgin how to take
Dexalgin (ampoules with dexketoprofen) - instructions for use Dexalgin how to take Diclak solution - instructions for use Diclofenac injections instructions for use for children
 Dream Interpretation: why dream of Fire, to see Fire in a dream, which means Why dream of fire in a mirror

