Today I made a selection DESIGN IDEAS interior with ordinary wall frames with photos or drawings and several MOUNTING IDEAS frames to the wall. That is, today we will study wall decor in our house.
I will tell….
1. HOW TO POSITION THE FRAMES ON THE WALL (so that they are in harmony with each other and with the interior as a whole)
2. OPTIONS MOUNTINGS FRAME (how to hang it with screws - how to attach it WITHOUT drilling holes in the wall)
3. PLOT IDEAS that can be depicted inside the frames
So let's get started...
HOW TO COMBINE frames on the walls.
Linear arrangement of frames on the wall.
The easiest way to hang frames on the wall is to place them IN ONE HORIZONTAL LINE. As a rule, this is done with frames of the same size and the same style of graphics framed by them.

Clear rows of paintings on the wall.
If the frames are the same size and format, they can be arranged in clear, regular rows resembling squares rubik's cube. This wall decoration with frames is reminiscent of colorful carpet.

By the way if there are not many frames and they are quite small, you can place them in the same order as CROSSWORD BOXES... a horizontal line... a vertical line... with them crossed.
...or place it in a checkerboard pattern...

The chaos of frames is inside a clear form.
And here we see that all the frames are clearly located INSIDE THE INVISIBLE BORDERS in the shape of a rectangle.

How to bring such options to life - a step-by-step guide...
In the first case -
- We buy several frames- and then we lay them out ON THE CARPET so that their area paved with frames has the correct RECTANGULAR SHAPE.
- Remember this form(click on the camera) and don’t remove it from the carpet yet...
- We measure the height and width of the GENERAL RECTANGLE (the one that turned out as a result of laying out the frames) - and then on the wall in small draw the contours of the same rectangle(the chalk can then be easily wiped off with a cloth)
- Apply one by one to the area painted on the wall each of the frames - and mark with a pencil the very place where you need to drive in a nail to attach the frame (exactly opposite the frame hole for hanging on a nail). Plus - we make sure to mark the boundary of the frame on the wall (so that we can then place the next frame next to this boundary)
- And so we bring each frame to the place where it should hang, and mark with a pencil on the wall the place where the screw will be inserted.
- When all the marks for all the nails have been transferred, all that remains is to drill all the holes, screw in the screws and hang the frames on the wall.
In the second case (see second photo above) - everything is the same - only it’s simpler - since we use frames of the same size...
A large picture and small frames on the wall.
I’ll tell you right away how to decorate a wall with frames like this.

- At first training on the carpet: we place a large picture on the floor, and then lay out smaller frames AROUND IT. When the composition laid out on the floor suits us more or less, take pictures of her.
- And now that the first idea is saved in the memory of our camera, let’s try to expand it again, but in a different way, small pictures around the big one - and again we photograph this second option of mixing pictures.
- And then we flip through the photos in the camera and choose the best from photographed options for the location of frames relative to each other.
- And now you can mount the frames on the wall, CONSULTING with the selected sample in the memory of the camera, first we hang a large picture on the wall in the intended place, and then small ones.
Or…
On the spot central large picture maybe a CLOCK FACE….
How make your own designer watches– I will definitely tell you and show you in pictures in a separate article.

Diamond-shaped pile of photo frames.
And here the frames are placed chaotically in the form of a cloud, in shape close to Rhombus. Photographs or pictures can have a variety of shapes, sizes and even different shades of color.

Chaotic filling of the entire wall with frames.
In this option for decorating a wall with frames, the frames are selected based on the color of the frame itself and the internal content of the graphics.
They can be different in shape, according to the degree of color saturation, but they should resonate with each other and the rest of the interior elements.

Frames with a combination of wall stickers and appliques.
Nowadays there are a lot of stencils for wall decoration on sale - everything is already drawn there, all you have to do is stick on the plot you have chosen...
It is very convenient to combine such a wall applique with frames on the wall...

Well, now let's figure out how to attach the frames to the wall...
HOW TO ATTACH frames to the wall...
3 ways
(with holes and without holes)
Of course, we all love frames... but... we don’t like to spoil the walls...
What to do?
You can just tell yourself - so what, if there will be a hole in the wall... these photos will still hang here for many years - delighting all loved ones and guests... And when I want to change the design, I’ll just cover these holes with putty and put up new wallpaper... once If the design changes then the wallpaper will be new - and that means there won’t be any holes...
Or…
How to hang several frames on one nail.
You can make minimal holes in the wall and hang several paintings at once ON ONE “NAIL”...
For example, like this... An excellent option for attaching frames to the wall.

Or like this... such FRAME MODULES can be ordered in online stores in the home decor department.

We attach frames to the walls - with panels or cables.
Or here’s another option to hang a maximum of pictures with a minimum of holes in the wall...
Option one – we make one wooden panel – and screw several paintings onto it – and then we hang this panel with 2-4 screws to the wall.
Option two – we stretch the cables along the entire wall and attach as many frames as we like to them.

How to attach a frame WITHOUT DRILLING holes in the wall...
We attach the frames to the wall using an adhesive fastener...
There is a special adhesive fastener on sale - for gluing frames... you can buy it in construction stores or search on the Internet... Here's what it looks like and what it's called...

One half clasp mounted on the wall, and the other half on the frame. If necessary, you can remove the frame by unhooking the frame half of the fastener from the wall half.
Then, if desired, you can remove the wall half of the adhesive fastener from the wall - and there will be no trace left.
To make it clear how it works... here I downloaded the instructions... it says that the tape ideally attaches the frame to painted walls, wooden, plastered (even), to wallpaper, etc. vinyl (unless they have a very textured structure).

and instructions on how to remove these adhesive mounts from the wall WITHOUT A TRACE...

We continue the topic of attaching frames to the wall... another simple way...
Making narrow shelves on the wall for frames
Often in living rooms there are special long narrow shelves above the sofas. Decorative interior tinsel and aesthetic frames with photos or graphics are placed on them, supporting the style of the overall interior.

Placing frames on the corners of the walls.
But this is a method with a very unusual and interesting approach to placing frames. If you don’t find such frames on sale, you can make them yourself or order them from a furniture manufacturing company. Such a simple design order will be easy to complete for any specialist in the manufacture of cabinet furniture.
There are corners and jambs in every home - and here’s a great idea to find a useful use for them...

So... we have already figured out how to arrange the frames...
And now it's time to find out... WHAT EXACTLY can be depicted within...
And what could be INSIDE THE FRAMEWORK?
What stories/in what style?
Now let's talk about the different themes of the contents of our frames. These can be photographs, abstract paintings, real works of oil or watercolor painting, and much more, let's look at the most successful options.
Aged photographs in modest frames.
You can place aged black and white or brown-white photos.
By the way, photo frames look very interesting elongated shapes(as in the photo below).
You can age existing color frames - this is done with a few clicks in Photoshop. If you don’t know how to do it yourself, ask some photographers you know.

Black and white graphics in ascetic frames.
Most often this black and white photographs, sometimes it's graphic arts black ink or even engraving prints in black tones.
You can hang black and white paintings on the wall in strict graphic order or in the lung chaotic run.

Decorating the walls with frames with florists.
In old times healers replaced dried herbariums with medicinal herbs on their walls. This theme is often used in modern interiors.
- These could be sketches of grass and flowers with a simple black pencil.
- Or how would cut out from textbooks pictures with herbs signed in Latin.
You can MAKE such a selection of paintings YOURSELF in one of two simple ways.
Method one: collect and dry real herbs, and then place them between the frame and the glass.
Method two: use the plant as engraving print, that is, apply paint to the plant and press it to a sheet of paper to obtain its graphic imprint.

Method three– get carried away with embroidery – and embroider flowers on canvas
As an option, you can find flowers already embroidered on fabric (for example, on our grandmothers' sofa covers) – and insert a piece of such a “blooming” cover fabric into the frame.
Frames with a repeating plot.
Your paintings decorating the wall may contain photographs or paintings of ONE CYCLE.
- You can take a photo of your wonderful weekend.
- Or capture IN DIFFERENT angles THE SAME scenery.
- Or take a photo one landscape from the same photo point, but in different weather or at different times of the year.

Here you see an example of three photographic paintings with children playing, photographed on the same day. Or here’s an original idea with a photo selection that captures the water surface of the boundless sea - such photo cycles can be brought back from a summer vacation at sea. This could be a photo cycle with shells or palm trees, or even a hotel interior.
Frames with a fragmented plot.
Here one photograph is divided into elements and each element is inserted into its own frame...
How to do this at home yourself - read in a special article - WHERE I WILL TELL AND SHOW how split the photo into several frames...

Wallpaper in frames.
Why paint, or look for decent scenes that will fit into the interior of the room, if everything you need can be found in the department of the store with ordinary wallpaper?
Or you can fill empty frames with the remains of wallpaper after gluing other rooms; you can ask neighbors or friends for different textured and multi-colored pieces of old wallpaper or wallpaper left over after gluing. Or, in the gift wrapping department, find beautiful wrapping paper with patterns and insert it into frames.

Framing the invisible... empty frames in the interior.
Oddly enough, but this technique looks very nice as on plain ones wallpaper tah and on the wallpaper with large graphics . In the latter case, empty frames can be positioned so that they serve as a natural frame already existing on the wallpaper of the picture.

Wow - white wallpaper!... Let's paint. Drawn frames.
You can make frames for the wall yourself just draw.
Your children will really like this option if they are already old enough to take the task of interior decoration seriously. Older kids will really enjoy coming up with the design and placement of their hand-drawn frames, while younger kids will love painting the frames in all the colors of the rainbow and even drawing a cute portrait of mommy inside.

Well, that’s all for today... phew... it’s a big article - but all the information is in one place...
I really hope that you have new ideas for decorating your home.
Comfort and warmth of home to you...
Olga Klishevskaya, especially for the site ""
Photos help us store important memories of events that happened earlier: family vacations, weddings, celebrations, meetings with friends. Previously, they were invested in albums, now they are mainly found on electronic media.
But why hide them - photos can be hung on the wall - this is an easy and economical wall decor!
But how nice it would be to see the most important photos not once a year, for example, but every day! They can be colored or black and white, glossy or matte, perhaps even with an antique effect, but they are all so familiar and pleasing to the eye and heart.
In this article we will look in detail at diagrams and methods of hanging photographs on the wall, as well as how to do it correctly.
Let us analyze in detail all the schemes and methods for arranging photos on the wall.


Along a horizontal line

It can be photos of the same size, or gradually from small increase (or vice versa). Draw a line and align the bottom edge of each photo along it.
Along an inclined line

Similar to the previous method, only here you draw an inclined line and the corner of each photo should approximately touch it.
TIP: Take photos of the same size, or large at the bottom, and make them smaller towards the top.
Rectangle or square


- The easiest option for this method is to choose all photos are the same size and place them at the same distance from each other, then the rectangle will turn out on its own.
- But you can also outline the outline of a rectangle or square and select photographs so that the edges of the side, top and bottom photos clearly coincide with the lines. This way, it’s like putting together a puzzle of photographs of different sizes.
Symmetrical along an arc


This method will look good if the arc passes, for example, around a mirror or a clock. Or it can be obtained by attaching a photo to a thread (read further in attachment methods).
Chaotic


ATTENTION: Even when hanging photos chaotically, keep in mind that they should look harmonious together. Think about what photos should be nearby.
Forming a drawing
For example, we put together a heart, a flower, a cloud from photographs


Methods for posting photos
Let's look at all the ways you can mount photos on the wall.
Hang in frames on the wall
This is a classic decoration option, and the frames can be wooden, metal or colored plastic.
Also, each of them can be separately decorated with such various decorative elements as beads, buttons, colored paper, fabric, ribbons, stones, rhinestones– whatever comes to mind, the main thing is that the decoration matches and matches the style of the photo.

Arrange in frames on shelves
Everything that concerns the frames from the previous point remains, only here we will not hang them on the walls, but place them on shelves, racks, bedside tables and tables.


Large photo frame
If you have a large and beautiful frame from a mirror or picture, you can pull the threads inside and post a photo. Also, such a frame made of baguette can be ordered in any workshop.


Attach to the wall with double-sided tape
A simple method, and less expensive in terms of money than the previous ones, because you don’t have to spend money on a frame, just print out the photo and hang it up. And it will be faster in time, no holes need to be drilled.


Hang threads on the wall and attach photos to them with clothespins
Nailed it two studs at opposite ends of the wall, stretch a string between them, and hang the photographs, securing them with clothespins.
- As soon as the photos start to get boring, quickly change them to others; here this will not be any problem: you don’t need to rearrange the frames, or peel the photos off the wall, thereby damaging the wallpaper.
- Can hang some ropes at different levels, thus decorating the entire wall.
TIP: The rope can be pulled tighter or looser by controlling the slack and placing the photo either in a straight line or in an arc.
.


Hang on wooden sticks
- In the photo in the upper corners we make a hole and thread a thread through them, then take a thin wooden stick to size approximately the width of the photo.
- And we tie these strings to the edges.
- Now we take another thread and tie it along the edges of our homemade stick frame and we hang our entire structure on a nail using this thread.

Where to hang
The best place to hang a photo is in places that attract the most attention: for example, around the TV, above the sofa, above the bed. Also, photos can fill and beautifully decorate any empty wall.
On the whole wall
If you have an entire empty wall, then photographs will fill that space in the best way possible. Select photos, a diagram and a hanging method and go ahead!


Above the sofa
Most often, there is empty space above the sofa, table or bedside table: the shelf will most likely get in the way, leaving the choice between a painting or photographs.
- If you stopped at the photographs, then further actions are similar to the previous point, only there will be a little less space.
- Although, even on an empty wall, most often they hang it not from the floor, but just at least a meter from the floor, so everything is the same.


Around the TV
Usually the wall on which the TV hangs is empty. But you can beautifully design her photo.


In the bedroom and above the desk
Photos above your desk or at the head of your bed will save you from the problem of buying any decorations.


Around mirrors, paintings, windows
The mirror will serve as the center of your exhibition and form a photo collage around itself. The mirror does not have to be the same shape as the frame. A round mirror and square frames are considered excellent.


On a blank wall in the corridor
In 3- or 2-room apartments with an old layout, there is often a blank wall at the end of a narrow corridor. Usually it is completely non-functional. But if you hang a photo on it and light it up, it will become much more cozy!

In an empty corner
The corners of the walls are most often empty, since protruding objects are easy to catch when moving. But the photographs are flat and a collage of them can decorate this part of the apartment in an original way.
- Along the steps or on the wall under the steps (if a private house or two-story apartment)
- You climb the steps slowly, look at the photographs and do not feel any fatigue. Alternatively, you can hang photographs from bottom to top as the children grow older.


How to hang it correctly
In order not to be disappointed in the result after attaching the photos, you need to initially plan how they will hang, and only then hang them. Let us roughly divide the planning process into three stages:

STEP #1: Mark
- First, make a sketch of the hanging diagram on a piece of paper, then make corresponding notes on the wall.
- Please note that the center attention will be at eye level, on average 160 cm,
- do not go right to the end of the wall, leave 20 centimeters.

STEP #2: Make a template
- Cut out the dimensions of the frames from newspapers or leaves and attach them to the wall according to the chosen pattern.
- See how it will actually look, make adjustments if you don’t like something.
STEP #3: Mount to the wall
Now, in place of each paper sketch, you can safely attach the selected photos and enjoy the result. Depending on the hanging method, you may have to drive in nails, in which case stock up on the necessary tools.

You can also attach signs with inscriptions near the photographs or simply write on the wall about the image, for example: vacation in the mountains, graduation, and the like.
Enjoy the memories and do not forget to create new unique life moments!
A modern person accumulates a lot of photos - in his memory, phone, computer or other gadgets. Pictures, even if associated with pleasant memories, are viewed extremely rarely. But why miss the opportunity to cheer yourself up by looking at memorable photos? It is enough to hang the pictures on the wall, and they will not only charge you with positivity, but will also decorate the interior.
1. Vinyl stickers - instead of frames

If artistic skills are completely absent and it is not possible to depict frames on the wall, then use vinyl stickers. They can be purchased in online stores. Such stickers do not damage the wall finish.
2. Drawing lessons

In order to depict frames on the wall, it is not at all necessary to have an art education. Even a child can repeat drawings in the style of primitivism. In order for the drawn frames to look harmonious, the wall must be monochromatic.
3. Graceful cords

Thin decorative laces act as a photo holder. Tie the cord into a knot and glue the free edge to the back of the photo. All that remains is to hang the photo on the wall, after hammering a nail into it.
4. Decoration in eco-style

A non-standard shaped branch replaces the frame, turning photos placed on it into original decor. The branch can be painted or varnished - then the homemade “frame” will last a long time.
5. From the closet to the wall
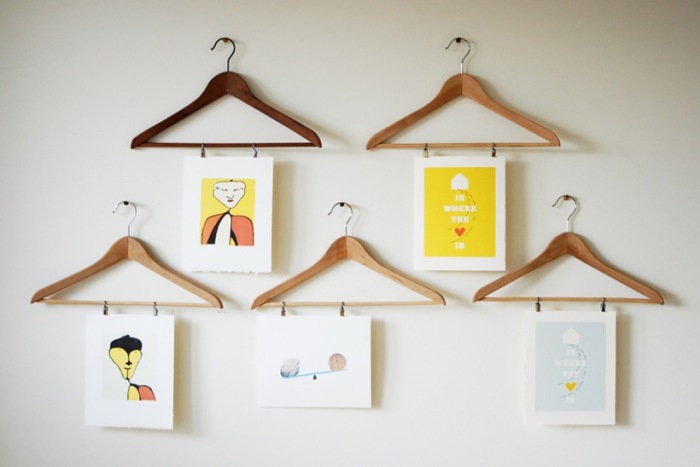
Hangers with hangers, which hang dozens in every closet, become unusual photo mounts. The main thing is to print the photo in a suitable size that matches the length of the hanger.
6. Flirty ribbons

A lady's boudoir will be transformed if you decorate it with photos on ribbons. Wide tapes are glued to the back of the frame using construction adhesive, such as silicone or acrylic.
7. Free style collage

Many photos, differing in style and size, look harmonious inside a large frame. The center of the decorative composition becomes a large photograph located in its central part.
8. Useful and beautiful angle

A brilliantly simple way to display photos is to hang them in a corner so that they form a single colored surface. Choose any geometric shape, and you can fix the photo on the wall using double-sided tape.
9. Unifying drawing

You can make a single decorative composition from several photos hanging on the wall using a laconic drawing on the wall. Any single-color pattern drawn over a group of photographs will do. Instead of a picture, you can use a vinyl sticker.
10. Nothing worse than a painting

If the paintings do not fit into the interior design, but you want to decorate your home with paintings, then replace it with a photo in a large frame. Glue several decorative cords to the back of the frame and secure the pictures to them with clothespins.
11. You can stand on the wall

Narrow shelves are great for displaying photos and paintings. They will also allow you to avoid making unnecessary holes in the wall. If there is no narrow shelf, then it can be replaced with wide moldings.
12. Optical illusions

As a rule, each frame comes with glass and thick cardboard, which serves as a holder for the photo. Use a second piece of glass instead of cardboard. Place the photo, with a drop of glue on the back side, between the two glasses. All that remains is to hang the picture on the wall.
13. Clear geometry

Once you have selected a few of your favorite photos, print them out as a collage. To do this, you just need to contact any photo or copy center. Depending on your preferences and interior design, you can choose any color for the background and type of photo placement.
14. Both photo and inscription

Think about an inscription that you would like to see on the wall every day. Then draw the outlines of the desired letters on the cardboard and carefully cut them out with a stationery knife. All that remains is to place the photo behind the cardboard and insert the entire composition into a frame of a suitable size.
15. Personal photo wallpaper

If family archives are impressive in size, then you can use them to make photo wallpaper. To keep the pictures securely on the wall, it is recommended to first cover it with paper wallpaper. Then the photo is glued to the wallpaper so that there is equal free space between adjacent photographs.
16. Democratic and stylish

The most accessible fixative for photos is ordinary clothespins. If this solution seems too radical, then buy decorative hats. They are sold in stores specializing in the sale of handicraft supplies.

Molded elements made of plaster or polyurethane become an original replacement for shelves. Even ordinary photos standing on such a stucco element turn into a real work of art.
19. Brutal placement

Hanging a photo on the wall using a cornice and chains is a solution for the most daring. But such a composition can become a real highlight of the interior. This idea is good for large and bright photos.
20. Family watch

The clock mechanism can be purchased at a craft store or taken from another clock. All that remains is to select twelve small photographs, each of which will replace the number on the dial.
Hanging photos on the walls is a great way to make your home more comfortable. Is this not enough? Then we recommend that you read
Properly placed photographs will help fill empty walls and set the right tone for your home environment. Original ideas for attaching them will help with this. After all, in addition to traditional photo frames, there are a lot of elements that will help secure photos in the right place. Today we will tell you how to beautifully place photos on the wall.
A creative arrangement of photographs on the wall will attract attention and decorate the apartment.
Family tree on the wall with family photos on the branches
You can draw tree branches or trees on the wall, and place photos in oval frames as fruits. This technique looks especially impressive when creating a family tree.

Another option for placing photos on branches in the interior
If you focus on the style of interior design, then special attention should be paid to the choice of frames. Its visual perception depends on the “packaging” of photographs. Photo frames carry not only an aesthetic load, but also a protective function. They create a barrier to the penetration of ultraviolet rays and protect photos from fading for a long period of time.

Photos in this frame can be changed at any time
When creating an exhibition, you should take into account that you cannot place glass and wooden frames next to each other, as this combination looks vulgar. A game with different image sizes looks interesting, but only if the goal is not to create perfect symmetry. Any symmetry on the wall requires symmetry in the interior design of the room.

Photos and postcards on a special metal frame on the wall

Original composition of photographs on the wall
The living room can be decorated with photographic portraits, stylized as paintings. In interior design, the popular photo diptychs and photo triptychs look great, the frames in which the photo is divided into several parts and creates a single composition.

Bright photographs in square frames in the interior of the room

Idea for newlyweds: photos together can be framed on the wall in the shape of a heart
Modern photo frames are presented in such a variety of colors and sizes that they will suit any interior. The most common option is to place a photo in a frame on some plane, for example, a table, shelves, cabinets, etc. Volumetric photo frames look original and impressive.

A solid composition of family photographs in black and white decorated the wall of the study

Square collage of square photos
Photos are attached not only to screws and nails, but also to tapes and ropes using glue or clothespins. Thus, you can create entire original garlands that will become reminders of some pleasant events.

Family photos on stands made of semi-precious stones

Large collage of photographs on the wall

Romantic idea with photos hung on LED garland
Don't miss interesting news in photos:


12 great ways to create a New Year's mood
Interesting ideas for storing things, or how to do without cabinets
Useful ideas on how to make your bathroom comfortable
How to make a Valentine card using the quilling technique with your own hands
Ideas for expanding the space of a children's room

, cornflower")