Remember how in childhood we made paper crafts with our own hands? With what pleasure we cut out snowflakes and folded airplanes and boats! The young pioneers grew up, but the need for positive emotions remained. Beautiful paper objects made by grown-up hands are a clear trend.
We have collected several examples to convince you that paper is an excellent material for decoration and relaxation. Save your favorite ideas in albums and bookmarks, you will have something to do on long winter evenings. Inspire your family with some simple creativity!
1. Three-dimensional paintings made of paper
It’s not at all difficult to create such a romantic picture as in the photo. To get a symmetrical shape, fold a piece of paper in half and cut out half the shape. And to get a neat fold (if you are working with thick paper), first use a pointed object to apply a thin groove on the bend line. Add a little variety to the layout of the picture: alternate open and unopened hearts, add a few hearts of a different color, write a couple of romantic lines. Instead of hearts, make butterflies, stars, geometric shapes, or whatever comes to your mind.

2. Abstract application
Paint a rectangular sheet of plywood with white acrylic enamel (or use primed stretchers from the store). Cut or tear pieces of multi-colored tracing paper. Using glue varnish, which is used for decoupage, glue the tracing paper onto the base layer by layer. Lay sheets of tracing paper overlapping each other to create the effect of translucency and overlapping colors.

3. Minimalist painting made from crumpled paper
You will need a sheet of kraft paper and a frame with mat. Crumple the paper, then straighten it and place it in the mat. To keep the painting in place, glue it to the back of the mat using masking tape. You can pre-paint the paper with acrylic paint in a pastel tone. Choose a color from the palette of your interior.
4. Painting from waste paper
Use leftover wallpaper, maps, music notations, old newspapers yellowed by time, drawings, patterns, covers of cult magazines or vinyl records. Everything that you or your parents regretted sending to waste paper can find a new life in a frame on the wall.

5. Wicker decorative panel
If you combine two pictures, you get the effect of a three-dimensional paper craft. Select two contrasting images of the same size: background and main. You can use photographs, postcards, printouts from the Internet. Cut the images into strips of equal width and interlace. Occasionally, carefully fix them with glue so that they do not move to the sides. The resulting panel can be inserted into a baguette and hung on the wall.

6. Card frame
The frame for photos from trips is decorated using decoupage technique using a fragment of a geographical map. Buy a simple rectangular plywood frame, place it face down on the card and trace around it on all sides. Add 5-6 millimeters for bending. Trim the resulting outline and stick the card onto the plywood. After the glue has dried, secure the image with varnish. Advice: To frame holiday family photos, use gift wrapping paper.

7. Frame with paper flowers
Complete the photo frame with three-dimensional elements: paper flowers, dry leaves and branches, seashells and other trinkets. Black and white photographs look good in such frames. The technique is also suitable for framing color photographs, but then it is better to make monochrome frames.
8. Composition of dry branches and paper feathers
How to make a paper bouquet? Cut some dead branches from your yard. Take several sheets of colored paper and carefully cut out the feathers. For “spring” paper crafts (as in the photo), take sheets of pastel colors, but you can experiment with bright colors. Glue the cut feathers to the branches using glue, place the bouquet in a vase and enjoy it until the first flowers appear. Advice: In spring, instead of dry branches, you can take fresh branches with swelling buds. Just put them in a vase with water.

9. Flower vase using origami technique
The paper “remembers its shape” perfectly. Take a thick sheet of paper, divide the sheet into triangular sectors (diagram at the link below) and mark the back side with a pencil. Go along each line with a non-sharp knife or a pen without ink. -
make the folds. After this, roll the sheet into a cylinder shape and glue the edges with office glue. Place a bottle of water and flowers inside the cylinder. No fresh flowers? They can be made from paper too!

10. Composition of bushings
Don't throw toilet paper or paper towel rolls straight into the trash; save them. Cut the bushings into rings of equal width, place them on a flat surface, give them an interesting shape and glue them together at the points of contact. The composition can be fixed directly to the wall using thin nails or pins. Paper compositions are also attached to the walls using pushpins or double-sided tape.

11. Floral panel
Take a look at the work of Sabrina Transiscus. The German artist makes roses and peonies from white paper, but creates an incredible variety of shapes. The artist performs most of her works to order, for example, to decorate the windows of fashion boutiques. The joint project of Sabrina Transiscus and the porcelain factory was exhibited at the Louvre.

12. Flower wall
The photo shows an element of the “Flower Wall” that Sabrina created for one project. The total area of work was 12 sq.m. Now its parts are presented in several galleries in Europe, as well as in the designer’s studio. To ensure that beautiful paper panels retain their appearance longer, Sabrina advises wiping them with antistatic wipes or carefully cleaning them with a vacuum cleaner at minimum power.

13. 3D art from old books
For an installation like the one in the photo, you will need several old hardback books. Take books with pages yellowed from time to time that you will no longer read. Fold each sheet. Fold in half, diagonally, fold into triangles, or alternate folded sheets to create a more complex shape. Color the edges of the sheets with a colored marker (such as gold or red). Important: In the photo, paintings from books are hanging in the bathroom, but we do not recommend such decor for a bathroom or shower room.

14
.Book sculptures
If you remove the binding from a book and glue the first and last sheets together with double-sided tape, you get a nice cylinder of paper. Create a sculptural composition from several books by folding the sheets in different ways. Such sculptures can be placed on a shelf and hung with a fishing line. The photo shows the work of artist Yvette Hawkins.

15. Wigwam for four-legged animals
You can make a house for a cat or dog, for example, from a box of household appliances. And if you cover the cardboard with wallpaper or gift paper, it will be even prettier.

16. Festive wreath
Is the holiday just around the corner? We will decorate the rooms with paper flags and garlands, and hang a wreath of paper on the door.
paper leaves. Cut out a ring from cardboard - it will serve as the basis for the wreath. Cut colored paper into squares, fold each in half and make arched cuts on the sides opposite the fold. Unfold the squares and glue the resulting sheets onto the cardboard circle. Finally, add foam balls to the wreath, and secure the picture mounts with tape on the back side.

17. Gift packaging
Remember how to cut out New Year's paper snowflakes for windows? Wrap the box with the gift in wrapping paper, cut out a lace pattern from colored paper and tie it to the package with cord or twine.

18. DIY wrapping paper
Use ready-made silicone or rubber stamps (available in art stores) or cut out the outline on a rubber rectangular blank. Dip the stamp into colored ink and stamp the design onto a large piece of glossy paper. Allow the ink to dry thoroughly before wrapping your birthday gift in homemade wrapping paper.

19. Tags for gifts
Complete the gift wrapping with personalized tags. These are very simple and beautiful crafts made from paper, cardboard and ribbons. Cut a rectangular label out of cardboard and make a hole on one side using a hole punch. Glue a rectangle of light decorative paper on top of the cardboard and decorate the label with decorative ribbons. Write a name or a short wish on it.

20. Decor for a children's table
The cactus garden is a great example of an unusual paper craft for children. Make a Mexican-themed holiday table decoration with your child. Cut out cacti of different shapes and sizes from colored cardboard, connect the elements according to the “groove-to-groove” principle (without glue), and draw on the spines with a felt-tip pen. Place in paper baking cups. No need to water!

21. Surprise boxes
Prepare small gifts for your child’s birthday, not only for him, but also for all the children invited to the holiday. Place sweets or small toys in boxes made of thick designer paper. Add them to your sweet table setting or reward the winners of children's competitions.

22. Advent calendar
We will make a calendar for children with our own hands from rolls of baking paper, foil or cling film. Fill it with sweets, cover it with colored paper on both sides and glue the sleeves together to make a house. Cover with a lid of colored paper and write down the numbers. Every day, open one calendar window and take out a sweet treat.

23. Calendar made from envelopes
Give envelopes glued to a sheet of cardboard a festive look by decorating them with paper stars, bows or Christmas tree decorations. If white is too boring for you, fold envelopes from colored or decorative paper.

24. Paper mask
A carnival mask is an example of a very quick paper craft for children. Draw individual elements of the mask on paper of different colors, cut out along the contour and glue all the elements together. Pull the elastic thread through. Try the mask on your child and be sure to check that the elastic band does not put pressure on the head. Complete the look with a light cape over your shoulders in the color of the mask. Children can make such a mask themselves - prepare stencils for them to cut out.

25. Paper tablecloth
Let the children decorate the holiday table themselves. A roll of old wallpaper and colorful paints is all you need. Children's imagination will turn wallpaper into a colorful festive tablecloth. Using brushes, palms or potato stamps, they will apply paint to the “canvas”, and in the meantime you can calmly prepare desserts.

26. Origami for serving
There are many master classes on the Internet on how to create simple paper crafts using the origami technique. Start with simple ones. If you get carried away, you will gradually learn to read symbols on diagrams and master complex figures.

27. Napkin rings
Decorate the table with napkins with cardboard rings in the shape of bats. Draw and cut out the outline of the bat's wings on black cardstock, apply glue to the wings and sprinkle with glitter. Once dry, shake off excess glitter. Fold the napkin like an accordion, roll the “bat” into a ring and secure it to the napkin a little closer to one edge. Straighten the second edge.

28. Corrugated cardboard napkins
These napkins are cut from corrugated cardboard. We trace a round tray or other object on cardboard and cut it out along the contour. We paint part of the napkin with a brush or stamp a pattern using a wine cork. In addition to napkins, you can make coasters for glasses and cups.

29. Heart-shaped napkins
The ability to fold napkins in the shape of a heart will come in handy for romantic dinners. Give a little surprise to your loved ones on Valentine's Day or March 8th. Follow the link to see how to do this.

30. Pendant for a children's room
A simple children's paper craft. You need to fold the square sheet several times to get the faces of funny dogs and cats. All that remains is to draw on the eyes, noses, mouths and antennae with a marker. Hang paper animals from strings decorated with beads on the wall or above the bed in the nursery.

31. Fox bookmark
Another very easy paper craft. It will take no more than 10 minutes to create a cardboard bookmark. Take a closer look - at the base of the picture there are several intersecting triangles. The bookmark is held on the sheet thanks to a cut at the back.

32. Book covers made from wallpaper and retro newspapers
Make your home library enjoyable not only for reading, but also for contemplation. Wrap books in covers made from leftover wallpaper, geographical maps, last year's calendars, colored or gift paper. The process is simple. A sheet of paper is cut out along the contour of the unfolded book, you just need to add 2-3 cm on each side. Wrap the book. Secure the cover with transparent tape.

33. Storage boxes
Decorate shoe boxes using a scrap map. Add cardboard tags to boxes to identify the contents without looking under the lid (see point 19 of this article).

34. Cardboard snack boxes
Fold them out of cardboard and fill them with popcorn, chips or any other snacks. Unfortunately, this product will only serve you once, but you can always make another batch of convenient boxes.

35. Boxes for small items
It would seem that it could be simpler than paper and cardboard crafts! This type of creativity is familiar to every child from an early age, and the kindergarten teacher talked a lot about various ways to create paintings, appliqués and figures from these simple materials. At school, a child can be shown paper creativity from a different perspective: they can be shown that crafts do not have to be primitive at all, they can have a functional meaning and bring aesthetic pleasure from the work done.
Technology: paper and cardboard crafts
An important component of school discipline in primary school technology - paper and cardboard crafts. This activity, like other types of creative activity for younger schoolchildren, is extremely important for the comprehensive development of the child. At the beginning of each lesson, where the children will be asked to work with their hands and create paper flowers, figurines and other crafts, the teacher should interest the students in this process.
If we are talking about creating a certain type of flowers, then you should say a few words about this plant, give an example of where it grows and where children could see it. Often used in technology lessons is a presentation with a visual demonstration of not only the introductory part of the lesson, but also step-by-step master classes. Thanks to visualization, schoolchildren better assimilate the material covered, and a presentation with a master class will attract their attention and arouse interest.
Dahlias - a simple option crafts made from colored paper and cardboard. A paper dahlia can be used to decorate a classroom if made large. The main thing is that the same master class allows you to make a small or huge flower, using the simplest and most affordable materials.
The dahlia consists of many sharp-angled paper tubes, which are glued to a cardboard base in layers. A large flower looks very impressive from a distance, so it can be glued to the walls on the eve of a school holiday or spring ball, but it is also impossible to take your eyes off it when looking at it up close.
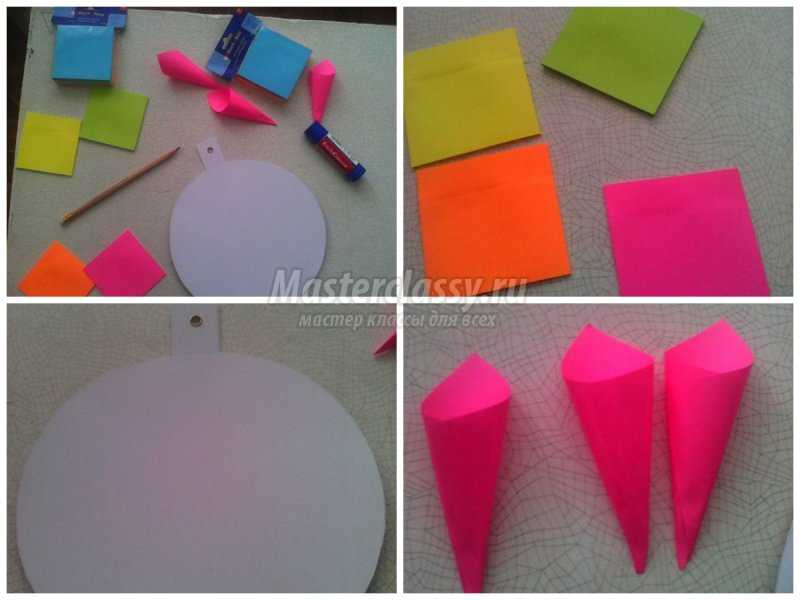
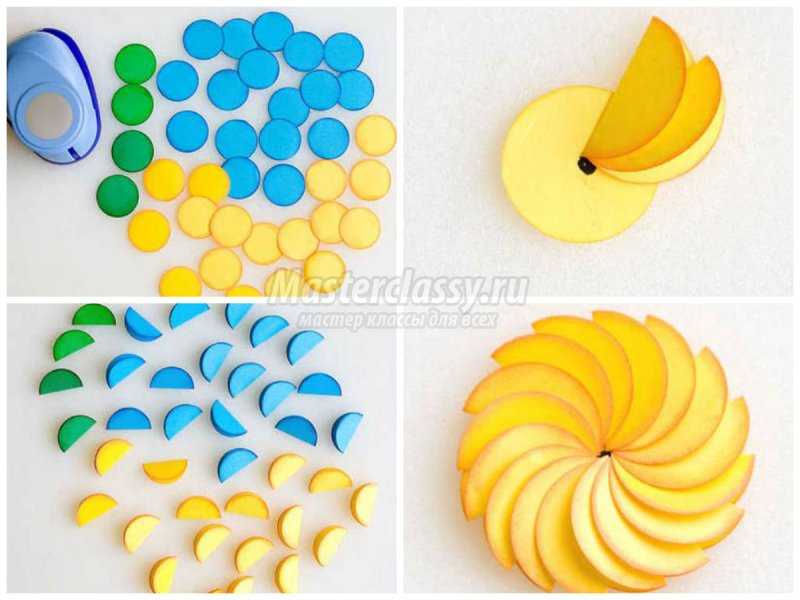
If you decide to make such voluminous flowers that can become an element of decoration for a homemade card or floral applique, without the help of a hole punch, then you will need a simple pencil and scissors. The task will not be easy: each circle must first be drawn on paper (you can use a small marker as a template), and then cut out one by one.
Cardboard circle
Colored scrap paper
The flowers turn out to be very beautiful if you use colored embossed scrap sheets for your work, but ordinary bright colored paper will do, but it must be colored on both sides.
We only need cardboard to cut out the base circle; it should be the same diameter as the rest of the circles. All prepared paper circles must be carefully folded in half diagonally. During the lesson, children will also be able to acquire first knowledge about geometric shapes and geometric terms. In the presentation, they should be told and shown on a slide what the diameter of a circle is. When all the blanks are ready, you can start creating the flower.
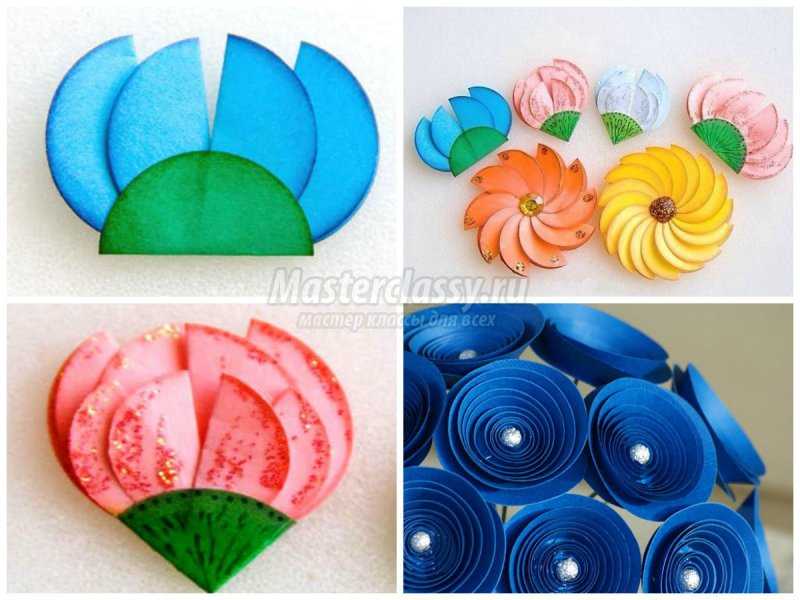
On the cardboard base, you need to mark the middle - put a dot with a marker, and then start gluing the blanks. One edge of the workpiece should touch the middle. Each piece should be glued so that the half is glued to the base, and the second half remains free; it will create the volume of our flower. The next piece must be glued so that it is nested into the previous one. The result is a voluminous flower, beautiful and original, and you can decorate the middle with a bead, rhinestone or a drop of glitter.
A blooming bud can be made using the same half blanks. For such a bud you will need only four circles for the petals and another green cardboard circle. The cardboard circle should be folded in half, and four blanks should be glued into it, as demonstrated in the master class. You can glue the blank petals in two rows, in this case it is better to use circles of different sizes: small for the first row, large for the second.
If you plan to make, for example, cards for Easter or March 8, then you can decorate greeting cards with such flowers.
Crafts made from paper and cardboard, grade 3
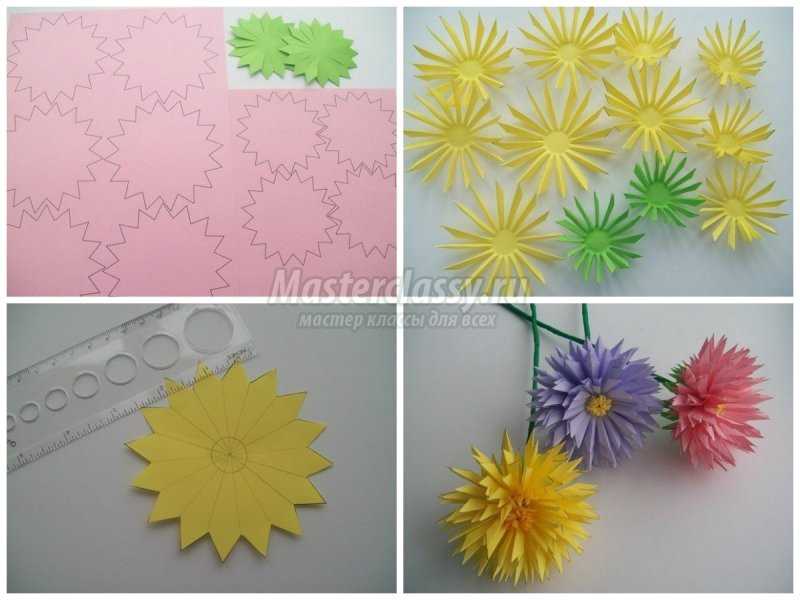
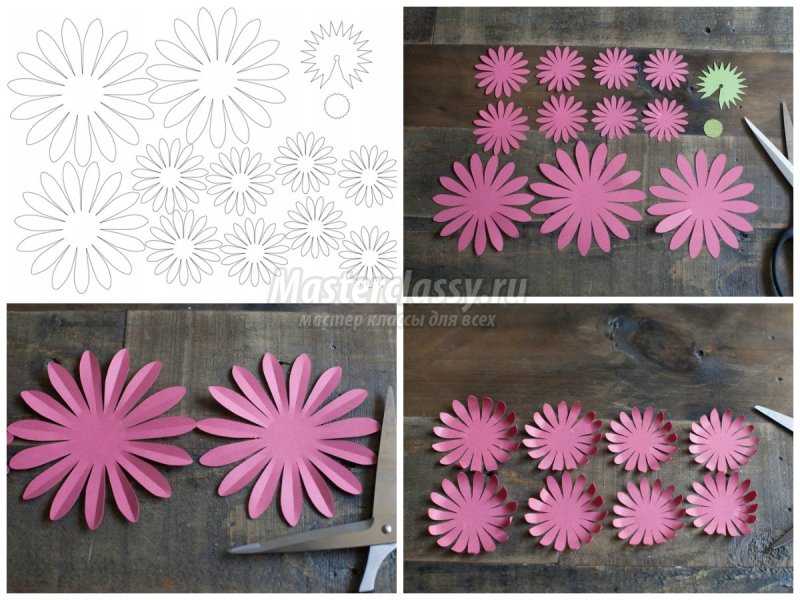
In some cases, when it comes to paper and cardboard crafts, templates may be needed. Typically, templates are used when there is a need to cut out many openwork parts of the same shape or size. For example, when making multilayer gerbera flowers, you need blanks with petals, and to make the craft as neat as possible, you can download a template of the desired shape, print it on a sheet, and then cut it along the contour with scissors.
You can also redraw the template onto a sheet of paper, attach it to the monitor and trace along the outline with a soft pencil, then transfer the template onto cardboard and cut it out. You will have a cardboard blank ready, which can be traced on colored paper, obtaining petals of the required shape.
At first glance, it seems that the cutting technique is very simple, and schoolchildren have long known how to create crafts made from paper and cardboard. 3rd grade You can teach not just cutting and gluing techniques, but also open up a fundamentally new way of working with long-known materials and tools. Schoolchildren can appreciate that the results are not primitive at all, but can look like a work of art. You can further interest children in paper crafts if you tell them about this modern super-toy.
Paper and cardboard crafts for children
We will make bright, colorful gerberas - this paper and cardboard crafts for children and for adults who are able to discover a fundamentally new technique for working with those materials that everyone has known since kindergarten. Looking at the list of materials needed for the work, you will see for yourself:
Colored thick paper
Glue gun
This is the entire basic set that will allow us to make a paper work of art. The proposed master class also used floral tape and wire, as well as wire cutters, but these materials can be called auxiliary, since they were used at the stage of forming bouquets of ready-made flowers.
Pay attention to the template: it contains 11 flowers, among them 3 large and another 8 smaller, while the small templates are not all the same size, among them are four larger and four smaller. This way you can create a beautiful multi-layered gerbera. The petal template should be printed on bright paper, the color you chose for the gerbera. Two more small details should be printed on a green sheet - these will be the details of the sepals and the center.
What to do with beautiful wrapping paper that ends up in a pile in the house after the holidays?
Don't rush to throw it away before you see these photos. We have prepared many ideas for you to use it!
1. “Outfit” for shoe boxes
Ordinary shoe boxes wrapped in gift paper turn into an original and practical item for storing photographs, stationery and other small items, and are worthy of taking up space on open shelving.

2. Add style to your shelving and freshen up your dresser drawers.

By lining your dresser drawers with bright paper, you will not only freshen up your furniture, but also create an incentive to keep things tidy.

3. Decoration of packages with gifts.
To create a festive mood, you don’t have to wait for special dates. When going to visit friends or family, take a gift with you, putting it in an elegant bag or wrapper. You can take care of the decoration in advance and make blanks for appliqués. If you receive crumpled paper, you can smooth it slightly with a warm iron.


4. Original book wrappers
It is not necessary to wrap all the books, one or two are enough to create bright accents in the interior


5. Wrapping paper can be used to decorate shelving made from boxes.


6. Organizing space in dresser drawers and desks
Cornflakes boxes, tin cans and toilet paper rolls all transform with a little dressing up. They can be used to store pencils, scissors and organize space in drawers.


7. Instead of paintings
A plainly painted wall can be decorated with gift paper, placing it in a frame.

Since the pieces of paper are quite colorful and bright, it is recommended to choose frames of the same color.


8. Colorful wallpaper
You can make colorful “patchwork” wallpaper from elegantly selected pieces of wrapping paper.

9. Holiday signs and decorations


Paper garland

Original “napkins” for treats.

10. Wall boards
Boards with metal clips decorated with wrapping paper can be placed on the wall. They are very convenient for keeping reminders and notes in sight.

11. Beautiful paper vases
They are useful for storing small items and sweets. To make paper vases, you need to select a suitable container, wrap it in thin plastic film and cover it with pieces of paper. Then the product should be allowed to dry for 24 hours. The inside of the vase can be coated with paint.


Volumetric crafts made from colored paper have been and remain the most popular type of children's creativity. Paper is one of the simplest and cheapest materials, often used in kindergartens and school groups. You can interest your child in paper crafts by choosing a theme that is interesting to a particular child. In addition, even from paper, crafts can be made using different techniques: scrapbooking, origami, three-dimensional appliqués, quilling.
Volumetric crafts - paper animals
If we talk about paper crafts for children 4, 5, 6 years old, then one of the popular topics for creativity is the animal world. Three-dimensional animals made of colored paper, birds, insects and fish seem to come to life, acquiring not only bright colors, but also a bizarre shape.
We have selected voluminous paper animal crafts, master classes, templates and step-by-step instructions especially for you.
In this article we will look at not just examples of finished works, but also templates for three-dimensional crafts, which can be printed directly from the site.
In addition to the paper and cardboard itself, we will also need scissors, a glue stick (or PVA), a simple pencil, some additional parts, for example, toilet paper rolls and doll eyes. By the way, you can make toy eyes yourself by cutting out a small circle from white paper and drawing a dot on it with a black marker.
Please note that some instructions contain not only colored paper, but also cardboard, paper cups or disposable paper plates and napkins, but voluminous paper crafts made with your own hands from these improvised materials look no less impressive.
An original solution would be a voluminous paper craft for a preschooler, made by hand, as a gift or small present to a close relative (grandparents/dad). This could be a themed figurine for one of the holidays or some memorable day. Thus, 3D animals, the diagrams and templates of which we will now consider, are a huge success among children.
This simple construction paper craft is not only easy to make, but also fun. Any child can cope with this task in 15 minutes. For a paper shark you need a sheet of double-sided blue or blue paper, white and red, scissors and a glue stick. We will work according to the following scheme:


Another interesting work is a voluminous giraffe made of yellow paper. To work you need a yellow sheet and a brown strip. Cut and glue as follows:

The following three works are performed using approximately the same technique - a paper caterpillar, a mouse and a bird. Blanks of the required size are cut out of the sheets, folded and then glued together.


A butterfly made from colored paper can be interesting in terms of making - this is where a child can show all his imagination and creativity. The wings of a butterfly can be completely different, and a colored sheet is taken as a basis, and different patterns can be glued onto it or simply painted.

A voluminous fish made of colored paper - such an interesting and simple craft will keep a child busy for 15-20 minutes:

Funny elephant made from black velvet paper - a simple craft that will require some participation from an adult. In order for a child to make an elephant, an adult must draw an outline on black paper, along which the outline of the animal must be cut out:

And we will make this elephant from a toilet roll (it’s also made of paper) and cover it with green paper (you can take any other color:

Another funny creature made from a paper roll is a chicken:

For voluminous animals, paper is not the only possible material. This original craft can also be made from paper cups:

Templates for three-dimensional paper crafts can be printed on white office paper, cut out and colored, but if we are talking about a specific living creature with a certain color (a frog, for example), then it is better to print the blank on paper of a specific color (in the case of a frog - green). Check out these paper animal templates for children aged 4 years and older:


