In the cold, especially winter, seasons, it becomes difficult for birds to find food for themselves, and they desperately need strength to survive. Man-made bird feeders placed on trees in gardens, parks, or near residential buildings (even near a window or balcony) will save birds from hunger and help them survive severe frosts.  These designs can be bought in stores or made yourself.
Where to place bird feeders
 Unlike birdhouses, which need to be placed in quiet, remote places, feeders should be hung in visible and open areas. The birds will immediately notice the food and will regularly visit the “feeding station”.
Suitable for this:
- squares and parks;
- courtyards of residential buildings;
- roofs of houses;
- garden in a country house.
 Feeders are hung, fixed to the branches of trees, bushes or on loggias, terraces, windows. When choosing the latter options, you can watch birds without leaving your home; this is very interesting and educational for children.
What materials are suitable for making a bird feeder?
To make feeders, you can use various materials, which greatly simplifies the implementation of your plans:

For fixation, you can use ropes, fishing lines, laces, and wire. Do not forget that for the convenience of birds, small “perches” are always made. Ice cream sticks, pieces of plastic or wood, twigs, and wood chips are suitable for this.
Fruit and vegetable
 The simplest option, which does not require any cost, is to use pumpkin, coconut (removing the pulp), or citrus peel. Often people, without thinking, throw away the peelings from oranges, pumpkins, and other fruits and vegetables. And they can be perfectly used under an organic feeder, filled with seeds, and hung on tree branches.
Cardboard packaging
 Making a feeder from cardboard containers is the simplest and cheapest option. Boxes for dairy products, juices, shoes, and equipment are suitable. Using scissors or a utility knife, make windows in the box and add food: seeds, grains, lard, cookies, bread. Then they are hung on bushes or trees, fences and other places.
Plastic bottles
 Bird feeders are often made from, this is also completely inexpensive and easy. Just as in the version with cardboard, they make openings for the birds, insert sticks or twigs so that the birds can sit comfortably, fill them with food and fix them in the chosen place.
When choosing a feeder made from a plastic bottle, you should not forget that this material is very sharp at the cut points. To prevent the birds from cutting themselves, it is necessary to “sand” all sharp cuts, or seal them with electrical tape (resistant to bad weather).
Metal option
 A simple solution is a feeder made from cans. This container is washed, dried and processed or all sharp edges are bent. If desired, paint the jar, glue wooden or plastic strips (it is better to avoid metal) for convenient placement of the birds. The prepared containers are attached to branches or fixed to fences and posts using self-tapping screws. Then feed is poured in.
Bird feeder houses made of wood
 The classic version of a wooden feeder is worth choosing if there are children in the house. This will promote children’s interest in caring for birds, fostering a sense of responsibility and kindness. A wooden feeder always looks very impressive; you can make it yourself in any size and shape.
For this:
- Create a preliminary sketch on paper with a pencil (in the form of a house).
- They make blanks from plywood according to the sketch.
- The structure is assembled - knocking together, gluing, and fixing all the elements.
- Choose a place and fix the bird feeder using durable fasteners, since this design has a heavier weight.
 Seeds, cereals, dried fruits and lard are poured into the finished feeder. You can often see several wooden feeders (5-6 pieces) installed in parks or courtyards.
The bottom of a wooden feeder made by yourself should be weighted so that in strong winds the structure does not turn over (for hanging options). To do this, choose small stones that are laid evenly on the bottom, or a steel sheet of the required size.
Non-standard options
In addition to frequently used and simple feeders, you can choose an original solution that will not only benefit the birds, but also add additional decor to the overall design of the yard or garden.
Porcelain designs
 It often happens that a cup or plate accidentally breaks and is thrown away. Meanwhile, there are good ideas on how to give broken dishes a second life - use them for feeding troughs. The broken parts are glued together, the cup is glued in a horizontal position to the saucer or plate - ready! All that remains is to fix it in the chosen place and fill it with food. You can only use cups, securing them to a base, such as a board. You can also use lampshades and glass jars.
Mixed feeder
 Original bird feeders will be visited daily if they are made in a non-standard way at minimal cost. To do this, make sugar syrup or dough from flour, water and protein. Seeds, nuts, grains, dried fruits, and cut fruits are poured into this sticky mass. Everything is mixed and laid out in durable plastic nets. The finished treat for birds is hung on branches.
Having placed the feeder in a certain place, you should not forget that it is always filled with food, as the birds will get used to it and will regularly visit it.

Bunker structures
 If it is not possible to fill the feeder every day, you can choose the right solution - the bunker option. This feeder is distinguished by a large closed, capacious feed container and small recesses for food outlet. As the birds eat grains and seeds, food will gradually be supplied again and again (automatically). In this option, it is very important not to forget to make a convenient additional area for placing the birds, as in the photo.
When installing a bird feeder, it should be taken into account that the location of the structure should not be on the leeward side - the food and birds will be blown away. The bird “house” must be safe for birds (without sharp edges), securely fastened, easy to use, and protected from bad weather. Its location should be accessible to the person who will add the food, and inaccessible to cats.
Winter has always been and remains a difficult time for birds. Day by day, it becomes more and more difficult for these small animals to find food. Think about the birds and place a homemade feeder in your yard, because any available materials that we usually throw in the trash are suitable for working with. The article will present ideas and photos of ready-made solutions, the implementation of which will not require either complex drawings or any special skills.
DIY birdhouse
Think for yourself, it’s impossible to imagine all the splendor of the world around us without birds and playful trills. By their nature, these animals fill everything around them with harmony and life, and therefore even a tiny garden will look much nicer if there are birds in it.
By placing a feeder in a suburban area, you can daily observe the secret life of birds and the fascinating bustle of birds. Some of them will enter into fierce competition with other species, others will try to defend their own rights in the fight against their relatives. But they all always carefully look around, so as not to miss the moment of attack by any predator.

A bird feeder can be assembled with your own hands from a variety of materials. However, there are certain general rules that must be followed during assembly:
- It is best to place the feeder on the wall of outbuildings or directly on tree branches. At the same time, the height of the placement should be at least half a meter, so that it is convenient for you to feed the birds, and so that cats cannot climb up to them.
- For small birds, the birdhouse should be made of appropriate dimensions so that larger animals cannot get inside.
- The corner walls of the finished structure should not be prickly or sharp.
- It is better if the building material from which the bird feeder is made has good resistance to adverse conditions and moisture. Otherwise, the birdhouse will not last long and will have to be replaced.
- Include special sides and a roof in the design of the feeder that will protect food and birds from wind, rain and snow.
- And most importantly, the feeder itself should always remain comfortable for the feathered animals, so that it is easy for them to remove food!


Advice! Do not forget that birds remember the place of constant feeding, and therefore are ready to fly a long distance to the desired place - in our case, a feeder. Based on this, birds must be fed daily, otherwise they may die!
Plywood bird feeder
Of course, you can always buy a feeder ready-made in a store, but it’s better to make it yourself, moreover, if it only takes a couple of hours. A plywood feeder can be made with a gable roof, a flat one, or without it at all. You can also provide a special hopper compartment if you know that you will not be able to accurately monitor the amount of feed inside. Naturally, the work will require drawings; fortunately, there are a huge number of designs on the Internet with ready-made sizes and dimensions for cutting. All you have to do is decide on the solution you like.

Important point! Do not neglect the drawing: firstly, it will significantly facilitate and speed up the work. Secondly, this approach guarantees that in the end you will get exactly what is shown in the picture.
When deciding on the appearance of the future feeder, do not forget to take into account the bird population specifically in your region. After all, for example, pigeons are able to eat all the reserves, leaving tiny tits without food. Based on this, it is recommended to make the opening in the feeder so that large birds cannot get inside.

To work you will need:
- Beam with a section of 20 by 20 mm;
- Sheets of plywood;
- Sandpaper;
- Hammer;
- Water based glue;
- Electric jigsaw;
- Nail.


Operating procedure :
- First of all, all the elements are outlined on the plywood sheets, which are then cut out with a jigsaw. A square sheet of plywood with sides of 25 by 25 cm will serve as the bottom of the feeder. In this case, the dimensions of the roof should be made a little larger in advance so that water does not flow down the walls onto the feed during rain.
- To avoid burrs, the edges of the workpieces should be pre-treated with sandpaper.
- We cut 4 posts about 30 cm long from a block.
- If you want to make the roof flat, you should shorten a couple of bars by 2-3 cm.
- We fix all the parts with waterproof glue, and then fasten the structure with nails. We attach stands to the bottom of the feeder, to which we fix the sides.
- We fasten the roof to the racks with self-tapping screws.
- We install a feed container, add food and watch the bird feast.
Wooden feeder: photos and ideas
The main advantage of a wooden bird feeder is that this design holds its shape perfectly and can serve for a long time, which in turn is explained by the low reliability and high characteristics of the wood itself. To assemble the feeder yourself, you will need drawings, as well as at least minimal experience in working with tools.

To assemble a wooden feeder you will need a board about 18-20 millimeters thick.
Next, we will consider a simple design option that you can easily do yourself, using a simple photo instead of a drawing. For work you will need: glue, timber for racks 2x4.5 cm, nails, a piece of plywood sheet measuring 25x25 centimeters for the bottom, self-tapping screws and a couple of sheets of plywood 22x35 cm for the roof.

Work order:
- The first step, of course, is to assemble the sides and bottom of the structure. The bars, adjusted to the dimensions of the lower part, are assembled for fitting, the end sides are coated with adhesive, after which we strengthen the fastening using self-tapping screws. As a result, we get a small frame. In this case, it is recommended to make two parallel sides slightly larger than the base, about 5 centimeters, so that in the future you can install perches to them.
- We fix the bottom of the feeder to the finished frame and nail it.

- We fasten 18-20 centimeter racks from the inside of the resulting structure.
- We supplement the racks with rafters. To do this, we install a pair of bars at right angles, strengthening the joint area with the help of an additional bar. As a result, you will see a right angle with equal sides. You will need another similar part.
Important point! Fasten the blocks at right angles to the table; in this case, it will be correct if the wide side is on the table, and the additional block is on top!
- Next, we fix the rafters to the racks using self-tapping screws.
- We attach sheets of plywood to the posts, which will act as a roof. If you have a wooden corner, you can use it by making a skate.
- Don’t forget about the elongated sides - glue sticks or glazing beads to them, which will play the role of perches.

This way you can easily and quickly assemble a bird feeder with your own hands. The finished structure can be hung on a wire by a hook by drilling several holes in the ridge, or placed directly on top of any pole on the site. Inside the house, the food will be perfectly protected from rain and wind, and several birds will be able to fly to the feeder at once. Birds will love this kind of cozy dining room!
Photo instructions
If you have a gazebo on your country property, then it would be a great idea to place a simple open feeder next to it. In this case, it will be sufficient to build a bottom and a side.

If you want to cover the feeder with varnish or paint, you should use water-based formulations only! This approach will protect the birds.
Birdhouse from a milk or juice box or carton
A beautiful bird feeder can be made from such simple things as a bag or box of juice or milk. Moreover, even a child can make a birdhouse. To work you will need:
- Stationery knife or scissors;
- Juice or milk box;
- Marker;
- Wire or nylon rope;
- Band-Aid.
The first step is to accurately mark and cut small holes on opposite sides of the box. The lower part of the window should be covered with adhesive tape to make it safe and convenient for the birds to fly out and take food from the feeder.

Using scissors, we make tiny holes under the holes; later here we will insert the cardboard rolled into a tube, left over from the holes made earlier. We insert a rope or wire through the holes in the bent corners of the future birdhouse and tie it to the branch. Ready!
The finished feeder can be placed on a tree branch, since the structure will not sway much in the wind. Feeding slots, which can be made on adjacent sides rather than opposite ones, will once again contribute to this. You can secure the craft more firmly if you attach a wire to one side of the feeder, tying it to a tree.

You can make a beautiful birdhouse with your own hands from several juice boxes. In this case, it is worth cutting off the third part from the first piece, cutting out a hole for the birds in the front - the element will become the bottom of the feeder or the feeding board. We cut the second blank along the sides, leaving the upper part untouched. We combine the components so that we end up with a triangle. You can connect the elements using tape or glue.
Crafts from small plastic bottles
Option 1. Simplest
We cut a couple of small holes symmetrically on both sides of the bottle. What shape is up to you to decide; they can be either rectangular or square, round or arch-shaped. Leave jumpers between the holes. The visor will cover your feathered friends from the rain; you can make it by making a cut in an inverted “P” shape, then bending the plate up.

The bottom of the hole in the new birdhouse should be covered with some material, be it fabric tape or adhesive tape - this will remove the sharp edges of the bottle, allowing the birds to sit comfortably.
We make holes at the bottom of the bottle at the same level so that later we can place the stick in a horizontal plane - a kind of perch for birds.

You can place the finished bottle feeder directly on the tree by wrapping the jumper with rope, tape or any other material, as in the photo.


Make holes in the bottle cap by inserting the ends of the twine into them and tying them into a knot, thus obtaining a loop with which you can conveniently fix the birdhouse on the branch of any tree in the yard.
Option 2. Hopper feeder
A bunker-type bird feeder is advantageous in that food can be poured into it in reserve, up to several days. At the same time, as the birds eat part of the reserves, the food will be automatically replenished.

This design will require a pair of identical bottles. The first one should be marked with a marker, then make small holes in the bottom, similar to the first feeder, and remove the top third of the bottle. We make a couple of holes at the top at the same level - later twine or tape will pass through them for hanging the feeder.

In the case of the second bottle, you need to cut several holes in the narrowest place - it is through them that the bird feed will pour out.
You should not make large holes; if necessary, they can always be expanded over time.
Finally, fill the bottle with food and screw the cap back in place, then simply place it in the rest of the first bottle. Ready!
Option 3. Spoon design
A hole is made inside the cork, where the twine is then inserted. After this, a couple more holes are made at the same level according to the dimensions of the spoon. The final hole is cut into the bottle itself, above the deep cupped area of the spoon. At the same time, it should be slightly expanded so that the birds feel comfortable eating in the feeder. At the end, all that remains is to fill the birdhouse with food.

A little advice! Moisture may accumulate inside the craft over time. You can avoid this with a simple solution: using a tiny nail or a heated needle, make several holes at the bottom of the bottle - this will allow moisture to escape as it accumulates.
Craft from a 5-liter bottle
Surely everyone has at least one 5-liter plastic bottle that lies idle. A bird feeder is quite easy to make with your own hands from this material. In addition, the volume of the bottle will allow you to place much more food inside for birds, and well-made holes will make it possible for several animals to feed at once!

Using a bottle as a birdhouse is a fairly quick and easy solution that kids can do too: just use wire or tape to place the structure on a tree and place a small supply of food inside. The only equipment you will need is a utility knife or pruning shears and, of course, the bottle itself.
It’s worth making a hole depending on how you plan to place the feeder on the tree:
- Vertically - 3 rectangles or a pair of square holes are cut at a distance of 5-7 centimeters from the bottom of the bottle;
- Horizontally - a pair of large holes are cut from the neck and bottom.

It is convenient to hang the future birdhouse from a bottle by twine or wire by the neck. When choosing a horizontal placement option, a couple of holes are made on the wall of the bottle, into which a rope is then passed for tying to a branch.
You can avoid the craft from swaying if you place a quarter of a brick inside, which will weigh down the feeder. Load the food on top and there will be no problems with rocking.
Bunker
If desired, a 5-liter bottle allows you to make a bunker feeder yourself. To do this, in addition to the mentioned bottle, you will need a couple more 1.5 liter bottles, a rope, a stationery knife and a marker.

Work order:
- First of all, we mark future holes for bird holes at the bottom of the workpiece. The ideal option is one large one and a couple of smaller holes. The first should fit a 1.5-liter bottle.
At the same time, it is better to cut a large hole in the shape of an inverted letter “P”; with this approach, the visor bent upward will cover the birds from rain and snow. As in the case of 1.5-2-liter bottles, the bottom edges of the openings should be sealed with some material, for example, adhesive tape, to avoid injuring the birds on sharp corners.
- We also make holes inside the smaller bottle in those places where it will touch the bottom of the 5-liter container. An additional hole will be required just above the indicated location. Through them, as the food is eaten, it will spill into the feeder.
- It is necessary to make a round hole inside the lid of a 5-liter container so that when fully screwed in, the thread of the neck of the second bottle is visible from above.
- Remove the top and neck of the second container to create a funnel. We put it on the neck of the bottle placed inside, and then screw it with a cork.
- This creates a beautiful and convenient bunker bird feeder. All work is done simply and quickly with your own hands. All that remains is to fill the new birdhouse with food and place it on a branch in the yard.
By showing a little imagination, you can always use the same plastic containers to make interesting and unusual crafts for birds, which will not only become a real boon for birds, but will also nicely decorate the design of your garden.


Using a shoe box
For self-assembly of a bird feeder, any material lying idle on the balcony can be used. Boxes of shoes, food and utensils can also be used!
Preference should be given to boxes and cardboard, having a laminated coating! Thanks to it, the finished feeder can last much longer.
The main advantage of a birdhouse out of the box is that the initial blank already has a roof, walls and bottom. All you have to do is make small holes on the sides of a rectangular or square shape.

For work you will need: tape, a knife or scissors, and a nylon cord. As you know, cardboard cannot be called a durable material, especially when used outdoors. Therefore, it is worth wrapping it with tape, thanks to which the feeder can last at least until the next season. After making holes on the sides and fixing the new birdhouse with a cord on the tree, fill the container with food, and the birds will not have to wait long.
To prevent the craft from being blown around too much by the wind, you should place some pebbles or sand at the bottom of the box.
You can do everything differently. The lid of the box is placed perpendicularly so as to act as a stern stand, while the second part will act as a roof and side. In this form, the structure is glued with tape for greater reliability. A pair of hooks are made from a piece of wire, with which the “ceiling” of the birdhouse is pierced. The hooks are twisted and bent from the inside. Using hooks, the bird feeder can easily be fixed on a branch, as shown in the photo. All that remains is to put down the food and wait for your feathered friends.

Video ideas
Hello, Dear readers of the site season-stroy.ru
Continuing the theme of caring for our smaller brothers, I previously wrote about how to make one for starlings, today we will learn how to build. This is especially true in winter, when there is not enough natural food, and feeding the remaining birds that spend the winter in our area is most necessary.
In this article I offer my version of a bird feeder with detailed diagrams and drawings.
Making a bird feeder. Drawing of a feeder.
Before proceeding directly to the process of making a bird feeder, let's prepare a workplace.
For work we need the following tools - a jigsaw or hacksaw, a hammer, a screwdriver. We will fasten the structure using self-tapping screws, nails and wood glue.
The material we use is a block of wood, plywood - 4 mm, beading, a wooden corner, mostly remnants from the previous ones.
So let's get started.
1. We begin assembling the feeder from the base. To do this, we use bars pre-cut to size. We lay them out as shown in the figure and secure them with self-tapping screws, gluing the junction points. The result is a box like this.

2. Cut out a square 23 x 23 cm from plywood. It will serve as the bottom of the feeder. Then we nail it to the resulting box.

3. We attach 2 side bars, and later we will make perches on them. We use a block 33 cm long, screw it onto self-tapping screws so that the protrusion of the ends on each side is 5 cm.

4. We install the racks under the roof. We fix four 20 cm long posts on the inner sides of the box as follows.

5. Let's start assembling the roof. To do this, we separately assemble two frames according to the diagram.

Now we attach the frames to the racks using self-tapping screws and glue. One note: to prevent the block from cracking when screwing in the screw, it is advisable to pre-drill a hole for it.

6. We make the roof. As such, we use plywood, cut into two rectangles 21 x 33 cm. We level it and nail it to the frame.

7. To give the roof a finished look, we make a ridge. For the ridge, a wooden corner is suitable, which we glue with wood glue.

8. All that remains is to make the crossbars, the so-called perches. For this I used regular glazing bead and wood glue.

9. I plan to hang the feeder on a tree, and to solve this problem these screws came in handy.
Having previously drilled a hole of the required diameter in the ridge, screwed in two screws.

The product will look more neat and aesthetic if you cover the heads of the screws with wood putty and then sand them with sandpaper until they are smooth.
To extend the life of our craft made of wood, I treated it with a protective solution. In this case, I do not recommend using impregnation with a solvent or white spirit; it is better to use a water-based composition.
Well, to add some zest to our creation, I decided to paint the feeder. I got hold of an airbrush from a friend, mixed some paint, prepared a stencil, and this is what came out in the end.


Now all that remains is to hang it and pour in the food. Oats, dried berries, sunflower seeds, millet, pieces of fruit, etc. are suitable as such. For the feeder, choose a place that is closed from the wind and inaccessible to cats.
So, after spending a little time, they did a good deed. I'm sure everyone can do it DIY bird feeder, and thereby contribute to the care of animals.
If the article was useful to you, subscribe to site updates and share with friends on social media. networks.
We offer you a selection of different options for making a bird feeder with your own hands. Here we have collected the best master classes and step-by-step lessons, as well as dozens of original ideas and photos for inspiration. In this article you will find crafts of varying degrees of complexity: from those that will take no more than 5 minutes to create, to those that will require a lot of tinkering.
Creating feeders is one of the best ways to organize excellent leisure time and at the same time help feathered creatures survive the cold. This is a really useful and very kind thing - by hanging a feeder, you will prevent the birds from dying of hunger (in urban conditions, this, unfortunately, is quite possible).
What should you pay attention to?
We have previously told you about how to choose the right wood for creating birdhouses. If you are planning to make a wooden feeder, check out our tips. However, feeders can be made from other materials. Here are some general important tips before starting the creative process.
- If you want to make your feeder colorful, paint only the outside to prevent birds from accidentally pecking and ingesting harmful chemicals.
- When creating feeders, make sure that the hole into which the bird flies is smooth on all sides (this is especially true for bottle feeders, the edges of which can get scratched if not carefully cut). This will help protect birds from accidental injury.
- If you use glue or varnish in your work, carefully study their composition. They should not contain toxic elements.
- Do not make paper feeders too large - if a bird sits on it, the craft may tear and harm the bird.
- Remember that wooden feeders can develop dangerous mold, and metal feeders can develop rust. Therefore, it is better to protect them with a special coating (without harmful chemicals).
- It is important to check the cleanliness of the feeder from time to time and examine it for damage.
Made of wood
Let's move on to the manufacturing process. A standard wooden feeder is made in the form of a birdhouse or house. They can also be made in several variations. We offer you the most popular of them.

House with vertical posts
Please use this dimensional drawing. The picture is clickable, and it contains step-by-step instructions for assembling the feeder with your own hands.

Please note that vertical posts can be replaced with thick branches.

The hut can be made of plywood, but it will need to be varnished.

Vary the size and height of the sides.

House with side walls

An approximate assembly diagram for this hut looks like this. Please note that dimensions can be changed and adjusted proportionally.

The side walls can be made solid. Interesting decor will add attractiveness to the house.

You can cut neat round holes in the side edges. Don't forget to sand them down so the birds don't pick up the splinter.


If the design turns out to be small, it is better to fill it with cereals and seeds, glued together into a special treat. More on this below.
Edible feeder
To feed the birds, you can do without a traditional feeder. Let's prepare special "cookies" for the birds and simply hang them on the branches.

We will need:
- 2 packs of gelatin;
- 2/3 glass of water;
- 2 cups of food (seeds, cereal);
- skewers;
- cookie cutters.
Pour hot water over the gelatin and wait for it to swell. Then mix it with cereal and seeds. Mix the mixture thoroughly and fill the cookie or muffin molds. Insert a skewer to make a hole.
When the mixture has cooled and “set”, carefully remove it from the mold and remove the skewer. Insert thread into the hole.

If you don't have molds, spread the gelatin mixture onto a toilet paper roll and roll it over the food to help it stick. Let it dry, then attach it to the branch.

You can also roll the mixture into lumps and place them in large mesh bags.

Birds really like this treat.
Bonus
Didn't find a suitable option? This video presents 50 more original ideas and a variety of ways to make a bird feeder from wood or bottles.
Choose any of the presented feeders, decorate it, fill it with seeds and cereals. This will give you a wonderful opportunity to observe the life of birds and do a good deed!
Views: 7,658
A bird feeder can become not only a vital help for our feathered friends in the winter, but also an excellent decoration for the site. Anyone can create it, as you can see below. Below we will look at the process of making the most interesting, in our opinion, feeders from various available materials and, of course, wood.
Wooden feeder - detailed analysis with drawings
A gable wooden feeder is the most common and at the same time the most complex design of all that we will talk about in this article. You will need a set of tools:
- hacksaw;
- screwdriver;
- tape measure and pencil;
- electric drill;
- sandpaper.
We start work with design, but before making a drawing, be sure to decide on the design and type of birds you want to feed - the dimensions of the feeder depend on this. As a basis, take the finished project, which is presented to your attention below with dimensions and assembly drawing. The proposed feeder includes a tray and a gable roof on four posts. If you wish, you can adjust the proposed dimensions or even change the design, for example, fix the roof on two racks or on solid plywood sides.
If you decide to create your own, unique project, it is not at all necessary to draw the design to scale with high accuracy. Pay attention only to the most important thing - try to depict all the details in detail, even by hand, and indicate their sizes in millimeters. This will avoid errors during the manufacturing process of the structure.

After preparing the project, you need to make all the details of the feeder. We start from the base, i.e. bottom of the pallet - cut a rectangle out of plywood or knock it together from boards. The dimensions of the base determine the area of the future feeder. Immediately make the sides for the pallet - cut two bars along the length of the base and two along its width. It is advisable to use rectangular bars for these purposes, for example, 20x40 mm.
For the manufacture of racks in the proposed project, square bars of 15x15 mm are used. From them you need to make four segments of the same length. If you want to make a feeder for small birds, then the stands should be low, and vice versa - so that large birds feel comfortable in the feeder, make the stands longer. Now you need to create two identical triangles from bars of the same cross-section as the posts. They will serve as roof trusses. The base of the triangles should be several centimeters wider than the pan so that precipitation does not penetrate inside. You can take any angle of the slopes.
Then make a ridge girder from the same block (in the proposed drawing this part is shown as number 8). Its length should be slightly longer than the length of the pallet. When the frame parts are ready, the roof can be sheathed, i.e. stingrays. The easiest way is to cut them out of plywood in the form of rectangles, but you can also use boards for these purposes. They need to be placed on the roof in a herringbone pattern so that water does not leak inside through the cracks. Such a roof will look even more beautiful than one simply covered with plywood.
Do not treat wooden parts with chemical antiseptics, as the smell of chemicals can scare away birds. To make the feeder durable, use moisture-resistant wood (larch, pine) to make it. Additionally, the wood can be treated with linseed oil.
Now all that remains is to assemble the feeder from ready-made parts. Start with a pallet - attach bars around the perimeter of the base that will serve as sides. It is better to use screws rather than nails to connect all the parts if you want the product to last longer. To prevent the wood from cracking when screwing in screws, pre-drill holes for them. Racks are installed at the corners of the resulting pallet on the inside. Attach them to the base and sides strictly perpendicular to the pallet. True, sometimes the racks are specially placed at a slight angle so that the structure resembles a tower in shape.
Attach trusses to each pair of end posts. They can be placed overlapping or butting, the main thing is that the triangles are on the same horizontal line, otherwise the roof will turn out skewed. Connect the trusses with a ridge girder, which will give rigidity to the structure. Attach the roof sheathing to the roof trusses - planks or rectangles of plywood. To ensure the tightness of the joint between the slopes, attach a wooden corner, a piece of linoleum or other material that does not allow moisture to pass through to the ridge.
Lightly sand the finished feeder with sandpaper so that the surface is smooth, without any nicks. Then screw a couple of ring screws into the ridge, by which the structure will be suspended. The work isn't finished yet. If you want the product to be a garden decoration, it must be decorated. You can do this in several ways:
- paint with paints. It is better to use water-dispersed paints that have no odor;
- decorate with carvings. In this case, it is better to process the parts before assembling the structure;
- apply patterns with a burner;
- attach all kinds of decorative elements, for example, you can make a beautiful decking of branches on the roof.
The feeder, made almost entirely from branches, looks interesting. It is manufactured in the same way as the design described above. The only thing is that all the bars are replaced with branches a finger and a half thick. It must be said that there are an infinite number of options for designing a feeder. Embody your own ideas, and then the product will surely become a source of pride for you.
Five-liter bottles - the easiest way
You can make beautiful feeders from five-liter plastic containers as quickly and effortlessly as possible. In fact, such bottles are almost ready-made feeders. All you need to do is cut out the holes and decorate the design. To make the holes even, use a marker to mark the cutouts on four sides of the eggplant. It is best to use a template, in which case the cutouts are guaranteed to be the same. Then cut through the plastic using a sharp knife according to the markings. The top of the windows may not be cut to the end, which will allow you to get U-shaped cutouts.

From the resulting “tongues” make canopies for the windows - cut them in half and bend them. Then sharpen the cutouts with a file or even a nail file, and cover them around the perimeter with tape or tape. As a result, the product will look neater, and besides, the birds will not be injured by clinging to the opening with their feathers. Make a couple of holes in the lid to attach a rope or wire on which you will hang the feeder. To ensure that the structure hangs evenly, the holes must be located in the center. In addition, when hanging the feeder, fill the bottom with sand or put a few pebbles there so that it does not sway too much in the wind.
Now the resulting product needs to be decorated, because in its original form it does not look like an element of the decor of the site. Use decorative stickers or even paints to decorate. Another interesting option is decorating with a rope, which is wound around the top of the bottle and glued to the surface. Using the same scheme, you can make a feeder from a mayonnaise bucket. True, due to the small dimensions of the bucket, only small birds will be able to feed in it.
House for birds made of pumpkin - no Halloween
There are many options for making a feeder from, but if your site is decorated in a rustic style, we recommend decorating it with a pumpkin product. For manufacturing you will need the following materials:
- pumpkin;
- several sticks as thick as your little finger;
- a pair of wire staples;
- twine.
Cut the pumpkin crosswise into three parts and remove the seeds. We only need the lower and upper parts. You can use the middle one for its intended purpose. Make a hole in the center of the bottom of the pumpkin so that you can thread a rope folded in half through it. Do not make the hole too large, otherwise food will spill through it. Then also make a hole in the center of the "lid" of the pumpkin. Insert 4-5 racks made of wooden sticks, pencils or even metal tubes into the walls of the lower part and place a “lid” on them.
Now measure the required length of string and tie its two ends to the staples. After this, attach the staples to the back of the “bottom” of the pumpkin, and thread the rope through the bottom and top holes. The product is now completely ready for use. I must say that you can make bird feeders from pumpkin even easier and faster. To do this, as in the previous case, cut it into three parts and remove the seeds. Then the “walls” of the lower part must be pierced through with two sticks located perpendicular to each other and parallel to the bottom. The edges of the sticks should protrude outward, i.e. behind the walls, a few centimeters. Tie ropes to the protruding edges of the sticks to hang the feeder.

If the first feeder can be conditionally called “winter”, since it has a roof, then the second one is exclusively a summer option. True, if you hang it under a canopy or canopy, then the birds will be able to feed in it in winter. You can also make a feeder from a whole one, i.e. uncut pumpkin. In this case, holes are cut in its machines, i.e. windows. All the seeds are simply scraped out through them - and the feeder is ready. Since pumpkin products are beautiful and original in themselves, they do not need additional decoration.
What can you make from wooden spoons?
You can make an original feeder from an ordinary plastic bottle with a volume of one or two liters and a couple of spoons. The length of the spoon handles should be 2–3 cm greater than the diameter of the bottle. Instead of spoons, of course, you can use ordinary wooden sticks or bars, but spoons will provide the product with a more interesting and original look. Start by making through holes in the sides of the plastic bottle so that the spoon handles can pierce through it. For one feeder, two or three spoons are enough, which should be located perpendicularly at different levels. Please note that the hole on the scoop side of the spoon must be made slightly larger than the diameter of the handle so that grain can spill through it.

Then insert the spoons into the holes made and immediately pour the food through the neck. Make a couple of holes in the center of the bottle cap and tie a rope to it, then screw the cap onto the neck. The principle of operation of such a feeder is extremely simple - food, poured right into the neck, fixes the spoons. Waking up through the hole, he ends up in the scoop. The latter serves not only as a receptacle for food, but also as a perch for birds. You can decorate such feeders using the same principle as products made from five-liter eggplants - use stickers and paints.
Boxes and Tetra Packs - what is not the material?
You can even use cardboard boxes left over from purchasing electrical goods to make cute feeders. In addition to the boxes, you need to prepare:
- scotch;
- nylon thread;
- stationery knife.
The work begins with cutting out the windows. As in the cases described above, to make the product neat, apply markings using a template. You can cut the windows according to the markings using scissors or a sharp stationery knife. You need to decorate the product immediately. For example, the box can be covered with colored cardboard or painted. Since cardboard does not withstand exposure to water, the box must be carefully taped. Glue the strips with an overlap of about five millimeters.
To make a gable roof, take a sheet of cardboard from another box and bend it in half. If the box is small, you can take two sheets of cardboard and glue them on both sides with tape. Attach the roof with wire or nylon thread. To do this, holes must be made in the areas where the roof adjoins the frame. Just like the box, cover the roof with tape. To finish the job, make two holes for the rope in the center of the roof.
It must be said that instead of a box you can use Tetra Packs, for example, for kefir/milk. In this case, the manufacturing process looks slightly different - in one Tetra Pak the wide wall is completely cut out. The result is a feed tray.

Cute ones made from cardboard juice boxes.
To make a gable roof, you will need a second Tetra Pak of the same type. It needs to be cut lengthwise from the top to the bottom; we do not cut the bottom itself. The cut should go through the center of the narrow walls. Then we turn the pack over and move the walls apart, the result should be the letter “L”, i.e. finished gable roof. We put the roof on a pallet and “sew” it to it with wire or nylon threads. Since Tetra Packs are resistant to moisture, they do not need to be covered with tape.
Mesh tube and saucer feeder - simple design
It will not be difficult for any home craftsman to make his own feeder from a metal or other suitable mesh rolled into a tube. You won’t need a lot of materials for it:
- the mesh itself with a suitable cell size. You can also use a ready-made mesh tube, for example, from a filter. It is advisable to choose a beautiful tube with an unusual cell shape or simply paint it, since the appearance of the product will depend on this;
- two plastic saucers from under flower pots. You can use one saucer and a plastic lid. The main thing is that the latter is larger in diameter than the tube;
- a threaded metal stud and a pair of nuts and washers.
The work is extremely simple - roll the mesh sheet into a tube and fix it in this position with wire or nylon threads, tying both ends of the sheet with them. If the saucers do not have holes in the center, or they are small, drill them out. The diameter must match the diameter of the stud. In one of the saucers, additionally drill a couple of small holes for hanging the product.

It’s not difficult to make a feeder from a mesh tube and saucers.
Place the tube on the saucer and insert the pin so that it fits into the hole. Then pour food into the tube and cover it with a second saucer or lid. Carefully tighten both saucers with nuts and washers. Do not overtighten the nuts, as the mesh walls may become deformed.
Log, drill and chisel - a universal set
Finally, let’s look at another version of a wooden feeder, which is made from logs. We recommend that only those who have at least the slightest ability to work with wood tools take on the task of making it. The fact is that, on the one hand, this bird feeder is easier to make with your own hands than a gable one, since it is done “by eye” from start to finish, on the other hand, the process of its manufacture itself is more labor-intensive and complex.

Manufacturing from logs is a rather labor-intensive and complex process.
It is desirable that the workpiece (log) be of soft wood. It's even better if you find a log with a rotten core, in which case the work will be much easier. Tools you will need:
- electric drill and long drill, preferably large in diameter;
- chisel;
- hacksaw.
First you need to cut two round pieces of wood a few centimeters thick from the log and set it aside. Subsequently, they will serve as the side walls of our feeder. Then we will outline the thickness of the walls of the future “dugout”. To do this, draw circles at the ends of a smaller diameter than the log. The difference in diameters should be 2–3 cm - this is the thickness of the walls. Next you need to do the most difficult work - hollow out the middle of the log. To do this, drill many holes next to each other using a long drill bit. Remove all perforated interior using a chisel and hammer. The result should be a hollow block.
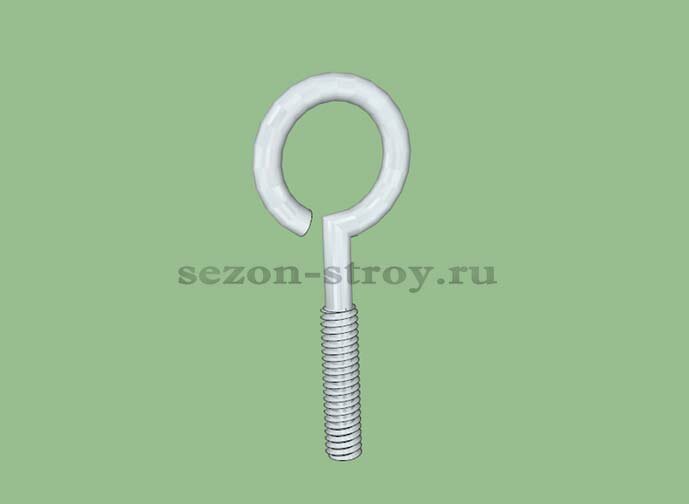
Cut a thin strip from the side of the log to provide the birds with access to the treat. The easiest way to do this is with a jigsaw. The wider the strip, the larger the birds will be able to visit the feeder. Now you can install the sidewalls, securing them to the ends of the workpiece with self-tapping screws. To make hanging the product more convenient, screw two self-tapping screws with rings on top. This completes the work.
It must be said that feeders made from logs are not only very unusual, but also universal. They can decorate absolutely any garden, regardless of the style of the landscape design. Products made from birch look especially beautiful, but hollowing out the core from birch logs is very difficult due to the hardness of this species. Finally, we note that it is not at all necessary to strictly adhere to the instructions outlined above. Taking them as a basis, realize your unusual ideas!


