The need to create an armored belt under the Mauerlat during the construction of the roof is not always obvious to novice builders. They often create a misconception about the reinforced strengthening of the foundation for the construction of the roof as something unnecessary and superfluous. However, the armored belt is an important intermediary that distributes the load of the roof on the walls of the building. Consider why an armored belt is needed under the roof, what functions it performs and how to do it yourself.
In this article
The need for an armored belt
Let's start the consideration of the reinforced base under the roof with its main functions.
Load transformation
The rafter legs transfer the load to the Mauerlat, the main concentration of which is in the places where the rafters rest on the walls of the house. The task of the Mauerlat and armored belt is to transform this load, making it uniform. Mauerlat is affected by two types of loads. This is the weight of the roof itself, the snow accumulated on it, the impact of wind gusts on the roof and other natural phenomena.

Another load is associated with the bursting of the walls of the building by the rafters. With an increase in the weight of the roof, it increases significantly. Modern materials for the construction of buildings, such as expanded clay concrete, aerated concrete, with a number of positive characteristics, are not able to withstand such a bursting load. Before mounting a Mauerlat on them, it is imperative to create a reinforced belt.
Brick walls have greater resistance to point loads, therefore, to mount a Mauerlat on them, it is enough to use anchors or embedded parts. However, experts recommend the use of an armored belt for brick walls if the building is being built in an earthquake-prone region.
Roof fastening to the house
The most important and main task of the Mauerlat is the strong fastening of the roof to the house. Thus, the Mauerlat itself must be securely mounted to the building. 
The main tasks of the reinforced base under the roof can be reduced to the following points:
- Maintaining the strict geometry of the building in all situations: seasonal fluctuations in the soil, earthquakes, shrinkage of the house, etc.;
- Alignment of walls in a horizontal projection, correction of inaccuracies and flaws made during the construction of walls;
- Ensuring the rigidity and stability of the entire structure of the building;
- Uniform and distributed distribution of the load of the roof on the walls of the building;
- The possibility of a strong attachment to the reinforced base of important elements of the roof, primarily the Mauerlat.

Calculation of the reinforced base under the roof
The process of reinforcing the base under the Mauerlat begins with planning and calculations. It is necessary to calculate the dimensions of the armored belt. According to building standards, it should be a width equal to the width of the wall, and not less than 25 cm. The recommended height of the reinforced base is around 30 cm. The armored belt and the Mauerlat laid on it should encircle the entire house.
If the walls are built from aerated concrete, then the top row is made of stone in the form of the letter U, which creates the formwork. It is necessary to lay reinforcing elements in it and pour the entire structure with a cement solution. 
Before starting the actual construction work, it is also necessary to prepare the necessary tools and building materials. To create a reinforced base under the roof, you will need:
- Concrete mixer for high-quality mixing of cement mortar;
- A specialized vibrator that disperses the cement mortar in the formwork, preventing the creation of air voids in the structure;
- Materials for the construction of formwork;
- Fittings.

Installation technology
Installation of the armored belt begins after masonry work. It is necessary to wait for the masonry to dry completely.
Creation of formwork and laying of reinforcement
The first stage is the construction of formwork. In buildings made of aerated concrete blocks, the last row of masonry is made from blocks in the form of the letter U. If these are not available, then the outer part of the formwork is created from sawn 100 mm blocks, and the inner part is made from boards. Installation is carried out with strict observance of the horizontal level.
A frame of reinforcement is laid in the formwork. Its longitudinal part is formed from 4 reinforcement bars with a diameter of 12 mm or more. Transverse fasteners are made of rods of 8 mm in diameter, subject to a step of no more than 25 cm. In projection, the frame looks like a square or rectangle. The frame parts are mounted with an overlap of up to 20 cm. The joints are connected with a knitting wire. In solution, such a reinforced frame exists as a monolithic one.

Laying the frame provides for compliance with certain rules:
- The thickness of concrete from the frame to the formwork is not less than 5 cm;
- To comply with this rule, stands made of bars of the desired height are placed under the frame.
An important part of the work is the strengthening of the formwork frame. If this is not done, then it will be crushed by the weight of concrete. This can be done in various ways:

Installing fasteners for Mauerlat
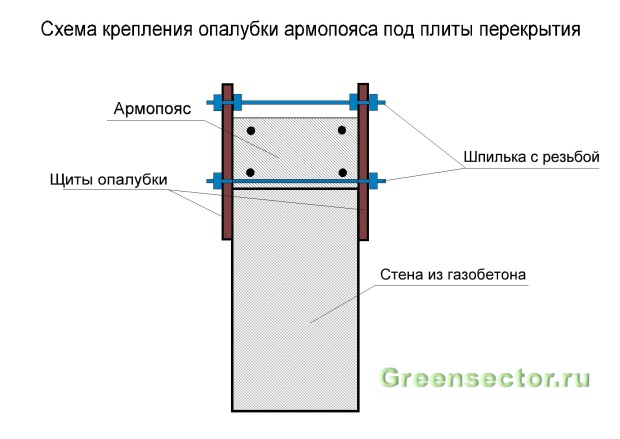
After working with the formwork and laying the reinforcement, you can proceed with the installation of fasteners for the Mauerlat. We recommend using threaded rods. It is convenient to purchase studs with a diameter of 12 mm. The length of the studs is calculated taking into account the fact that their bottom is attached to the frame, and the top protrudes 2-2.5 cm above the Mauerlat.
Installation of studs is carried out taking into account:
- There is at least one hairpin between two rafters;
- The maximum installation step is no more than 1 meter.

Pouring with cement mortar
The main feature of the reinforced base under the Mauerlat is its strength. It is possible to achieve it only when pouring concrete mortar at a time.
Concrete not less than M200 is used to create a concrete mix. The best mixture for filling the belt is prepared in the following proportions:
- 1 part of cement M400;
- 3 parts of washed sand and the same amount of rubble.
The use of plasticizers will help to increase the strength and hardening rate of the mixture.
Since a lot of mixture is required to create an armored belt at once, it is advisable to use a concrete mixer and a special pump for supplying the solution. In the absence of equipment, the help of several people will be required for the preparation and continuous supply of the finished mixture.
After pouring concrete into the formwork, it is important to expel all air from possible air pockets. For this, a special vibrator device and simple fittings can be used, with which the mixture is pierced around the entire perimeter.
Mauerlat installation

Removal of the formwork from the armo-belt is possible as soon as the concrete hardens sufficiently, and installation on the Mauerlat structure can be started no earlier than 7-10 days after the armo-belt has been poured.
Before laying the Mauerlat parts must be prepared in a special way:
- Mauerlat beam is treated with antiseptics;
- The connections of its individual elements are made by the method of a direct lock or oblique cutting;
- Mauerlat is applied to the armored belt and places for studs are marked. Mounting holes are drilled.

The laying of the Mauerlat is preceded by covering the reinforced base with a layer of rolled waterproofing, as a rule, roofing material is used for these purposes.
Mauerlat is fastened with a large washer and nut; locknuts are used for safety. After tightening all fasteners, the remaining tops of the studs are cut off with a grinder.
Summing up
A reinforced base under the Mauerlat is more of a necessity than a luxury. The roof structure has a rather large impact on the walls of the house, which, although evenly distributed due to the Mauerlat, can adversely affect the strength of the entire building.
The creation of an armored belt is necessary in buildings made of gas and expanded clay concrete due to the fragility of these materials, in areas with high seismic activity. It is also advisable to strengthen the walls under the Mauerlat when creating heavy roofing structures.
Reinforcing the upper part of the walls is not a difficult job that requires the involvement of specialists. Subject to a number of rules and the involvement of assistants, it can be done on its own.
The manufacture of a reinforcing belt over the masonry of the wall guarantees the high strength of the structure. This is especially important for buildings whose walls are made of porous materials with limited bearing capacity, such as foam concrete, gas-filled blocks or expanded clay concrete. The list can be supplemented with brick walls of some structures.
When do you need an armored belt and how to make it
This node plays the role of an “intermediary” between the building frame and the superstructure, consisting of a rafter system and a roofing pie. Point loads from each rafter leg are transferred to the supporting structure and are evenly distributed along the upper plane of the walls. The nature of the loading consists of two vectors:
- Vertically directed, due to the mass of the truss system and wind loads on the roof.
- Horizontal, transmitted by an inclined element - a rafter. In the end, the bursting force can lead to deformation of the walls and their destruction.
Therefore, the reinforcing belt is an indispensable element if the building box is made of foam concrete, expanded clay concrete, brick and similar materials. It should be noted that the armo-belt device does not eliminate the need to install a Mauerlat, since these nodes perform fundamentally different functions:
Strictly speaking, in most modern building designs there are several armored belts. The first of them is located below, under the box of the building, and has its own name - grillage. Its purpose is the same - the distribution of loads on the foundation. The second and subsequent ones are higher, the last one is on the top of the wall under the Mauerlat.
It should be understood that the grillage is the main strengthening element. The device of subsequent reinforced belts (due to the installation of more powerful reinforcement) without a lower armored belt is pointless and is a waste of money.
 Interfloor armored belts give the building additional strength
 Dimensions and design of the armored belt
Usually the width of the reinforcing belt under the Mauerlat should approach the width of the wall masonry. The minimum size is 25x25 centimeters. When using aerated concrete blocks for masonry walls, the top row is made of special U-shaped blocks, designed specifically to create an armored belt.
 U-shaped blocks simplify the filling of the armored belt, being a formwork for it
 On brick walls, the role of the outer wall of the formwork is played by half-brick laying, and the inner one is made of various materials, such as OSB, plywood, boards and other similar products.
If it is planned to build a house with an attic, in the truss system, as a rule, racks, beds and other details characteristic of such a structure are used. In this case, the load should be distributed to the walls inside the house, they also need to arrange an armored belt. In all other cases, such a support is arranged only along the outer perimeter of the walls.
Device technology
Various technologies have been developed and applied for the manufacture of this device. The difference between them lies in the materials of the formwork and the methods of its construction, as well as in the methods of reinforcing.
Formwork for armored belt
The formwork is made from boards or sheet materials. The ligament along the bottom is made with bars of 50x50 millimeters, which set the distance between the walls. To give the structure rigidity, inserts are made of threaded studs M8 in size. Inside the formwork, a plastic tube is put on the stud, the length of which corresponds to the size of the armored belt in width. After the concrete has matured on the 7th - 10th day, the formwork can be dismantled, while the lower bars and plastic tubes remain in the concrete mass without significantly affecting its strength characteristics.
Photo gallery: types of formwork for armored belt
The board is the most common material for the formwork of the armored belt. When pouring the armored belt, the wall is insulated to cut off the "cold bridge"
The upper edge of the formwork must be set strictly horizontally, using the water level. At the same time, it should be taken into account that the level of pouring concrete will be controlled precisely along the edges of the formwork.
Before pouring the armored belt, embedded parts are installed. Screw studs and anchor bolts are attached to the reinforcement with knitting wire, and wooden bars are simply poured with concrete. Mortgages are needed to solve the following tasks:

Reinforcement
To simplify the process of installing bars, it is often used to assemble grids on the ground from four or six rebars, which are then placed in the formwork. Cross-links are located at a distance of 20-25 centimeters from each other. The size of the cross section of such a grid is 15–25 centimeters. The disadvantage of this method is that their docking occurs at the corners of the building box. And this contradicts the basic rule of reinforcement - docking at the corners and intersections of the reinforcement is unacceptable.
 Reinforcement increases the bearing capacity of the belt
 Reinforcement is best done by sequential assembly inside the formwork. To do this, the reinforcement bars are laid out in one layer around the entire perimeter of the armored belt. Where the ends go to the corner of the building, a bend is made and the end is attached to the next bar with a knitting wire. After laying the lower belt, the second one is installed. To do this, you need to make U-shaped racks and crossbars in advance, which must be installed at a distance of 20–25 centimeters from each other. Fastening is made with a knitting wire. Attention should be paid to the choice of this material. The nodes fastened by it work only during pouring, and after the concrete has hardened, they do not carry any load. Therefore, there is no need to purchase high-strength wire, preferably 3 or 4 mm low-carbon products that have undergone an annealing process. They are much easier to use, and the result is the same.
 When mounting the reinforcing frame, it is better to use soft annealed wire
 Filling the armored belt under the Mauerlat
The peculiarity of the work on pouring the armored belt is that they are performed at a height. That is, the supply of concrete or its components to the place of work is significantly difficult. And the filling of the armored belt must be done in one step. It should be understood that the order of a concrete pump in this case is inevitable.
 The use of a concrete pump guarantees the filling of the belt in one step
 How much to order concrete
The calculation of the material requirement for this case is simple. For example, with an armo-belt size of 25x30 centimeters and a perimeter length of 40 meters, concrete will be needed: 0.25 x 0.3 x 40 \u003d 3 cubic meters. We must agree that it is very difficult to prepare such a quantity of material and raise it to a height.
How to fill the armored belt
Filling must be done with concrete of a grade of at least 200, which implies the following recipe:
- cement brand 400 - one part;
- washed sand - three parts;
- gravel - three parts;
- water - one part with control of the consistency of the solution.
For greater fluidity of concrete, plasticizers are introduced into its composition that do not affect the quality.
Concrete mortar is fed into the formwork continuously and fills the formwork to the brim. In the process of pouring concrete, it must be constantly pierced with a rod, and it is better to process it with a submersible vibrator. Otherwise, voids may form in the mass, affecting the strength characteristics of the armored belt.
 Vibrator treatment guarantees concrete quality
 To fix the Mauerlat during the pouring process, you need to install a mount. The following options are possible:
- A wire with a diameter of 5–6 millimeters is tied to the reinforcing mesh in such a way that its ends up to 40 centimeters long extend beyond the level of concrete on both sides of the armored belt.
- It is also possible to release the fastening ends of the wire along the axis of the armored belt at a distance of 20–25 centimeters. In this case, the two ends are released through two holes, and the beam is attached to the concrete surface with a twist.
- In addition to these methods, anchor bolts or threaded studs are also used, with the help of which a Mauerlat is attached over the armored belt.
Installation and fastening of the Mauerlat
This responsible operation is carried out taking into account a number of circumstances:

Video: how to arrange an armored belt with your own hands
A building with an armored belt will ensure the operation of a country house for at least 50 years with minimal repair costs. And most importantly - living in such a fortified house will be comfortable and safe.
Remove the steel hoops from the wooden barrel and it will fall apart. Remove the reinforced belt from the house and the building will not stand for long. This is a simplified, but very clear explanation of the need to strengthen the walls. Anyone who is going to build a solid house will benefit from information about the purpose, types and arrangement of armored belts.
What is this design and what functions does it perform? Armopoyas - a tape made of monolithic reinforced concrete, which is laid on several levels of a building under construction.
The reinforced belt is poured in the foundation, under the floor slabs and under the mauerlats (rafter support beams).
This amplification method performs four important functions:
- Increases the spatial rigidity of the building.
- Protects the foundation and walls from cracks caused by uneven settlement and frost heaving of the soil.
- Does not allow heavy floor slabs to push through fragile gas and foam concrete.
- Reliably connects the roof truss system with walls made of lightweight blocks.
The main material for increasing the rigidity of the walls was and remains reinforced concrete. For small outbuildings, you can use a less powerful brick armored belt. It consists of 4-5 rows of brickwork, the width of which is equal to the width of the bearing wall. In the seam of each row, a grid with a cell of 30-40 mm made of steel wire with a diameter of 4-5 mm is laid on the solution.

In what cases is an armored belt needed?
Strengthening the walls with a reinforced belt is not always required. Therefore, there is no need to waste money on its device in the following cases:
- under the sole of the foundation lies a solid soil (rocky, coarse or coarse sand, not saturated with water);
- the walls are built of brick;
- a one-story house is being built, which is covered with wooden beams, and not reinforced concrete panels.
If weak soils (pulverized sand, loam, clay, loess, peat) lie on the site, then the answer to the question of whether a reinforcing belt is needed is obvious. You can not do without it in the case when the walls are built from expanded clay concrete or cellular blocks (foam or aerated concrete).
These are fragile materials. They do not withstand ground movements and point loads from interfloor floor slabs. The armored belt eliminates the risk of wall deformation and evenly distributes the load from the plates to the blocks.
For wood concrete blocks (the wall thickness is not less than 30 cm, and the strength grade is not lower than B2.5), the armored belt is not needed.
For Mauerlat
The wooden beam on which the rafters rest is called the Mauerlat. She cannot push through the foam block, so it may seem to someone that an armored belt is not needed under her. However, the correct answer to this question depends on the material from which the house is built. Mauerlat fastening without armored belt is allowed for brick walls. They securely hold the anchors with which the Mauerlat is attached to them.
If we are dealing with light blocks, then the armored belt will have to be poured. In aerated concrete, foam concrete and expanded clay blocks, anchor fasteners cannot be securely fixed. Therefore, a very strong wind can tear off the Mauerlat from the wall along with the roof.
For foundation
Here the approach to the amplification problem does not change. If the foundation will be assembled from FBS blocks, then the armored belt is definitely necessary. Moreover, it must be done at two levels: at the level of the sole (base) of the foundation and at its upper cut. This solution will protect the structure from intense loads that occur during the rise and settlement of the soil.

For reinforced concrete strip foundations, reinforcement with a reinforced belt is also required, at least at the level of the sole. Rubble concrete is an economical, but not resistant to soil movement material, so it needs reinforcement. But the monolithic "tape" does not need an armored belt, since its basis is a steel three-dimensional frame.
There is no need for a device of this design for a solid foundation slab, which is poured under buildings on soft soils.
Under what types of interfloor ceilings do you need an armored belt?
Under the panels, which are based on expanded clay concrete blocks, gas or foam concrete, a reinforced belt must be made without fail.
Under a monolithic reinforced concrete floor, it can not be poured, since it evenly transfers the load to the walls and firmly binds them into a single spatial structure.
An armored belt for a wooden floor, which is based on light blocks (aerated concrete, expanded clay, foam concrete) is not required. In this case, under the beams, it will be enough to fill in the support pads of concrete 4-6 cm thick to eliminate the risk of punching blocks.
Someone may object to us, pointing to a number of cases when the armored belt is poured under the wooden floor of the floor. However, in this case, reinforcement is required not because the wooden beams on concrete pads are able to push through the masonry, but to increase the spatial rigidity of the building frame.
How to make an armored belt?
The technology for constructing a reinforced stiffening belt is no different from the method of pouring a monolithic foundation.
In general, it consists of three operations:
- Reinforcing cage manufacturing;
- Formwork installation;
- Pouring concrete.
Certain subtleties and nuances in the work appear depending on the location of the armored belt.
Reinforced belt under the foundation
Answering the question of how to make a reinforced belt under the foundation (level 1), let's say that its width should be 30-40 cm more than the width of the supporting part of the main concrete "tape". This will significantly reduce the pressure of the building on the ground. Depending on the number of storeys of the house, the thickness of such a stiffening belt can be from 40 to 50 cm.

The reinforced belt of the first level is made under all the load-bearing walls of the building, and not just under the outer ones. The frame for it is made by knitting reinforcing clamps. Welding is used only for preliminary connection (tack) of the main reinforcement into a common spatial structure.
Armoias of the second level (on the foundation)
This design is essentially a continuation of the strip foundation (rubber concrete, block). To reinforce it, it is enough to use 4 rods with a diameter of 14-18 mm, connecting them with clamps with a diameter of 6-8 mm.
If the main foundation is rubble concrete, then there are no problems with installing formwork under the armored belt. To do this, you need to leave free space in it (20-30 cm) for installing the reinforcing cage, taking into account the protective layer of concrete (3-4 cm).
With FBS blocks, the situation is more complicated, since formwork is not placed for them. In this case, wooden spacers should be used, which support the formwork panels from below. Before installation on the shields, trimmings of boards are stuffed, which protrude beyond the dimensions of the formwork by 20-30 cm and do not allow the structure to move to the right or left. To connect the formwork panels, short cross bars are nailed along the top of the boards.

You can simplify the mounting system by using threaded studs. They are placed in pairs in formwork panels at a distance of 50-60 cm. By tightening the studs with nuts, we get a sufficiently strong and stable structure for pouring concrete without wooden supports and crossbars.
This system is also suitable for formwork, which requires an armored belt for floor slabs.

Studs that will be filled with concrete should be wrapped in glassine or a little machine oil should be applied to them. This will make it easier to remove them from the concrete after it has hardened.
Armopoyas for floor slabs
Ideally, its width should be equal to the width of the wall. This can be done in the case when the facade will be completely lined with slab insulation. If it is decided to use only plaster mortar for decoration, then the width of the armored belt will have to be reduced by 4-5 centimeters in order to leave room for foam or mineral wool. Otherwise, a through cold bridge of very solid dimensions will appear in the zone of laying the stiffening belt.
When making an armored belt on aerated concrete, you can use another solution. It consists in installing two thin blocks along the edges of the masonry. A steel frame is placed in the space between them and concrete is poured. The blocks act as formwork and insulate the belt.

If the thickness of the aerated concrete wall is 40 cm, then partition blocks 10 cm thick can be used for this purpose.

With a smaller wall thickness, you can cut out a cavity for an armored belt in a standard masonry block with your own hands or buy a ready-made aerated concrete U-block.

Reinforced belt under Mauerlat

The main feature that distinguishes the armo-belt under the Mauerlat from other types of reinforcement is the presence of anchor studs in it. With their help, the beam is firmly fixed to the wall without the risk of tearing or shifting under the action of wind loads.

The width and height of the reinforcing cage must be such that, after the structure is monolithic, at least 3-4 cm of the concrete protective layer remains on all sides between the metal and the outer surface of the belt.
Armopoyas (reinforced belt) - is it needed and how to do it right?
Find out in which cases a reinforced belt is needed - under ceilings for walls from various blocks, under a Mauerlat and a foundation. How to make an armored belt -
Reinforced belt for wooden floors

Armopoyas has many names: reinforcing belt, unloading belt, seismic belt. And this is no coincidence, because all of them fully reflect the functions and purpose of this design. It is thanks to the reinforced concrete strip that many block (and not only) buildings do not fall apart and do not crack during earthquakes, strong winds, etc. The armor belt holds the structure together, like a hoop on a barrel.
What is an armored belt?
Armopoyas is a monolithic reinforced concrete structure that runs along the perimeter of the building. It must necessarily follow the contour of the house, not be interrupted along the entire length and be closed. It is used to strengthen walls and prevent deformation of the structure as a result of external or internal factors. A simple design at times increases the strength of houses. This is especially true for structures built from porous blocks (gas and foam blocks).

An example of an armored belt in the formwork
As a rule, when building a house, several armored belts are poured. The first - at the level of the foundation, the last - before installing the roof. Be sure to install a reinforcing structure before the construction of interfloor ceilings. armored belt performs several important functions:
- uniform load distribution;
- protection of gas and foam blocks from punching;
- strengthening the connection of the roof and rafters with the walls;
- increasing the spatial rigidity of the structure under construction.
In what cases is it necessary
The construction of an armored belt is not always a necessity. So, when constructing cast structures, building from brick or wood, there is no need for additional reinforcement. Another thing is when it comes to building houses from porous blocks. Often, construction technology requires the construction of an armored belt for floors. Reinforcement is needed when:
- truss system using studs, anchor bolts;
- beams lie unevenly and create a point load on the porous material of the walls;
- a prefabricated foundation is used or it is slightly deepened;
- it is necessary to give rigidity to the erected structure;
- the house is being built on loose soil that gives uneven shrinkage, or on an uneven surface, for example, on a slope;
- construction above 1 floor;
- armored belt for floor slabs is necessary in case of using porous blocks for the construction of walls and excessive weight of the slabs themselves;
- are affected by negative external, natural factors (strong winds, seismic activity);
- materials of various hardness are used in the construction.
How to make an armored belt. Formwork erection
Armopoyas, as a rule, is poured into a wooden formwork. The standard height of the structure is 30 cm. The boards are attached to the wall from the outside and inside using self-tapping screws. Fastening at a level of 3-5 cm will be sufficient. The outer and inner parts of the formwork must be connected with additional ties in increments of 70-100 cm. Otherwise, the boards may move apart under the pressure of the mass of concrete.

Finished formwork with reinforcement
As a rule, the formwork is equal in width to the wall. But in some cases, in order to reduce heat loss through a reinforced concrete structure, it is recommended to put the boards 3 cm narrower. The resulting space on the inside can be filled with insulation.
Reinforcing cage manufacturing
Reinforcement is placed inside the finished formwork. The optimal size is from 8 to 12 diameters. If the house will be subjected to significant external or internal loads, it is advisable to use rods of 12 diameters. The amount of reinforcement used will also depend on the level of load. Cross bars are fastened with a special wire or welded. The reinforcement cage is made on site, on the wall, because the metal structure is heavy. The rods are placed on special stars or other supports to form an active bottom layer, and the reinforcement does not adhere directly to the blocks. It is also necessary to retreat at least 5 cm on the sides so that the frame is completely recessed into the concrete. That is, if the formwork boards are at a distance of 30 cm, then the width of the internal metal structure will be no more than 20 cm.

Reinforcing cage inside foam blocks
In order not to spoil the studs during the subsequent pouring of the armored belt with concrete, it is advisable to wrap them with something, for example, cellophane.
If the building does not experience heavy loads, then you can limit yourself to a reinforcing cage in the form of a ladder. Otherwise, you need to make a metal structure in the form of a parallelepiped. Here, indents of 5 cm on all sides must also be observed. The reinforcement cage must be leveled. If the construction involves the use of studs, then they are installed after the manufacture of the reinforcement cage.
The final stage is the pouring of concrete. The building mixture is kneaded and filled with formwork. The entire armored belt must be made at a time, otherwise it will not be able to perform its functions, since the integrity of the structure will be violated. Subsequently, with an uneven load, the armored belt may crack at the junction.

Filling the armored belt with concrete
For better adhesion of the armored belt with the upper row of blocks, it is recommended to make a “hedgehog”, i.e., hammer nails or wire so that 1 part goes into the blocks, and 2 is poured with concrete. This will make the structure more durable.
Concrete for pouring can be made independently or purchased ready-made. To prepare a building mixture, it is necessary to mix cement with sand and gravel in a ratio of 1:3:5 and mix, adding water to the desired consistency. When pouring, you can also use a concrete pump. But if the solution falls from a great height, there is a high probability of damage to the formwork and divergence of the boards. Therefore, in most cases, the procedure is best done manually. At the same time, one portion of concrete should not be allowed to harden before a new one is poured.
The mixture must be compacted by baying. This is necessary to remove the voids that form when pouring portions of concrete. A piece of reinforcement or a special tool is suitable for this. At the end of the procedure, the solution is leveled. After 3-5 days, the concrete will harden, and it will be possible to remove the formwork and the armored belt is ready.
If there is not enough concrete, the armo-belt can only be divided vertically. That is, a jumper is installed, for example, a piece of board, block or brick, and concrete is poured to its full height before it. The next day, the barrier is removed, the solution is wetted at the junction with a fresh portion and pouring continues until the entire armo-belt is ready.
The controversial issue of the use of armored belts for wooden floors
Wooden floors are the lightest of all. They create a minimum load on the load-bearing walls. Therefore, often when building houses with wooden floors, the construction of an armored belt is neglected. For hard and durable materials, it is really not needed. Another thing is if a building is being built from gas silicate or foam blocks. These materials do not differ in density, strength and resistance to deformation. Therefore, before the final decision, it is necessary to decide what loads the walls will experience, what types of roof fastening will be used. So, when building a small one-story outbuilding, it is unlikely that there will be a need for an armored belt. If it is planned to build a two-story house, then the armored belt is needed for each floor, since the load will be significant. So, reinforced concrete tape for wooden floors will be needed in the following cases:
- rafters or floor beams will be attached directly to the walls, this will evenly distribute the weight and avoid point loading;
- a house is being built with a height of 2-3 floors, or 1 with an attic, because this will create a high vertical load on the walls, because of which they can spread and crack;
- construction is carried out on weak ground, shrinking or on a prefabricated or shallow foundation;
- the house is being built in an area with high seismic activity, strong winds or rains.
In other cases, the use of an unloading belt for wooden floors is optional. So, an armored belt is a reinforced concrete tape that stiffens the structure and prevents it from cracking. It is usually used in the construction of porous block structures to evenly distribute the load and prevent cracks.
What is and how to make an armored belt for wooden floors?
How to make an armored belt with your own hands and is it necessary for wooden floors? Characteristics and properties of the armored belt for wooden floors, tips for use.
Wooden floors: classification, comparison, maintainability
Wooden floors compare favorably with reinforced concrete ones in that they do not require much time for installation, and they can take the load immediately after construction. If we also take into account the much lower weight, and the lower labor intensity in the performance of work, then their popularity becomes quite understandable. True, during construction, some questions may arise, for example, whether an armored belt is needed for wooden floors. Let's try to understand the nuances of using wooden floors.
Classification of wooden floors
Depending on the design, such types of wooden floors can be distinguished as:
- beam - powerful wooden beams with a section of about 20x10 cm, or even more, are used as load-bearing elements. A rough floor is laid on the beams, and then a finishing floor, the distance between the beams can reach 1.5 m;
The span of the beam should be selected based on the thickness of the flooring boards and the expected load.
The smaller the span, the less deformation of the deck under load.
- ribbed - differs from the beam in that instead of thick wooden beams, ribs are used (wide, but relatively thin boards, for example, 15x4 cm). They also differ from beams in that the step between the individual ribs is small, which makes it possible to use thinner boards for flooring;
Ribbed ceilings differ from beam ceilings in a smaller step between the ribs
- beam-ribbed - beams and ribs are combined. The ribs can be located both on top of the beams (in this case, the work is easier to do, but the thickness of the overlap will turn out to be quite large), and on the same level with them (the installation process is a little more complicated).
Combination of beams and ribs
Comparison of wooden and concrete floors
The main difference between wooden floors and concrete floors is the speed of installation. But there are a number of other features of the use of wood.
In general, the use of a wooden floor is distinguished by the following features:
- have several times less weight than a concrete floor, this is important, because the load is transferred to the walls;
- installation takes a couple of days at most, after which it is ready for use, but in the case of concrete, you will have to wait until the mixture hardens and only then remove the formwork. Because of this, an undesirable interruption in work occurs;
No lifting equipment required for installation
- light weight allows you to save on the crane. It is quite possible to raise the beams on your own, the maximum that is needed is a couple of assistants;
- the price of such a structure will be lower than when using concrete or reinforced concrete slabs. Savings are obtained not only due to the cost of the material, but also due to the fact that you do not need to rent a crane.
Of course, it was also not without drawbacks:
- the tree, despite all the tricks, impregnation with an antiseptic, antipyretic, remains extremely vulnerable to insects, and even in the event of a fire, the antipyretic will not give 100% protection against open fire;
Insects can destroy any wood
- wood is susceptible to changes in the level of humidity in the room;
- Compared to concrete, a wooden floor is more deformable. Deflections, of course, are small, but they are still many times greater than the deformation of a concrete slab;
- due to the deformability of a beam or ribbed floor, problems may arise with the finish of the floor. For example, a plastered ceiling may crack after a couple of years of operation;
- problems can arise when it is necessary to cover a large span. There may simply not be beams in the warehouse that need lengths, they will have to be increased, and this is a thankless task, and the joint remains a weak point;
Wooden beams can be built up with overlays
- due to the design features of the wooden floor beams, they unevenly transfer the load to the walls of the room. But this drawback cannot be considered critical, it is enough just to arrange a reinforced belt, and on top of it lay a wooden beam around the perimeter of the room and already rely on it for floor beams.
On top of the wall, you can simply lay a wooden beam for overlapping
Despite these shortcomings, wooden floors do not lose popularity. They were widely used in the past (you can still find stalinkas with wooden ceilings) and continue to be used today.
Maintainability of wooden floors
Quite often, you may encounter a situation where one or more beams / ribs are rotten due to poor-quality antiseptic treatment or for any other reason. In this case, only a complete replacement will help.
The repair process is not so much complicated as time-consuming. The fact is that the ceiling will have to be partially dismantled, and for this it will be necessary to dismantle the floor covering, and the ceiling finish on the floor below will suffer.
Otherwise, the question of how to replace the floor beam is solved simply - we disassemble it, remove the old beam and install a new one. Of course, the height of the new beam must be exactly equal to the height of the old one, otherwise the floor will start to "play". As for the requirements for overlap, you can be guided by the requirements of SNiP II-25-80 (updated version of 2011 - SP 64.13330.2011)
Also, the repair of the ceiling may consist in its strengthening. To do this, it’s enough just to reduce the step between the beams, but you can’t do without disassembling the old structure either.
Basic rules for the installation of wooden floors
Despite the differences in design, there are several general rules for constructing wooden floors, for example, the issue of installing reinforced belts on walls, ways to pair beams with a wall, etc.
floor structure
One of its features can be considered the fact that a lot of free space remains inside the ceiling. This provides an excellent opportunity to improve its sound and heat insulation characteristics, it is enough just to lay heat-insulating material in the space between the finishing and subfloor.
You can offer the following floor design:
- if a wooden floor will be installed for the floor of the first floor, then the beams can be recommended to be raised using small brick columns;
In old houses, you can find logs lying just on the ground, this is a gross violation of the technology of the floor device.
No impregnation will save the tree from rotting if it just lies on the ground.
Floor covering for first floor
- further, small wooden bars are attached to the lower parts of the beams on both sides, that is, the cross section of the beam takes the form of an I-beam;
- further, subfloor boards are attached to the resulting shelves;
- heat-insulating material is placed in the resulting cells;
- in order for the insulation not to become damp, the ceiling must “breathe”, and moisture must pass in only one direction. For this, a special vapor barrier membrane is used. If the ceiling is installed on the ground floor, then the film is placed under the insulation so that the moisture from below does not moisten the mineral wool, while the vapor barrier layer remains permeable from top to bottom;
- a finishing floor is laid on top of the wooden beams, its design can vary greatly. It is allowed to use OSB boards, and already on top of them lay boards or any other material, even a thin cement screed can be arranged if desired.
One of the options for interfloor overlap
If it is necessary to arrange an interfloor overlap, then the waterproofing is placed above the insulation, otherwise the design remains similar. Unless the draft floor can be attached directly to the bottom of the beams / ribs. It is also worth thinking about the stairs in advance, the opening under the stairs in the wooden floor is provided even at the stage of sawing timber and boards.
Do I need a reinforced belt
Many copies have been broken in disputes about this, some say that the armored belt is simply necessary, others rightly point out that a wooden floor weighs several times less than a concrete one, and you can do without it.
Both of them are right, the armored belt is arranged for several purposes:
- it reliably combines the walls of the building into one, increasing the spatial rigidity;
- thanks to him, the load on the walls themselves is distributed evenly;
- armopoyas reliably protects window and door openings from excessive deformations.
The concrete is poured, it remains to wait for it to harden
In the case of a wooden floor, a lot depends on what kind of material is used to build the walls. The fact is that beams can simply push through relatively low-strength blocks of gas or foam concrete. But to prevent this, it is enough to simply arrange support platforms or lay a wooden beam along the perimeter of the walls and fasten the beams to it.
So it can be argued that the armored belt will not be superfluous, but not because of the heavy load from the ceiling, but solely for reasons of the durability of the building. Moreover, this is not a very difficult task, all the work can be done by hand. It is enough to build a formwork 20-40 cm high, place an idle knitted frame (A-III reinforcement) in it and pour it with concrete.
Of course, in wooden houses there can be no talk of any reinforced belts.
Floor-to-wall mate
Much depends on the material of the wall, as well as on where the ceiling itself is arranged (between floors) or at the floor level of the first floor.
The following options are possible:
- in the case of wooden walls, pairing is the easiest. For this, metal brackets are used, which are attached to the wall with powerful screws. The end of the beam is simply placed on the fixed bracket and is also fixed with self-tapping screws (holes are provided for this in the bracket itself);
Beams can simply lean against walls
The end of the beam is carefully waterproofed.
To do this, you can use bituminous coating waterproofing.
Additionally, the end of the beam is wrapped with roofing material at a distance of 10 cm from the wall.
- during frame construction, punching a hole in the wall or using brackets will not work. Therefore, the ends of the beams / ribs of the floor simply rest on the top trim. In order for them not to move under load, they are additionally fixed with steel corners on both sides.
In conclusion
Wooden floors are valued not only for their low weight and ease of installation, but also for their high performance. Wooden floors according to SNiP II-25-80 (revised version of 2011) will retain their original rigidity and strength for at least several decades, or even longer.
Wooden floors: do-it-yourself video installation instructions, features of openings in stalinkas, how to replace, how they differ, do you need an armored belt, SNiP, price, photo
Wooden floors: do-it-yourself video installation instructions, features of openings in stalinkas, how to replace, how they differ, do you need an armored belt, SNiP, price,
Armopoyas (reinforced reinforced concrete belt) aka seismic belt- a very strong monolithic strip along the perimeter of the building and load-bearing walls made of aerated concrete.
Tasks of the armored belt - significant strengthening of load-bearing walls to increase their bearing capacity, to avoid cracks and other deformations due to uneven shrinkage of the building, roofing, wind and other loads.
The armored belt securely fastens aerated concrete blocks, evenly distributes the load and creates structural rigidity.

Ideally, the geometry, reinforcement and composition of the concrete of the armored belt is determined by calculations.
Usually the width (thickness) of the armored belt equal to the width of the wall, 200-400mm, and the recommended height is 200-300mm.
But it would be wiser to make the width of the armored belt a little thinner than the wall, so that there is a reserve of space for insulation, to reduce cold bridges. Extruded polystyrene foam (EPS) is best for this business, as it isolates heat perfectly. There is also the option of pouring the armored belt into ready-made aerated concrete U-blocks, but see more about this later in the text.
- With uneven shrinkage of the house, with seasonal heaving of the soil, during earthquakes, the armored belt holds the geometry of the building.
- Armopoyas can align walls horizontally.
- Giving rigidity to the entire building of aerated concrete.
- Local loads are distributed evenly on load-bearing walls.
- The high strength of the armored belt allows you to attach all critical structures to it, for example, a Mauerlat.


Mauerlat must be firmly attached to the load-bearing walls with studs and anchors. The rafter system itself, the weight of the entire roof, snow and wind loads create a significant bursting force that can break unreinforced walls. The armored belt under the Mauerlat solves this problem, and it will be performed in the same way as under the ceiling.

- The frame of the belt reinforcement must be continuous.
- Armopoyas should be on all load-bearing walls.
- The overlap of the longitudinal reinforcement is at least 800 mm.
- The frame is made of two rows of reinforcement, two rods each.
- The minimum thickness of the longitudinal reinforcement is 10 mm.
- It is advisable to use long (6-8 meters) reinforcement bars.
- The diameter of the transverse reinforcement is 6-8 mm.
- Step of transverse reinforcement - 200-400 mm.
- Reinforcement on all sides must have a protective layer of concrete of at least 5 cm.
- The longitudinal and transverse reinforcement is connected to each other with a knitting wire.
- At the corners, the longitudinal reinforcement must be bent, and try to overlap further from the corner.
- The frame must be strictly horizontal.
Calculate the distance between the reinforcement bars according to the thickness and height of the armored belt, taking into account the protective layer of concrete, at least 5 cm on each side.
Do-it-yourself armored belt for aerated concrete (video)
Scheme of reinforcement of corners and junctions of the armored belt


Armo-belt insulation
The armored belt is a very serious "bridge" of cold, through which most of the heat escapes, and on which condensation forms from the inside of the armored belt. And to avoid this, it is necessary to insulate the outer side of the armored belt with aerated concrete, or polystyrene foam or polystyrene. Expanded polystyrene is more preferable. So in advance you need to provide space for insulation, filling in the armored belt with an indent from the outer edge of the wall.
Insulated armored belt for aerated concrete


What brand of concrete to fill the armored belt
For pouring the reinforced belt on aerated concrete, concrete grade M200-M250 is used. It can be brought ready-made with a mixer from the factory, or you can make it yourself.
Proportions for concrete grade M200: cement M400, sand, crushed stone (1:3:5). Proportions for concrete grade M250: cement M400, sand, crushed stone (1:2:4).
There should be a minimum amount of water in concrete, and to give plasticity, use a plasticizer.

The water-cement ratio should be in the range from 0.5 to 0.7, that is, 5 to 7 parts of water per 10 parts of cement.
Adding too much water to concrete makes it less durable.
To remove air bubbles from concrete, it should be vibrated with a special building vibrator, or the liquid concrete should be intensively and for a long time pierced with a piece of reinforcement.
Concrete must be poured into the formwork at one time so that it is monolithic (inseparable).
Remove the steel hoops from the wooden barrel and it will fall apart. Remove the reinforced belt from the house and the building will not stand for long. This is a simplified, but very clear explanation of the need to strengthen the walls. Anyone who is going to build a solid house will benefit from information about the purpose, types and arrangement of armored belts.
What is this design and what functions does it perform? Armopoyas - a tape made of monolithic reinforced concrete, which is laid on several levels of a building under construction.
The reinforced belt is poured in the foundation, under the floor slabs and under the mauerlats (rafter support beams).
This amplification method performs four important functions:
- Increases the spatial rigidity of the building.
- Protects the foundation and walls from cracks caused by uneven settlement and frost heaving of the soil.
- Does not allow heavy floor slabs to push through fragile gas and foam concrete.
- Reliably connects the roof truss system with walls made of lightweight blocks.
The main material for increasing the rigidity of the walls was and remains reinforced concrete. For small outbuildings, you can use a less powerful brick armored belt. It consists of 4-5 rows of brickwork, the width of which is equal to the width of the bearing wall. In the seam of each row, a grid with a cell of 30-40 mm made of steel wire with a diameter of 4-5 mm is laid on the solution.

In what cases is an armored belt needed?
for walls
Strengthening the walls with a reinforced belt is not always required. Therefore, there is no need to waste money on its device in the following cases:
- under the sole of the foundation lies a solid soil (rocky, coarse or coarse sand, not saturated with water);
- the walls are built of brick;
- a one-story house is being built, which is covered with wooden beams, and not reinforced concrete panels.
If weak soils (pulverized sand, loam, clay, loess, peat) lie on the site, then the answer to the question of whether a reinforcing belt is needed is obvious. You can not do without it in the case when the walls are built from expanded clay concrete or cellular blocks (foam or aerated concrete).
These are fragile materials. They do not withstand ground movements and point loads from interfloor floor slabs. The armored belt eliminates the risk of wall deformation and evenly distributes the load from the plates to the blocks.
For (the wall thickness is not less than 30 cm, and the strength grade is not lower than B2.5), the armored belt is not needed.
For Mauerlat
The wooden beam on which the rafters rest is called the Mauerlat. She cannot push through the foam block, so it may seem to someone that an armored belt is not needed under her. However, the correct answer to this question depends on the material from which the house is built. Mauerlat fastening without armored belt is allowed for brick walls. They securely hold the anchors with which the Mauerlat is attached to them.
If we are dealing with light blocks, then the armored belt will have to be poured. B, and anchor fastenings cannot be securely fixed. Therefore, a very strong wind can tear off the Mauerlat from the wall along with the roof.
For foundation
Here the approach to the amplification problem does not change. If the foundation will be assembled from FBS blocks, then the armored belt is definitely necessary. Moreover, it must be done at two levels: at the level of the sole (base) of the foundation and at its upper cut. This solution will protect the structure from intense loads that occur during the rise and settlement of the soil.

For reinforced concrete strip foundations, reinforcement with a reinforced belt is also required, at least at the level of the sole. Rubble concrete is an economical, but not resistant to soil movement material, so it needs reinforcement. But the monolithic “tape” does not need an armored belt, since its basis is a steel three-dimensional frame.
There is no need for a device of this design for a solid foundation slab, which is poured under buildings on soft soils.
Under what types of interfloor ceilings do you need an armored belt?
Under the panels, which are based on expanded clay concrete blocks, gas or foam concrete, a reinforced belt must be made without fail.
Under a monolithic reinforced concrete floor, it can not be poured, since it evenly transfers the load to the walls and firmly binds them into a single spatial structure.
An armored belt for a wooden floor, which is based on light blocks (aerated concrete, expanded clay, foam concrete) is not required. In this case, under the beams, it will be enough to fill in the support pads of concrete 4-6 cm thick to eliminate the risk of punching blocks.
Someone may object to us, pointing to a number of cases when the armored belt is poured under the wooden floor of the floor. However, in this case, reinforcement is required not because the wooden beams on concrete pads are able to push through the masonry, but to increase the spatial rigidity of the building frame.
How to make an armored belt?
The technology for constructing a reinforced stiffening belt is no different from the method of pouring a monolithic foundation.
In general, it consists of three operations:
- Reinforcing cage manufacturing;
- Formwork installation;
- Pouring concrete.
Certain subtleties and nuances in the work appear depending on the location of the armored belt.
Reinforced belt under the foundation
Answering the question of how to make a reinforced belt under the foundation (level 1), let's say that its width should be 30-40 cm more than the width of the supporting part of the main concrete "tape". This will significantly reduce the pressure of the building on the ground. Depending on the number of storeys of the house, the thickness of such a stiffening belt can be from 40 to 50 cm.

The reinforced belt of the first level is made under all the load-bearing walls of the building, and not just under the outer ones. The frame for it is made by knitting reinforcing clamps. Welding is used only for preliminary connection (tack) of the main reinforcement into a common spatial structure.
Armoias of the second level (on the foundation)
This design is essentially a continuation of the strip foundation (rubber concrete, block). To reinforce it, it is enough to use 4 rods with a diameter of 14-18 mm, connecting them with clamps with a diameter of 6-8 mm.
If the main foundation is, then there are no problems with installing formwork under the armored belt. To do this, you need to leave free space in it (20-30 cm) for installing the reinforcing cage, taking into account the protective layer of concrete (3-4 cm).
With the situation is more complicated, since the formwork is not set for them. In this case, wooden spacers should be used, which support the formwork panels from below. Before installation on the shields, trimmings of boards are stuffed, which protrude beyond the dimensions of the formwork by 20-30 cm and do not allow the structure to move to the right or left. To connect the formwork panels, short cross bars are nailed along the top of the boards.

You can simplify the mounting system by using threaded studs. They are placed in pairs in formwork panels at a distance of 50-60 cm. By tightening the studs with nuts, we get a sufficiently strong and stable structure for pouring concrete without wooden supports and crossbars.
This system is also suitable for formwork, which requires an armored belt for floor slabs.
Studs that will be filled with concrete should be wrapped in glassine or a little machine oil should be applied to them. This will make it easier to remove them from the concrete after it has hardened.
Armopoyas for floor slabs
Ideally, its width should be equal to the width of the wall. This can be done in the case when the facade will be completely lined with slab insulation. If it is decided to use only plaster mortar for decoration, then the width of the armored belt will have to be reduced by 4-5 centimeters in order to leave room for foam or mineral wool. Otherwise, a through cold bridge of very solid dimensions will appear in the zone of laying the stiffening belt.
When making an armored belt on aerated concrete, you can use another solution. It consists in installing two thin blocks along the edges of the masonry. A steel frame is placed in the space between them and concrete is poured. The blocks act as formwork and insulate the belt.

If the thickness of the aerated concrete wall is 40 cm, then partition blocks 10 cm thick can be used for this purpose.

With a smaller wall thickness, you can cut out a cavity for an armored belt in a standard masonry block with your own hands or buy a ready-made aerated concrete U-block.

Reinforced belt under Mauerlat

The main feature that distinguishes the armo-belt under the Mauerlat from other types of reinforcement is the presence of anchor studs in it. With their help, the beam is firmly fixed to the wall without the risk of tearing or shifting under the action of wind loads.

The width and height of the reinforcing cage must be such that, after the structure is monolithic, at least 3-4 cm of the concrete protective layer remains on all sides between the metal and the outer surface of the belt.


