Living in a private house, each person, for obvious reasons, wants not only to protect his site from outsiders, but also to install convenient gates with a gate on it. When choosing the right option, you should pay attention to the gates made of corrugated board with a gate, the popularity of which in Russia is due to the budget cost, as well as aesthetic beauty. The secret of the demand for corrugated board is that this material is the best suited for the gate. After all, it has such qualities as durability, relatively low weight and versatility of use.
A wide range of sizes and colors of corrugated gates
 One of the advantages of such gates is that they can be made according to individual sizes, depending on the required span width, as well as the customer's wishes. Many people make such structures on their own, because if you have elementary locksmith skills, be able to weld metal, then with the right approach, this is quite within the reach of many. A wide range of colors makes it possible to choose the shade that will best harmonize with the fence, house and courtyard buildings.
 In order for metal swing gates with corrugated board gates to be strong and durable, it is important to consider the following:
- At the first stage, it is necessary to draw up a preliminary design, in which it is important to determine the dimensions of the structure, the type of material used and its quantity, calculate the weight load, as well as the necessary fittings (hinges, handles, locks)
- The materials must be of high quality, and this applies not only to corrugated board, which must be purchased from a trusted manufacturer, but also to a profiled pipe of rectangular or square section, from which the frame will be cooked. The same applies to fittings, which must be resistant to wear, as well as the necessary additional elements: self-tapping screws, rivet "caps", deadbolts, stoppers and other things.
- One of the most difficult stages of work is the alignment of individual sections of the profile to obtain the correct rectangle, which is not easy to do because of the large size, so a locksmith's corner is used here.
- The doorway can be located not only on one of the sides, but also closer to the middle, which depends solely on the desire of the customer
- Taking into account the high load that the supporting pillars will experience, special attention should be paid to their appropriate section, as well as competent concreting.
 It is important to understand that it is quite possible to make a gate and a gate from corrugated board with your own hands, but this will require a certain amount of time and effort.
In the manufacture of the frame and sashes, it is best to weld blanks on a flat surface with minimal height differences, for which you can lay a sheet of iron or tin on the ground.
If a person doubts his abilities, you can contact a specialized company that provides appropriate services. By entrusting the design, construction and installation to experienced specialists, the customer receives confidence that gates with a wicket door will be manufactured in a short time, which will last for many years. At the same time, the gates made of corrugated board with a wicket inside, the drawing of which is provided to the customer for approval, must be made of certified materials.
Options for gates made of corrugated board with a wicket door
There are many varieties of such structures, due to size and configuration, but in general, 3 most popular types can be distinguished:

Not all types are used as a facing material, but only grades "H", "C" and "NS" of the wall type, the metal thickness of which is not less than 0.5 mm. When choosing a suitable corrugated gate with a wicket door, it is important to check that the corrugated board has a high-quality polymer coating and is also made of galvanized metal. This will avoid the destructive process of corrosion and maximize the life of the structure. As an additional decoration, the bearing pillars can be overlaid with decorative masonry made of red facing bricks.
 Numerous photos of corrugated gates with a gate, presented on the Internet, help the owners quickly decide which option suits them best. Gates with additional decoration with forged elements look especially attractive, thanks to which you can give the design uniqueness and “wealth”.
If the structure is not made of new metal, but of a used pipe, it must be treated with a rust converter, after which it should be primed and painted.
When planning to place an order for the manufacture of gates from corrugated board with a wicket, it is better to contact the company that can also deliver and install the turnkey structure. This is very convenient, because it saves a person from having to look for a team of professional installers separately. In order to be sure that the gate will be manufactured with high quality, it is best to conclude a written contract with the company, which will reflect the rights and obligations of the parties.
How to make a gate from corrugated board - video
The owners of any land plot seek to protect it with enclosing structures from unauthorized entry. Nowadays, there are many materials for this, but recently the greatest preference has been given to a fence and gates with a gate made of corrugated board. This is due to the relatively inexpensive cost and good strength characteristics of the material.
Typical fence with brick pillars
Fences made of corrugated board are found in the fencing of both temporary and permanent structures. They are used for private households, urban structures, office buildings and construction sites. The popularity of this fence is quite understandable.
Country option
pros
The corrugated board was created for several other purposes, but, as it turned out, it is ideal for fencing. Consider its main positive qualities and characteristics:
- light weight, allowing installation without additional erection of the supporting structure and unhindered fastening to the logs;
- high strength, achieved due to stiffeners, which are formed during the profiling process;
- ease of installation;
- ease in bending and cutting the material, which requires only a grinder;
- durability due to multi-layer (anti-corrosion, decorative coating) protective treatment;
- aesthetic appearance due to the extraordinary shape of the sheet and the choice of color palette.
If necessary, you can order the production of material in any color.
Fencing in the village
Minuses
Despite the large number of advantages, corrugated fences also have disadvantages:
- insufficient level of protection against unauthorized entry due to the easy possibility of damaging the material with scissors or a knife;
- self-unscrewing of self-tapping screws, which is eliminated by installing rivets, but it is worth noting that the price of such work will be much higher;
- with insufficient fixing of the support pillars, there is a high probability of damage under the pressure of strong gusts of wind;
- susceptibility to corrosion;
- difficulties in the staining process, which can be solved by applying masking tape.
Posts for fencing
But do not be afraid of such an impressive list of shortcomings, since any material also has its own negative characteristics.
Types of corrugated board
The production of corrugated board takes place in the process of cold pressing of steel. To date, several types of this material can be noted, differing from each other in the shape of the wave, its length, depth or width. These parameters determine not only the strength of the material, but also the rigidity.
A variety of types of profiled sheet makes it possible to use it for a variety of purposes. Let's take a closer look at the three main types.
roofing
Virtually no different from the metal. The difference is only in the form. The photo shows the distinguishing features.
Variety of options
The material is often used as a final coating for roofing, as it perfectly copes with loads of any nature, is resistant to mechanical and atmospheric influences. But it is worth noting that the roof is not the only purpose of this type of corrugated board. It is also suitable for facade cladding, the construction of decorative structures and the construction of fences.
wall
The main difference between this type of corrugated board is the low level of relief. This is clearly visible in the photo.
wall type
The material is used for the construction of walls, cladding and facade decoration, the installation of load-bearing elements, roofing and for the construction of decorative structures.
Bearing type
The material is used for those elements of structures that are most subject to loads. This type is suitable for the construction of load-bearing walls of garages, warehouses and houses, the construction of a new roof, fences.
Preparing for installation
Many are interested in technology, since making a fence with your own hands will be much more economical. Special skills are not required for this, it is only worth attracting one assistant to work.
fencing
Initially, when installing a fence, it is necessary to mark the territory. This is a very important point that requires attention, since an extra piece of land can lead to unpleasant proceedings with neighbors, and this is definitely not necessary for anyone.
Galvanized sheet
Marking is carried out using pegs that will help with the placement of load-bearing supports. Also, when planning on the territory of bends, marks with the same pegs will be required. A straight fence does not require marking in the middle. Separately, it is worth noting the location on the site of the gate with a gate.
After completing the marking work, you can make the calculation of materials. Here, first of all, you will need to compile a list of the necessary elements and only after that calculate the required number of them. As a result, the approximate price for all the necessary materials will be known.
Fencing on a strip foundation
List of required materials:
- rectangular profile with parameters 30x60 mm - for load-bearing supports;
- rectangular profile with parameters 20x30 mm - for crossbars;
- profiled sheets with a minimum thickness of 0.5 mm;
- self-tapping screws with a length of at least 19 mm - for attaching a profiled sheet;
- sand, cement, crushed stone, water - for pouring supports.
Also, before starting work, it is worth preparing the tools:
- roulette;
- sledgehammer;
- welding machine;
- cord;
- level.
It is worth noting that sometimes additional devices, such as a gasoline hole drill, may be required. It depends on the basic characteristics of the soil on the site.
Foundation
Installing a fence from corrugated board requires the preparation of the foundation. Several options can be used here.
Scheme of the device of the base with brick pillars
Columnar
This option involves the preparation of pits into which concrete is poured. The columnar foundation is distinguished by the simplicity of technology, and the price will please. But the disadvantage of the method is that it is not suitable for large loads. As a result, the facade fence from the profiled sheet will require additional reinforcement.
Column-tape
Tape reinforcement scheme
Stone
This option is considered the most reliable and durable.
Made from various types of stone. It is used for forged metal or stone fences, less often for profiled sheet fences. The price of such a foundation will be high and will require the involvement of an experienced specialist.
Selection and installation
The choice of the appropriate type of foundation depends on many factors, but first of all, this is influenced by the characteristics of the soil, the distance from the highway and the weight of the fence itself.
Enclosing the site with a fence
supports
Since the cost of the option with the installation of supports is the lowest compared to other proposed ones, it is the most popular. Wooden or asbestos-cement poles are used as supports.
When choosing the first option, pre-treatment with an antiseptic is required. The part of the post intended for deepening should be distinguished by maximum strength, therefore it is pre-treated with a blowtorch, and then with a bituminous primer.
Pole installation
The support installation technology consists of the following steps:
- Mark the places for the installation of supports. It is important to remember that the maximum distance between them should be no more than 3 m.
- Using a manual hole drill, in the marked places it is necessary to dig holes with a depth of 1 to 1.5 m and a width of 150 mm. The depth of the pit depends on the height of the future fence. That is, the higher the fence, the deeper it is necessary to make holes.
- A layer (150–200 mm) of medium fraction gravel must be poured onto the bottom of each recess. Then, using a plumb line for a strictly vertical direction, and pour everything with cement mortar.
- In order for the supports to be more durable, metal rods should be welded on both sides of the supports, which also go deep into the ground.
- It will take at least three days for the cement to harden, so during this period all work must be stopped.
Wiring diagram
frame
After the foundation has hardened, you can proceed to the next step - assembling the frame for the fence. The technology consists in hanging profiles with a section of 40x25 mm on the supporting pillars, which serve as crossbars. The process is divided into several stages:
- It is required to arrange the logs in two rows: at a distance of 4 cm from the top point of the supports and at a distance of 4 cm from the edge of the earth.
- (more than 2 m) requires the installation of a third row of crossbars, which is located in the middle.
- To fasten the crossbars to the support pillars, self-tapping screws are used, under which a sealant is placed, which will prevent corrosion processes. For more durable fastening, electric welding is used.
Fencing installation scheme
In order to protect all metal structural elements from corrosion processes, it is necessary to cover them with a special primer.
Decking
The installation of the fence is completed by attaching the profiled sheet to the finished frame. A few tips:
- Self-tapping screws with a sealing lining are used for fastening.
- Fastening sheets should definitely be overlapped by one wave to increase the strength of the fence.
- The interval between fasteners should be no more than 50 cm.
To ensure your own safety, it is worth using thick gloves for chores, as the material can be easily injured.
Sheet fastening scheme
Gates and gates are a necessary addition to the fence of their profiled sheet. The gates provide access to the site for cars and special equipment, and the gate is for those who came on foot. Unlike a fence, the design of gates and gates turns out to be more complex, so a separate drawing is developed for them and a special calculation of materials is made.
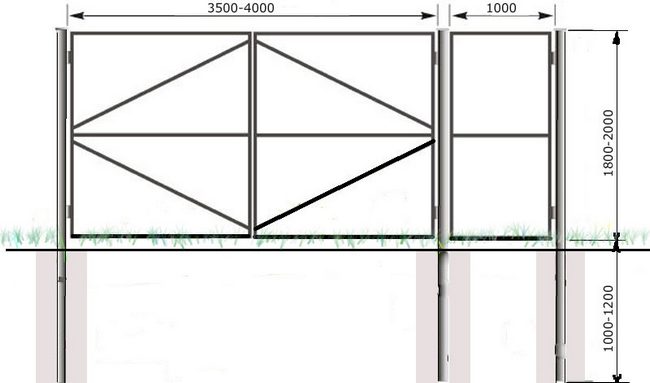
We want to offer you several ready-made drawings of corrugated gates and wickets that you can customize to suit your conditions. The height of the fence and gate must match the height of the fence.
The main types of gates for country and country houses
- hinged - are two hinged doors that open inward or outward. Simple and cheap to install, however, they can damage the car upon entry, especially if there is a strong wind. They also need to clear a lot of space.
- sliding or sliding gates with a guide rail - the door moves on a roller mechanism along the fence line. A complex design, special expensive fittings make such gates not the most affordable. But they provide a higher level of comfort: an automated drive makes it possible to open them without leaving the car.
Drawings of swing gates and wickets
When drawing up a drawing, it is important to determine the width of the gate and wicket opening, height, as well as the frame model. Do not forget that when designing the gate, it is necessary to correctly distribute the load on the leaf, because it is attached to the side hinges and their weight completely rests on the pillars. For this reason, gate posts are often made of a thicker profile pipe or laid out of brick.
The metal thickness of the profile pipe should be at least 3-4 mm. Accordingly, the foundation under the gate supports must be sufficiently reliable. Weak supports will lead to sagging of the sashes and deformation of the structure from wind loads and the gravity of the sashes. For the frame, you need to use a lighter profile pipe in order to prevent overload on the wings, however, a frame that is too thin will not withstand wind loads.
Pay attention to the choice of gate width. The optimal width is 4 meters, it allows both cars and trucks to safely enter, even from a narrow street. Remember, the wider the leaf, the greater the load it creates on the supports (in accordance with the law of the lever).
Schemes of gates and wickets made of corrugated board with a parallel frame
1. Before us is a "classic" and well-balanced drawing of a gate with a wicket. The height of 2 meters corresponds to the traditional height of the fence from the profiled sheet. 60x60 pillars must cope with a 40x20 pipe frame. The frame itself is not overloaded, easy to calculate, does not require a lot of materials. It has only one drawback - the lack of diagonal rigidity. It is compensated by the presence of two horizontal strips of the profile pipe at once, which form three sections 60-70 cm wide on the sash.
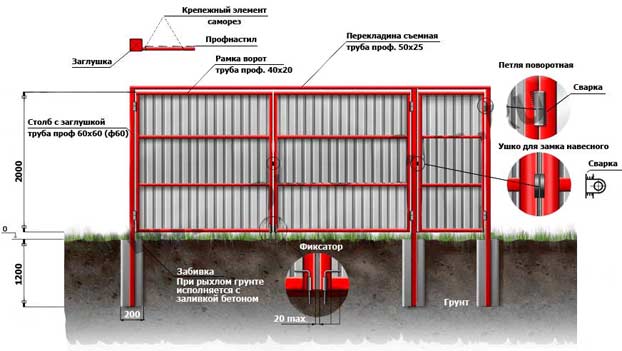
Also a characteristic feature is the presence of the upper crossbar. It gives a more balanced load distribution, prevents the posts from moving towards each other, however, in order to successfully enter the area of high cars, you need to make it removable.
2. Another version of the drawing. This time without the crossbar. Please note that the support poles have a larger diameter due to the lack of a crossbar.

3. Swing gates with a built-in gate. This scheme is perfect for those who have limited space to enter / enter the territory. At a width of 4 meters, both the gate and the gate are placed. However, it should be understood that the presence of a gate increases the mass of the leaf, which means that the cross section of the side column should be at least 10x10 cm and it is better to place the gate closer to the column (according to the law of the lever, it will give less load to the gate support).

Schemes of gates and wickets with diagonals
The presence of diagonal elements of the frame increases the rigidity of the structure and makes it resistant to various kinds of deformations, however, it should be remembered that additional lines are an additional load and it is important to choose the right pattern here. So instead of two horizontal bars it is better to use one. Diagonal slat arrangement options are shown in the drawings below. The cross section of the supporting posts for a fence with diagonals must be at least 80x80.
1. Diagonals from extreme corners to the middle or vice versa. Such schemes look quite nice. One looks like a snowflake, the other forms a diamond pattern.

Length of the hypotenuse: where A And b are the sides of a right triangle.
2. Diagonals from one corner of the sash to another. The scheme allows you to minimize the load on the sash and at the same time give the necessary rigidity, however, welding such a diagonal is not very convenient.

3. Small diagonals at the corners of the wings. It looks quite beautiful and creates a minimum load, however, such wings have a high windage, which means they can suffer from wind loads.

In the following video, you will receive valuable tips on how to prevent the support posts from bevelling under the weight of the sashes:
Drawings of sliding gates from corrugated board
The best option for a sliding fence that you can build on your own is a design with a guide rail. For her, it is enough just to pick up sets of fittings and automation systems. The gate includes a retractable leaf with a bottom rail that moves on a special roller system. In order for the structure to be balanced when closed, an additional triangular console is welded to the side of the frame.

As you can see, the gate frame consists of a frame and a console, which are made of a thicker profile pipe (60x40). The internal elements of the console are also better made from this pipe. Inside the gate frame, the frame pattern can be made in different versions (with rectangles or triangles. The main thing is that the pipe be a lighter pipe (for example, 40x20). Also, do not make the grate too frequent. The procedure for installing a sliding fence is presented in the following video:
We hope that the above drawings will help you make your own gates and gates from corrugated board, which will be comfortable, reliable and durable.
A deaf fence is needed to protect and protect the private territory of a land or summer cottage. Naturally, the fence must have an entrance. At first, a gate was enough, then a gate was needed for the crew, and, as a result, for the car.
Metal gates and a gate will provide an entrance / entrance to the yard and guarantee safety for the residents of the house. Previously, iron gates were sheathed with sheet metal 3-5 mm, in modern conditions corrugated board is popular.
According to the method of opening, all types of gates made of metal / wood can be divided into two groups: swing and sliding.
According to the type of gate device: built-in (inside) and free-standing (nearby).
You can buy ready-made gates from a profiled sheet, order production in size or make it yourself. Let's take a closer look at the last option - homemade gates, as a cheap and affordable option.
Since swing gates are a simpler design to manufacture, we will describe how to make swing gates from corrugated board on our own. The strength and aesthetic properties of the profiled sheet, as well as the "price / quality" ratio, make it possible to speak about the expediency of such a choice of cladding. As for the gate, we will describe two options for the device.
Do-it-yourself gate from corrugated board -
step-by-step instruction
Step-by-step technology for manufacturing a structure with a separate gate.
Stage 1 - the dimensions of the gate from corrugated board with and without a gate
Note that the installation of swing gates involves taking into account the layout of the site / yard.
Profiled gate width
The width of the opening for the gate is determined based on the width of the car (including mirrors) plus one meter additionally, for a margin.
The width of the supporting pillars (columns) is also taken into account. When installing a gate with a free-standing gate, there will be three pillars. In addition, it is necessary to take into account the size of the gaps between the support pillars and the frame frame. As well as the size of the gap between the wings of the swing gates, taking into account the parameters of the fittings.
- The optimal opening width for the gate is 4500-5000 mm.
- The standard width of a corrugated gate is 1200 mm.
Advice. Since one sheet per sash is not enough, it is advisable to calculate the width of the sash based on the width of the corrugated sheet.
The table shows the dependence of the width of the gate leaf on the width of the profiled sheet.
The material was prepared for the site www.site
The height of the gate from corrugated board
The height of swing gates made of profiled sheet is 2200-2500 mm. This is due to the standard length of the corrugated sheet - 2,000 mm. Although the manufacturer can offer any length with a resolution of 50 mm.
In addition, the clearance from below (between the gate leaves and the ground) is taken into account, which is necessary to ensure the operation of the gate during the formation of ice and high snow cover. The gap under the gate is 150-300 mm.
The height of the gate is affected by the presence of decorative elements on top. For example, the use of forging allows you to increase the height of the gate from corrugated board and decorate the structure decoratively, as a result of which the entrance group looks more respectable.
Advice. If the gap from the ground seems too large, you can install a removable bar from the bottom of the gate, which must be removed at the beginning of winter.
Stage 2 - Drawing of a gate from corrugated board
A scheme or drawing of a swing gate is necessary to simplify the calculation of the amount of material and the assessment of structural rigidity.
Two ways to make swing gates:
- with one large sash (single sash). The disadvantage of this method can be considered that you need a lot of room to maneuver the gate, as well as their large windage. Reducing the windage due to additional frame parts leads to an increase in the load on the hinges, which in turn leads to a skew of the sash. This method is suitable only for gates with a small opening width or for wicket devices;
- with two doors (double doors). All the disadvantages described above are eliminated, but the cost of manufacturing increases due to the addition of loops and frame elements. Perhaps a device with the same or with different widths of the shutters. Double-leaf swing gates have the advantage of being more resistant to wind loads.
The scheme of swing gates from corrugated board should contain:


- overall width of the opening. It will be necessary, if necessary, to make a maneuver - when increasing the gaps or changing the size of the fittings;
- the width of each sash;
- number, width of racks and depth of burying of racks;
- frame configuration indicating the width of its constituent elements;
- location and width of the gate. This is an important aspect. The production of a gate from a corrugated board at the same time as the frame for the gate will reduce the project implementation time. And if the gate is located inside the gate frame, the drawing will allow you to take into account its location when marking and cutting blanks;
- place of installation of loops;
- place and method of installation of the lock;
- location of the internal door latch (vertical latch).


On the drawing of the gate from the corrugated board, elements of the frame reinforcement are applied without fail. It is the visualization of the future gate that allows you to understand which of the elements to use and determine the place of its installation, taking into account the wind load.
Ways to strengthen the gate from corrugated board:
1. weld a corner for rigidity.
This method is suitable if the width of the wings is small (up to 1,500 mm, each). The corner can be solid (kerchief) or in the form of an angular jumper (spacer). The wider the corner or the closer to the center the jumper is installed, the stiffer the gate frame will be.


2. make a frame inside the frame or above it.
 In the first case, workpieces of a smaller section are placed in the cells of the frame, and are tacked by welding in increments of 200-300 mm.
A continuous seam is not allowed in order to exclude deformation of the metal due to heating (so that it does not lead and twist).
 In the second, a smaller section pipe is welded over the main frame. The figure shows a top view of such a reinforcement.
 3. install transverse or diagonal jumpers.
It is important to set the jumpers correctly here. If the gate made of corrugated board has a slight windage and it is enough for it to install one transverse jumper perpendicular to the long elements of the frame, then the situation with the gate is more complicated. In this case, it is more reasonable to use a diagonal jumper.
Methods for installing a jumper on a gate made of corrugated board are shown in the photo.

Door stiffeners - location options:
A) Despite the apparent simplicity, this option is quite thoughtful, since it guarantees the integrity of the gate leaves. On the one hand, it will be held by hinges, the possibility of deformation is excluded from above due to the strengthening of the corners. From below, it will be held by horizontal clamps (latches);
b) This is the most economical of the options presented, but it only creates reinforcement in the middle of the frame. The only advantage is that it makes it possible to install a lock on a jumper.
V) the disadvantage of this option is the weak reinforcement of the upper internal corners. Strong wind can deform the sash;
G) in this case, there is no reinforcement of the left inner corner;
e) in this case, there is no reinforcement of both internal corners;
e) perfect option. Places of insertion of the lock, installation of hinges, lower clamps and upper corners are reinforced. This method eliminates the torsion of the frame.
Advice. The wider the sash, the stronger the frame is reinforced.
Stage 3 - tools and material for corrugated gates
The drawing of the gate from the profiled sheet is a visual aid for calculating the material. For manufacturing you will need:
- corrugated board - for sheathing. It is preferable to take a wall, because. it has a large working width.
- self-tapping screws or rivets for fastening the profiled sheet;
- metal pipe with a cross section of 60x60 mm and above - for support pillars;
- pipe with a section of 40x40 or 60x20 ... 60 mm. - for the elements of the sash frame (frame);
- pipe 20x20 to strengthen the frame (if necessary). 20x20 is suitable for a frame made of 60x20 pipe. 30x30 - if a 60x30 pipe was used.
Masters advise buying all pipes with a thickness of 3 mm, not 2. Their price is somewhat more expensive, but it will be much easier for beginners to weld them. The metal heats up more slowly and does not deform as quickly.
- metal sheet for forming scarves (if necessary);
- hinges, locks (latches, latches, plugs), lower clamps;
- metal primer and paint;
- decorative elements (forging).
From the tool you will need: a welding machine, grinder, screwdriver (drill and riveter), tape measure, level, plumb line, metal shears, brushes and consumables for the tool.
Stage 4 - installation of support posts for gates from corrugated board
Installation of gates from corrugated board begins with the installation of support pillars. The most common way to install gate posts is to dig in followed by concreting.


How to properly install gate posts
- dig a hole with a garden drill. Using a shovel increases the consumption of concrete. The larger the diameter of the support, the larger the diameter of the recess should be. For a pipe with a section of 60x60, the diameter of the drill should be 120 mm.
How deep should gate posts be buried? Installation depth is 1/3 of the length of the support
- pour a mixture of crushed stone and sand into the recess. The thickness of the pillow is 150-300 mm. The pillow is designed to prevent the influence of frost heaving of the soil and ensure the outflow of water from the base of the support, thereby slowing down its destruction;
- prepare the support (coat with a primer against corrosion);
- install the support strictly vertically. The slightest deviation will lead to a distortion of the entire structure. The correctness of the installation is checked with a plumb or level;
- concrete the support. While the concrete will set, you can begin to manufacture the frame;
- close the upper part of the support with a metal overlay or a special decorative element. In extreme cases, pour concrete into the post (concrete from the inside) to avoid water getting inside and thereby prevent the destruction of the post.
Which corrugated gate posts can be used?
In addition to supports made of metal pipes, you can install a concrete pillar or use piles. Supports decorated (lined) with brick or stone (brick pillars) look beautiful. When calculating the width of the door opening, the material of manufacture and the width of the support should be taken into account.
Stage 5 - production of a frame for gates from corrugated board
Before starting production, you need to measure the width of the opening of the gate and gate again in order to make timely changes to the size of the leaves.
Manufacturing technology:
- metal is broken into blanks. It is advisable to cut the cut at an angle of 45 ° for a more reliable fastening. Although butt welding of parts is also found, it is easier to cut workpieces and weld them;
Advice. Masters advise welding the upper corners at an angle of 45 degrees, this will prevent water from flowing into them, and the lower ones can be butted.


- each workpiece is cleaned of dirt and rust;
- frame elements are welded together. And first, the workpieces are baited, and after checking the geometry, they are welded with a continuous seam;
- the frame is reinforced (if necessary);
- welded seams are carefully cleaned;
- degrease the frame, coat with a primer and paint the welding points. After the paint dries - paint the frame completely.
Advice. The manufacture of gates from corrugated board requires great accuracy in observing dimensions. When making a sash frame, it is better to make the frame a little smaller than larger. In the first case, to eliminate the gap between the wings of the swing gates, it will be enough to weld the flashing on one frame leaf, where it adjoins the second. In the second, you will need to cut the frame, and reduce its width.
Stage 6 - installation of hinges for swing gates from corrugated board
Garage hinges (canopies) are used to install the gate.
How to weld the hinges on the corrugated gate correctly?
First, the hinge is welded onto the support post, then onto the gate frame at a distance of 200-300 mm from the edge of the leaf frame. Please note that the location of the hinge affects the position of the door in the open state. If it is necessary that the gate opens in both directions, the hinge is butt welded to the support. If only in one, the loop is placed on the frame. To prevent the sash from reaching the fence, a limiter is installed.


How many hinges to weld on the gate?
If the gate is reinforced, three hinges are required for each leaf. If the lungs - enough two.
Stage 7 - installation of corrugated board on the gate
The profiled sheet is mounted on one or two sides of the frame. The installation rules are not complicated, but their knowledge and observance will help to install the corrugated board on the gate correctly.
In general terms: it is necessary to ensure reliable fastening of the sheet to the frame by fixing the profiled sheet through one lower wave of the sheet. In this case, the profiled sheet is also screwed to the diagonal or perpendicular jumpers. And two sheets are interconnected at the top of the wave (on the crest).
Rivets or self-tapping screws are used for fastening. Rivets look more elegant (especially matched to the color of the profiled sheet), self-tapping screws exclude the possibility of water flowing into the installation site. Of course, this is not as critical as on the roof, but the appearance of rusty smudges over time cannot be avoided.
Stage 8 - installation of fittings (accessories for gates)
Additional items:
- lock for swing gates made of corrugated board. It is installed after the sashes are hung.
Types of locks and how to embed / put (installation rules):
- mounted. It is necessary to provide loops for the lock when welding the frame and fastening sheets of corrugated board;
- overhead. It is installed on a transverse jumper, most often on an additionally welded flat sheet of metal. Or it is screwed with hardware directly to the frame. Masters do not recommend using welding for mounting the design of the locking mechanism, because. the castle needs maintenance and replacement;
- mortise. The lock cuts into the plane of the pipe to hide / decorate the installation site using a metal pocket.
- the bottom latch of the swing gate leaf - is needed to redistribute the load from the lock and additionally fix the lower part of the open / closed gate leaf from the wind (wind load).


- latch on the gate (bolt), designed to close the gate from the inside (blocking). The latch is more suitable for a gate, and a lock (bolt) is used for swing gates.
- swing gate automation. Allows you to open the gate remotely, which is very convenient when it is cold, raining or dark.
- security system: outdoor surveillance camera, signal lamp, alarm system.
Swing gates made of corrugated board with a built-in gate
Separately, we will talk about how to make swing gates with a gate from corrugated board. This option is used when the opening is not wide enough to install a gate and a separate gate.
Options for the location of the gate in the gate
Locations:
 In the manufacture of sash frames, they are made in different sizes. Then a narrower sash serves as a gate.
This is the most budget option, since the load on only one gate post increases, which will require the installation of an additional hinge and reinforcement of the frame. Overall, costs will go down.
 In the middle of the gate leaf. The option with the location in the middle is good because the wicket frame acts as an amplifier for the sash frame. And installing the hinges not in the center, but closer to the top and bottom of the gate will further strengthen the structure.
  Closer to the pillar. In this case, the main load falls on the support post, because both the gate frame and the wicket frame rest on it.
  Closer to the inner edge of the sash. This design is the most “flimsy”, its weak link is the junction of two wings and a gate. In the last three cases, in the process of manufacturing the frame, an additional frame for the gate is provided. Moreover, it is made more reinforced than for a free-standing gate, since it accounts for the wind load, which acts on the gate leaves made of corrugated board. Please note that the gate will greatly overload the frame, which means that additional hinges and reinforcement of the sash frame will be needed.
 In general, the technology of manufacturing gates from corrugated board with a wicket inside is carried out similarly to the manufacture of gates with a separate wicket. All the nuances are considered in the process of creating a drawing.
Advice. The lower latch for such models of swing gates from a profiled sheet is required.
Advantages and disadvantages of swing gates made of corrugated board
Advantages (pros):
- comparative simplicity of design and manufacture;
- low cost compared to sliding gates;
- ease of operation and maintenance;
- availability for installation of automation;
Disadvantages (cons):
- requirements for free space for maneuver (opening will require the release of an area equal to the width of the gate leaf);
- the need to take into account the wind load;
- the need to provide for the fastening of open gates in order to avoid their unauthorized closing (retainer, stop, locking devices);
- installation of a limiter so that the open gate does not damage the fence canvas and does not block access to the gate;
- the difficulty of leaving in the winter season, which consists in the need to remove snow over a large area.
Approximate prices for swing gates made of corrugated board

Conclusion
As you can see, with some effort, you can make and install do-it-yourself swing gates from corrugated board in 1-2 weeks, which will decorate the entrance group and will reliably serve as a beautiful business card of a private house.
Corrugated fences are a practical and reliable design that you can build with your own hands. To do this, you need to study the principle of the device of such a fence and stock up on the necessary tools and material.
swing gates made of corrugated board with a gate of non-standard configuration
Do-it-yourself fence installation from corrugated board
Before you start installing a fence from a corrugated board with your own hands, you should draw up a construction plan, which will describe all the stages of building a fence.
Stages of building a fence:
- preparatory work (marking the territory and the necessary measurements);
- trench preparation and foundation;
- erection of the fence structure (laying of pillars, logs);
- arrangement of gates and fence gates;
- sheathing of the fence structure with profiled sheets.
To obtain a better result, before starting installation work, it is recommended to make a constructive calculation of the future fence.

diagram of the construction of a gate made of corrugated board with brick pillars
How to properly organize a gate from corrugated board, photo
One of the important and rather difficult stages of installing a fence from corrugated board with your own hands is the organization of gates and gates. This process requires a detailed approach and strict adherence to all requirements.
The organization of the gate for the fence is as follows:
- In the process of designing the fence, you need to decide on the location and width of the gate;
- Decide in which direction the gate leaves will open (inward or outward);
- Determine a place for the gate. It is very convenient when corrugated gates include a gate in their area (the so-called built-in design).

drawing of a gate made of corrugated board with a gate inside the section (horizontal guides are clearly visible)
The advantages of such a constructive option (a fence with a gate) are significant space savings. This option is applicable in the case when the entry zone is limited. As a rule, the width of such gates is 4 m.

calculation scheme of swing gates made of corrugated board with a wicket next to it
If the space of the entrance (entrance) zone allows, the gate can be arranged next to the gate. In this case, the width of the gate with a wicket can take 5 m.
Do-it-yourself installation instructions for a gate made of corrugated board with a gate
The option under consideration is a swing gate made of corrugated board with a gate, which will be placed in one of the wings.
Construction stages, photo and video
We install the support pillars on which the gate leaves will be attached. Based on the fact that these pillars will have a large load - they should be fixed as much as possible. To do this, the support pillars must be tied to the main structure of the fence, which will eliminate unwanted distortions of the bearing supports.

detailed diagram of the device of the gate from corrugated board in the section
We proceed to the assembly of the frame and the calculation of the parameters of the valves. In this case, the total width of the opening is divided into two equal parts. It is important to remember that the metal has its own thickness and this must be taken into account when taking dimensions.
When organizing the frame, you can use a profile pipe - it is practical to assemble, has a low weight and an affordable price.
Important. All horizontal rails in two door sections must be placed at the same level. This will contribute to the symmetrical fixing of corrugated sheets on the frame.

diagram of the device for a gate made of corrugated board with a gate (the drawing shows the places where the lag and hinges are laid)
In one of the sections of the fence we arrange an opening for the gate. To do this, from the frame of the fence sash, from the side of its attachment to the supporting pillars, we make the necessary indent to the side and weld the vertical guide. In the future, this vertical guide will hold the gate structure.

detailed diagram of the device for a gate fence from corrugated board
We proceed to the manufacture of the gate. First, we assemble a rectangular frame of given dimensions. It is very important to observe accuracy, down to millimeters. Therefore, it is better not to rush and once again double-check the parameters of the opening of the future gate. The guides on the door frame should be set at the same distance as the guides on the gate leaves.

layout of loops for a fence made of corrugated board with a gate
We proceed to the installation of hinged hinges on the gate and gate sections. To do this, we put the doorway in its place (in one of the sections) and install the hinges. To avoid distortions of the gate, the above action must be carried out on a flat plane.
The mounting of the hinges on the support posts and on the frame of the sections is carried out somewhat differently. First, on the pillars we make markings according to the height of the wings. At the same time, it must be remembered that the gate leaves should not touch the ground. Then, from each mark, we retreat 25 cm along the column towards each other and fasten the fitting (half of the loop). Next, we make markings on each sash frame, taking into account the deduction of the inner half of the loop.
To simplify the installation of hinges and reduce the load on them, you can use a special mounting plate, which should be welded to the hinge. But you just need to do it in advance.

gates with a gate are sheathed with sheets of corrugated board
We sheathe the gate leaves and the gate with profiled sheets. This process is also recommended to be carried out on a flat plane. Using a grinder in a profiled sheet, we cut out an opening for the gate and fasten it with self-tapping screws to the metal frame of one of the gate sections. Next, we fasten the sheets of corrugated board to another sash and install the gate with a wicket.
Price for installation and materials
The cost of manufacturing a gate from corrugated board with a gate, as well as the price of the material, will depend on a number of indicators. For example: on the complexity of the design, on the type of corrugated board (color, configuration), on fittings (hinges, locks, rivets).

options for profiled sheets in the section for a fence with a gate
For a preliminary calculation of the cost of installing a gate made of corrugated board with a gate, a small estimate will help to determine.

price of material and accessories for a corrugated fence with a gate
Note that the installation of gates from corrugated board with a gate with your own hands saves money. After all, with this option, money will be needed only for the purchase of material and tools (if one is not available).